
Sound Bar
Wall Mounting Installation
Guide
EN

CONTENTS
About this Wall Mounting Installation Guide.. ............................................... 3
Precautions..............................................................................................4
Items to use for wall mounting installation...................................................5
Mounting the sound bar on a wall................................................................6
2
CONTENTS

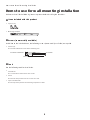
About this Wall Mounting Installation Guide
(This guide explains the installation method for qualified service personnel who mount the sound bar on a
wall.
(This guide uses the following signal words for important information.
(CAUTION
This content indicates “risk of injury.”
(NOTICE
Indicates points that you must observe in order to prevent product failure, damage, or malfunction, as
well as to protect the environment.
(NOTE
Indicates notes on instructions, restrictions on functions, and additional information that may be
helpful.
(The illustrations in this guide are for instructional purposes only.
(The company names and product names in this guide are the trademarks or registered trademarks of their
respective companies.
NOTE
(The Quick Guide and the Safety Guide are included with this product. The Quick Guide explains the procedures for this product,
from opening the box after purchase until enjoying the sound from a TV or Bluetooth device. General precautions for handling this
product are described in the Safety Guide. See this document before installing the sound bar.
(For details on the functions, see the User Guide of your product.
(SR-B40A
https://manual.yamaha.com/av/23/srb40a/
(SR-B30A
https://manual.yamaha.com/av/23/srb30a/
(ATS-B400
https://manual.yamaha.com/av/23/atsb400/
(ATS-B300
https://manual.yamaha.com/av/23/atsb300/
3
About this Wall Mounting Installation Guide

Precautions
Before mounting the sound bar on a wall, be sure to read the following precautions for safe installation. Be
sure to follow the precautions.
nPrecautions for mounting the sound bar on a wall
CAUTION
(For proper installation of the sound bar on a wall, make sure to have the work done by the dealer from where you purchased
the unit or by a contractor with qualified service personnel. Some skills and experience are required for safe installation.
(Be sure to follow the precautions when mounting the sound bar on a wall. The sound bar may fall, resulting in injury.
(Do not attach it to a wall constructed of weak materials such as drywall or plasterboard.
(Use screws that are of the size specified in this guide and that can support the weight of the installation. Do not use nails,
two-sided tape, screws other than the size specified, or screws that are worn out or damaged.
(Fix the cables in place so nothing will accidentally catch on them.
(When hanging the sound bar on the screws, be sure that the connected cables do not put stress on the jacks. Failure to observe
this may cause damage to the jacks.
(Check that the sound bar is securely fixed in place immediately after the installation. Yamaha will bear no responsibility for any
accidents caused by improper installations.
nPrecautions after installation
CAUTION
(Do not lean on the wall-mounted sound bar or apply excessive force to its top. Doing so may cause the sound bar to fall.
4
Precautions

Items to use for wall mounting installation
Make sure that all of the following items are present before installing the sound bar.
nItems included with this product
(Spacers (×2)
(Mounting template
nScrews (commercially available)
In addition to the included items, the following screws (commercially available) are required.
(Screws (×2)
Use round head wood screws of the following size:
7 to 9 mm in diameter 4 to 5 mm
12 to 14 mm 20 mm or more
nTools
Use the following tools for installation.
(Screwdriver
Use a screwdriver that matches the screws.
(Pencil
Use to mark the positions for the screws on a wall.
(Tape or thumbtacks
Use to temporarily attach the mounting template to a wall.
5
Items to use for wall mounting installation

Mounting the sound bar on a wall
(Before mounting the sound bar on a wall, be sure to read the following precautions.
(“Precautions”(p.4)
After installing the spacers and screws on the wall, hang the sound bar on those screws.
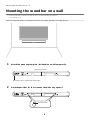
1Attach the mounting template (included) on a wall temporarily.
Attach with tape or thumbtacks temporarily
Mounting template
2Mark the positions for the screws on the wall using a pencil.
Screw position
6
Mounting the sound bar on a wall

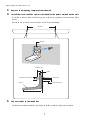
3Remove the mounting template from the wall.
4Install the screws and the spacers (included) at the points marked on the wall.
Install the screws on the wall, then hang the screw-hanging holes of the spacers on those
screws.
Be sure to use screws of the size shown in the illustration below.
Spacer
12 to 14 mm
4 to 5 mm
20 mm or more
457 mm
7 to 9 mm in diameter
Spacer
60.3 mm
8 mm
5Connect cables to the sound bar.
For the connection procedure, see the Quick Guide or User Guide of your product.
7
Mounting the sound bar on a wall

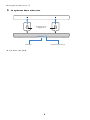
6Hang the sound bar on the screws.
Sound bar screw-
hanging holes
Indicators Remote control sensor
The installation is completed.
8
Mounting the sound bar on a wall

Yamaha Global Site
https://www.yamaha.com/
Yamaha Downloads
https://download.yamaha.com/
© 2023 Yamaha Corporation
Published 06/2023 NV-A0
AV23-0044
Layout Folder: YMH_PDF_Manual_A5_AV
Stylesheet Name: 01_YMH_PDF_Manual_A5_AV_En-Multi
Stylesheet Version: 2022.12.12
-
 1
1
-
 2
2
-
 3
3
-
 4
4
-
 5
5
-
 6
6
-
 7
7
-
 8
8
-
 9
9


Yamaha SR-B30A Guida d'installazione
- Tipo
- Guida d'installazione
in altre lingue
- English: Yamaha SR-B30A Installation guide
- français: Yamaha SR-B30A Guide d'installation
- español: Yamaha SR-B30A Guía de instalación
- Deutsch: Yamaha SR-B30A Installationsanleitung
- русский: Yamaha SR-B30A Инструкция по установке
- Nederlands: Yamaha SR-B30A Installatie gids
- português: Yamaha SR-B30A Guia de instalação
- dansk: Yamaha SR-B30A Installationsvejledning
- svenska: Yamaha SR-B30A Installationsguide
- suomi: Yamaha SR-B30A Asennusohje