Beko BIHPR 090 Split Type Air Conditioner Manuale utente
- Categoria
- Condizionatori d'aria a sistema split
- Tipo
- Manuale utente

10M-8503933200-4821-01
EN | IT
Split Type Air Conditioner
User Manual
BIHPR 090 / BIHPR 091
BIHPR 120 / BIHPR 121
BIHPR 180 / BIHPR 181
BRHPC 090 / BRHPC 091
BRHPC 120 / BRHPC 121
BRHPC 180 / BRHPC 181
BRHPR 090 / BRHPR 091
BRHPR 120 / BRHPR 121
BRHPR 180 / BRHPR 181

ENGLISH 3-55
ITALIANO 56-116
CONTENTS
V2111001
AF UM

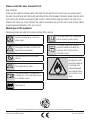
Please read this user manual first!
Dear Customer,
Thank you for preferring a Beko product. We hope that you get the best results from your product which
has been manufactured with high quality and state-of-the-art technology. Therefore, please read this entire
user manual and all other accompanying documents carefully before using the product and keep it as a
reference for future use. If you handover the product to someone else, give the user manual as well. Follow
all warnings and information in the user manual.
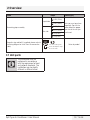
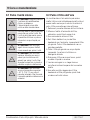
Meanings of the symbols
Following symbols are used in the various section of this manual:
3
Important information or useful hints
about usage.
A
Warning for hazardous situations with
regard to life and property.
Warning to actions that must never
perform.
B
Warning for electric shock.
This symbol shows that information is
available such as the operating manual
or installation manual.
Do not cover it.
This symbol shows that the operation
manual should be read carefully.
This symbol shows that a service
personnel should be handling this
equipment with reference to the
installation manual.
(For R32/ R290 gas type)
This symbol shows that
this appliance used a
flammable refrigerant.
If the refrigerant is
leaked and exposed
to an external ignition
source, there is a risk
of fire.
This product has been manufactured at modern facilities respectful to the environment without harming nature.
Complies with the WEEE Regulation. Does not contain PCB.

4 / 116 EN Split Type Air Conditioner / User Manual
CONTENTS
1 Safety precautions 5
2 Overview 12
2.1 Unit parts ..................................................................13
2.2 Controls and parts ......................................................14
3 Unit specifications and features 15
3.1 Indoor unit display ......................................................15
3.2 Operating temperature ...............................................16
3.3 Inverter Split type ....................................................... 16
3.4 Fixed-speed type .......................................................16
3.5 Other features ...........................................................17
3.6 Setting angle of air flow ..............................................18
3.6.1 Setting vertical angle of air flow ...............................18
3.6.2 Setting horizontal angle of air flow ............................18
3.7 Install the HomeWhiz kit (wireless module) ...................18
3.8 Manual operation (without remote) .............................. 18
4 Installation 20
4.1 Installation summary - indoor unit ............................... 20
4.2 Installation Instructions – Indoor unit ...........................21
4.2.1 Prior to installation ..................................................21
4.2.2 Mounting plate dimensions ...................................... 22
4.2.3 Before performing any electrical work, read these
regulations ......................................................................24
4.3 Outdoor Unit Installation .............................................28
4.3.1 Installation Instructions – Outdoor unit ......................28
5 Refrigerant piping connection 33
5.1 Connection Instructions – Refrigerant Piping ................34
5.2 Instructions for connecting piping to indoor unit ...........35
5.3 Instructions for connecting piping to outdoor unit .........36
6 Air evacuation 37
6.1 Preparations and precautions .....................................37
6.1.1 Before performing evacuation .................................. 37
6.1.2 Evacuation instructions ............................................37
6.1.3 Note on adding refrigerant ....................................... 38
7 Electrical and gas leak checks 39
7.1 Before test run ...........................................................39
7.2 Electrical safety checks ..............................................39
7.3 Gas leak checks .........................................................39
8 Test run 40
8.1 Test run instructions ...................................................40
9 Care and maintenance 41
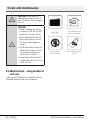
9.1 Cleaning your indoor unit ............................................ 41
9.2 Cleaning your air filter ................................................41
9.3 Maintenance – long periods of non-use .......................42
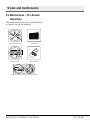
9.4 Maintenance – Pre-Season Inspection ........................43
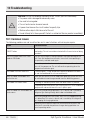
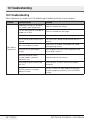
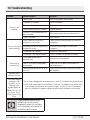
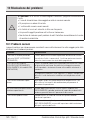
10 Troubleshooting 44
10.1 Common issues ....................................................... 44
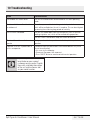
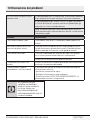
10.2 Troubleshooting .......................................................46
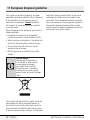
11 European disposal guideline 48
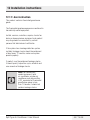
12 Installation instructions 49
12.1 F-Gas instruction .....................................................49
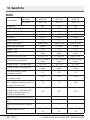
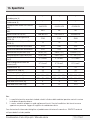
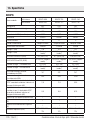
13.Specifications 50

5 / 116 EN
Split Type Air Conditioner / User Manual
Warning
This appliance can be used by
children aged from 8 years and
above and persons with reduced
physical, sensory or mental
capabilities or lack of experience
and knowledge if they have been
given supervision or instruction
concerning use of the appliance
in a safe way and understand the
hazards involved. Children shall not
play with the appliance. Cleaning
and user maintenance shall not
be made by children without
supervision (European Union
countries).
This appliance is not intended for
use by persons (including children)
with reduced physical, sensory
or mental capabilities, or lack of
experience and knowledge, unless
they have been given supervision
or instruction concerning use of the
appliance by a person responsible
for their safety. Children should be
supervised to ensure that they do
not play with the appliance.
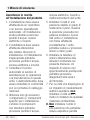
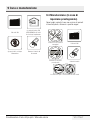
Warnings for product use
•If an abnormal situation
arises (like a burning smell),
immediately turn off the unit
and disconnect the power. Call
your dealer for instructions to
avoid electric shock, fire or
injury.
•Do not insert fingers, rods or
other objects into the air inlet
or outlet. This may cause injury,
since the fan may be rotating
at high speeds.
•Do not use flammable sprays
such as hair spray, lacquer or
paint near the unit. This may
cause fire or combustion.
•Do not operate the air
conditioner in places near or
around combustible gases.
Emitted gas may collect around
the unit and cause explosion.
•Do not operate your air
conditioner in a wet room
such as a bathroom or laundry
room. Too much exposure to
water can cause electrical
components to short circuit.
•Do not expose your body
directly to cool air for a
prolonged period of time.
•Do not allow children to
play with the air conditioner.
Children must be supervised
around the unit at all times.
1 Safety precautions

6 / 116 EN Split Type Air Conditioner / User Manual
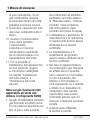
•If the air conditioner is used
together with burners or other
heating devices, thoroughly
ventilate the room to avoid
oxygen deficiency.
•In certain functional
environments, such as
kitchens, server rooms, etc.,
the use of specially designed
air-conditioning units is highly
recommended.
Cleaning and maintenance
warnings
•Turn off the device and
disconnect the power before
cleaning. Failure to do so can
cause electrical shock.
•Do not clean the air
conditioner with excessive
amounts of water.
•Do not clean the air
conditioner with combustible
cleaning agents. Combustible
cleaning agents can cause fire
or deformation.
Caution
•Turn off the air conditioner and
disconnect the power if you are
not going to use it for a long
time.
•Turn off and unplug the unit
during storms.
•Make sure that water
condensation can drain
unhindered from the unit.
•Do not operate the air
conditioner with wet hands.
This may cause electric shock.
•Do not use device for any
other purpose than its intended
use.
•Do not climb onto or place
objects on top of the outdoor
unit.
•Do not allow the air conditioner
to operate for long periods of
time with doors or windows
open, or if the humidity is very
high.
Electrical warnings
•Only use the specified power
cord. If the power cord is
damaged, it must be replaced
by the manufacturer, its service
agent or similarly qualified
persons in order to avoid a
hazard.
1 Safety precautions

7 / 116 EN
Split Type Air Conditioner / User Manual
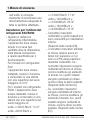
•Keep power plug clean.
Remove any dust or grime that
accumulates on or around the
plug. Dirty plugs can cause fire
or electric shock.
•Do not pull power cord to
unplug unit. Hold the plug
firmly and pull it from the
outlet. Pulling directly on the
cord can damage it, which can
lead to fire or electric shock.
•Do not modify the length of
the power supply cord or use
an extension cord to power the
unit.
•Do not share the electrical
outlet with other appliances.
Improper or insufficient power
supply can cause fire or
electrical shock.
•The product must be properly
grounded at the time of
installation, or electrical shock
may occur.
•For all electrical work, follow
all local and national wiring
standards, regulations, and the
Installation Manual. Connect
cables tightly, and clamp them
securely to prevent external
forces from damaging the
terminal. Improper electrical
connections can overheat and
cause fire, and may also cause
shock. All electrical connections
must be made according to the
Electrical connection diagram
located on the panels of the
indoor and outdoor units.
•All wiring must be properly
arranged to ensure that the
control board cover can close
properly. If the control board
cover is not closed properly,
it can lead to corrosion and
cause the connection points on
the terminal to heat up, catch
fire, or cause electrical shock.
•If connecting power to
fixed wiring, an all-pole
disconnection device which
has at least 3mm clearances
in all poles, and have a leakage
current that may exceed 10mA,
the residual current device
(RCD) having a rated residual
operating current not exceeding
30mA, and disconnection must
be incorporated in the fixed
1 Safety precautions

8 / 116 EN Split Type Air Conditioner / User Manual
wiring in accordance with the
wiring rules.
Take note of fuse
specifications
The air conditioner’s circuit board
(PCB) is designed with a fuse to
provide overcurrent protection.
The specifications of the fuse are
printed on the circuit board, such
as:
T3.15AL/250VAC, T5AL/250VAC,
T3.15A/250VAC, T5A/250VAC,
T20A/250VAC, T30A/250VAC, etc.
C
Note: For the units using
R32 or R290 refrigerant, only
the blast-proof ceramic fuse
can be used.
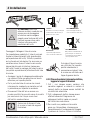
Warnings for product
installation
1. Installation must be
performed by an authorized
dealer or specialist. Defective
installation can cause water
leakage, electrical shock, or
fire.
2. Installation must be performed
according to the installation
instructions. Improper
installation can cause water
leakage, electrical shock, or
fire.
3. Contact an authorized service
technician for repair or
maintenance of this unit. This
appliance shall be installed
in accordance with national
wiring regulations.
4. Only use the included
accessories, parts, and
specified parts for installation.
Using non-standard parts
can cause water leakage,
electrical shock, fire, and can
cause the unit to fail.
5. Install the unit in a firm
location that can support
the unit’s weight. If the
1 Safety precautions

9 / 116 EN
Split Type Air Conditioner / User Manual
chosen location cannot
support the unit’s weight, or
the installation is not done
properly, the unit may drop
and cause serious injury and
damage.
6. Install drainage piping
according to the instructions
in this manual. Improper
drainage may cause water
damage to your home and
property.
7. For units that have an
auxiliary electric heater, do
not install the unit within
1 meter (3 feet) of any
combustible materials.
8. Do not install the unit in a
location that may be exposed
to combustible gas leaks. If
combustible gas accumulates
around the unit, it may cause
fire.
9. Do not turn on the power until
all work has been completed.
10. When moving or relocating
the air conditioner, consult
experienced service
technicians for disconnection
and reinstallation of the unit.
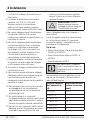
11. How to install the appliance
to its support, please read
the information for details in
“indoor unit installation” and
“outdoor unit installation”
sections.
Note about fluorinated
gasses (Not applicable to the
unit using R290 Refrigerant)
1. This air-conditioning
unit contains fluorinated
greenhouse gasses. For
specific information on the
type of gas and the amount,
please refer to the relevant
label on the unit itself or
the “User Manual - Product
Fiche“ in the packaging of the
outdoor unit. (European Union
products only).
2. Installation, service,
maintenance and repair of
this unit must be performed
by a certified technician.
3. Product uninstallation and
recycling must be performed
by a certified technician.
4. For equipment that contains
fluorinated greenhouse gases
1 Safety precautions

10 / 116 EN Split Type Air Conditioner / User Manual
in quantities of 5 tonnes of
CO2 equivalent or more, but
of less than 50 tonnes of
CO2 equivalent, If the system
has a leak-detection system
installed, it must be checked
for leaks at least every
24 months.
5. When the unit is checked for
leaks, proper record-keeping
of all checks is strongly
recommended.
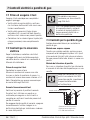
Warning for Using R32/R290
Refrigerant
•When flammable refrigerant
are employed, appliance shall
be stored in a well -ventilated
area where the room size
corresponds to the room area
as specifiec for operation.
For R32 frigerant models:
Appliance shall be installed,
operated and stored in a room
with a floor area larger than
4m2.
For R290 refrigerant models,
appliance shall be installed,
operated and stored in a room
with a floor area larger than:
1 Safety precautions
<=9000Btu/h units: 13m2
>9000Btu/h and
<=12000Btu/h units: 17m2
>12000Btu/h and
<=18000Btu/h units: 26m2
>18000Btu/h and
<=24000Btu/h units: 35m2
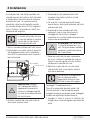
•Reusable mechanical
connectors and flared joints
are not allowed indoors.
(EN Standard Requirements).
•Mechanical connectors used
indoors shall have a rate of
not more than 3g/year at 25%
of the maximum allowable
pressure. When mechanical
connectors are reused indoors,
sealing parts shall be renewed.
When flared joints are reused
indoors, the flare part shall be
re-fabricated. (UL Standard
Requirements)
•When mechanical connectors
are reused indoors, sealing
parts shall be renewed.
When flared joints are reused
indoors, the flare part shall be
re-fabricated. (IEC Standard
Requirements)

11 / 116 EN
Split Type Air Conditioner / User Manual
•Mechanical connectors used
indoors shall comply with
ISO 14903.
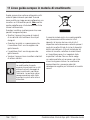
European disposal guidelines
This marking shown on the product
or its literature, indicates that
waste electrical and eletrical
equipment should not be mixed
with general household waste.
Correct disposal of
this product (Waste
electrical & Electronic
equipment)
This appliance
contains refrigerant
and other potentially
hazardous materials. When
disposing of this appliance, the
law requires special collection and
treatment. Do not dispose of this
product as household waste or
unsorted municipal waste.
When disposing of this appliance,
you have the following options:
•Dispose of the appliance
at designated municipal
electronic waste collection
facility.
•When buying a new appliance,
the retailer will take back the
old appliance free of charge.
1 Safety precautions
•The manufacturer will take
back the old appliance free of
charge. (for some countries)
•Sell the appliance to certified
scrap metal dealers. (for some
countries)
C
Special notice: Disposing of
this appliance in the forest
or other natural surroundings
endangers your health and
is bad for the environment.
Hazardous substances may
leak into the ground water
and enter the food chain.

12 / 116 EN Split Type Air Conditioner / User Manual
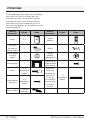
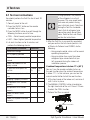
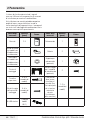
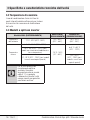
2 Overview
The air conditioning system comes with the following
accessories. Use all of the installation parts and
accessories to install the air conditioner. Improper
installation may result in water leakage, electrical
shock and fire, or cause the equipment to fail. The
items are not included with the air conditioner must be
purchased separately.
Name of
Accessories Q’ty(pc) Shape Name of
Accessories Q’ty(pc) Shape
Manual 2-3 Remote
controller 1
Drain joint
(for cooling &
heating models)
1 Battery 2
Seal (for cooling
& heating
models)
1
Remote
controller
holder(optional)
1
Mounting plate 1
Fixing screw for
remote controller
holder (optional)
2
Anchor
5~8
(depending on
models)
Small Filter
(Need to be
installed on the
back of main
air filter by
the authorized
technician while
installing the
machine)
1~2
(depending on
models)
Mounting plate
fixing screw
5~8
(depending on
models)
Wireless USB kit 1 (For Wifi
models only)

13 / 116 EN
Split Type Air Conditioner / User Manual
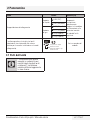
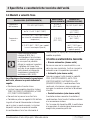
2 Overview
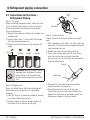
Name Shape Quantity(PC)
Connecting pipe assembly
Liquid side 6.35 (1/4in)
Parts you must purchase
separately. Consult the
dealer about the proper
pipe size of the unit you
purchased.
9.52 (3/8in)
Gas side
9.52 (3/8in)
12.7 (1/2in)
16 (5/8in)
19 (3/4in)
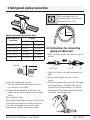
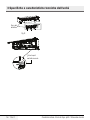
Magnetic ring and belt (if supplied, please refer to
the wiring diagram to install it on the connective
cable)
1 2 3
Pass the belt through
the hole of the Magnetic
ring to fix it on the cable
Pass the belt through the
hold of the Magnetic ring to
fix it on the cable
Varies by model
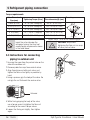
2.1 Unit parts
C
The installation must be
performed in accordance
with the requirement of local
and national standards. The
installation may be slightly
different in different areas.

14 / 116 EN Split Type Air Conditioner / User Manual
2 Overview
(1) (2)
1
23
4
6
7
8
9
10
11
Air-break switch
3
1
2
4
5
6
7
8
11
5
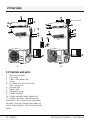
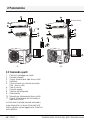
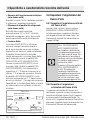
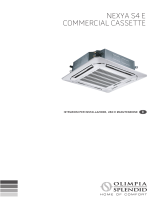
2.2 Controls and parts
1. Wall mounting plate
2. Front panel
3. Power cable (some units)
4. Louver
5. Functional filter (on back of main
filter - some units)
6. Drainage pipe
7. Signal cable
8. Refrigerant piping
9. Remote controller
10. Remote controller holder (some units)
11. Outdoor unit power cable (some units)
Illustrations in this manual are for explanatory
purposes. The actual shape of your indoor unit
may be slightly different. The actual shape shall
prevail.

15 / 116 EN
Split Type Air Conditioner / User Manual
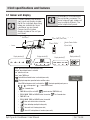
3.1 Indoor unit display
C
Different models have different
front panel and display window.
Not all the indicators describing
below are available for the air
conditioner you purchased.
Please check the indoor
display window of the unit you
purchased.
3 Unit specifications and features
CIllustrations in this manual are
for explanatory purposes. The
actual shape of your indoor unit
may be slightly different. The
actual shape shall prevail.
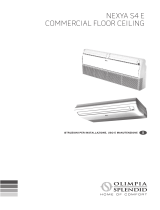
Displays temperature, operation feature and
Error codes:
fresh defrost run timer
Power Cable (Some Units)
Remote Control
Remote Control
Holder(Some Units)
Louver
Front Panel
Display window(A) Display window(D)
Display window(B)
fresh defrost run timer
Display window(C)
“ ” for 3 seconds when:
• FRESH, SWING, TURBO, or SILENCE feature is turned on
“fresh” when Fresh feature is activated(some units)
“ ” for 3 seconds when:
• TIMER OFF is set
• FRESH, SWING, TURBO, or SILENCE feature is turned o
“ ” when defrosting(cooling & heating units)
“ ” when anti-cold air feature is turned on
“ ” when unit is self-cleaning(some units)
“defrost” when defrost feature is activated.
Display Code
Meanings
,
,
“ ”
When ECO function(some units) is activated, the
illuminates gradually one by one as --
-- --set temperature -- ...... in one second interval.
fresh defrost run timer
“run” when the unit is on.
“timer” when TIMER is set.
“ ” when Wireless Control feature is activated(some units)
“ ” when 8 C heating feature is turned on(some units)
• TIMER ON is set (if the unit is OFF, remains on when TIMER ON is set )
“ ”
Front Panel
Louver
Power Cable (Some Units)
Remote Control Remote Control Holder
(Some Units)
Display window (D)
Display window (C)
Display window (B)Display window (A)
“fresh” when Fresh feature is activated (some units)
“defrost” when defrost feature is activated.
“run” when the unit is on.
“timer” when TIMER is set.
“” when Wireless Control feature is activated (some units)
“” Displays temperature, operation feature and Error codes:
When ECO function(some units) is activated, the “ ” illuminates gradually one by one as
-- -- -- set temperature -- ...... in one second interval.
“” for 3 seconds when:
•
TIMER ON is set (if the unit is OFF, “ ” remains on when TIMER ON is set)
•
FRESH, SWING, TURBO, or SILENCE feature is turned on “ ” for 3 seconds when:
•
TIMER OFF is set
•
FRESH, SWING, TURBO, or SILENCE feature is turned off
•
“ ” when anti-cold air feature is turned on
•
“ ” when defrosting (cooling & heating units)
•
“ ” when unit is self-cleaning (some units)
•
“ ” when 8 C° heating feature is turned on (some units)
freshfresh
fresh defrostdefrost
defrost runrun
run timertimer
timer
Display Code
Meanings

16 / 116 EN Split Type Air Conditioner / User Manual
3 Unit specifications and features
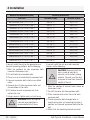
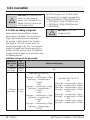
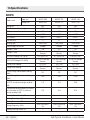
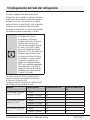
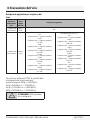
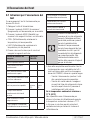
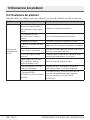
3.2 Operating temperature
When your air conditioner is used outside of
the following temperature ranges, certain safety
protection features may activate and cause the
unit to disable.
3.3 Inverter Split type
COOL mode HEAT mode DRY mode
Room Temperature 17°C - 32°C (62°F - 90°F) 0°C - 30°C (32°F
- 86°F)
10°C - 32°C (50°F -
90°F)
Outdoor
Temperature
0°C - 50°C (32°F - 122°F)
-15°C - 30°C (5°F
- 86°F)
0°C - 50°C (32°F -
122°F)
-15°C - 50°C (5°F - 122°F) (For models
with low temp. cooling systems.)
0°C - 52°C (32°F - 126°F) (For special
tropical models)
0°C - 52°C (32°F -
126°F) (For special
tropical models)
C
For outdoor units with auxiliary
electric heater. When outside
temperature is below 0°C
(32°F), we strongly recommend
keeping the unit plugged in
at all time to ensure smooth
ongoing performance.
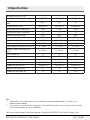
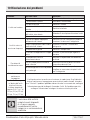
3.4 Fixed-speed type
COOL mode HEAT mode DRY mode
Room Temperature 17°C-32°C (62°F-90°F) 0°C-30°C
(32°F-86°F) 10°C-32°C (50°F-90°F)
Outdoor
Temperature
18°C-43°C (64°F-109°F)
-7°C-24°C
(19°F-75°F)
11°C-43°C
(52°F-109°F)
-7°C-43°C (19°F- 109°F) (For models
with low-temp cooling systems)
18°C-43°C
(64°F-109°F)
18°C-52°C (64°F -126°F) (For special
tropical models)
18°C-52°C (64°F-
126°F) (For special
tropical models)

17 / 116 EN
Split Type Air Conditioner / User Manual
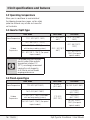
C
Room relative humidity less
than 80%. If the air conditioner
operates in excess of this
figure, the surface of the
air conditioner may attract
condensation. Please sets the
vertical air flow louver to its
maximum angle (vertically to the
floor), and set HIGH fan mode.
To further optimize the performance of your
unit, do the following
•Keep doors and windows closed.
•Limit energy usage by using TIMER ON and
TIMER OFF functions.
•Do not block air inlets or outlets.
•Regularly inspect and clean air filters.
A guide on using the infrared remote is not
included in this literature package. Not all the
functions are available for the air conditioner,
please check the indoor display and remote
control of the unit you purchased.
3.5 Other features
• Auto-Restart(some units)
If the unit loses power, it will automatically restart
with the prior settings once power has been
restored.
• Anti-mildew (some units)
When turning off the unit from COOL, AUTO
(COOL), or DRY modes, the air conditioner will
continue operate at very low power to dry up
condensed water and prevent mildew growth.
• Wireless Control (some units)
Wireless control allows you to control your air
conditioner using your mobile phone and a
wireless connection.
For the USB device access, replacement,
maintenance operations must be carried out by
professional staff.
• Louver Angle Memory (some units)
When turning on your unit, the louver will
automatically resume its former angle.
• Refrigerant Leakage Detection (some
units)
The indoor unit will automatically display “EC” or
“EL0C”or flash LEDS (some units) when it detects
refrigerant leakage.
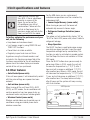
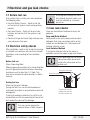
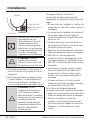
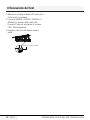
• Sleep Operation
The SLEEP function is used to decrease energy
use while you sleep (and don’t need the same
temperature settings to stay comfortable). This
function can only be activated via remote control.
And the Sleep function is not available in FAN or
DRY mode.
Press the SLEEP button when you are ready to
go to sleep. When in COOL mode, the unit will
increase the temperature by 1°C (2°F) after 1
hour, and will increase an additional 1°C (2°F)
after another hour. When in HEAT mode, the unit
will decrease the temperature by 1°C (2°F) after
1 hour, and will decrease an additional 1°C (2°F)
after another hour. The sleep feature will stop
after 8 hours and the system will keep running
with final situation.
Set
temperature
1hr 1hr
Keep
running
SLEEP Operation
Saving energy during sleep
Heat mode( -1 C/2 F) per hour
for the first two hours
Cool mode(+1 C/2 F) per hour
for the first two hours
Set
temperature Keep running
Cool mode (+1 °C/2 °F) per hour for the
first two hours
Heat mode ( -1 °C/2 °F) per hour for the
first two hours
Saving energy during sleep
SLEEP Operation
3 Unit specifications and features

18 / 116 EN Split Type Air Conditioner / User Manual
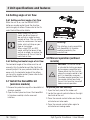
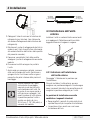
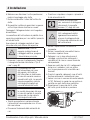
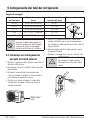
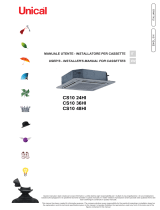
3.6 Setting angle of air flow
3.6.1 Setting vertical angle of air flow
While the unit is on, use the SWING/DIRECT
button on remote control to set the direction
(vertical angle) of airflow. Please refer to the Re
mote Control Manual for details.
C
When using COOL or DRY
mode, do not set louver at
too vertical an angle for long
periods of time. This can cause
water to condense on the louver
blade, which will drop on your
floor or furnishings.
When using COOL or HEAT
mode, setting the louver at too
vertical an angle can reduce the
performance of the unit due to
restricted air flow.
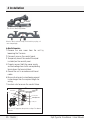
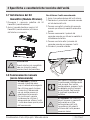
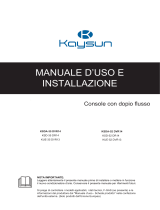
3.6.2 Setting horizontal angle of air flow
The horizontal angle of the airflow must be set
manually. Grip the deflector rod (See Fig.B) and
manually adjust it to your preferred direction. For
some units, the horizontal angle of the airflow
can be set by remote control. please refer to the
Remote Control Manual.
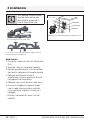
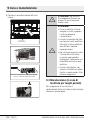
3.7 Install the HomeWhiz kit
(wireless module)
1. Remove the protective cap of the HomeWhiz kit
(wireless module)
2. Open the front panel and insert the HomeWhiz
kit (wireless module) into the reserved
interface.
3 Unit specifications and features
Insert
A
Warning:
This interface is only compatible
with HomeWhiz kit (wireless
module) provided by the
manufacturer.
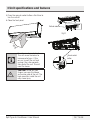
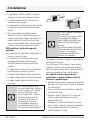
3.8 Manual operation (without
remote)
A
CAUTION! The manual button
is intended for testing purposes
and emergency operation only.
Please do not use this function
unless the remote control is lost
and it is absolutely necessary.
To restore regular operation, use
the remote control to activate
the unit. Unit must be turned off
before manual operation.
To operate your unit manually:
1. Open the front panel of the indoor unit.
2. Locate the manual control button on the right-
hand side of the unit.
3. Press the manual control button one time to
activate forced auto mode.
4. Press the manual control button again to
activate forced coolıng mode.

19 / 116 EN
Split Type Air Conditioner / User Manual
3 Unit specifications and features
5. Press the manual control button a third time to
turn the unit off.
6. Close the front panel.
Range
Range
C
Do not move louver by hand.
This will cause the louver to
become out of sync. If this
occurs, turn off the unit and
unplug it for a few seconds,
then restart the unit. This will
reset the louver.
A
CAUTION! Do not put your
fingers in or near the blower
and suction side of the unit. The
high-speed fan inside the unit
may cause injury.
Fig. B
Deflector
rod
Manual control
button
Deflector rod
Manual control
button
Fig. B

20 / 116 EN Split Type Air Conditioner / User Manual
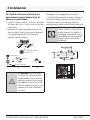
4 Installation
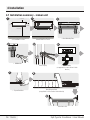
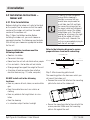
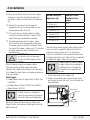
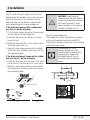
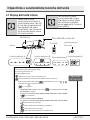
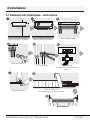
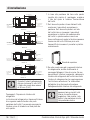
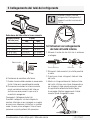
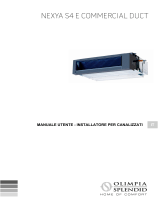
4.1 Installation summary - indoor unit
Select Installation Location
Attach Mounting Plate
Determine Wall Hole Position
1 2 3
Drill Wall Hole
Mount Indoor Unit
STEP 8
Wrap Piping and Cable
(not applicable for some locations in North America)
Connect Piping
Prepare Drain Hose
Connect Wiring
(not applicable for some
locations in North America )
456
78
9
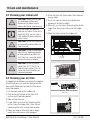
Select Installation Location
Drill Wall Hole
Prepare Drain Hose
Determine Wall Hole Position
Connect Piping
Wrap Piping and Cable
(not applicable for some locations in North America)
Attach Mounting Plate
Connect Wiring
(not applicable for some locations in North
America)
Mount Indoor Unit
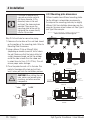
15cm (5.9in)
2.3m (90.55in)
12cm
(4.75in)
12cm
(4.75in)
La pagina sta caricando ...
La pagina sta caricando ...
La pagina sta caricando ...
La pagina sta caricando ...
La pagina sta caricando ...
La pagina sta caricando ...
La pagina sta caricando ...
La pagina sta caricando ...
La pagina sta caricando ...
La pagina sta caricando ...
La pagina sta caricando ...
La pagina sta caricando ...
La pagina sta caricando ...
La pagina sta caricando ...
La pagina sta caricando ...
La pagina sta caricando ...
La pagina sta caricando ...
La pagina sta caricando ...
La pagina sta caricando ...
La pagina sta caricando ...
La pagina sta caricando ...
La pagina sta caricando ...
La pagina sta caricando ...
La pagina sta caricando ...
La pagina sta caricando ...
La pagina sta caricando ...
La pagina sta caricando ...
La pagina sta caricando ...
La pagina sta caricando ...
La pagina sta caricando ...
La pagina sta caricando ...
La pagina sta caricando ...
La pagina sta caricando ...
La pagina sta caricando ...
La pagina sta caricando ...
La pagina sta caricando ...
La pagina sta caricando ...
La pagina sta caricando ...
La pagina sta caricando ...
La pagina sta caricando ...
La pagina sta caricando ...
La pagina sta caricando ...
La pagina sta caricando ...
La pagina sta caricando ...
La pagina sta caricando ...
La pagina sta caricando ...
La pagina sta caricando ...
La pagina sta caricando ...
La pagina sta caricando ...
La pagina sta caricando ...
La pagina sta caricando ...
La pagina sta caricando ...
La pagina sta caricando ...
La pagina sta caricando ...
La pagina sta caricando ...
La pagina sta caricando ...
La pagina sta caricando ...
La pagina sta caricando ...
La pagina sta caricando ...
La pagina sta caricando ...
La pagina sta caricando ...
La pagina sta caricando ...
La pagina sta caricando ...
La pagina sta caricando ...
La pagina sta caricando ...
La pagina sta caricando ...
La pagina sta caricando ...
La pagina sta caricando ...
La pagina sta caricando ...
La pagina sta caricando ...
La pagina sta caricando ...
La pagina sta caricando ...
La pagina sta caricando ...
La pagina sta caricando ...
La pagina sta caricando ...
La pagina sta caricando ...
La pagina sta caricando ...
La pagina sta caricando ...
La pagina sta caricando ...
La pagina sta caricando ...
La pagina sta caricando ...
La pagina sta caricando ...
La pagina sta caricando ...
La pagina sta caricando ...
La pagina sta caricando ...
La pagina sta caricando ...
La pagina sta caricando ...
La pagina sta caricando ...
La pagina sta caricando ...
La pagina sta caricando ...
La pagina sta caricando ...
La pagina sta caricando ...
La pagina sta caricando ...
La pagina sta caricando ...
La pagina sta caricando ...
La pagina sta caricando ...
-
 1
1
-
 2
2
-
 3
3
-
 4
4
-
 5
5
-
 6
6
-
 7
7
-
 8
8
-
 9
9
-
 10
10
-
 11
11
-
 12
12
-
 13
13
-
 14
14
-
 15
15
-
 16
16
-
 17
17
-
 18
18
-
 19
19
-
 20
20
-
 21
21
-
 22
22
-
 23
23
-
 24
24
-
 25
25
-
 26
26
-
 27
27
-
 28
28
-
 29
29
-
 30
30
-
 31
31
-
 32
32
-
 33
33
-
 34
34
-
 35
35
-
 36
36
-
 37
37
-
 38
38
-
 39
39
-
 40
40
-
 41
41
-
 42
42
-
 43
43
-
 44
44
-
 45
45
-
 46
46
-
 47
47
-
 48
48
-
 49
49
-
 50
50
-
 51
51
-
 52
52
-
 53
53
-
 54
54
-
 55
55
-
 56
56
-
 57
57
-
 58
58
-
 59
59
-
 60
60
-
 61
61
-
 62
62
-
 63
63
-
 64
64
-
 65
65
-
 66
66
-
 67
67
-
 68
68
-
 69
69
-
 70
70
-
 71
71
-
 72
72
-
 73
73
-
 74
74
-
 75
75
-
 76
76
-
 77
77
-
 78
78
-
 79
79
-
 80
80
-
 81
81
-
 82
82
-
 83
83
-
 84
84
-
 85
85
-
 86
86
-
 87
87
-
 88
88
-
 89
89
-
 90
90
-
 91
91
-
 92
92
-
 93
93
-
 94
94
-
 95
95
-
 96
96
-
 97
97
-
 98
98
-
 99
99
-
 100
100
-
 101
101
-
 102
102
-
 103
103
-
 104
104
-
 105
105
-
 106
106
-
 107
107
-
 108
108
-
 109
109
-
 110
110
-
 111
111
-
 112
112
-
 113
113
-
 114
114
-
 115
115
-
 116
116


Beko BIHPR 090 Split Type Air Conditioner Manuale utente
- Categoria
- Condizionatori d'aria a sistema split
- Tipo
- Manuale utente
in altre lingue
Altri documenti
-
Mitsubishi Electric KOMPAKT MXZ-2D40VA Guida d'installazione
-
 Olimpia Splendid UI ALYAS E INVERTER 12 Manuale del proprietario
-
Samsung AR09TXHQASIN Manuale utente
-
MAXA Tredis Manuale del proprietario
-
 Olimpia Splendid Nexya S4 E Cassette Inverter Commercial Guida d'installazione
-
 Olimpia Splendid Nexya S4 E Ceiling Inverter Commercial Guida d'installazione
-
 Kaysun Double Flow Console Manuale utente
-
Fujitsu ASYA09KLWA Istruzioni per l'uso
-
 Unical CS10 - Cassette Guida d'installazione
-
 Olimpia Splendid Nexya S4 E Duct Inverter Multi Guida d'installazione


