Midas HD96-24-CC-TP Guida utente
- Categoria
- Apparecchiature musicali supplementari
- Tipo
- Guida utente

Quick Start Guide
HD96-24-CC-TP
Live Digital Console Control Centre with 144 Input Channels,
120 Mix Buses, 96 kHz Sample Rate, 21" Touch Screen and
Touring Grade Road Case
V 2.0

2H D 9 6 -2 4 - CC-T P Quick Start Guide 3
Las terminales marcadas con este símbolo
transportan corriente eléctrica de
magnitud suciente como para constituir
un riesgo de descarga eléctrica. Utilice solo cables de
altavoz profesionales y de alta calidad con conectores
TS de 6,3 mm o de bayoneta prejados. Cualquier otra
instalación o modicación debe ser realizada únicamente
por un técnico cualicado.
Este símbolo, siempre que aparece,
leadvierte de la presencia de voltaje
peligroso sin aislar dentro de la caja;
estevoltaje puede ser suciente para constituir un riesgo
dedescarga.
Este símbolo, siempre que aparece,
leadvierte sobre instrucciones operativas
y de mantenimiento que aparecen en la
documentación adjunta. Por favor, lea el manual.
Atención
Para reducir el riesgo de descarga
eléctrica, no quite la tapa (o la parte
posterior). No hay piezas en el interior del equipo que
puedan ser reparadas por el usuario. Si es necesario,
póngase en contacto con personal cualicado.
Atención
Para reducir el riesgo de incendio o
descarga eléctrica, no exponga este
aparato a la lluvia, humedad o alguna otra fuente que
pueda salpicar o derramar algún líquido sobre el aparato.
Nocoloque ningún tipo de recipiente para líquidos sobre
el aparato.
Atención
Las instrucciones de servicio deben
llevarlas a cabo exclusivamente personal
cualicado. Para evitar el riesgo de una descarga eléctrica,
no realice reparaciones que no se encuentren descritas
en el manual de operaciones. Lasreparaciones deben ser
realizadas exclusivamente por personalcualicado.
1. Lea las instrucciones.
2. Conserve estas instrucciones.
3. Preste atención a todas las advertencias.
4. Siga todas las instrucciones.
5. No use este aparato cerca del agua.
6. Limpie este aparato con un paño seco.
7. No bloquee las aberturas de ventilación. Instale el
equipo de acuerdo con las instrucciones del fabricante.
8. No instale este equipo cerca de fuentes de calor
tales como radiadores, acumuladores de calor, estufas u
otros aparatos (incluyendo amplicadores) que puedan
producir calor.
9. No elimine o deshabilite nunca la conexión a tierra
del aparato o del cable de alimentación de corriente.
Unenchufe polarizado tiene dos polos, uno de los cuales
tiene un contacto más ancho que el otro. Una clavija con
puesta a tierra dispone de tres contactos: dos polos y la
puesta a tierra. El contacto ancho y el tercer contacto,
respectivamente, son los que garantizan una mayor
seguridad. Si el enchufe suministrado con el equipo no
concuerda con la toma de corriente, consulte con un
electricista para cambiar la toma de corriente obsoleta.
10. Coloque el cable de suministro de energía de manera
que no pueda ser pisado y que esté protegido de objetos
alados. Asegúrese de que el cable de suministro de
energía esté protegido, especialmente en la zona de la
clavija y en el punto donde sale del aparato.
11. Use únicamente los dispositivos o accesorios
especicados por el fabricante.
12. Use únicamente la
carretilla, plataforma,
trípode, soporte o mesa
especicados por el
fabricante o suministrados
junto con el equipo.
Altransportar el equipo,
tenga cuidado para evitar
daños y caídas al tropezar con algún obstáculo.
13. Desenchufe el equipo durante tormentas o si no va a
utilizarlo durante un periodo largo.
14. Confíe las reparaciones únicamente a servicios
técnicos cualicados. La unidad requiere mantenimiento
siempre que haya sufrido algún daño, si el cable de
suministro de energía o el enchufe presentaran daños,
sehubiera derramado un líquido o hubieran caído objetos
dentro del equipo, si el aparato hubiera estado expuesto
a la humedad o la lluvia, si ha dejado de funcionar de
manera normal o si ha sufrido algún golpe o caída.
15. Al conectar la unidad a la toma de corriente eléctrica
asegúrese de que la conexión disponga de una unión
atierra.
16. Si el enchufe o conector de red sirve como único
medio de desconexión, éste debe ser accesiblefácilmente.
17. Cómo debe deshacerse de
este aparato: Este símbolo indica
que este aparato no debe ser
tratado como basura orgánica,
según lo indicado en la Directiva
WEEE (2012/19/EU) y a las
normativas aplicables en su país.
En lugar de ello deberá llevarlo al punto limpio más
cercano para el reciclaje de sus elementos eléctricos/
electrónicos (EEE). Al hacer esto estará ayudando a
prevenir las posibles consecuencias negativas para el
medio ambiente y la salud que podrían ser provocadas
por una gestión inadecuada de este tipo de aparatos.
Además, el reciclaje de materiales ayudará a conservar
los recursos naturales. Para más información acerca del
reciclaje de este aparato, póngase en contacto con el
Ayuntamiento de su ciudad o con el punto limpio local.
18. No instale esta unidad en un espacio muy reducido,
tal como encastrada en una librería o similar.
19. No coloque objetos con llama, como una vela
encendida, sobre este aparato.
20. Tenga presentes todas las advertencias relativas
al reciclaje y correcta eliminación de las pilas. Las pilas
deben ser siempre eliminadas en un punto limpio y nunca
con el resto de la basura orgánica.
21. Puede usar este aparato en lugares con climas tropicales
y moderados que soporten temperaturas de hasta 45°C.
Music Tribe no admite ningún tipo de responsabilidad
por cualquier daño o pérdida que pudiera sufrir
cualquier persona por conar total o parcialmente en
la descripciones, fotografías o armaciones contenidas
en este documento. Las especicaciones técnicas,
imágenes y otras informaciones contenidas en este
documento están sujetas a modicaciones sin previo
aviso. Todas las marcas comerciales que aparecen
aquí son propiedad de sus respectivos dueños. Midas,
Klark Teknik, Lab Gruppen, Lake, Tannoy, Turbosound,
TC Electronic, TC Helicon, Behringer, Bugera, Oberheim,
Auratone, Aston Microphones y Coolaudio son marcas
comerciales o marcas registradas de Music Tribe
Global Brands Ltd. © Music Tribe Global Brands Ltd.
2021 Reservados todos los derechos.
Si quiere conocer los detalles y condiciones aplicables
de la garantía así como información adicional sobre la
Garantía limitada de Music Tribe, consulte online toda la
información en la web musictribe.com/warranty.
Instrucciones de
seguridad
NEGACIÓN LEGAL
GARANTÍA LIMITADA
CUIDADO
La sustitución de la batería
por otra de tipo incorrecto
puede dar lugar a un riesgo de incendio o explosión.
Sustituya la batería únicamente por otra idéntica o
equivalente.
El arrojar una batería a un fuego u horno caliente o la
ruptura o corte de una batería por medios mecánicos
puede dar lugar a un riesgo de explosión;
Igualmente, el dejar una batería en un entorno con una
temperatura ambiente extremadamente elevada puede
dar lugar a una explosión o a la fuga de un líquido o gas
inamable; y
Una batería que quede sujeta a una presión de aire
extremadamente baja también puede dar lugar a un
riesgo de explosión a la fuga de un líquido o gas
inamable.
También debe prestar la máxima atención a los aspectos
medioambientales y de correcto reciclaje a la hora de
deshacerse de una batería.
Important Safety
Instructions
LEGAL DISCLAIMER
LIMITED WARRANTY
Terminals marked with this symbol carry
electrical current of sucient magnitude
to constitute risk of electric shock.
Use only high-quality professional speaker cables with
¼" TS or twist-locking plugs pre-installed. Allother
installation or modication should be performed only
by qualiedpersonnel.
This symbol, wherever it appears,
alertsyou to the presence of uninsulated
dangerous voltage inside the
enclosure-voltage that may be sucient to constitute a
risk ofshock.
This symbol, wherever it appears,
alertsyou to important operating and
maintenance instructions in the
accompanying literature. Please read the manual.
Caution
To reduce the risk of electric shock, donot
remove the top cover (or the rear section).
No user serviceable parts inside. Refer servicing to
qualied personnel.
Caution
To reduce the risk of re or electric shock,
do not expose this appliance to rain and
moisture. The apparatus shall not be exposed to dripping
or splashing liquids and no objects lled with liquids,
suchas vases, shall be placed on the apparatus.
Caution
These service instructions are for use
by qualied service personnel only.
Toreduce the risk of electric shock do not perform any
servicing other than that contained in the operation
instructions. Repairs have to be performed by qualied
servicepersonnel.
1. Read these instructions.
2. Keep these instructions.
3. Heed all warnings.
4. Follow all instructions.
5. Do not use this apparatus near water.
6. Clean only with dry cloth.
7. Do not block any ventilation openings. Install in
accordance with the manufacturer’s instructions.
8. Do not install near any heat sources such as
radiators, heat registers, stoves, or other apparatus
(including ampliers) that produce heat.
9. Do not defeat the safety purpose of the polarized
or grounding-type plug. A polarized plug has two blades
with one wider than the other. A grounding-type plug
has two blades and a third grounding prong. The wide
blade or the third prong are provided for your safety. Ifthe
provided plug does not t into your outlet, consult an
electrician for replacement of the obsolete outlet.
10. Protect the power cord from being walked on or
pinched particularly at plugs, convenience receptacles,
and the point where they exit from the apparatus.
11. Use only attachments/accessories specied by
themanufacturer.
12. Use only with the
cart, stand, tripod, bracket,
or table specied by the
manufacturer, orsold with
the apparatus. When a cart
is used, use caution when
moving the cart/apparatus
combination to avoid
injury from tip-over.
13. Unplug this apparatus during lightning storms or
when unused for long periods of time.
14. Refer all servicing to qualied service personnel.
Servicing is required when the apparatus has been
damaged in any way, such as power supply cord or plug
is damaged, liquid has been spilled or objects have fallen
into the apparatus, the apparatus has been exposed
to rain or moisture, does not operate normally, or has
beendropped.
15. The apparatus shall be connected to a MAINS socket
outlet with a protective earthing connection.
16. Where the MAINS plug or an appliance coupler is
used as the disconnect device, the disconnect device shall
remain readily operable.
17. Correct disposal of this
product: This symbol indicates
that this product must not be
disposed of with household
waste, according to the WEEE
Directive (2012/19/EU) and
your national law. This product
should be taken to a collection center licensed for the
recycling of waste electrical and electronic equipment
(EEE). The mishandling of this type of waste could have
a possible negative impact on the environment and
human health due to potentially hazardous substances
that are generally associated with EEE. At the same time,
your cooperation in the correct disposal of this product
will contribute to the ecient use of natural resources.
For more information about where you can take your
waste equipment for recycling, please contact your local
city oce, or your household waste collection service.
18. Do not install in a conned space, such as a book
case or similar unit.
19. Do not place naked ame sources, such as lighted
candles, on the apparatus.
20. Please keep the environmental aspects of battery
disposal in mind. Batteries must be disposed-of at a
battery collection point.
21. This apparatus may be used in tropical and moderate
climates up to 45°C.
Music Tribe accepts no liability for any loss which may
be suered by any person who relies either wholly or in
part upon any description, photograph, or statement
contained herein. Technical specications, appearances
and other information are subject to change without
notice. All trademarks are the property of their
respective owners. Midas, Klark Teknik, Lab Gruppen,
Lake, Tannoy, Turbosound, TC Electronic, TC Helicon,
Behringer, Bugera, Oberheim, Auratone, Aston
Microphones and Coolaudio are trademarks or registered
trademarks of Music Tribe Global Brands Ltd. © Music
Tribe Global Brands Ltd. 2021 All rights reserved.
For the applicable warranty terms and conditions
and additional information regarding Music Tribe’s
Limited Warranty, please see complete details online at
musictribe.com/warranty.
CAUTION
Risk of re or explosion if
the battery is replaced by
an incorrect type.
Replace only with the same or equivalent type.
Disposal of a battery into re, hot oven, mechanically
crushing or cutting of a battery can result in an explosion;
Leaving a battery in an extremely high temperature
surrounding environment that can result in an explosion
or the leakage of ammable liquid or gas; and
A battery subjected to extremely low air pressure that
may result in an explosion or the leakage of ammable
liquid or gas.
Attention should be drawn to the environmental
aspects of battery disposal.
WARNING
Do not ingest the battery,
Chemical Burn Hazard.
This product contains a coin/button cell battery. If the
coin/button cell battery is swallowed, it can cause severe
internal burns in just 2 hours and can lead to death.
Keep new and used batteries away from children.
If you think batteries might have been swallowed or
placed inside any part of the body, seek immediate
medical attention.

12 H D 9 6 -2 4 - CC-T P Quick Start Guide 13
HD96-24 Overview
Chapter 1: Introduction
Welcome to the HD96-24 Digital Mixing System. The HD96-24 is a transformation
of the Midas live sound experience, designed for the modern day live sound
engineer without compromise.
Designed from the ground up the HD96-24 system is the rst step in a new way
of mixing and interacting with a Midas mixing console, while keeping the famous
no-compromise sonic quality. New forward-thinking ideas including large touch
screen control, modern multi-touch gesture control with separate widget style
areas and the Midas mCloud system to help manage many duties of the HD96-24
system are just a few of the new concepts created to take mixing audio to
a new level.
To obtain the best results please read this quick start guide (QSG) and enjoy the
future of mixing with the HD96-24 System.
About This Guide
This QSG is designed to quickly familiarize the user with the console layout, show
how to congure and set the system up and then show how to carry out basic
functions needed to start mixing audio.
This document is aimed at professional engineers, such as front of house (FOH)
and monitor (MON) engineers, who will be using this equipment in a live sound
environment. It is assumed that the reader has previous experience of using
professional audio equipment.
For full details of the HD96-24 system please refer to the HD96-24 owner’s
manual, which can be found on our website at midasconsoles.com. Its highly
advised that you read the full manual as many improvements will take place and
some of the screenshots in this QSG may be out of date as the software rapidly
improves. We are at the inception of this powerful new audio mixing system
which will only grow and develop over time.
HD96-24 System Firmware Version
Our team of software engineers are constantly working to improve and expand
the features of the HD96-24. It is crucial to have the latest rmware version
installed on your system in order to achieve the best results from your console.
Updates can be found in the Midas mCloud (cloud.midasconsoles.com), a new
approach to track and store system updates or via the midasconsoles.com website.
HD96-24 Touchscreen
Warning: the HD96-24 should not be placed or operated in direct sunlight. If the
screen is exposed to direct sunlight it may be come unresponsive and too hot to
handle. Please ensure you have suitable cover for your console.
Warranty and Registration
Midas are world renowned for quality and reliability. This product come with the
standard Midas 10-year warranty.
Registration of your console is achieved by using the Midas mCloud.
Service and Support
The HD96-24 is state of the art technology. We provide incredible levels of support
and service available via the Midas mCloud or by our service team to give owners
and users condence in Midas products.
Commonly Used Terms and Denitions
Below are some of the terms used in this QSG. Knowing these terms and what
they mean will make reading this document straight forward.
GUI - Graphic User Interface or Touchscreen.
Channel - Any input, Output (Aux, Matrix).
Path - Any Input, Output, VCA or Master.
POPulation Group - A group of channels used to bring or recall paths
to the surface.
Contributions - Any path that contributes to an output bus.
Touch - The action of pressing the touch screen to turn on or select a function.
Select - The same as Touch.
Pinch - Two ngers squeezed together, used to tighten or
widen equalizer width (Q).
Swipe - Moving a page left to right or up and down by pressing,
holding and moving in the required direction.
Press and Hold - Either a way to select all the paths on a current page for
multiple editing or a way to engage a parameter function that may be critical if
pressed in error, for example atting the EQ is a press and hold function.
Widget - The name for a window or various windows displaying information on
the GUI as part of a workow.
Workow - Visualizes the activities needed to mix audio.
Pot - A physical control used to adjust a level or value.
Chapter 2: HD96-24 Overview
Introducing the HD96-24 Digital Mixing System.
For decades Midas has been a driving force in the world of pro audio. Building
on the incredible success of the XL8 and PRO Series with their exemplary audio
performance and road-proven rugged and reliable construction, the Midas PRO
Series became the gold standard in concert touring and installed live sound.
Oering the same outstanding sample-synchronised and phase-coherent audio
performance, interpolated control functions and intuitive navigation, the PRO2,
PRO3, PRO6, PRO9 and later PRO-X Live Audio Systems have become one of the
industry’s main choices for live sound mixing.
Now the HD96-24 pushes the boundaries further yet again with a 21" touchscreen
for hands on instant access to all controls. Parameter adjustment becomes
fast and easy with gesture touch interaction using the precise and accurate
multi-touch display which allows up to 10 simultaneous touches. Featuring 144
Simultaneous exi inputs and 123 (96 x Flexi Aux + 24 x Matrix + 3 Output busses
= 123) time-aligned, phase-coherent busses with no stealing of resources in
channel or bus counts. True and consistent 96 kHz sampling frequency and 64 bit
oating point processing provide exemplary quality audio processing, and the
oversampled and interpolated digital signal processing algorithms, combined
with the fully interpolated and touch sensitive user controls, result in the smooth
continuous response and immediacy of working on an analogue console.
The HD96-24 features the rugged and road-proven Klark Teknik HyperMAC (HMAC)
and SuperMAC (AES50-compliant) networking technologies with their ultra-low
and deterministic latencies and robust error correction. Its powerful audio
networking oers up to up to 624 inputs and 654 outputs at the 96kHz sample
frequency depending on conguration.
Chapter 1: Introduction
About this manual
Training
HD96-24 user documentation
HD96-24 host software version
Warranty and registration
Service and support
Commonly Used Terms and Denitions
Chapter 2: HD96-24 Overview
Introducing the HD96-24
Overview/Key features
Applications
System components
System busses
Mix matrix
Processing
Audio physical connections
Introduction to the mCloud Network
Reliability (redundancy)
HD96-24 software
GUI
System card expansion
Chapter 3: Before You Start
Principles of operation
Operating modes
Hints and tips
Saving your work
mCloud integration
mCloud support
User Journey
Setting up a user Prole
Chapter 4: About the
Control Surface
Overview of the control Surface
Control surface layout
Channel strip layout
Global assignable shortcuts
HOME button function
TAP button function
Front and rear panel connections
External interfaces and peripheral devices
Chapter 5: System Setup
Initial set-up procedure
Unpacking the equipment
Racking the I/O
Connection instructions
System components
Powering the system
Switching the control surface on/o
Setting up the ID of the unit(s)
Connection to the interne
Chapter 6: Navigation
Chapter 6: Surface Controls
Navigating via the surface detail area
Cong
Equaliser
Dynamics
Phones
Talk
Solo
Monitor
Master
Chapter 7: Technical Specication
and Dimensions

14 H D 9 6 -2 4 - CC-T P Quick Start Guide 15
Network
The network of the HD96-24 utilises the physical connectivity of Ethernet
(EtherCon® connectors and Cat 5e/copper cable) but replaces its data protocol
with AES50 protocol (implemented as SuperMac) and the HyperMac high capacity
system, which are more suited to high quality, low latency audio distribution. The
use of the AES standard allows straightforward interfacing with any third-party
hardware that also utilises this connection.
AES50 connections carry digital audio and control data bi-directionally down a
single cable. Cat 5e cable is used for the ‘local’ connections and the dual digital
‘snake’ (equivalent to a 384-channel analogue multi-core, 192 channels per snake
connection) between console and I/O. The combination of audio, control, clock and
third-party Ethernet data in a single network means that the hardware interfaces
on a single RJ45 connection.
All system connections can be duplicated for full dual redundancy.
mCloud Network
The Midas mCloud network is a brand-new concept in le and system
management. The HD96-24 has built in Wi-Fi capabilities which allow the
surface to share its information over a Wi-Fi connection and any other network
connections to the mCloud. Be reassured the connection is completely safe and
great lengths have been taken to keep information secure.
The mCloud can be used to store your show les, preset les and all other types of
data from the console. If you leave your USB stick with your vital settings at home,
you can directly log into your mCloud account and load your show le straight to
the HD96-24 without breaking a sweat.
New system updates can be downloaded directly to the surface ready for you to
update when you’re ready. A list of all previous software versions will be stored on
the HD96-24 for peace of mind.
It also allows audio rental companies to keep a track of registrations, software
versions, warranties and diagnostic logs. All the admin for running a busy hire
company in one place.
Each user of the HD96-24 will be prompted to set up a user prole which also in
turn congures your mCloud account. Visit cloud.midasconsoles.com to set up and
use your account.
HD96-24 software
The operating system of the HD96-24 is Linux, which is an open-source, stable,
proven operating system (OS). Linux is used in many mission-critical applications
worldwide and has allowed Midas’ software engineers to write a ground-up
system that contains no ‘hidden’ or unused code. This has resulted in an ecient,
compact application, which is quick in operation, quick booting and comparatively
easy to debug.
Graphic User Interface (GUI)
The HD96-24 has a 21” touch screen that provides a quick and intuitive workow.
Modern touch gestures such as pinch and smooth touch screen faders have been
included to speed up work ow and let you concentrate on the mix. Not only does
the GUI reect what is happening on the control surface, but it also provides extra
functionality via a top and side bar menu. These menus provide access to all the
pages that you will require to set up, congure, manage and operate the entire
control surface.
Gone are the days of only one touch on a screen at a time. Use both hands to
manipulate up to 10 faders at a time if you so wish.
Pinch gesture showing EQ width adjustment.
Independent widget style areas are extensively used to display various dierent
types of information at once, all fully customisable to suit your workow.
System card expansion
The HD96-24 has 2 x CM-1 slots built in for further audio expansion. Adding up to
an additional 128 channels of I/O greatly increases networked capabilities. Virtual
sound checks and recording have never been easier to set-up and achieve with
exible options. Being able to support new and emerging protocols via its two
industry-standard expansion slots gives the HD96-24 a greatly extended shelf life.
The 24 VCA (Variable Control Association) and 24 POP (POPulation) groups,
combined with the advanced touch screen navigation system, 28 faders,
assignable controls and innovative shortcut area allow simultaneous display and
control of all the critical information required to craft an unprecedented
mix experience.
Applications
The HD96-24 is the go-to high-end Midas Digital Console System, akin to the
‘industry standard’ Heritage 3000 and XL4. Although the HD96-24 is designed for
the traditional touring live sound environment, it is also ideal for theatre, house of
worship installations and broadcast. So, being a truly multi-functional console in
the Midas tradition, the HD96-24 is suitable for many applications, such as:
Live sound touring FOH or MON duties.
Live sound theatre FOH or MON duties.
Live sound house of worship FOH or MON duties.
System busses
The HD96-24 has comprehensive system busses to suit demanding applications,
compromising of:
1. 2 stereo solo busses, routable from all locations and allowing for
dual operator.
2. 3 master busses (1 Stereo 1 mono), routable from the mic/line inputs
(up to 144), and 96 aux busses.
3. 24 matrix busses, routable from the mic/line inputs (up to 144),
96 aux busses and three stereo busses.
4. 96 aux busses (either standard or exi-aux, routable from the
mic/line inputs (up to 144) or exi aux bus to aux bus for group or
stem style processing.
All of the bus routings provide simultaneous and time aligned mixing of all the
sources, which will be switchable for minimum latency requirements.
For monitor mixing, the master, matrix and aux busses can all be routed directly
from the input channels, with independent level controls providing up to 123
monitor mix busses. Flexi-Aux busses allow group mixing of channels to be sent to
Auxes, Matrices or the Masters, for example, mix and process all your drums via a
Flexi-Aux then send to an IEM Aux.
For traditional FOH sub group mixing, any (or all) of the aux busses can change to
operate post-channel fader and pan (that is, aux gain xed at unity).
Mix matrix
Fundamentally, the mix matrix denes the capability of the HD96-24. Probably
the best way to imagine the mix matrix is to think of an analogue console layout,
where inputs run vertically, and busses run horizontally. A mix matrix is usually
dened as the number of busses and the quantity of simultaneously-mixable
inputs there are per bus. The following diagrams illustrate the capability within
the HD96-24 system.
HD96-24 Overview

16 H D 9 6 -2 4 - CC-T P Quick Start Guide 17
Saving a show versus storing a scene
It is important to understand the dierences between saving a show and storing
a scene. Storing a scene saves the current settings of the system to the show le.
Scene data is never updated unless you manually store a scene. The show le
remains unsaved in RAM. Although the state of the control surface is copied every
ve seconds, it is not stored in a scene. Instead, it is placed in the NVRAM (non-
volatile random-access memory) of the control surface’s memory, which is a type
of RAM that doesn’t lose its data when the power goes o. If the control surface
loses power accidentally, these settings are loaded so that audio parameters are
identical, thus avoiding audio level jumps.
Saving a show copies the show le onto the internal solid-state disk of the control
surface. This provides you with a ‘permanent’ copy, provided you shut down the
system properly as detailed in the following section. You also have the option of
saving your show to your Midas mCloud account. This gives extra security to your
work and allows your show le to be restored to a console even if you have lost
your USB stick.
Shutting down the control centre properly
When switching o the control surface, we recommend that you use the
shutdown option in the GUI menu.
Hold Shutdown for a short time while the line traces around the outside of the
button. The surface will then start the shutdown routine, the screen will go blank,
the Midas logo will briey be displayed, then the screen will go blank for a second
time indicating the shutdown procedure has nished. Only once the system
has been shutdown correctly is it safe to turn o the power switch. By using
shutdown, the cached copy of the show data, which is maintained by the system,
is automatically stored. Shutdown then uses the current show le, NVRAM data
and cache les to restore the control surface to exactly the same state as at power
down; even to the point of loading the unsaved show and placing you at the
correct scene, with non-stored scene data at the control surface.
If you don’t use the Shutdown option the audio parameters are still restored,
but the show and show status (saved/unsaved) cannot be restored automatically.
You must manually reload the show, and any unsaved changes will be lost.
The Midas mCloud system
mCloud handles all show le storage at its basic level. Imagine leaving your USB
stick at home but not worrying as once you sign into your mCloud account on the
surface you can see all your shows in one convenient place.
Below is a status list to show how your les are synced or not.
Status if connected to the mCloud:
• Synced All versions of this show have been pushed to the mCloud;
any newer mCloud versions have been synced to the console.
• Pending One or more newer versions have been created on the
console and will be synced shortly.
• Syncing Edits are being pushed to and/or pulled from the mCloud.
• Conicted Edits have been made on both console and cloud:
awaiting user to select the correct current version.
• Error The sync service encountered a problem trying to sync this
resource (e.g. due to an issue communication with the mCloud).
“Connected to mCloud” means the console can reach the mCloud server, the
current user is mCloud-enabled and a valid password has been entered (or a valid
token saved from a previous session).
Status if oine:
• Synced Latest version of shows on the console have been synced to
the mCloud. Newer mCloud versions will be unknown.
• Pending One or more newer versions have been created on the
console and will be scheduled for sync next time the console
is connected.
• Syncing n/a
• Conicted n/a
• Error n/a
HD96-24 Basic Operation
Chapter 3: Before You Start
Principles of operation
Control surface operation is based on the concept of colours and groups rather
than ‘layering’ or ‘paging’, which is the case with most digital consoles on the
market today. With so many channels available it is far easier to remember them
by their user-congured individual/group colour and name rather than their
channel number. Tags can also be used to group channels together in order to
speed up certain functions, for example, changing the colour of all the
drum channels.
The control surface is populated with instantly recognisable controls that are
logically distributed in major sections, so that all the controls you need to access
most of the time are always on the control surface, while the remainder are only
one action away. You can display all I/O meters, both on the control surface and
the GUI via the Console View workow, to give instant monitoring and
metering feedback.
Operating modes
You can change certain aspects of the control centre operation by assigning
dierent tasks to certain areas of the control surface.
Hints and tips
Checking the Console View screen frequently is a good idea. This provides at a
glance an overview of the control surface’s input/output status.
The Manchino (Multi Edit) page is a great place to set various inputs or outputs
to user dened levels or settings e.g. for setting all faders to 0dB, setting all
contributions into a particular aux to be Pre-fade, or routing a large number of
paths to the Stereo bus. Details of how it works can be found in full HD96-24
manual.
User Journey
When the HD96-24 is switched on for the rst time you will be presented with
the welcome screen, then the Country or Region selection page. In order to enjoy
the full benets of the mCloud system it is advised an internet wired or wireless
network connection is available. You will then be guided through the various
pages to set up and login into your mCloud account.
Setting up a User Prole
The HD96-24 incorporates a system of User Proles for storing information about
the console set-up and other User info. Each person using the HD system can
have their own prole which keeps all your show les and other useful
information on the console and via the mCloud network if the HD system
has an active internet connection.
After the system has been registered and is turned on for the second time you will
be asked to either log in or create and add a new prole.
1. Current selected prole.
2. Change user prole
3. Login to your mCloud account (all active les in your account
will be available in Show Manager).
4. Safe Mode (the show database is not available in safe mode,
but you can still mix).
5. Activates the lock screen.
6. Shutdown the console.
Saving your work
We recommend that you save your work regularly to the mCloud and a USB stick
while carrying out the procedures included in this guide. Not only is this good
practice during normal operation, but in this instance, it may save you from losing
some set-ups that could prove useful later on.

18 H D 9 6 -2 4 - CC-T P Quick Start Guide 19
The HD96-24 has 4 fully assignable fader banks split into three banks of eight faders and one bank with four faders each with individual full colour ultra-bright LCD
displays. Any section can be assigned to any function, be it inputs, outputs, POPs, VCA, Matrices or Masters. This concept allows the user to fully customise the surface to
suit their mixing preferences.
The global assignable shortcuts area can be used to provide many simple and complex functions with macro style controls right at your ngertips. E.g. Pop group
selection, triggering macros or automation recall.
The assignable controls above the faders and to the side of the GUI can be fully customised to suit your workow. Functions can be changed quickly with the cursor
arrow controls. For e.g. altering pan position, aux control or gain changes.
Channel strip layout
Each channel strip within a bank provides:
(1) LCD Display - A high-resolution display providing metering,
channel information and ip status.
and local parameter values.
(2) Sel (Fader Channel Select) - This button selects the channel for a variety
of operations, including adjusting parameters from the GUI and assigning
to the channel detail area.
(3) COMP - Compressor gain reduction meter (GR).
(4) INPUT - Input metering.
(5) GATE - Gate gain attenuation meter (GA).
(6) MUTE - Press the MUTE button to mute (turn o) the channel.
(7) SOLO - Press SOLO to listen to the channel signal.
(8) LEVEL - The fader is touch sensitive providing gain control
from -∞ to +10dB (or +6dB if contributing to an output bus).
Chapter 4: About the Control Surface
The HD96-24 has been designed from the ground up to give the operator easy-to-use touchscreen controls along with familiar analogue style controls. This clever
combining of working methods ensures any engineer can walk up to this console and instantly feel at home, but when required can delve deeper into the system to
achieve complex routing and detailed sonic manipulation.
The surface is constructed on a robust Midas steel frame chassis similar to those used in established Midas analogue products. All of the surface is controlled from two
processors. All associated power supplies, computer motherboards, Wi-Fi router, Bluetooth, memory, graphics cards etc. are housed within the surface, which also
contains a digital audio router box that supports local I/O connectors on the rear panel. Substantial forced air-cooling is provided by a bulkhead and large (but slow
moving) internal fans. The large capacitive touchscreen displays a large quantity of information and can be customised to match your workow to make mixing a
pleasure. Using modern day gestures from mobile phone and tablet technology such as pinch and swipe makes parameter manipulation even faster and more
responsive with up to 10 simultaneous touch points.
The HD96-24 system is designed to be easy to see for colour blind people. Great care has been taken to make the system visible to as many types of colour blind people
as possible.
Control surface layout
The HD96-24 surface can be spilt in to 7 distinct areas making operation quick and precise with all controls close to hand. The areas are dened in the diagram below.
HD96-24 Basic Operation

20 H D 9 6 -2 4 - CC-T P Quick Start Guide 21
Chapter 5: System Setup
Unpacking the equipment
After carefully unpacking the equipment, save all packing materials, as they will
prove useful should it become necessary to transport the equipment later. Inspect
the equipment carefully for any sign of damage incurred during transportation. It
has undergone stringent quality control inspection and tests prior to packing and
was in perfect condition when it left the factory. However, if the equipment shows
any signs of damage, notify the transportation company without delay. Only
you, the consignee, may institute a claim against the carrier for damage during
transportation.
Racking the I/O
Please take note of the rack requirements as detailed below:
To ensure the correct installation and function of the outboard equipment,
any rack has to meet the following general requirements:
Shock mounting (for non-installation environments)
The rack must provide adequate shock protection of the units it houses by
incorporating appropriately-designed shock protection methods. For example, a
foam-suspended rack or a frame suspended on anti-vibration mounts.
Ventilation
The HD96-24 has air intake vents on each side of the console. Air is drawn in
through the console side vents and exits via the two fans on the rear of the
surface. It is vital none of these airways are blocked as overheating may occur if
airow is restricted.
The Midas I/O units have been designed such that their internal ventilation airow
is drawn in through the front of the unit and expelled though the rear. To facilitate
this, rack design must ensure that cool air can ow freely through the rack in the
same direction, that is, in through the front of the rack and out through the rear.
Situations where the air ows in a circular direction around and through a Midas
I/O unit must be prevented. Midas recommends that racks with fully opening front
and rear doors are used.
Caution
Never combine units in the same rack that have been designed for a ventilation
air ow direction other than that designed for the MIDAS units. To avoid this, we
recommend that any non-MIDAS units are housed separately.
Rack mount supports
Always secure the rear of the Midas I/O units to the rack via their rear rack mount
support brackets. These brackets are tted to every Midas I/O unit and are
recommended for use in touring applications.
Handles on rack case
You must ensure that there are sucient external handles tted to the rack casing
to enable the rack to be manoeuvred easily and safely, and by the number of
personnel suitable for the task. Also, these handles must be t for purpose.
Clearance at rear of units
Ensure an adequate clearance at the rear of the units to provide sucient free
space to enable the cables to achieve their minimum bend radius.
Securing the cables
We recommend that the cables at the rear of the units be tidied using lacing bars
and cable ties. This should provide optimum access to the rear of the units for
connecting other cables, switching the units on/o etc., and also to give
maximum visibility of the units’ LEDs for determining communication status,
link status, condition of audio etc.
Connection instructions
There are currently two ways to connect the system equipment together:
1. HD96-24 surface to a Klark Teknik DN9680 via copper (up to 100 m) or with a
multi-mode (MM) bre optic snake (up to 500 m). Then Klark Teknik DN9680 to
I/O box (for example, DL231) via Cat5E (up to 100 m).
2. HD96-24 surface direct to I/O (for example, DL231) via Cat5E (up to 100 m).
It is imperative only STP Cat5E Rated cables are used!
Length = 100M Point to point as per the Cate5E ethernet protocol - Please take
into consideration any in line connections or links reduce the overall cable length.
AES50 Cat5e STP vs UTP cables.
Music Tribe are standardising the use of Ethercon cables used for AES50
connections and state that customers must use Shielded Twisted Pair (STP)
cable only with shielded RJ45 plugs and Ethercon shells.
STP cable has the added advantage of a foil or braided shield that guards the cable
against electromagnetic interference. A good foil or braided shield and correctly
connected shielded plugs and shells also helps protect against Electrostatic
discharge (ESD) that can be the cause of dropouts on AES50 connections.
Occasionally shielded Ethercon cables will leave the shield disconnected on
one end to help with ground loops, even though it has no benet for AES50
connections. These connections should have continuity of the shield on both ends
including the Ethercon shells. This will ensure the best possible protection against
strong ESD impacts, such as handling discharges or even lightning strikes in the
neighbourhood.
All AES/EBU connections must use good quality 110Ω AES/EBU cable to ensure
correct operation.
Front and rear panel connections
The surface has connector panels on both the front and rear. The front connector panel to the right of the GUI has an XLR socket and a USB sockets for connecting a talk
mic and USB device, respectively. For example, you can connect a USB memory stick for show le backup and transfer. Under the armrests at either side there are two
6.35 mm headphone sockets which link to Mon A and Mon B respectively.
HD96-24 Basic Operation
Global Assignable Shortcuts
The Global Assignable Shortcuts area in the centre of the surface allows various
functions to be placed within easy reach of the user. Twelve full colour LCD displays
with selection buttons show a great deal of information and allow for complex
operations to be recalled with one button press.
Home
The HOME key is located under the Shortcuts area. When pressed the
HOME workow is brought to the GUI.
Tap
The TAP button is used to set the tempo for eects assigned to the
Global TAP tempo function. Commonly 8 taps are required for an accurate tempo.
Arrow Keys
These two keys tab through the various pages of the global assignable
shortcuts pages which can be fully customised.
The familiar looking Channel Detail Area is used for hands on control with sections
for Cong, Equaliser, Dynamics, Phones, Talk, Solo, Monitor, Main Bus and Master.
This area makes using the surface easy to use with a familiar analogue feel. The 4
x Change Over (C/O) buttons for Master, Mono, Monitor A and Monitor B assign the
control to the fader below for quick control by fader level.
AIR
FLOW
OUT
AIR
FLOW
IN

22 H D 9 6 -2 4 - CC-T P Quick Start Guide 23
Connection Via DN9680
HD96-24 Basic Operation
System components
Below is a list of currently compatible system I/O components with the
HD software. When I/O is connected to the HD96-24 system it will be necessary to be update to the latest HD I/O software. The updater is built into the console and
guides you through the update process. Once updated, I/O boxes will still be compatible with Pro Series consoles.
Note: I/O boxes will need to be updated in order to work with the HD96-24 system. The I/O Box and Device updater can be found in the Update
Manager page. With all your I/O connected press Sync I/O and follow the instructions. Updated I/O boxes are fully compatible with
Pro Series consoles.
I/O UNIT
DL231 - 2 award-winning Midas microphone
preampli ers per input with switchable +48 V
phantom power 2 dual redundant AES50 network
ports with independent phase-locked loop
synchronisation 24 electronically balanced output
channels can be sourced from microphone
preampliers or AES50 ports
DL151 - 24 award-winning Midas analogue
mic preamps with switchable +48 V phantom power
DL152 - 24 active-balanced low impedance
line-level outputs
DL153 - 16 award-winning Midas analogue mic
preamps with switchable +48 V phantom power
8 active-balanced low impedance line-level outputs
DL154 - 16 active-balanced low impedance
line-level outputs 8 award-winning Midas analogue
mic preamps with switchable +48 V phantom power
DL155 - 8 award-winning Midas analogue mic
preamps with switchable +48 V phantom power
8 active-balanced low-impedance line level outputs
8 AES3 (AES/EBU) digital inputs and 8
DL251 - Audio System I/O This is supplied as a xed
conguration unit with 48 mic/line inputs and
16 outputs.
DL252 - Audio System I/O This is supplied as a xed
conguration unit with 16 mic/line inputs and
48 outputs.
CONNECTION VIA AES50 CAT5E
STP UP TO 100M
CONNECTION VIA HMAC MULTIMODE FIBRE UP TO 500M OR
CAT 5E UP TO 100M

24 H D 9 6 -2 4 - CC-T P Quick Start Guide 25
To power up the system
Important Note:
Make sure your speaker system, in-ears or monitor wedges are muted until the start-up of the system has been completed.
After all system interconnections have been made, start up the system by doing the following:
Switching on the HD96-24
1. Plug the two mains cables into the mains power outlets. Both power supply modules should be supplying power to the
HD96-24 surface for correct redundant operation.
2. Plug the connectors of the mains cables into the IEC mains sockets on the rear of the HD96-2
3. Turn on the power to the HD96-24 surface by switching both AC POWER switches on. The surface will boot up.
Once the default GUI screen is displayed, it is ready for use.
To switch o the HD96-24 surface
1. Make sure you have saved any shows, scenes or settings you require.
2. In the GUI, select Menu from the top bar, then press and hold the red
SHUTDOWN button at the bottom of the menu until the line traces around the outside of the red button. The shutdown procedure will then initiate.
3. The screen will go blank, the Midas logo will briey be displayed, then the screen will go blank for a second time indicating the shutdown procedure has nished.
Only once the system has been shutdown correctly is it safe to turn o both AC power switches (rear of surface).
HD96-24 Basic Operation
Direct connection of I/O
Connect mains cables to each PSU. Apply
power to the surface via the AC/POWER
switch for each PSU. Note the surface can
function on 1 PSU if required.
DL153 connected at
FOH for extra local I/O
Direct connection of
HD96-24 to DL231
I/O rach via Cat5e

26 H D 9 6 -2 4 - CC-T P Quick Start Guide 27
Chapter 6 Surface Controls
The HD96-24 has full multi-touch screen control. This gives the user some of the
feeling of working with analogue consoles again whilst at the same time
incorporating modern ways of interacting with everyday products like
smartphones and tablets. One of the advantages digital consoles have over
analogue ones is that their channel count is not limited by the control surface
hardware. However, this means that only a certain number of channels can be
shown on the control surface at any time, while the others are available at the
touch of the screen (GUI) or assignable shortcuts area.
Pressing the SEL (select) button on any input or output will bring the chosen
channel to the surface controls (also to the touch screen widgets). From here
adjustments to many common parameters can be changed such as Gain, EQ,
Dynamics or Pan position. This way of working has a familiar feel that you will
understand and be comfortable to use. Mute will turn the channel o and solo
will send the audio of the selected path to either the A or B solo bus depending on
path settings.
Navigating via the surface detail area
The surface is laid out with a familiar analogue feel for easy operation. Everyday
functions are available for hands on operation. All functions are mirrored in the
GUI with parameter values highlighted on touch. This allows you to make changes
quickly to the selected channel or path.
HD96-24 Basic Operation
Setting up the ID of the unit(s)
After connecting up your system, you may need to set up the ID of the unit(s) in the rack, such as the DL231 I/O or DL15x I/O, as each unit within the same family of units
must have its own unique ID number.
Please refer to the DL series or HD manuals for full details on changing unit ID’s.
A connector panel on the rear of the control surface has two main sections. On the left are two mains power inlet and ventilation assemblies, with 2 x AC power switches
below. The right-section contains connections for the Snake/Multicore, Ethernet control, eight analogue audio inputs and outputs, three AES3 inputs and outputs,
diagnostics, word clock, Twin HDMI™ external monitor outputs, Midi, Talkback (line level input), two expansion card slots and USB Hub.
External interfaces and peripheral devices
Various devices can be used with the HD96-24 such an external USB keyboard.
MIDI Standard 5-pin connectors are housed in the rear panel for use as MIDI IN, OUT and THRU ports. These are also tted on some I/O units (DL231, DL251 for example)
and, therefore, are available at both the FOH and the stage locations.
USB 2 x 4way USB 3.0 hubs are provided on the rear of the HD96-24. In addition, a USB port can be found to the right of GUI screen for convenient le transfer.
The Fader Port USB outputs are only for use with future fader bank expansions.
External monitor The HD96-24 has 2 HDMI™ connections on the rear panel to connect extra displays (1920 x 1080p 59.94Hz/60Hz 16:9 &
720 x 480p 59.94Hz/60Hz 16:9 supported).
Ethernet port The Ethernet port on the rear of the surface is for connecting the HD96-24 to a network or external wireless router.
Ultranet 2 x Ports for connecting Ultranet enabled devices.
Mains power
and ventilation Audio, control
and networking Fixed local I/O

28 H D 9 6 -2 4 - CC-T P Quick Start Guide 29
Dynamics
(1) Compressor GR Meter - Compressor (Comp) Gain Reduction Meter
(Range -1 dB to – 23 dB).
(2) GATE GA Meter - Gate Gain Attenuator Meter Range (-1 dB to -34 dB).
(3) SEL Comp - Selects the compressor setting for the selected channel.
(4) ON - Turns the compressor on for the selected channel.
(5) SEL Gate - Selects the gate setting for the selected channel.
(6) ON - Turns the gate on for the selected channel.
(7) Mode - Selects the mode of the compressor (Corrective, Adaptive,
Creative and Vintage) or gate (Gate or Ducker).
(8) Attack - Controls the attack settings of the gate or comp.
(9) Hold - Controls the hold value of the gate. Hold is the amount of time
the gate is open until the release part of the gate starts.
(10) Release - Controls the release characteristic of the gate and comp.
(11) Range/Ratio - Range relates to the gate and controls the amount of
signal allowed to pass when the gate is closed. This is useful on drums to
allow some of the dry drum sound through when the gate is closed.
Ratio relates to the comp. With a ratio setting of 3:1 for every 1 dB above
the threshold point the signal will be turned down or compressed by 3 dB.
(12) Threshold - Adjust the point at which either the gate opens, or
compression starts to take place.
(13) Knee - Changes the compression knee setting (Hard, Medium or Soft).
(14) Make-Up - Adds gain to the compressors output. This allows you to
balance the levels of the compressor when on and o by increasing the
make-up gain to match the amount of gain reduction taking place.
(Range 0 dB to 24 dB).
(15) Sidechain Frequency - Set the frequency that the sidechain of the gate
or comp listen to in order to give tighter control of a certain range
of frequencies.
(16) On - Turns the sidechain of the gate or comp on/o.
(17) Listen - Sends the selected sidechain frequency to the solo bus for
monitoring and to give accurate adjustment of the frequency.
(18) Width - Changes the width of the sidechain for the gate and comp
(0.1 Oct, 0.3 Oct, 1 Oct and 2 Oct).
Phones
(1) Phones A - Level control.
(2) Phones B - Level Control.
(3) Phones A - Mute button.
(4) Phones B - Mute button.
Talk
(1) Talk Gain - Adjust the gain of the surface Talk Mic input.
(2) Talk Mic - XLR input for local talk mic.
(3) Talk INT (Internal) - Allows the talk mic to be sent to the internal talk
bus. For example, it can be used to send your talk mic into a channel to test
signal ow.
(4) Talk EXT (External) - Allows your local talk mic to be routed to the Ext Talk.
(5) OSC INT - Activates the oscillator on the selected internal bus.
(6) OSC EXT - Sends the oscillator to the Ext Talk bus. This can be used to send
the oscillator to a channel if required by patching the Ext Talk out in the
monitor patching page to a channel.
Cong
HD96-24 Basic Operation
(1) Meters - 12 LEDs Stereo input meters display signals
from -35 dB to 20 dB.
(2) Link - Links the currently selected input channel to the next input.
Note outputs always link odd to even, i.e. Aux 1 to 2 etc.
(3) Talk - Send the talk bus to the select channel.
(4) Gain - Adjust the gain of the input channel pre-amp.
(5) Trim - Adjust the trim level for inputs -40 to 20 dB or for Aux,
Matrices and Master Busses -12 to 6 dB.
(6) HPF - High Pass Filter (HPF) control with a range from 10 Hz to 10 kHz.
(7) LPF - Low Pass Filter (LPF) control with a range from 40 Hz to 20 kHz.
(8) Dir Mute - Mutes the direct out of the currently selected channel.
(9) Insert - Switches on the insert point on the selected channel.
(10) 48 V - Activates 48 V phantom power on the selected input channel.
(11) Ø - Polarity Switch. Changes the polarity of the selected channel by
180° (often inaccurately called phase reverse as the button only
inverts polarity).
(12) HPF on - Activates the HPF.
(13) LPF on - Activates the LPF.
Equaliser
(1) On - Turns the Equaliser on for the selected channel.
(2) Gain - Each band has +- 16.2 dB of range.
(3) Frequency - Each band as a frequency range of 16 Hz to 25 kHz.
(4) Width - The width or Q of an EQ band can be changed from 0.3 to 5.3.
(5) Shape - Changes the shape of Band For inputs the shape options include,
Bell, Bright, Classic and Soft. For outputs the Shape button has Shelf,
LP 6 dB, LP 12 dB and Bell modes.
(6) Shape - Changes the shape of Band For inputs the shape options include,
Bell, Deep, Classic and Warm. For outputs the Shape button has Shelf,
HP 6 dB, HP 12 dB and Bell modes.

30 H D 9 6 -2 4 - CC-T P Quick Start Guide 31
Master
(1) Master Mute - Mutes the Master Stereo Bus.
(2) Mono Mute - Mutes the Mono Bus.
(3) Master Meters - Stereo 20 LED meters, -36 dB to 21 dB.
(4) Mono Meter - Stereo 20 LED meters, -36 dB to 21 dB.
(5) Master Stereo Bus Level - Level control. Maximum level 10 dB.
(6) Mono Bus Level - Level control. Maximum level 10 dB.
(7) C/O - Sends the Master Stereo Bus level control to the fader directly below
for easy adjustment.
(8) C/O - Sends the Mono Bus level control to the fader directly below for
easy adjustment.
Solo
(1) A PFL - Indicates an input channel is being heard by
Pre Fader Listen via Solo A bus.
(2) B PFL - Indicates an input channel is being heard by
Pre Fader Listen via Solo B bus.
(3) A PFL - Indicates an output channel is being heard by
Pre Fader Listen via Solo A bus.
(4) B PFL - Indicates an output channel is being heard by
Pre Fader Listen via Solo B bus.
(5) Add (A) - Allows more than one input channel to be listened
at once on the A solo bus.
(6) Add (B) - Allows more than one input channel to be listened
at once on the B solo bus.
(7) Clear (A) - Clears any current solo selections.
(8) Clear (B) - Clears any current solo selections.
Main Bus
(1) Pan - Controls the position of the signal in the stereo eld.
(2) Delay - Adjusts the delay time for the selected channel.
(3) Mono - Adjusts the send to the Mono Bus.
(4) Stereo - Sends the selected channel to the Stereo Bus.
(5) On - Turns the selected channel’s delay time on.
(6) Mono - Sends the selected channel to the Mono Bus.
Monitor
(1) Out Swap - Completely swaps the A and B Monitor Busses over meaning
A becomes B and vice versa. For example, this allows you to hear a wedge
monitor mix on the in-ear monitor bus if desired without having to re-patch.
(2) Talk Back - Allows the rear line level talkback input to be directly inputted
into the Monitor A bus.
(3) Talk Back - Allows the rear line level talkback input to be directly inputted
into the Monitor B bus.
(4) ST- Routes the stereo bus to the monitor A bus.
(5) ST- Routes the stereo bus to the monitor B bus.
(6) DIM A - Turns the level of the Monitor A bus down by 6 dB.
(7) DIM B - Turns the level of the Monitor B bus down by 6 dB.
(8) Mute - Mutes the Monitor A bus.
(9) Mute - Mutes the Monitor B bus.
(10) Monitor A Metering - Stereo 20 LED meters, -36 dB to 21 dB.
(11) Monitor B Metering - Stereo 20 LED meters, -36 dB to 21 dB.
(12) Monitor A Level - Level control. Maximum level 10 dB.
(13) Monitor B Level - Level control. Maximum level 10 dB.
(14) C/O - Sends the monitor A level control to the fader directly below for
easy adjustment.
(15) C/O - Sends the monitor B level control to the fader directly below for
easy adjustment.
HD96-24 Basic Operation

32 H D 9 6 -2 4 - CC-T P Quick Start Guide 33
HD96-24 Dimensions
1028
352
352
719

208 H D 9 6 -24 - C C-T P Quick Start Guide 209
Specications
Processing
Input processing channels 144 exi channels
Output processing channels 96 exi aux outputs, 24 matrices, stereo bus, mono bus
Internal eects engines
24 x eects slots (up to 96 eects)
32 x Stereo multiband compressors
96 x Stereo dynamic equalisers
Point-to-point routing matrix 622 x 652
Signal processing 64-bit oating point
D/A converter 24-bit, 96 kHz and 128 times oversampling
A/D converter 24-bit, 96 kHz and 128 times oversampling
Sampling frequency 96 kHz
I/O latency (surface input to output) 1.34 ms
Input audio processing
Dual-slope high and low-pass lters
True phase lter control
4-band parametric EQ with 3 shelf modes
4-mode creative input compressors
Input gates or ducker
Insert point on/o with processing order change
Direct output with adjustable level and processing pick of point
Delay-compensated aux return mode on inputs
5 x tap-o points per send
Output audio processing
Output 4-band parametric EQ with shelving/HP/LP options
4-mode creative output dynamics
Insert point on/o with processing order change
Direct input with adjustable level and processing tap-o point
Mixing control assistance
12 x talk groups
12 x mute groups
24 x surface POPulation groups
24 x VCA associated population groups
Scene snapshot automation
Connectors
Midas microphone preamplier 8 x XLR balanced
Balanced outputs 8 x XLR balanced
Talkback connector 1 x XLR balanced
Talk connector 1 x XLR balanced
Headphone connector 2 x 1⁄4" TRS (stereo)
Digital AES3 input / output (XLR) 2 / 2
AES50 ports (Klark Teknik SuperMAC, 100 Mbit/s) 4
Snake (copper) 2 x HyperMac (192 channels of bi-directional digital audio) on Ethercon XLR
Snake (bre) 2 x HyperMac (192 channels of bi-directional digital audio) on Opticon XLR
CM1 expansion slots 2 x slots (CM1 module for AES50, DANTE, MADI and USB)
Ultranet 2 x Ultranet ports (up to 16 digital outputs per port)
Word clock IN BNC, accepts TTL level, 96 kHz square wave, impedance 75 Ohms
Word clock OUT BNC, provides a TTL level, 96 kHz square wave
HD96-24 Wymiary
1028
352
352
719

210 H D 9 6 -2 4 - CC-T P Quick Start Guide 211
Controls
100 mm motorized faders 8 + 8 + 8 + 4
Touch-sensitive rotary controls 66
Custom controls
Fully assignable rotary controls
Fully assignable backlit buttons
28 + 8
28 + 8 + 12
Headphone controls A and B, min to max
Talk Talk gain min to max
Wi-Fi
Antenna Internal dual-band
IEEE 802.11 a/b/g/n Supports a / b / g / n devices
Frequency range 2412-2462 MHz / 5.15–5.850 GHz operation dependent on region
Max output power 20 dBm (using 5 GHz range)
Bluetooth
Version 4.0 EDR and LE
Power 20 dBm
Compatibility Supports GAP, SDN, PAN, SPP, IAP, HFP 1.5, GATT, ATTR, IAP, A2DP, ACRP.
Maximum communcation range 30 m typical
Power
Switch-mode power supply 2 x auto-ranging 100-240 V (50/60 Hz)
Power consumption 2 x 650 W
Current 9 A max
Physical
Operating temperature range 5 °C to 45 °C(41°F – 113°F)
Storage temperature range -20 °C to 60 °C (-4°F – 140°F)
Dimensions(H x W x D) 352 x 1028 x 719 mm(13.9 x 40.5 x 28.3")
Weight 43.2 kg(95.0 lbs)
Connectors
AES3 sync IN 1 x 3-pin XLR
AES3 sync OUT 1 x 3-pin XLR
External (Ethernet) connector Ethercon XLR
Monitor output 2 x HDMI (1920 x 1080p 59.94Hz/60Hz 16:9 & 720 x 480p 59.94Hz/60Hz 16:9 supported)
USB 3.0 type A hub 4 x 5 V ⎓ 900 mA
USB 3.0 type A (fader port expansion) 4 x 5 V ⎓ 900 mA
USB 2.0 type A (front surface data) 1 x 5 V ⎓ 500 mA
Diagnostics Port Serial port
MIDI In, Out and Thru 5-pin MIDI DIN sockets
Lamp 2 x 12 V DC 5 W 4-pin
IEC mains socket with power switch 2
Input / Output Characteristics
Surface input impedance 10 kΩ
Non-clip maximum input level +24 dBu
Input gain -22.5 dB to +65 dB
Phantom power (switchable per input) +48 V
Talk mic impedance 5 kΩ
Talk mic gain +15 dB to +60 dB
Talk mic max level +6 dB
Talkback impendance 20 kΩ
Talkback gain ∞0 to + 10 dB
Talkback max level +21 dBu
Surface output impedance 50 Ω
Surface output gain 0 dB
Surface output max level +21 dBu
Dynamic range 106 dB, 22 Hz to 22 kHz, unweighted
Maximum voltage gain 100 dB inputs to subgroups and masters, 106 dB inputs to aux and matrix
Crosstalk at 1 kHz -100 dB physically adjacent input channels
Crosstalk at 10 kHz -90 dB physically adjacent input channels
Fader / pan cut o at 1 kHz -100 dB
Fader / pan cut o at 10 kHz -100 dB
Headphones output impedance 10 Ω
Headphones maximum output level +21 dBu
Displays
Display screen 21" LCD high brightness 1920 x 1080 px, captive touchscreen,
up to 10 simultaneous touches
LCD info displays 41 x full colour LCD info displays, 24 mm x 24 mm (size), 240 x 240 px
Input meters (quantity 30) 12 segment -35 dBu to +20 dBu
Output meters (quantity 7) 20 segment -36 dBu to +21 dBu
Channel comp meters (quantity 28) 5 segment -24 dBu to -1 dBu
Channel gate meters (quantity 28) 5 segment -34 dBu to -5 dBu
Comp meter (quantity 1) 12 segment -23 dBu to -1 dBu
Gate meter (quantity 1) 12 segment -34 dBu to -1 dBu
Specications

212 H D 9 6 -24 - C C-T P Quick Start Guide 213
Other important information
1. Register online. Please register your new
Music Tribe equipment right after you purchase it by
visiting musictribe.com. Registering your purchase using
our simple online form helps us to process your repair
claims more quickly and eciently. Also, read the terms
and conditions of our warranty, if applicable.
2. Malfunction. Should your Music Tribe
Authorized Reseller not be located in your vicinity,
you may contact the Music Tribe Authorized Fulller for
your country listed under “Support” at musictribe.com.
Should your country not be listed, please check if your
problem can be dealt with by our “Online Support” which
may also be found under “Support” at musictribe.com.
Alternatively, please submit an online warranty claim at
musictribe.com BEFORE returning the product.
3. Power Connections. Before plugging the
unit into a power socket, please make sure you are using
the correct mains voltage for your particular model.
Faulty fuses must be replaced with fuses of the same type
and rating without exception.
1. Registro online. Le recomendamos que
registre su nuevo aparato Music Tribe justo después de
su compra accediendo a la página web musictribe.com.
El registro de su compra a través de nuestro sencillo
sistema online nos ayudará a resolver cualquier
incidencia que se presente a la mayor brevedad posible.
Además, aproveche para leer los términos y condiciones de
nuestra garantía, si es aplicable en su caso.
2. Averías. En el caso de que no exista un distribuidor
Music
Tribe en las inmediaciones, puede ponerse en
contacto con el distribuidor
Music
Tribe de su país,
que encontrará dentro del apartado “Support” de nuestra
página web musictribe.com. En caso de que su país no
aparezca en ese listado, acceda a la sección “Online Support”
(que también encontrará dentro del apartado “Support”
de nuestra página web) y compruebe si su problema aparece
descrito y solucionado allí. De forma alternativa, envíenos a
través de la página web una solicitud online de soporte en
periodo de garantía ANTES de devolvernos el aparato.
3. Conexiones de corriente. Antes de enchufar
este aparato a una salida de corriente, asegúrese de que dicha
salida sea del voltaje adecuado para su modelo concreto.
En caso de que deba sustituir un fusible quemado, deberá
hacerlo por otro de idénticas especicaciones, sin excepción.
1. Enregistrez-vous en ligne. Prenez le
temps d’enregistrer votre produit Music Tribe aussi vite
que possible sur le site Internet musictribe.com. Le fait
d’enregistrer le produit en ligne nous permet de gérer
les réparations plus rapidement et plus ecacement.
Prenez également le temps de lire les termes et conditions
de notre garantie.
2. Dysfonctionnement. Si vous n’avez pas
de revendeur Music Tribe près de chez vous, contactez le
distributeur Music Tribe de votre pays : consultez la liste
des distributeurs de votre pays dans la page “Support”
de notre site Internet musictribe.com. Si votre pays n’est
pas dans la liste, essayez de résoudre votre problème avec
notre “aide en ligne” que vous trouverez également dans
la section “Support” du site musictribe.com. Vous pouvez
également nous faire parvenir directement votre demande
de réparation sous garantie par Internet sur le site
musictribe.com AVANT de nous renvoyer le produit.
3. Raccordement au secteur. Avant de relier
cet équipement au secteur, assurez-vous que la tension
secteur de votre région soit compatible avec l’appareil.
Veillez à remplacer les fusibles uniquement par des
modèles exactement de même taille et de même valeur
électrique — sans aucune exception.
1. Online registrieren. Bitte registrieren Sie
Ihr neues Music Tribe-Gerät direkt nach dem Kauf auf der
Website musictribe.com. Wenn Sie Ihren Kauf mit unserem
einfachen online Formular registrieren, können wir Ihre
Reparaturansprüche schneller und ezienter bearbeiten.
Lesen Sie bitte auch unsere Garantiebedingungen,
falls zutreend.
2. Funktionsfehler. Sollte sich kein Music Tribe
Händler in Ihrer Nähe benden, können Sie den
Music Tribe Vertrieb Ihres Landes kontaktieren, der auf
musictribe.com unter „Support“ aufgeführt ist. Sollte Ihr
Land nicht aufgelistet sein, prüfen Sie bitte, ob Ihr Problem
von unserem „Online Support“ gelöst werden kann, den
Sie ebenfalls auf musictribe.com unter „Support“ nden.
Alternativ reichen Sie bitte Ihren Garantieanspruch
online auf musictribe.com ein, BEVOR Sie das
Produkt zurücksenden.
3. Stromanschluss. Bevor Sie das Gerät an
eine Netzsteckdose anschließen, prüfen Sie bitte, ob Sie
die korrekte Netzspannung für Ihr spezielles Modell
verwenden. Fehlerhafte Sicherungen müssen ausnahmslos
durch Sicherungen des gleichen Typs und Nennwerts
ersetzt werden.
1. Registre-se online. Por favor, registre seu
novo equipamento Music Tribe logo após a compra
visitando o site musictribe.com Registrar sua compra
usando nosso simples formulário online nos ajuda a
processar seus pedidos de reparos com maior rapidez e
eciência. Além disso, leia nossos termos e condições de
garantia, caso seja necessário.
2. Funcionamento Defeituoso.
Caso seu fornecedor Music Tribe não esteja localizado
nas proximidades, você pode contatar um distribuidor
Music Tribe para o seu país listado abaixo de “Suporte”
em musictribe.com. Se seu país não estiver na lista,
favor checar se seu problema pode ser resolvido com o
nosso “Suporte Online” que também pode ser achado
abaixo de “Suporte”em musictribe.com. Alternativamente,
favor enviar uma solicitação de garantia online em
musictribe.com ANTES da devolução do produto.
3. Ligações. Antes de ligar a unidade à tomada,
assegure-se de que está a utilizar a voltagem correcta para
o modelo em questão. Os fusíveis com defeito terão de
ser substituídos, sem qualquer excepção, por fusíveis do
mesmo tipo e corrente nominal.
1. Registratevi online. Vi invitiamo a registrare
il nuovo apparecchio Music Tribe subito dopo averlo
acquistato visitando musictribe.com. La registrazione
dell'acquisto tramite il nostro semplice modulo online ci
consente di elaborare le richieste di riparazione in modo
più rapido ed eciente. Leggete anche i termini e le
condizioni della nostra garanzia, qualora applicabile.
2. Malfunzionamento. Nel caso in cui il
rivenditore autorizzato Music Tribe non si trovi nelle vostre
vicinanze, potete contattare il Music Tribe Authorized
Fulller per il vostro paese, elencato in “Support”
@ musictribe.com. Se la vostra nazione non è elencata,
controllate se il problema può essere risolto tramite il
nostro “Online Support”che può anche essere trovato sotto
“Support” @ musictribe.com. In alternativa, inviate una
richiesta di garanzia online su musictribe.com PRIMA di
restituire il prodotto.
3. Collegamento all’alimentazione.
Prima di collegare l'unità a una presa di corrente,
assicuratevi di utilizzare la tensione di rete corretta
per il modello specico. I fusibili guasti devono essere
sostituiti, senza eccezioni, con fusibili dello stesso tipo e
valore nominale.
Important information
Aspectos importantes
Informations importantes
Weitere wichtige
Informationen
Outras Informações
Importantes
Informazioni importanti
1. Registreer online. Registreer uw nieuwe
Music Tribe-apparatuur direct nadat u deze hebt gekocht
door naar musictribe.com te gaan. Door uw aankoop
te registreren via ons eenvoudige online formulier,
kunnen wij uw reparatieclaims sneller en eciënter
verwerken. Lees ook de voorwaarden van onze garantie,
indien van toepassing.
2. Storing. Mocht uw door Music Tribe
geautoriseerde wederverkoper niet bij u in de buurt zijn
gevestigd, dan kunt u contact opnemen met de door Music
Tribe Authorized Fulller voor uw land vermeld onder
“Support” op musictribe.com. Als uw land niet in de lijst
staat, controleer dan of uw probleem kan worden opgelost
door onze "Online Support", die u ook kunt vinden onder
"Support" op musictribe.com. U kunt ook een online
garantieclaim indienen op musictribe.com VOORDAT u het
product retourneert.
3. Stroomaansluitingen. Voordat u het
apparaat op een stopcontact aansluit, moet u ervoor
zorgen dat u de juiste netspanning voor uw specieke
model gebruikt. Defecte zekeringen moeten zonder
uitzondering worden vervangen door zekeringen van
hetzelfde type en dezelfde waarde.
1. Registrera online. Registrera din nya Music
Tribe-utrustning direkt efter att du köpt den genom
att besöka musictribe.com. Att registrera ditt köp med
vårt enkla onlineformulär hjälper oss att behandla dina
reparationsanspråk snabbare och mer eektivt. Läs också
villkoren i vår garanti, om tillämpligt.
2. Fel. Om din Music Tribe-auktoriserade återförsäljare
inte nns i din närhet kan du kontakta Music Tribe
Authorized Fulller för ditt land listat under “Support” på
musictribe.com. Om ditt land inte är listat, kontrollera om
ditt problem kan hanteras av vår “Onlinesupport” som
också nns under “Support” på musictribe.com. Alternativt
kan du skicka in ett online-garantianspråk på musictribe.
com INNAN du returnerar produkten.
3. Strömanslutningar. Innan du ansluter
enheten till ett eluttag, se till att du använder rätt
nätspänning för just din modell. Felaktiga säkringar
måste bytas ut mot säkringar av samma typ och
märkning utan undantag.
1. Zarejestrować online. Zarejestruj swój
nowy sprzęt Music Tribe zaraz po zakupie na stronie
musictribe.com. Zarejestrowanie zakupu za pomocą
naszego prostego formularza online pomaga nam szybciej
i efektywniej rozpatrywać roszczenia dotyczące naprawy.
Przeczytaj również warunki naszej gwarancji, jeśli dotyczy.
2. Awaria. Jeśli Twój autoryzowany sprzedawca
Music Tribe nie znajduje się w pobliżu, możesz
skontaktować się z autoryzowanym dostawcą Music Tribe
dla swojego kraju, wymienionym w sekcji „Wsparcie” na
stronie musictribe.com. Jeśli Twojego kraju nie ma na
liście, sprawdź, czy Twój problem może zostać rozwiązany
przez nasze „Wsparcie online”, które można również
znaleźć w sekcji „Wsparcie” na stronie musictribe.com.
Alternatywnie, prześlij zgłoszenie gwarancyjne online na
musictribe.com PRZED zwrotem produktu.
3. Połączenia zasilania. Przed podłączeniem
urządzenia do gniazdka sieciowego upewnij się, że
używasz odpowiedniego napięcia sieciowego dla danego
modelu. Wadliwe bezpieczniki należy bez wyjątku
wymienić na bezpieczniki tego samego typu i wartości.
Belangrijke informatie
Viktig information
Ważna informacja

214 H D 9 6 -24 - C C-T P Quick Start Guide 215
FEDERAL COMMUNICATIONS
COMMISSION COMPLIANCE
INFORMATION
Responsible Party Name: Music Tribe Commercial NV Inc.
Address: 5270 Procyon Street,
Las Vegas NV 89118,
United States
Phone Number: +1 702 800 8290
FCC ID: XF6-RS9113DB
HD96-24-CC-TP
This equipment has been tested and found to comply with the limits for a Class A
digital device, pursuant to part 15 of the FCC Rules. These limits are designed to
provide reasonable protection against harmful interference when the equipment
is operated in a commercial environment. This equipment generates, uses, and can
radiate radio frequency energy and, if not installed and used in accordance with
the instruction manual, may cause harmful interference to radio communications.
Operation of this equipment in a residential area is likely to cause harmful
interference in which case the user will be required to correct the interference at
his own expense.
This equipment complies with Part 15 of the FCC Rules. Operation is subject to the
following two conditions:
(1) This device may not cause harmful interference, and
(2) This device must accept any interference received, including interference that
may cause undesired operation.
Warning: Operation of this equipment in a residential environment could cause
radio interference.
Caution!
The manufacturer is not responsible for any radio or TV interference caused by
unauthorized modication to this equipment. Such modications could void the user
authority to operate the equipment.
FCC RF Radiation Exposure Statement:
1. This Transmitter must not be co-located or operating in conjunction with any other
antenna or transmitter.
2. This equipment complies with FCC RF radiation exposure limits set forth for an
uncontrolled environment. This equipment should be installed and operated with
minimum distance of 20 centimeters between the radiator and your body.
Hereby, Music Tribe declares that this product is in compliance with Directive
2014/53/EU, Directive 2014/30/EU, Directive 2014/35/EU, Directive 2011/65/EU and
Amendment 2015/863/EU, Directive 2012/19/EU, Regulation 519/2012 REACH SVHC
and Directive 1907/2006/EC.
Full text of EU DoC is available at https://community.musictribe.com/
EU Representative: Music Tribe Brands DK A/S
Address: Ib Spang Olsens Gade 17, DK - 8200 Aarhus N, Denmark
HD96-24-CC-TP

-
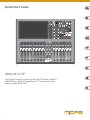 1
1
-
 2
2
-
 3
3
-
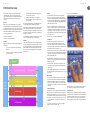 4
4
-
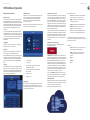 5
5
-
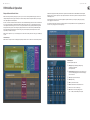 6
6
-
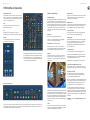 7
7
-
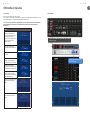 8
8
-
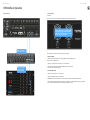 9
9
-
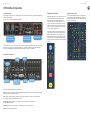 10
10
-
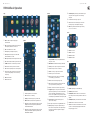 11
11
-
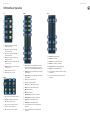 12
12
-
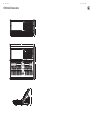 13
13
-
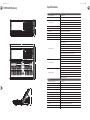 14
14
-
 15
15
-
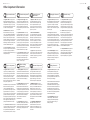 16
16
-
 17
17
-
 18
18


Midas HD96-24-CC-TP Guida utente
- Categoria
- Apparecchiature musicali supplementari
- Tipo
- Guida utente
in altre lingue
- English: Midas HD96-24-CC-TP User guide