Toku TJ15 Manuale del proprietario
- Categoria
- Utensili elettrici
- Tipo
- Manuale del proprietario
Questo manuale è adatto anche per

Symbol
Please observe all safety precautions listed below.
WARNING:This may cause an accident resulting in injury or death if it is not observed.
CAUTION:This may cause injury, damage or trouble to the air tool or equipment if it is not followed.
WARNING
To reduce risk of injury, everyone using, installing. repairing, maintaining changing accessories on, or working
near this tool MUST read and understand these instructions before performing any such task.
DO NOT DISCARD – GIVE TO USER
Do not use a Rack Drill until this safety instruction has been read and understood completely.
This manual is necessary to help you to use the Rock Drill correctly.
WARNING
Do not use a Rock Drill before reading this safety instruction manual.
Obey all of the safety measures indicated in this manual
FOR DETAILED INFORMATION ABOUT TOKU AIR TOOLS AND EQUIPMENT
CONTACT TO:
Air & Allied Sales (Pacific) Pty Ltd
HEAD OFFICE
1/50 Success Street, Acacia Ridge, QLD 4110, AUSTRALIA
13th edition
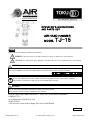
OPERATOR’S INSTRUCTIONS
AND PARTS LIST
AIR HAND HAMMER
MODEL TJ-15
1
Air & Allied Sales (Pacific) Pty Ltd
www.air-allied.com.au
www.air-allied.com.au

Safety precaution when using an Air Tool
Always obey the law and the safety regulations during work.
Always wear proper clothing and use other protective equipment when operating an air tool.
WARNING
Always wear ear protection to prevent possible ear damage when operating an air tool at high noise level or for
a long time.
WARNING
Heavy vibration from an air tool may result in injury to the hand, fingers and wrist of operator during a long
period of operation.
Stop using an air tool if you feel pain or any problem concerning the use of an air tool. Resume use of an air tool
after consulting with a doctor, confirming that there is no problem concerning the use of an air tool.
Always wear suitable working clothes when operating an air tool because a necktie or clothing with an open
sleeve may get caught in the air tool during operation and may result in danger to the operator.
Always wear the following protective equipment during the operation of an air tool to protect the operator from
getting hurt according to the type of the operation.
Gloves Dust proof mask Helmet Protective goggles Ear protection Working shoes
Setting up a dust vacuum device is recommended when operating an air tool indoors.
Rules for the purpose of safety, which must be observed
WARNING
It is absolutely necessary to receive permission from the manufacture for the purpose of any modifications
concerning the air tool.
The manufacturer will not assume any responsibility concerning an accident resulting in injury, death or any
trouble from an air tool due to the reconstruction without the permission of the manufacturer.
Always use GENUlNE tool replacement parts recommended by the manufacturer when replacing any part of an
air tool.
There must be a sticker or a sign indicating matters concerning the safety precautions and maintenance on a
new air tool.
It is always important to keep this sticker of sign to be clean enough to read. It is available from the distributor
of the manufacturer if it is lost.
Checking the workplace or work site
Do not permit people except operators get near the work site. Especially it is very dangerous to permit children
into the working area.
Arranging and preparing the working area are the starting lines to ensure safety operation. Always maintain the
work site or workshop to be in order and make sure they have enough light.
Always observe the rules such as warning, caution, manual, etc written in the working area.
Do not use the tool in explosive conditions.
Maintenance and replacement of the chisel
WARNING
Turn the valve cock of the compressor completely to the stop position, hold down the throttle valve and release
the pressure in the hose completely before inspecting and replacing the chisel.
Inspect the chisel regularly, replace with a new one if any defect, such as a crack is found. Using a chisel with
any defect is very dangerous.
Make sure that the tip of the chisel is sharp once again.
2
Air & Allied Sales (Pacific) Pty Ltd
www.air-allied.com.au

Hose connection
WARNING
Install the metallic cap of the air hose onto the body of the air tool firmly. The metallic cap will come off and
cause the hose to run amuck due to vibration if the metallic cap is used in a loose condition. This will be very
dangerous.
Check for damage of the air hose and in the connection part of the air tool body.
Confirm that there is no dust or dirt.
Do not point the air hose at anyone.
Never use compressed air to clean cloth.
Operation
CAUTION
Keep your feet away from the chisel. There would be a risk for injury if the chisel drops onto the operator' s foot
when the chisel is broken.
Never operate an air tool at an air pressure over the limit of the air tool.
Confirm that the retainer of the chisel is locked firmly before starting the air tool.
Never start an air tool without a chisel.
Always hold an air tool with both hands. Confirm that the handle is clean without any grease or oil.
Do not place the air tool on a person's foot.
Always keep well balanced during operation.
Never get on a tool. For example, do not put one foot on the handle of the air tool.
This may become a reason to get hurt especially when the air tool is broken.
Investigate the material of the work. For example, when using the tool for electric and telephone cable, water
and drain pipe, etc, inspect for hidden cable or pipe underground before operating an air tool.
In case the chisel hits something during operation, stop the air tool immediately.
Restart the tool after the danger is cleared.
Service and maintenance
Turn the valve cock of the compressor completely to the stop position, hold down the throttle valve and release
the pressure in the air hose completely before disconnecting an air tool.
Read and understand the instruction manual correctly. Contact with the selling agent or distributor of the
manufacturer for further service information if necessary.
Whet it is necessary to use solvent to clean parts, be sure it is within the safety standards first, then use the
solvent at a place with good ventilation.
Never be careless
Always concentrate on the work.
Always use common sense.
Eye vision and reaction deteriorate significantly in fatigue conditions after taking medicine, or drinking alcohol.
Never use an air tool when you are under the influence of these conditions.
Always direct exhaust away from yourself and others in the aria.
Always disconnect tool from the air supply when not in operation.
If quick-disconnect couplings are used, separate the coupling from the tool with a leader hose.
Always make sure cutting chisel is securely latched in the tool before depressing throttle trigger.
Always hold cutting tool down firmly on the work before depressing throttle trigger.
3
Air & Allied Sales (Pacific) Pty Ltd
www.air-allied.com.au

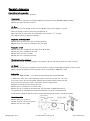
Operator’s instruction
Preparations before operation
Check following matters before operation.
Compressor
Capacity of the compressor is sufficient. Minimum requirement 16hp, 56CFM at 90psig (6.2bar)
Whether the drain has been removed.
Air Hose
Whether there is any damage to the air hose. Whether the size and length is correct.
Clean the interior of the air hose using compressed air.
When using two or more tools, all except leader hose should be 1” or large.
(See diagram above for piping and fittings.)
Inspection of the Rock Drill
Whether there is looseness in the screw thread areas.
Whether there is a crack or breakage in the main body.
Inspection of rod
Whether the rod is suitable for the shank of the Rock Drill.
Whether the rod is suitable for the work.
Whether there is wear or cracks.
Whether the rod is mounted correctly.
Wearing protective equipment
Whether the helmet, protective goggles, ear protection, gloves and working shoes are worn correctly.
Air Supply
Whether the air pressure is suitable. For best operation, supply tool with 90psig (6.2bar) of clean, dry air.
Higher pressure drastically reduces tool life and can void warranty. (600kPa for max)
Lubrication
To flush out GUM and DIRT - you should do the following two steps EACH DAY.
1. (Before the shift), pour a liberal quantity of gum solvent oil into the tool’s air inlet.
2. Connect tool to air line and operate. Repeat this procedure before storing the tool.
Air line lubricator should be used in conjunction with the integral oiler.
Repeat this procedure before storing the tool.
Whether there is sufficient oil in the line oiler.
Whether the oil is suitable for the Rock Drill. (Oil equivalent to #100 Rock Drill oil)
The importance of adequate and continuous lubrication cannot be overemphasized.
A few minutes operation without oil may severely damage the valve parts, cylinder and piston.
Hose Connection
Whether there is any dust, or
damage to the air connection portion.
Whether the air hose is tight.
4
Air & Allied Sales (Pacific) Pty Ltd
www.air-allied.com.au

Operation guide
Maintain good balance on both feet. Keep proper distance from the chisel of the Rock Drill.
Never put your hand near the rod when using the Rock Drill horizontally.
Push the Rock Drill against the object firmly using the handle before turning the throttle valve level.
Obey the law and safety regulations.
CAUTION:Pressing the Rock Drill with proper force
Pressing the Rock Drill on the object too strong, much load is applied to
rotation parts and these parts wear out quickly.
It depends on the rock quality but basically the maximum pressing force at
vertical drilling is 30kgf.
If the Rock Drill is used for a long time with higher pressing force than
maximum value, it might lead to the quick wear or premature failure for internal
parts.
Conversely, if pressing force is too weak, the Rock Drill works intensely and
cause high vibration.
Then it might lead to high burden and early fatigue for workers, and lead to
quick wear for the consumable parts.
Inspection and maintenance
WARNING
Turn valve cock of the compressor to the stop position first, turn the throttle valve level of the Rock Drill and
release the excess pressure in the air hose completely, then disconnect the Rock Drill from the air hose and
finally inspect the Rock Drill.
Inspection and storage for a Rock Drill
Clean the exterior surface using a cloth.
Regularly inspect the tightening torque on the bolts.
Inspect whether there are any cracks or damage in the Rock Drill.
Storage of the Rock Drill
Apply 3 cc of oil from the air inlet. operate the Rock Drill for about 5 seconds after completing work.
Repeat above operation 2-3 times before storing the Rock Drill.
Put a cap on the air inlet of the Rock Drill to prevent any dust or foreign material from entering the
Rock Drill. Keep the Rock Drill in a dry place.
Loss of power/erratic action (possible causes)
1. Reduced compressor output.
2. Excessive drain on air line.
3. Moisture or restricted pipe, hose or fittings.
4. Improper size or poor condition of pipe, hose or fittings.
5. Incorrect shank size of chisel, or excessively worn shank.
6. Free running (or blank blow) can cause damage to the tool. Always hold the tool down to the work.
7. Loosening of side bolts or back head bolts will cause loss of power and can cause damage to the tool.
Periodic inspection of bolt torque at regular intervals (at least once a week if tool is being used regularly)
is recommended.
If everything else appears to be in order, then disassemble tool, replace worn or damaged parts, clean,
reassemble and lubricate.
Replacement parts
Always use GENUINE TOKU TOOL Replacement Parts.
When replacement parts are required, order by Part Number and Description from the Parts List.
5
Air & Allied Sales (Pacific) Pty Ltd
www.air-allied.com.au

To prevent oil leakage from Line Oiler
1. Use Rock Drill Oil #100 or equivalent.
Don’t use “Turbine Oil” or “Spindle Oil”.
These oils will be consumed faster because of its low viscosity.
Use “Rock Drill Oil #100” or equivalent high viscosity.
2.Pay attention to the position of the Hose built in the Line-Oiler when installation.
Install Line-Oiler with correct position otherwise Oil flow off air hole in Line-Oiler tank.
Correct Line-Oiler position is shown on picture A below.
Hose in the Line Oiler must be downside when placing the Rock Drill horizontally on the
ground as position shown below picture.
Air consumption at air pressure of 600kPa
1.6 m3/min
Sound levels with muffler (ISO 15744)
Sound pressure level
L
pA 110.74 dB(A)
Uncertainty
K
pA =
K
WA
Sound power level
L
WA 121.74 dB(A)
3 dB
Vibration value (ISO 28927-10)
Declared vibration emission value
a
hd Uncertainty
K
33 m/s2 3.8 m/s2
6
Air & Allied Sales (Pacific) Pty Ltd
www.air-allied.com.au

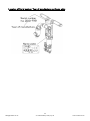
Installation of Muffler (option parts)
①Remove Through-Bolt-Nuts and pull Through-bolts out.
Remove the section above the valve guide.
Then, remove the Valve-Knock-Pin.
(Don’t loose the Knock-Pin)
②Set Muffler-Bushing between Cylinder-Upper
-Flange and Exhaust-hole-Flange.
③Reassemble Parts, and tighten
Through-Bolt-Nuts equally
Tightening Torque:5.8kgf・m {56.9N・m}
④Put Muffler onto Rock Drill.
Muffler-Groove and Muffler-Bushing must correspond.
⑤Tighten Screws and Nuts. (6 Points)
tightening Torque:29kgf・cm { 3N・m }
Exhaust Side
Holes For Through-Bolts
7
Air & Allied Sales (Pacific) Pty Ltd
www.air-allied.com.au

EC DECLARATION OF CONFORMITY
(2) We :
TOKU PNEUMATIC TOOL MFG. CO., LTD.
5733, Minobaru, Miyaki-machi, Miyaki-Gun, Saga Japan
(3) Technical file authorized representative :
S.Fukuyama, Manager, Manufacturing Div.
TOKU PNEUMATIC TOOL MFG. CO., LTD.
5733, Minobaru, Miyaki-machi, Miyaki-Gun, Saga Japan
(4) declare that the product(s) : ROCK DRILL
(5) Model/Type : TJ-15
(6) Version(s) : TJ-15, PFF15, PK 140 LS, J-15, TJ-15SV, PFF15SV, PK 140 SA, J-15SV
(7) Starting Serial No. : 11J001
(8) is in conformity with the requirement of the council Directives on the approximation of the laws of
the Member States relating :
(9) to "Machinery" 2006/42/EC
(10) applicable harmonized standard(s) : EN ISO 12100
(11) Place and date : Saga Japan, 03/10/2011
(12) NAME and POSITION of issuer :
8
(1)
Air & Allied Sales (Pacific) Pty Ltd
www.air-allied.com.au

EC DECLARATION OF CONFORMITY
ESPAÑOL (SPANISH)
(1) DECLARACION DE CONFORMIDAD CE- (2) Nosotros TOKU- (3) Archivo técnico disponible en - (4)
declaramos que el producto : - Perforador - (5) tipo de máquina : - (6) versión : - (7) con comienzo de nº de
serie : - (8) es conforme a los requisitos de la Directiva del Consejo sorbe la aproximación de las leyes de los
Estados con relación - (9) a la "maquinaria" 2006/42/CE - (10) normas armonizadas aplicadas : - (11)
Normbre y cargo del expedidor : - (12) Fecha
DEUTSCH (GERMANY)
(1) EG-KONFORMITÄTSERKLÄRUNG - (2) Wir, TOKU - (3) Technische Datei beim EU - (4) erklären hiemit,
daß das (die) Produkt(e) : - Felsbohler - (5) Typ(en) : - (6) version : - (7) serien Nr. beginn : - (8) den
Anforderungen der EG-Richtlinie zur Angleichung der Rechtsvorschrifen der Mitgliedsstaaten - (9) für
"Maschinen" 2006/42/EG - (10) geltende harmonisierte Norme(n) : - (11) NAME und EIGENSCHAFT des
Ausstellers : - (12) Datum
FRANÇAIS (FRENCH)
(1) DECLARATION DE CONFORMITE - (2) Nous TOKU – (3) Dossier technique disponible auprès du siège
social - (4) déclarons qui les produits : - Marteau Perforateur - (5) type : - (6) version : - (7) premier N° de
série : - (8) est (sont) en conformité avec les exigences de la Directive du consil, concernant les législations
des états membres relatives - (9) aux "Machines" 2006/42/CE - (10) Norme(s) harmonisée(s) applicable(s) :
- (11) NOM et FONCTION de l’ émetteur : - (12) Place et data
ITALIANO (ITALIAN)
(1) DICHIARAZIONE DI CONFORMITÀ CE - (2) La Società : TOKU - (3) File tecnico disponibile dal - (4)
dichiara che il(i) prodotto(i) : - Perforatore - (5) tipo : - (6)version : (7) avente numeri di serie che partono dul
suffiss : (8) è (sono) in conformità con le esigenze previste dalla Direttiva del Consiglio, sulle legislazioni degli
Stati membri relative : - (9) alle "macchine" 2006/42/CE - (10) norma(e) armonizzat(e) applicabile(i) : - (11)
NOME e FUNZIONE del dichiarante -(12) Data
PORTUGUÊS (PORTUGUESE)
(1) DECLARAÇÃO DE CONFORMIDADE CE - : (2) Nós TOKU - (3) Ficheiro técnico disponivel na - (4)
declaramos que o produto : - Martelo Perfurador - (5) tipo de máquina : - (6) versão : - (7) N.º inicial de Série -
(8) está em conformidade com os requisitos da Directiva do Conselho, referente às legislações dos
Estados-membros relacionados com : - (9) "maquinaria" 2006/42/CE - (10) Normas harmonizadas
aplicáveis - (11) Nome e cargo do emissor : - (12) Data
NEDERLANDS (DUTCH)
(1) E.G.-VERKLARING VAN OVEREENSTEMMING - (2) De firma : TOKU - (3) Technisch bestand
verkrijgbaar - (4) verklaart hierbij dat het (de) produkt(en) : - Boorhammer - (5) type : - (6) versie : - (7) vanaf
serie nummer : - (8) in overeenstemming is (zijn) met de vereisten van de richtlijn van de Raad inzake de
onderlinge aanpassing van de wetgevingen van de lidstaten betreffende : (9) "machines" 2006/42/EG - (10)
geldige geharmoniseerde norm(en) - (11) NAAM en FUNCTIE van de opsteller : - (12) Datum
ΕΛΛΗΝΙΚΑ (GREEK)
(1) ΔΗΛΩΣΗ ΠΙΣΤΟΤΗΤΑΣ ΕΚ - (2) Η εταιρεία : TOKU - (3) Τεχνικός φάκελος διαθέσιμος - (4) δηλώνει
υπεύθυνα ότι το(τα) προϊόν(-ντα) : - Περιστροφικό Αερόφυρο - (5) τύπου(-ων) : - (6) eναλλακτικοί τύποι : - (7)
αρχή σειράς Νο. : - (8) είναι σύμφωνο(-α) προς τις απαιτήσεις της Οδηγίας του Συμβουλίου που αφορά την
προσέγγιση των νομοθεσιών των κρατών τις οχετικές με : - (9) τα "μηχανήματα" 2006/42/ΕΚ - (10)
εφαρμοστέο(-α) εναρμονισμένο(-α) πρότυπο(-α) : - (11) ΟΝΟΜΑ και ΑΡΜΟΔΙΟΤΗΤΑ του δηλούντος : - (12)
Ημερομηνία
9
(1)
Air & Allied Sales (Pacific) Pty Ltd
www.air-allied.com.au


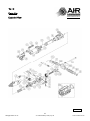
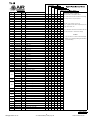
TJ-15
MUST REPLACE 100%
HIGH WEAR 70%
MEDIUM WEAR 50%
LOW WEAR 30%
NON WEAR 10%
SUBJECT TO EXTERNAL DAMAGE
Symbol
No.
Parts No. Q'ty
Req.
Description This service chart is a guide to
1430101A00 1 Back Head Xexpectant life of component parts.
2430101A40 1 Throttle Valve XThe replacement levels are based on average
3430101A50 1 Throttle Valve Handle Xtool usage over a one year period.
4130403002 1 Throttle Valve Plunger A
5130803001 1 Throttle Valve Spring A
6430101A70 1 Throttle Valve Bolt AExample : For 10 tools in use:10
7134401010 1 Hex Nut (M10) Amust ーreplace items will be required per year,
8131301010 1 Spring Washer (M10) A7 high wear items, etc.
9430101B00 1 Air Connection Tube (PT) X
10 430101B31 1 Air Connection Nut XNote:Quantities must be increased if the tool
11 131101023 1 O-Ring P-24 Xis in more service or continuous usage.
12 131101030 1 O-Ring P-30 X
13 130803004 1 Air Connection Clamp X
14 131503002 1 Handle Bolt XX-Type of wear, if no other comments apply.
15 134501016 1 U-Nut M16 AA-Easily lost or damaged during disassembly
16A 131307016 2 Plane Washer M16 A and reassembly.
16B 430101C40 2 Grip Handle Washer (H.Collar) A
17 430101B7A 2 Handle Grip CP (Incl.17A , 17B) A
17A 136603001 (1) Handle Grip A
17B 430101C50 (1) Handle Grip Pipe X
18 430101C80 1 Cylinder X
19 430101P60 1 Exhaust Cap A
20 430101F80 1 Valve X
21 430101F9B 1 Valve Chest CP X
22 430101G20 1 Valve Guide X
23 130403001 1 Valve Knock X
24 430101G60 1 Ratchet X
25 130409001 1 Ratchet Key A
26 430101H01 1 Rifle Bar X
27 430101H10 1 Rifle Nut X
28 430101E50 1 Piston X
29A 430101H20 4 Rotation Pawl X
29B 136303002 4 Pawl Plunger X
30 130803006 4 Pawl Plunger Spring X
430101H5A 1 Rotation Sleeve (S) CP (3/4X3-1/4) X
430102H5A (1) Rotation Sleeve (S) CP (7/8X3-1/4) X
430106H6A (1) Rotation Sleeve (L) CP (3/4X4-1/4) X
430107H6A (1) Rotation Sleeve (L) CP (7/8X4-1/4) X
430101H50 (1) Rotation Sleeve(S) (3-1/4) X
430106H60 (1) Rotation Sleeve(L) (4-1/4) X
430101H70 (1) Sleeve Bushing (S) (3/4X3-1/4) X
430102H70 (1) Sleeve Bushing (S) (7/8X3-1/4) X
430106H80 (1) Sleeve Bushing (L) (3/4X4-1/4) X
430107H80 (1) Sleeve Bushing (L) (7/8X4-1/4) X
33 131503001 2 Through Bolt X
34 430101W10 2 Through Bolt Nut A
35 131303032 2 Through Bolt Washer W1/2 A
430101W60 1 Front Head (S) (3-1/4) X
430106W70 (1) Front Head (L) (4-1/4) X
37 430101W80 2 Front Head Bushing X
430101K90 1 Steel Holder (3/4) X
430102K90 1 Steel Holder (7/8) X
39 430101L00 2 Steel Holder Bolt A
40 430101M30 2 Steel Holder Nut A
41 130803007 2 Steel Holder Spring A
46 430101V0J 1 Line Oiler CP (LO-150) X
800 430101Y1C (1) Muffler CP (OPTION) X
11
LEGEND
13th edition
31
31A
32
36
38
Spare Parts Service Chart
Air & Allied Sales (Pacific) Pty Ltd
www.air-allied.com.au
www.air-allied.com.au

-
 1
1
-
 2
2
-
 3
3
-
 4
4
-
 5
5
-
 6
6
-
 7
7
-
 8
8
-
 9
9
-
 10
10
-
 11
11
-
 12
12


Toku TJ15 Manuale del proprietario
- Categoria
- Utensili elettrici
- Tipo
- Manuale del proprietario
- Questo manuale è adatto anche per
in altre lingue
- English: Toku TJ15 Owner's manual
Documenti correlati


Altri documenti
-
Chicago Pneumatic CP 0022, CP 0032, CP 0069 Istruzioni per l'uso
-
Ingersoll-Rand 85040079 Operation And Maintenance
-
-
Ingersoll-Rand IR10PV Operation And Maintenance
-
Craftsman 875199800 Manuale del proprietario
-
-
KYMCO 125 AGILITY CITY Manuale utente
-
Miller AIR PAK Manuale del proprietario