
Agape srl. Via Po Barna, 69 - 46031 Bagnolo S.Vito Mantova Italia - Tel. 0376/250311 - Cod. 09070 22 luglio 2020 Istruzioni di montaggio / Istruction for installation
ARUB0968N (Square-Memory) ASEN0968N (Sen) - Placca per cassetta Geberit / Flush plate for Geberit concealed cistern
1
20 mm.
1
3
4
5
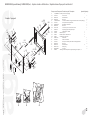
staa di supporto
support bracket
rivestimento
nished wall surface 2
Predisposizioni
Placca utilizzabile con cassette Geberit (mod.
Combix, Duox, Unica)
Il foro nel rivestimento, in corrispondenza della
cassetta: 210 x 160 mm
Prearrangement
Flush plate suitable for Geberit cisterns
(mod.Combix, Duox, Unica)
Hole necessary in the wall covering in correspon-
dence to the cistern: 210 x 160mm
Insallazione
- inserire i distanziali nei fori della cassetta, questi
permettono una regolazione da 1 a 6 cm
- inserire la staa di supporto nella sede della casset-
ta, il bordo deve aderire alla supercie del rivestimen-
to nito
Installation
- put the spacers into the cistern’s holes, they allow an
adjustment from 1 to 6 cm
- put the bracket in its place on the cistern, its rim has
to cling to the surface of the wall covering.
Fissaggio e regolazione
- ssare la staa di supporto con le viti e le
rondelle in dotazione, regolandone l’oizzontalità
Fixing and adjustment
- x the bracket with help of the screws and
washers supplied, being careful to mount it
horizontally.
Montaggio barre lettate
- avvitare le due viti M10 con chiave da 13 mm
- avvitare le due barre lettate alle connessioni
della cassetta fondo a 20 mm dal lo della parete.
- bloccare con i dadi M5 con chiave da 8 mm
Installing the threaded bars
- tighten two M10 screws with 13 mm. spanner
- screw the two threaded bars to the
connections in the box until 20 mm. from the
edge of the wall
- block the M5 bolts with 8 mm spanner
Montaggio perni guida
- avvitare i due perni guida nella parte posteriore
della piastra.
Installing the guide pins
- tighten the two guide pins to the back of the
plate.
Installazione parte esterna
- siliconare il bordo posterore della piastra
- posizionare e premere la piastra no al bloccag-
gio della stessa
Installing tthe external component
- apply silicone to the back of the plate
- place the plate and apply pressure until it is
securely xed.
rivestimento
nished wall surface
0,0 rivestimento nito
min.10 / max 60 0,0 nished wall covering
210
160

Agape srl. Via Po Barna, 69 - 46031 Bagnolo S.Vit o Mantova It alia - Tel. 0376/250311 - Cod. 09070 22 luglio 2020
Ricambi / Spare parts
2
04
06
08
08
11
11
10
07
09
08
10
07
09
09
02.1
01.1
01.1
02.1
02.4
02.2 02.4
02.2
03.1
03.2
02.3
02.3
03.3
10
0910
07
06
08 07
05
05
01 02 03
Componente/Component
Descrizione parti/ Description Quantità/ Quantity
03.4
03.4
03.3
03.2
11
ARUB0968N (Square-Memory) ASEN0968N (Sen) - Esploso ricambi e distinta base / Exploded view of spare parts and base list
01 1SQU.ARUBSAC01 Sacchetto perni / Auction packaging 1
01.1 FOL060.004 Perno / Auction 2
01.2 MAG331.004 Rondella / Washer 4
01.03 MAG322.004 Dado / Nut 4
02 1CUT.RRCT05SAC02 Sacchetto barre lettate e ssaggi / Threaded bars and connections packaging 1
02.1 FOL018.007 Perno pulsante / Auction push-button 2
02.2 PELVI480005000 Barra lettata / Threaded bar 2
02.3 MAG322.005 Dado / Nut 2
02.4 ZUC500.052-1 Connessione perno / Connection of the auction 2
03 AKIT0968N Kit per ssaggio placca / Fixing kit for plate 1
03.1 .MET0968 Staa di supporto / Bracket 1
03.2 .PLA0955 Distanziale / Spacer 2
03.3 .FER0310 Rondella 15x5,2x12 / Washer15x5,2x12 2
03.4 .FER0100 Vite di ssaggio / Fixing screws 2
04 CRUB1010NA Piastra / Plate 1
05 FOL049.014 Pulsante / Push-button 2
06 FOL052.016 Bussola per scorrimento pulsante / Block for sliding push-button 2
07 MAG322.005 Dado / Nut 4
08 MAG331.005 Rondella / Washer 4
09 MEV33902.001 Molla / Spring 4
10 MAG306.4X28.5 Vite / Screw 4
11 FER0665 Calamite (già incollate alla piastra 04) / Magnet (already glued to plate 04) 4
-
 1
1
-
 2
2


agape ARUB0968N_MM Assembly Instructions
- Tipo
- Assembly Instructions
- Questo manuale è adatto anche per
Documenti correlati
-
agape DE10 Assembly Instructions
-
-
-
-
-
-
-
-
-
Altri documenti
-
Geberit ESG Manuale utente
-
Geberit AquaClean Manuale utente
-
Geberit 968.797.00.0(03) ONE Mirror Cabinet Manuale utente
-
Bushnell 78-8840 Manuale utente
-
Bushnell 78-8845 Manuale utente
-
Legrand TESTPDF1 Guida d'installazione
-
Alfa Network Zeno Manuale utente
-
Bushnell 788945 Manuale utente
-
Yamaha CS1D Manuale del proprietario