Bosch Combination steam oven Manuale utente
- Categoria
- Supporti per apparecchiature AV
- Tipo
- Manuale utente

*9000265572* 9000265572 970427
970427
Ø Montageanleitung
Þ Notice de montage
Ú Installation instructions
â Istruzioni per il montaggio
é Installatievoorschrift
× Monteringsvejledning
ê Monteringsveiledning
ó Monteringsanvisning
Ý Asennusohje
Û Instrucciones de montaje
ì Instruções de montagem
Ù Οδηγίες εγκατάστασης
î Инструкция по монтажу
ë Instrukcja montażu
ô Montaj kılavuzu
á Szerelési útmutató
Ü Paigaldusjuhend
ä Montavimo instrukcija
å Montāžas instrukcija
í Instrucţiuni de montaj
õ Інструкція з монтажу
à Upute za montažu
ð Navodila za montažo
.%2
PLQ
$
La pagina si sta caricando...
La pagina si sta caricando...

2. Centrer l'appareil.
Une fente d'aération de 5 mm est nécessaire entre l'appareil et
la façade des meubles voisins.
3. Aligner l'appareil exactement à l'horizontale en utilisant le
niveau à bulle.
4. Visser l'appareil.
Dépose
1. Mettre l'appareil hors tension.
2. Desserrer les vis de fixation.
3. Soulever légèrement l'appareil et le retirer complètement.
Seul le fabricant ou le service après-vente est habilité à
remplacer un câble d'alimentation défectueux par un câble
d'alimentation de rechange.
en
Ú Installation instructions
Important notes
This appliance is intended for use up to a maximum height of
2000 metres above sea level.
If the appliance is being installed under a hob, refer to the
assembly instructions for the hob.
For installation under an induction hob, the work surface
thickness must be min. 50 mm.
Do not open the appliance door if the appliance is standing on a
flat surface. The door may be damaged.
Do not use the door handle to carry or install the appliance.
Before installation, check the appliance for transportation
damage.
Before starting up the appliance, remove any packaging
material and adhesive film from the cooking compartment and
the door.
The appliance must be disconnected from the power supply
during all installation work.
Preparing the kitchen units
Safe use of this appliance can only be guaranteed if it has been
installed professionally in accordance with these installation
instructions. The installer is liable for damages incurred as a
result of incorrect installation.
Units into which ovens are to be fitted must be heat-resistant up
to 90 °C and adjacent cabinets up to 70 °C.
Do not install the appliance behind a decorative panel. There is
a risk of overheating.
Carry out all cut-out work on the furniture unit and worktop
before fitting the appliances. Remove shavings. Otherwise, the
correct operation of electrical components may be adversely
affected.
Caution during installation. Parts that are accessible during
installation may have sharp edges. Wear protective gloves to
prevent injury from cuts.
Secure freestanding units to the wall using standard,
commercially available brackets A.
Permanently fix furniture units to the worktop.
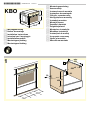
Appliance under worktop - Fig. 1
To ventilate the appliance, there must be a gap of 45 mm
between the intermediate floor and the wall.
The gap between the worktop and the appliance must not be
closed using additional battens.
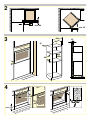
Corner installation - Fig. 2
For corner installation, check minimum clearances. Ensure that
there is sufficient clearance B for the front panel and its handles.
Check that the appliance door can be opened properly.
Appliance in a tall unit - Fig. 3
To ventilate the appliance, there must be a gap of 45 mm
between all intermediate floors and the wall.
Only fit the appliance up to a height which allows accessories to
be easily removed.
The appliance can also be fitted above a ventilated oven made
by the same manufacturer or above a cooling unit.
Connecting the appliance to the power supply
The appliance is fitted with a plug and must only be connected
using the power cable provided.
The fuse protection must correspond to the power rating
specified on the appliance's rating plate and to local regulations.
The appliance must only be connected to a protective contact
socket which has been correctly installed.
If the plug is no longer accessible following installation, an all-
pole disconnection switch must be present on the installation
side with a contact gap of at least 3 mm.
Contact protection must be ensured by the method of
installation.
Fixing the appliance in place - Fig. 4
1. Fully insert the appliance. Do not kink or trap the power cable,
or route it over sharp edges.
2. Centre the appliance.
There must be an air gap of 5 mm between the appliance and
adjacent cabinets.
3. Using a spirit level, adjust the appliance so that it is perfectly
level.
4. Screw the appliance firmly in place.
Removal
1. Disconnect the appliance from the power supply.
2. Undo the securing screws.
3. Lift the appliance slightly and pull it out completely.
A faulty power cable must only be replaced by a special
replacement power cable from the manufacturer or from after-
sales service.
it
â Istruzioni per il montaggio
Avvertenze importanti
Questo apparecchio è progettato solo per l'utilizzo fino ad
un'altezza di massimo 2000 metri sul livello del mare.
Se si monta l'apparecchio sotto un piano di cottura, seguire le
istruzioni di montaggio di quest'ultimo.
In caso di montaggio al di sotto di un piano di cottura a
induzione lo spessore del piano di lavoro deve essere di
almeno 50 mm.
Non aprire la porta dell'apparecchio se questo si trova su una
base d'appoggio piatta, per evitare che la porta si danneggi.
Non utilizzare la maniglia della porta per trasportare o installare
l'apparecchio.
Prima dell'installazione, controllare che l'apparecchio non
presenti danni dovuti al trasporto.
Rimuovere il materiale di imballaggio e la pellicola adesiva dal
vano cottura e dallo sportello prima della messa in funzione.
Durante tutte le operazioni di montaggio l'apparecchio deve
essere senza tensione.
Preparazione dei mobili
L'utilizzo sicuro viene garantito solo se il montaggio è stato
effettuato in modo corretto secondo le presenti istruzioni. In
caso di danni dovuti a un montaggio scorretto la responsabilità
ricade su chi ha montato l'apparecchio.
I mobili da incasso devono essere termostabili fino a una
temperatura pari a 90 °C e i mobili contigui fino a 70 °C.
Non montare l'apparecchio dietro a un pannello decorativo.
Sussiste il pericolo di surriscaldamento.
Completare tutti i lavori di taglio sui mobili e sul piano di lavoro
prima di inserire l'apparecchio. Rimuovere i trucioli in quanto
possono pregiudicare il funzionamento dei componenti elettrici.
Prestare attenzione durante il montaggio! Parti che restano
scoperte durante il montaggio possono essere appuntite.
Indossare guanti protettivi per evitare di procurarsi ferite da
taglio.
Fissare il mobile alla parete con un angolare A disponibile in
commercio.
Fissare il mobile al piano di lavoro.
Apparecchio sotto il piano di lavoro - Figura 1
Per la ventilazione dell'apparecchio occorre lasciare una fessura
di 45 mm nel doppiofondo adiacente al muro.
Non chiudere lo spazio tra il piano di lavoro e l'apparecchio con
ulteriori listelli.
Montaggio angolare - Figura 2
Quando si effettua un montaggio angolare, rispettare le distanze
minime. Rispettare la distanza sufficiente B dal frontale del
mobile e dalle maniglie. Deve essere possibile aprire la porta
dell'apparecchio.
Apparecchio in un mobile alto - Figura 3
Per la ventilazione dell'apparecchio occorre lasciare una fessura
di 45 mm in tutti i doppiofondi adiacenti al muro.

Montare l'apparecchio a un'altezza tale da poter prelevare gli
accessori senza problemi.
È possibile montare l'apparecchio su un forno ventilato dello
stesso marchio o su un frigorifero.
Allacciamento dell'apparecchio
Allacciare l'apparecchio esclusivamente mediante il cavo di
alimentazione fornito in dotazione.
La protezione avviene secondo la potenza indicata sulla
targhetta di identificazione e nel rispetto delle disposizioni locali.
L'apparecchio può essere collegato solamente a una presa con
messa a terra installata secondo le istruzioni.
Se dopo il montaggio la spina non è più raggiungibile, occorre
predisporre un dispositivo di collegamento universale con una
distanza di contatto dal lato di installazione di min. 3 mm.
La protezione da contatto deve essere garantita tramite il
montaggio.
Fissaggio dell'apparecchio - Figura 4
1. Inserire l'apparecchio fino in fondo. Fare in modo che il cavo
di alimentazione non si pieghi, non rimanga incastrato e non
passi su spigoli vivi.
2. Centrare l'apparecchio.
Tra l'apparecchio e i frontali dei mobili contigui deve esserci
uno spazio libero di 5 mm.
3. Mettere l'apparecchio perfettamente in piano servendosi di una
livella a bolla d'aria.
4. Fissare l'apparecchio con le viti.
Smontaggio
1. Scollegare l'apparecchio.
2. Svitare le viti di fissaggio.
3. Sollevare leggermente l'apparecchio ed estrarlo
completamente.
Un cavo di alimentazione danneggiato deve essere sostituito
con un cavo di ricambio speciale dal produttore o dal servizio di
assistenza tecnica.
nl
é Installatievoorschrift
Belangrijke aanwijzingen
Dit apparaat is bestemd voor gebruik tot op hoogten van
maximaal 2.000 meter boven zeeniveau.
Wordt het apparaat onder een kookplaat ingebouwd, neem dan
het installatievoorschrift voor de kookplaat in acht.
Bij inbouw van een inductiekookplaat dient het werkblad min. 50
mm dik te zijn.
Apparaatdeur niet openen wanneer het apparaat op een vlakke
ondergrond staat. De deur kan beschadigd worden.
Deurgreep niet gebruiken voor het transport of de inbouw van
het apparaat.
Apparaat voor de inbouw controleren op transportschade.
Verpakkingsmateriaal en plakfolie voor ingebruikname
verwijderen uit de binnenruimte en van de deur.
Bij alle montagewerkzaamheden dient het apparaat
spanningsloos te zijn.
Meubel voorbereiden
Alleen als de inbouw op deskundige wijze en conform dit
installatievoorschrift wordt uitgevoerd, is de veiligheid bij het
gebruik gegarandeerd. De monteur is aansprakelijk voor
schade als gevolg van een verkeerde inbouw.
Inbouwmeubels dienen bestand te zijn tegen een temperatuur
van maximaal 90 °C, aangrenzende voorzijden van meubels
tegen een temperatuur van maximaal 70 °C.
Het apparaat nooit achter een decorplaat inbouwen. Er bestaat
gevaar van oververhitting.
Alle uitsnijdingswerkzaamheden aan het meubel en het
werkblad uitvoeren voordat de apparaten worden ingebracht.
Spanen verwijderen! Deze kunnen invloed hebben op de
werking van elektrische componenten.
Voorzichtig bij het inbouwen! Delen die tijdens het inbouwen
toegankelijk zijn, kunnen scherpe randen hebben. Draag
werkhandschoenen ter voorkoming van snijwonden.
Niet bevestigde meubels met een gebruikelijke, in de handel
verkrijgbare haakA aan de wand bevestigen.
Werkblad en meubel goed aan elkaar bevestigen.
Apparaat onder werkblad- Afbeelding 1
Voor de ventilatie van het apparaat dient er een spleet van
45 mm tussen het tussenschot en de plaatsingswand te zijn.
De spleet tussen werkblad en apparaat mag niet door extra
deklatten worden afgesloten.
Hoekinbouw - Afbeelding 2
Bij hoekinbouw dient u zich aan de minimale afstanden te
houden. Voldoende afstand B tot de voorzijden van meubels en
de deurgrepen hiervan aanhouden. De deur van het apparaat
moet geopend kunnen worden.
Apparaat in hoge kast - Afbeelding 3
Voor de ventilatie van het apparaat dient er een spleet van
45 mm tussen alle tussenschotten en de plaatsingswand te zijn.
Het apparaat niet te hoog inbouwen, zodat de toebehoren er
zonder probleem uitgenomen kunnen worden.
Het apparaat kan ook boven een geventileerde oven van
dezelfde producent of boven een koelapparaat worden
gemonteerd.
Apparaat aansluiten.
Het apparaat is stekkerklaar en mag alleen met het
meegeleverde aansluitsnoer worden aangesloten.
De zekering dient in overeenstemming te zijn met de
vermogensopgave op het typeplaatje en de lokale voorschriften.
Het apparaat mag alleen op een geaarde contactdoos worden
aangesloten die volgens de voorschriften is geïnstalleerd.
Wanneer de stekker na het inbouwen niet meer toegankelijk is,
moet op het apparaat een schakelaar met een contactafstand
van minstens 3 mm voorhanden zijn.
De bescherming tegen aanraking dient door de inbouw te zijn
gewaarborgd.
Apparaat bevestigen - Afbeelding 4
1. Apparaat helemaal inschuiven. Zorg er voor dat het
aansluitsnoer hierbij niet knikt, wordt ingeklemd of over
scherpe randen geleid.
2. Apparaat centrisch uitrichten
Tussen het apparaat en de aangrenzende voorzijden van
meubels dient een luchtspleet van minstens 5 mm aanwezig te
zijn.
3. Apparaat met een waterpas exact horizontaal uitrichten.
4. Apparaat vastschroeven.
Demontage
1. Maak het apparaat spanningsloos.
2. Bevestigingsschroeven losdraaien.
3. Het apparaat licht optillen en helemaal naar buiten trekken.
Een defect aansluitsnoer mag alleen worden vervangen door
een speciaal reserveaansluitsnoer van de fabrikant of de
klantenservice.
da
× Monteringsvejledning
Vigtigt
Dette apparat er beregnet til brug i en højde på op til maksimalt
2000 meter over havets overflade.
Hvis apparatet skal indbygges under en kogesektion, skal
monteringsvejledningen for kogesektionen overholdes.
Ved indbygning under en induktions-kogesektion skal
bordpladen være mindst 50 mm tyk.
Undlad at åbne døren, hvis apparatet står på et fladt underlag.
Døren kan blive beskadiget.
Brug ikke dørgrebet til at transportere eller indbygge apparatet.
Kontrollér apparatet for transportskader før indbygning.
Fjern emballagemateriale og klæbefolie fra ovnrummet og
døren inden ibrugtagningen.
Apparatet skal være uden elektrisk spænding ved alle former for
montagearbejde.
Forberede køkkenelement
Der kan kun garanteres for sikkerheden ved brugen af
apparatet, hvis indbygningen foretages i henhold til denne
monteringsvejledning. Montøren er ansvarlig for skader, som
skyldes ukorrekt indbygning.
Køkkenelementer til indbygning skal være
temperaturbestandige op til 90 °C og fronter på tilstødende
køkkenelementer op til 70 °C.
La pagina si sta caricando...
La pagina si sta caricando...
La pagina si sta caricando...
La pagina si sta caricando...
La pagina si sta caricando...
La pagina si sta caricando...
La pagina si sta caricando...
La pagina si sta caricando...
La pagina si sta caricando...
La pagina si sta caricando...
La pagina si sta caricando...
-
 1
1
-
 2
2
-
 3
3
-
 4
4
-
 5
5
-
 6
6
-
 7
7
-
 8
8
-
 9
9
-
 10
10
-
 11
11
-
 12
12
-
 13
13
-
 14
14
-
 15
15
-
 16
16


Bosch Combination steam oven Manuale utente
- Categoria
- Supporti per apparecchiature AV
- Tipo
- Manuale utente
in altre lingue
- English: Bosch Combination steam oven User manual
- français: Bosch Combination steam oven Manuel utilisateur
- español: Bosch Combination steam oven Manual de usuario
- Deutsch: Bosch Combination steam oven Benutzerhandbuch
- русский: Bosch Combination steam oven Руководство пользователя
- Nederlands: Bosch Combination steam oven Handleiding
- português: Bosch Combination steam oven Manual do usuário
- dansk: Bosch Combination steam oven Brugermanual
- polski: Bosch Combination steam oven Instrukcja obsługi
- eesti: Bosch Combination steam oven Kasutusjuhend
- svenska: Bosch Combination steam oven Användarmanual
- Türkçe: Bosch Combination steam oven Kullanım kılavuzu
- suomi: Bosch Combination steam oven Ohjekirja
- română: Bosch Combination steam oven Manual de utilizare
Documenti correlati
-
Bosch HBC34D554B Manuale del proprietario
-
Bosch HBA21B360J/35 Manuale utente
-
Bosch HMT85DL53/45 Manuale utente
-
Bosch EQ391EK00(00) Manuale utente
-
Bosch HE13045/03 Manuale utente
-
Bosch HB25D5L2B Manuale del proprietario
-
Bosch HBC84K533/45 Guida d'installazione
-
Bosch HBX33R51/02 Manuale utente
-
Bosch HMT84G654I/06 Manuale del proprietario
-
Bosch HMT72G654/06 Manuale del proprietario