
1
Plug-in Board Editor
for PLG150-DR/PLG150-PC
Owner’s Manual
Contents
Introduction. . . . . . . . . . . . . . . . . . . . . . . . . . . . . . . . . . . . . . . . .2
Starting Up . . . . . . . . . . . . . . . . . . . . . . . . . . . . . . . . . . . . . . . . .3
Assigning the PLG150-DR/PLG150-PC to a Part . . . . . . . . . . . . . . 4
Using the Plug-in Board Editor — Example Operation. . . . . .5
Menu Bar . . . . . . . . . . . . . . . . . . . . . . . . . . . . . . . . . . . . . . . . . . .6
The Library window . . . . . . . . . . . . . . . . . . . . . . . . . . . . . . . . . .8
The Toolbar. . . . . . . . . . . . . . . . . . . . . . . . . . . . . . . . . . . . . . . . . . . 10
The Edit window . . . . . . . . . . . . . . . . . . . . . . . . . . . . . . . . . . . .16
The Toolbar. . . . . . . . . . . . . . . . . . . . . . . . . . . . . . . . . . . . . . . . . . . 19
Troubleshooting . . . . . . . . . . . . . . . . . . . . . . . . . . . . . . . . . . . .20
• Click on the red-colored text to jump to the related item in this manual.
• The software and this owner’s manual are exclusive copyrights of Yamaha Corporation.
• Copying of the software or reproduction of this manual in whole or in part by any means is expressly
forbidden without the written consent of the manufacturer.
• Yamaha makes no representations or warranties with regard to the use of the software and documentation
and cannot be held responsible for the results of the use of this manual and the software.
• Copying of the commercially available music sequence data and/or digital audio files is strictly prohibited
except for your personal use.
• The company names and product names in this Owner’s Manual are the trademarks or registered
trademarks of their respective companies.
• The screen displays as illustrated in this Owner’s Manual are for instructional purposes, and may appear
somewhat different from the screens which appear on your computer.
© 2002 Yamaha Corporation. All rights reserved.
This owner’s manual is applicable to both the Plug-in Board Editor for PLG150-DR and the Plug-in
Board Editor for PLG150-PC.
The screen illustrations are mainly taken from the Plug-in Board Editor for PLG150-DR for Windows.
This owner’s manual assumes that you are already familiar with basic Windows operation. If you are not,
please refer to the owner’s manual which came with your Windows OS software before using Plug-in
Board Editor.
For information about hardware requirements, the interconnection of devices and the installation of the
Plug-in Board Editor software, refer to the separate “PLG150-DR/PLG150-PC Owner’s Manual” as well
as the Owner’s Manual for the respective MIDI device.

2
Introduction
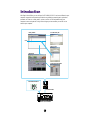
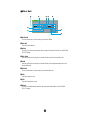
With Plug-in Board Editor, you can edit your PLG150-DR/PLG150-PC’s voices and effects via your
computer. Its graphical user interface provides for easy editing by presenting each synthesizer
parameter on screen as a slider, switch, and so on, which can be manipulated using your
computer’s mouse or keyboard. Finally, all the changes you have made to your voices can be
saved to your computer.
Library window Save the Library file
Import a voice
Edit window
Voice
Set the effects parameters
Transmit bulk data
Synthesizer / Tone Generator
PLG150-DR/PLG150-PC

3
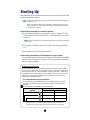
Starting Up
After installing the Plug-in Board Editor and making all necessary connections, start up the Editor
according to the following instructions.
• For the Plug-in Board Editor to work properly, you’ll need to make appropriate output settings for the
MIDI driver (Page 13).
• When using an Modular Synthesis Plug-in System (MSPS) compatible synthesizer (such as the
MOTIF or S80), make sure to switch from the Internal Voice bank to the Board Voice bank before
starting the Plug-in Board Editor.
●
Start the Plug-in Board Editor as a stand-alone application
1.
Select the Plug-in Board Editor from the Start menu. (Programs
m
YAMAHA OPT Tools
m
Plug-in Board Editor for PLG150-DR/PLG150-PC
m
Plug-in Board Editor for PLG150-DR/
PLG150-PC)
The Plug-in Board Editor can also be started by double-clicking on any Library file made with the
Editor.
2.
Click the [MIDI SETUP] button called up in step #1 above, then set the appropriate MIDI
port.
3.
Select the part in the “Select Part” dialog and click “OK”.
●
Start the Plug-in Board Editor in the client application as a plug-in software
The Plug-in Board Editor can be used as a plug-in software in any client application compatible
with Open Plug-in Technology (OPT). Refer to the owner’s manual of the client application for
details on using plug-in software.
NOTE
NOTE
About Open Plug-in Technology
Open Plug-in Technology (OPT) is a newly developed software format that allows control over MIDI
devices from a music software sequencer. For example, this allows you to start up and operate various
parts of your music system, such as plug-in board editors, and mixing control editors — directly from an
OPT-compatible sequencer, without having to use each separately. This also makes it unnecessary to
set MIDI drivers for each application, streamlining your music production system and making all
operations more convenient and seamless.
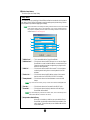
OPT Level Implementation for the Plug-in Board Editor
The client application and its compatibility with OPT can be divided into three levels, as shown
below. (For more information, refer to the documentation or help files included with the client
application.)
This chart shows the OPT-compatibility of the Plug-in Board Editor.
NOTE: Certain operations may not work as expected if there is no corresponding function in the client
application (sequencer, etc.). The highest level of implementation for the client application is
indicated in the OPT logo (which appears along with the version information in the application).
OPT levels of the client
application
Plug-in Board Editor operation
Operation support Operation limits
VIEWS (Level 3)
Yes None
PROCESSORS (Level 2)
Yes None
PANELS (Level 1)
Yes None

4
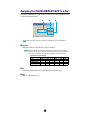
Assigning the PLG150-DR/PLG150-PC to a Par
t
In order to play and edit the PLG150-DR/PLG150-PC, the DR/PC voice must be assigned to a Part
on the tone generator/sound card.
If you need to select a Part after starting the Plug-in Board Editor, use the “Setup” dialog box.
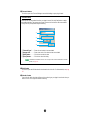
q
Select Part
Select the part to which the PLG150-DR/PLG150-PC is assigned.
If the Plug-in Board has been installed to a Modular Synthesis Plug-in System compatible
synthesizer, select the Part according to the chart below. (Each Part in the relevant synthesizer
is fixed. For more information, refer to the owner’s manual of the particular synthesizer.)
Part Assignments for Plug-in Board (fixed)
w
OK
Starts the Plug-in Board Editor. The Library window and the Edit window open.
e
Setup
Opens the “Setup” dialog (Page 13).
MOTIF
S80, CS6R, CS6x S30
Mode SLOT1 SLOT2 SLOT3 SLOT1 SLOT2 SLOT1
Voice Mode
111111
Performance Mode
16 15 14 16 15 16
Song/Pattern Mode
16 15 14 – – –
w eq
NOTE
NOTE

5
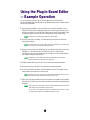
Using the Plug-in Board Editor
— Example Operation
There is no single way in which to use the many components in Plug-in Board Editor.
Your particular editing needs may differ; however, the following steps provide an example of how to
use the Plug-in Board Editor.
1.
Start the Plug-in Board Editor. If you use the Editor as a stand-alone application, click the
“MIDI SETUP” button and set the appropriate MIDI port. Assign the plug-in board to a part in
the “Select Part” dialog. Then click the “Editor Setup” button to open the “Setup” dialog. Select
the appropriate MIDI Out Port and Device No. settings (see the section “Setup” Dialog).
Editor Setup can be called up from the toolbar of the Library window.
2.
Click “OK” in the “Select Part” dialog. The Edit window of the User Voice No. 001 and the
Library window will open.
In the Library window, you can open existing Library files containing the Voices you wish to edit,
and specific voices can be imported to the Library window.
3.
Various units are arranged in the Edit window. First, let’s select the wave set to be used in the
ORIGINAL KIT. Then select the note to be edited in the KEY Unit. Adjust the tonal
characteristics of the voice using the filter and other settings. You can use the graph editors in
each dialog to visually edit the parameters.
By enabling the “Compare” button in the toolbar in the Edit window, you can make A/B
comparisons between the original voice and the edited voice.
4.
Select the Insertion Effect Type in the EFFECT Unit and set the remaining parameters.
5.
Select the Reverb Type in the EFFECT Unit and set the remaining parameters.
6.
Click the “Store” button in the toolbar of the Edit window to open the “Store” dialog. This will
store the edits for the current voice in the Library file.
The edits for the voice are only stored in the Library file temporarily. Beware that if you proceed
further without saving the Library file itself, you will lose all your edits.
7.
Switch back to the Library window and click the “Save” button in the toolbar to save (overwrite)
the Library file. The edits for your voice will be saved with the voice itself in the designated voice
list location.
• The Library file you have saved can be opened in the Library window at any time. Voices in the
Library window can be transmitted to your plug-in board.
• You can create a variety of different Library files, each tailored for live performances, recording,
etc. allowing you to modify voices to suit different situations and needs.
NOTE
NOTE
NOTE
NOTE
NOTE

6
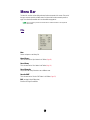
Menu Bar
The Menu Bar contains various editing and setup functions/commands in its menus. Click each of
the menu names to open their pull-down menu, and choose the function/command you wish to
apply. Those functions/commands which are unavailable are grayed out.
The most commonly-used menus in the Menu Bar are available as buttons in the Plug-in Board
Editor’s toolbar.
File
New
Creates and opens a new Library file.
Open Library
This is the same as the “Open” button in the Toolbar (Page 10).
Save Library
This is the same as the “Save” button in the Toolbar (Page 11).
Save Library As
Lets you save the Library file under a new or different name.
Save As SMF
This is the same as the “Save As SMF” button in the Toolbar (Page 12).
Exit
(use plug-in Board Editor alone)
Exits from the Plug-in Board Editor.
NOTE

7
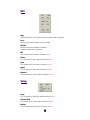
Edit
Copy
Copies the selected voice to the clipboard. If nothing is selected, this item is grayed out.
Paste
Copies the voice from the clipboard to Plug-in Board Editor.
Initialize
Resets the selected voice parameters to the default.
If nothing is selected, this item is grayed out.
Edit
This is the same as the “Edit” button in the toolbar (Page 14).
Library
This is the same as the “Library” button in the toolbar (Page 19).
Store
This is the same as the “Store” button in the toolbar (Page 19).
Import
This is the same as the “Import” button in the toolbar (Page 15).
Compare
This is the same as the “Compare” button in the toolbar (Page 19).
Setup
Setup
This is the same as the “Editor Setup” button in the toolbar (Page 13).
Transmit Bulk
This is the same as the “Transmit” button in the toolbar (Page 14).
Monitor
This is the same as the “Monitor” button in the toolbar (Page 14).

8
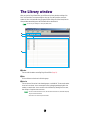
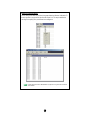
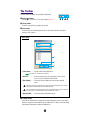
The Library window
When you start the Plug-in Board Editor, you will first see the Library window consisting of the
“User” and “Preset” tabs, each representing the voice type. Each tab lists all the names and
numbers of voices in the selected voice type group. Double-clicking a file (Voice Name) from the
Library window automatically opens the Edit window for the selected voice.
You can save your settings as a Library file (*.DRK/*.PCK).
q
Toolbar
This area holds the buttons controlling Plug-in Board Editor (Page 10).
w
Tabs
Click one of these to view the voice list for that group.
e
Voice list
This area shows all the voices in the selected group as a scrollable list. The name and number
of each voice are shown. You can rearrange the voices by dragging-and-dropping their voice
numbers to a new location. You can rename a voice in Windows by selecting the voice name,
then clicking on it again to enter a new name.
• To select a continuous block of voices, click the number of the first voice, hold down the [Shift]
key, then click the last number.
• Voice names can consist of up to 8 characters.
NOTE
e
q
w
NOTE

9
Viewing Just the Voice Names
You can view just the names of all voices in the group without their “Number” information. To
do this, right-click on any part of the voice list and choose “List.” This may be useful when
choosing voices quickly, since you will have less scrolling to do.
To switch back to the full Voice Name/Number list, right-click on any part of the voice list and
choose “Details.”
NOTE

10
The T
oolbar
q
“Open” button
Click this to open the “Open” dialog and select a Library file to open.
“Open” Dialog
q
“Look in:”
..................Click this and choose the folder containing the Plug-in Board
Editor files.
w
List box
.....................Shows the contents of the current folder.
e
“File name:”
..............Shows the name of the files selected from the List.
r
“Files of type:”
.........Click this and choose the file type.
t
[Open] button
...........Click this to open the file selected from the List.
y
[Cancel] button
.........Click this to cancel the operation.
q w e r t y u i
q
w
e
r
t
y

11
w
“Save” button
Click this to save the existing Library file with your new settings. If you are working on a new
file, this button will open the “Save As” dialog, where you can name and save your settings as a
new Library file (*.DRK/*.PCK).
“Sa
ve As” Dialog
You can store the list of edited voices as a Library file (extension: “.DRK” or “.PCK”). Specify
the desired location, input the file name, then click [Save]. The file is saved and the dialog box
automatically closes.
Library file names can consist of up to 8 characters plus a 3-character extension.
q
“Save in:”
..................Click this and choose the folder in which to save the Library file.
w
List box
.....................Shows the contents of the folder you wish to save to.
e
“File name:”
..............Specify the name of the Library file to be saved here.
r
“Save as type:”
.........Click this and choose the file type.
t
[Save] button
............Click this to save the Library file with the name specified in the
“File name:”.
y
[Cancel] button
.........Click this to close this dialog without saving.
NOTE
q
w
e
r
t
y

12
e
Save As SMF
Click this to open the “Save As SMF” Dialog.
“Sa
ve As SMF” Dialog
Voice data can be saved as an SMF format file.
If you choose multiple voices in the Library window, only one voice (lowest Voice No.) is saved.
q
“Save in:”..................Click this and choose the folder in which to save the file.
w List box .....................Shows the contents of the folder you wish to save to.
e “File name:”..............Specify the name of the file to be saved here.
r “Save as type:”.........Click this and choose the file type.
t [Save] button............Click this to save the file as SMF with the name specified in the
“File name:”.
y [Cancel] button.........Click this to close this dialog without saving.
NOTE
q
w
e
r
t
y

13
r “Editor Setup” button
Click this to open the “Setup” dialog.
“Setup”
Dialog
This is where you set up the Plug-in Board Editor to allow the transmission of voice data to
your plug-in board. Click the [OK] button to apply the settings and quit the dialog. Click the
[Cancel] button to quit without applying the settings.
For more information on the settings in this dialog, refer to the owner’s manual or documentation
for the particular “mother” device or client application. If you are using a Modular Synthesis
Plug-in System compatible synthesizer, make sure the settings match the ones fixed on the
instrument itself. (See chart on page 4.)
q “MIDI In Port:”...........This is unavailable for the Plug-in Board Editor.
w “MIDI Out Port:”........Click this and choose the MIDI Out port. You can use the Plug-in
Board Editor to control and edit the device connected to this port.
Select the port which has been assigned to your plug-in board
within the client application.
e “MIDI Ch:”.................Click this and choose the MIDI Out channel. This is used when
monitoring sounds using the on-screen keyboard in the Edit
windows.
r “Device No.:”............Click this and choose the MIDI device number of the “mother”
device to which the PLG150-DR/PLG150-PC is installed.
t “Dump Interval:” ......Click this and choose the interval between successive MIDI
dumps.
If you set too short an interval, you may encounter errors when transmitting MIDI data.
y “Part No:”..................Click this and choose the Part used for the DR/PC voice.
u “Board No”................Click this and choose the plug-in board to which the Plug-in
Board Editor will send data.
If you have multiple plug-in boards in the “mother” device, each is automatically set to a
different Board Number (in numerical order from 1).
i Output when edited in library
When this is checked, any edits that you make with the Plug-in
Board Editor are instantly and automatically transmitted to your
plug-in board. This ensures that you can audition edits as soon
as you make them.
NOTE
q
w
e
r
t
y
u
i
NOTE
NOTE

14
t “Transmit” button
Click this to open the “Transmit” dialog to transmit all settings to your plug-in board.
y “Edit” button
Click this to open the Edit window for the selected voice in the list. For further details, see page
16.
u “Monitor” button
If you click this, bulk voice data will be sent for monitoring on your plug-in board each time you
select a voice. Click it again to disable monitoring.
“T
ransmit” Dialog
Voice data can be transmitted in bulk to your plug-in board. Click the [Start] button to begin
transmitting the data. The progress bar shows how much of the data has been transmitted.
Finally, click the [Close] button to quit the dialog.
q “Transmit Type”........Shows the voice data to be transmitted.
w Progress bar.............Shows how much of the data has been transmitted.
e [Start] button............Click this to transmit the data.
r [Close] button...........Click this to close this dialog.
The MIDI Device Number has to be set correctly in order to transmit bulk data. For further
details, see page 13.
q
w
e
r
NOTE

15
i “Import” button
Click this to open the “Import” dialog and import voices from an existing Library file. You can
drag-and-drop voices to the Library window.
More than one of these dialogs can be opened simultaneously.
“Import” Dialog
q “File Name:” .............Shows the name of the Library file from which voice data is to be
imported.
w [Open File] button....Click this to open the “Open” dialog and select a Library file to
open.
e “Memory:”.................Click this and select the voice group from which voice data is to
be imported.
r Voice list....................This area shows all the voices in the selected Memory as a
scrollable list, in order of voice number. You can select a voice
here and import it directly to the voice list in the Library window
by drag-and-drop. (Multiple voices can also be imported this
way.) You can alternatively copy the voice by selecting it and
pressing [CTRL]+[C] on the computer keyboard, and then switch
to the Library window and press [CTRL]+[V] at the new location
to paste (import) it.
To select a block of voices, click the number of the first voice, hold down the [Shift] key, then
click the last voice.
t “Monitor” ..................If you check this box, the bulk data for each voice you select from
the list will be transferred to your plug-in board for monitoring.
Monitoring will not be possible if the MIDI Out port and other parameters in the Editor Setup
are not set correctly. For further details, see page 13.
y [Close] button...........Click this to close the Import dialog.
NOTE
w
q
e
y
r
t
NOTE
NOTE

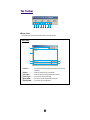
16
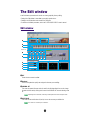
The Edit window
In the Edit window, parameters and controls are shown graphically for easy editing.
• Setting in the Edit window is transmitted to your plug-in board at once.
• Settings in the Edit window can be stored in the Library file.
• For details on individual parameters, refer to the PLG150-DR/PLG150-PC owner’s manual.
Edit window
q KEY
Shows the note name to be edited.
w Keyboard
Click on the keyboard to specify note assigned to the wave you are editing.
e ORIGINAL KIT
This shows the preset kit’s wave set that is used for the kit being edited. You can also change
the wave set to be used by clicking the kit name in the ORIGINAL KIT box and selecting a new
kit.
Depending on the selected kit, certain ranges of the keyboard do not have assigned sounds.
r VOICE NAME
This shows the name of the drum kit (voice). You can also rename your edited voice.
Voice names can consist of up to 8 characters.
w
u
!7
!8
!9
@0
@3@2@1
q
r
y
!0 !5!3i
!1o !2 !4 !6
e
t
EFFECT Unit
NOTE
NOTE

17
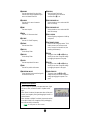
t VOLUME
Sets the output level of the signal from
Insertion Effect and the bypassed signal
sent to the Reverb Effect Unit.
y COARSE
Sets the pitch in coarse increments
(semitones).
u FINE
Fine-tunes the pitch.
i RESO
Sets the LFO Resonance level.
o CUTOFF
Sets the LFO Cutoff Frequency.
!0 ATTACK
Sets the Attack Rate.
!1 DECAY1
Set the Decay1 Rate.
!2 DECAY2
Set the Decay2 Rate.
!3 LEVEL
Sets the output level of the wave.
!4 PAN
Sets the Pan position of the wave.
!5 INSERTION ON/OFF
Selects whether or not to send the signal to
the Insertion Effect Unit.
!6 REVERB
Sets the Reverb Send Level.
This parameter has no effect if the
Insertion effect (!5) is on.
!7 RECEIVE NOTE ON
Selects whether or not to receive the MIDI
Note On message.
!8 RECEIVE NOTE OFF
Selects whether or not to receive the MIDI
Note Off message.
!9 KEY ASSIGN
Selects Single key assignment or Multi key
assignment.
@0 ALTERNATE GROUP
Selects an alternate group number. This is
used to prevent a pair of drum sounds,
such as an open and closed hi-hat, from
sounding simultaneously.
@1 PITCH
This graph shows the y and u settings
visually. You can also change the settings
by dragging the squares in the graph.
@2 FILTER
This graph shows the i and o settings
visually. You can also change the settings
by dragging the square in the graph.
@3 AMPLITUDE EG
This graph shows the !0, !1 and !2
settings visually. You can also change the
settings by dragging the squares in the
graph.
Parameter Knob Operation
You can change the operation of the parameter knobs. Right
click on any knob, and select “Rotate” or “Up/down or left/
right.”
When “Rotate” is selected, the parameter values (of the panel
“knobs”) are changed by clicking and dragging the mouse in a
circular direction.
When “Up/down or left/right” is selected, the parameter values
(of the panel “knobs”) are changed by clicking and dragging
the mouse vertically or horizontally.
The setting made here affects all knobs.
NOTE

18
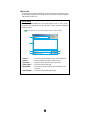
■ Effect Unit
q INSERTION
Click on the text box and choose the type of Insertion Effect.
w DRY/WET
Sets the Dry/Wet balance.
e DETAIL
Click this to set the exact parameters for the respective Insertion Effect via the “INSERTION
EFFECT” dialog.
r REV SEND
Sets the send level of the signal from Insertion Effect sent to the Reverb Effect unit.
t SEND
Sets the send level of the signal from Insertion Effect and the bypassed signal sent to the
Reverb Effect Unit.
y REVERB
Click on the text box and choose the type of Reverb Effect Unit.
u PAN
Sets the Reverb Panning.
i RTN
Sets the Reverb Return Level.
o DETAIL
Click this to set detailed parameters for the respective Reverb Effect via the “REVERB
EFFECT” dialog.
q e t y o
w
r
i
u

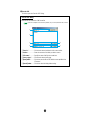
19
The Toolbar
This area contains the buttons for controlling the Edit window.
q “Editor Setup” button
See item e in “The Toolbar” of “The Library window” (Page 13).
w “Library” button
Click this to bring the Library window back into view.
e “Store” button
Click this to open the “Store” dialog, where you can name your edited voice and select a
location in which to store it.
r “Compare” button
If you click this, bulk data for the original voice (prior to editing) will be sent to on your plug-in
board. Click it again to send the bulk data for your edited voice. This button is useful for making
A/B comparisons between the original and edited voices.
“Store”
Dialog
q “Voice Name:” ..........Specify a name for your edited voice.
Voice names can consist of up to 8 characters.
w Voice list....................Shows the contents of the voice type group as a list. Click the
voice in which your edited voice will be stored.
e [Store] button...........Click this to store your edited voice in the location specified
above.
After storing to a Library file, the data for the original voice will be overwritten when you save the
Library file. It is recommended that you back up important data.
The “Store” dialog is used to temporarily store your Library file. After storing, save your Library file.
If you do not save your Library file after storing, your edits will not be saved.
r [Cancel] button.........Click this to quit the dialog without storing.
q w e r
q
w
r
e
NOTE
CAUTION
CAUTION

20
Troubleshooting
If you encounter problems such as no sound output or abnormal behavior, verify the connections
before checking the following. If you are using Plug-in Board Editor in the client application, refer to
the client application’s owner’s manual as well.
Sound does not change when using knobs or sliders.
• Are the MIDI Out port and Device Number set correctly in the Editor Setup? (Page 13)
Bulk data is not transmitted.
• Are the MIDI Out port and Device Number set correctly in the Editor Setup? (Page 13)
• Is the Dump Interval in the Editor Setup too short? Make sure the Dump Interval is at least 10
ms.
Sound is doubled when playing keyboard.
• On the “mother” device, switch Local to OFF.
No sound heard when clicking on-screen keyboard in Edit window.
• Is the MIDI Ch. set correctly in the Editor Setup? (Page 13)
Sound does not change when Monitor button is pressed.
• Are the MIDI Out port and Device No. set correctly in the Editor Setup? (Page 13)
MIDI Out port is not available in Editor Setup.
• The MIDI Out port in Editor Setup can be chosen from the MIDI Out ports in the System Setup of
the client application. Check the MIDI Out settings in the System Setup of the client application.
-
 1
1
-
 2
2
-
 3
3
-
 4
4
-
 5
5
-
 6
6
-
 7
7
-
 8
8
-
 9
9
-
 10
10
-
 11
11
-
 12
12
-
 13
13
-
 14
14
-
 15
15
-
 16
16
-
 17
17
-
 18
18
-
 19
19
-
 20
20


in altre lingue
- English: Yamaha PLG150 Owner's manual
- français: Yamaha PLG150 Le manuel du propriétaire
- español: Yamaha PLG150 El manual del propietario
- Deutsch: Yamaha PLG150 Bedienungsanleitung
- русский: Yamaha PLG150 Инструкция по применению
- Nederlands: Yamaha PLG150 de handleiding
- português: Yamaha PLG150 Manual do proprietário
- dansk: Yamaha PLG150 Brugervejledning
- čeština: Yamaha PLG150 Návod k obsluze
- polski: Yamaha PLG150 Instrukcja obsługi
- svenska: Yamaha PLG150 Bruksanvisning
- Türkçe: Yamaha PLG150 El kitabı
- suomi: Yamaha PLG150 Omistajan opas
- română: Yamaha PLG150 Manualul proprietarului
Documenti correlati
-
Yamaha PLG150-PF Manuale del proprietario
-
-
-
Yamaha S08 Voice Editor Manuale del proprietario
-
-
-
-
Yamaha MOTIF8 Manuale del proprietario
-
-
Yamaha Recording Equipment Manuale utente