
SATA Hard Drive Enclosure
Installation Guide English
Installationsanleitung Deutsch
Manuel Utilisateur Français
Manuale d’uso Italiano
© LINDY ELECTRONICS LIMITED & LINDY-ELEKTRONIK GMBH - SECOND EDITION (November 2009)
INSTALLATION
ENGLISH
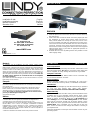
1. Slide the plastic end cover in the direction as shown above by
the white arrow.
2. Slide in the HDD so that the SATA connector properly fits into
the backplane as shown above (black arrow) and press it
firmly. Not all HDDs are exactly the same size, and so once
you have inserted your HDD it is important to move the enclo-
sure around to ensure that the HDD does not move inside the
enclosure. If it does move, firstly check that the SATA connec-
tion has been made correctly, then attach some of the supplied
adhesive foam strips to your HDD in appropriate positions to
stop the HDD moving.
3. Reinstall the end cover by sliding it back into position so both
sides engage safely.
For Home and Office Use
Tested to Comply with FCC Standards
No. 42840 (USB 2.0)
No. 42841 (USB 2.0 & eSATA)
No. 42842 (USB 2.0 & FW400)
No. 43100 (USB 3.0)
www.LINDY.com
Deutsch
(1) Schieben Sie die Endkappe wie oben gezeigt seitlich heraus.
(2) Schieben Sie die Platte so ein, dass sie sicher in die Anschlussleiste
(Bild Vorseite, schwarzer Pfeil) einrastet. Aufgrund leicht unterschiedlicher
Formen kann die Platte sich im Gehäuse bewegen, prüfen Sie dies durch
Schütteln. Stoßen Sie die Platte gegebenenfalls aus dem Gehäuse in die
offene Hand und befestigen Sie einen beiliegenden Schaumstreifen an
geeigneter Stelle der Platte. Achten Sie darauf, dass sie nicht so fest sitzt,
dass sie später nicht wieder heraus genommen werden kann! Stoßen Sie
die Platte und das Gehäuse nie auf harte Flächen um die Festplatte
nicht zu beschädigen!
(3) Schieben Sie nun die Endkappe von der Seite her wieder so auf, dass
beide Seiten sicher einrasten.
Français
(1) Retirez la façade comme vu ci-dessus (flèche blanche)
(2) Insérez le disque dur fermement dans la connectique SATA indiquée
par la flèche noire
Un disque dur n’a pas toujours la même taille, et peut bouger dans le
boîtier, vérifiez cela en secouant le boîtier. Fixez ensuite les bandes
adhésives fournies sur votre disque dur pour l’empêcher totalement de
bouger. Ne cognez pas le disque et le boîtier sur des surfaces dures,
pour ne pas endommager le disque dur !
(3) Remettez la façade
Italiano
1. Far scorrere il frontalino nella direzione indicata nel disegno soprastante
2. Inserire l’HDD nel verso giusto per permettere il collegamento al
connettore SATA come evidenziato qui sopra (freccia nera).
Non tutti gli HDD hanno le stesse dimensioni, verificare quindi, dopo aver
inserito l’HDD, che lo stesso sia collegato correttamente scuotendo
l’alloggiamento; se il disco all’interno si muove, controllare che l’HDD sia
collegato correttamente al connettore SATA interno, quindi attaccare le
strisce adesive incluse nella fornitura all’HDD in modo da impedirne il
movimento all’interno del box.
3. Reinserire il frontalino facendolo tornare nella posizione iniziale.
OPERATION (ENGLISH)
Power Requirement
3.5” drives cannot be powered by the USB bus and therefore need
their own power supply. Do not use any power supply other than
the one supplied, as it may damage the enclosure or your HDD.
Computer connection
The dual interface models 42841, 42842 can be connected only
via one of their interfaces at a time!
Driver Installation
Modern operating systems such as Windows XP, Vista and 7
already include the necessary drivers, so installation is automatic.
LED Indicator
The right LED indicator lights up red when the housing is powered
up. The left LED flashes blue during data transfer.
Do not disconnect the enclosure whilst the LED is flashing!
HDD Partitioning
If you use a brand new hard drive it may not be formatted or have
a partition and so your operating system will not show a drive
letter. Use the partitioning program from your operating system
(FDISK or similar). In Windows, Right click on My Computer and
select Manage. Then click Disk Management. On the bottom
right side the new drive should now be shown without a drive
letter. Right click on the grey field to the left of the drive and select
Initialize Disk. Once completed you can right click on the new
drive, choose to format it and change drive letters according to
your requirements.
Find more information on this topic from the HELP section of your
operating system.

ANSCHLUSS & BETRIEB (DEUTSCH)
STROMVERSORGUNG
3,5“ Festplatten benötigen immer ihr eigenes Netzteil. Verwenden
Sie ausschließlich das mitgelieferte Netzteil, andere Netzteile
können falsche Spannungen auf den Steckerpins haben und
Platte und Gehäuse zerstören!
RECHNERANSCHLUSS
Bei den Modellen 42841 und 42842 mit zwei Interfaces darf
gleichzeitig nur eins der Interfaces angeschlossen werden!
TREIBERINSTALLATION
Moderne Betriebssysteme wie Windows XP, Vista, 7 haben be-
reits alle notwendigen Treiber an Board.
ANZEIGE-LED
Die rechte Anzeige-LED leuchtet rot sobald das Gehäuse ange-
schlossen und mit Strom versorgt ist. Die Linke blinkt blau wäh-
rend eines Datentransfers. Ziehen Sie nie die Stecker während
die LED noch blinkt!
PARTITIONIERUNG DER FESTPLATTE
Wenn Sie eine brandneue Festplatte anschließen ist diese wahr-
scheinlich nicht partitioniert und Ihr Betriebssystem wird keinen
Laufwerkbuchstaben anzeigen! Verwenden Sie das Partitionie-
rungsprogramm Ihres Betriebssystems. Unter Windows XP wäh-
len Sie nach Rechtsklick auf Arbeitsplatz das Programm Verwal-
tung. Wählen Sie Datenträgerverwaltung. Diese sollte unten
rechts die neue Platte anzeigen. Nach Rechtsklick in den grauen
Bereich links neben der neuen Platte wählen Sie Initialisieren. Im
Anschluss können Sie nach Rechtsklick auf die Platte selbst diese
nach Ihren Bedürfnissen formatieren und Laufwerksbuchstaben
ändern.
Weitergehende Informationen hierzu finden Sie im Hilfesystem
Ihres Betriebssystem oder wenden Sie sich an einen erfahrenen
PC-Techniker.
UTILISATION (FRANCAIS)
PUISSANCE NECESSAIRE
Les disques durs 3,5’’ nécessitent toujours leur propre alimenta-
tion. Utilisez exclusivement l’alimentation fournie, les autres ali-
mentations peuvent délivrer de mauvaises tensions et endomma-
ger le disque dur et le boîtier !
CONNEXION A L’ORDINATEUR
Les modèles N° Art. 42841 et 42842 avec deux interfaces, doivent
être connectés sur une seule des deux !
INSTALLATION DU PILOTE
Les systèmes d’exploitation actuels comme Windows XP, Vista, 7
possèdent déjà le pilote USB et FireWire.
INDICATEURS LED
La LED de droite s’allume en rouge dès que le boîtier est connec-
té et alimenté. La LED de gauche clignote en bleu pendant le
transfert de données. Ne débranchez jamais le boîtier à ce
moment là !
PARTITONNEMENT DU DISQUE DUR
Si vous installez un nouveau disque dur et qu’il n’est pas reconnu
par le système, il est nécessaire de le partitionner avant son
utilisation (FDISK ou autre).
Pour Windows XP : cliquez sur Démarrer, puis clic droit sur “Poste
de Travail”, choisir l’option “Gérer”, ensuite cliquez sur “Gestions
des Disques”. Vous devez voir apparaître le nouveau disque sans
attribution de lettre. Faites un clic droit sur la zone grisée, pour
formater, et changer la lettre du lecteur
Pour de plus amples informations veuillez vous référer à la section
Aide de votre système d’exploitation, ou auprès d’un technicien
expérimenté.
UTILIZZO (ITALIANO)
Alimentazione richiesta.
Hard Disk da 3.5” non possono essere alimentati dal bus USB, è
necessario quindi utilizzare un alimentatore esterno. Utilizzando
un alimentatore diverso da quello incluso nella fornitura potrebbe
provocare danni all’alloggiamento o all’HDD.
Collegamento al Computer
Le versioni a doppia interfaccia 42841 e 42842 possono essere
collegate al Computer con un’interfaccia alla volta.
Installazione dei Driver
Sistemi operativi moderni come Windows XP, Vista e 7
includono già i driver necessari, l’installazione è automatica.
Indicatori LED
Il LED di destra si illumina quando l’alloggiamento è acceso, il
LED blu a sinistra si illumina durante il trasferimento di dati, NON
scollegare l’alloggiamento mentre il LED sta lampeggiando.
Partizionamento dell’HDD
Se state utilizzando un Hard Disk nuovo esso potrebbe non
essere formattato o partizionato e quindi non viene visto dal
sistema operativo. Utilizzate il programma di partizionamento del
vostro sistema operativo (FDISK o similare). Su Windows, cliccate
col tasto destro del mouse su Risorse del Computer e seleziona-
re Gestione. Quindi cliccate su Gestione Disco. In questo campo
dovreste poter vedere il disco in questione senza alcuna lettera
assegnata. Cliccare col tasto destro su questo campo e seleziona-
re Inizializza disco. Seguire la configurazione guidata, formattare
il disco e assegnare una lettera. Potrete trovare informazioni su
questa operazione nella guida del vostro sistema operativo o
chiedete aiuto ad un tecnico esperto.
Certifications
FCC Certifications
This equipment has been tested and found to comply with the limits for a Class A digital device,
pursuant to part 15 of the FCC Rules. These limits are designed to provide reasonable protection
against harmful interference when the equipment is operated in a commercial environment. This
equipment generates, uses, and can radiate radio frequency energy and, if not installed and used in
accordance with the instruction manual, may cause harmful interference to radio communications.
Operation of this equipment in a residential area is likely to cause harmful interference in which
case the user will be required to correct the interference at their own expense.
This device complies with Part 15 of the FCC Rules. Operation is subject to the following two
conditions: (1) this device may not cause harmful interference, and (2) this device must accept any
interference received; including interference that may cause undesired operation.
CE Statement
This equipment complies with the relevant EC Regulations for IT Equipment
Recycling Information
WEEE (Waste of Electrical and Electronic Equipment),
Recycling of Electronic Products
In 2006 the European Union introduced regulations (WEEE) for the collection and recycling of all
waste electrical and electronic equipment. The Wheelie bin symbol shown indicates that this
product must not be disposed of with household waste. Instead the product must be recycled in a
manner that is environmentally friendly. For more information on how to dispose of this product,
please contact your local recycling centre or your household waste disposal service. Each individual
EU member state has implemented the WEEE regulations into national law in slightly different
ways. Please follow your national law when you want to dispose of any electrical or electronic
products.
Germany / Deutschland
Die Europäische Union hat mit der WEEE Direktive umfassende Regelungen für die Verschrottung
und das Recycling von Elektro- und Elektronikprodukten geschaffen. Das ElektroG – Elektro- und
Elektronikgerätegesetz verbietet vom 24.März 2006 an das Entsorgen von entsprechenden, auch
alten, Elektro- und Elektronikgeräten über die Hausmülltonne! Diese Geräte müssen den lokalen
Sammelsystemen bzw. örtlichen Sammelstellen zugeführt werden! Dort werden sie kostenlos
entgegen genommen. Die Kosten für den weiteren Recyclingprozess übernimmt die Gesamtheit
der Gerätehersteller.
Reine B2B Geräte sind von gewerblichen Verbrauchern dem geregelten Recycling eigenverant-
wortlich zuzuführen. Reine B2B LINDY-Geräte werden von LINDY kostenlos entgegengenommen
und dem Recycling zugeführt.
LINDY No.43100, 42840, 42841, 42842
www.lindy.com
For Home and Office Use
Tested to Comply with FCC Standards
-
 1
1
-
 2
2


Lindy 42842 Manuale utente
- Categoria
- Schede di interfaccia / adattatori
- Tipo
- Manuale utente
in altre lingue
- English: Lindy 42842 User manual
- français: Lindy 42842 Manuel utilisateur
- Deutsch: Lindy 42842 Benutzerhandbuch
Documenti correlati
-
Lindy 42907 Manuale utente
-
-
Lindy 42891 Manuale utente
-
-
-
-
-
-
-