
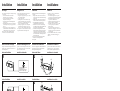
Parts for Installation and Connections
Pièces de montage et de raccordement
Montageteile und Anschlußzubehör
Componenti per installazione e collegamenti
The numbers in the list are keyed to those in the instructions.
Les numéros de la liste correspondent à ceux des instructions.
Die Nummern in der Liste sind dieselben wie im Erläuterungstext.
I numeri nella lista corrispondono a quelli riportati nelle istruzioni.
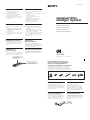
CDX-52RF
Compact Disc
Changer System
Sony Corporation 1996 Printed in Japan
3-856-014-12 (1)
Installation/Connections
Installation/Connexions
Installation/Anschluß
Installazione/Collegamenti
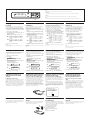
Wired remote
•Avoid mounting it where it may:
— hinder normal driving activities.
— jeopardize the passengers.
— be subjected to hot air from the heater.
— be subjected to direct sunlight.
•After installing the system, be sure to check
that the whole system can be operated by the
wired remote.
Télécommande à fil
•Evitez de l’installer dans des endroits où elle
pourrait:
— gêner la conduite normale du véhicule,
— mettre les passagers en danger,
— être exposée au courant d’air chaud du
chauffage,
— être en plein soleil.
•Quand vous avez installé le système, vérifiez
que la télécommande à fil peut commander
tout le système.
Installing the wired remote
Use the supplied double-sided adhesive tape
4, and mount the wired remote in a suitable
location where it will not interfere with your
driving.
Installation de la
télécommande à fil
Utilisez la bande à double face adhésive fournie
4 pour installer la télécommande à fil dans un
endroit qui ne risque pas de gêner la conduite.
Kabelfernbedienung
•Bringen Sie die Fernbedienung nicht an einer
Stelle an, an der sie:
— den Fahrer beim Steuern des Fahrzeugs
hindert,
— die Beifahrer gefährdet,
— dem warmen Luftstrom der Heizung
ausgesetzt ist,
— direktem Sonnenlicht ausgesetzt ist.
•Überprüfen Sie anschließend noch einmal, ob
sich das gesamte System über die
Kabelfernbedienung steuern läßt.
Telecomando a fili
•Evitare di installare il telecomando dove:
— possa interferire con le normali operazioni
di guida.
— possa mettere in pericolo la sicurezza dei
passeggeri.
— possa essere esposto al getto di aria calda
dell’impianto di riscaldamento.
— possa essere esposto alla luce solare diretta.
•Dopo avere installato il sistema, assicurarsi
che l’intero sistema possa essere attivato dal
telecomando a fili.
Anbringen der
Kabelfernbedienung
Bringen Sie die Kabelfernbedienung mit
Doppelklebeband 4 an einer geeigneten Stelle
an. Achten Sie darauf, daß die Fernbedienung
Sie beim Fahren nicht behindert.
Installazione del telecomando
Usare il nastro biadesivo in dotazione 4 e
installare il telecomando a fili in un luogo in cui
non interferisca con le normali operazioni di
guida.
1
2
× 1× 2 × 4
3
× 4
4
× 1
5
× 1
6
Reset button
After the installation and connections are
complete, after the batteries have been changed,
or when the POWER SELECT switch has been
changed, make sure to press the RESET button
with a ballpoint pen, etc.
Touche de réinitialisation
Lorsque l’installation et les connexions sont
terminées, que les piles ont été remplacées ou
lorsque le commutateur POWER SELECT a été
réinitialisé, n’oubliez pas d’appuyer sur la
touche RESET à l’aide d’une pointe bic, etc.
Taste RESET
Wenn Sie das Gerät montiert und
angeschlossen haben oder wenn Sie die
Batterien ausgetauscht oder die Stellung des
Schalters POWER SELECT geändert haben,
denken Sie daran, mit einem Kugelschreiber
oder etwas ähnlichem die Taste-RESET zu
drücken.
Pulsante di azzeramento
Completati l’installazione e i collegamenti,
sostituite le batterie, o cambiata la posizione
dell’interruttore POWER SELECT, assicurarsi
di premere il tasto RESET con la punta di una
penna a sfera, ecc.
RESET button
Touche de RESET
Taste-RESET
Pulsante RESET
The back of the wired remote
Dos de la télécommande à fil
Rückseite der Kabelfernbedienung
Retro del telecomando a fili
Double-sided adhesive tape 4
Ruban à double face adhésive 4
Doppelklebeband 4
Nastro biadesivo 4

Installazione
Cambia CD
• Scegliere con cura il luogo di installazione,
osservando quanto segue:
— Non installare l’apparecchio in un punto
esposto al getto di aria calda del riscaldamento.
— Non installare l’apparecchio in un punto
esposto alla luce diretta del sole.
— Il serbatoio del carburante non deve essere
danneggiato dalle viti autofilettanti.
— Non devono essere presenti né cavi, né tubi
sotto il luogo scelto per l’installazione
dell’apparecchio.
— Le viti e l’apparecchio stesso non devono
interferire con o danneggiare la ruota di scorta,
gli attrezzi o altri dispositivi presenti dentro o
sotto il bagagliaio.
• Per un’installazione stabile e sicura, assicurarsi di
utilizzare solo il materiale di montaggio in
dotazione.
Installazione del cambia CD
Quando si installa il cambia CD, fare attenzione a
non danneggiare i cavi o le apparecchiature
sull’altro lato della superficie di installazione.
Installation
CD changer
•Choose the mounting location carefully, observing
the following:
— Do not install the unit where it will be
subjected to hot air from the heater.
— Do not install the unit where it will be
subjected to direct sunlight.
— The fuel tank should not be damaged by the
tapping screws.
— There should be no wire harnesses or pipelines
under the place where you are going to install
the unit.
— The spare tire, tools or other equipment in or
under the trunk should not be interfered with
or damaged by the screws or the unit itself.
•Be sure to use only the supplied mounting
hardware for a safe and secure installation.
How to install the CD changer
When you install the CD changer, be careful not to
damage wiring or equipment on the other side of
the mounting surface.
Installation
Changeur de CD
•Choisir l’emplacement de montage en tenant
compte des observations suivantes:
— L’appareil ne peut pas être exposé au courant
d’air chaud du chauffage,
— ni être en plein soleil.
— Vérifiez que le réservoir d’essence ne risque
pas d’être endommagé par les vis taraudeuses.
— Il ne doit pas y avoir de faisceaux de fils ou de
tuyaux à l’emplacement du montage.
— Vérifiez que l’appareil ou les vis ne risquent
pas d’endommager ou de gêner la roue de
secours, les outils ou autre objet dans le coffre.
•Pour garantir la sécurité de l’installation, utilisez
uniquement le matériel de montage fourni.
Installation du changeur de CD
Quand vous installez le changeur de CD, veillez à
ne pas endommager les câbles ou les instruments
qui se trouvent de l’autre côté.
Installation
CD-Wechsler
• Beachten Sie bei der Auswahl der Montagestelle
folgendes:
— Bringen Sie das Gerät nicht an einer Stelle an,
an der es dem warmen Luftstrom der Heizung
ausgesetzt ist.
— Bringen Sie das Gerät nicht an einer Stelle an,
an der es direktem Sonnenlicht ausgesetzt ist.
— Der Kraftstofftank darf nicht durch die
Schneideschrauben beschädigt werden.
— Hinter der Stelle, an der das Gerät befestigt
wird, dürfen sich keine elektrischen Kabel und
keine sonstigen Leitungen befinden.
— Ersatzreifen, Werkzeug und andere Teile im
Kofferraum dürfen nicht durch die Schrauben
oder das Gerät am Herausnehmen behindert
oder beschädigt werden. Achten Sie auf darauf,
Gerät und Schrauben so anzubringen, daß sie
nicht hinderlich sind.
• Für eine sichere und problemlose Installation
verwenden Sie nur die mitgelieferten
Montageteile.
Installation des CD-Wechslers
Achten Sie sorgfältig darauf, daß keine Kabel und
keine anderen Teile auf der anderen Seite der
Montagestelle beschädigt werden.
Horizontaler Einbau
Installazione in orizzontale
Horizontal installation Installation horizontale
2
1
3
2
1
1
2
3
ø 3.5 mm
HORIZONTAL
Vertical installation Installation verticale Vertikaler Einbau Installazione in verticale
VERTICAL
Align with the marked position.
Alignez sur le repère.
Auf die Markierung ausrichten
Allineare con il punto segnato.
12
3
2
1
1
3
2
ø 3.5 mm
Suspended installation Suspension du changeur de CD Hängender Einbau Installazione in sospensione
21
HORIZONTAL
1
1
2
ø 3.5 mm
2
3
3
When the unit is to be installed under the rear tray
or in the trunk, observe the following.
•Choose the mounting location carefully so that the
unit can be installed horizontally.
•Make sure that the unit does not hinder the
movement of the torsion bar spring etc. of the
trunk door.
Si vous comptez installer le changeur de CD sous la
plage arrière par exemple ou dans le coffre, prenez
les précautions suivantes.
•Choisissez soigneusement l’emplacement pour
que le changeur soit à l’horizontale.
•Vérifiez que le changeur ne gêne pas le ressort du
capot, entre autres.
Beim hängenden Einbau unter der Heckablage oder
im Kofferraum beachten Sie folgende
Vorsichtsmaßnahmen:
• Wählen Sie die Montagestelle sorgfältig so aus,
daß die Einheit horizontal montiert werden kann.
• Achten Sie darauf, daß das Gerät beim Öffnen
und Schließen des Kofferraumdeckels nicht
hinderlich ist.
Se l’apparecchio deve essere installato sotto il
ripiano posteriore o nel bagagliaio, osservare
quanto segue:
•Scegliere con attenzione il luogo di montaggio, in
modo che l’apparecchio possa essere installato
orizzontalmente.
•Assicurarsi che l’apparecchio non ostacoli il
movimento del coperchio del cofano.
Inclined installation Installation inclinée
Installation in geneigter Position Installazione in posizione inclinata
Après avoir installé l’appareil, alignez le
disque sur l’un des repères afin que la flèche
soit aussi proche que possible de la position
verticale.
After installing the unit, align the dial with
one of the marks so that the arrow comes as
close to a vertical position as possible.
Nach dem Installieren des Geräts richten Sie
den Dial-Ring an einer der Markierungen aus,
so daß der Pfeil möglichst senkrecht steht.
Dopo aver installato l’apparecchio, allineare
la manopola ad una delle tacche in modo che
la freccia sia il più verticale possibile.
HORIZONTAL
VERTICAL
HORIZONTAL
VERTICAL
HORIZONTAL
VERTICAL
Note
Be sure to align the left and right dials with the same mark.
Nota
Accertarsi di allineare le manopole di sinistra e di destra alla
stessa tacca.
Remarque
Veillez à aligner les disques gauche et droite sur le même repère.
Hinweis
Achten Sie darauf, den linken und rechten Dial-Ring an
derselben Markierung auszurichten.
Align with the marked position.
Alignez sur le repère.
Auf die Markierung ausrichten
Allineare con il punto segnato.
Align with the marked position.
Alignez sur le repère.
Auf die Markierung ausrichten
Allineare con il punto segnato.

AMS
REP
SHUF
5 3
CD
TRACK DISC
AMS
DISC
DISC
OFF
REP
Note
The supplied wireless remote (RM-X58) can be operated just like the wired remote (RM-X57).
Remarque
Télécommande sans fil (RM-X58) fournie qui peut être utilisée de la même façon que la télécommande à fil (RM-X57).
Hinweis
Die mitgelieferte drahtlose Fernbedienung RM-X58 funktioniert genauso wie die Kabelfernbedienung RM-X57.
Nota
Il telecomando senza fili in dotazione (RM-X58) può essere utilizzato nello stesso modo del telecomando a fili (RM-X57).
Changing the transmitting
frequency
Because this unit processes CD playback sound
through an FM tuner, there may be interference
noise during CD playback. In this case change the
frequency of the modulated RF signal transmitted
from hideaway unit. The initial setting is 88.3 MHz.
1. Press (REP) for two seconds.
2. Press either the left or right side of (AMS) to
select the frequency.
Each time you press (AMS), the frequencies
change as follows:
+ : 88.3 MHz n 88.5MHz n 88.7 MHz n
88.9MHz n 89.1 MHz n 89.3 MHz n
89.5MHz n 89.7MHz n 89.9MHz n
88.3MHz
= :88.3 MHz n 89.9MHz n 89.7 MHz n
89.5MHz n 89.3 MHz n 89.1 MHz n
88.9MHz n 88.7MHz n 88.5MHz n
88.3MHz
3. Press (REP) for two seconds.
Note
Be sure to set the frequency of your FM tuner to the newly
selected frequency.
Changing the output level
You can select the output level from the CD
changer. Normally the system is used at the initial
output level; change the level if necessary.
1. Press (REP) for two seconds.
2. Press (REP).
3. Press either the left or right side of (AMS) to
select the output level.
To decrease the output level
To increase the output level
4. Press (REP) for two seconds.
Installing the system in a car
without an accessory switch
position
POWER SELECT switch setting
When the unit is used in a car without an accessory
position on the ignition switch, set the POWER
SELECT switch on the side of the hideaway unit to
OFF.
This causes the display to go out when you turn the
ignition OFF. After changing the POWER SELECT
switch position, be sure to press the RESET button
on the hideaway unit with a ballpoint pen etc.
Install the wireless remote
Use the supplied velcro tapes 5, and mount the
wireless remote in a suitable location where it will
not interfere with your driving.
Changement de la fréquence de
transmission
Comme cet appareil traite le son de lecture CD via
un syntoniseur FM, il se peut qu’il y ait des
interférences durant la lecture du CD. Si c’est le cas,
changez la fréquence du signal FM modulé
transmis par le modulateur. Le réglage initial est de
88,3 MHz.
1. Appuyez sur (REP) pendant deux secondes.
2. Appuyez sur la gauche ou la droite de (AMS)
pour choisir la fréquence.
A chaque pression sur la touche, la fréquences
change dans l’ordre suivant:
+ : 88,3 MHz n 88,5MHz n 88,7 MHz n
88,9MHz n 89,1 MHz n 89,3 MHz n
89,5MHz n 89,7MHz n 89,9MHz n
88,3MHz
= :88,3 MHz n 89,9MHz n 89,7 MHz n
89,5MHz n 89,3 MHz n 89,1 MHz n
88,9MHz n 88,7MHz n 88,5MHz n
88,3MHz
3. Appuyez sur (REP) pendant deux secondes.
Remarque
N’oubliez pas de régler votre tuner FM sur la nouvelle fréquence
choisie.
Changement du niveau de sortie
Vous pouvez sélectionner le niveau de sortie du
changeur de CD. Normalement, le système
fonctionne sur le niveau de sortie initial. Changez-le
si nécessaire.
1. Appuyez sur (REP) pendant deux secondes.
2. Appuyez (REP).
3. Appuyez sur la gauche ou la droite de (AMS)
pour choisir le niveau.
Pour diminuer le niveau de sortie
Pour augmentar le niveau de sortie
4. Appuyez sur (REP) pendant deux secondes.
Installation du système dans une
voiture sans position accessoire
Réglage du commutateur POWER SELECT
Si vous utilisez cet appareil sur un véhicule dont le
contacteur d’allumage est dépourvu de toute
position accessoire, amenez le commutateur de
POWER SELECT monté sur le flanc du modulateur
sur la position OFF. Ainsi, l’affichage s’éteindra
lorsque vous amènerez la clé de contact sur la
position OFF. Après avoir modifié la position du
commutateur de POWER SELECT , n’oubliez pas
d’appuyer sur la touche RESET du modulateur avec
un stylo-bille ou autre objet pointu.
Installation de la télécommande
sans fil
Utilisez les bandes velcro fournies 5 pour installer
la télécommande sans fil dans un endroit qui ne
risque pas de gêner la conduite.
Ändern der Übertragungsfrequenz
Da bei diesem Gerät die CD-Wiedergabe über einen
UKW-Tuner erfolgt, kann es bei der
CD-Wiedergabe zu Interferenzen kommen.
Wechseln Sie in diesem Fall die Frequenz des vom
Hauptgerät ausgestrahlten RF-Signals. Werkseitig
ist eine Frequenz von 88,3 MHz eingestellt.
1. Drücken Sie (REP) zwei Sekunden lang.
2. Wählen Sie die gewünschte Frequenz, indem
Sie (AMS) nach rechts oder links schieben.
Die Frequenzen ändert sich bei jeder Betätigung
des Schalters wie folgt:
+ : 88,3 MHz n 88,5MHz n 88,7 MHz n
88,9MHz n 89,1 MHz n 89,3 MHz n
89,5MHz n 89,7MHz n 89,9MHz n
88,3MHz
= :88,3 MHz n 89,9MHz n 89,7 MHz n
89,5MHz n 89,3 MHz n 89,1 MHz n
88,9MHz n 88,7MHz n 88,5MHz n
88,3MHz
3. Drücken Sie (REP) zwei Sekunden lang.
Hinweis
Stimmen Sie den UKW-Tuner ebenfalls auf die oben eingestellte
Frequenz ab.
Ändern des Ausgangspegels
Falls erforderlich, kann der ursprünglich
eingestellte Ausgangspegel des CD-Wechslers wie
folgt geändert werden.
1. Drücken Sie (REP) zwei Sekunden lang.
2. Drücken Sie (REP) kurzzeitig.
3. Wählen Sie den gewünschten
Ausgangspegel, indem Sie (AMS) nach links
oder rechts schieben.
Zum Verringern des Ausgangspegels
Zum Erhöhen des Ausgangspegels
4. Drücken Sie (REP) zwei Sekunden lang.
Einbau des Systems in einem Auto
ohne Zündposition ACC
Einstellen des Schalters POWER SELECT
Wenn Sie das Gerät in ein Auto ohne Zündposition
ACC einbauen wollen, stellen Sie den Schalter
POWER SELECT an der Seite des Hauptgeräts auf
OFF.
Bei dieser Schalterstellung erlischt das Display,
wenn Sie die Zündung ausschalten. Nachdem Sie
den Schalter POWER SELECT umgestellt haben,
denken Sie daran, mit einem Kugelschreiber oder
etwas ähnlichem am Hauptgerät Taste-RESET zu
drücken.
Anbringen der drahtlosen
Fernbedienung
Bringen Sie die drahtlose Fernbedienung mit den
mitgelieferten Klettbändren 5 an einer geeigneten
Stelle an. Achten Sie darauf, daß die Fernbedienung
Sie beim Fahren nicht behindert.
Cambiamento della frequenza di
trasmissione
Poiché l’apparecchio elabora la riproduzione del
suono dei CD attraverso il sintonizzatore FM, la
riproduzione dei CD potrebbe subire delle
interferenze. In tal caso, cambiare la frequenza del
segnale RF modulato trasmesso dall’unità da
nascondere. La regolazione iniziale è 88,3 MHz.
1. Premere (REP) per due secondi.
2. Premere il lato sinistro o il lato destro di
(AMS) per selezionare la frequenza.
A ciascuna pressione di AMS, le frequenze
cambiano come segue:
+ : 88,3 MHz n 88,5MHz n 88,7 MHz n
88,9MHz n 89,1 MHz n 89,3 MHz n
89,5MHz n 89,7MHz n 89,9MHz n
88,3MHz
= : 88,3 MHz n 89,9MHz n 89,7 MHz n
89,5MHz n 89,3 MHz n 89,1 MHz n
88,9MHz n 88,7MHz n 88,5MHz n
88,3MHz
3. Premere (REP) per due secondi.
Nota
Assicurarsi di regolare la frequenza del sintonizzatore FM sulla
nuova frequenza selezionata.
Cambiamento del livello di uscita
E possibile selezionare il livello di uscita dal cambia
CD. Normalmente il sistema è usato al livello di
uscita iniziale; se necessario cambiare il livello.
1. Premere (REP) per due secondi.
2. Premere (REP).
3. Premere il lato sinistro o il lato destro di
(AMS) per selezionare il livello di uscita.
Per diminuire il livello di uscita
Per aumentare il livello di uscita
4. Premere (REP) per due secondi.
Installazione del sistema in
un’auto priva della posizione
accessoria del l’interruttore
Impostazione del l’interruttore POWER
SELECT
Se l’apparecchio viene usato in un’auto priva della
posizione accessoria dell’interruttore di accensione,
impostare su OFF l’interruttore POWER SELECT
sul lato dell’unità da nascondere.
In tal modo il display si spegne non appena il
motore viene spento. Dopo avere cambiato la
posizione dell’interruttore POWER SELECT,
assicurarsi di premere il pulsante il tasto RESET
sull’unità da nascondere con la punta di una penna
a sfera, ecc.
Installazione del telecomando
senza fili
Utilizzare i nastri Velcro 5 in dotazione e installare
il telecomando senza fili in un punto dove non
interferisca con la guida.
=
+
0
1
CD
LEVEL
00 00
4
CD
LEVEL
00 0
3
CD
LEVEL
Werksseitig
voreingestellter Pegel
00 0
3
CD
LEVEL
=
0
1
CD
LEVEL
+
00 00
4
CD
LEVEL
Réglage initial
Initial setting
00 0
3
CD
LEVEL
=
0
1
CD
LEVEL
+
00 00
4
CD
LEVEL
0
1
CD
LEVEL
00 00
4
CD
LEVEL
=
+
00 0
3
CD
LEVEL
Regolazione iniziale
OFF ON
POWER
SEL
POWER SELECT switch
Commutateur POWER SELECT
Schalter POWER SELECT
l’interruttore POWER SELECT
5 to where it is going to be mounted
vers l’emplacement de montage
an die Stelle, an der Sie die
drahtlose Fernbedienung anbringen
wollen
al punto in cui sarà installato

Connexions
Précautions
•Ce système est conçu pour fonctionner sur
courant continu de 12 V avec masse négative.
•Avant d’effectuer les raccordements, débranchez
la borne de terre de la batterie du véhicule pour
éviter tout court-circuit.
•Branchez les fils d‘entrée d‘alimentation jaune et
rouge seulement après avoir terminé tous les
autres branchements.
•Veillez à ne pas raccorder le fil rouge d‘entrée
d‘alimentation à la borne positive de 12 V qui est
alimentée quand la clé de contact est sur la
position accessoire.
•Rassemblez tous les fils de terre en un point de
masse commun.
•Quand vous avez terminé les connexions,
appuyez sur la touche de RESET du
modulateur.
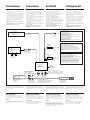
Connections
Caution
• This system is designed for negative ground 12 V
DC operation only.
• Before making connections, disconnect the ground
terminal of the car battery to avoid short circuits.
• Connect the yellow and red power input leads
only after all other leads have been connected.
• Be sure to connect the red power input lead to the
positive 12 V power terminal which is powered
when the ignition switch is in the accessory
position.
• Run all ground wires to a common ground
point.
• Press the RESET button on the hideaway unit
after completing the connections.
Anschluß
Vorsicht
•Dieses System ist ausschließlich für ein negativ
geerdetes 12-V-Bordnetz bestimmt.
•Bevor Sie Anschlüsse vornehmen, trennen Sie die
Erdungsleitung der Autobatterie ab, um
Kurzschlüsse zu vermeiden.
•Schließen Sie die gelben und roten
Stromversorgungsleitungen erst an, wenn alle
anderen Kabel angeschlossen sind.
•Schließen Sie die rote Stromversorgungsleitung an
einen positiven 12-V-Kontakt des Bordnetzes an,
der in der Zubehörposition des Zündschlosses
unter Strom steht.
•Leiten Sie alle Erdungsleitungen an einen
gemeinsamen Massepunkt.
•Nach dem Anschließen drücken Sie die taste-
RESET an der Haupteinheit.
Collegamenti
Attenzione
• Questo sistema è stato progettato solo per il
funzionamento a 12 V CC, massa negativa.
• Prima di eseguire i collegamenti, scollegare il
terminale di massa della batteria dell’auto per
evitare cortocircuiti.
• Collegare i cavi di ingresso alimentazione giallo e
rosso solo dopo avere collegato tutti gli altri cavi.
• Assicurarsi di collegare il cavo rosso di ingresso
alimentazione al terminale di alimentazione
positivo da 12 V che è sotto tensione quando
l’interruttore di accensione è nella posizione
accessoria.
• Portare tutti i fili di massa a un punto di massa
comune.
• Premere il pulsante di RESET sull’unità da
nascondere dopo avere completato i
collegamenti.
RCA pin cord (supplied)
Cordon à broche RCA (fourni)
Cinchkabel (mitgeliefert)
Cavo con terminali RCA (in dotazione)
CD changer
Changeur de CD
CD-Wechsler
Cambiatore CD
Insert the connector until it locks.
Insérez le connecteur jusquà ce qu’il s’enclenche.
Den Stecker ganz einstecken, bis er einrastet.
Inserire il connettore fino a quando si blocca.
Fuse
Fusible
Sicherung
Fusibile
Fuse
Fusible
Sicherung
Fusibile
Red
Rouge
Rot
Rosso
Yellow
Jaune
Gelb
Giallo
Black
Noir
Schwarz
Nero
Insert with the marks facing up.
Insérez en dirigeant les repères vers le haut.
Mit der Markierung nach oben anschließen.
Collegare con i simboli rivolti in alto.
Note
Even though this system is connected with BUS cables, it doesn’t
include the custom file function. If you connect this CD changer
with a Sony master unit which includes the custom file function,
this function will not work.
Fuse replacement
If the fuse blows, check the power connection and
replace the fuse. If the fuse blows again after
replacement, there may be an internal malfunction.
Warning
Use a fuse with the specified amperage rating.
Use of a higher amperage fuse may cause serious
damage.
Remarque
Ce système est raccordé par des câbles BUS, toutefois il n’a pas de
fonction de fichier personnalisé. Même si vous raccordez un
changeur CD Sony à un appareil Sony doté de la fonction de
fichier personnalisé, vous ne pourrez pas vous servir du fichier.
Remplacement du fusible
Si le fusible saute, vérifiez les connexions
d’alimentation et remplacez-le. Si le fusible saute à
nouveau quand vous venez de le remplacer, il s’agit
peut être d’un mauvais fonctionnement interne.
Avertissement
Utilisez un fusible de l’ampérage spécifié.
L’utilisation d’un fusible d’ampérage supérieur
peut causer de sérieux dommages.
Hinweis
Das System wird mit BUS-Kabeln angeschlossen. Allerdings
arbeitet die “Custom File”-Funktion nicht. Selbst bei Anschluß
des CD-Wechslers an ein Hauptgerät von Sony, die eine”Custom
File”-Funktion besitzt, kann diese Funktion nicht verwendet
werden.
Austauschen der Sicherung
Wenn die Sicherung durchbrennt, überprüfen Sie
den Stromanschluß und tauschen die Sicherung
aus. Wenn auch die neue Sicherung wieder
durchbrennt, kann eine interne Störung vorliegen.
Achtung
Achten Sie darauf, eine Ersatzsicherung mit dem
gleichen Ampere-Wert zu verwenden. Verwenden
Sie unter keinen Umständen eine Sicherung mit
einem höheren Ampere-Wert. Andernfalls kann es
zu Schäden am Gerät kommen.
Nota
Sebbene questo sistema sia collegato con cavi BUS, esso non è
dotato della funzione di schedario personale. Anche se si collega il
cambiatore CD ad un apparecchio principale Sony dotato della
funzione di schedario personale, questa non potrà essere attivata.
Sostituzione del fusibile
Se il fusibile salta, controllare il collegamento
dell’alimentazione e sostituire il fusibile. Se il
fusibile appena cambiato salta di nuovo, potrebbe
trattarsi di un cattivo funzionamento interno.
Avvertenza
Utilizzare un fusibile con l’amperaggio specificato.
Se si utilizza un fusibile con un amperaggio
superiore, si rischia di causare gravi danni.
BUS cable (supplied)
Câble BUS (fourni)
BUS-Kabel (mitgeliefert)
Cavo BUS (in dotazione)
Hideaway unit
Modulateur
Haupteinheit
Unità da nascondere
RESET button
Touche de RESET
Taste-RESET
Pulsante di RESET
Wired Remote
Télécommande à fil
Kabelfernbedienung
Telecomando a fili
Car audio
Autoradio
Auto-Audioanlage
Autoradio
to a metal point on the car
First connect the black ground lead, then connect the yellow and
red power input leads.
vers un point métallique de la voiture
Branchez d’abord le fil de masse noir et, ensuite, les fils d’entrée
d’alimentation jaune et rouge.
an ein Metallteil des Fahrzeugs
Schließen Sie zuerst die schwarze Masseleitung an, dann die
gelbe und die rote Stromleitung.
a un punto metallico dell’auto
Prima collegare il cavo di massa nero, poi i cavi di ingresso
alimentazione giallo e rosso.
to a car antenna
à l’antenne de voiture
an Autoantenne
all’antenna dell’automobile
to the +12 V power terminal which is powered at all times
Be sure to connect the black ground lead first.
à la borne d’alimentation +12 V qui est alimentée en permanence
Raccordez d’abord le fil de masse noir.
an den +12-V-Stromanschluß (ständig stromführend)
Bitte schließen Sie zuerst die schwarze Masseleitung an.
al terminale di alimentazione a 12 V permanentemente sotto
tensione
Assicurarsi di collegare per primo il cavo di massa nero.
to the +12 V power terminal which is powered when the ignition
key switch is in the accessory position
Be sure to connect the black ground lead first
à la borne d’alimentation de +12 V qui est alimentée quand la clé
de contact est sur la position accessoire
Raccordez d’abord le fil de masse noir.
an den +12-V-Stromanschluß, der nur dann Strom führt, wenn
sich der Zündschlüssel in der Zubehörposition befindet.
Bitte schließen Sie zuerst die schwarze Masseleitung an.
al terminale di alimentazione a 12 V, alimentato quando
l’interruttore di accensione è nella posizione accessoria
Assicurarsi di collegare per primo il cavo di massa nero.
6
Speaker system
Système de haut-parleurs
Lautsprecher
Sistema diffusori
Antenna connector
Connecteur d’antenne
Antennenanschluß
Connettore antenna
-
 1
1
-
 2
2
-
 3
3
-
 4
4


in altre lingue
- English: Sony CDX-52RF Installation guide
- français: Sony CDX-52RF Guide d'installation
- Deutsch: Sony CDX-52RF Installationsanleitung
Documenti correlati
-
Sony CDX-52RF Manuale del proprietario
-
-
-
-
-
-
Sony cdx 444 rf Manuale del proprietario
-
-
-