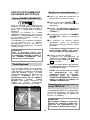
Candy CDIM 6120PR Manuale utente
- Categoria
- Lavastoviglie
- Tipo
- Manuale utente

Guida pratica all’uso
User instructions
Mode d’emploi
Bedienungsanleitung
Instrucciones para el uso
Instruções de utilização
Instrukcja obs∏ugi
Upute za kori‰tenje
Navodilo za uporabo
Návod k pouÏití
Gebruiksaanwijzing
Használati utasítás
IT
EN
FR
DE
ES
PT
PL
HR
SL
CZ
EL
NL
HU
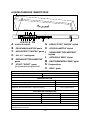
CDIM 6120PR
LAVASTOVIGLIE
DISHWASHER
LAVE-VAISSELLE
GESCHIRRSPÜLER
LAVAVAJILLAS
MÁQUINA DE LAVAR LOIÇA
ZMYWARKI
PERILICA POSUDJA
POMIVALNI STROJ
MYâKY NÁDOBÍ
AFWASMACHINE
MOSOGATÓGÉP

2
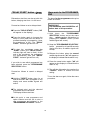
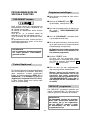
Complimenti,
con l'acquisto di questo elettrodomestico Candy, Lei ha dimostrato di non accettare compromessi: Lei vuole il meglio.
Candy è lieta di proporLe questa nuova lavastoviglie, frutto di anni di ricerche e di esperienze maturate sul mercato, a
contatto diretto con i Consumatori.
Lei ha scelto la qualità, la durata e le elevate prestazioni che questa lavastoviglie Le offre.
Candy Le propone inoltre una vasta gamma di elettrodomestici:
lavatrici, lavastoviglie, lavasciuga, cucine, forni a microonde, forni e piani di cottura, frigoriferi e congelatori.
Chieda al Suo Rivenditore il catalogo completo dei prodotti Candy.
La preghiamo di leggere attentamente le avvertenze contenute nel presente libretto in quanto forniscono importanti indicazioni
riguardanti la sicurezza di installazione, d'uso, di manutenzione ed alcuni utili consigli per il migliore utilizzo della lavastoviglie.
Conservi con cura questo libretto per ogni ulteriore consultazione.
Servizio Assistenza Clienti
CERTIFICATO DI GARANZIA CONVENZIONALE: cosa fare?
Il Suo prodotto è garantito, alle condizioni e nei termini riportati sul certificato inserito nel prodotto ed in base alle previsioni del
decreto legislativo 24/02, nonché del decreto legislativo 6 settembre 2005, n. 206, per un periodo di 24 mesi decorrenti dalla
data di consegna del bene.
Così come riportato nei testi dei Decreti Legislativi citati, il certificato di garanzia dovrà essere da Lei conservato, debitamente
compilato, per essere mostrato al Servizio Assistenza Tecnica Autorizzato, in caso di necessità, unitamente ad un documento
fiscalmente valido rilasciato dal rivenditore al momento dell’acquisto (bolla di consegna, fattura, scontrino fiscale, altro) sul quale
siano indicati il nominativo del rivenditore, la data di consegna, gli estremi identificativi del prodotto ed il prezzo di cessione.
Resta pure inteso che, salvo prova contraria, poiché si presume che i difetti di conformità che si manifestano entro sei mesi
dalla consegna del bene esistessero già a tale data, a meno che tale ipotesi sia incompatibile con la natura del bene o con la
natura del difetto di conformità, il Servizio di Assistenza Tecnica Autorizzato, verificato il diritto all’intervento, lo effettuerà senza
addebitare il diritto fisso di intervento a domicilio, la manodopera ed i ricambi. Per contro, nel successivo periodo di diciotto
mesi di vigenza della garanzia, sarà invece onere del consumatore che intenda fruire dei rimedi accordati dalla garanzia stessa
provare l’esistenza del difetto di conformità del bene sin dal momento della consegna; nel caso in cui il consumatore non fosse
in grado di fornire detta prova, non potranno essere applicate le condizioni di garanzia previste e pertanto il Servizio di
Assistenza Tecnica Autorizzato effettuerà l’intervento addebitando al consumatore tutti i costi relativi.
Le ricordiamo inoltre che sullo stesso certificato di garanzia convenzionale Lei troverà le informazioni ed i documenti
necessari per una copertura sino a 5 anni e così, in caso di guasto, non pagare il diritto fisso di intervento a domicilio, la
manodopera ed i ricambi.
Per qualsiasi informazione necessitasse, La preghiamo rivolgersi al numero telefonico del Servizio Clienti
199 12 13 14
.
ANOMALIE E MALFUNZIONAMENTI: a chi rivolgersi ?
Per qualsiasi necessità il centro assistenza autorizzato è a Sua completa disposizione per fornirLe i chiarimenti necessari;
comunque qualora il Suo prodotto presenti anomalie o mal funzionamenti, prima di rivolgersi al Servizio Assistenza
Autorizzato, consigliamo vivamente di effettuare i controlli indicati nel capitolo "Ricerca piccoli guasti".
UN SOLO NUMERO TELEFONICO PER OTTENERE ASSISTENZA.
Qualora il problema dovesse persistere, componendo il “Numero Utile” sotto indicato, sarà messo in contatto direttamente
con il Servizio Assistenza Tecnica Autorizzato che opera nella Sua zona di residenza.
Attenzione:
la chiamata è a pagamento; il costo verrà comunicato, tramite messaggio vocale, dal Servizio clienti dell’operatore telefonico
utilizzato. Dettagli sono presenti sul sito internet www.candy.it.
MATRICOLA DEL PRODOTTO. Dove si trova?
E’ indispensabile che comunichi al Servizio Assistenza Tecnica Autorizzato la sigla del prodotto ed il numero di matricola (16
caratteri che iniziano con la cifra 3) che troverà sul certificato di garanzia oppure sulla targa matricola posta all'interno dello
sportello, sul bordo superiore destro. In questo modo Lei potrà contribuire ad evitare trasferte inutili del tecnico, risparmiando
oltretutto i relativi costi.

3
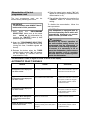
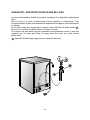
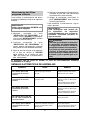
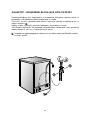
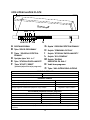
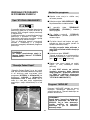
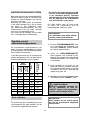
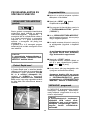
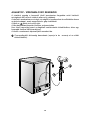
A DISPLAY DIGITALE
B
Pulsante
"SELEZIONE PROGRAMMA"
C
Pulsante "PARTENZA DIFFERITA"
D
Pulsante opzione "ALL in 1"
E
Pulsanti "GRADO DI SPORCO"
F
Pulsante "START"/"RESET"
(avvio/annullamento programma)
G Spia "PARTENZA DIFFERITA"
H Spia "SELEZIONE OPZIONE"
I Spie " GRADO DI SPORCO"
L Spia "ESAURIMENTO SALE"
M Spia "ESAURIMENTO BRILLANTANTE"
N Descrizione programmi
O Tasto "AVVIO/ARRESTO"
DESCRIZIONE DEI COMANDI
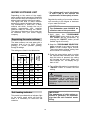
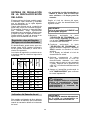
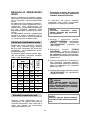
DIMENSIONI
DATI TECNICI
CONSUMI (programmi principali)*
Programma Energia (kWh) Acqua (L)
INTENSIVO
UNIVERSALE
ECO
RAPIDO 24'
2,07
1,53
1,08
0,59
21
15
10
9
Larghezza x Altezza x Profondità (cm) 59,8 x 81,8 ÷ 89,8 x 55
Ingombro con porta aperta (cm) 117
Coperti (EN 50242)
Capacità con pentole e piatti
Pressione nell'impianto idraulico (MPa)
Ampere fusibile / Potenza max. assorbita / Tensione d'alimentazione
16
9 persone
Min. 0,08 - Max. 0,8
Vedere targhetta dati
Consumo di energia nei modi spento e stand-by: 0,30 W / 0,45 W
*Valori misurati in laboratorio secondo la Norma Europea EN 50242 (nell’uso quotidiano, sono
possibili differenze).
ABCD E FM
N
O
LG H I

4
SCELTA DEL PROGRAMMA
E FUNZIONI PARTICOLARI
Pulsanti "GRADO DI SPORCO"
Questi pulsanti permettono di variare l'in-
tensità di lavaggio, a seconda del grado di
sporco delle stoviglie, modificando di con-
seguenza i parametri di durata del ciclo e la
sua temperatura.
Premendo il pulsante
+ si aumenta l’inten-
sità di lavaggio, premendo il pulsante
– la
si diminuisce, riducendo significativamente
la durata del ciclo.
L’associazione dei pulsanti ai 4 programmi
base, consente di ottenere 8 cicli di lavag-
gio aggiuntivi.
IMPORTANTE
All'accensione della lavastoviglie
viene visualizzata l'ultima imposta-
zione di "GRADO DI SPORCO" ese-
guita.
"Perfect Rapid zone"
Il "Perfect Rapid zone" garantisce presta-
zioni di lavaggio ottimali nei cicli rapidi e la
rimozione dello sporco più ostinato nei cicli
intensivi. Nella zona sinistra della vasca
sono montati due bracci lavanti supple-
mentari che si attivano automaticamente
durante i programmi rapidi (RAPIDO 24' e
Classe A 59’) ed i programmi U-WASH +
(Igienizzante, Universale Plus, Eco
Plus). Le stoviglie posizionate in quella zona
potranno quindi beneficiare della forza lavan-
te addizionale del "Perfect Rapid zone".
Impostazione dei programmi
■ Aprire lo sportello ed introdurre le stovi-
glie da lavare.
■ Premere il tasto "AVVIO/ARRESTO" .
Sul display verranno visualizzati due
trattini.
■ Scegliere un programma premendo il
pulsante "SELEZIONE PROGRAMMA"
("PROGR.").
■ Scegliere eventualmente il "GRADO DI
SPORCO" premendo il relativo pulsante.
■ Se lo si desidera, premere il pulsante
opzione (la spia corrispondente s'illumi-
nerà).
L'opzione può essere attivata o disat-
tivata ENTRO un minuto dalla parten-
za del programma.
■ Premere il pulsante "START". Il display
visualizzerà il tempo di durata del pro-
gramma, alternando l'indicazione delle
ore a quella dei minuti [Es: 1 h (1 ora) /
25 (25 minuti)].
■ Chiudere lo sportello (dopo un segnale
acustico, il programma si avvierà auto-
maticamente).
ENTRO un minuto dalla partenza del
ciclo di lavaggio, è possibile sceglie-
re un altro programma, semplicemen-
te premendo il pulsante "SELEZIONE
PROGRAMMA" (è anche possibile
cambiare la selezione del "GRADO DI
SPORCO").
Programmi "IMPULSE"
I programmi "IMPULSE" utilizzano una
tecnica di lavaggio ad impulsi, che riduce i
consumi, il rumore e migliora le prestazioni.
IMPORTANTE
Il funzionamento "intermittente"
della pompa di lavaggio NON è indice
di un malfunzionamento, ma è una
caratteristica particolare del lavag-
gio ad impulsi ed è quindi segnale
del corretto svolgimento del pro-
gramma.

5
Interruzione di un programma
Sconsigliamo l’apertura dello sportello
durante lo svolgimento del programma, in
particolare durante la fase centrale del
lavaggio e del risciacquo finale caldo.
Tuttavia, se a programma avviato si apre lo
sportello (per esempio perché si vogliono
aggiungere delle stoviglie) la macchina si
ferma automaticamente e sul display viene
visualizzato lampeggiante il tempo rima-
nente alla fine del ciclo.
Richiudendo lo sportello, senza premere
alcun pulsante, il ciclo ripartirà dal punto
in cui era stato interrotto.
ATTENZIONE!
Se si apre lo sportello mentre la lava-
stoviglie è nella fase di asciugatura,
viene attivato un segnale acustico
per avvisare che il ciclo non è ancora
terminato.
Modifica di un programma in
corso
Se si vuole cambiare o annullare un pro-
gramma già in corso, procedere nel
seguente modo:
■ Aprire lo sportello.
■Tenere premuto per almeno 5 secondi il
pulsante "RESET". Sul display verrà
visualizzato "00" e verranno emessi dei
segnali acustici.
■Il programma in corso verrà annullato. Sul
display verranno visualizzati due trattini.
■A questo punto sarà possibile impostare
un nuovo programma.
ATTENZIONE!
Prima di far partire un nuovo pro-
gramma, è bene accertarsi che non
sia già stato asportato il detersivo; se lo
fosse, ripristinare la dose nel contenitore.
Nel caso d’interruzione di corrente, la
lavastoviglie conserverà in memoria il
programma in fase di svolgimento che
verrà ripreso, dal punto in cui era stato
interrotto, non appena sarà ripristinata
l’alimentazione elettrica.
Fine del programma
La fine del programma verrà indicata tramite
un segnale acustico (se non disattivato)
della durata di 5 secondi, ripetuto per 3
volte ad intervalli di 30 secondi.
Sarà quindi possibile prelevare le stoviglie
appena lavate e spegnere la lavastoviglie
premendo il tasto "AVVIO/ARRESTO",
oppure effettuare un nuovo carico per un
altro ciclo di lavaggio.
Pulsanti opzione
Pulsante "ALL in 1"
Questa opzione permette l'utilizzo ottimale
dei detersivi combinati “ALL in 1” ("3 in
1"/"4 in 1"/ "5 in 1"). Premendo questo pul-
sante, il programma di lavaggio impostato
viene modificato in modo da ottenere la
migliore prestazione dai detersivi combinati;
inoltre, vengono disattivati gli indicatori di man-
canza sale e brillantante.
ATTENZIONE!
Una volta selezionata, l’opzione resta
attiva (spia corrispondente accesa)
anche per successivi programmi di
lavaggio e potrà essere disattivata
(spia corrispondente spenta) solo pre-
mendo nuovamente il relativo pulsante.
IMPORTANTE
L’uso di quest'opzione è raccomanda-
to specialmente in caso di utilizzo del
programma RAPIDO 24', la cui durata
sarà prolungata di circa 15 minuti per
consentire una migliore azione del
detersivo in pastiglie.

6
Pulsante
"PARTENZA DIFFERITA"
Questo pulsante permette di programmare
l'avvio del ciclo di lavaggio, con un ritardo
compreso tra 1 e 23 ore.
Per impostare la partenza ritardata proce-
dere nel seguente modo:
■ Premere il pulsante "PARTENZA DIF-
FERITA" (sul display verrà visualizzata
la scritta"00").
■ Premere nuovamente il pulsante per
incrementare il ritardo in ore (ad ogni
pressione il ritardo viene incrementato di
1 ora, fino ad un massimo di 23). La spia
“PARTENZA DIFFERITA” s’illuminerà.
■ Per avviare il conteggio, premere il pul-
sante "START" (la spia “PARTENZA
DIFFERITA” inizierà a lampeggiare).
Alla fine del conteggio, il programma
partirà automaticamente (la spia
“PARTENZA DIFFERITA” si spegnerà).
Se si desidera vedere il programma impo-
stato, premere il pulsante "SELEZIONE
PROGRAMMA".
Se si desidera annullare la partenza ritar-
data procedere nel seguente modo:
■ Tenere premuto per almeno 5 secondi il
pulsante "RESET". Sul display verrà
visualizzato "00" e verranno emessi dei
segnali acustici.
■ La partenza ritardata ed il programma
selezionato verranno annullati.
Sul display verranno visualizzati due
trattini.
■ A questo punto, se si desidera far partire
la lavastoviglie, sarà necessario impo-
stare nuovamente il programma deside-
rato ed eventualmente selezionare i pul-
santi opzione, come indicato nel paragrafo
"IMPOSTAZIONE DEI PROGRAMMI".
Esclusione segnalazione
acustica di FINE PROGRAMMA
La segnalazione acustica di fine program-
ma può essere disattivata nel seguente
modo:
IMPORTANTE
Iniziare la procedura SEMPRE dalla
condizione di lavastoviglie spenta.
1. Mantenere premuto il pulsante "SELE-
ZIONE PROGRAMMA" e contempora-
neamente accendere la lavastoviglie
con il tasto "AVVIO/ARRESTO" (verrà
emesso un breve suono).
2. Continuare a tenere premuto il pulsan-
te "SELEZIONE PROGRAMMA" per
almeno 15 secondi (durante questo
periodo si udiranno 2 segnali acustici).
3. Rilasciare il pulsante nel momento in
cui verrà emesso il secondo segnale
acustico (nel display verrà visualizzato
"b1" che sta ad indicare che la suone-
ria è attivata).
4. Premere nuovamente lo stesso pulsante
(apparirà "b0" che sta ad indicare che la
suoneria è disattivata).
5. Spegnere la lavastoviglie premendo il
tasto "AVVIO/ARRESTO" per rendere
effettiva la nuova impostazione.
Per riattivare la suoneria, seguire la stessa
procedura.

7
4. Premere nuovamente lo stesso pulsante (sul
display verrà visualizzato "A1" che sta ad
indicare che la memorizzazione è attivata).
5. Spegnere la lavastoviglie premendo il
tasto "AVVIO/ARRESTO" per rendere
effettiva la nuova impostazione.
Per disattivare la memorizzazione, seguire
la stessa procedura.
IMPORTANTE
Questa lavastoviglie è dotata di un
dispositivo di sicurezza antitrabocco
che, in caso di anomalia, interviene
scaricando l’acqua in eccesso.
ATTENZIONE!
Per evitare l'intervento intempestivo
del dispositivo di sicurezza antitra-
bocco, si raccomanda di non muove-
re o inclinare la lavastoviglie durante
il funzionamento.
Nel caso sia necessario muovere o
inclinare la lavastoviglie, assicurarsi
prima che abbia completato il ciclo di
lavaggio e che non ci sia acqua nella
vasca.
SEGNALAZIONE AUTOMATICA DI ANOMALIE
Spegnere la lavastoviglie, aprire il
rubinetto e reimpostare il ciclo.
Verificare se il tubo di scarico è
piegato o il sifone otturato e se i filtri
sono intasati.
Se il difetto permane, rivolgersi al
Servizio Assistenza Tecnica.
Verificare se il tubo di scarico è
piegato o il sifone otturato e se
i filtri sono intasati.
Se il difetto permane, rivolgersi al
Servizio Assistenza Tecnica.
E' necessario rivolgersi al Servizio
Assistenza Tecnica.
Pulire piastra filtro.
Se il difetto permane, rivolgersi al
Servizio Assistenza Tecnica.
ANOMALIA CAUSA RIMEDIO
Sul display compare E2
accompagnato da un breve
segnale acustico.
Sul display compare E3
accompagnato da un breve
segnale acustico.
Sul display compare
E4
accompagnato da un breve
segnale acustico.
Sul display compare
E5,E6,E7,
Ef
o EL, accompagnati da un
breve segnale acustico.
Sul display compare
E8 o Ei
accompagnati da un breve
segnale acustico.
Mancanza acqua (rubinetto dell'ac-
qua chiuso).
La macchina non riesce a scaricare
l'acqua dalla vasca.
Perdita di acqua.
Guasto al controllo elettronico.
L'elemento riscaldante dell'acqua
non funziona correttamente o piastra
filtro intasata.
La lavastoviglie è in grado di segnalare una serie di anomalie visualizzate sul display
Memorizzazione dell'ultimo
programma utilizzato
Per abilitare la memorizzazione dell'ultimo
programma utilizzato procedere nel
seguente modo:
IMPORTANTE
Iniziare la procedura SEMPRE dalla
condizione di lavastoviglie spenta.
1. Mantenere premuto il pulsante "SELE-
ZIONE PROGRAMMA" e contempora-
neamente accendere la lavastoviglie
con il tasto "AVVIO/ARRESTO" (verrà
emesso un breve suono).
2. Continuare a tenere premuto il pulsan-
te "SELEZIONE PROGRAMMA" per
almeno 30 secondi (durante questo
periodo si udiranno 3 segnali acustici).
3. Rilasciare il pulsante nel momento in
cui verrà emesso il TERZO segnale
acustico (sul display verrà visualizzato
"A0" che sta ad indicare che la memo-
rizzazione è disattivata).

8
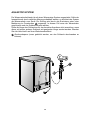
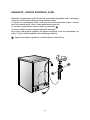
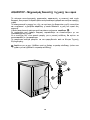
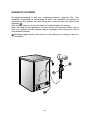
Il tubo di carico dell’acqua è provvisto di un dispositivo di sicurezza che blocca
l’afflusso dell’acqua qualora il tubo di carico si deteriori. Questo fatto viene segnalato
dall’apparizione di una tacca rossa nella finestrella .
In questo caso il tubo di carico acqua dovrà essere necessariamente sostituito.
Se la lunghezza del tubo non è sufficiente per un corretto allacciamento, il tubo
stesso dovrà essere sostituito con uno di lunghezza adeguata. Richiedere il tubo
presso il Centro Assistenza Tecnica.
Dispositivo antisvitamento (premere per svitare la ghiera).
AQUASTOP-DISPOSITIVO DI BLOCCAGGIO DELL’ACQUA

9
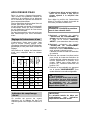
NO
SI
SI
SI
SI
SI
SI
SI
0
1
2
3
*4
5
6
7
0-5
6-10
11-20
21-30
31-40
41-50
51-60
61-90
0-3
4-6
7-11
12-16
17-22
23-27
28-33
34-50
*
La regolazione è stata impostata dalla
fabbrica al livello 4 (d4) in quanto questo
soddisfa la maggior parte dell'utenza.
A seconda del livello di appartenenza della
vostra acqua impostare il valore di decalcifi-
cazione nel seguente modo:
IMPORTANTE
Iniziare la procedura SEMPRE dalla
condizione di lavastoviglie spenta.
1. Mantenere premuto il pulsante "SELE-
ZIONE PROGRAMMA" e contempora-
neamente accendere la lavastoviglie con
il tasto "AVVIO/ARRESTO" (verrà
emesso un breve suono).
2. Continuare a tenere premuto il pulsante
"SELEZIONE PROGRAMMA" per
almeno 5 secondi, rilasciandolo SOLO
dopo aver udito un segnale acustico. Nel
display verrà indicato il livello di decalcifi-
cazione corrente.
3. Premere nuovamente lo stesso pulsante
per scegliere il livello di decalcificazione
voluto: ad ogni pressione del pulsante, il
valore aumenta di un grado. Dopo aver
raggiunto il valore "d7", l'indicatore salta
di nuovo al valore "d0".
4. Spegnere la lavastoviglie premendo il
tasto "AVVIO/ARRESTO" per rendere
effettiva la nuova impostazione.
ATTENZIONE!
Se per qualsiasi motivo non si riuscisse
a terminare la procedura, spegnere la
lavastoviglie premendo il tasto
"AVVIO/ARRESTO" e ripartire dall'inizio
(PUNTO 1).
IMPIANTO DI DECALCIFICAZIONE
L'acqua contiene in misura variabile, a
seconda delle località, sali calcarei e minera-
li che si possono depositare sulle stoviglie
lasciando macchie e depositi biancastri.
Più elevato è il contenuto di questi sali, mag-
giore è la durezza dell'acqua.
La lavastoviglie è corredata di un decalcifica-
tore che, utilizzando del sale rigenerante
specifico per lavastoviglie, fornisce acqua
priva di calcare (addolcita) per il lavaggio
delle stoviglie.
Potete richiedere il grado di durezza della
vostra acqua all'Ente erogatore di zona.
Regolazione del decalcificatore
Il decalcificatore può trattare acqua con
durezza fino a 90°fH (gradi francesi),
50°dH (gradi tedeschi) tramite 8 livelli di
regolazione.
I livelli di regolazione vengono riportati nella
tabella seguente con la relativa acqua di rete
da trattare.
Livello
°fH
(gradi
francesi)
°dH
(gradi
tedeschi)
d0
d1
d2
d3
d4
d5
d6
d7
Durezza
dell'acqua
Regolazione
decalcificazione
Uso sale
rigenerante
Indicatore di riempimento sale
Questo modello è dotato di una spia elet-
trica sul cruscotto che si accende quando
diviene necessario provvedere a riempire
il contenitore del sale.
IMPORTANTE
La comparsa di macchie biancastre
sulle stoviglie è generalmente un
indice importante di mancanza del
sale.

10
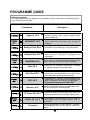
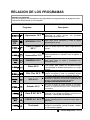
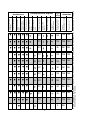
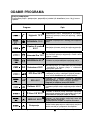
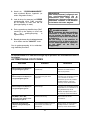
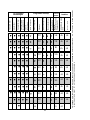
ELENCO DEI PROGRAMMI
Lavaggio con prelavaggio
Per i programmi con prelavaggio, si consiglia di aggiungere una seconda dose di detersivo
(MAX. 10 grammi) direttamente nella lavastoviglie.
Adatto al lavaggio di pentole e di tutte le altre
stoviglie particolarmente sporche.
Igienizzante 75°C
Adatto al lavaggio quotidiano, subito dopo l’uso, di
stoviglie e pentole normalmente sporche (MAX 8
coperti).
Ciclo superveloce da eseguire a fine pasto, indica-
to per un lavaggio di stoviglie fino a 6 coperti.
Adatto al lavaggio di stoviglie delicate e con decorazio-
ni e cristalleria.Indicato anche per il lavaggio quotidiano
di stoviglie poco sporche, ad esclusione delle pentole.
Breve prelavaggio per le stoviglie usate al mattino
o mezzogiorno, quando si vuole rimandare il lavag-
gio del carico completo.
Adatto al lavaggio di stoviglie e pentole normal-
mente sporche.
Programma per stoviglie normalmente sporche (il
più efficiente in termini di consumo combinato
d'acqua ed energia per il lavaggio di tali stoviglie).
Programma normalizzato EN 50242.
INTENSIVO 75°C
Forte Veloce 65°C
Universale Plus 70°C
UNIVERSALE 60°C
Giornaliero 55°C
Eco Plus 55°C
ECO 45°C
Delicato 45°C
Classe
A 59’ 65°C
RAPIDO 24' 50°C
Prelavaggio
Ciclo con azione antibatterica, adatto a lavare ed
igienizzare stoviglie (anche particolarmente
incrostate) biberon, ecc…
Adatto al lavaggio rapido di stoviglie abbondan-
temente sporche.
Adatto al lavaggio di stoviglie di tutti i giorni. Due
risciacqui finali garantiscono un elevato livello
d'igiene e pulizia.
Ciclo veloce, per stoviglie normalmente sporche,
adatto ai lavaggi frequenti e carichi normali.
Programma a media temperatura, per il lavaggio
di stoviglie e pentole normalmente sporche, uti-
lizzando detersivi contenenti enzimi.
+
+
= Programmi “IMPULSE”
= "Perfect Rapid zone" attivo
Programma
Descrizione

11
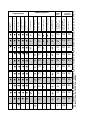
Operazioni da compiere Svolgimento del Programma
Durata
media in
Minuti
Funzioni
Facoltative
Detersivo prelavaggio
Detersivo lavaggio
Pulizia filtro e piastra
Controllo scorta
brillantante
Controllo scorta sale
Prelavaggio caldo
Prelavaggio freddo
Lavaggio
Primo risciacquo
freddo
Secondo
risciacquo freddo
Risciacquo caldo con
brillantante
Con acqua fredda
(15°C)
*
-Tolleranza ± 10%-
Pulsante
“PARTENZA DIFFERITA”
Pulsante “ALL in 1”
140
•••
•
75°C
•
•••
•
•
•••
•
•
130
85
75°C
65°C
•••
•
•••
•
•••
•
•••
•
•
•••
•
•
190
190
85
59
24
5
55°C
45°C
45°C
65°C
50°C
*
CON ACQUA CALDA IL TEMPO RESIDUO AL TERMINE DEL PROGRAMMA SI AGGIORNA AUTOMATICAMENTE DURANTE LO
SVOLGIMENTO DELLO STESSO.
SI SI
SI SI
SI SI
SI SI
SI SI
SI SI
•••
•
•••
•
•••
•
125
120
80
70°C
SI SI
SI SI
SI SI
SI SI
SI SI
SI
•
60°C
55°C

Congratulations!
Thank you for choosing a Candy
appliance; quality dishwashers which
guarantee high performance and
reliability.
Candy manufacture a vast range
of domestic appliances: washing
machines, washer/dryers, cookers,
microwave ovens, ovens and hobs,
refrigerators and freezers.
Ask your dealer for the catalogue with
the complete range of Candy products.
Please read this booklet carefully as
it provides important information
regarding the safe installation, use,
and maintenance of the machine,
together with some useful advice on
how to achieve the best results from
your dishwasher.
For future reference please keep this
instruction booklet in a safe place.
CUSTOMER SERVICE AND
GUARANTEE
Your new appliance is fully guaranteed
by the manufacturer for 12 months
against electrical/mechanical break-
down excluding:
A. Any faults which occur due to bad
installation or misuse of the machine.
B. Any faults which occur due to repair
of, or interference with, the machine
by any person not authorised by the
manufacturer to carry out service.
C. Any faults which occur due to
any parts which are fitted to the
machine which are not the original
manufacturers parts.
D. Any faults arising from non-domestic
use or unusual or abnormal use of
the machine.
E. Any faults arising from operation at
incorrect voltage.
F. Any faults arising from incorrect
operation of the machine.
The guarantee applies to Gt Britain
and Northern Ireland only, and is an
addition to your statutory rights.
AFTER SALES SERVICE
For service and repairs call your local engineer on our national telephone number:
GIAS Service Tel: 0884 995599
Support Service (Eire 0818 200021)
12

13
DESCRIPTION OF THE CONTROL PANEL
A DIGITAL DISPLAY
B
"PROGRAMME SELECTION" button
C "DELAY START" button
D
"ALL in 1" option button
E "DEGREE OF SOILING" buttons
F "START"/"RESET" button
(start/cancelling programme)
G "DELAY START" indicator light
H
"OPTION SELECTION" light
I "DEGREE OF SOILING" lights
L "SALT EMPTY" light
M
"RINSE AID EMPTY" light
N Programme guide
O "ON/OFF" button
DIMENSIONS
TECHNICAL DATA
CONSUMPTION (main programmes)*
Programme Energy (kWh) Water (L)
INTENSIVE
UNIVERSAL
ECO
RAPID 24'
Width x Height x Depth (cm)
Depth with door open (cm)
EN 50242 place load
Capacity with pans and dishes
Water supply pressure (MPa)
Fuse / Power input / Supply voltage
16
9 persons
Min. 0,08 - Max. 0,8
See rating plate
Power consumption of the off-mode and of the left-on mode: 0,30 W / 0,45 W
*Values are measured in a laboratory according to European Standard EN 50242 (consumption may
vary according to conditions of usage).
2,07
1,53
1,08
0,59
21
15
10
9
59,8 x 81,8 ÷ 89,8 x 55
117
ABCD E FM
N
O
LG H I

PROGRAMME SELECTION
AND SPECIAL FUNCTIONS
(Use in conjunction with programme guide)
"DEGREE OF SOILING" buttons
These buttons allow to modify the wash
intensity, according to how dirty the dishes
are. The wash time and temperature will be
modified.
Pressing the button
+ the intensity of
wash will be increased, pressing the
button
– the intensity of wash will be
reduced and the wash time will be
remarkably shorter.
The combination of the buttons with the 4
main wash programmes enable to have 8
additional wash cycles.
IMPORTANT
When the dishwasher is switched on,
the "DEGREE OF SOILING" last used
will be indicated.
"Perfect Rapid zone"
The "Perfect Rapid zone" is identified by
the left side of the tub, in which two extra
washing arms will be activated during
Rapid programs (RAPID 24' and A Class
59’) and U-WASH + programs (Hygienic,
Universal Plus and Eco Plus) to provide
an extra washing force, more water, in that
zone.
Programme settings
■ Open the door and place the dirty dishes
inside the appliance.
■ Press the "ON/OFF" button . The
display will show two lines.
■ Choose a programme by pressing the
"PROGRAMME SELECTION" button
("PROGR.").
■ If you wish to choose the "DEGREE OF
SOILING", press the corresponding button.
■ If you wish to select an option, press the
option button (the corresponding indicator
light will light up).
The option button can be selected or
deselected WITHIN one minute of the
programme commencing.
■ Press the "START" button.
The length of the program will be shown on
the display alternating hours with minutes
[I.e.: 1 h (1 hour) / 25 (25 minutes)].
■ Close the door (after an audible signal
has sounded, the programme will start
automatically).
WHITIN one minute of the programme
commencing, another programme
can be selected, by pressing the
"PROGRAMME SELECTION" button
(it is also possible to change the
"DEGREE OF SOILING" setting).
"IMPULSE" programmes
The “IMPULSE” programmes use an
impluse washing technology, which reduces
consumption, noise and increases
performances.
IMPORTANT
The “intermittent” working of the
washing pump MUST NOT BE
considered a malfunction, it is a
characteristic of the impulse washing
so must be considered a normal
function of the programme.
14

15
Programme interruption
Opening the door when a programme is
running is not recommended especially
during the main wash and final hot rinse
phases. However, if the door is opened
while a programme is running (for example,
to add dishes) the machine stops
automatically and the display will flash the
remaining time before the end of the cycle.
Close the door, without pressing any
buttons. The cycle will start from where it
left off.
WARNING!
If you open the door during the
drying cycle, an audible audio signal
advises you that the drying cycle has
not yet finished.
Changing a running programme
Proceed as follows to change or cancel a
running programme:
■ Open the door.
■ Hold the "RESET" button down for at
least 5 seconds. "00" will appear on the
display and some audible signals will
sound.
■ The running programme will be cancelled.
The display will show two lines.
■At this point a new programme can be set.
WARNING!
Before starting a new programme,
you should check that there is still
detergent in the dispenser.
If necessary, top up the dispenser.
If there is any break in the power supply
while the dishwasher is operating, a
special memory stores the selected
programme and, when the power is
restored, it continues where it left off.
Programme end
A 5 second alarm will sound (if not muted)
3 times at 30 second intervals to signal that
the programme has ended.
Dishes can now be removed and the
dishwasher turned off by pressing the
"ON/OFF" button or dishes can be loaded
for a new cycle.
Option buttons
“ALL in 1” button
This option optimises the use of “ALL in 1”
(“3 in 1”/ “4 in 1”/“5 in 1”, etc...) combined
detergents. By pressing this button, the
selected washing programme is modified
to get the best performance from combined
detergents; furthermore, the salt and rinse
aid shortage lights are de-activated.
WARNING!
Once selected, this option keeps
being on (light on) also for next
washing cycles and it can be de-activate
(light off) only by pressing the button
once again.
IMPORTANT
This option is recommended when
using the RAPID 24' program, the
duration of which will be extended for
about 15 minutes, allowing the
detergent tablets to achieve a better
performance.

16
"DELAY START" button
Dishwasher start time can be set with this
button, delaying start from 1 to 23 hours.
Proceed as follows to set a delayed start:
■ Press the "DELAY START" button ("00"
will appear on the display).
■ Press the button again to increase the
delay in hours (each time the button is
pressed the delay is increased by 1 hour
to a maximum of 23). The “DELAY
START” indicator light will turn on.
■ To start the countdown press the
"START" button (the “DELAY START”
indicator light will start to flash). At the
end of the countdown, the programme
will automatically start (the “DELAY
START” indicator light will turn off).
If you wish to see which programme has
been selected, press the "PROGRAMME
SELECTION" button.
Proceed as follows to cancel a delayed
start:
■ Hold the "RESET" button down for at
least 5 seconds. "00" will appear on the
display and some audible signals will
sound.
■ The delayed start and the selected
programme will be cancelled.
The display will show two lines.
■ At this point, a new programme and
option buttons must be set to start a
new programme as indicated in the
"PROGRAMME SETTINGS" section.
Alarm mute for the PROGRAMME
END
The alarm for the programme end may be
muted as follows:
IMPORTANT
The dishwasher must ALWAYS be off
before start of this procedure.
1. Hold down the "PROGRAMME
SELECTION" button and at the same
time switch on the dishwasher by
pressing the "ON/OFF" button (a brief
audible signal will sound).
2. Keep the "PROGRAMME SELECTION"
button pressed for at least 15 seconds
(during this time, 2 audible signals will
sound).
3. Release the button when the second
audible signal sounds ("b1" will appear on
the display to indicate that the alarm is on).
4. Press the same button again ("b0" will
appear on the display to indicate that the
alarm is off).
5. Turn off the dishwasher by pressing the
"ON/OFF" button to confirm the new
setting.
To turn the alarm on again, follow the same
procedure.

17
AUTOMATIC FAULT SIGNALS
Turn off the dishwasher, open the
inlet hose and reset the cycle.
Check if the drain tube is bent or if
the siphon or filters are clogged.
If the problem persists, contact
Customer Service.
Check if the drain tube is bent or if
the siphon or filters are clogged.
If the problem persists, contact
Customer Service.
Contact Customer Service.
Clean the filter plate.
If the problem persists, contact
Customer Service.
FAULTS CAUSE SOLUTION
E2
appears on the display and
the alarm sounds.
E3 appears on the display and
the alarm sounds.
E4 appears on the display and
the alarm sounds.
E5,E6,E7,Ef or EL appears
on the display and the alarm
sounds.
E8 or Ei appear on the display
and the alarm sounds.
No water (inlet hose closed).
The machine cannot drain water.
Water leak
Electronic control fault.
The water heating element is not
working correctly or the filter plate is
clogged.
The dishwasher is able to signal a series of faults in the display.
4. Press the same button again ("A1" will
appear on the display to indicate that the
memorization is on).
5. Turn off the dishwasher by pressing the
"ON/OFF" button to confirm the new
setting.
To disable the memorization, follow the
same procedure.
IMPORTANT
This dishwasher is equipped with an
anti-overflow safety device which will
automatically discharge any excess
water should a problem occur.
WARNING!
To ensure the correct operation of
the anti-overflow safety device, we
recommend that the dishwasher is
not moved or tilted during operation.
If however it is necessary to tilt or
move the dishwasher, please ensure
that the washing cycle is complete
and that there is no remaining water
inside the dishwasher.
Memorization of the last
programme used
The last programme used can be
memorized by following the below:
IMPORTANT
The dishwasher must ALWAYS be off
before start of this procedure.
1. Hold down the "PROGRAMME
SELECTION" button and at the same
time switch on the dishwasher by
pressing the "ON/OFF" button (a brief
audible signal will sound).
2. Keep the "PROGRAMME SELECTION"
button pressed for at least 30 seconds
(during this time, 3 audible signals will
sound).
3. Release the button when the THIRD
audible signal sounds ("A0 " will appear
on the display to indicate that the
memorization is off).

18
The water-stop device protects against water damages caused by leaks on the fill
hose which could develop due to natural ageing of the hose.
In the water-stop system the leaking water fills the corrugated hose and activates a
stop valve which cuts off the water supply to the machine.
This fault is shown by a red sector on the window .
Would this occur, please refer to your Service Agent.
If the hose is not long enough for correct connection, it must be replaced with a longer
one. The hose can be obtained from your Service Agent.
Safety antitwist device (press and twist to remove the washer).
AQUASTOP-SYSTEM

19
* The softener unit is set in the factory
at level 4 (d4) as this satisfies the
requirements of the majority of users.
Regulate the setting of your water softener
unit according to the degree of hardness
of your water as follows:
IMPORTANT
The dishwasher must ALWAYS be
off before start of this procedure.
1. Hold down the "PROGRAMME
SELECTION" button and at the same
time switch on the dishwasher by
pressing the "ON/OFF" button (a brief
audible signal will sound).
2. Keep the "PROGRAMME SELECTION"
button pressed for at least 5 seconds,
UNTIL a brief audible signal sounds.
The current water softener setting level
will be shown on the display.
3. Press the same button again to select
the required water softener level: each
time the button is pressed, the setting
will increase by one level. When you
have reached "d7", the display will go
back to "d0".
4. Turn off the dishwasher by pressing the
"ON/OFF" button to confirm the new
setting.
WARNING!
If any problem occurs, turn the
dishwasher off by pressing the
"ON/OFF" button and start the
procedure again from the beginning
(STEP 1).
WATER SOFTENER UNIT
Depending on the source of the supply,
water contains varying amounts of limestone
and minerals which are deposited on the
dishes leaving whitish stains and marks.
The higher the level of these minerals
present in the water, the harder the water is.
The dishwasher is fitted with a water
softener unit which, through the use of
special regenerating salt, supplies
softened water for washing the dishes.
The degree of hardness of your water can
be obtained from your water supply
company.
Regulating the water softener
The water softener can treat water with a
hardness level of up to 90°fH (French
grading) or 50°dH (German grading)
through 8 settings.
The settings are listed in the table below:
NO
YES
YES
YES
YES
YES
YES
YES
0
1
2
3
*4
5
6
7
0-5
6-10
11-20
21-30
31-40
41-50
51-60
61-90
0-3
4-6
7-11
12-16
17-22
23-27
28-33
34-50
Level
°fH
(French)
°dH
(German)
d0
d1
d2
d3
d4
d5
d6
d7
Water
hardness
Water
softener
setting
Use of
regenerating
salt
Salt loading indicator
This model is provided with an indicator light
on the control panel which will light up
when it is necessary to reload the salt
container.
IMPORTANT
The appearance of white stains on
dishes is generally an important
sign that the salt container needs
filling.

= "IMPULSE" programmes
20
PROGRAMME GUIDE
Wash with prewash
For wash programmes with prewash, it is advisable to add a second dose of detergent (max.
10 g) directly in the machine.
Once a day - for heavily soiled pans and any
other items that have been left all day for
washing.
Hygienic 75°C
Suitable for heavily soiled items that are to be
washed straight after a meal (Max 8 place load).
Quick wash for dishes which are to be washed
immediately after the meal. Wash load of
6 persons.
Suitable for delicate crockery and glassware. Also
for less soiled items excluding pans.
Short cold pre-wash for items that are stored in
the dishwasher until you are ready to wash a full
load.
Once a day - for normal soiled pans and any other
items that have been left all day for washing.
INTENSIVE 75°C
Strong & Fast 65°C
Universal Plus 70°C
UNIVERSAL 60°C
Daily 55°C
Eco Plus 55°C
ECO 45°C
Delicate 45°C
A Class 59’ 65°C
RAPID 24' 50°C
Pre-wash
An antibacterial cycle, intended for washing and
sterilising dishes (even heavily stained ones)
babies’ bottles etc.
Intended for rapid washing of very dirty dishes.
Intended for everyday dishwashing. Two final
rinses ensure a high level of hygiene and
cleanliness.
Fast cycle, for “normally” dirty dishes - intended
for frequent washes and normal loads.
A medium temperature programme, intended for
washing pans and dishes that are “normally” dirty,
using detergents which contain enzymes.
+
+
Programme for normally soiled tableware (the
most efficient in terms of its combined energy and
water consumption for that type of tableware).
Programme standardised to EN 50242.
= "Perfect Rapid zone" switched on
Programme
Description
La pagina si sta caricando...
La pagina si sta caricando...
La pagina si sta caricando...
La pagina si sta caricando...
La pagina si sta caricando...
La pagina si sta caricando...
La pagina si sta caricando...
La pagina si sta caricando...
La pagina si sta caricando...
La pagina si sta caricando...
La pagina si sta caricando...
La pagina si sta caricando...
La pagina si sta caricando...
La pagina si sta caricando...
La pagina si sta caricando...
La pagina si sta caricando...
La pagina si sta caricando...
La pagina si sta caricando...
La pagina si sta caricando...
La pagina si sta caricando...
La pagina si sta caricando...
La pagina si sta caricando...
La pagina si sta caricando...
La pagina si sta caricando...
La pagina si sta caricando...
La pagina si sta caricando...
La pagina si sta caricando...
La pagina si sta caricando...
La pagina si sta caricando...
La pagina si sta caricando...
La pagina si sta caricando...
La pagina si sta caricando...
La pagina si sta caricando...
La pagina si sta caricando...
La pagina si sta caricando...
La pagina si sta caricando...
La pagina si sta caricando...
La pagina si sta caricando...
La pagina si sta caricando...
La pagina si sta caricando...
La pagina si sta caricando...
La pagina si sta caricando...
La pagina si sta caricando...
La pagina si sta caricando...
La pagina si sta caricando...
La pagina si sta caricando...
La pagina si sta caricando...
La pagina si sta caricando...
La pagina si sta caricando...
La pagina si sta caricando...
La pagina si sta caricando...
La pagina si sta caricando...
La pagina si sta caricando...
La pagina si sta caricando...
La pagina si sta caricando...
La pagina si sta caricando...
La pagina si sta caricando...
La pagina si sta caricando...
La pagina si sta caricando...
La pagina si sta caricando...
La pagina si sta caricando...
La pagina si sta caricando...
La pagina si sta caricando...
La pagina si sta caricando...
La pagina si sta caricando...
La pagina si sta caricando...
La pagina si sta caricando...
La pagina si sta caricando...
La pagina si sta caricando...
La pagina si sta caricando...
La pagina si sta caricando...
La pagina si sta caricando...
La pagina si sta caricando...
La pagina si sta caricando...
La pagina si sta caricando...
La pagina si sta caricando...
La pagina si sta caricando...
La pagina si sta caricando...
La pagina si sta caricando...
La pagina si sta caricando...
La pagina si sta caricando...
La pagina si sta caricando...
La pagina si sta caricando...
La pagina si sta caricando...
La pagina si sta caricando...
La pagina si sta caricando...
La pagina si sta caricando...
La pagina si sta caricando...
La pagina si sta caricando...
La pagina si sta caricando...
La pagina si sta caricando...
La pagina si sta caricando...
La pagina si sta caricando...
La pagina si sta caricando...
La pagina si sta caricando...
La pagina si sta caricando...
La pagina si sta caricando...
La pagina si sta caricando...
La pagina si sta caricando...
La pagina si sta caricando...
La pagina si sta caricando...
La pagina si sta caricando...
La pagina si sta caricando...
La pagina si sta caricando...
La pagina si sta caricando...
La pagina si sta caricando...
La pagina si sta caricando...
La pagina si sta caricando...
La pagina si sta caricando...
La pagina si sta caricando...
La pagina si sta caricando...
La pagina si sta caricando...
La pagina si sta caricando...
La pagina si sta caricando...
La pagina si sta caricando...
La pagina si sta caricando...
-
 1
1
-
 2
2
-
 3
3
-
 4
4
-
 5
5
-
 6
6
-
 7
7
-
 8
8
-
 9
9
-
 10
10
-
 11
11
-
 12
12
-
 13
13
-
 14
14
-
 15
15
-
 16
16
-
 17
17
-
 18
18
-
 19
19
-
 20
20
-
 21
21
-
 22
22
-
 23
23
-
 24
24
-
 25
25
-
 26
26
-
 27
27
-
 28
28
-
 29
29
-
 30
30
-
 31
31
-
 32
32
-
 33
33
-
 34
34
-
 35
35
-
 36
36
-
 37
37
-
 38
38
-
 39
39
-
 40
40
-
 41
41
-
 42
42
-
 43
43
-
 44
44
-
 45
45
-
 46
46
-
 47
47
-
 48
48
-
 49
49
-
 50
50
-
 51
51
-
 52
52
-
 53
53
-
 54
54
-
 55
55
-
 56
56
-
 57
57
-
 58
58
-
 59
59
-
 60
60
-
 61
61
-
 62
62
-
 63
63
-
 64
64
-
 65
65
-
 66
66
-
 67
67
-
 68
68
-
 69
69
-
 70
70
-
 71
71
-
 72
72
-
 73
73
-
 74
74
-
 75
75
-
 76
76
-
 77
77
-
 78
78
-
 79
79
-
 80
80
-
 81
81
-
 82
82
-
 83
83
-
 84
84
-
 85
85
-
 86
86
-
 87
87
-
 88
88
-
 89
89
-
 90
90
-
 91
91
-
 92
92
-
 93
93
-
 94
94
-
 95
95
-
 96
96
-
 97
97
-
 98
98
-
 99
99
-
 100
100
-
 101
101
-
 102
102
-
 103
103
-
 104
104
-
 105
105
-
 106
106
-
 107
107
-
 108
108
-
 109
109
-
 110
110
-
 111
111
-
 112
112
-
 113
113
-
 114
114
-
 115
115
-
 116
116
-
 117
117
-
 118
118
-
 119
119
-
 120
120
-
 121
121
-
 122
122
-
 123
123
-
 124
124
-
 125
125
-
 126
126
-
 127
127
-
 128
128
-
 129
129
-
 130
130
-
 131
131
-
 132
132
-
 133
133
-
 134
134
-
 135
135
-
 136
136


Candy CDIM 6120PR Manuale utente
- Categoria
- Lavastoviglie
- Tipo
- Manuale utente