Karma TM WASH70 Manuale del proprietario
- Categoria
- Stroboscopi
- Tipo
- Manuale del proprietario

www.karmaitaliana.it
TM WASH70
Mini wash moving head
Mini testa mobile wash
MANUALE DI ISTRUZIONI
Instruction Manual

2
• OTHER LANGUAGES •
• OTROS IDIOMAS •
• AUTRES LANGUES •
• OUTRAS LÍNGUAS •
PT
ES
FR
DE
INDICE / INDEX
CONTENUTO DELLA CONFEZIONE / INSIDE THE PACKAGING
TESTA MOBILE
Moving head MANUALE
Manual
• ITALIANO
• ENGLISH
PAG. 4
PAG. 10
CAVO ALIMENT.
Power cable
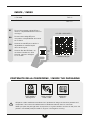
All’apertura della confezione controllate che il prodotto sia integro e che siano presenti tutti i
componenti. Comunicate immediatamente al venditore eventuali danni o mancanze.
When you open the package check that product is in good condition and that all the parts are
present. Immediately notify the seller if any part is damaged or missing.
Faça a leitura deste código QR para
verificar a disponibilidade do manual na
sua língua
Escanea este código QR para
comprobar la disponibilidad del manual
en tu idioma
Scannez le code QR pour vérifier la
disponibilité du mode d’emploi
dans votre langue.
Scannen Sie den QR-Code, um
nach dem Handbuch in Ihrer
Sprache, wenn es verfügbar
is, zu suchen

3
Il fabbricante, allo scopo di migliorare i propri prodotti, si riserva il diritto di modificarne le
caratteristiche siano esse tecniche o estetiche, in qualsiasi momento e senza al cun preavviso.
The manufacturer, in order to improve its products, reserves the right to modify their
characteristics whether technical or aesthetic, at any time and without notice.
IT
EN
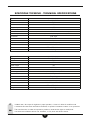
SPECIFICHE TECNICHE - TECHNICAL SPECIFICATIONS
Tipo di effetto Wash
Tipo led 7 x 10W RGBW
PAN 540°
TILT 270°
Angolo di proiezione 45°
Assorbimento 80W
Canali DMX 9 o 14
Modalità operativa Automatico / manuale / tempo di musica / DMX
Connettori XLR 3 pin
Staffa Da soffitto
Colore Nero
Display Si
Alimentazione 110 - 230V ~; 50 - 60Hz
Dimensioni 177 x 177 x 240 mm
Peso 2,8 Kg
Type of effect Wash
Led type 7 X 10W RGBW
PAN 540°
TILT 270°
Beam angle 45°
Power consumption 80W
DMX channels 9 or 14
Operating modes Auto / manual / music / DMX
Connectors XLR 3 pins
Bracket For ceiling
Colour Black
Display Yes
Power supply 110 - 230V ~; 50 - 60Hz
Dimensions 177 x 177 x 240 mm
Weight 2,8 Kg

4
GRAZIE PER IL VOSTRO ACQUISTO
Il prodotto da Lei acquistato è frutto di un’accurata progettazione da parte di ingegneri specializzati. Per la
sua fabbricazione sono stati impiegati materiali di ottima qualità per assicurarne il funzionamento nel tempo.
Il prodotto è stato realizzato in conformità alle normative imposte dall’ Unione Europea, garanzia di
affidabilità e sicurezza.
Vi preghiamo di leggere attentamente questo manuale prima di iniziare ad utilizzare l’apparecchio al fine di
sfruttarne appieno le potenzialità.
Augurandoci che rimarrete soddisfatti del vostro acquisto, vi ringraziamo nuovamente per la fiducia riposta
nel nostro marchio e vi invitamo a visitare il nostro sito internet www.karmaitaliana.it dove troverete l’intera
gamma dei prodotti, insieme ad informazioni ed aggiornamenti utili.
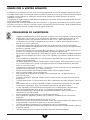
PRECAUZIONI ED AVVERTENZE
• Leggete con attenzione le istruzioni riportate su questo manuale e seguitele scrupolosamente.
• Conservate il manuale per future consultazioni e allegatelo se cedete l’apparecchio ad altri.
• Il dispositivo funziona con pericolosa tensione di rete a 110 - 230V. Non apritelo, non
smontatelo e non cercate di intervenire al suo interno. In caso di utilizzo improprio esiste il
pericolo di una scarica elettrica.
• L’installazione del prodotto deve essere effettuata esclusivamente da tecnici specializzati.
In caso di installazione o collegamenti errati il produttore non si assume alcuna responsabilità
per danni a persone o cose.
• Assicuratevi sempre che la tensione della rete elettrica corrisponda a quella impostata sul
prodotto. Un voltaggio errato danneggerebbe seriamente l’apparecchio.
• Per evitare il rischio di pericolose scosse elettriche, prima di accendere il prodotto controllate
sempre che sia collegato alla messa a terra. Non tagliate il cavo interno o esterno di messa a
terra.
• Prima di effettuare collegamenti con altri dispositivi controllate che tutti gli apparecchi siano
scollegati dall’alimentazione.
• Se dovete appendere il prodotto utilizzate solo la staffa originale. Assicuratevi che la struttura
su cui viene montato sia in grado di sorreggerne il peso e fissatelo saldamente, utilizzando
anche un cavo di sicurezza.
• Il prodotto non è adatto per usi esterni. Per evitare il rischio di cortocircuiti non esponetelo a
temperature elevate (oltre i 40°), pioggia o umidità.
• Evitate che nel prodotto entrino liquido infiammabile, acqua o oggetti metallici.
• Non toccate il prodotto con le mani bagnate.
• Non posizionate recipienti pieni di liquido, come ad esempio vasi, sull’apparecchio o in
prossimità di esso.
• Installate il prodotto in posizione stabile e areata, lontano da fonti di calore e non ostruite le
prese d’aria.
• Trattate l’apparecchio e i suoi comandi con la dovuta delicatezza, evitando vibrazioni, cadute o
colpi.
• Se il prodotto non si accende controllate il fusibile e se necessario sostituitelo con uno dello
stesso tipo e amperaggio, dopo aver scollegato l’apparecchio dall’alimentazione.
• In caso di problemi di funzionamento interrompete l’uso immediatamente. Non tentate di
riparare l’apparecchio per conto vostro, ma rivolgetevi all’assistenza autorizzata.
Riparazioni effettuate da personale non competente potrebbero creare gravi danni sia
all’apparecchio che alle persone.
• Evitate l’esposizione diretta degli occhi alla sorgente luminosa.
• Non accendere e spegnere il prodotto a brevi intervalli: potrebbe ridurre la durata del
dispositivo
• Scollegate l’unità dall’alimentazione quando non è in uso.
• Non staccate il cavo di alimentazione tirandolo dal filo. Non tagliate modificate o piegate il cavo
di alimentazione e controllate sempre che sia in buone condizioni.
• Lasciate raffreddare il prodotto prima di effettuare pulizia o manutenzione.
• Per la pulizia del prodotto usate esclusivamente uno panno umido, evitando solventi o detersivi
di qualsiasi genere.
• I bambini devono essere sorvegliati se presenti durante l’utilizzo del prodotto.

5
CONDIZIONI DI GARANZIA
Il prodotto è coperto da garanzia in base alle vigenti normative nazionali ed Europee.
Per le condizioni complete di garanzia e per effettuare richieste di assistenza visitate il sito:
www.karmaitaliana.it
• La garanzia copre i difetti di fabbrica ed i guasti verificatisi nei primi 2 anni dalla data di acquisto.
Nel caso di acquisto con fattura, la garanzia è limitata ad 1 anno.
• Sono esclusi i guasti causati da imperizia o da uso non appropriato dell’apparecchio
• La garanzia non ha più alcun effetto qualora l’apparecchio risulti manomesso.
• La garanzia non prevede necessariamente la sostituzione del prodotto.
• Sono escluse dalla garanzia le parti esterne, le batterie, le manopole, gli interruttori, e le parti
asportabili o consumabili.
• Le spese di trasporto e i rischi conseguenti sono a carico del proprietario dell’apparecchio
• A tutti gli effetti la validità della garanzia è avallata unicamente dalla presentazione della fattura o
scontrino d’acquisto.
• In caso di invio in assistenza è importante che il prodotto sia completo dell’imballo originale:
vi raccomandiamo quindi di conservarlo.
Vi suggeriamo anche di procedere alla registrazione del prodotto sul nostro sito internet,
www.karmaitaliana.it loggandovi nell’area riservata. Avrete così la possibilità di tener traccia della validità
della garanzia e di ricevere aggiornamenti sui nostri articoli.
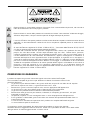
Questo simbolo vi avverte della presenza di istruzioni d’uso e manutenzione importanti, nel manuale o
nella documentazione che accompagna il prodotto
Questo simbolo vi avverte della presenza di materiale non isolato “sotto tensione“ ad elevato voltaggio,
all’interno del prodotto, che può costituire pericolo di folgorazione per le persone.
Il marchio CE indica che questo prodotto è conforme alle direttive europee e relative normative ad esso
applicabili. La documentazione di conformità in forma completa è reperibile presso la società Karma
Italiana Srl.
Ai sensi del Decreto Legislativo N°49 del 14 Marzo 2014 - “ Attuazione delle Direttive 2012/19/UE
sui rifiuti di apparecchiature elettriche ed elettroniche (RAEE)”.
Il simbolo del cassonetto barrato riportato sull’apparecchiatura indica che il prodotto alla fine della
propria vita utile deve essere raccolto separatamente dagli altri rifiuti. L’utente dovrà, pertanto,
conferire l’apparecchiatura integra dei componenti essenziali giunta a fine vita agli idonei centri di
raccolta differenziata dei rifiuti elettronici ed elettrotecnici, oppure riconsegnarla al rivenditore al
momento dell’acquisto di nuova apparecchiatura di tipo equivalente, in ragione di uno a uno oppure 1
a zero per le apparecchiature aventi lato maggiore inferiore a 25 cm. L’adeguata raccolta differenziata
per l’avvio successivo dell’apparecchiatura dimessa al reciclaggio, al trattamento e allo smaltimento
ambientale compatibile contribuisce ad evitare possibili effetti negativi sull’ambiente e sulla salute e
favorisce il riciclo dei materiali di cui è composta l’apparecchiatura. Lo smaltimento abusivo del
prodotto da parte dell’utente comporta l’applicazione delle sanzioni amministrative di cui al D.Lgs n.
Decreto Legislativo N° 49 del 14 Marzo 2014.

1
2
6
5
4
3
8
7
9 10
6

7
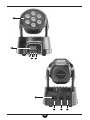
1) LED RGBW
E’ la parte mobile in grado ruotare e inclinarsi sul
suo perno per poter proiettare il fascio luminoso
in qualsiasi direzione.
2) DISPLAY
Mostra le principali informazioni e permette il
settaggio di tutti i parametri selezionati tramite i
tasti (3-6).
3) TASTO MODE/ESC
Consente di selezionare il parametro da cambiare.
Premetelo ripetutamente per passare da una
funzione all’altra. Terminate le modifiche
ripremetelo per uscire.
4) TASTO UP
Incrementa ad ogni pressione il valore mostrato a
display.
5) TASTO DOWN
Decrementa ad ogni pressione il valore mostrato
a display.
6) TASTO ENTER
Conferma la selezione effettuata con i tasti
UP/DOWN (4-5).
7) PRESA DI ALIMENTAZIONE
Permette il collegamento del cavo elettrico che
andrà poi connesso alla presa elettrica domestica
110/220V.
8) FUSIBILE
In caso di mancata accensione dell’apparecchio
scollegate il cavo di alimentazione dalla presa (7),
quindi estraete il fusibile di protezione aprendo il
piccolo vano. Se necessario sostituite il fusibile
con uno di eguale valore amperometrico.
Attenzione: questa operazione va effettuata
esclusivamente a cavo scollegato per evitare rischi
di shock elettrici.
9) PRESA INPUT
Qui potete collegare il cavo DMX a 3pin in
ingresso.
10) PRESA OUTPUT
Qui potete collegare il cavo DMX a 3pin in uscita
verso il prossimo apparecchio DMX.
INTRODUZIONE A CONNESSIONI DMX
In una connessione DMX 512 ci sono 512 canali a
disposizione.
Ogni apparecchio DMX impiega 1 o più canali per
gestire le varie funzioni. L’utente deve assegnare un
indirizzo di partenza ad ogni apparecchio DMX
connesso all’impianto, tale indirizzo indicherà il
primo canale occupato nella centralina. Bisogna
pianificare la scelta dell’indirizzo di partenza in
modo da non far mai sovrapporre i canali, onde
evitare un funzionamento non corretto
dell’apparecchio.
Esempio: Ammettiamo di collegare 3 apparecchi
DMX ognuno dotato di 10 canali, il primo
apparecchio dovrà essere settato sull’indirizzo 1, il
secondo apparecchio sull’indirizzo 11 ed il terzo
sull’indirizzo 21. Tuttavia si può usare lo stesso
indirizzo di partenza su più apparecchi se si
desidera ottenere un loro movimento all’unisono.
Gli apparecchi DMX sono concepiti per ricevere
dati tramite collegamento seriale Daisy Chain.
Questo tipo di collegamento si ha quando l’uscita
dati di un apparecchio è connessa all’ingresso dati
del successivo. L’ ordine in cui gli apparecchi sono
collegati non ha importanza e non incide su come
la centralina comunica con ciascuno di essi.
Utilizzare l’ordine in cui il cablaggio è più semplice e
diretto. La lunghezza del cavo di segnale non
dovrebbe superare i 100 metri per evitare
l’interferenze tra segnali e altri apparecchi elettrici.
Per settare l’indirizzo (da 001 a 512) che volete
assegnare all’apparecchio, premete ripetutamente
il tasto MODE (3) fino a visualizzare la scritta “d”
quindi, tramite i tasti SU e GIU’ impostate l’indirizzo
e confermate con enter.
Per poter operare correttamente in impianti DMX
occorre conoscere il numero di canali di cui ogni
apparecchio connesso dispone e la funzione dei
canali stessi.
La tabella 1 mostra le funzioni abbinate ai vari
canali dell’apparecchio in modalità 9 o 14 canali.
L’apparecchio può operare a 9 o 14 canali (la
scelta è effettuabile dai menu).
La tabella 2 mostra le funzioni di ognuno dei 9
canali in ogni valore possibile (da 0 a 255).
La tabella 3 mostra le funzioni di ognuno dei 14
canali in ogni valore possibile (da 0 a 255).
Prima di utilizzare l’apparecchio è utile fare un
corso specifico sugli impianti DMX per
comprendere appieno le potenzialità e le funzioni di
questo apparecchio.

8
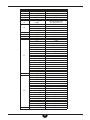
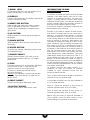
TABELLA 1
# Canale 9 CANALI 14 CANALI
1 PAN PAN
2 TILT PAN FINE
3 DIMMER E STROBO TILT
4 ROSSO TILT FINE
5 VERDE VELOCITA’ PAN/TILT
6 BLU DIMMER E STROBO
7 BIANCO ROSSO
8 VELOCITA’ VERDE
9 RESET BLU
10 BIANCO
11 COLORE
12 VELOCITA’ COLORE
13 AUTO/SOUND
14 RIPOSO
TABELLA 2 (DMX 9 CANALI)
# Canale VALORE FUNZIONE
1 0-255 PAN
2 0-255 PAN FINE
3
0-7 Vuoto
8-134 Dimmer
135-239 Strobo da 0Hz a 40Hz
240-255 Aperto
4 0-255 Rosso
5 0-255’ Verde
6 0-255 Blu
7 0-255 Bianco
8 0-255 Velocità
9 0-255 Riposo

9
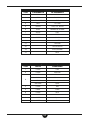
TABELLA 3 (DMX 14 CANALI)
# Canale VALORE FUNZIONE
1 0-255 PAN
2 0-255 PAN FINE
3 0-255 TILT
4 0-255’ TILT FINE
5 0-255 VELOCITA’PAN/TILT
(da veloce a lenta)
6
0-7 Vuoto
8-134 Dimmer
135-239 Strobo da 0Hz a 40Hz
240-255 Aperto
7 0-255 Rosso
8 0-255 Verde
9 0-255 Blu
10 0-255 Bianco
11
0-7 Vuoto
8-21 Bianco
22-34 Rosso
35-49 Verde scuro
50-63 Blu scuro
64-77 Blu chiaro
78-91 Magenta
92-105 Giallo
106-119 Viola
120-134 arancio
135-147 Verde chiaro
148-161 Rosa
162-175 Marrone
176-189 Oro
190-203- Cremisi
204-217 Violetto
218-231 Viola scuro
232-255 Cambia colori
12 0-255 Velocità colori
13
0-7 Vuoto
8-22 Effetti automatici 1
23-37 Effetti automatici 2
38-53 Effetti automatici 3
54-67 Effetti automatici 4
68-82 Effetti automatici 5
83-97 Effetti automatici 6
98-112 Effetti automatici 7
113-127 Effetti automatici 8
128-142 Effetti a tempo di musica 1
143-157 Effetti a tempo di musica 2
158-172 Effetti a tempo di musica 3
173-187 Effetti a tempo di musica 4
188-202 Effetti a tempo di musica 5
203-217 Effetti a tempo di musica 6
218-232 Effetti a tempo di musica 7
233-255 Effetti a tempo di musica 8
14 150-200 Riposo

10
THANK YOU FOR YOUR PURCHASE
The product you have purchased is the result of careful planning by specialized engineers. High quality
materials were used for its construction, to ensure its functioning over time.
The product is manufactured in compliance with the strict regulations imposed by the European Union, a
guarantee of reliability and safety.
Please read this manual carefully before starting using the device in order to take advantage of its full
potential.
Hoping that you will be satisfied of your purchase, we thank you again for your trust in our brand and we invite
you to visit our website www.karmaitaliana.it where you will find the whole range of our products, along with
useful information and updates.
CAUTIONS AND WARNINGS
• Read and follow strictly the instructions contained in this manual.
• Keep this manual for future reference and include it if you give the product to another user.
• This device works with dangerous 110 - 230V mains power. Do not open, do not
disassemble and don’t try to operate inside it. In case of wrong use an electric shock may
occur.
• The installation of the product must be carried out exclusively by specialized technicians.
In case of wrong installation or connections, the manufacturer doesn’t take any responsibility
for damages to people or objects.
• Make sure that your power outlet voltage matches with the voltage set on the product.
A wrong voltage would seriously damage the fixture.
• To avoid the risk of dangerous electric shocks, before turning on the product always check
that it is connected to a circuit with suitable earth ground. Never cut internal or external
ground wires.
• Before making any connection with other devices, check that all the fixtures are disconnected
from the power source.
• If you need to suspend the product use only the original bracket. Make sure that the
structure where it is mounted can support its weight and fasten it firmly, using also a safety
cable.
• The product is not suitable for outdoor use. To avoid the risk of shortcircuits don’t expose it
to high temperatures (above 40°), rain or humidity.
• Do not allow flammable liquid, water or metal objects to enter the product.
• Don’t touch the product with wet hands.
• Do not place any recipients filled with liquids, such as vases, on top of or directly next to the
appliance.
• Install the product in a stable and ventilated position, far from heat sources and don’t
obstruct the air vents.
• Use the fixture and its controls with due accuracy, avoiding falls, vibrations or impacts.
• If the product doesn’t turn on, check the fuse and if necessary replace it with one of the
same type and rating, after disconnecting the fixture from power.
• In the event of a serious operating problem, stop using the product immediately. Never try to
repair it by yourself, but contact the authorized technical service center. Repairs carried out
by unskilled persons could lead to serious damages both to the fixture and to people.
• Avoid direct eye exposure to the light source.
• Do not turn the product on and off at short intervals, it may reduce the life of the device.
• Disconnect the unit from power when it is not used.
• Never disconnect the product from the power source by pulling on the cord. Do not cut, kink,
otherwise damage nor modify the power supply cord and periodically check that it is in good
condition.
• Wait for the product to cool before cleaning or maintenance.
• To clean the product, use only a damp cloth, avoiding solvents or detergents of any kind.
• If the product is used in the presence of children they must be supervised.

11
This symbol alerts you of the presence of important operating and maintenance instructions, in the
manual or in the documentation accompanying the product
This symbol alerts you to the presence of uninsulated dangerous voltage within the product’s enclosure
that might be of sufficient magnitude to constitute a risk of electric shock. Do not open the product’s
case.
The CE mark indicates that this product complies with the applicable European directives and their
related standards. Compliance documentation in complete form is available at the company Karma
Italiana Srl
Directive 2012/19/UE regarding electric and electronic equipment waste (WEEE).
The symbol of the crossed-out dustbin indicates that the product at the end of its life must be collected
separately from other waste . The user must , therefore , confer the fixture complete with all the
essential components to an authorized disposal center for collection of electronic and electrical waste,
or return it to the dealer when buying new equipment of equivalent type, at a rate of one to one, or
one to zero if external dimension is less than 25cm. Appropriate separate collection to send the
decommissioned equipment to recycling , treatment and environmentally compatible disposal helps to
prevent negative impact on the environment and human health and promotes recycling of the materials
making up the product. In Italy illegal dumping of the product by the user entails the application of
administrative sanctions pursuant to Legislative Decree n. 49 (14/03/2014).
WARRANTY CONDITIONS
The product is covered by warranty according to current national and European regulations.
For detailed warranty conditions and RMA requests please refer to our website: www.karmaitaliana.it.
• The warranty covers manifacturing defects and faults occurred in the first 2 years from the date of
purchase. In case of purchase with invoice, the warranty is limited to 1 year.
• Damages caused by negligence or wrong use of the device are not covered by warranty.
• The warranty is no longer effective if the item is modified or disassembled by not authorized people.
• This warranty doesn’t necessarily envisage the product’s replacement.
• External components, batteries, knobs, switches and any removable or subject to wear and tear parts
are excluded from warranty.
• Shipment for the return of faulty items is at expense and risk of the owner.
• For all intents and porpuses the warranty is effective only upon exhibition of the invoice or of the
purchase receipt.
• If you send the product for repair, it must be shipped with complete original packaging: we therefore
recommend to save it.
We also suggest to register your product on our website www.karmaitaliana.it, after signing in to access
the reserved area. In this way you will have the possibility to keep track of the warranty validity and to
receive updates on our items.
WARNING
RISK OF ELECTRIC SHOCK,
DO NOT OPEN
WARNING: to reduce the risk of electric shock, do not
remove the cover. No serviceable parts for the user
inside. For servicing refer to qualied personnel.

12
1
2
6
5
4
3
8
7
9 10

13
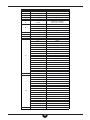
1) RGBW LEDS
It’s the the moving part that can rotate or tilt to
project the light beam in any direction.
2) DISPLAY
It shows main information and settings selected by
means of the buttons (3-6).
3) MODE/ESC BUTTON
Used to select the setting you need to change.
Press it repeatedly to skip from a function to
another. Once completed the changes press it
again to exit.
4) UP BUTTON
When pressed it increases the value shown on
the display.
5) DOWN BUTTON
When pressed it decreases the value shown on
the display.
6) ENTER BUTTON
To confirm the settings selected by means of the
UP/DOWN(4-5) keys.
7) POWER SOCKET
Connect here the power cord, which is to be
connected on the other side to a 110/220V
power outlet.
8) FUSE
If the fixture doesn’t turn on disconnect the power
cord from the socket (7), then pull out the
protection fuse from the small housing.
If necessary replace the fuse with one of
the same amperage.
Warning: This operation is to be made only with
the power cord disconnected, to avoid risks of
electric shock.
9) INPUT SOCKET
Connect here the 3 pin DMX input cable.
10) OUTPUT SOCKET
Connect here the 3 pin DMX output cable
INTRODUCTION TO DMX
CONNECTIONS
In a DMX 512 connection there are 512 available
channels. Each DMX fixture uses one or more
channels to manage its functions. The user must
assign a starting address to each DMX fixture
connected to the system. This address will indicate
the first channel used by the controller. You have to
plan the starting address choice in order
to avoid the channels’ overlapping. Otherwise the
fixture wouldn’t work correctly.
Example: If you need to connect 3 DMX fixtures,
each with 10 channels, the first unit is to be set on
address 1, the second unit on address 11 and the
third one on address 21. Anyway you can set the
same starting address on more devices if you wish
them to operate in synchrony. DMX devices are
conceived to receive data through a serial Daisy
Chain connection. With this kind of connection the
data output of a fixture is connected to the data
input of the following one. The connection order of
the devices is not important and it doesn’t affect on
how the controller interacts with each of them.
We suggest to put them in the easiest and most
direct sequence for cable connection. The signal
cable length should not be more than 100 m to
avoid interferences with other signals or electric
devices. To set the address you want to assign to
the fixture (from 001 to 512), press the MODE (3)
key until the display shows the symbol “d”. Then, by
means of the UP and DOWN keys, set the address
and confirm with ENTER.
To operate correctly with DMX systems it is
necessary to know the number of channels
available on each connected fixture and the
function of these channels.
Chart 1 shows the functions related to the fixture’s
channels in 9 or 14 channel mode.
It is possible to choose from the menu between 9
or 14 channel operation.
Chart 2 shows the functions of each of the 9
channels‘ possible values (from 0 to 255).
Chart 3 shows the functions of each of the 14
channels’ possible values (from 0 to 255).
Before using the fixture it would be advisable to
take a specific course on DMX systems for full
understanding of its potential and functions.

14
CHART 1
# CH 9 CHANNELS 14 CHANNELS
1 PAN PAN
2 TILT PAN FINE
3 DIMMER & STROBE TILT
4 RED TILT FINE
5 GREEN PAN/TILT SPEED
6 BLUE DIMMER & STROBE
7 WHITE RED
8 SPEED GREEN
9 RESET BLUE
10 WHITE
11 COLOUR
12 COLOR SPEED
13 AUTO/SOUND
14 REST
CHART 2 (9 CHANNEL DMX)
# CH VALUE FUNCTIONS
1 0-255 PAN
2 0-255 PAN FINE
3
0-7 Blank
8-134 Dimmer
135-239 Strobe from 0Hz to 40Hz
240-255 Open
4 0-255 Red
5 0-255’ Green
6 0-255 Blue
7 0-255 White
8 0-255 Speed
9 0-255 Rest

15
CHART 3 (14 CHANNEL DMX)
# CH VALUE FUNCTION
1 0-255 PAN
2 0-255 PAN FINE
3 0-255 TILT
4 0-255’ TILT FINE
5 0-255 PAN/TILT SPEED
(from fast to slow)
6
0-7 Blank
8-134 Dimmer
135-239 Strobe from 0 Hz to 40Hz
240-255 Open
7 0-255 Red
8 0-255 Green
9 0-255 Blue
10 0-255 White
11
0-7 Blank
8-21 White
22-34 Red
35-49 Dark green
50-63 Dark blue
64-77 Light blue
78-91 Magenta
92-105 Yellow
106-119 Purple
120-134 Orange
135-147 Light green
148-161 Pink
162-175 Brown
176-189 Gold
190-203- Crimson
204-217 Violet
218-231 Dark purple
232-255 Color change
12 0-255 Color speed
13
0-7 Blank
8-22 Auto effects1
23-37 Auto effects 2
38-53 Auto effects 3
54-67 Auto effects 4
68-82 Auto effects 5
83-97 Auto effects 6
98-112 Auto effects 7
113-127 Auto effects 8
128-142 Sound activated effects 1
143-157 Sound activated effects 2
158-172 Sound activated effects 3
173-187 Sound activated effects 4
188-202 Sound activated effects 5
203-217 Sound activated effects 6
218-232 Sound activated effects 7
233-255 Sound activated effects 8
14 150-200 Rest

www.karmaitaliana.it
Made in China
Ver. 23.1
Prodotto da/ produced by:
KARMA ITALIANA SRL
Via Gozzano 38 bis
21052, Busto Arsizio (VA) - Italy
-
 1
1
-
 2
2
-
 3
3
-
 4
4
-
 5
5
-
 6
6
-
 7
7
-
 8
8
-
 9
9
-
 10
10
-
 11
11
-
 12
12
-
 13
13
-
 14
14
-
 15
15
-
 16
16


Karma TM WASH70 Manuale del proprietario
- Categoria
- Stroboscopi
- Tipo
- Manuale del proprietario
in altre lingue
- English: Karma TM WASH70 Owner's manual