
CRDS - CDDS
La pagina si sta caricando...

2 IT
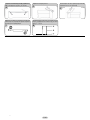
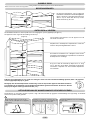
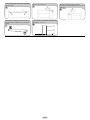
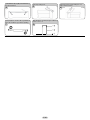
Togliere i tappi (A) e (B ), svita re le viti ed es trarre
parzialmente il crus cotto.
S vitare la cerniera destra
5
Dalla busta accessori in dotazione, prelevare
e fissare la cerniera s uperiore sinistra
6
R imuovere il tappo s ulla parte s inistra e ins erirlo
sulla parte destra delle tes tatine centrali e
inferiore.
7
R imontare le cerniere e le porte operando dal
basso verso l•alto, 1 2 3
8
4

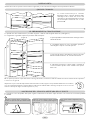
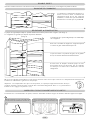
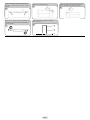
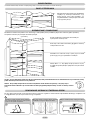
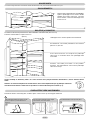
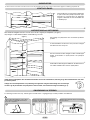
NB . This is the rating plate. If you need to contact our S ervice Department in the event of faults , remember to give them the
information on the plate.
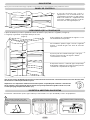
Important: If the room temperature is very warm, the appliance may work c ontinuous ly and a layer of fros t
will depos it on the back of the fridge compartment. In this cas e, turn the knob to lower s ettings (1-2).
DOUB LE DOOR
C ONTR OL PANE L
The thermostat box to control the appliance
is located inside the fridge compartment on
the top right. To check whether the appliance
is functioning, make sure that the thermostat
knob is not set on Œ0•.
DE FR OS TING and FR E E ZING
The rating plate states the maximum quantity of foods that can be frozen, (see “ gure 2).
Freezing is guaranteed with any knob setting.
(Figure 2)
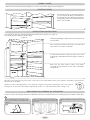
Defros ting of the fridge compartment occurs automatically
in this product.
We recommend you defrost the freezer area when the
layer of frost is more than 3 mm thick.
A small amount of frost or drops of water on the back
of the fridge compartment when the fridge is working is
normal
Make sure the water outlet is always clean. Make
sure foods do not touch the back or sides of the fridge
compartment
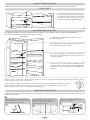
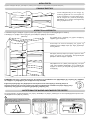
R E V E R S ING T HE O P E NING O F T HE DOO R S
In order to reverse the opening of the doors, follow the indications in relation to the insert and hinge type your product is made up of.
P lace or tilt the fridge at a 45° angle, since
it is necessary to work on the bottom of the
appliance
1
R emove the middle screw and remove the top
door
3
R emove the bottom hinge by removing the
screws, the plug and washers, then remove the
bottom door
2
A
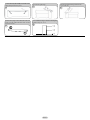
3 E N
Wait at least two hours before switching the appliance on, in order to ensure that the refrigerant circuit is fully efficient.
La pagina si sta caricando...
La pagina si sta caricando...
La pagina si sta caricando...
La pagina si sta caricando...
La pagina si sta caricando...
La pagina si sta caricando...
La pagina si sta caricando...
La pagina si sta caricando...
La pagina si sta caricando...
La pagina si sta caricando...
La pagina si sta caricando...
La pagina si sta caricando...
La pagina si sta caricando...
La pagina si sta caricando...
La pagina si sta caricando...
La pagina si sta caricando...
La pagina si sta caricando...

21 FI
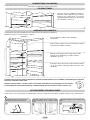
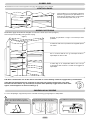
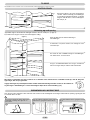
Huom! Arvokilpi on kiinnitetty tähän. Jos sinun tarvitsee ottaa yhteyttä huoltoon vikatilanteessa, muista ilmoittaa kilven
tiedot.
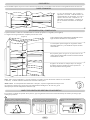
Tärkeää: Jos huoneen lämpötila on erittäin lämmin, laite saattaa käydä koko ajan ja jääkaapin takaosaan
muodostuu huurrekerros. Käännä tässä tapauksessa valitsin alhaisempaan asentoon (1-2).
KAKSIOVINEN
OHJAUSPANEELI
Laitteen säätöön tarkoitettu termostaattilaatikko
sijaitsee jääkaappiosaston sisällä oikealla
ylhäällä. Kun haluat tarkastaa, että laite
toimii, varmista, että termostaattinuppi ei ole
asennossa "0“.
SULATUS ja PAKASTUS
Arvokilvessä ilmoitetaan pakastettavien elintarvikkeiden enimmäismäärä (katso kuva 2)
Pakastus taataan kaikissa nupin asennoissa.
(Kuva 2)
Jääkaappiosaston sulatus tapahtuu automaattisesti.
Suosittelemme, että sulatat pakastimen, kun huurteen
paksuus on yli 3 mm.
Pieni määrä huurretta tai vesipisaroita jääkaapin
takaosassa on normaalia silloin, kun jääkaappi toimii
normaalisti
Varmista, että veden poistoaukko on aina puhdas.
Varmista, että elintarvikkeet eivät kosketa jääkaapin
takaosaa tai sivuja.
OVIEN KÄTISYYDEN VAIHTAMINEN
Kun haluat vaihtaa ovien kätisyyden, noudata ohjeita oman tuotteesi ja saranatyypin mukaisesti.
Laita jääkaappi lattialle tai kallista sitä 45°,
koska on tarpeen työskennellä laitteen
pohjassa.
1
Irrota keskimmäinen ruuvi ja irrota yläovi.
3
Irrota alasarana avaamalla ruuvit, tulppa
ja alusrenkaat, irrota sitten alaovi.
2
A
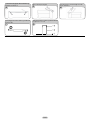
Ennen laitteen käynnistämistä on suositeltavaa
odottaa vähintään kaksi tuntia, jotta odottaa vähintään kaksi tuntia, jotta
La pagina si sta caricando...
La pagina si sta caricando...
La pagina si sta caricando...
La pagina si sta caricando...
La pagina si sta caricando...
La pagina si sta caricando...
La pagina si sta caricando...

Z STUDIO > 11-2006 – 41018270
-
 1
1
-
 2
2
-
 3
3
-
 4
4
-
 5
5
-
 6
6
-
 7
7
-
 8
8
-
 9
9
-
 10
10
-
 11
11
-
 12
12
-
 13
13
-
 14
14
-
 15
15
-
 16
16
-
 17
17
-
 18
18
-
 19
19
-
 20
20
-
 21
21
-
 22
22
-
 23
23
-
 24
24
-
 25
25
-
 26
26
-
 27
27
-
 28
28
-
 29
29
-
 30
30


in altre lingue
- English: Candy CDDS Owner's manual
- français: Candy CDDS Le manuel du propriétaire
- español: Candy CDDS El manual del propietario
- Deutsch: Candy CDDS Bedienungsanleitung
- Nederlands: Candy CDDS de handleiding
- português: Candy CDDS Manual do proprietário
- dansk: Candy CDDS Brugervejledning
- čeština: Candy CDDS Návod k obsluze
- polski: Candy CDDS Instrukcja obsługi
- svenska: Candy CDDS Bruksanvisning
- suomi: Candy CDDS Omistajan opas
Documenti correlati
-
Candy CFBD2450/2E & CFBD 2450/1E Manuale del proprietario
-
-
-
-
-
Otsein-Hoover HDA 2950 Manuale utente
-
-
Otsein-Hoover OHVN 3886 Manuale utente
-
Otsein-Hoover CFM 2260 E Manuale utente