
www.samsung.com
User Manual
07/2016. Rev.1.1
EO-PN920

Table of Contents
English (UK)
Français
Deutsch
Italiano
Español
Magyar
Polski
Română
Български
Hrvatski
Srpski
Português
Latviešu
Lietuvių kalba
Eesti
Nederlands
Svenska
Norsk
Suomi
Dansk
Ελληνικά
Slovenščina
Türkçe
Русский
Українська
Қазақ тілі
English (USA)
Español (Castellano)
简体中文
Français (Canada)
Português (Brasil)
한국어

3
Read me first
Please read this manual before using the device to ensure safe and proper use.
•
Images may differ in appearance from the actual product. Content is subject to change
without prior notice.
•
Before connecting the headset to your other device, make sure the other device is
compatible with the headset.
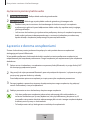
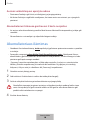
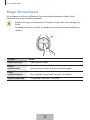
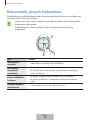
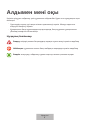
Instructional icons
Warning: situations that could cause injury to yourself or others
Caution: situations that could cause damage to your device or other equipment
Notice: notes, usage tips, or additional information
English (UK)
1

4
Getting started
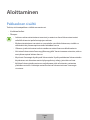
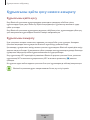
Package contents
Check the product box for the following items:
•
Headset
•
Quick start guide
•
The items supplied with the device and any available accessories may vary
depending on the region or service provider.
•
The supplied items are designed only for this device and may not be compatible
with other devices.
•
Appearances and specifications are subject to change without prior notice.
•
You can purchase additional accessories from your local Samsung retailer. Make
sure they are compatible with the device before purchase.
•
Use only Samsung-approved accessories. Using unapproved accessories may cause
the performance problems and malfunctions that are not covered by the warranty.
•
Availability of all accessories is subject to change depending entirely on
manufacturing companies. For more information about available accessories, refer
to the Samsung website.
English (UK)
2

Getting started
5
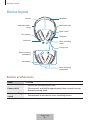
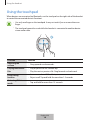
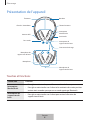
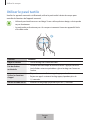
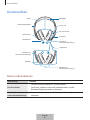
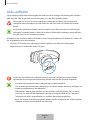
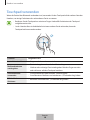
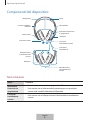
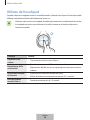
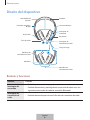
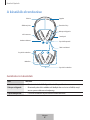
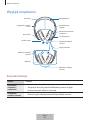
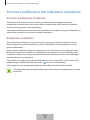
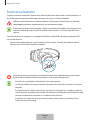
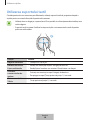
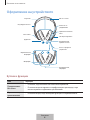
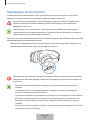
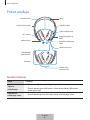
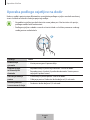
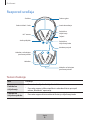
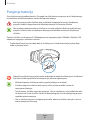
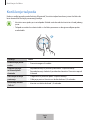
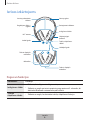
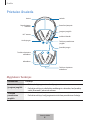
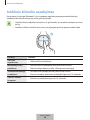
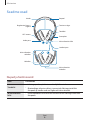
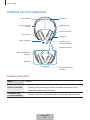
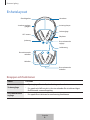
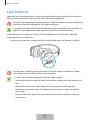
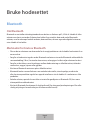
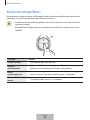
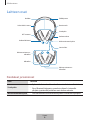
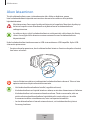
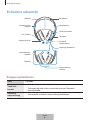
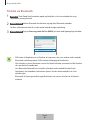
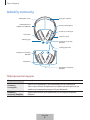
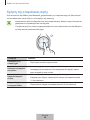
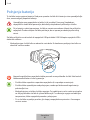
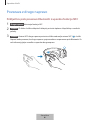
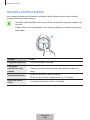
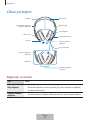
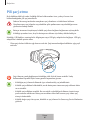
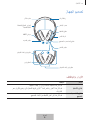
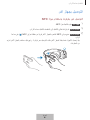
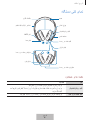
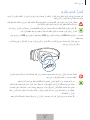
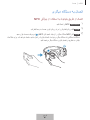
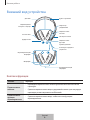
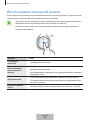
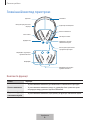
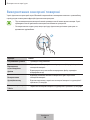
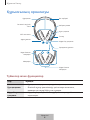
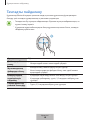
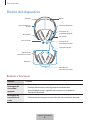
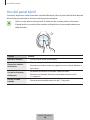
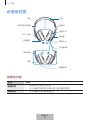
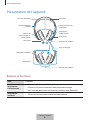
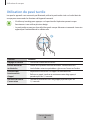
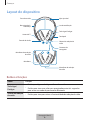
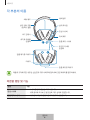
Device layout
NFC antenna
Charger jack
Microphone
Noise-cancelling
microphone
Headband
Ear pad
Noise-cancelling
switch
Power switch
Notification light
Touchpad
Audio jack
Noise-cancelling
microphone
Adjustable slider /
Hinge
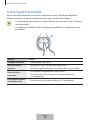
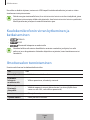
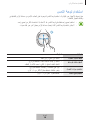
Buttons and functions
Name Function
Power switch
•
Slide to turn the headset on or off.
•
Slide upwards and hold for approximately three seconds to enter
Bluetooth pairing mode.
Noise-cancelling
switch
•
Slide upwards to activate the noise-cancelling feature.
English (UK)
3

Getting started
6
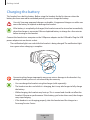
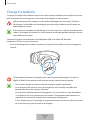
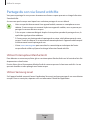
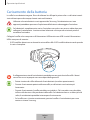
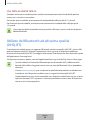
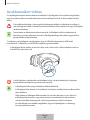
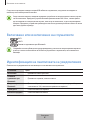
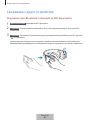
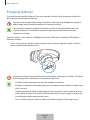
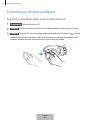
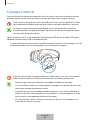
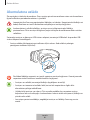
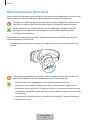
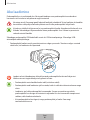
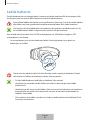
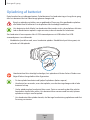
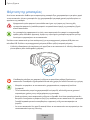
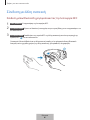
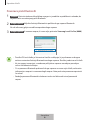
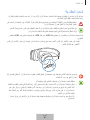
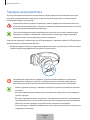
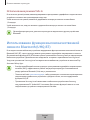
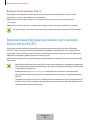
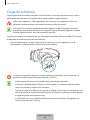
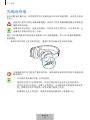
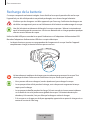
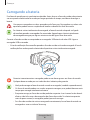
Charging the battery
This headset has a built-in battery. Before using the headset for the first time or when the
battery has been unused for extended periods, you must charge the battery.
Use only Samsung-approved chargers and cables. Unapproved chargers or cables can
cause the battery to explode or damage the headset.
If the battery is completely discharged, the headset cannot be turned on immediately
when the charger is connected. Allow a depleted battery to charge for a few minutes
before turning on the headset.
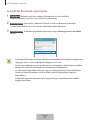
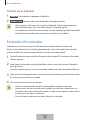
Connect the headset to a computer or the USB power adaptor via the USB cable. Plug the USB
power adaptor into an electric socket.
•
The notification light turns red while the headset is being charged. The notification light
turns green when charging is complete.
Connecting the charger improperly may cause serious damage to the headset. Any
damage caused by misuse is not covered by the warranty.
•
You can charge the headset using the charger (sold separately).
•
The headset can be used while it is charging, but it may take longer to fully charge
the battery.
•
While charging, the headset may heat up. This is normal and should not affect the
headset’s lifespan or performance. If the battery gets hotter than usual, the charger
may stop charging.
•
If the headset is not charging properly, take the headset and the charger to a
Samsung Service Centre.
English (UK)
4

Getting started
7
After fully charging, first unplug the USB cable from the headset, and then unplug it from the
computer or the electric socket.
•
To save energy, unplug the charger when not in use. The charger does not have a
power switch, so you must unplug the charger from the electric socket when not in
use to avoid wasting power. The charger should remain close to the electric socket
and easily accessible while charging.
•
The socket-outlet shall be installed near the equipment and shall be easily
accessible.
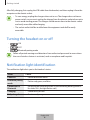
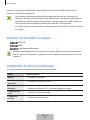
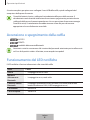
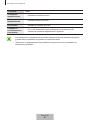
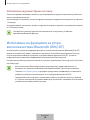
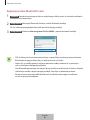
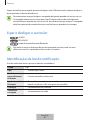
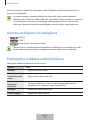
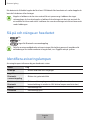
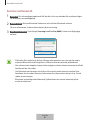
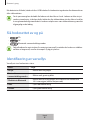
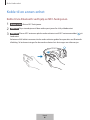
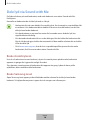
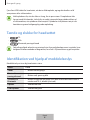
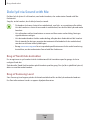
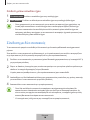
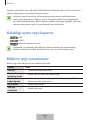
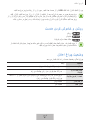
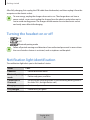
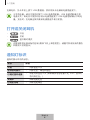
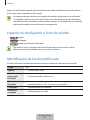
Turning the headset on or off
•
: ON
•
: OFF
•
: Bluetooth pairing mode
Follow all posted warnings and directions from authorised personnel in areas where
the use of wireless devices is restricted, such as aeroplanes and hospitals.
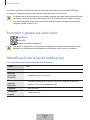
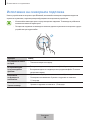
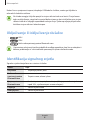
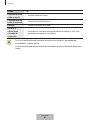
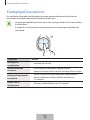
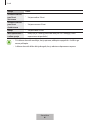
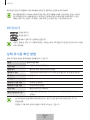
Notification light identification
The notification light alerts you to the headset’s status.
Status Colour
Power on
•
Flashes blue three times
Bluetooth pairing
mode
•
Flashes red, green, and blue
Connected via
Bluetooth
•
Quickly flashes blue three times (If the remaining battery power is
less than 10%, the light flashes red.)
Charging
•
Continuously on red
Fully charged
•
Continuously on green
English (UK)
5

Getting started
8
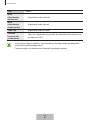
Status Colour
Noise-cancelling
activated
•
Flashes green three times
Noise-cancelling
deactivated
•
Flashes yellow three times
Power off
•
Flashes red three times
During use or in
sleep mode
•
Off (If the remaining battery power is less than 10%, the light
continuously flashes red.)
•
If the notification light does not work as described, disconnect the charger from
the headset and reconnect it.
•
The notification light may work differently depending on the connected device.
English (UK)
6

9
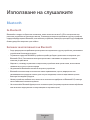
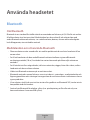
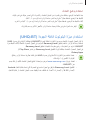
Using the headset
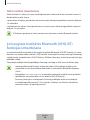
Bluetooth
About Bluetooth
Bluetooth is a wireless technology standard that uses a 2.4 GHz frequency to connect to
various devices over short distances. It can connect and exchange data with other Bluetooth
enabled devices, such as mobile devices, computers, printers, and other digital home
appliances, without connecting via cables.
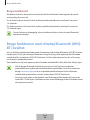
Notices for using Bluetooth
•
To avoid problems when connecting your headset to another device, place the devices
close to each other.
•
Ensure that your headset and the other Bluetooth device are within the Bluetooth
connection range (10 m). The distance may vary depending on the environment the
devices are used in.
•
Ensure that there are no obstacles between the headset and a connected device,
including human bodies, walls, corners, or fences.
•
Do not touch the Bluetooth antenna of a connected device.
•
Bluetooth uses the same frequency as some industrial, scientific, medical, and low power
products and interference may occur when making connections near these types of
products.
•
Some devices, especially those that are not tested or approved by the Bluetooth SIG, may
be incompatible with your headset.
•
Do not use the Bluetooth feature for illegal purposes (for example, pirating copies of files
or illegally tapping communications for commercial purposes).
English (UK)
7

Using the headset
10
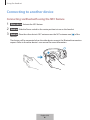
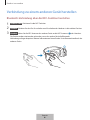
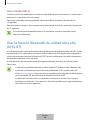
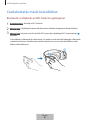
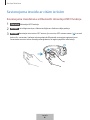
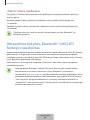
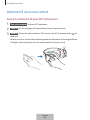
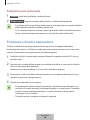
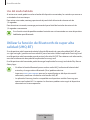
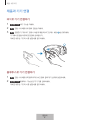
Connecting to another device
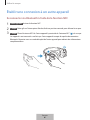
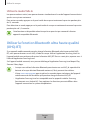
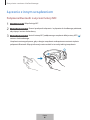
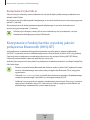
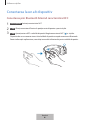
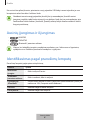
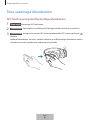
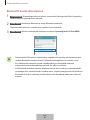
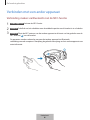
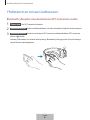
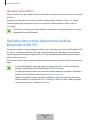
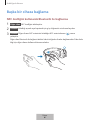
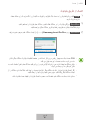
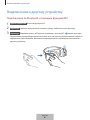
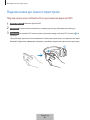
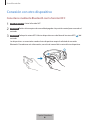
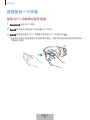
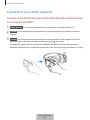
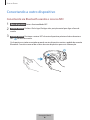
Connecting via Bluetooth using the NFC feature
1
Other device Activate the NFC feature.
2
Headset Slide the Power switch to the centre position to turn on the headset.
3
Headset Place the other device’s NFC antenna near the NFC antenna area ( ) of the
headset.
The devices will be connected when the other device accepts the Bluetooth connection
request. Refer to the other device’s user manual for more information.
English (UK)
8

Using the headset
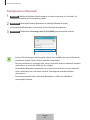
11
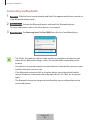
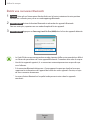
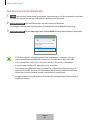
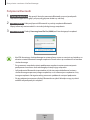
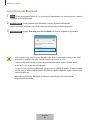
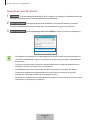
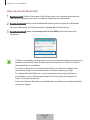
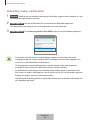
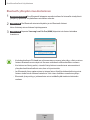
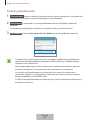
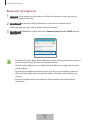
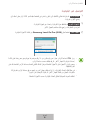
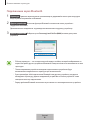
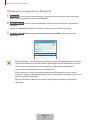
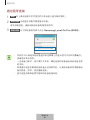
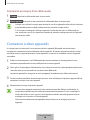
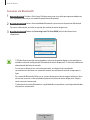
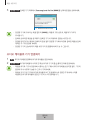
Connecting via Bluetooth
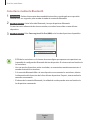
1
Headset Slide the Power switch upwards and hold it for approximately three seconds to
enter Bluetooth pairing mode.
2
Other device Activate the Bluetooth feature and search for Bluetooth devices.
For more information, refer to the other device’s user manual.
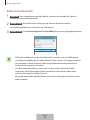
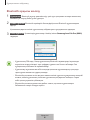
3
Other device Tap
Samsung Level On Pro (0000)
from the list of available devices.
•
The PIN for the headset is the four-digit number in parenthesis displayed on the
other device’s Bluetooth settings screen. The number differs depending on the
headset.
•
Once devices are paired, recently connected devices automatically connect to your
headset whenever you turn it on.
•
If the Bluetooth connection fails or the other device cannot locate the headset,
remove the device’s information from the other device’s list. Then, try to connect
again.
•
The Bluetooth connection range and sound quality may vary depending on the
connected devices.
English (UK)
9

Using the headset
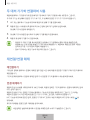
12
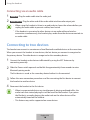
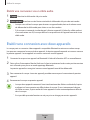
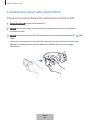
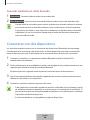
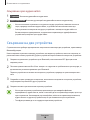
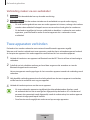
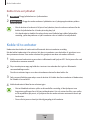
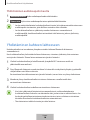
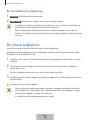
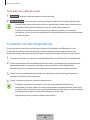
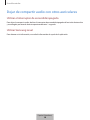
Connecting via an audio cable
1
Headset Plug the audio cable into the audio jack.
2
Other device Plug the other end of the audio cable into the audio output jack.
•
When using the headset to listen to an audio device, lower the volume before you
unplug the audio cable to prevent sudden, loud sound.
•
If the headset is connected to other devices via an audio cable and wireless
connection simultaneously, the headset plays audio from the device connected via
an audio cable.
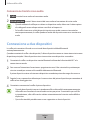
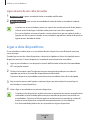
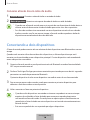
Connecting to two devices
The headset can connect to a maximum of two Bluetooth-enabled devices at the same time.
When you connect the headset to two devices, the last device you connect is recognised as
the primary device. The other device is recognised as the secondary device.
1
Connect the headset and a device via Bluetooth by using the NFC feature or by
connecting manually.
2
Slide the Power switch upwards and hold it for approximately three seconds to enter
Bluetooth pairing mode.
The first device is saved as the secondary device before it is disconnected.
3
Follow the same connection procedure used for connecting the first device to connect
the headset to another device.
4
Reconnect the headset to the first device.
•
When two connected devices are simultaneously playing multimedia files, the
audio track that started playing first will be heard on the headset. If you pause
the file that is currently playing, the audio track on the other device will be
automatically heard on the headset.
•
This feature may not be supported on some devices.
English (UK)
10

Using the headset
13
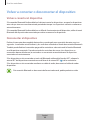
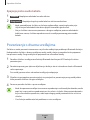
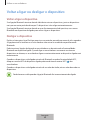
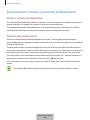
Reconnecting or disconnecting device
Reconnecting the device
If the Bluetooth connection ends due to the distance between the devices, bring the devices
closer together within a certain period of time. The devices will automatically reconnect.
If the Bluetooth connection ends because of a device malfunction, use the Bluetooth menu
on the disconnected device to reconnect the devices.
Disconnecting the device
Slide the Power switch upwards and hold it for approximately three seconds. The current
connection will end and the headset will enter Bluetooth pairing mode.
You can also end the connection by turning off the headset or deactivating the Bluetooth
feature on the connected device. When you turn on the headset again and the devices are in
range, the headset automatically connects with the most recently connected device.
When the devices are connected via Bluetooth using the NFC feature, place the connected
device’s NFC antenna near the NFC antenna area (
) of the headset.
When the devices are connected via an audio cable, unplug the cable from both devices.
Noise may occur if the Bluetooth connection is disconnected improperly.
English (UK)
11

Using the headset
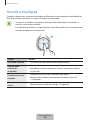
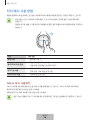
14
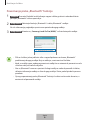
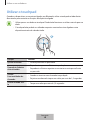
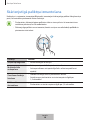
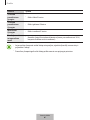
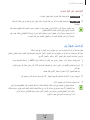
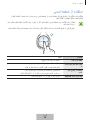
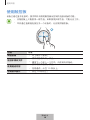
Using the touchpad
When devices are connected via Bluetooth, use the touchpad on the right side of the headset
to control the connected device’s functions.
•
Use only one finger on the touchpad. It may not work if you use more than one
finger.
•
The touchpad cannot be used while the headset is connected to another device
via an audio cable.
Function Method
Adjusting the
volume
•
Drag upwards or downwards.
Playing multimedia
files
•
Play or pause the file: Double-tap.
•
Play the next or previous file: Drag forwards or backwards.
Using calling
features
•
Answer or end a call: Double-tap.
•
Reject a call: Tap and hold for more than 1.5 seconds.
Activating Talk-In
mode
•
Tap and hold for more than 1.5 seconds.
English (UK)
12

Using the headset
15
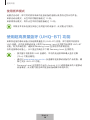
Using Talk-In mode
When this mode is activated, you can hear audio from the connected device and sounds that
occur around you at the same time.
To activate this mode, tap and hold the headset’s touchpad for more than 1.5 seconds.
To deactivate this mode, tap and hold the headset’s touchpad for more than 1.5 seconds
again.
This feature is available even when the headset is not connected to other Bluetooth-
enabled devices.
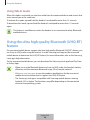
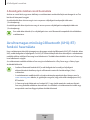
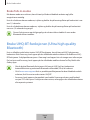
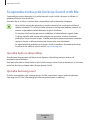
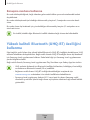
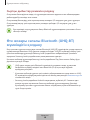
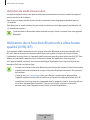
Using the ultra high quality Bluetooth (UHQ-BT)
feature
If a connected mobile device supports the ultra high quality Bluetooth (UHQ-BT) feature, you
can listen to UHQ audio using the headset. Use the Samsung Level app on the connected
mobile device to deactivate the UHQ-BT feature. For more information, refer to the Samsung
Level app’s help information.
On the connected mobile device, you can download the Samsung Level app from Play Store
or Galaxy Apps.
•
When you use the Bluetooth feature to listen to UHQ audio, the headset’s battery
efficiency and the maximum Bluetooth range (10 m) may be reduced.
•
Visit www.samsung.com to view the product specifications for the connected
mobile device to confirm that it supports the UHQ-BT feature.
•
The Samsung Level app is compatible with Samsung mobile devices running
Android 4.2.2 or higher. The functions may differ depending on the connected
device or the operating system.
English (UK)
13

Using the headset
16
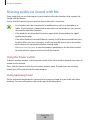
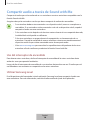
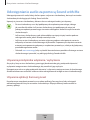
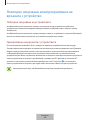
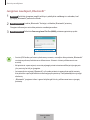
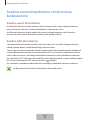
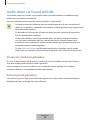
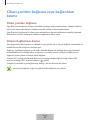
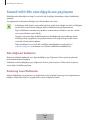
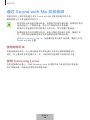
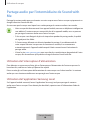
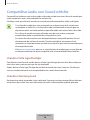
Sharing audio via Sound with Me
Share audio that you are listening to on your headset with other headsets that support the
Sound with Me feature.
Ensure that the headset that you want to share audio with is turned on.
•
Your headset must be connected to a mobile device, such as a smartphone or
tablet. If your headset is connected to more than one mobile device, you cannot
share audio with other headsets.
•
If the headsets are more than five metres apart while sharing audio, the signal
quality may be poor.
•
If the other headset is turned off during sharing, it will be disconnected from your
headset. When you turn it on again, it will automatically reconnect to the mobile
device that it was connected to before sharing audio.
•
Visit www.samsung.com to view the product specifications for the other headset
to confirm that it supports the Sound with Me feature.
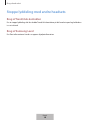
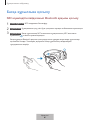
Using the Power switch
To detect another headset, slide the power switch of the other headset upwards two times to
enable it to be located.
Then, slide the Power switch of your headset upwards once. The audio you are currently
listening to will be shared with the other headset.
Using Samsung Level
On the connected mobile device, launch the Samsung Level app to share audio with other
headsets. For more information, refer to the app’s help information.
English (UK)
14

Using the headset
17
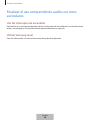
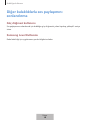
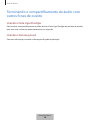
Ending audio sharing with other headsets
Using the Power switch
To end audio sharing, slide your headset’s Power switch upwards and hold it for
approximately one second.
Using Samsung Level
For more information, refer to the app’s help information.
English (UK)
15

18
Appendix
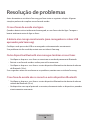
Troubleshooting
Before contacting a Samsung Service Centre, please attempt the following solutions. Some
situations may not apply to your headset.
Your headset does not turn on
When the battery is completely discharged, your headset will not turn on. Charge the battery
completely before turning on the headset.
The battery does not charge properly (For Samsung-approved USB
cables and chargers)
Ensure that the USB cable or the charger is connected properly.
If the problem is still not resolved, contact a Samsung Service Centre.
Another Bluetooth device cannot locate your headset
•
Ensure that your headset is in Bluetooth pairing mode.
•
Restart your headset and search for the headset again.
•
Ensure that your headset and the other Bluetooth device are within the Bluetooth
connection range (10 m).
If the tips above do not solve the problem, contact a Samsung Service Centre.
Your headset cannot connect to another Bluetooth device
•
Ensure that your headset and the other Bluetooth device are within the maximum
Bluetooth range (10 m).
•
On the device you want to connect with, disconnect all paired devices and try to connect
again.
English (UK)
16

Appendix
19
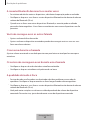
Bluetooth connection is often disconnected
•
If there are obstacles between the devices, the operating distance may be reduced.
•
Ensure that your headset and the other Bluetooth device are within the maximum
Bluetooth range (10 m).
•
When using the headset with other Bluetooth devices, the connection may be affected
by electromagnetic waves. Use the headset in environments with fewer wireless devices
present.
You cannot hear others speaking
•
Adjust the headset volume.
•
Adjust the volume on the connected device when you cannot hear sounds on your
headset at full volume.
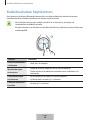
Sound echoes during a call
Adjust the volume by dragging your finger upwards or downwards on the touchpad, or move
to another area.
Others cannot hear you speaking on a call
•
Ensure that you are not covering the built-in microphone.
•
Ensure that the microphone is close to your mouth.
Audio quality is poor
•
Wireless network services may be disabled due to issues with the service provider’s
network. Ensure to keep the headset away from electromagnetic waves.
•
Ensure that your headset and the other Bluetooth device are within the maximum
Bluetooth range (10 m).
•
You may experience drops in volume or noise depending on the connected device’s
volume. To avoid this, appropriately adjust the connected device’s sound.
English (UK)
17

Appendix
20
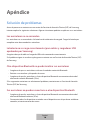
The headset works differently as described in the manual
•
Available functions may differ depending on the connected device.
•
Some features cannot be used when two devices are connected with the headset at the
same time.
The battery depletes faster than when first purchased
•
When you expose the headset or the battery to very cold or very hot temperatures, the
useful charge may be reduced.
•
The battery is consumable and the useful charge will get shorter over time.
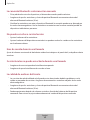
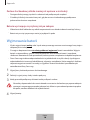
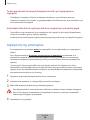
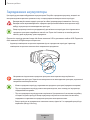
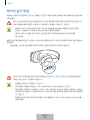
Removing the battery
•
To remove the battery, you must visit an authorised service centre with the provided
instructions.
•
For your safety, you must not attempt to remove the battery. If the battery is not
properly removed, it may lead to damage to the battery and device, cause personal
injury, and/or result in the device being unsafe.
•
Samsung does not accept liability for any damage or loss (whether in contract or tort,
including negligence) which may arise from failure to precisely follow these warnings and
instructions, other than death or personal injury caused by Samsung’s negligence.
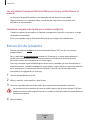
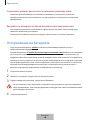
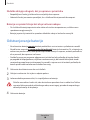
1
Remove the headset’s left ear pad.
2
Loosen and remove the four screws and open the cover.
3
Separately cut each wire connected to the battery.
Do not short-circuit the headset by cutting the black and red wires at the same time.
Doing so may cause electric shock or fire, or the battery may malfunction or explode.
4
Remove the battery.
English (UK)
18
La pagina si sta caricando...
La pagina si sta caricando...
La pagina si sta caricando...
La pagina si sta caricando...
La pagina si sta caricando...
La pagina si sta caricando...
La pagina si sta caricando...
La pagina si sta caricando...
La pagina si sta caricando...
La pagina si sta caricando...
La pagina si sta caricando...
La pagina si sta caricando...
La pagina si sta caricando...
La pagina si sta caricando...
La pagina si sta caricando...
La pagina si sta caricando...
La pagina si sta caricando...
La pagina si sta caricando...
La pagina si sta caricando...
La pagina si sta caricando...
La pagina si sta caricando...
La pagina si sta caricando...
La pagina si sta caricando...
La pagina si sta caricando...
La pagina si sta caricando...
La pagina si sta caricando...
La pagina si sta caricando...
La pagina si sta caricando...
La pagina si sta caricando...
La pagina si sta caricando...
La pagina si sta caricando...
La pagina si sta caricando...
La pagina si sta caricando...
La pagina si sta caricando...
La pagina si sta caricando...
La pagina si sta caricando...
La pagina si sta caricando...
La pagina si sta caricando...
La pagina si sta caricando...
La pagina si sta caricando...
La pagina si sta caricando...
La pagina si sta caricando...
La pagina si sta caricando...
La pagina si sta caricando...
La pagina si sta caricando...
La pagina si sta caricando...
La pagina si sta caricando...
La pagina si sta caricando...
La pagina si sta caricando...
La pagina si sta caricando...
La pagina si sta caricando...
La pagina si sta caricando...
La pagina si sta caricando...
La pagina si sta caricando...
La pagina si sta caricando...
La pagina si sta caricando...
La pagina si sta caricando...
La pagina si sta caricando...
La pagina si sta caricando...
La pagina si sta caricando...
La pagina si sta caricando...
La pagina si sta caricando...
La pagina si sta caricando...
La pagina si sta caricando...
La pagina si sta caricando...
La pagina si sta caricando...
La pagina si sta caricando...
La pagina si sta caricando...
La pagina si sta caricando...
La pagina si sta caricando...
La pagina si sta caricando...
La pagina si sta caricando...
La pagina si sta caricando...
La pagina si sta caricando...
La pagina si sta caricando...
La pagina si sta caricando...
La pagina si sta caricando...
La pagina si sta caricando...
La pagina si sta caricando...
La pagina si sta caricando...
La pagina si sta caricando...
La pagina si sta caricando...
La pagina si sta caricando...
La pagina si sta caricando...
La pagina si sta caricando...
La pagina si sta caricando...
La pagina si sta caricando...
La pagina si sta caricando...
La pagina si sta caricando...
La pagina si sta caricando...
La pagina si sta caricando...
La pagina si sta caricando...
La pagina si sta caricando...
La pagina si sta caricando...
La pagina si sta caricando...
La pagina si sta caricando...
La pagina si sta caricando...
La pagina si sta caricando...
La pagina si sta caricando...
La pagina si sta caricando...
La pagina si sta caricando...
La pagina si sta caricando...
La pagina si sta caricando...
La pagina si sta caricando...
La pagina si sta caricando...
La pagina si sta caricando...
La pagina si sta caricando...
La pagina si sta caricando...
La pagina si sta caricando...
La pagina si sta caricando...
La pagina si sta caricando...
La pagina si sta caricando...
La pagina si sta caricando...
La pagina si sta caricando...
La pagina si sta caricando...
La pagina si sta caricando...
La pagina si sta caricando...
La pagina si sta caricando...
La pagina si sta caricando...
La pagina si sta caricando...
La pagina si sta caricando...
La pagina si sta caricando...
La pagina si sta caricando...
La pagina si sta caricando...
La pagina si sta caricando...
La pagina si sta caricando...
La pagina si sta caricando...
La pagina si sta caricando...
La pagina si sta caricando...
La pagina si sta caricando...
La pagina si sta caricando...
La pagina si sta caricando...
La pagina si sta caricando...
La pagina si sta caricando...
La pagina si sta caricando...
La pagina si sta caricando...
La pagina si sta caricando...
La pagina si sta caricando...
La pagina si sta caricando...
La pagina si sta caricando...
La pagina si sta caricando...
La pagina si sta caricando...
La pagina si sta caricando...
La pagina si sta caricando...
La pagina si sta caricando...
La pagina si sta caricando...
La pagina si sta caricando...
La pagina si sta caricando...
La pagina si sta caricando...
La pagina si sta caricando...
La pagina si sta caricando...
La pagina si sta caricando...
La pagina si sta caricando...
La pagina si sta caricando...
La pagina si sta caricando...
La pagina si sta caricando...
La pagina si sta caricando...
La pagina si sta caricando...
La pagina si sta caricando...
La pagina si sta caricando...
La pagina si sta caricando...
La pagina si sta caricando...
La pagina si sta caricando...
La pagina si sta caricando...
La pagina si sta caricando...
La pagina si sta caricando...
La pagina si sta caricando...
La pagina si sta caricando...
La pagina si sta caricando...
La pagina si sta caricando...
La pagina si sta caricando...
La pagina si sta caricando...
La pagina si sta caricando...
La pagina si sta caricando...
La pagina si sta caricando...
La pagina si sta caricando...
La pagina si sta caricando...
La pagina si sta caricando...
La pagina si sta caricando...
La pagina si sta caricando...
La pagina si sta caricando...
La pagina si sta caricando...
La pagina si sta caricando...
La pagina si sta caricando...
La pagina si sta caricando...
La pagina si sta caricando...
La pagina si sta caricando...
La pagina si sta caricando...
La pagina si sta caricando...
La pagina si sta caricando...
La pagina si sta caricando...
La pagina si sta caricando...
La pagina si sta caricando...
La pagina si sta caricando...
La pagina si sta caricando...
La pagina si sta caricando...
La pagina si sta caricando...
La pagina si sta caricando...
La pagina si sta caricando...
La pagina si sta caricando...
La pagina si sta caricando...
La pagina si sta caricando...
La pagina si sta caricando...
La pagina si sta caricando...
La pagina si sta caricando...
La pagina si sta caricando...
La pagina si sta caricando...
La pagina si sta caricando...
La pagina si sta caricando...
La pagina si sta caricando...
La pagina si sta caricando...
La pagina si sta caricando...
La pagina si sta caricando...
La pagina si sta caricando...
La pagina si sta caricando...
La pagina si sta caricando...
La pagina si sta caricando...
La pagina si sta caricando...
La pagina si sta caricando...
La pagina si sta caricando...
La pagina si sta caricando...
La pagina si sta caricando...
La pagina si sta caricando...
La pagina si sta caricando...
La pagina si sta caricando...
La pagina si sta caricando...
La pagina si sta caricando...
La pagina si sta caricando...
La pagina si sta caricando...
La pagina si sta caricando...
La pagina si sta caricando...
La pagina si sta caricando...
La pagina si sta caricando...
La pagina si sta caricando...
La pagina si sta caricando...
La pagina si sta caricando...
La pagina si sta caricando...
La pagina si sta caricando...
La pagina si sta caricando...
La pagina si sta caricando...
La pagina si sta caricando...
La pagina si sta caricando...
La pagina si sta caricando...
La pagina si sta caricando...
La pagina si sta caricando...
La pagina si sta caricando...
La pagina si sta caricando...
La pagina si sta caricando...
La pagina si sta caricando...
La pagina si sta caricando...
La pagina si sta caricando...
La pagina si sta caricando...
La pagina si sta caricando...
La pagina si sta caricando...
La pagina si sta caricando...
La pagina si sta caricando...
La pagina si sta caricando...
La pagina si sta caricando...
La pagina si sta caricando...
La pagina si sta caricando...
La pagina si sta caricando...
La pagina si sta caricando...
La pagina si sta caricando...
La pagina si sta caricando...
La pagina si sta caricando...
La pagina si sta caricando...
La pagina si sta caricando...
La pagina si sta caricando...
La pagina si sta caricando...
La pagina si sta caricando...
La pagina si sta caricando...
La pagina si sta caricando...
La pagina si sta caricando...
La pagina si sta caricando...
La pagina si sta caricando...
La pagina si sta caricando...
La pagina si sta caricando...
La pagina si sta caricando...
La pagina si sta caricando...
La pagina si sta caricando...
La pagina si sta caricando...
La pagina si sta caricando...
La pagina si sta caricando...
La pagina si sta caricando...
La pagina si sta caricando...
La pagina si sta caricando...
La pagina si sta caricando...
La pagina si sta caricando...
La pagina si sta caricando...
La pagina si sta caricando...
La pagina si sta caricando...
La pagina si sta caricando...
La pagina si sta caricando...
La pagina si sta caricando...
La pagina si sta caricando...
La pagina si sta caricando...
La pagina si sta caricando...
La pagina si sta caricando...
La pagina si sta caricando...
La pagina si sta caricando...
La pagina si sta caricando...
La pagina si sta caricando...
La pagina si sta caricando...
La pagina si sta caricando...
La pagina si sta caricando...
La pagina si sta caricando...
La pagina si sta caricando...
La pagina si sta caricando...
La pagina si sta caricando...
La pagina si sta caricando...
La pagina si sta caricando...
La pagina si sta caricando...
La pagina si sta caricando...
La pagina si sta caricando...
La pagina si sta caricando...
La pagina si sta caricando...
La pagina si sta caricando...
La pagina si sta caricando...
La pagina si sta caricando...
La pagina si sta caricando...
La pagina si sta caricando...
La pagina si sta caricando...
La pagina si sta caricando...
La pagina si sta caricando...
La pagina si sta caricando...
La pagina si sta caricando...
La pagina si sta caricando...
La pagina si sta caricando...
La pagina si sta caricando...
La pagina si sta caricando...
La pagina si sta caricando...
La pagina si sta caricando...
La pagina si sta caricando...
La pagina si sta caricando...
La pagina si sta caricando...
La pagina si sta caricando...
La pagina si sta caricando...
La pagina si sta caricando...
La pagina si sta caricando...
La pagina si sta caricando...
La pagina si sta caricando...
La pagina si sta caricando...
La pagina si sta caricando...
La pagina si sta caricando...
La pagina si sta caricando...
La pagina si sta caricando...
La pagina si sta caricando...
La pagina si sta caricando...
La pagina si sta caricando...
La pagina si sta caricando...
La pagina si sta caricando...
La pagina si sta caricando...
La pagina si sta caricando...
La pagina si sta caricando...
La pagina si sta caricando...
La pagina si sta caricando...
La pagina si sta caricando...
La pagina si sta caricando...
La pagina si sta caricando...
La pagina si sta caricando...
La pagina si sta caricando...
La pagina si sta caricando...
La pagina si sta caricando...
La pagina si sta caricando...
La pagina si sta caricando...
La pagina si sta caricando...
La pagina si sta caricando...
La pagina si sta caricando...
La pagina si sta caricando...
La pagina si sta caricando...
La pagina si sta caricando...
La pagina si sta caricando...
La pagina si sta caricando...
La pagina si sta caricando...
La pagina si sta caricando...
La pagina si sta caricando...
La pagina si sta caricando...
La pagina si sta caricando...
La pagina si sta caricando...
La pagina si sta caricando...
La pagina si sta caricando...
La pagina si sta caricando...
La pagina si sta caricando...
La pagina si sta caricando...
La pagina si sta caricando...
La pagina si sta caricando...
La pagina si sta caricando...
La pagina si sta caricando...
La pagina si sta caricando...
La pagina si sta caricando...
La pagina si sta caricando...
La pagina si sta caricando...
La pagina si sta caricando...
La pagina si sta caricando...
La pagina si sta caricando...
La pagina si sta caricando...
La pagina si sta caricando...
La pagina si sta caricando...
La pagina si sta caricando...
La pagina si sta caricando...
La pagina si sta caricando...
La pagina si sta caricando...
La pagina si sta caricando...
La pagina si sta caricando...
La pagina si sta caricando...
La pagina si sta caricando...
La pagina si sta caricando...
La pagina si sta caricando...
La pagina si sta caricando...
La pagina si sta caricando...
La pagina si sta caricando...
La pagina si sta caricando...
La pagina si sta caricando...
La pagina si sta caricando...
La pagina si sta caricando...
La pagina si sta caricando...
La pagina si sta caricando...
La pagina si sta caricando...
La pagina si sta caricando...
La pagina si sta caricando...
La pagina si sta caricando...
La pagina si sta caricando...
La pagina si sta caricando...
La pagina si sta caricando...
La pagina si sta caricando...
La pagina si sta caricando...
La pagina si sta caricando...
La pagina si sta caricando...
La pagina si sta caricando...
La pagina si sta caricando...
La pagina si sta caricando...
La pagina si sta caricando...
La pagina si sta caricando...
La pagina si sta caricando...
La pagina si sta caricando...
La pagina si sta caricando...
La pagina si sta caricando...
La pagina si sta caricando...
La pagina si sta caricando...
La pagina si sta caricando...
La pagina si sta caricando...
La pagina si sta caricando...
La pagina si sta caricando...
La pagina si sta caricando...
La pagina si sta caricando...
La pagina si sta caricando...
La pagina si sta caricando...
La pagina si sta caricando...
La pagina si sta caricando...
La pagina si sta caricando...
La pagina si sta caricando...
La pagina si sta caricando...
La pagina si sta caricando...
La pagina si sta caricando...
La pagina si sta caricando...
La pagina si sta caricando...
La pagina si sta caricando...
La pagina si sta caricando...
La pagina si sta caricando...
La pagina si sta caricando...
La pagina si sta caricando...
La pagina si sta caricando...
La pagina si sta caricando...
La pagina si sta caricando...
La pagina si sta caricando...
La pagina si sta caricando...
La pagina si sta caricando...
La pagina si sta caricando...
La pagina si sta caricando...
La pagina si sta caricando...
La pagina si sta caricando...
La pagina si sta caricando...
La pagina si sta caricando...
La pagina si sta caricando...
La pagina si sta caricando...
La pagina si sta caricando...
La pagina si sta caricando...
La pagina si sta caricando...
La pagina si sta caricando...
La pagina si sta caricando...
La pagina si sta caricando...
La pagina si sta caricando...
La pagina si sta caricando...
La pagina si sta caricando...
La pagina si sta caricando...
La pagina si sta caricando...
La pagina si sta caricando...
La pagina si sta caricando...
La pagina si sta caricando...
La pagina si sta caricando...
La pagina si sta caricando...
La pagina si sta caricando...
La pagina si sta caricando...
La pagina si sta caricando...
La pagina si sta caricando...
La pagina si sta caricando...
La pagina si sta caricando...
La pagina si sta caricando...
La pagina si sta caricando...
La pagina si sta caricando...
La pagina si sta caricando...
La pagina si sta caricando...
La pagina si sta caricando...
La pagina si sta caricando...
La pagina si sta caricando...
La pagina si sta caricando...
La pagina si sta caricando...
La pagina si sta caricando...
La pagina si sta caricando...
La pagina si sta caricando...
La pagina si sta caricando...
La pagina si sta caricando...
La pagina si sta caricando...
La pagina si sta caricando...
La pagina si sta caricando...
La pagina si sta caricando...
La pagina si sta caricando...
La pagina si sta caricando...
La pagina si sta caricando...
La pagina si sta caricando...
La pagina si sta caricando...
La pagina si sta caricando...
La pagina si sta caricando...
La pagina si sta caricando...
La pagina si sta caricando...
La pagina si sta caricando...
La pagina si sta caricando...
La pagina si sta caricando...
La pagina si sta caricando...
La pagina si sta caricando...
La pagina si sta caricando...
La pagina si sta caricando...
La pagina si sta caricando...
La pagina si sta caricando...
La pagina si sta caricando...
La pagina si sta caricando...
La pagina si sta caricando...
La pagina si sta caricando...
La pagina si sta caricando...
La pagina si sta caricando...
La pagina si sta caricando...
La pagina si sta caricando...
La pagina si sta caricando...
La pagina si sta caricando...
La pagina si sta caricando...
La pagina si sta caricando...
La pagina si sta caricando...
La pagina si sta caricando...
La pagina si sta caricando...
La pagina si sta caricando...
La pagina si sta caricando...
La pagina si sta caricando...
La pagina si sta caricando...
La pagina si sta caricando...
La pagina si sta caricando...
La pagina si sta caricando...
La pagina si sta caricando...
La pagina si sta caricando...
La pagina si sta caricando...
La pagina si sta caricando...
La pagina si sta caricando...
La pagina si sta caricando...
La pagina si sta caricando...
La pagina si sta caricando...
La pagina si sta caricando...
La pagina si sta caricando...
La pagina si sta caricando...
La pagina si sta caricando...
La pagina si sta caricando...
La pagina si sta caricando...
La pagina si sta caricando...
La pagina si sta caricando...
La pagina si sta caricando...
La pagina si sta caricando...
La pagina si sta caricando...
La pagina si sta caricando...
La pagina si sta caricando...
La pagina si sta caricando...
La pagina si sta caricando...
La pagina si sta caricando...
La pagina si sta caricando...
La pagina si sta caricando...
La pagina si sta caricando...
La pagina si sta caricando...
La pagina si sta caricando...
La pagina si sta caricando...
La pagina si sta caricando...
La pagina si sta caricando...
La pagina si sta caricando...
La pagina si sta caricando...
La pagina si sta caricando...
La pagina si sta caricando...
La pagina si sta caricando...
La pagina si sta caricando...
La pagina si sta caricando...
La pagina si sta caricando...
La pagina si sta caricando...
La pagina si sta caricando...
La pagina si sta caricando...
La pagina si sta caricando...
La pagina si sta caricando...
La pagina si sta caricando...
La pagina si sta caricando...
La pagina si sta caricando...
La pagina si sta caricando...
La pagina si sta caricando...
La pagina si sta caricando...
La pagina si sta caricando...
La pagina si sta caricando...
La pagina si sta caricando...
La pagina si sta caricando...
La pagina si sta caricando...
La pagina si sta caricando...
La pagina si sta caricando...
La pagina si sta caricando...
La pagina si sta caricando...
La pagina si sta caricando...
La pagina si sta caricando...
La pagina si sta caricando...
La pagina si sta caricando...
La pagina si sta caricando...
La pagina si sta caricando...
La pagina si sta caricando...
La pagina si sta caricando...
La pagina si sta caricando...
La pagina si sta caricando...
La pagina si sta caricando...
-
 1
1
-
 2
2
-
 3
3
-
 4
4
-
 5
5
-
 6
6
-
 7
7
-
 8
8
-
 9
9
-
 10
10
-
 11
11
-
 12
12
-
 13
13
-
 14
14
-
 15
15
-
 16
16
-
 17
17
-
 18
18
-
 19
19
-
 20
20
-
 21
21
-
 22
22
-
 23
23
-
 24
24
-
 25
25
-
 26
26
-
 27
27
-
 28
28
-
 29
29
-
 30
30
-
 31
31
-
 32
32
-
 33
33
-
 34
34
-
 35
35
-
 36
36
-
 37
37
-
 38
38
-
 39
39
-
 40
40
-
 41
41
-
 42
42
-
 43
43
-
 44
44
-
 45
45
-
 46
46
-
 47
47
-
 48
48
-
 49
49
-
 50
50
-
 51
51
-
 52
52
-
 53
53
-
 54
54
-
 55
55
-
 56
56
-
 57
57
-
 58
58
-
 59
59
-
 60
60
-
 61
61
-
 62
62
-
 63
63
-
 64
64
-
 65
65
-
 66
66
-
 67
67
-
 68
68
-
 69
69
-
 70
70
-
 71
71
-
 72
72
-
 73
73
-
 74
74
-
 75
75
-
 76
76
-
 77
77
-
 78
78
-
 79
79
-
 80
80
-
 81
81
-
 82
82
-
 83
83
-
 84
84
-
 85
85
-
 86
86
-
 87
87
-
 88
88
-
 89
89
-
 90
90
-
 91
91
-
 92
92
-
 93
93
-
 94
94
-
 95
95
-
 96
96
-
 97
97
-
 98
98
-
 99
99
-
 100
100
-
 101
101
-
 102
102
-
 103
103
-
 104
104
-
 105
105
-
 106
106
-
 107
107
-
 108
108
-
 109
109
-
 110
110
-
 111
111
-
 112
112
-
 113
113
-
 114
114
-
 115
115
-
 116
116
-
 117
117
-
 118
118
-
 119
119
-
 120
120
-
 121
121
-
 122
122
-
 123
123
-
 124
124
-
 125
125
-
 126
126
-
 127
127
-
 128
128
-
 129
129
-
 130
130
-
 131
131
-
 132
132
-
 133
133
-
 134
134
-
 135
135
-
 136
136
-
 137
137
-
 138
138
-
 139
139
-
 140
140
-
 141
141
-
 142
142
-
 143
143
-
 144
144
-
 145
145
-
 146
146
-
 147
147
-
 148
148
-
 149
149
-
 150
150
-
 151
151
-
 152
152
-
 153
153
-
 154
154
-
 155
155
-
 156
156
-
 157
157
-
 158
158
-
 159
159
-
 160
160
-
 161
161
-
 162
162
-
 163
163
-
 164
164
-
 165
165
-
 166
166
-
 167
167
-
 168
168
-
 169
169
-
 170
170
-
 171
171
-
 172
172
-
 173
173
-
 174
174
-
 175
175
-
 176
176
-
 177
177
-
 178
178
-
 179
179
-
 180
180
-
 181
181
-
 182
182
-
 183
183
-
 184
184
-
 185
185
-
 186
186
-
 187
187
-
 188
188
-
 189
189
-
 190
190
-
 191
191
-
 192
192
-
 193
193
-
 194
194
-
 195
195
-
 196
196
-
 197
197
-
 198
198
-
 199
199
-
 200
200
-
 201
201
-
 202
202
-
 203
203
-
 204
204
-
 205
205
-
 206
206
-
 207
207
-
 208
208
-
 209
209
-
 210
210
-
 211
211
-
 212
212
-
 213
213
-
 214
214
-
 215
215
-
 216
216
-
 217
217
-
 218
218
-
 219
219
-
 220
220
-
 221
221
-
 222
222
-
 223
223
-
 224
224
-
 225
225
-
 226
226
-
 227
227
-
 228
228
-
 229
229
-
 230
230
-
 231
231
-
 232
232
-
 233
233
-
 234
234
-
 235
235
-
 236
236
-
 237
237
-
 238
238
-
 239
239
-
 240
240
-
 241
241
-
 242
242
-
 243
243
-
 244
244
-
 245
245
-
 246
246
-
 247
247
-
 248
248
-
 249
249
-
 250
250
-
 251
251
-
 252
252
-
 253
253
-
 254
254
-
 255
255
-
 256
256
-
 257
257
-
 258
258
-
 259
259
-
 260
260
-
 261
261
-
 262
262
-
 263
263
-
 264
264
-
 265
265
-
 266
266
-
 267
267
-
 268
268
-
 269
269
-
 270
270
-
 271
271
-
 272
272
-
 273
273
-
 274
274
-
 275
275
-
 276
276
-
 277
277
-
 278
278
-
 279
279
-
 280
280
-
 281
281
-
 282
282
-
 283
283
-
 284
284
-
 285
285
-
 286
286
-
 287
287
-
 288
288
-
 289
289
-
 290
290
-
 291
291
-
 292
292
-
 293
293
-
 294
294
-
 295
295
-
 296
296
-
 297
297
-
 298
298
-
 299
299
-
 300
300
-
 301
301
-
 302
302
-
 303
303
-
 304
304
-
 305
305
-
 306
306
-
 307
307
-
 308
308
-
 309
309
-
 310
310
-
 311
311
-
 312
312
-
 313
313
-
 314
314
-
 315
315
-
 316
316
-
 317
317
-
 318
318
-
 319
319
-
 320
320
-
 321
321
-
 322
322
-
 323
323
-
 324
324
-
 325
325
-
 326
326
-
 327
327
-
 328
328
-
 329
329
-
 330
330
-
 331
331
-
 332
332
-
 333
333
-
 334
334
-
 335
335
-
 336
336
-
 337
337
-
 338
338
-
 339
339
-
 340
340
-
 341
341
-
 342
342
-
 343
343
-
 344
344
-
 345
345
-
 346
346
-
 347
347
-
 348
348
-
 349
349
-
 350
350
-
 351
351
-
 352
352
-
 353
353
-
 354
354
-
 355
355
-
 356
356
-
 357
357
-
 358
358
-
 359
359
-
 360
360
-
 361
361
-
 362
362
-
 363
363
-
 364
364
-
 365
365
-
 366
366
-
 367
367
-
 368
368
-
 369
369
-
 370
370
-
 371
371
-
 372
372
-
 373
373
-
 374
374
-
 375
375
-
 376
376
-
 377
377
-
 378
378
-
 379
379
-
 380
380
-
 381
381
-
 382
382
-
 383
383
-
 384
384
-
 385
385
-
 386
386
-
 387
387
-
 388
388
-
 389
389
-
 390
390
-
 391
391
-
 392
392
-
 393
393
-
 394
394
-
 395
395
-
 396
396
-
 397
397
-
 398
398
-
 399
399
-
 400
400
-
 401
401
-
 402
402
-
 403
403
-
 404
404
-
 405
405
-
 406
406
-
 407
407
-
 408
408
-
 409
409
-
 410
410
-
 411
411
-
 412
412
-
 413
413
-
 414
414
-
 415
415
-
 416
416
-
 417
417
-
 418
418
-
 419
419
-
 420
420
-
 421
421
-
 422
422
-
 423
423
-
 424
424
-
 425
425
-
 426
426
-
 427
427
-
 428
428
-
 429
429
-
 430
430
-
 431
431
-
 432
432
-
 433
433
-
 434
434
-
 435
435
-
 436
436
-
 437
437
-
 438
438
-
 439
439
-
 440
440
-
 441
441
-
 442
442
-
 443
443
-
 444
444
-
 445
445
-
 446
446
-
 447
447
-
 448
448
-
 449
449
-
 450
450
-
 451
451
-
 452
452
-
 453
453
-
 454
454
-
 455
455
-
 456
456
-
 457
457
-
 458
458
-
 459
459
-
 460
460
-
 461
461
-
 462
462
-
 463
463
-
 464
464
-
 465
465
-
 466
466
-
 467
467
-
 468
468
-
 469
469
-
 470
470
-
 471
471
-
 472
472
-
 473
473
-
 474
474
-
 475
475
-
 476
476
-
 477
477
-
 478
478
-
 479
479
-
 480
480
-
 481
481
-
 482
482
-
 483
483
-
 484
484
-
 485
485
-
 486
486
-
 487
487
-
 488
488
-
 489
489
-
 490
490
-
 491
491
-
 492
492
-
 493
493
-
 494
494
-
 495
495
-
 496
496
-
 497
497
-
 498
498
-
 499
499
-
 500
500
-
 501
501
-
 502
502
-
 503
503
-
 504
504
-
 505
505
-
 506
506
-
 507
507
-
 508
508
-
 509
509
-
 510
510
-
 511
511
-
 512
512
-
 513
513
-
 514
514
-
 515
515
-
 516
516
-
 517
517
-
 518
518
-
 519
519
-
 520
520
-
 521
521
-
 522
522
-
 523
523
-
 524
524
-
 525
525
-
 526
526
-
 527
527
-
 528
528
-
 529
529
-
 530
530
-
 531
531
-
 532
532
-
 533
533
-
 534
534
-
 535
535
-
 536
536
-
 537
537
-
 538
538
-
 539
539
-
 540
540
-
 541
541
-
 542
542
-
 543
543
-
 544
544
-
 545
545
-
 546
546
-
 547
547
-
 548
548
-
 549
549
-
 550
550
-
 551
551
-
 552
552
-
 553
553
-
 554
554
-
 555
555
-
 556
556
-
 557
557
-
 558
558
-
 559
559
-
 560
560
-
 561
561
-
 562
562
-
 563
563
-
 564
564
-
 565
565
-
 566
566
-
 567
567
-
 568
568
-
 569
569
-
 570
570
-
 571
571
-
 572
572
-
 573
573
-
 574
574
-
 575
575
-
 576
576
-
 577
577
-
 578
578
-
 579
579
-
 580
580
-
 581
581
-
 582
582
-
 583
583
-
 584
584
-
 585
585
-
 586
586
-
 587
587
-
 588
588
-
 589
589
-
 590
590
-
 591
591
-
 592
592
-
 593
593
-
 594
594
-
 595
595
-
 596
596
-
 597
597
-
 598
598
-
 599
599
-
 600
600
-
 601
601
-
 602
602
-
 603
603
-
 604
604
-
 605
605
-
 606
606
-
 607
607
-
 608
608
-
 609
609
-
 610
610
-
 611
611
-
 612
612
-
 613
613
-
 614
614
-
 615
615
-
 616
616
-
 617
617
-
 618
618
-
 619
619
-
 620
620
-
 621
621
-
 622
622
-
 623
623
-
 624
624
-
 625
625
-
 626
626
-
 627
627
-
 628
628
-
 629
629
-
 630
630
-
 631
631
-
 632
632
-
 633
633
-
 634
634
-
 635
635
-
 636
636
-
 637
637
-
 638
638
-
 639
639
-
 640
640
-
 641
641
-
 642
642
-
 643
643
-
 644
644
-
 645
645
-
 646
646
-
 647
647


in altre lingue
Documenti correlati
-
Samsung EO-AG900 Manuale utente
-
-
-
Samsung HM3700 Manuale utente
-
-
Samsung BHM1100 Manuale utente
-
Samsung HM-1300 Manuale utente
-
-
-
Samsung HM1700 Manuale utente