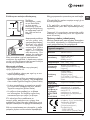
Indesit IWSB 50651 EU Guida utente
- Categoria
- Lavatrici
- Tipo
- Guida utente

GB
1
Contents
Installation, 2-3
Unpacking and levelling
Connecting the electricity and water supplies
The first wash cycle
Technical data
Care and maintenance, 4
Cutting off the water or electricity supply
Cleaning the washing machine
Cleaning the detergent dispenser drawer
Caring for the door and drum of your appliance
Cleaning the pump
Checking the water inlet hose
Precautions and tips, 5
General safety
Disposal
Description of the washing machine
and starting a wash cycle, 6-7
Control panel
Indicator lights
Starting a wash cycle
Wash cycles, 8
Table of wash cycles
Personalisation, 9
Setting the temperature
Functions
Detergents and laundry, 10
Detergent dispenser drawer
Bleach cycle
Preparing the laundry
Garments requiring special care
Load balancing system
Troubleshooting, 11
Service, 12
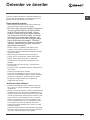
Instructions for use
WASHING MACHINE
IWSB 50651
English,1
GB
GR
TR
Ελληνικά, 13
Türkçe, 25
Italiano,37
I
Česky,49
SK
Slovensky, 61
CZ

2
GB
! This instruction manual should be kept in a safe
place for future reference. If the washing machine
is sold, transferred or moved, make sure that the
instruction manual remains with the machine so
that the new owner is able to familiarise himself/
herself with its operation and features.
! Read these instructions carefully: they contain
vital information relating to the safe installation
and operation of the appliance.
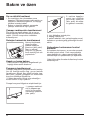
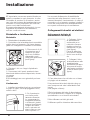
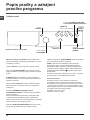
Unpacking and levelling
Unpacking
1. Remove the washing machine from its packaging.
2. Make sure that the washing machine has not
been damaged during the transportation process.
If it has been damaged, contact the retailer and do
not proceed any further with the installation process.
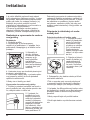
3. Remove the 4 pro-
tective screws (used
during transportation)
and the rubber washer
with the corresponding
spacer, located on the
rear part of the applian-
ce (see figure).
4. Close off the holes using the plastic plugs
provided.
5. Keep all the parts in a safe place: you will need
them again if the washing machine needs to be
moved to another location.
! Packaging materials should not be used as
toys for children.
Levelling
1. Install the washing
machine on a flat stur-
dy floor, without resting
it up against walls,
furniture cabinets or
anything else.
2. If the floor is not
perfectly level, com-
pensate for any une-
venness by tightening
or loosening the adjustable front feet (see figure);
the angle of inclination, measured in relation to
the worktop, must not exceed 2°.
Levelling the machine correctly will provide it with
stability, help to avoid vibrations and excessive
noise and prevent it from shifting while it is ope-
rating. If it is placed on carpet or a rug, adjust the
feet in such a way as to allow a sufficient venti-
lation space underneath the washing machine.
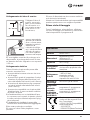
Connecting the electricity and wa-
ter supplies
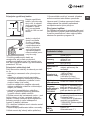
Connecting the water inlet hose
1. Connect the supply
pipe by screwing it to
a cold water tab using
a ¾ gas threaded con-
nection (see figure).
Before performing the
connection, allow the
water to run freely until
it is perfectly clear.
2. Connect the inlet
hose to the washing
machine by screwing
it onto the correspon-
ding water inlet of the
appliance, which is si-
tuated on the top right-
hand side of the rear
part of the appliance
(see figure).
3. Make sure that the hose is not folded over
or bent.
! The water pressure at the tap must fall within
the values indicated in the Technical details table
(see next page).
! If the inlet hose is not long enough, contact a
specialised shop or an authorised technician.
! Never use second-hand hoses.
! Use the ones supplied with the machine.
Installation

GB
3
Technical data
Model
IWSB 50651
Dimensions
width 59,5 cm
height 85 cm
depth 42 cm
Capacity
from 1 to 5 kg
Electrical
connections
please refer to the technical
data plate fixed to the machine
Water
connection
maximum pressure
1 MPa (10 bar)
minimum pressure
0.05 MPa (0.5 bar)
drum capacity 40 litres
Spin speed
up to 600 rotations per
minute
Test wash
cycles in ac-
cordance with
directives
1061/2010
and
1015/2010
Programme 3:
Cotton standard 60°C.
Programme 4:
Cotton standard 40°C.
This appliance conforms to
the following EC Directives:
- 2004/108/CE (Electroma-
gnetic
Compatibility)
- 2002/96/EC
- 2006/95/EC Low Voltage)
65 - 100 cm
Connecting the drain hose
Connect the drain
hose, without bending
it, to a drainage duct or
a wall drain located at a
height between 65 and
100 cm from the floor;
alternatively, rest it on
the side of a washba-
sin or bathtub, faste-
ning the duct supplied
to the tap (see figure).
The free end of the
hose should not be
underwater.
! We advise against the use of hose extensions;
if it is absolutely necessary, the extension must
have the same diameter as the original hose and
must not exceed 150 cm in length.
Electrical connections
Before plugging the appliance into the electricity
socket, make sure that:
• the socket is earthed and complies with all
applicable laws;
• the socket is able to withstand the maximum
power load of the appliance as indicated in the
Technical data table (see opposite);
• the power supply voltage falls within the values
indicated in the Technical data table (see opposite);
• the socket is compatible with the plug of the
washing machine. If this is not the case, repla-
ce the socket or the plug.
! The washing machine must not be installed
outdoors, even in covered areas. It is extremely
dangerous to leave the appliance exposed to
rain, storms and other weather conditions.
! When the washing machine has been installed,
the electricity socket must be within easy reach.
! Do not use extension cords or multiple sockets.
! The cable should not be bent or compressed.
! The power supply cable must only be replaced
by authorised technicians.
Warning! The company shall not be held responsible
in the event that these regulations are not respected.
The first wash cycle
Once the appliance has been installed, and
before you use it for the first time, run a wash
cycle with detergent and no laundry, using the
wash cycle 2.

4
GB
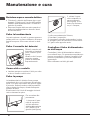
Care and maintenance
Cutting off the water and electricity
supplies
• Turn off the water tap after every wash cycle.
This will limit wear on the hydraulic system in-
side the washing machine and help to prevent
leaks.
• Unplug the washing machine when cleaning it
and during all maintenance work.
Cleaning the washing machine
The outer parts and rubber components of the
appliance can be cleaned using a soft cloth
soaked in lukewarm soapy water. Do not use
solvents or abrasives.
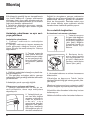
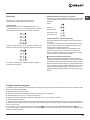
Cleaning the detergent dispenser
drawer
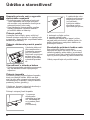
Remove the dispenser
by raising it and pulling
it out (see figure).
Wash it under running
water; this operation
should be repeated
frequently.
Caring for the door and drum of
your appliance
• Always leave the porthole door ajar in order to
prevent unpleasant odours from forming.
Cleaning the pump
The washing machine is fitted with a self-clea-
ning pump which does not require any mainte-
nance. Sometimes, small items (such as coins
or buttons) may fall into the pre-chamber which
protects the pump, situated in its bottom part.
! Make sure the wash cycle has finished and
unplug the appliance.
To access the pre-chamber:
1. using a screwdriver,
remove the cover pa-
nel on the lower front
part of the washing
machine (see figure);
2. unscrew the lid by
rotating it anti-clockwi-
se (see figure): a little
water may trickle out.
This is perfectly nor-
mal;
3. clean the inside thoroughly;
4. screw the lid back on;
5. reposition the panel, making sure the hooks
are securely in place before you push it onto the
appliance.
Checking the water inlet hose
Check the inlet hose at least once a year. If there
are any cracks, it should be replaced immedia-
tely: during the wash cycles, water pressure is
very strong and a cracked hose could easily
split open.
! Never use second-hand hoses.

GB
5
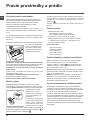
Precautions and tips
! This washing machine was designed and constructed in
accordance with international safety regulations. The fol-
lowing information is provided for safety reasons and must
therefore be read carefully.
General safety
• This appliance was designed for domestic use only.
• This appliance can be used by children aged
from 8 years and above and persons with re-
duced physical, sensory or mental capabilities
or lack of experience and knowledge if they
have been given supervision or instruction
concerning use of the appliance in a safe way
and understand the hazards involved. Children
shall not play with the appliance. Cleaning and
user maintenance shall not be made by children
without supervision.
• Do not touch the machine when barefoot or with wet or
damp hands or feet.
• Do not pull on the power supply cable when unplugging the
appliance from the electricity socket. Hold the plug and pull.
• Do not open the detergent dispenser drawer while the
machine is in operation.
• Do not touch the drained water as it may reach extremely
high temperatures.
• Never force the porthole door. This could damage the safety
lock mechanism designed to prevent accidental opening.
• If the appliance breaks down, do not under any circum-
stances access the internal mechanisms in an attempt to
repair it yourself.
• Always keep children well away from the appliance while
it is operating.
• The door can become quite hot during the wash cycle.
• If the appliance has to be moved, work in a group of two
or three people and handle it with the utmost care. Never
try to do this alone, because the appliance is very heavy.
• Before loading laundry into the washing machine, make
sure the drum is empty.
Disposal
• Disposing of the packaging materials: observe local regu-
lations so that the packaging may be re-used.
• The European Directive 2002/96/EC on Waste Electrical
and Electronic Equipment, requires that old household
electrical appliances must not be disposed of in the normal
unsorted municipal waste stream. Old appliances must
be collected separately in order to optimise the recovery
and recycling of the materials they contain and reduce the
impact on human health and the environment. The crossed
out “wheeled bin” symbol on the product reminds you of
your obligation, that when you dispose of the appliance it
must be separately collected.
Consumers should contact their local authority or retailer
for information concerning the correct disposal of their old
appliance.

6
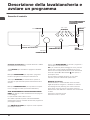
GB
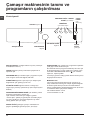
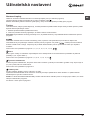
Detergent dispenser drawer: used to dispense
detergents and washing additives (see “Detergents and
laundry”).
ON/OFF button: switches the washing machine on and
off.
WASH CYCLE knob: programmes the wash cycles. Du-
ring the wash cycle, the knob does not move.
FUNCTION buttons with indicator light: used to select the
available functions. The indicator light corresponding to the
selected function will remain lit.
TEMPERATURE knob: sets the temperature or the cold
wash cycle (see “Personalisation”).
WASH CYCLE PROGRESS/DELAY TIMER
indicator
light
s: used to monitor the progress of the wash cycle.
The illuminated indicator light shows which phase is in
progress.
If the Delay Timer function has been set, the time remai-
ning until the wash cycle starts will be indicated (see next
page).
DOOR LOCKED indicator light: indicates whether the
door may be opened or not (see next page).
START/PAUSE button with indicator light: starts or tem-
porarily interrupts the wash cycles.
N.B. To pause the wash cycle in progress, press this
button; the corresponding indicator light will flash orange,
while the indicator light for the current wash cycle phase
will remain lit in a fixed manner. If the DOOR LOCKED
indicator light is switched off, the door may be opened.
To start the wash cycle from the point at which it was inter-
rupted, press this button again.
Standby mode
This washing machine, in compliance with new energy sa-
ving regulations, is fitted with an automatic standby system
which is enabled after about 30 minutes if no activity is
detected. Press the ON-OFF button briefly and wait for the
machine to start up again.
Consumption in off-mode: 0,5 W
Consumption in Left-on: 0,5 W
Description of the washing
machine and starting a wash cycle
WASH CYCLE PROGRESS/
DELAY TIMER indicator lights
DOOR LOCKED
indicator light
START/
PAUSE
button with
indicator light
Control panel
Detergent dispenser drawer
ON/OFF
button
WASH CYCLE
knob
TEMPERATURE
knob
FUNCTION
buttons with
indicator lights

GB
7
Indicator lights
The indicator lights provide important information.
This is what they can tell you:
Delayed start
If the DELAY TIMER function has been activated (see “Per-
sonalisation”), after the wash cycle has been started the
indicator light corresponding to the selected delay period
will begin to flash:
As time passes, the remaining delay will be displayed and
the corresponding indicator light will flash:
The set programme will start once the selected time delay
has expired.
Wash cycle phase indicator lights
Once the desired wash cycle has been selected and has be-
gun, the indicator lights switch on one by one to indicate which
phase of the cycle is currently in progress.
Function buttons and corresponding indicator lights
When a function is selected, the corresponding indicator
light will illuminate.
If the selected function is not compatible with the program-
med wash cycle, the corresponding indicator light will flash
and the function will not be activated.
If the selected function is not compatible with another
function which has been selected previously, the indicator
light corresponding to the first function selected will
flash and only the second function will be activated; the
indicator light corresponding to the enabled option will
remain lit.
Door locked indicator light
When the indicator light is on, the porthole door is locked
to prevent it from being opened; make sure the indicator
light is off before opening the door (wait approximately 3
minutes). To open the door during a running wash cycle,
press the START/PAUSE button; the door may be opened
once the DOOR LOCKED indicator light turns off.
Starting a wash cycle
1. Switch the washing machine on by pressing the ON/OFF button. All indicator lights will switch on for a few seconds, then
they will switch off and the START/PAUSE indicator light will pulse.
2. Load the laundry and close the door.
3. Set the WASH CYCLE knob to the desired programme.
4. Set the washing temperature (see “Personalisation”).
5. Measure out the detergent and washing additives (see “Detergents and laundry”).
6. Select the desired functions.
7. Start the wash cycle by pressing the START/PAUSE button and the corresponding indicator light will remain lit in a fixed
manner, in green.
To cancel the set wash cycle, pause the machine by pressing the START/PAUSE button and select a new cycle.
8. At the end of the wash cycle the indicator light will switch on. The door can be opened once the DOOR LOCKED
indicator light turns off. Take out your laundry and leave the appliance door ajar to make sure the drum dries completely.
Switch the washing machine off by pressing the ON/OFF button.
Wash
Rinse
Spin
Drain
End of wash cycle

8
GB
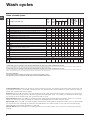
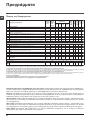
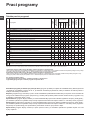
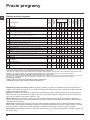
Wash cycles
Table of wash cycles
Cotton Standard 20° (wash cycle 7) ideal for heavily soiled cotton loads. The effective performance levels achieved at cold
temperatures, which are comparable to washing at 40°, are guaranteed by a mechanical action which operates at varying
speed, with repeated and frequent peaks.
Express (wash cycle 11) this wash cycle was designed to wash lightly soiled garments quickly: it lasts just 15 minutes and
therefore saves both energy and time. By selecting this wash cycle (11 at 30°C), it is possible to wash different fabrics toge-
ther (except for wool and silk items), with a maximum load of 1,5 kg.
Sport Intensive (
wash cycle
12) is for washing heavily soiled sports clothing fabrics (tracksuits, shorts, etc.); for best
results, we recommend not exceeding the maximum load indicated in the “Table of wash cycles”.
Sport Light (
wash cycle
13) is for washing lightly soiled sports clothing fabrics (tracksuits, shorts, etc.); for best results,
we recommend not exceeding the maximum load indicated in the “Table of wash cycles”. We recommend using a
liquid detergent and dosage suitable for a half-load.
Special Shoes (
wash cycle
14) is for washing sports shoes; for best results, do not wash more than 2 pairs simulta-
neously.
1) Test wash cycle in compliance with directive 1061/2010: set wash cycle 3 with a temperature of 60°C.
This cycle is designed for cotton loads with a normal soil level and is the most efficient in terms of both electricity and water consumption; it should be used for garments
which can be washed at 60°C. The actual washing temperature may differ from the indicated value.
2) Test wash cycle in compliance with directive 1061/2010: set wash cycle 4 with a temperature of 40°C.
This cycle is designed for cotton loads with a normal soil level and is the most efficient in terms of both electricity and water consumption; it should be used for garments
which can be washed at 40°C. The actual washing temperature may differ from the indicated value.
For all Test Institutes:
2) Long wash cycle for cottons: set wash cycle 4 with a temperature of 40°C.
3) Long wash cycle for synthetics: set wash cycle 6; with a temperature of 40°C.
The length of cycle shown on the display or in this booklet is an estimation only and is calculated assuming standard working conditions. The actual duration can vary accor-
ding to factors such as water temperature and pressure, the amount of detergent used, the amount and type of load inserted, load balancing and any wash options selected.
Wash cycles
Description of the wash cycle
Max.
temp.
(°C)
Max.
speed
(rpm)
Detergents
Max. load (kg)
Residual
dampness %
Energy
consumption
kWh
Total water lt
Cycle
duration
Prewash
Wash
Fabric
softener
Bleach
Daily
1
Cotton with prewash: extremely soiled whites. 90° 600
- 5 80 1,68 61 145’
2
Cotton: extremely soiled whites. 90° 600 -
5 80 1,57 56 130’
3
Cotton Standard 60° (1): heavily soiled whites and resistant colours. 60° 600 -
5 80 0,89 44,4 165’
4
Cotton Standard 40° (2): lightly soiled whites and delicate colours. 40° 600 -
5 80 1,09 92 160’
5
Coloured Cottons: lightly soiled whites and delicate colours. 40° 600 -
5 80 0,59 48 80’
6
Synthetics: heavily soiled resistant colours. 60° 600 -
3 44 0,70 70 105’
6
Synthetics (
3
): lightly soiled resistant colours. 40° 600 -
3 44 0,47 38 95’
7
Cotton Standard 20°: lightly soiled whites and delicate colours. 20° 600 -
5 - - - 170’
Special
8
Wool: for wool, cashmere, etc. 40° 600 -
- 1 - - - 65’
9
Silk/Curtains: for garments in silk and viscose, lingerie. 30° 0 -
- 1 - - - 55’
10 Jeans
40° 600 -
- 2,5 - - - 70’
11
Express: to refresh lightly soiled garments quickly (not suitable for wool, silk
and clothes which require washing by hand).
30° 600 -
- 1,5 71 0,13 29 15’
Sport
12 Sport Intensive
30° 600 -
- 2,5 - - - 85’
13 Sport Light
30° 600 -
- 2,5 - - - 60’
14 Special Shoes
30° 600 -
-
Max.
2 pairs
- - - 55’
Partial wash cycles
Rinse - 600 - -
5 - - - 36‘
Spin + Drain - 600 - - - - 5 - - - 16‘

GB
9
Personalisation
Setting the temperature
Turn the TEMPERATURE knob to set the wash temperature (see Table of wash cycles).
The temperature may be lowered, or even set to a cold wash .
The washing machine will automatically prevent you from selecting a temperature which is higher than the maximum value
set for each wash cycle.
Functions
The various wash functions available with this washing machine will help to achieve the desired results, every time.
To activate the functions:
1. Press the button corresponding to the desired function;
2. the function is enabled when the corresponding indicator light is illuminated.
Note: If the indicator light flashes rapidly, this signals that this particular function may not be selected in conjunction with the
selected wash cycle.
Selecting this option enables you to suitably adjust drum rotation, temperature and water to a reduced load of lightly soiled
cotton and synthetic fabrics (refer to the
“Table of wash cycles”
). “ ” enables you to wash in less time thereby saving
water and electricity. We suggest using a liquid detergent suitably measured out to the load quantity.
! This function may not be used in conjunction with wash cycles 1, 2, 7, 8, 9, 10, 11, 12, 13, 14, , .
Stain removal
Bleaching cycle designed to remove the toughest stains. Please remember to pour the bleach into extra compartment 4 (see
“Bleach cycle”).
! This function may not be used in conjunction with wash cycles 1, 8, 9, 10, 11, 12, 13, 14, .
No spin
The washing machine will not carry out the spin cycle, but rather a drum spin at medium speed to assist water draining.
Recommended when washing garments which are difficult to iron.
! This function may not be used in conjunction with wash cycles 9.
Delay timer
This timer delays the start time of the wash cycle by up to 12 hours.
Press the button repeatedly until the indicator light corresponding to the desired delay time switches on. The fifth time the button
is pressed, the function will be disabled.
N.B. Once the START/PAUSE button has been pressed, the delay time can only be modified by decreasing it until launching
the set programme.
! This option is enabled with all programmes.

10
GB
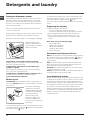
Detergents and laundry
Detergent dispenser drawer
Good washing results also depend on the correct dose of
detergent: adding too much detergent will not necessa-
rily result in a more efficient wash, and may in fact cause
build up on the inside of your appliance and contribute to
environmental pollution.
! Do not use hand washing detergents because these
create too much foam.
! Use powder detergent for white cotton garments, for pre-
washing, and for washing at temperatures over 60°C.
! Follow the instructions given on the detergent packaging.
Open the detergent di-
spenser drawer and pour
in the detergent or washing
additive, as follows.
ompartment 1: Pre-wash detergent (powder)
Before pouring in the detergent, make sure that extra com-
partment 4 has been removed.
compartment 2: Detergent for the wash cycle
(powder or liquid)
Liquid detergent should only be poured in immediately
prior to the start of the wash cycle.
compartment 3: Additives (fabric softeners, etc.)
The fabric softener should not overflow the grid.
extra compartment 4: Bleach
Bleach cycle
! Traditional bleach should be used on sturdy white fa-
brics, and delicate bleach for coloured fabrics, synthetics
and for wool.
This option is particularly
useful for the removal of
stubborn stains. Place extra
compartment 4 (supplied)
into compartment 1.
When pouring in the
bleach, be careful not to
exceed the “max” level
marked on the central pivot
(see figure).
To run the bleach cycle on its own, pour the bleach into extra
compartment 4, set the “Rinse” programme and activate
the “Stain removal” option.
1
2
3
4
To bleach during a wash cycle, pour in the detergent and
any fabric softener you wish to use, set the desired wash
cycle and enable the “Stain removal” option.
The use of extra compartment 4 excludes the “Pre-wash”
option.
Preparing the laundry
• Divide the laundry according to:
- the type of fabric/the symbol on the label
- the colours: separate coloured garments from whites.
• Empty all garment pockets and check the buttons.
• Do not exceed the listed values, which refer to the
weight of the laundry when dry: see “Table of wash
cycles”.
How much does your laundry weigh?
1 sheet 400-500 g
1 pillow case 150-200 g
1 tablecloth 400-500 g
1 bathrobe 900-1200 g
1 towel 150-250 g
Garments requiring special care
Wool: all wool garments can be washed using programme
8, even those carrying the “hand-wash only” label. For
best results, use special detergents and do not exceed
1 kg of laundry.
Silk: use special wash cycle 9 to wash all silk garments.
We recommend the use of special detergent which has
been designed to wash delicate clothes.
Curtains: fold curtains and place them in a pillow case or
mesh bag. Use wash cycle 9.
Jeans: Turn garments inside-out before washing and use
a liquid detergent. Use programme 10.
Load balancing system
Before every spin cycle, to avoid excessive vibrations and
to distribute the load in a uniform manner, the drum rotates
continuously at a speed which is slightly greater than the
washing rotation speed. If, after several attempts, the load
is not balanced correctly, the machine spins at a reduced
spin speed. If the load is excessively unbalanced, the
washing machine performs the distribution process instead
of spinning. To encourage improved load distribution and
balance, we recommend small and large garments are
mixed in the load.

GB
11
Troubleshooting
Your washing machine could fail to work. Before contacting the Technical Assistance Centre (see “Assistance”), make sure
that the problem cannot be solved easily using the following list.
Problem:
The washing machine does not
switch on.
The wash cycle does not start.
The washing machine does not
take in water (the indicator light for
the first wash cycle stage flashes
rapidly).
The washing machine continuously
takes in and drains water.
The washing machine does not
drain or spin.
The washing machine vibrates a lot
during the spin cycle.
The washing machine leaks.
The “option” indicator lights and the
“start/pause” indicator light flash,
while one of the “phase in progress”
indicator lights and the “door lo-
cked” indicator light will remain lit in
a fixed manner.
There is too much foam.
Possible causes / Solutions:
• The appliance is not plugged into the socket fully, or is not making contact.
• There is no power in the house.
• The washing machine door is not closed properly.
• The ON/OFF button has not been pressed.
• The START/PAUSE button has not been pressed.
• The water tap has not been opened.
• A delayed start has been set (see “Personalisation”).
• The water inlet hose is not connected to the tap.
• The hose is bent.
• The water tap has not been opened.
• There is no water supply in the house.
• The pressure is too low.
• The START/PAUSE button has not been pressed.
• The drain hose is not fitted at a height between 65 and 100 cm from the floor
(see “Installation”).
• The free end of the hose is under water (see “Installation”).
• The wall drainage system is not fitted with a breather pipe.
If the problem persists even after these checks, turn off the water tap, switch
the appliance off and contact the Assistance Service. If the dwelling is on one of
the upper floors of a building, there may be problems relating to water drainage,
causing the washing machine to fill with water and drain continuously. Special
anti-draining valves are available in shops and help to avoid this inconvenience.
• The wash cycle does not include draining: some wash cycles require the drain
phase to be started manually.
• The drain hose is bent (see “Installation”).
• The drainage duct is clogged.
• The drum was not unlocked correctly during installation (see “Installation”).
• The washing machine is not level (see “Installation”).
• The washing machine is trapped between cabinets and walls (see “Installation”).
• The water inlet hose is not screwed on properly (see “Installation”).
• The detergent dispenser drawer is blocked (for cleaning instructions, see
“Care and maintenance”).
• The drain hose is not fixed properly (see “Installation”).
• Switch off the machine and unplug it, wait for approximately 1 minute and
then switch it back on again.
If the problem persists, contact the Technical Assistance Service.
• The detergent is not suitable for machine washing (it should display the text
“for washing machines” or “hand and machine wash”, or the like).
• Too much detergent was used.

12
GB
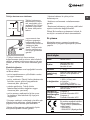
Service
Before calling for Assistance:
• Check whether you can solve the problem alone (see “Troubleshooting”);
• Restart the programme to check whether the problem has been solved;
• If this is not the case, contact an authorised Technical Assistance Centre using the telephone number provided on the
guarantee certificate.
! Always request the assistance of authorised technicians.
Have the following information to hand:
• the type of problem;
• the appliance model (Mod.);
• the serial number (S/N).
This information can be found on the data plate applied to the rear of the washing machine, and can also be found on the
front of the appliance by opening the door.

13
GR
Ελληνικά
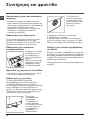
Περιεχόμενα
Εγκατάσταση, 14-15
Αποσυσκευασία και οριζοντίωση
Υδραυλικές και ηλεκτρικές συνδέσεις
Πρώτος κύκλος πλυσίματος
Τεχνικά στοιχεία
Συντήρηση και φροντίδα, 16
Αποκλεισμός νερού και ηλεκτρικού ρεύματος
Καθαρισμός του πλυντηρίου
Καθαρισμός του συρταριού απορρυπαντικών
Φροντίδα της πόρτας και του κάδου
Καθαρισμός της αντλίας
Έλεγχος του σωλήνα τροφοδοσίας του νερού
Προφυλάξεις και συμβουλές, 17
Γενική ασφάλεια
Διάθεση
Περιγραφή του πλυντηρίου και εκκίνηση
ενός προγράμματος, 18-19
Πίνακας ελέγχου
Ενδεικτικά φωτάκια
Εκκίνηση ενός προγράμματος
Προγράμματα, 20
Πίνακας των Προγραμμάτων
Εξατομικεύσεις, 21
Θέστε τη θερμοκρασία
Λειτουργίες
Απορρυπαντικά και μπουγάδα, 22
Θήκη απορρυπαντικών
Κύκλος λεύκανσης
Προετοιμασία της μπουγάδας
Ειδικά ρούχα
Σύστημα ισοστάθμισης του φορτίου
Ανωμαλίες και λύσεις, 23
Υποστήριξη, 24
GR
IWSB 50651
Οδηγίες χρήσης
ΠΛΥΝΤΗΡΙΟ ΡΟΥΧΩΝ

14
GR
Εγκατάσταση
! Είναι σημαντικό να διατηρήσετε το εγχειρίδιο
αυτό για να μπορείτε να το συμβουλεύεστε
οποιαδήποτε στιγμή. Σε περίπτωση πώλησης,
παραχώρησης ή μετακόμισης, βεβαιωθείτε
ότι παραμένει μαζί με το πλυντήριο για να
πληροφορεί τον νέο ιδιοκτήτη για τη λειτουργία
και τις σχετικές προειδοποιήσεις.
! Διαβάστε προσεκτικά τις οδηγίες: υπάρχουν
σημαντικές πληροφορίες για την εγκατάσταση,
τη χρήση και την ασφάλεια.
Αποσυσκευασία και οριζοντίωση
Αποσυσκευασία
1. Αποσυσκευάστε το πλυντήριο.
2. Ελέγξτε αν το πλυντήριο έχει υποστεί ζημιές
κατά τη μεταφορά. Αν έχει υποστεί ζημιές
μην το συνδέετε και επικοινωνήστε με τον
μεταπωλητή.
3. Αφαιρέστε τις 4
βίδε ς προσ τασ ίας
για τη μεταφορά και
το λαστιχάκι με το
σχετικό διαχωριστικό,
που βρίσκονται στο
πίσω μέρος (βλέπε
εικόνα).
4. Κλείστε τις οπές με τα πλαστικά πώματα που
σας παρέχονται.
5. Διατηρείστε και τα τρία τεμάχια: αν το
πλυντήριο χρειαστεί να μεταφερθεί, θα πρέπει
να ξαναμονταριστούν.
! Οι συσκευασίες δεν είναι παιχνίδια για μικρά
παιδιά.
Ευθυγράμμιση
1. Εγκαταστήστε το
πλυντήριο σε ένα
δάπεδο επίπεδο και
ανθεκτικό, χωρίς να
το ακουμπήσετε σε
τοίχους, έπιπλα ή άλλο.
2 . Α ν το δ ά π ε δ ο
δεν είναι απόλυτα
ο ρ ι ζ ο ν τ ι ω μ έ ν ο ,
α ν τ ι σ τ α θ μ ί σ τ ε
τ ι ς α ν ω μ α λ ί ε ς
βιδώνοντας ή ξεβιδώνοντας τα πρόσθια
ποδαράκια (βλέπε εικόνα). Η γωνία κλίσης,
μετρημένη στην επιφάνεια εργασίας, δεν
πρέπει να ξεπερνάει τις 2°.
Μια φροντισμένη οριζοντίωση προσδίδει
σταθερότητα στη μηχανή και αποσοβεί
δονήσεις, θορύβους και μετατοπίσεις κατά τη
λειτουργία. Σε περίπτωση μοκέτας ή τάπητα,
ρυθμίστε τα ποδαράκια έτσι ώστε να υφίσταται
κάτω από το πλυντήριο αρκετός χώρος για τον
αερισμό.
Υδραυλικές και ηλεκτρικές συνδέσεις
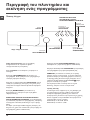
Σύνδεση του σωλήνα τροφοδοσίας του νερού
1 . Σ υ ν δ έ σ τ ε τ ο
σωλήνα τροφοδοσίας
βιδώνοντάς τον σε
ένα κρουνό κρύου
ν ε ρ ο ύ μ ε σ τ ό μ ι ο
σπειρώματος 3/4 gas
(βλέπε εικόνα).
Πριν τη σύν δε ση ,
αφήστε να τρέξει το
νερό μέχρι να γίνει
διαυγές.
2. Συνδέστε το σωλήνα
τ ρ ο φ ο δ ο σ ί α ς σ τ ο
πλυντήριο βιδώνοντάς
τον στην αντίστοιχη
είσοδο νερού, στο
πίσω μέρος επάνω
δεξιά (βλέπε εικόνα).
3. Προσέξτε ώστε στο σωλήνα να μην υπάρχουν
ούτε πτυχώσεις, ούτε στενώσεις.
! Η πίεση νερού του κρουνού πρέπει να
κυμαίνεται μεταξύ των τιμών του πίνακα Τεχνικά
στοιχεία (βλέπε σελίδα δίπλα).
! Αν το μήκος του σωλήνα τροφοδοσίας δεν
επαρκεί, απευθυνθείτε σε ένα ειδικευμένο
κατάστημα ή σε ένα εξουσιοδοτημένο τεχνικό.
! Μη χρησιμοποιείτε ποτέ χρησιμοποιημένους
σωλήνες.
! Χρησιμοποιείτε εκείνους που σας παρέχονται
με τη μηχανή.

15
GR
65 - 100 cm
Σύνδεση του σωλήνα αδειάσματος
Συνδέστε
αδειάσματος, χωρίς
να τον διπλώσετε,
σε έναν αγωγό
εκκένωσης ή σε μια
επιτοίχια αποχέτευση
σε απόσταση από 65
έως 100 cm από το
έδαφος.
Διαφορετικά αποθέστε
τον στο χείλος ενός
νιπτήρα ή μιας λεκάνης,
δένοντας τον οδηγό
που σας παρέχεται
στονκρουνό (βλέπε
εικόνα). Το ελεύθερο
άκρο του σωλήνα
α δ ε ι ά σ μ α το ς δε ν
πρέπει να παραμένει
βυθισμένο στο νερό.
! Δεν συνιστάται η χρήση προεκτάσεων
σωλήνων. Αν απαιτείται, η προέκταση πρέπει
να έχει την ίδια διάμετρο του αρχικού σωλήνα
και να μην ξεπερνάει τα 150 cm.
Ηλεκτρική σύνδεση
Πριν εισάγετε το βύσμα στην ηλεκτρική
πρίζα, βεβαιωθείτε ότι:
• η πρίζα διαθέτει γείωση και τηρεί τις εκ του
νόμου προδιαγραφές.
• Η πρίζα να είναι σε θέση να υποφέρει το μέγιστο
φορτίο ισχύος της μηχανής, που αναφέρεται
στον πίνακα Τεχνικών στοιχείων (βλέπε δίπλα).
• Η τάση τροφοδοσίας να κυμαίνεται μεταξύ
των τιμών που αναφέρονται στον πίνακα
Τεχνικών στοιχείων (βλέπε δίπλα).
• Η πρίζα να είναι συμβατή με το βύσμα
του πλυντηρίου. Σε αντίθετη περίπτωση,
αντικαταστήστε την πρίζα ή το βύσμα.
! Το πλυντήριο δεν εγκαθίσταται σε
ανοιχτό χώρο, ακόμη και αν ο χώρος είναι
καλυμμένος, διότι είναι πολύ επικίνδυνο να το
αφήνετε εκτεθειμένο σε βροχή και κακοκαιρία.
! Με την εγκατάσταση του πλυντηρίου, η πρίζα
ρεύματος πρέπει να είναι εύκολα προσβάσιμη.
! Μη χρησιμοποιείτε προεκτάσεις και πολύπριζα.
! Το καλώδιο δεν πρέπει να φέρει πτυχές ή να
είναι συμπιεσμένο.
! Το καλώδιο τροφοδοσίας πρέπει να
αντικαθίσταται μόνο από εξουσιοδοτημένους
τεχνικούς.
Προσοχή! Η επιχείρηση αποποιείται κάθε
ευθύνης σε περίπτωση που δεν τηρούνται
αυτοί οι κανόνες.
Πρώτος κύκλος πλυσίματος
Μετά την εγκατάσταση, πριν τη χρήση, διενεργήστε
ένα κύκλο πλυσίματος με απορρυπαντικό και
χωρίς ρούχα θέτοντας το πρόγραμμα 2.
Ôå÷íéêÜ óôïé÷åßá
ÌïíôÝëï IWSB 50651
ÄéáóôÜóåéò
ðëÜôïò cm 59,5
ýøïò cm 85
âÜèïò cm 42
×ùñçôéêüôçôá áðü 1 Ýùò 5 kg
ÇëåêôñéêÝò
óõíäÝóåéò
ÂëÝðå ôçí ðéíáêßäá
÷áñáêôçñéóôéêþí åðß ôçò
ìç÷áíÞò
ÓõíäÝóåéò
íåñïý
ìÝãéóôç ðßåóç
1 MPa (10 bar)
ÅëÜ÷éóôç ðßåóç
0,05 MPa (0,5 bar)
÷ùñçôéêüôçôá ôïõ êÜäïõ 40
ëßôñá
Ôá÷ýôçôá
óôõøßìáôïò
ìÝ÷ñé 600 óôñïöÝò ôï ëåðôü
Προγράμματα
ελέγχου
σύμφωνα με
τις οδηγίες
1061/2010
και
1015/2010
ðñüãñáììá 3; κανονικό
πρόγραμμα για βαμβακερά
στους 60 °C.
ðñüãñáììá 4; κανονικό
πρόγραμμα για βαμβακερά
στους 40 °C.
Ç óõóêåõÞ áõôÞ åßíáé
óýìöùíç ìå ôéò áêüëïõèåò
ÊïéíïôéêÝò Ïäçãßåò:
- 2004/108/CE
(ÇëåêôñïìáãíçôéêÞ
Óõìâáôüôçôá)
- 2002/96/CE
- 2006/95/CE (×áìçëÞ ÔÜóç)

16
GR
Συντήρηση και φροντίδα
Αποκλεισμός νερού και ηλεκτρικού
ρεύματος
• Κλείνετε τον κρουνό του νερού μετά από
κάθε πλύσιμο. Έτσι περιορίζεται η φθορά της
υδραυλικής εγκατάστασης του πλυντηρίου και
αποσοβείται ο κίνδυνος απωλειών.
• Να βγάζετε το βύσμα από το ρεύμα όταν
καθαρίζετε το μηχάνημα και κατά τις
εργασίες συντήρησης.
Καθαρισμός του πλυντηρίου
Το εξωτερικό μέρος και τα λαστιχένια μέρη
μπορούν να καθαρίζονται με ένα πανί
βρεγμένο με χλιαρό νερό και σαπούνι. Μη
χρησιμοποιείτε διαλύτες ή αποξυστικά.
Καθαρισμός του συρταριού
απορρυπαντικών
Τραβήξτε το συρτάρι
ανασηκώνοντάς το
και τραβώντας το
προς τα έξω (βλέπε
εικόνα).
Πλένετέ το κάτω από
τρεχούμενο νερό. Ο
καθαρισμός αυτός
διενεργείται συχνά.
Φροντίδα της πόρτας και του κάδου
• Να αφήνετε πάντα μισόκλειστη την πόρτα
για να μην παράγονται δυσοσμίες.
Καθαρισμός της αντλίας
Το πλυντήριο διαθέτει μια αντλία
αυτοκαθαριζόμενη που δεν χρειάζεται
συντήρηση. Μπορεί, όμως, να τύχει να
πέσουν μικρά αντικείμενα (κέρματα, κουμπιά)
στον προθάλαμο που προστατεύει την
αντλία, που βρίσκεται στο κάτω μέρος αυτής.
! Βεβαιωθείτε ότι ο κύκλος πλυσίματος έχει
τελειώσει και βγάλτε το βύσμα.
Για να έχετε
πρόσβαση στον
προθάλαμο:
1. αφαιρέστε το
ταμπλό κάλυψης
στο πρόσθιο πλευρό
του πλυντηρίου με
τη βοήθεια ενός
κατσαβιδιού
(βλέπε εικόνα).
2. Ξεβιδώστε το
καπάκι στρέφοντάς
το αριστερόστροφα
(βλέπε εικόνα): είναι
φυσικό να βγαίνει
λίγο νερό.
3. καθαρίστε επιμελώς το εσωτερικό.
4. ξαναβιδώστε το καπάκι.
5. ξαναμοντάρετε το πάνελ όντας σίγουροι,
πριν το σπρώξετε προς τη μηχανή, ότι έχετε
εισάγει τα γαντζάκια στις αντίστοιχες εσοχές.
Έλεγχος του σωλήνα τροφοδοσίας
του νερού
Ελέγχετε το σωλήνα τροφοδοσίας τουλάχιστον
μια φορά ετησίως. Αν παρουσιάζει σκασίματα
και σχισμές αντικαθίσταται: κατά τα πλυσίματα οι
ισχυρές πιέσεις θα μπορούσαν να προκαλέσουν
αναπάντεχα σπασίματα.
! Μη χρησιμοποιείτε ποτέ χρησιμοποιημένους
σωλήνες.

17
GR
Προφυλάξεις και
συμβουλές
! Το πλυντήριο σχεδιάστηκε και κατασκευάστηκε
σύμφωνα με τους διεθνείς κανόνες ασφαλείας. Αυτές οι
προειδοποιήσεις παρέχονται για λόγους ασφαλείας και
πρέπει να διαβάζονται προσεκτικά.
Γενική ασφάλεια
• Η συσκευή αυτή σχεδιάστηκε αποκλειστικά για οικιακή
χρήση.
• Η συσκευή αυτή μπορεί να χρησιμοποιηθεί
από παιδιά άνω των 8 ετών και από άτομα
με μειωμένες φυσικές, αισθητηριακές ή
νοητικές ικανότητες ή με εμπειρία και γνώσεις
ανεπαρκείς, αν επιτηρούνται ή αν έχουν δεχτεί
κατάλληλη εκπαίδευση σχετικά με τη χρήση της
συσκευής με τρόπο ασφαλή και κατανοώντας
τους σχετικούς κινδύνους. Τα παιδιά δεν πρέπει
να παίζουν με τη συσκευή. Συντήρηση και
καθαρισμός δεν πρέπει να διενεργούνται από
παιδιά χωρίς επιτήρηση.
• Μην αγγίζετε το μηχάνημα με γυμνά πόδια ή με τα
χέρια ή τα πόδια βρεγμένα.
• Μην βγάζετε το βύσμα από την ηλεκτρική πρίζα
τραβώντας το καλώδιο, αλλά να πιάνετε την πρίζα.
• Μην ανοίγετε το συρταράκι απορρυπαντικών ενώ το
μηχάνημα είναι σε λειτουργία.
• Μην αγγίζετε το νερό αδειάσματος, αφού μπορεί να
φτάσει σε υψηλές θερμοκρασίες.
• Μην ζορίζετε σε καμία περίπτωση την πόρτα: θα
μπορούσε να χαλάσει ο μηχανισμός ασφαλείας που
προστατεύει από τυχαία ανοίγματα.
• Σε περίπτωση βλάβης, σε καμία περίπτωση να
μην επεμβαίνετε στους εσωτερικούς μηχανισμούς
προσπαθώντας να την επισκευάσετε.
• Να ελέγχετε πάντα τα παιδιά να μην πλησιάζουν στο
μηχάνημα σε λειτουργία.
• Κατά το πλύσιμο η πόρτα τείνει να θερμαίνεται.
• Αν πρέπει να μετατοπιστεί, συνεργαστείτε δύο ή τρία
άτομα με τη μέγιστη προσοχή. Ποτέ μόνοι σας γιατί το
μηχάνημα είναι πολύ βαρύ.
• Πριν εισάγετε τη μπουγάδα ελέγξτε αν ο κάδος είναι
άδειος.
Διάθεση
• Διάθεση του υλικού συσκευασίας: τηρείτε τους
τοπικούς κανονισμούς, ώστε οι συσκευασίες να
μπορούν να επαναχρησιμοποιηθούν.
• Η ευρωπαϊκή οδηγία 2002/96/EK για τα Απόβλητα
Ηλεκτρικού και Ηλεκτρονικού Εξοπλισμού, απαιτεί ότι
οι παλαιές οικιακές ηλεκτρικές συσκευές δεν πρέπει
να αποβάλονται μαζί με τα υπόλοιπα απόβλητα
του δημοτικού δικτύου. Οι παλαιές συσκευές
πρέπει να συλλεχθούν χωριστά προκειμένου να
βελτιστοποιηθούν η αποκατάσταση και η ανακύκλωση
των υλικών που περιέχουν και με σκοπό τη μείωση
των βλαβερών επιπτώσεων στην ανθρώπινη υγεία
και το περιβάλλον. Το σύμβολο με το διεγραμμένο
“δοχείο αποβλήτων” στο προϊόν υπενθυμίζει σε σας
την υποχρέωσή σας, πως όταν επιθυμείτε να πετάξετε
τη συσκευή ,πρέπει να συλλεχθεί χωριστά.
Οι καταναλωτές θα πρέπει να απευθύνονται στις
τοπικές αρχές ή στα καταστήματα λιανικής για
πληροφορίες που αφορούν τη σωστή διάθεση των
παλαιών ηλεκτρικών συσκευών.

18
GR
Θήκη απορρυπαντικών: για την προσθήκη
απορρυπαντικών και πρόσθετων (βλέπε
«Απορρυπαντικά και μπουγάδα»).
Κουμπί ON/OFF: Για να ανάψετε ή να σβήσετε το
πλυντήριο.
Επιλογέας ΠΡΟΓΡΑΜΜΑΤΩΝ: για να θέσετε τα
προγράμματα. Κατά τη διάρκεια του προγράμματος ο
επιλογέας παραμένει ακίνητος.
Κουμπι ά με ενδεικτικά φωτάκια ΛΕΙΤΟΥΡΓΙΑΣ: για να
επιλέξετε τις διαθέσιμες λειτουργίες. Το σχετικό με την
επιλεγείσα λειτουργία ενδεικτικό φωτάκι θα παραμείνει
αναμμένο.
Επιλογέας ΘΕΡΜΟΚΡΑΣΙΑ: για να θέσετε τη
θερμοκρασία ή το πλύσιμο σε κρύο νερό (βλέπε
«Εξατομικεύσεις»).
ΕΝΔΕΙΚΤΙΚΑ ΦΩΤΑΚΙΑ ΠΡΟΩΘΗΣΗΣ ΚΥΚΛΟΥ/
ΚΑΘΥΣΤΕΡΗΜΕΝΗΣ ΕΚΚΙΝΗΣΗΣ: για να ακολουθείτε
την κατάσταση προόδου του προγράμματος πλυσίματος.
Το αναμμένο ενδεικτικό φωτάκι δείχνει την σε εξέλιξη
φάση.
Αν τέθηκε η λειτουργία “Καθυστερημένη εκκίνηση”, θα
δείχνουν τον χρόνο που υπολείπεται για την έναρξη του
προγράμματος (βλέπε σελίδα δίπλα).
Ενδεικτικό φωτάκι ΠΟΡΤΑ ΑΣΦΑΛΙΣΜΕΝΗ: για να
καταλάβετε αν η πόρτα ανοίγει (βλέπε σελίδα δίπλα).
Κουμπί με ενδεικτικό φωτάκι START/PAUSE: για την εκκίνηση
των προγραμμάτων ή την προσωρινή διακοπή τους.
ΣΗΜΕΙΩΣΗ: για να θέσετε σε παύση το σε εξέλιξη
πλύσιμο, πιέστε το κουμπί αυτό, το σχετικό ενδεικτικό
φωτάκι θα ανάψει με πορτοκαλί χρώμα ενώ εκείνο της
σε εξέλιξης φάσης θα είναι συνεχώς αναμμένο. Αν το
ενδεικτικό φωτάκι ΠΟΡΤΑ ΑΣΦΑΛΙΣΜΕΝΗ σβήσει,
μπορείτε να ανοίξετε την πόρτα.
Για να ξεκινήσει πάλι το πλύσιμο από το σημείο
διακοπής, πατήστε εκ νέου το κουμπί αυτό.
Τρόπος stand by
Το πλυντήριο αυτό, σύμφωνα με τις νέες διατάξεις για
την εξοικονόμηση ενέργειας, διαθέτει ένα σύστημα
αυτόματου σβησίματος (stand by) που τίθεται σε
λειτουργία εντός 30 λεπτών στην περίπτωση μη χρήσης.
Πιέστε στιγμιαία το κουμπί ON/OFF και περιμένετε να
ενεργοποιηθεί εκ νέου η μηχανή.
Κατανάλωση σε off-mode: 0,5 W
Κατανάλωση σε Left-on: 0,5 W
Περιγραφή του πλυντηρίου και
εκκίνηση ενός προγράμματος
ΕΝΔΕΙΚΤΙΚΑ ΦΩΤΑΚΙΑ
ΠΡΟΩΘΗΣΗΣ ΚΥΚΛΟΥ/
ΚΑΘΥΣΤΕΡΗΜΕΝΗΣ ΕΚΚΙΝΗΣΗΣ
Ενδεικτικό
φωτάκι ΠΟΡΤΑ
ΑΣΦΑΛΙΣΜΕΝΗ
Κουμπί με
ενδεικτικό φωτάκι
START/PAUSE
Πίνακας ελέγχου
Θήκη απορρυπαντικών
Κουμπί
ON/OFF
Επιλογέας
ΠΡΟΓΡΑΜΜΑΤΩΝ
Επιλογέας
ΘΕΡΜΟΚΡΑΣΙΑ
Κουμπι ά με
ενδεικτικά φωτάκια
ΛΕΙΤΟΥΡΓΙΑΣ

19
GR
Ενδεικτικά φωτάκια
Τα ενδεικτικά φωτάκια παρέχουν σημαντικές
πληροφορίες.
Να τι μας λένε:
Καθυστερημένη εκκίνηση
Αν ενεργοποιήθηκε η λειτουργία “Καθυστερημένη
εκκίνηση” (βλέπε “Εξατομικεύσεις”), αφού εκκινήσετε το
πρόγραμμα, θα αρχίσει να αναβοσβήνει το ενδεικτικό
φωτάκι το σχετικό με την επιλεγμένη καθυστέρηση:
Με το πέρασμα του χρόνου θα απεικονίζεται η
υπολειπόμενη καθυστέρηση, με το σχετικό ενδεικτικό
φωτάκι να αναβοσβήνει.
Αφού ολοκληρωθεί η προεπιλεγμένη χρονοκαθυστέρηση
θα αρχίσει το επιλεγμένο πρόγραμμα.
Ενδεικτικά φωτάκι φάσης σε εξέλιξη
Κατά τον επιθυμητό κύκλο πλυσίματος, τα ενδεικτικά
φωτάκια θα ανάψουν προοδευτικά για να δείξουν την
κατάσταση προώθησης:
Κουμπιά λειτουργίας και σχετικά ενδεικτικά φωτάκια
Επιλέγοντας μια λειτουργία το σχετικό ενδεικτικό φωτάκι
θα φωτιστεί.
Αν η επιλεγμένη λειτουργία δεν είναι συμβατή με το τεθέν
πρόγραμμα το σχετικό ενδεικτικό φωτάκι θα αναβοσβήνει
και η λειτουργία δεν θα ενεργοποιηθεί.
Αν η επιλεγμένη λειτουργία δεν είναι συμβατή με μια
άλλη που επελέγη προηγουμένως, το σχετικό φωτάκι της
πρώτης επιλεγμένης λειτουργίας θα αναβοσβήνει και θα
ενεργοποιηθεί μόνο η δεύτερη, το ενδεικτικό φωτάκι της
ενεργοποιηθείσας λειτουργίας θα φωτιστεί.
Ενδεικτικό φωτάκι ασφαλισμένης πόρτας
Το αναμμένο ενδεικτικό φωτάκι δείχνει ότι η πόρτα είναι
μπλοκαρισμένη για να αποφευχθεί το άνοιγμα. Για να ανοίξετε
την πόρτα πρέπει το ενδεικτικό φωτάκι να είναι σβηστό
(περιμένετε 3 λεπτά περίπου). Για να ανοίξετε την πόρτα ενώ
είναι σε εξέλιξη ένας κύκλος πιέστε το κουμπί START/PAUSE.
Αν το ενδεικτικό φωτάκι ΠΟΡΤΑ ΑΣΦΑΛΙΣΜΕΝΗ είναι σβηστό
μπορείτε να ανοίξετε την πόρτα.
Εκκίνηση ενός προγράμματος
1. Ανάψτε το πλυντήριο πιέζοντας το κουμπί ON/OFF. Όλα τα ενδεικτικά φωτάκι θα ανάψουν μερικά δευτερόλεπτα, μετά θα
σβήσουν και θα πάλλεται το ενδεικτικό φωτάκι START/PAUSE.
2. Φορτώστε τη μπουγάδα και κλείστε την πόρτα.
3. Θέστε με τον επιλογέα ΠΡΟΓΡΑΜΜΑΤΩΝ το επιθυμητό πρόγραμμα.
4. Θέστε τη θερμοκρασία πλυσίματος (βλέπε «Εξατομικεύσεις»).
5. Χύστε απορρυπαντικό και πρόσθετα (βλέπε «Απορρυπαντικά και μπουγάδα»).
6. Επιλέξετε τις διαθέσιμες λειτουργίες.
7. Εκκινήστε το πρόγραμμα πιέζοντας το κουμπί START/PAUSE και το σχετικό ενδεικτικό φωτάκι θα παραμείνει αναμμένο
συνεχώς με πράσινο χρώμα. Για να ακυρώσετε τον τεθέντα κύκλο θέστε τη μηχανή σε παύση πιέζοντας το κουμπί START/
PAUSE και επιλέξτε ένα νέο κύκλο.
8. Στο τέλος του προγράμματος θα φωτιστεί το ενδεικτικό φωτάκι . Όταν η ενδεικτική λυχνία ΠΟΡΤΑ ΑΣΦΑΛΙΣΜΕΝΗ
σβήσει μπορείτε να ανοίξετε την πόρτα. Βγάλτε τη μπουγάδα και αφήστε την πόρτα μισόκλειστη για να στεγνώσει ο κάδος.
Σβήστε το πλυντήριο πιέζοντας το κουμπί ON/OFF.
Πλύσιμο
Ξέβγαλμα
Στύψιμο
Άδειασμα
Τέλος Πλυσίματος

20
GR
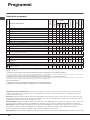
Προγράμματα
Πίνακας των Προγραμμάτων
Κανονικό πρόγραμμα για βαμβακερά στους 60 °C 20°C (πρόγραμμα 7) ιδανικό για φορτία λερωμένων βαμβακερών.
Οι καλές επιδόσεις και σε χαμηλή θερμοκρασία, συγκρίσιμες με ένα πλύσιμο στους 40°, εξασφαλίζονται από μια μηχανική
δράση που λειτουργεί με μεταβολή ταχύτητας σε επαναλαμβανόμενες και κοντινές αυξομειώσεις.
Express (πρόγραμμα 11) μελετήθηκε για το πλύσιμο ρούχων ελαφρά λερωμένων σε σύντομο χρόνο: διαρκεί μόνο 15
λεπτά και σας εξοικονομεί χρόνο και ενέργεια. Θέτοντας το πρόγραμμα (11 σε 30°C) μπορείτε να πλύνετε μαζί υφάσματα
διαφορετικής φύσης (εκτός μάλλινων και μεταξωτών) με ένα μέγιστο φορτίο 1,5 kg.
Sport Intensive (πρόγραμμα 12) σχεδιάστηκε για το πλύσιμο υφασμάτων αθλητικής ένδυσης (φόρμες, παντελονάκια, κλπ.)
λίγο λερωμένα. Για να πετύχετε τα καλύτερα αποτελέσματα συστήνεται να μην ξεπερνάτε το μέγιστο φορτίο του “Πίνακα
των προγραμμάτων”.
Sport Light (πρόγραμμα 13) σχεδιάστηκε για το πλύσιμο υφασμάτων αθλητικής ένδυσης (φόρμες, παντελονάκια, κλπ.)
λίγο λερωμένα. Για να πετύχετε τα καλύτερα αποτελέσματα συστήνεται να μην ξεπερνάτε το μέγιστο φορτίο του “Πίνακα
των προγραμμάτων”. Συστήνεται η χρήση υγρού απορρυπαντικού, χρησιμοποιείτε μια δόση κατάλληλη για μισό φορτίο.
Sport Shoes (πρόγραμμα 14) σχεδιάστηκε για το πλύσιμο αθλητικών υποδημάτων. Για να πετύχετε τα καλύτερα
αποτελέσματα μην πλένετε περισσότερα από 2 ζευγάρια.
Η διάρκεια του κύκλου που φαίνεται στην οθόνη ή στο εγχειρίδιο αποτελεί μια εκτίμηση υπολογισμένη με βάση τις στάνταρ συνθήκες. Ο πραγματικός χρόνος μπορεί να ποικίλει με βάση πολυάριθμους παράγοντες
όπως θερμοκρασία και πίεση του εισερχόμενου νερού, θερμοκρασία περιβάλλοντος, ποσότητα απορρυπαντικού, ποσότητα και τύπος φορτίου, ισοστάθμιση του φορτίου, πρόσθετες επιλεγμένες δυνατότητες.
1) Πρόγραμμα ελέγχου σύμφωνα με την προδιαγραφή 1061/2010: θέστε το πρόγραμμα 3 σε μια θερμοκρασία 60°C.
Ο κύκλος αυτός είναι κατάλληλος για τον καθαρισμό φορτίου βαμβακερών με συνηθισμένη βρωμιά και είναι ο πλέον αποτελεσματικός σε όρους κατανάλωσης ενέργειας
και νερού, προς χρήση σε ρούχα πλενόμενα στους 60°C. Η πραγματική θερμοκρασία πλυσίματος μπορεί να διαφέρει από την υποδεικνυόμενη.
2) Πρόγραμμα ελέγχου σύμφωνα με την προδιαγραφή 1061/2010: θέστε το πρόγραμμα 4 σε μια θερμοκρασία 40°C.
Ο κύκλος αυτός είναι κατάλληλος για τον καθαρισμό φορτίου βαμβακερών με συνηθισμένη βρωμιά και είναι ο πλέον αποτελεσματικός σε όρους κατανάλωσης ενέργειας
και νερού, προς χρήση σε ρούχα πλενόμενα στους 40°C. Η πραγματική θερμοκρασία πλυσίματος μπορεί να διαφέρει από την υποδεικνυόμενη.
Για όλα τα Test Institutes:
2) Πρόγραμμα βαμβακερών μακρύ: θέστε το πρόγραμμα 4 σε μια θερμοκρασία 40°C.
3) Συνθετικά πρόγραμμα μαζί: θέστε το πρόγραμμα 6 σε μια θερμοκρασία 40°C.
ÐñïãñÜììáôá
ÐåñéãñáöÞ ôïõ Ðñïãñܵµáôïò
ÌÝãéóôç
èåñµïêñ.
(°C)
ÌÝãéóôç
ôá÷ýôçôá
(óôñïöÝò
áíÜ
ëåðôü)
ÁðïññõðáíôéêÜ
ÌÝãéóôï
Öïñôßï. (Kg)
Υπολειπόμενη
υγρασία %
Κατανάλωση
ενέργειας kWh
Συνολικό
νερό lt
ÄéÜñêåéá
êýêëïõ
Ðñïð-
ëõóç
Ðëýó-
éµï
Ìáëáê-
ôéêü
λευκα-
ντικό
KáèçµåñéνÜ (Daily)
1
ÂáµâáêåñÜ ðñüðëõóç: ËåõêÜ åîáéñåôéêÜ ëåñùìÝíá.
90° 600
- 5 80 1,68 61 145’
2
ÂáµâáêåñÜ ëåõêÜ: ËåõêÜ åîáéñåôéêÜ ëåñùìÝíá.
90° 600 -
5 80 1,57 56 130’
3
Κανονικό πρόγραμμα για βαμβακερά στους 60 °C (1): ËåõêÜ êáé ÷ñùµáôéóôÜ
áíèåêôéêÜ, ðïëý ëåñùµÝíá.
60° 600 -
5 80 0,89 44,4 165’
4
Κανονικό πρόγραμμα για βαμβακερά στους 40 °C (2): ËåõêÜ ëßãï ëåñùµÝíá
êáé åõáßóèçôá ÷ñþµáôá.
40° 600 -
5 80 1,09 92 160’
5
ÂáµâáêåñÜ ÷ñùµáôéóôÜ: ËåõêÜ ëßãï ëåñùµÝíá êáé åõáßóèçôá ÷ñþµáôá.
40° 600 -
5 80 0,59 48 80’
6
ÓõíèåôéêÜ:
×ñùµáôéóôÜ áíèåêôéêÜ, ðïëý ëåñùµÝíá.
60° 600 -
3 44 0,70 70 105’
6
ÓõíèåôéêÜ (3):
×ñùµáôéóôÜ áíèåêôéêÜ, ëßãï ëåñùµÝíá.
40° 600 -
3 44 0,47 38 95’
7
Βαμβακερά Στάνταρ 20°C: ËåõêÜ ëßãï ëåñùµÝíá êáé åõáßóèçôá ÷ñþµáôá.
20° 600 -
5 - - - 170’
ÅéäéêÜ (Special)
8
ÌÜëëéíá: Ãéá µÜëëéíá, cachemire, êëð.
40° 600 -
- 1 - - - 65’
9
ÌåôáîùôÜ/ Êïõñôßíåò: Ãéá µåôáîùôÜ ñïý÷á, âéóêüæç, ëéíÜ.
30° 0 -
- 1 - - - 55’
10
Jeans
40° 600 -
- 2,5 - - - 70’
11
Express: Ãéá ôï ãñÞãïñï öñåóêÜñéóµá ñïý÷ùí åëáöñÜ ëåñùµÝíùí (äåí åíäåßêíõôáé ãéá
µÜëëéíá, µåôáîùôÜ êáé ñïý÷á ðïõ ðëÝíïíôáé óôï ÷Ýñé).
30° 600 -
- 1,5 71 0,13 29 15’
Sport
12
Sport Intensive
30° 600 -
- 2,5 - - - 85’
13
Sport Light
30° 600 -
- 2,5 - - - 60’
14
Sport Shoes
30° 600 -
-
(MAX. 2
æåýãç.)
- - - 55’
Åðß µÝñïõò ðñïãñܵµáôá
ÎÝâãáëµá
- 600 - -
5 - - - 36’
Óôýøéµï + ¢íôëçóç
- 600 - - - - 5 - - - 16’
La pagina si sta caricando...
La pagina si sta caricando...
La pagina si sta caricando...
La pagina si sta caricando...
La pagina si sta caricando...
La pagina si sta caricando...
La pagina si sta caricando...
La pagina si sta caricando...
La pagina si sta caricando...
La pagina si sta caricando...
La pagina si sta caricando...
La pagina si sta caricando...
La pagina si sta caricando...
La pagina si sta caricando...
La pagina si sta caricando...
La pagina si sta caricando...
La pagina si sta caricando...
La pagina si sta caricando...
La pagina si sta caricando...
La pagina si sta caricando...
La pagina si sta caricando...
La pagina si sta caricando...
La pagina si sta caricando...
La pagina si sta caricando...
La pagina si sta caricando...
La pagina si sta caricando...
La pagina si sta caricando...
La pagina si sta caricando...
La pagina si sta caricando...
La pagina si sta caricando...
La pagina si sta caricando...
La pagina si sta caricando...
La pagina si sta caricando...
La pagina si sta caricando...
La pagina si sta caricando...
La pagina si sta caricando...
La pagina si sta caricando...
La pagina si sta caricando...
La pagina si sta caricando...
La pagina si sta caricando...
La pagina si sta caricando...
La pagina si sta caricando...
La pagina si sta caricando...
La pagina si sta caricando...
La pagina si sta caricando...
La pagina si sta caricando...
La pagina si sta caricando...
La pagina si sta caricando...
La pagina si sta caricando...
La pagina si sta caricando...
La pagina si sta caricando...
La pagina si sta caricando...
-
 1
1
-
 2
2
-
 3
3
-
 4
4
-
 5
5
-
 6
6
-
 7
7
-
 8
8
-
 9
9
-
 10
10
-
 11
11
-
 12
12
-
 13
13
-
 14
14
-
 15
15
-
 16
16
-
 17
17
-
 18
18
-
 19
19
-
 20
20
-
 21
21
-
 22
22
-
 23
23
-
 24
24
-
 25
25
-
 26
26
-
 27
27
-
 28
28
-
 29
29
-
 30
30
-
 31
31
-
 32
32
-
 33
33
-
 34
34
-
 35
35
-
 36
36
-
 37
37
-
 38
38
-
 39
39
-
 40
40
-
 41
41
-
 42
42
-
 43
43
-
 44
44
-
 45
45
-
 46
46
-
 47
47
-
 48
48
-
 49
49
-
 50
50
-
 51
51
-
 52
52
-
 53
53
-
 54
54
-
 55
55
-
 56
56
-
 57
57
-
 58
58
-
 59
59
-
 60
60
-
 61
61
-
 62
62
-
 63
63
-
 64
64
-
 65
65
-
 66
66
-
 67
67
-
 68
68
-
 69
69
-
 70
70
-
 71
71
-
 72
72


Indesit IWSB 50651 EU Guida utente
- Categoria
- Lavatrici
- Tipo
- Guida utente
in altre lingue
- slovenčina: Indesit IWSB 50651 EU Užívateľská príručka
- Türkçe: Indesit IWSB 50651 EU Kullanici rehberi