Whirlpool BD 241 Guida utente
- Categoria
- Frigo-congelatori
- Tipo
- Guida utente
Questo manuale è adatto anche per

Frigorifero
Installazione e uso
Refrigerator
Installation and use
Frigorífico
Instalación y uso

I
Frigocongelatore 2 porte 1
Istruzioni per l'installazione e l'uso
Two-door refrigerator/freezer 10
Instructions for installation and use
Refrigerador-congeladore 2 puertas 19
Instrucciones para la instalación y uso
BD 241
BD 241 S
Per garantire l’efficienza e la sicurezza di questo elettrodomestico:
- rivolgetevi esclusivamente a centri di assistenza tecnica autorizzati
- richiedete sempre l’utilizzo di parti di ricambio originali
To maintain the EFFICIENCY and SAFETY of this appliance, we recommend:
- call only the Service Centers authorized by the manufacturer
- always use original Spare Parts
Para garantizar la eficacia y seguridad de este electrodoméstico:
- Diríjase exclusivamente al Servicio Técnico Oficial del Fabricante.
- Solicite siempre la utilización de recambios originales.
GB
E

1
I
La sicurezza, una buona abitudine
tere in bocca cubetti di ghiaccio appena estratti dal freezer
poiché rischiate di ustionarvi.
7. Non fate né pulizia né manutenzione senza aver prima
staccato la spina; non basta, infatti, portare la manopola
per la regolazione della temperatura sulla posizione per
eliminare ogni contatto elettrico.
8. Prima di farvi ritirare il vecchio frigorifero, mettete fuori
uso l’eventuale serratura per evitare che i bambini, giocan-
do, possano rimanere chiusi dentro l’apparecchio.
9. In caso di guasto, prima di chiamare il servizio-assistenza,
controllate al capitolo “C’è qualche problema?” per verifi-
care se è possibile eliminare l’eventuale inconveniente. Non
tentate di riparare il guasto, cercando di accedere alle parti
interne.
10. In caso di danneggiamento, il cavo alimentazione di
questo apparecchio deve essere sostituito obbligatoriamen-
te dal nostro Servizio Assistenza Tecnica, essendo necessa-
rio l'uso di utensili specifici.
11. Non usate apparecchi elettrici all'interno dello scompar-
to conservatore di cibi, se questi non sono del tipo racco-
mandato dal costruttore.
12. Al termine della vita funzionale dell'apparecchio, conte-
nente gas ciclopentano nella schiuma isolante ed eventual-
mente gas R600a (isobutano) nel circuito refrigerante, lo stes-
so dovrà essere messo in sicurezza prima dell'invio in disca-
rica. Per questa operazione rivolgetevi al vostro negoziante
o all'Ente Locale preposto.
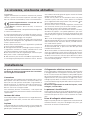
Installazione
Per garantire un buon funzionamento e un consumo
contenuto di elettricità è importante che l’installazio-
ne sia eseguita correttamente.
L’aerazione
Il compressore ed il condensatore emettono calore e richie-
dono perciò una buona aerazione. Sono poco adatti am-
bienti con una non perfetta ventilazione. L’apparecchio va
quindi installato in un ambiente servito da un’apertura (fi-
nestra o portafinestra) che assicuri il necessario ricambio
dell’aria. E che non sia troppo umido.
Fare attenzione, durante l'installazione, a non coprire od
ostruire le griglie che permettono la buona ventilazione del-
l'apparecchio.
Lontano dal calore
Evitare di posizionare l'apparecchio in un luogo direttamen-
te esposto alla luce solare, accanto alla cucina elettrica o
similari.
In piano
L'apparecchio deve essere ben in piano; se il pavimento non
è livellato, è possibile intervenire con gli appositi piedini re-
golabili posti anteriormente.
Collegamento elettrico e messa a terra
Prima di procedere al collegamento elettrico, controllate che
il voltaggio indicato sulla targhetta caratteristiche, posta in
basso a sinistra accanto alla verduriera, corrisponda a quella
del vostro impianto di casa, e che la presa sia dotata di una
regolare messa a terra, come prescrive la legge sulla sicurez-
za degli impianti 46/90. Se manca la messa a terra, la Casa
Costruttrice declina ogni responsabilità. Non usate prese mul-
tiple o adattatori.
Posizionare l’apparecchio in modo che la presa, a cui è
collegato, sia accessibile.
La potenza è insufficiente?
La presa elettrica deve essere in grado di sopportare il carico
massimo di potenza dell’apparecchio, indicata sulla targhetta
caratteristiche posta in basso a sinistra accanto alla verdu-
riera.
Prima di collegarlo elettricamente
Dopo il trasporto posizionare l’apparecchio verticalmente ed
attendere almeno 3 ore prima di collegarlo alla presa, per
consentire un corretto funzionamento.
ATTENZIONE
Leggete attentamente le avvertenze contenute nel presente
libretto in quanto forniscono importanti indicazioni riguar-
danti la sicurezza di installazione, d’uso e di manutenzione.
Questa apparecchiatura è conforme alle se-
guenti Direttive Comunitarie:
- 73/23/CEE del 19/02/73 (Basse Tensioni) e successive
modificazioni;
- 89/336/CEE del 03/05/89 (Compatibilità Elettromagnetica)
e successive modificazioni.
1. Questo apparecchio non va installato all’aperto, nemme-
no se lo spazio è riparato da una tettoia; è molto pericoloso
lasciarlo esposto alla pioggia e ai temporali.
2. Deve essere usato soltanto da adulti ed esclusivamente
per conservare e congelare i cibi, seguendo le istruzioni d’uso
scritte in questo manuale.
3. Non toccate né manovrate mai l’apparecchio a piedi nudi
o con le mani o piedi bagnati.
4. Sconsigliamo di ricorrere a prolunghe e prese multiple. Se
il frigorifero è installato tra i mobili, controllate che il cavo
non subisca piegature o compressioni pericolose.
5. Non tirate mai il cavo né il frigorifero per staccare la spina
dalla presa a muro: è molto pericoloso.
6. Non toccate le parti interne raffreddanti soprattutto con
le mani bagnate poiché potreste ustionarvi o ferirvi. Né met-

2
I
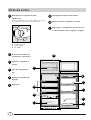
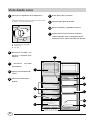
Visto da vicino
A
Manopola per la regolazione della
temperatura
Questa manopola consente di regolare la tempe-
ratura dei due sreparti su diverse posizioni:
il frigo è spento;
1 meno freddo;
5 più freddo
B
Balconcino estraibile con
scatola burro e portauova
C
Balconcino regolabile in
altezza
D
Vano per bottiglia da 2
litri
E
Balconcino estraibile per
bottiglie
F
Verduriera
G
Convogliatore acqua di sbrinamento
H
Ripiani estraibili e regolabili in altezza
I
Reparto per la congelazione dei cibi freschi e
la conservazione di cibi congelati e surgelati
H
A
I
D
E
F
G
B
C
C

3
I
Come avviare l'apparecchio
ATTENZIONE
Dopo il trasporto, posizionare l’apparecchio verticalmente
ed attendere circa 3 ore prima di collegarlo alla presa di
corrente per favorire un buon funzionamento.
Prima di mettere gli alimenti nel frigorifero o nel freezer
pulite bene l’interno con acqua tiepida e bicarbonato.
Dopo aver collegato la spina alla presa di corrente accertartevi
che la lampada di illuminazione sia accesa quindi ruotare la
manopola per la regolazione della temperatura “A” sulla
posizione “3” e dopo qualche ora potrete inserire i cibi fre-
schi nel reparto frigo e quelli congelati nel freezer.
Cosa non va in frigorifero
L’aglio (trasmette gli odori), la cipolla e i porri.
Le banane (anneriscono).
Gli agrumi (meglio al fresco, sul balcone).
Patate e tuberi (solo buio e niente umidità).
Come utilizzare al meglio il reparto frigorifero
La temperatura all'interno del reparto frigorifero si regola
automaticamente in base alla posizione della manopola del
termostato.
1 = meno freddo
5 = più freddo
Si consiglia, comunque, una posizione media
Per aumentare lo spazio e disposizione e migliorare l'aspet-
to estetico, questo apparecchio ha la "parte raffreddante"
posizionata all'interno della parete posteriore del reparto
frigo. Tale parete, durante il funzionamento, si presenterà
coperta di brina, oppure di goccioline di acqua a secondo se
il compressore è in funzione o in pausa. Non preoccupatevi
di questo! Il frigorifero sta lavorando in modo normale.
Se si imposta la manopola su numeri alti, con notevoli
quantitativi di cibi e con una temperatura ambiente eleva-
ta, l'apparecchio può funzionare di continuo favorendo la
formazione di brina sulla parete posteriore raffreddante con
conseguente aumento di consumo di energia elettrica.
Per ovviare a questo inconveniente è sufficiente spo-
stare la manopola del termostato verso i numeri più
bassi in modo da permettere all'apparecchio un rego-
lare sbrinamento automatico.
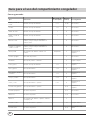
Guida alla sistemazione e conservazione dei cibi nel reparto frigorifero
Cibo
Tempo di
conservazione
Disposizione nel frigo
Carne e pesce pulito
(avvolgere in sacchetti o fogli di plastica)
2 o 3 giorni
Sopra la verduriera
(zona più fredda)
Formaggi freschi 3 o 4 giorni
Sopra la verduriera
(zona più fredda)
Uova 1 mese Nell'apposito contenitore della controporta
Burro e margarine Nel balconcino della controporta
Cibi cotti (chiudere in recipienti ermetici ed
introdurre dopo il raffreddamento)
3 o 4 giorni Su qualsiasi ripiano
Salumi crudi, pane in cassetta, cioccolata,
pasticcini alla crema, pomodori, ecc.
3 o 4 giorni Su qualsiasi ripiano
Bottiglie, latte, bibite, yogurt Negli appositi balconcini della controporta
Frutta e verdura Nella verduriera

4
I
- All’interno del frigorifero l’aria circola in modo naturale
e quella più fredda tende a scendere perché è più pesan-
te. Ecco perché carni e formaggi devono essere posti so-
pra la verduriera.
- Seguite attentamente i nostri consigli sulla durata massi-
ma della conservazione: qualsiasi cibo, anche il più fresco,
non rimane intatto molto a lungo.
- Contrariamente a quanto si crede, i cibi cotti non si man-
tengono più a lungo di quelli crudi.
- Non inserite i liquidi in recipienti scoperti perché provoche-
rebbero l'aumento di umidità all'interno del frigorifero e di
conseguenza la formazione di brina.
- Fate attenzione a non mettere contenitori (plastica, ve-
tro), cibi ed altro a diretto contatto della parete refrige-
rante (quella posteriore). Ciò potrebbe danneggiare i cibi,
far aumentare i consumi di energia e facilitare la forma-
zione di condensa (sui cibi, contenitori, ecc.).
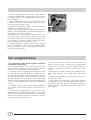
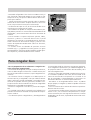
- Il reparto frigorifero è dotato di pratici ripiani estraibili
(Fig. 1) e regolabili in altezza grazie alle apposite guide.
Per questo è possibile inserire anche grandi contenitori e
cibi di notevoli dimensioni.
Fig. 1
- Per la preparazione dei cibi da congelare consultare
un manuale specializzato.
- Un alimento scongelato, anche solo parzialmente, non
deve mai essere ricongelato: lo dovete cuocere per con-
sumarlo (entro 24 ore) oppure per ricongelarlo.
- Gli alimenti freschi da congelare non devono essere po-
sti a contatto con quelli già congelati o surgelati ma van-
no messi sopra la griglia del reparto freezer possibilmen-
te a contatto delle pareti (laterali e posteriore). Non biso-
gna infatti dimenticare che la buona conservazione degli
alimenti congelati dipende dalla velocità di congelazione.
- Durante la congelazione evitate di aprire la porta del
freezer.
- La quantità massima giornaliera da congelare è indicata
sulla targhetta caratteristiche posta a sinistra della ver-
duriera.
- Per ottenere una congelazione e una successiva scon-
gelazione ottimali è consigliabile dividere i cibi in piccole
porzioni così si congeleranno rapidamente e in modo omo-
geneo. Sulle confezioni riportate le indicazioni sul conte-
nuto e sulla data di congelamento.
- Non aprite la porta del freezer in caso di mancanza di
corrente o di un guasto, ritarderete così l’aumento della
temperatura al suo interno. In questo modo i surgelati e i
congelati si conserveranno senza alterazioni per circa 9-
14 ore.
- Non mettete nel freezer bottiglie piene: potrebbero rom-
persi poiché, gelandosi, tutti i liquidi aumentano di volu-
me.
- Riempite le bacinelle dei cubetti di ghiaccio fino a circa
3/4 della loro altezza.
- Se per lungo tempo permane la temperatura ambiente
più fredda di 14°C, non si raggiungono completamente le
temperature necessarie per una lunga conservazione nel
reparto freezer e il periodo di conservazione risulterà per-
tanto ridotto.
Per congelare bene

5
I
Consigli per risparmiare
- Installatelo bene
E cioè lontano da fonti di calore, dalla luce diretta del
sole, in locale ben aerato e con le distanze indicate nel
paragrafo "Installazione/L'aerazione".
IL CONSUMO DI ENERGIA EFFETTIVO DIPENDE DAL
MODO IN CUI L’APPARECCHIO VIENE UTILIZZATO E DAL
POSTO IN CUI VIENE SITUATO.
Le prove di consumo sono state eseguite in colonne di pro-
fondità 560mm, condizione più comune di installazione
- Il freddo giusto
Il troppo freddo fa aumentare i consumi
- Non riempitelo troppo
Per conservare bene i cibi il freddo deve circolare liberamen-
te all’interno del frigorifero. Riempirlo troppo significa im-
pedire questa circolazione facendo lavorare di continuo il
compressore.
- A porte chiuse
Aprite il vostro frigorifero il meno possibile perché ogni
volta che lo fate va via gran parte dell’aria fredda. Per
ristabilire la temperatura il motore deve lavorare a lungo
consumando molta energia.
- Occhio alle guarnizioni
Mantenetele efficienti e pulite in modo che aderiscano bene
alle porte; solo così non lasceranno uscire nemmeno un po’
di freddo.
- Niente cibi caldi
Una pentola calda messa nel frigorifero alza immediatamente
la temperatura di diversi gradi, lasciatela raffreddare a tem-
peratura ambiente prima di introdurla nel frigorifero.
- Brina nel freezer
Controllate lo spessore della brina sulle pareti del freezer ed
effettuate subito lo sbrinamento se lo strato è diventato trop-
po spesso (Vedi più avanti “Come tenerlo in forma”).

6
I
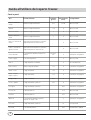
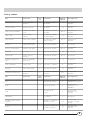
Guida all'utilizzo del reparto freezer
Carni e pesci
Tipo Confezionamento
Frollatura
(giorni)
Conservazione
(mesi)
Scongelamento
Arrosto e bollito di
manzo
Avvolto in foglio di alluminio 2 / 3 9 / 10 Non necessario
Agnello Avvolto in foglio di alluminio 1 / 2 6 Non necessario
Arrosto di maiale Avvolto in foglio di alluminio 1 6 Non necessario
Arrosto e bollito di
vitello
Avvolto in foglio di alluminio 1 8 Non necessario
Bistecche e braciole di
maiale
Ogni fetta avvolta in politene e quindi in
foglio di alluminio in numero di 4-5
6 Non necessario
Fettine e cotolette di
agnello o manzo
Ogni fetta avvolta in politene e quindi in
foglio di alluminio in numero di 4-5
6 Non necessario
Carne macinata
In contenitori di alluminio ricoperti con
politene
Freschissi-
ma
2 Lentamente in frigorifero
Cuore e fegato In sacchetti di politene 3 Non necessario
Salsicce In fogli di politene o alluminio 2 A seconda dell’uso
Polli e tacchini Avvolti in fogli di alluminio 1 / 3 9 Lentamente in frigorifero
Anatre e oche In fogli di alluminio 1 / 4 6 Lentamente in frigorifero
Anatre selvatiche,
fagiani e pernici
In fogli di alluminio 1 / 3 9 Lentamente in frigorifero
Conigli e lepri In fogli di alluminio 3 / 4 6 Lentamente in frigorifero
Cervo e capriolo In fogli di alluminio o politene 5 / 6 9 Lentamente in frigorifero
Pesci grossi In fogli di alluminio o politene 4 / 6 Lentamente in frigorifero
Pesci piccoli In buste di politene 2 / 3 Non necessario
Crostacei In buste di politene 3 / 6 Non necessario
Molluschi
In contenitori di alluminio o plastica
ricoperti con acqua e sale
3 Lentamente in frigorifero
Pesci cotti In fogli di alluminio o politene 12 In acqua calda
Pesci fritti In sacchetti di politene 4 / 6 Direttamente in padella

7
I
Frutta e verdura
Tipo Preparazione
Scottatura
(min)
Confezionamento
Conservazione
(mesi)
Scongelamento
Mele e pere
Sbucciare e tagliare a
pezzetti
2’
In contenitori ricoperti di
sciroppo
12 Lentamente in frigorifero
Albicocche, pesche,
ciliege e prugne
Snocciolare e pelare 1’ / 2’
In contenitori ricoperti di
sciroppo
12 Lentamente in frigorifero
Fragole, more e
mirtilli
Pulire, lavare e lasciare
asciugare
In contenitori ricoperti di
zucchero
10 / 12 Lentamente in frigorifero
Frutta cotta
Tagliare, cuocere e
passare
In contenitori,
aggiungere 10% di
zucchero
12 Lentamente in frigorifero
Succhi di frutta
Lavare, tagliare e
schiacciare
In contenitori, zucchero
a piacere
10 / 12 Lentamente in frigorifero
Cavolfiori
Spezzettare e scottare
in acqua e succo di
limone
2’ In sacchetti di politene 12 Non necessario
Cavolo e cavolini
Pulire e lavare
(spezzettare)
1’ / 2’ In sacchetti di politene 10 / 12 A temperatura ambiente
Piselli Sbucciare e lavare 2’ In sacchetti di politene 12 Non necessario
Fagiolini
Lavare e tagliare a
pezzetti
2 In sacchetti di politene 10 / 12 Non necessario
Carote, peperoni e
rape
Tagliare a fette,
pelare, lavare
3’ / 4’ In sacchetti di politene 12 Non necessario
Funghi e asparagi Lavare e tagliare 3’ / 4’ In sacchetti o contenitori 6 A temperatura ambiente
Spinaci Lavare e tagliuzzare 2’ In sacchetti di politene 12 A temperatura ambiente
Verdure varie per
minestra
Lavare e tagliare a
pezzetti
3’
In sacchetti in piccole
porzioni
6 / 7 A temperatura ambiente
Cibi vari Preparazione Scottatura Confezionamento
Conservazione
(mesi)
Scongelamento
Pane In sacchetti di politene 4
A temperatura ambiente o
nel frigorifero
Torte In fogli di politene 6
A temperatura ambiente e
cuocere a 100/200°C
Panna In contenitori di plastica 6
A temperatura ambiente o
nel frigorifero
Burro
Nel suo incarto originale
avvolto in alluminio
6 In frigorifero
Cibi cotti,
minestrone
Suddiviso in contenitori
di plastica o vetro
3 / 6
A temperatura ambiente e
in acqua calda
Uova
Congelare senza guscio
in piccoli contenitori
10
A temperatura ambiente o
nel frigorifero

8
I
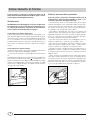
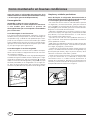
Pulizia e manutenzioni particolari
Prima di pulire il frigorifero scollegarlo dalla rete di
alimentazione elettrica (disinserendo la spina o l’in-
terruttore generale dell’appartamento).
- I materiali con i quali è stato fabbricato il vostro appa-
recchio sono igienici e non trasmettono odori ma per man-
tenere queste qualità è necessario che i cibi vengano sem-
pre protetti e ben chiusi, per evitare macchie difficilmen-
te rimovibili o la creazione di cattivi odori.
- Solo acqua e bicarbonato. Per pulire sia l’interno che
l’esterno usate una spugnetta con acqua tiepida e bicar-
bonato di sodio che, tra l’altro, è anche un buon disinfet-
tante. Se non l’avete in casa potete impiegare del sapo-
ne neutro (quello di Marsiglia ad esempio).
- Cosa non usare. Mai abrasivi, mai candeggina, mai am-
moniaca. Proibitissimi i solventi e altri prodotti simili.
- Tutto ciò che si può togliere, mettetelo a bagno in acqua
calda con sapone o detersivo per i piatti. E prima di ri-
metterli a posto, risciacquateli e asciugateli bene.
- Quando sta fermo a lungo. Durante il periodo estivo, se
decidete di fermare il frigorifero, bisogna pulire l’interno
e lasciare le porte aperte, altrimenti si formeranno cattivi
odori e muffe.
- Come sostituire la lampadina interna. Nella parte poste-
riore della scatola termostato è posta la lampada di illu-
minazione interna. In caso di sostituzione scollegare l’ap-
parecchio dalla rete elettrica, svitare la lampada non fun-
zionante e sostituirla con un’altra di potenza non superio-
re a 15 W. operando come illustrato in figura 3.
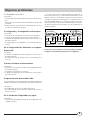
Come tenerlo in forma
Prima di pulire il frigorifero scollegarlo dalla rete di
alimentazione elettrica (disinserendo la spina o l’inter-
ruttore generale dell’appartamento).
Sbrinamento
ATTENZIONE: non danneggiare il circuito refrigerante.
Fare attenzione a non usare dispositivi meccanici o al-
tri utensili per accelerare il processo di sbrinamento,
oltre a quelli raccomandati dal costruttore.
Come sbrinare il reparto frigorifero.
Questo apparecchio ha lo sbrinamento automatico e l’ac-
qua viene convogliata verso la parte posteriore da un appo-
sito scarico (Fig. 2) dove il calore prodotto dal compresso-
re la fa evaporare. L’unico intervento che dovete fare
periodicamente consiste nel pulire il foro di scarico che si
trova dietro le verduriere affinché l’acqua passi regolar-
mente.
Come sbrinare il reparto freezer
- Eliminate ogni tanto la brina con l’apposito raschietto in
dotazione (niente coltelli od oggetti metallici).
- Se la brina ha superato i 5 mm bisogna fare lo sbrinamen-
to.
Procedete così: posizionare la manopola per la regolazione
delle temperature A nella posizione ; avvolgete tutti i sur-
gelati e i congelati in carta da giornale mettendoli o in frigo-
rifero o in un luogo fresco. Lasciate aperta la porta in modo
che la brina si sciolga del tutto, aiutandola con dei conteni-
tori pieni di acqua tiepida.
Fig. 2
Fig. 3

9
I
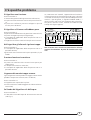
C'è qualche problema
Il frigorifero non funziona.
Avete controllato se:
· l’interruttore generale dell’appartamento è disinserito;
· la spina non è correttamente inserita nella presa di corren-
te;
· la presa non è efficiente; provate a collegare la spina ad
un’altra presa del locale.
Il frigorifero e il freezer raffreddano poco.
Avete controllato se:
· le porte non chiudono bene o le guarnizioni sono rovinate;
· le porte rimangono aperte per lungo tempo;
· la manopola di regolazione della temperatura non è in
posizione corretta;
· il frigorifero o il freezer sono stati riempiti eccessivamente.
Nel frigorifero gli alimenti si gelano troppo.
Avete controllato se:
· la manopola di regolazione della temperatura non è in
posizione corretta;
· gli alimenti sono a contatto con la parte posteriore, la più
fredda.
Il motore funziona in continuo.
Avete controllato se:
· le porte non sono ben chiuse o sono rimaste aperte per
lungo tempo;
· la temperatura esterna è molto alta;
· la manopola di regolazione della temperatura non è in
posizione corretta.
L’apparecchio emette troppo rumore.
Il gas refrigerante interno produce un leggero rumore anche
quando il compressore è fermo (non è un difetto).
Avete controllato se:
· Il frigorifero non è posto ben in piano:
· è stato installato tra mobili o oggetti che vibrano ed emet-
tono rumori;
Sul fondo del frigorifero c’è dell’acqua.
Avete controllato se:
· il foro dello scarico dell’acqua di sbrinamento è otturato
(vedi fig. 2).
Non ricorrete mai a tecnici non autorizzati e rifiutate
sempre l’installazione di pezzi di ricambio non origi-
nali.
Mod.
RG 2330
TI
Cod.
93139180000 S/N 704211801
220 - 240 V- 50 Hz 150 W
W
Fuse
A
Max 15 w
Total
Gross
Bruto
Brut
Compr.
Kompr.
Syst.
R 134 a
kg 0,090
Gross
Bruto
Brut
340
Net
Util
Utile
Gross
Bruto
Brut
Freez. Capac
Poder de Cong
75
Made in Italy 13918
Test
P.S-I.
Pressure
HIGH-235
LOW 140
kg/24 h
4,0
Class
Clase
N
Classe
Se, nonostante tutti i controlli, l’apparecchio non funziona e
l’inconveniente da voi rilevato continua ad esserci, chiamate
il Centro di Assistenza più vicino, comunicando queste infor-
mazioni: il tipo di guasto, la sigla del modello (Mod.) e i
relativi numeri (S/N) scritti sulla targhetta delle caratteristi-
che posta in basso a sinistra, accanto alla verduriera (vedi
esempi nelle figure seguenti).

10
GB
into your mouth because they could stick to your mouth
and cause burns.
7. Never clean or perform maintenance on the appliance
without first removing the plug from the socket; in fact,
turning the knob for adjusting the temperature to the ·
setting is not sufficient to eliminate all electrical contact with
the mains.
8. Before having your old refrigerator picked up for disposal,
remove or make inoperable any locking devices to prevent
children who might play in or around the appliance from
being locked inside.
9. Before calling for service/assistance in the case of mal-
function, consult the chapter entitled “Is There a Problem?
to determine whether it is possible to eliminate the prob-
lem. do not try to repair the problem by trying to access the
internal components of the appliance.
10. If damaged, the power supply cord on this appliance
must necessarily be replaced by our service centre because
special tools are required for replacement.
11. Do not use electric appliances inside the compartment
for food storage, if these are not those recommended by
the manufacturer.
12. At the end of the functional life of your appliance –
containing cyclopentane gas in the insulation foam and
perhaps gas R600a (isobutane) in the refrigeration circuit –
the latter should made safe before being sent to the dump.
For this operation, please contact your dealer or the Local
Organisation in charge of waste disposal.
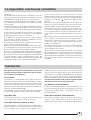
Installation
To ensure that the appliance operates properly and to
reduce energy consumption, it is important that the
appliance is installed correctly.
Ventilation
The compressor and condenser generate heat and, there-
fore, need to be ventilated properly. Rooms with less than
perfect ventilation are not very suited for installation of the
appliance. Therefore, it should be installed in a room with
an opening (window or French window) that provide the
appropriate amount of air re-circulation. It is also important
that the room not be too humid.
During installation, make sure not to cover or obstruct the
grates that allow for proper ventilation of the appliance.
Away from Heat
Avoid positioning the appliance in a place where it is directly
exposed to sunlight or near an oven, cook top or the like.
Electrical Connection and Earthing
Before proceeding with the electrical connection, make sure
that the voltage indicated on the rating plate, located at the
bottom left near the vegetable crisper, corresponds to the
mains voltage in your home and that the socket is fitted
with a standard earthing wire in accordance with safety
standards for 46/90 systems. If the socket is not fitted with
an earthing wire, the manufacturer will not be held liability
for any damages and or injuries arising out of the use of the
appliance. Do not use multiple sockets or adapters.
Position the appliance in such a way that you can access
the socket where it is plugged in.
Insufficient power?
The electrical socket must be able to handle the maximum
power load of the appliance, which is indicated on the rat-
ing plate located at the bottom left next to the vegetable
crisper.
Before making the electrical connection ...
After the appliance has been delivered, place it in the verti-
cal upright position and wait at least 3 hours before insert-
ing the plug into the socket in order to ensure that it func-
tions properly.
ATTENTION
Read your manual carefully since it contains instructions
which will ensure safe installation, use and maintenance of
your appliance.
Your Refrigerator is built to International safety standards
(EN60) and has been awarded the European approval mark
(IMQ) for compliance with UK electrical safety requirements.
It also meets the EC standards on the prevention and elimi-
nation of radio interference (EC directive 87/308 - 02.06.89).
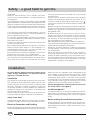
Safety - a good habit to get into.
1. This appliance must not be installed outdoors - not even
in an area protected by a roof. It is extremely dangerous to
leave it exposed to rain or storms.
2. It must only be used by adults and exclusively to refriger-
ate and freeze foodstuffs, following the instructions for use
contained in this manual.
3. Do not ever touch or handle the appliance with bare feet
or with wet hands or feet.
4. It is highly recommended that you do not use extension
cords or multiple socket adapters. If the refrigerator is in-
stalled between cabinets, make sure that the cord is not
bent or dangerously pinched or compressed.
5. Never pull on the cord or the refrigerator to remove the
plug from the wall socket - this is very dangerous.
6. Never touch the cooling components within the appli-
ance, especially with wet hands because this could result in
injury. Never put ice cubes just removed from the freezer

11
GB
A closer look
A
A
Thermostat knob for regulating
the temperature
Use this knob to regulate the temperature of the
refrigerator. The following settings are available:
The refrigerator is off;
1 less cold;
5 colder
B
Removable door shelves
with lid, with egg tray and
lidded butter dish
C
Removable miscellaneous
shelf
D
Compartment for a 2 litre
bottle
E
Removable door shelf for
bottles
F
Fruit and vegetable drawer
G
Drain for defrost water
H
Removable height adjustable shelves
I
Compartment for storing frozen foods, freezing
fresh foods and making ice
H
A
I
D
E
F
G
B
C
C

12
GB
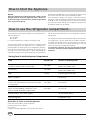
How to Start the Appliance
NOTICE
After the appliance has been delivered, stand it in the
upright position and wait approximately 3 hours be-
fore connecting it to the electrical outlet to guarantee
that it operates properly.
Before placing foodstuffs in the refrigerator or freezer, clean
the interior well with warm water and baking soda.
After putting the plug in the socket, make sure that the
light is on inside the appliance and then turn the thermostat
knob (A) to the “3” setting. After a few hours have passed,
you can place fresh food in the refrigerator compartment
and frozen foods into the freezer.
The thermostat automatically regulates the temperature in-
side the appliance
1 = less cold
5 = colder
It is recommended that a medium setting be used.
To increase the amount of space, optimize arrangement and
improve appearance, this appliance has a “cooling area”
located within the back panel of the refrigerator compart-
ment. When the appliance is operating, this panel may be
covered with frost or droplets of water depending on
whether the compressor is operating or not at a given time.
Do not be concerned about this! The refrigerator is operat-
ing normally.
If the thermostat knob is positioned on higher settings while
the refrigerator is heavily filled and the ambient tempera-
ture high, the appliance may run continuously, resulting in
the formation of frost on the back cooling area. This will
lead to an increase in energy consumption.
To avoid this situation, just turn the thermostat knob
to a lower setting so that the appliance defrosts auto-
matically.
Storing Food in the Refrigerator Compartment
Food Storage Time Location in the Refrigerator
Wrapped meat and cleaned fish
(use plastic wrap or pack in plastic bags)
2 or 3 days
On the shelf above the vegetable crisper
(which is the coldest area).
Fresh cheese 3 or 4 days
On the shelf above the vegetable crisper
(which is the coldest area).
Eggs 1 month In special egg rack on door.
Butter, margarine On any shelf.
Cooked or precooked food
(placer in air-tight containers and when cool store
in refrigerator)
3 or 4 days On any shelf.
Sausages, salami, sandwich meats in general, fresh
pasta, custards,puddings, chocolates, cream
pastries, bread, dry pastries, red tomatoes
3 or 4 days On any shelf.
Bottled products, milk, drinks, yoghurt On special door shelves.
Fruits and legumes In vegetable crisper.
What Not to Store in the Refrigerator
Garlic (transmits odour), onions and leeks.
Bananas (they will turn black).
Citrus fruits.
Potatoes and root vegetables (store in dark, dry places).
How to use the refrigerator compartment...

13
GB
- Within the refrigerator compartment, the air circulates natu-
rally, with the colder air falling because it is heavier. This is
the reason why meat and cheeses should be placed above
the vegetable crisper.
- Please follow our instructions carefully on maximum stor-
age time: any food, even the freshest, will not remain edible
for any extended amount of time.
- Contrary to popular belief, cooked foods do not store any
longer than raw food.
- Do not place liquids in containers without covering them
because this will lead to an increase in the level of moisture
within the refrigerator, causing the formation of frost.
- Remember to cool hot food before storing otherwise the
temperature inside the appliance will increase, causing the
compressor to work harder and use more energy.
- Be careful not to place containers (plastic or glass), food or
other objects in direct contact with the cooling area of the
back wall of the refrigerator. This could harm the food, in-
crease energy consumption and facilitate the formation of
condensate (on food, containers, etc.).
- For the preparation of food to be frozen, please con-
sult a specialized manual.
- Food that has be thawed, even partially, must not be re-
frozen: you must cook it in order to consume it (within 24
hours) or to freeze it once again.
- Fresh foods that you intend to freeze must not be placed
in contact with those that are already frozen or those that
have been fast-frozen. Rather, they must placed atop the
grate in the freezer compartment, in contact with the walls
of the compartment (back or side) if possible. Please keep in
mind that proper conservation of frozen foods depends on
the speed with which they are frozen.
- During the freezing process, avoid opening the door of the
freezer.
- The maximum daily quantity of food that can be frozen is
indicated on the rating plate located to the left of the veg-
etable crisper.
- In order to freeze and then thaw foods optimally, it is rec-
ommended that you divide food into small portions so that
they freeze quickly and uniformly. The packages should be
clearly marked with the content and the date they were
frozen.
- Do not open the freezer door in the event of a power
failure or malfunction. This precaution will slow the rise in
temperature within the compartment. If the door is not
opened, frozen and fast-frozen foods will remain in their
current state for approximately 9-14 hours.
- Do not place full bottles in the freezer: they could easily
burst because all liquids increase in volume when they freeze.
- Fill the ice cube trays about 3/4 full.
- If the ambient temperature remains below 14°C for an
extended period of time, the temperature needed for ex-
tended storage of food in the freezer will not be reached,
resulting in reduced storage life of the food.
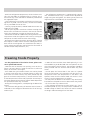
Freezing Foods Properly
- The refrigerator compartment is equipped with conven-
ient, removable shelves (Fig. 1) which can be adjusted for
height using the shelf guides. This allows you to place even
large containers and foodstuffs in the refrigerator.
Fig. 1

14
GB
Tips on Saving Energy
- Install the Appliance Correctly
This means that the appliance should be installed away from
heat sources or direct sunlight in a well ventilated room.
THE ACTUAL ENERGY CONSUMPTION OF THE
APPLIANCE DEPENDS ON THE WAY THE SAME IS USED
AND ON ITS LOCATION. The consumption tests were
performed in 560mm deep column units, the most common
installation setting for this appliance.
- Use the Right Temperature Setting
A setting which is too cold increases energy consumption.
- Do not Overfill
To conserve food properly, the cold air must circulate freely
within the refrigerator. If it is overfilled, this will prevent proper
air circulation, forcing the compressor to work continuously.
- Close the Doors
Open your refrigerator as little as possible because each time
you do so you loose much of the cold air. To raise the tem-
perature to the proper level again, the motor must work for
a long time, consuming energy.
- Keep an Eye on the Seals
Keep the seals clean and make sure that they adhere well to
the door. This alone will ensure that no cold air escapes.
- No Hot Foods
A hot pot or pan placed in the refrigerator immediately raises
the temperature several degrees. Let hot cookware and food
cool to ambient temperature before placing them in the re-
frigerator.
- Defrost the Freezer
Check the thickness of the frost on the walls of the freezer
and immediately defrost it if the layer of frost is too thick.
(see the section entitled, “Keeping your Appliance in Shape”).

15
GB
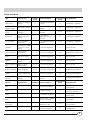
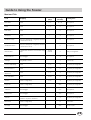
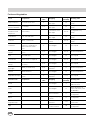
Guide to Using the Freezer
Meat and Fish
Food Wrapping
Tenderising
(days)
Storage
(months)
Thawing Time
Beef Roast Tinfoil 2 / 3 9 / 10 Not required.
Lamb Tinfoil 1 / 2 6 Not required.
Pork Roast Tinfoil 1 6 Not required.
Veal Roast Tinfoil 1 8 Not required.
Veal/Pork Chops
Each piece wrapped in cling wrap and then
in tinfoil (4 to 6 slices)
6 Not required.
Veal/Lamb Cutlets
Each piece wrapped in cling wrap and then
in tinfoil (4 to 6 slices)
6 Not required.
Minced Meat
In aluminium containers covered with cling
wrap.
Freshly
minced
2 Slowly in refrigerator.
Heart and Liver Plastic Baggies 3 Not required.
Sausages Cling Wrap or Tinfoil 2 As necessary.
Chicken and Turkey Tinfoil 1 / 3 9 Very slowly in refrigerator.
Duck and Goose Tinfoil 1 / 4 6 Very slowly in refrigerator.
Pheasant, Partrige and
Wild Duck
Tinfoil 1 / 3 9 Very slowly in refrigerator.
Hare and Rabbit Tinfoil 3 / 4 6 Very slowly in refrigerator.
Venison Tinfoil or Cling Wrap 5 / 6 9 Very slowly in refrigerator.
Large Fish Tinfoil or Cling Wrap 4 / 6 Very slowly in refrigerator.
Small Fish Plastic Baggies 2 / 3 Not required.
Crustaceans Plastic Baggies 3 / 6 Not required.
Shellfish
Store in salted water in aluminium
containers or plastic containers.
3 Very slowly in refrigerator.
Boiled Fish Tinfoil or Cling Wrap 12 In hot water.
Fried Fish Plastic Baggies 4 / 6 Directly in pan.

16
GB
Fruits and Vegetables
Food Preparation
Blanching
Time
Wrapping
Storage
(months)
Thawing Time
Apples and Pears Peel and cut into slices. 2’
In Containers (cover
with syrup)
12
In refrigerator very
slowly.
Apricots, Peaches,
Cherries and Plums
Peel and pit. 1’ / 2’
In Containers (cover
with syrup)
12
In refrigerator very
slowly.
Strawberries
Blackberries and
Raspberries
Rinse and fry.
In Containers (cover
with sugar)
10 / 12
In refrigerator very
slowly.
Cooked Fruit Cut, cook and strain.
In Containers (add
10% sugar)
12
In refrigerator very
slowly.
Fruit Juice Wash, cut and crush.
In Containers (sugar
to taste)
10 / 12
In refrigerator very
slowly.
Cauliflower
Remove leaves, cut head into
small pieces and blanch in
water and a little lemon
juice.
2’ Plastic Baggies 12 Not required.
Cabbage and Brussel
Sprouts
Wash and cut into small
pieces.
1’ / 2’ Plastic Baggies 10 / 12 At room temperature.
Peas Shell and wash. 2’ Plastic Baggies 12 Not required.
French Beans Wash and slice if required. 2 Plastic Baggies 10 / 12 Not required.
Carrots, Peppers and
Turnips
Peel, wash and slice if
necessary.
3’ / 4’ Plastic Baggies 12 Not required.
Mushrooms and
Asparagus
Wash, peel and cut up. 3’ / 4’
Plastic Baggies or
Containers
6 At room temperature.
Spinach Wash and mince. 2’ Plastic Baggies 12 At room temperature.
Vegetable for Soups
Wash and cut up in small
pieces.
3’
Plastic Baggies or
Containers
6 / 7 Not required.
Various Foods Preparation
Blanching
Time
Wrapping
Storage
(months)
Thawing time
Bread Plastic Baggies 4
At room temperature
and in the oven.
Cakes Plastic Baggies 6
About 10 minutes at
room temperature, cook
at 100/200°C.
Cream Plastic Containers 6
At room temperature or
in refrigerator.
Butter
In original wrapping
or tinfoil
6 In refrigerator.
Boiled Food or
Vegetable Soup
Plastic or Glass
Containers
3 / 6
At room temperature or
in hot water.
Eggs
Freeze without shells
in small containers
10
At room temperature or
in refrigerator.

17
GB
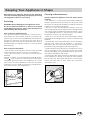
Keeping Your Appliance in Shape
Cleaning and maintenance
Always unplug the appliance from the mains before
cleaning.
- Your appliance is manufactured with hygienic odourless
materials. To preserve these characteristics, always use sealed
containers for strong smelling foods to avoid the formation
of odours that are difficult to remove.
- Use only a water and bicarbonate solution: Clean the
internal and exterior of your appliance with a sponge soaked
with a warm water and sodium bicarbonate solution, which
is also a good disinfectant. If you do not have any sodium
bicarbonate at home, use neutral detergent.
- What not to use: Do not use abrasive detergents, bleach
or detergents containing ammonia. Never use solvent based
products.
- Dishwashable: All the removable parts can be cleaned by
soaking in hot soapy water or detergent. If you own a
dishwasher, you may wash these parts in the dishwasher.
Remember to dry thoroughly before replacing them.
- Discontinued use of the appliance: If the appliance is not in
use for any length of time, remember to clean the interior
and dry thoroughly, leaving the doors open to prevent the
formation of bad odours and mould.
- Replacing the light bulb. The bulb for lighting the interior
of the appliance is located at the back of the thermostat
box. Unscrew the burnt bulb and replace it with another
bulb of no more than 15 Watt, follow the instructions
illustrated in fig. 3.
Before doing any cleaning, disconnect the appliance
from the electricity (by pulling out the plug or turning
off the general switch in your home).
Defrosting
WARNING: do not damage the refrigeration circuit.
Do not use mechanical devices or other tools to speed
up the defrosting process, unless they have been rec-
ommended by the manufacturer.
How to Defrost the Refrigerator
This appliance defrosts automatically and the water is
channeled to the back toward the drain installed for this
purpose (fig. 2). Here, the heat produced by the compressor
will make it evaporate. The only thing you must do is to
periodically check and clean the hole of the drain, which is
located behind the vegetable crispers, so that the water
drains properly.
How to Defrost the Freezer
- Every so often, remove the frost with the scraper provided
with the appliance (do not use knives or metal objects).
- If the frost is more than 15 mm thick, the freezer must be
defrosted.
Proceed as follows: turn the thermostat knob (A) to the ·
setting . Then wrap all the frozen and fast-frozen food in
newspaper, placing it either in the refrigerator or in a cool
place. Leave the freezer door open so that the frost thaws
completely. You can speed this process by placing contain-
ers of warm water in the compartment.
Fig. 2
Fig. 3

18
GB
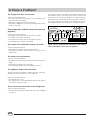
Is There a Problem?
The refrigerator does not function.
Have you checked whether:
• The main switch for the electricity to the apartment or
home has been turned off;
• The plug is properly inserted in the outlet;
• The outlet is adequate; try inserting the plug into another
outlet in the room.
The refrigerator and the freezer do not cool
properly.
Have you checked whether:
• The doors do not close well or the seals are faulty;
• The doors are left open too long;
• The thermostat knob is not on the proper setting;
• The refrigerator or freezer is overfilled.
The food in the refrigerator becomes too cold.
Have you checked whether:
• The thermostat knob is on the proper setting;
• The food is in contact with the back wall - which is the
coldest part.
The motor runs continuously.
Have you checked whether
• The doors are not closed well or have remained open too
long;
• The ambient temperature is too high;
• The thermostat knob is not on the proper setting.
The appliance makes too much noise.
The gas refrigerant produces a slight noise even when the
compressor is not running (this is not a defect).
Have you checked whether:
• The refrigerator is level.
• The appliance was installed between cabinets or objects
that vibrate and make noise.
There is water on the bottom of the refrigerator.
Have you checked whether:
• The hole for draining the water from the frost is clogged
(see fig. 2).
Never call on unauthorized technicians and always
refuse spare parts which are not originals.
Mod.
RG 2330
TI
Cod.
93139180000 S/N 704211801
220 - 240 V- 50 Hz 150 W
W
Fuse
A
Max 15 w
Total
Gross
Bruto
Brut
Compr.
Kompr.
Syst.
R 134 a
kg 0,090
Gross
Bruto
Brut
340
Net
Util
Utile
Gross
Bruto
Brut
Freez. Capac
Poder de Cong
75
Made in Italy 13918
Test
P.S-I.
Pressure
HIGH-235
LOW 140
kg/24 h
4,0
Class
Clase
N
Classe
If after all the checks, the appliance still does not operate or
the problem persists, call the nearest Service Centre and
inform them of: the type of problem, the abbreviation of
the model name (Mod.) and the relative numbers (S/N) writ-
ten on the rating plate located at the bottom left next to
the vegetable crisper (see examples in the figures below).
La pagina si sta caricando...
La pagina si sta caricando...
La pagina si sta caricando...
La pagina si sta caricando...
La pagina si sta caricando...
La pagina si sta caricando...
La pagina si sta caricando...
La pagina si sta caricando...
La pagina si sta caricando...
La pagina si sta caricando...
La pagina si sta caricando...
La pagina si sta caricando...
-
 1
1
-
 2
2
-
 3
3
-
 4
4
-
 5
5
-
 6
6
-
 7
7
-
 8
8
-
 9
9
-
 10
10
-
 11
11
-
 12
12
-
 13
13
-
 14
14
-
 15
15
-
 16
16
-
 17
17
-
 18
18
-
 19
19
-
 20
20
-
 21
21
-
 22
22
-
 23
23
-
 24
24
-
 25
25
-
 26
26
-
 27
27
-
 28
28
-
 29
29
-
 30
30
-
 31
31
-
 32
32


Whirlpool BD 241 Guida utente
- Categoria
- Frigo-congelatori
- Tipo
- Guida utente
- Questo manuale è adatto anche per
in altre lingue
- English: Whirlpool BD 241 User guide
- español: Whirlpool BD 241 Guía del usuario
Documenti correlati
-
Whirlpool MTA 241 Guida utente
-
Whirlpool BA 13 Guida utente
-
-
-
Smeg FR 138 B Manuale del proprietario
-
Hotpoint-Ariston BD 292 AI S Manuale del proprietario
-
-
-
-