
Quick Start Guide
Guide de démarrage rapide
Schnellstart-Handbuch
Guida di installazione rapida
Guía de instrucciones rápidas
Guia de uso rápido
Snel aan de slag
Snabbstartguide
Introduktion
Hurtigreferanse
Pikaopas
Gyors útmutató
Stručná příručka
Wprowadzenie
Οδηγός γρήγορης εκκίνησης
快速入門指南
eGo
™
Portable
Hard Drive
USB 2.0

Contents • Matières • Inhalt • Sommario • Contenido • Conteúdo
Inhoudsopgave • Innehåll • Indhold • Innhold • Sisällys
Tartalom • Obsah • Spis treści • Περιεχόµενα • 內容
Quick Install. . . . . . . . . . . . . . . . . . . . . . . . . . . . . . . . . . . . . . . . . . . . . . . . . . . . . . . . . . . . . . . . . . . . . 4
Installation rapide
. . . . . . . . . . . . . . . . . . . . . . . . . . . . . . . . . . . . . . . . . . . . . . . . . . . . . . . . . . . . . . . . 4
Schnellstart
. . . . . . . . . . . . . . . . . . . . . . . . . . . . . . . . . . . . . . . . . . . . . . . . . . . . . . . . . . . . . . . . . . . . . 5
Installazione rapida . . . . . . . . . . . . . . . . . . . . . . . . . . . . . . . . . . . . . . . . . . . . . . . . . . . . . . . . . . . . . .
5
Instalación rápida
. . . . . . . . . . . . . . . . . . . . . . . . . . . . . . . . . . . . . . . . . . . . . . . . . . . . . . . . . . . . . . . . 5
Instalação rápida . . . . . . . . . . . . . . . . . . . . . . . . . . . . . . . . . . . . . . . . . . . . . . . . . . . . . . . . . . . . . . . .
5
Snelle installatie . . . . . . . . . . . . . . . . . . . . . . . . . . . . . . . . . . . . . . . . . . . . . . . . . . . . . . . . . . . . . . . . .
6
Snabbinstallation . . . . . . . . . . . . . . . . . . . . . . . . . . . . . . . . . . . . . . . . . . . . . . . . . . . . . . . . . . . . . . . .
6
Hurtig installation
. . . . . . . . . . . . . . . . . . . . . . . . . . . . . . . . . . . . . . . . . . . . . . . . . . . . . . . . . . . . . . . . 7
Rask installering . . . . . . . . . . . . . . . . . . . . . . . . . . . . . . . . . . . . . . . . . . . . . . . . . . . . . . . . . . . . . . . . .
7
Pika-asennus
. . . . . . . . . . . . . . . . . . . . . . . . . . . . . . . . . . . . . . . . . . . . . . . . . . . . . . . . . . . . . . . . . . . . 7
Gyors telepítés . . . . . . . . . . . . . . . . . . . . . . . . . . . . . . . . . . . . . . . . . . . . . . . . . . . . . . . . . . . . . . . . . .
7
Rychlá instalace
. . . . . . . . . . . . . . . . . . . . . . . . . . . . . . . . . . . . . . . . . . . . . . . . . . . . . . . . . . . . . . . . . . 8
Skrócona instrukcja insalacji . . . . . . . . . . . . . . . . . . . . . . . . . . . . . . . . . . . . . . . . . . . . . . . . . . . . . . .
8
Γρήγορη
εγκατάσταση . . . . . . . . . . . . . . . . . . . . . . . . . . . . . . . . . . . . . . . . . . . . . . . . . . . . . . . . . . . . 9
快速安裝指南 . . . . . . . . . . . . . . . . . . . . . . . . . . . . . . . . . . . . . . . . . . . . . . . . . . . . . . . . . . . . . . . . . . . 9
Using the Drive . . . . . . . . . . . . . . . . . . . . . . . . . . . . . . . . . . . . . . . . . . . . . . . . . . . . . . . . . . . . . . . . .
10
Utilisation du lecteur
. . . . . . . . . . . . . . . . . . . . . . . . . . . . . . . . . . . . . . . . . . . . . . . . . . . . . . . . . . . . .12
Das Laufwerk verwenden . . . . . . . . . . . . . . . . . . . . . . . . . . . . . . . . . . . . . . . . . . . . . . . . . . . . . . . . .
13
Uso dell’unità . . . . . . . . . . . . . . . . . . . . . . . . . . . . . . . . . . . . . . . . . . . . . . . . . . . . . . . . . . . . . . . . . .
15
Uso de la unidad . . . . . . . . . . . . . . . . . . . . . . . . . . . . . . . . . . . . . . . . . . . . . . . . . . . . . . . . . . . . . . . .
16
Utilização da unidade
. . . . . . . . . . . . . . . . . . . . . . . . . . . . . . . . . . . . . . . . . . . . . . . . . . . . . . . . . . . .18
De drive gebruiken . . . . . . . . . . . . . . . . . . . . . . . . . . . . . . . . . . . . . . . . . . . . . . . . . . . . . . . . . . . . . .
20
使用磁碟機 . . . . . . . . . . . . . . . . . . . . . . . . . . . . . . . . . . . . . . . . . . . . . . . . . . . . . . . . . . . . . . . . . . . .22

Formatting the Drive for Mac OS . . . . . . . . . . . . . . . . . . . . . . . . . . . . . . . . . . . . . . . . . . . . . . . . . . .10
Formatage du disque pour Mac OS . . . . . . . . . . . . . . . . . . . . . . . . . . . . . . . . . . . . . . . . . . . . . . . . . . . . . 12
Formatieren des Laufwerks für Mac OS . . . . . . . . . . . . . . . . . . . . . . . . . . . . . . . . . . . . . . . . . . . . . . . . . . . . . . .13
Formattazione dell’unità per Mac OS. . . . . . . . . . . . . . . . . . . . . . . . . . . . . . . . . . . . . . . . . . . . . . . .15
Formateo de la unidad para Mac OS . . . . . . . . . . . . . . . . . . . . . . . . . . . . . . . . . . . . . . . . . . . . . . . . . . . . 17
Formatação da unidade em Mac OS. . . . . . . . . . . . . . . . . . . . . . . . . . . . . . . . . . . . . . . . . . . . . . . . . . 18
De drive formatteren voor Mac OS . . . . . . . . . . . . . . . . . . . . . . . . . . . . . . . . . . . . . . . . . . . . . . . . . .20
格式化 Mac OS 的磁碟機 . . . . . . . . . . . . . . . . . . . . . . . . . . . . . . . . . . . . . . . . . . . . . . . . . . . . . . . .22
Troubleshooting . . . . . . . . . . . . . . . . . . . . . . . . . . . . . . . . . . . . . . . . . . . . . . . . . . . . . . . . . . . . . . . .
11
Dépannage . . . . . . . . . . . . . . . . . . . . . . . . . . . . . . . . . . . . . . . . . . . . . . . . . . . . . . . . . . . . . . . . . . . .
12
Fehlerbehebung . . . . . . . . . . . . . . . . . . . . . . . . . . . . . . . . . . . . . . . . . . . . . . . . . . . . . . . . . . . . . . . .
14
Risoluzione dei problemi . . . . . . . . . . . . . . . . . . . . . . . . . . . . . . . . . . . . . . . . . . . . . . . . . . . . . . . . .
16
Solución de problemas
. . . . . . . . . . . . . . . . . . . . . . . . . . . . . . . . . . . . . . . . . . . . . . . . . . . . . . . . . . .17
Solução de problemas . . . . . . . . . . . . . . . . . . . . . . . . . . . . . . . . . . . . . . . . . . . . . . . . . . . . . . . . . . .
19
Problemen oplossen
. . . . . . . . . . . . . . . . . . . . . . . . . . . . . . . . . . . . . . . . . . . . . . . . . . . . . . . . . . . . .21
疑難排解 . . . . . . . . . . . . . . . . . . . . . . . . . . . . . . . . . . . . . . . . . . . . . . . . . . . . . . . . . . . . . . . . . . . . . .23
Limited Warranty. . . . . . . . . . . . . . . . . . . . . . . . . . . . . . . . . . . . . . . . . . . . . . . . . . . . . . . . . . . .24
Garantie Limitée . . . . . . . . . . . . . . . . . . . . . . . . . . . . . . . . . . . . . . . . . . . . . . . . . . . . . . . . . . . .25
Eingeschränkte Garantie . . . . . . . . . . . . . . . . . . . . . . . . . . . . . . . . . . . . . . . . . . . . . . . . . . . . . .26
Garanzia limitata. . . . . . . . . . . . . . . . . . . . . . . . . . . . . . . . . . . . . . . . . . . . . . . . . . . . . . . . . . . .28
Garantía limitada . . . . . . . . . . . . . . . . . . . . . . . . . . . . . . . . . . . . . . . . . . . . . . . . . . . . . . . . . . .29
Garantia limitada . . . . . . . . . . . . . . . . . . . . . . . . . . . . . . . . . . . . . . . . . . . . . . . . . . . . . . . . . . .30
Models may vary.
Les modèles peuvent varier.
Abweichungen je nach Modell möglich
.
I modelli possono variare.
Los modelos pueden variar.
Os modelos podem variar.
Modellen kunnen verschillen.
不同機型之間有所差異。

4
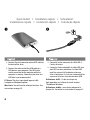
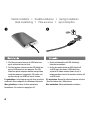
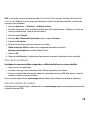
1. Connect the mini connector on the USB cable to
the back of the drive.
2. Connect the other end of the USB cable to a
USB port on your computer. The USB cable
can be connected to the computer while the
computer is running. Connecting the drive to a
USB hub is not recommended.
PC Users: The drive icon should appear in My
Computer or Windows Explorer.
Mac Users
: You will need to reformat the drive. See
instructions on page 10
.
Quick Install • Installation rapide • Schnellstart
Installazione rapida • Instalación rápida • Instalação rápida
1. Connectez le mini-connecteur du câble USB à
l’arrière du lecteur.
2.
Connectez l’autre extrémité du câble USB à un
port USB sur votre ordinateur. Le câble USB
peut être connecté à l’ordinateur alors que
celui-ci fonctionne. Il n’est pas recommandé de
connecter le lecteur à un concentrateur USB.
Utilisateurs de PC : l’icône du disque dur
doit apparaître sur le Poste de travail ou dans
l’Explorateur Windows.
Utilisateurs de Mac : vous devez reformater le
disque dur. Consultez les instructions à la page 12.

5
1. Collegare il connettore mini al cavo USB situato sul
retro dell’unità.
2.
Collegare l’estremità opposta del cavo USB
a una porta USB sul computer. È possibile
collegare il cavo USB quando il computer è
acceso. Si sconsiglia di collegare l’unità a un
hub USB.
Utenti PC: l’icona dell’unità compare in Risorse del
computer o in Esplora risorse.
Utenti Mac: sarà necessario riformattare l’unità.
Fare riferimento alle istruzioni a pagina 15.
1. Schließen Sie den Ministecker des USB-Kabels an
der Rückseite des Laufwerks an.
2.
Schließen Sie das andere Ende des USB-Kabels
an einen USB-Anschluss Ihres Computers an. Das
USB-Kabel kann an den Computer angeschlossen
werden, während der Computer eingeschaltet ist.
Es wird nicht empfohlen, das Laufwerk an einen
USB-Hub anzuschließen.
PC-Benutzer: Das Laufwerksymbol sollte im
Arbeitsplatz oder im Windows-Explorer angezeigt
werden.
Mac-Benutzer: Sie müssen das Laufwerk neu
formatieren. Lesen Sie hierzu die Anweisungen auf
Seite 13.
1. Conecte el mini conector al cable USB en la parte
posterior de la unidad.
2.
Conecte el otro extremo del cable USB a un
puerto USB del ordenador. El cable USB se
puede conectar al ordenador mientras está en
funcionamiento. No se recomienda conectar la
unidad a un concentrador USB.
Usuarios de PC: En Mi PC o en el Explorador de
Windows debe aparecer el icono de unidad.
Usuarios de Mac: Tendrá que volver a dar formato
a la unidad. Consulte las instrucciones de la
página 17.
1. Conecte o mini conector no cabo USB na parte
posterior da unidade.
2.
Conecte a outra extremidade do cabo USB à
porta USB no computador. O cabo USB pode
ser conectado durante o funcionamento do
computador. Não é recomendável conectar a
unidade a um hub USB.
Usuários de PC: O ícone da unidade deve aparecer
em Meu computador ou no Windows Explorer.
Usuários de Mac: Será preciso reformatar a
unidade. Consulte as instruções na página 18.

6
1. Anslut minikontakten till USB-kabeln på
baksidan av enheten.
2. Anslut den andra ändan av USB-kabeln till
en USB-port i din dator. USB-kabeln kan
anslutas till datorn medan datorn är på. Vi
rekommenderar inte att du ansluter enheten till
en USB-hubb.
PC-användare: Ikonen för enheten kommer att visas
i Den här datorn eller i Utforskaren.
Mac-användare: Måste omformatera enheten.
1. Sluit de miniconnector van de USB-kabel aan
op de achterkant van de drive.
2. Sluit het andere uiteinde van de USB-kabel aan
op een USB-poort van de computer. De USB-
kabel kan op de computer worden aangesloten
nadat de computer is opgestart. Wij raden u af
om de drive op een USB-hub aan te sluiten.
Pc-gebruikers: het pictogram van de drive verschijnt
normaal in Deze computer of in Windows Verkenner.
Mac-gebruikers: u dient de drive opnieuw te
formatteren. Zie instructies op pagina 20.
Snelle installatie • Snabbinstallation • Hurtig installation
Rask installering • Pika-asennus • Gyors telepítés

7
1. Tilslut ministikket på USB-kablet på drevets
bagside.
2. Sæt den anden ende af USB-kablet i en USB-
port på computeren. USB-kablet kan sættes
i computeren, mens computeren kører. Det
anbefales ikke at slutte drevet til en USB-hub.
Pc-brugere: Drevikonet bør vises i Denne computer
eller Windows Stifinder.
Mac-brugere: Du skal genformatere drevet.
1. Kytke USB-kaapelin miniliitin kiintolevyaseman
takana olevaan liitäntään.
2. Kytke USB-kaapelin toinen pää tietokoneen
USB-porttiin. USB-kaapelin voi kytkeä
tietokoneeseen, vaikka tietokoneeseen on
kytketty virta. Kiintolevyaseman liittämistä
USB-keskittimeen ei suositella.
PC-tietokoneen käyttäjät: Aseman kuvakkeen
pitäisi tulla näkyviin Oma tietokone -ikkunaan tai
Windowsin Resurssienhallintaan.
Macintosh-käyttäjät: Asema pitää alustaa
uudelleen.
1. Koble til minikontakten på USB-kabelen på
baksiden av stasjonen.
2. Koble den andre enden av USB-kabelen til USB-
porten på datamaskinen. USB-kabelen kan
kobles til datamaskinen mens datamaskinen
står på. Det anbefales ikke å koble stasjonen til
en USB-hub.
PC-brukere: Ikonet til stasjonen skal vises i Min
datamaskin eller Windows Utforsker.
Mac-brukere: Du må formatere stasjonen på nytt.
1. Csatlakoztassa az USB kábelen lévő mini
csatlakozót a meghajtó hátoldalához.
2. Csatlakoztassa az USB kábel másik
végét a számítógép USB portjához. Az
USB-kábelt a számítógép bekapcsolt
állapotában is csatlakoztathatja. A
meghajtót nem ajánlott USB-elosztóhoz
csatlakoztatni.
PC-felhasználók: A meghajtó ikonja nem
jelenik meg a Sajátgép vagy a Windows Intéző
ablakokban.
Mac-felhasználók: Formáznia kell a meghajtót.

8
Rychlá instalace • Skrócona instrukcja insalacji
1. Připojte mini konektor kabelu USB do zadní části
jednotky.
2. Druhý konec kabelu USB zapojte do
konektoru USB na počítači. Kabel USB
lze připojit i ke spuštěnému počítači.
Nedoporučujeme připojit diskové pole k
rozbočovači USB.
Uživatelé počítačů: Ve složce Tento počítač nebo
v programu Průzkumník Windows by se měla
objevit ikona jednotky.
Pro uživatele systému Mac: Bude třeba
zformátovat jednotku.
1. Podłącz mini złącze kabla USB do tylnej części
napędu.
2.
Podłącz drugi koniec kabla USB do
portu USB komputera. Kabel USB można
podłączyć do uruchomionego komputera.
Podłączanie dysku do koncentratora USB
nie jest zalecane.
Użytkownicy komputerów PC: Ikona dysku
zostanie wyświetlona w oknie Mój komputer lub
w oknie programu Eksplorator Windows.
Użytkownicy komputerów Macintosh: Konieczne
będzie ponowne sformatowanie napędu.

9
1. Συνδέστε το µίνι βύσµα του καλωδίου USB
στο πίσω µέρος της µονάδας δίσκου.
2.
Συνδέστε το άλλο άκρο του καλωδίου USB
σε µια υποδοχή USB στον υπολογιστή σας. Η
σύνδεση του καλωδίου USB στον υπολογιστή
µπορεί να γίνει ενώ ο υπολογιστής λειτουργεί.
∆εν συνιστάται η σύνδεση της µονάδας δίσκου
σε διανοµέα USB.
Χρήστες PC: Το εικονίδιο της συσκευής πρέπει να
εµφανιστεί στο φάκελο Ο Υπολογιστής µου ή στην
Εξερεύνηση των Windows.
Χρήστες Mac: Θα χρειαστεί να κάνετε διαµόρφωση
του δίσκου.
Γρήγορη εγκατάσταση
• 快速安裝指南
1. 將 mini-USB 纜線接頭連接至磁碟機的後面。
2. 將 USB 纜線的另一端連接到電腦的 USB 連
接埠上。即使電腦正在運作,您也可以將 USB
纜線連接到電腦。建議您不要將磁碟機連接
到 USB 集線器。
PC 使用者:「我的電腦」或「Windows 檔案總管」
中應該會出現此磁碟機圖示。
Mac 使用者:您將需要重新格式化磁碟機。請參閱
第 22 頁的說明。

10
Using the Drive
Disconnecting the Drive
CAUTION! To prevent data loss, do not disconnect the drive during data transfer (activity light flashing).
PC Users: Use the Safely Remove Hardware icon in the Windows taskbar before disconnecting.
Mac Users: Drag the disk icon to the Trash (Eject) icon on the Mac Desktop.
Backing Up with Your Drive
Iomega recommends periodic system backups and more frequent data backups to ensure that your critical
data is always protected. The frequency of your backup should depend on the importance of your data. To
protect your data, you can simply drag and drop copies of your critical files onto the drive.
Formatting the Drive for Mac OS
The drive ships formatted NTFS. Use Disk Utility to reformat the drive Mac OS Extended Journaled.
NOTE: The following instructions work for Mac OS X, version 10.4 or above. For Mac OS X version 10.1
through 10.3.9, use Disk Utility, Erase to format the drive. See Mac Help if you need more detailed
instructions.
1. Select Applications
→ Utilities → Disk Utility
2. In the left hand column, click on the drive icon for the Iomega Hard Drive. Make sure you click on the
orange drive icon, not the volume icon.
3. Select the Partition tab.
4. Select Mac OS Extended (Journaled) from the Format drop-down menu.
5. Click on the Options button.
6. Select the type of partition needed for your Mac:
GUID Partition Table for bootability on an Intel-based Macintosh computer.
Apple Partition Map for a PowerPC-based Mac.
7. Click
OK.
8. Click the Partition button. The drive is ready to use when the format completes.

11
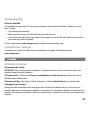
Troubleshooting
Drive not detected
Try the following suggestions if the drive does not appear in My Computer, Windows
®
Explorer, or on the
Mac
®
Desktop.
• Try restarting your computer.
• Make sure you are using the USB cable that came with the drive.
• Connect the data cable directly to the port on the computer or on the USB card. Do not plug the drive’s
data cable into a hub or keyboard.
See the support area on www.iomega.com for additional troubleshooting help.
Complete User’s Manual
A complete user’s manual in HTML format is available on the Support & Downloads area on
www.iomega.com
.
Utilisation du lecteur
Déconnexion du lecteur
ATTENTION ! Pour éviter toute perte de données, ne déconnectez pas le lecteur pendant un transfert de
données (voyant d’activité clignotant).
Utilisateurs de PC : Utilisez l’icône Retirer le périphérique en toute sécurité dans la barre des tâches
Windows avant la déconnexion.
Utilisateurs de Mac : Faites glisser l’icône du disque sur l’icône Corbeille (Ejecter) sur le bureau Mac.
Sauvegarde sur le lecteur
Iomega conseille de procéder à des sauvegardes plus fréquentes de données afin de s’assurer que vos
données importantes soient toujours protégées. La fréquence des sauvegardes dépend de l’importance des
données. Pour protéger vos données, copiez vos fichiers les plus importants sur le lecteur par simple glisser-
déplacer.

12
Formatage du disque pour Mac OS
Le disque dur est livré formaté NTFS. Utilisez l’utilitaire de disque pour reformater le disque dur Mac OS étendu
(journalisé)
.
REMARQUE : les instructions suivantes fonctionnent pour Mac OS X, version 10.4 ou ultérieure. Pour les versions
Mac OS X versions 10.1 à 10.3.9, utilisez Utilitaire de disque, puis Effacer pour reformater le disque. Consultez
l’Aide Mac si vous souhaitez des instructions plus détaillées.
1. Sélectionnez Applications
→ Utilitaires → Utilitaire de disque
2. Dans la colonne de gauche, cliquez sur l’icône du disque dur Iomega. Assurez-vous de cliquer sur l’icône
orange du disque, pas sur l’icône de volume.
3. Sélectionnez l’onglet Partitionner
.
4. Sélectionnez Mac OS étendu (journalisé) dans le menu déroulant Format
.
5. Cliquez sur le bouton Options
.
6. Sélectionnez le type de partition requise pour votre Mac :
Tableau de partition GUID pour l’amorçage sur un ordinateur Macintosh basé sur Intel.
Carte de partition Apple pour un Mac basé sur PowerPC.
7. Cliquez sur OK
.
8. Cliquez sur le bouton Partitionner. Le disque peut être utilisé dès que le formatage est terminé.
Dépannage
Lecteur non détecté
Effectuez les opérations suivantes si le lecteur ne s’affiche pas dans le Poste de travail, l’Explorateur
Windows
®
ou le bureau Mac
®
.
• Redémarrez votre ordinateur.
• Assurez-vous que vous utilisez le câble USB fourni avec le lecteur
.
• Connectez le câble de données directement au port de l’ordinateur ou à la carte USB. Ne reliez pas le
câble de données du lecteur à un concentrateur ou à un clavier.
Visitez la section d’assistance sur le site www.iomega.com pour une aide supplémentaire au dépannage.

13
Guide complet de l’utilisateur
Un guide de l’utilisateur complet est disponible au format HTML dans la section Support et Téléchargement
du site www.iomega.com
.
Das Laufwerk verwenden
Trennen des Laufwerks vom System
ACHTUNG! Um Datenverluste zu vermeiden, trennen Sie das Laufwerk während der Datenübertragung (wenn
Aktivitätsanzeige blinkt) nicht vom Computer.
PC-Benutzer: Klicken Sie vor dem Herausziehen der Stecker auf das Symbol Hardware sicher entfernen in
der Windows-Taskleiste.
Mac-Benutzer: Ziehen Sie das Datenträgersymbol zum Symbol Papierkorb (Auswerfen) auf dem Mac-
Schreibtisch.
Mit dem Iomega Laufwerk auf Nummer Sicher
Um einen kontinuierlichen Schutz Ihrer kritischen Daten sicherzustellen, empfiehlt es sich, das System in
regelmäßigen Abständen zu sichern. Bei den Daten sollten Sie dies noch häufiger tun.
Sie können die Daten
auf einfache Weise sichern, indem Sie Kopien derselben mit der Maus auf das Laufwerk ziehen.
Formatieren des Laufwerks für Mac OS
Das Laufwerk ist mit NTFS vorformatiert. Verwenden Sie das Datenträgerdienstprogramm, um das Laufwerk mit Mac OS
Extended Journaled neu zu formatieren.
HINWEIS: Die folgenden Anweisungen gelten für Mac OS X, Version 10.4 oder höher. Verwenden Sie den Befehl
„Löschen“ des Datenträgerdienstprogramms für Mac OS X Version 10.1 bis 10.3.9. In der Mac-Hilfe finden Sie weitere
ausführliche Anweisungen.
1. Wählen Sie Anwendungen → Dienstprogramme → Datenträgerdienstprogramm
2. Klicken Sie in der linken Spalte auf das Laufwerksymbol für die Iomega-Festplatte. Stellen Sie sicher, dass Sie auf
das orangefarbene Laufwerksymbol und nicht auf das Volume-Symbol klicken.
3. Wählen Sie die Registerkarte Partition.

14
4. Wählen Sie Mac OS Extended (Journaled) aus dem Dropdown-Menü Format aus.
5. Klicken Sie auf die Schaltfläche
Optionen.
6. Wählen Sie den für Mac erforderlichen Partitionstyp aus:
GUID Partition Table für Bootfunktion auf einem Intel-basierten Macintosh-Computer.
Apple Partition Map für einen PowerPC-basierten Mac.
7. Klicken Sie auf
OK.
8. Klicken Sie auf die Schaltfläche Partition. Sobald die Formatierung abgeschlossen ist, können Sie das Laufwerk
verwenden.
Fehlerbehebung
Laufwerk nicht gefunden
Falls das Laufwerk im Windows
®
Explorer unter Arbeitsplatz oder auf dem Mac
®
-Schreibtisch nicht gefunden
wird, versuchen Sie folgende Lösungsansätze:
• Führen Sie probeweise einen Neustart des Computers durch.
• Achten Sie darauf, dass Sie das mit dem Laufwerk gelieferte USB-Kabel verwenden.
• Verbinden Sie das Datenkabel direkt mit dem Anschluss am Rechner oder auf der USB-Karte. Verbinden
Sie das Datenkabel des Laufwerks nicht mit einem Hub oder einer Tastatur.
Weitere Tipps zur Fehlerbehebung erhalten Sie im Supportbereich unter www.iomega.com
.
Benutzerhandbuch (vollständig)
Im Bereich “Support & Downloads” unter www.iomega.com steht Ihnen ein vollständiges
Benutzerhandbuch im HTML-Format zur Verfügung.

15
Uso dell’unità
Scollegamento dell’unità
ATTENZIONE! Per evitare che si verifichino perdite di dati, non scollegare l’unità durante il trasferimento di
informazioni (la spia verde di attività lampeggia).
Utenti PC: Prima di scollegare l’unità, usare l’icona Rimozione sicura dell’hardware nella barra delle
applicazioni di Windows.
Utenti Mac: Trascinare l’icona del disco nel Cestino (Espelli) sulla Scrivania Mac.
Esecuzione di backup con l’unità
Iomega consiglia di eseguire backup di dati più frequenti per garantire la protezione dei dati critici. La
frequenza di esecuzione dei backup dovrebbe dipendere dall’importanza dei dati. Per proteggere i dati, è
sufficiente trascinare sull’unità le copie dei dati più importanti.
Formattazione dell’unità per Mac OS
L’unità viene fornita formattata in NTFS. Utilizzare utility Disco per riformattare l’unità Mac OS Extended
Journaled
.
NOTA: le seguenti istruzioni sono valide per Mac OS X, versione 10.4 o successive. Per Mac OS X, da 10.1 a
10.3.9, utilizzare l’Utility disco, Cancella per formattare l’unità. Per ulteriori informazioni consultare il menu
Aiuto del Mac.
1. Selezionare Applicazioni
→
Utility
→
Utility disco
2. Nella colonna a sinistra, fare clic sull’icona dell’unità corrispondente all’unità Iomega Hard Drive.
Assicurarsi di fare clic sull’icona arancione dell’unità e non sull’icona del volume.
3. Selezionare la scheda Partizione
.
4. Selezionare Mac OS Extended (Journaled) dal menu a discesa Formattazione
.
5. Fare clic sul pulsante Opzioni
.
6. Selezionare il tipo di partizione richiesta per il sistema Mac in uso:
Tabella di partizione GUID per avviabilità su computer Macintosh basato su Intel.

16
Mappa delle partizioni Apple per computer Mac basato su PowerPC.
7. Scegliere
OK.
8. Fare clic sul pulsante Partizione. Sarà possibile utilizzare l’unità al termine della formattazione.
Risoluzione dei problemi
Nessuna unità rilevata
Se l’icona dell’unità non compare in Risorse del computer, Esplora risorse di Windows
®
o sulla Scrivania
Mac
®
, procedere come descritto qui di seguito.
• Provare a riavviare il computer.
• Accertarsi che venga utilizzato il cavo USB fornito con l’unità
.
• Collegare il cavo dati direttamente alla porta del computer o alla scheda USB. Non collegare il cavo dati
dell’unità a un hub o alla tastiera.
Per ulteriore assistenza nella risoluzione dei problemi, visitare l’area del supporto tecnico all’indirizzo
www.iomega.com
.
Manuale completo dell’utente
Il manuale completo dell’utente è disponibile nell’area Assistenza e download all’indirizzo
www.iomega.com
.
Uso de la unidad
Desconexión de la unidad
PRECAUCIÓN: Para impedir la pérdida de datos, no desconecte la unidad durante el proceso de
transferencia de datos (la luz de actividad parpadea).
Usuarios de PC: Utilice el icono Quitar hardware con seguridad de la barra de tareas de Windows antes de
proceder a la desconexión.
Usuarios de Mac: Arrastre el icono del disco al icono Papelera (Expulsar) del escritorio de Mac.

17
Realizar copias de seguridad con su unidad
Iomega recomienda que se realicen copias copias de seguridad frecuentes de los datos para garantizar que la
información importante esté siempre protegida. La frecuencia con la que se realicen dichas copias de seguridad
dependerá de la importancia de los datos. Para proteger los datos, no tiene más que arrastrar y soltar copias de los
archivos importantes a la unidad.
Formateo de la unidad para Mac OS
La unidad se entrega con formato NTFS. Utilice la Utilidad de Discos para volver a dar formato a la unidad en Mac
OS Extended Journaled
.
NOTA: Las siguientes instrucciones funcionan para Mac OS X, versión 10.4 o superior. Para Mac OS X versiones
10.1 a 10.3.9, utilice Utilidad de Discos, Borrar, para dar formato a la unidad. Consulte la Ayuda de Mac si necesita
más instrucciones detalladas.
1. Seleccione Aplicaciones
→ Utilidades → Utilidad de Discos
2. En la columna de la izquierda, haga clic en el icono de unidad de disco duro Iomega. Asegúrese de que hace
clic en el icono de unidad de color naranja y no en el icono del volumen.
3. Seleccione la ficha Partición
.
4. Seleccione Mac OS Extended (Journaled) del menú desplegable Formato
.
5. Haga clic en el botón Opciones
.
6. Seleccione el tipo de partición necesaria para su Mac:
Tabla de partición GUID para tener capacidad de arranque en un sistema Macintosh con base Intel.
Mapa de partición de Apple para un sistema PowerPC con base Mac
7. Haga clic en Aceptar
.
8. Haga clic en el botón Partición. Cuando la operación de formato finalice, la unidad estará lista para utilizarse.
Solución de problemas
No se detecta la unidad
Siga las recomendaciones que se muestran a continuación si la unidad no aparece en Mi PC, en el
Explorador de Windows
®
o en el escritorio de Mac
®
.
• Pruebe a reiniciar el ordenador.

18
• Asegúrese de que está utilizando el cable USB que se incluye con la unidad.
• Conecte el cable de datos directamente al puerto del ordenador o a la tarjeta USB. No conecte el cable
de datos de la unidad a un concentrador o a un teclado.
Consulte el área de asistencia de www.iomega.com para obtener ayuda adicional sobre la solución de
problemas.
Completo manual del usuario
El manual de usuario completo en formato HTML está disponible en el área de asistencia y descargas del
sitio www.iomega.com
.
Utilização da unidade
Desconexão da unidade
CUIDADO! A fim de evitar a perda de dados, não desconecte a unidade durante a transferência de dados (luz
de atividade da unidade piscando).
Usuários de PC: Utilize o ícone Remover hardware com segurança na barra de tarefas do Windows antes de
desconectar.
Usuários de Mac: Arraste o ícone do disco até o ícone Lixeira (Ejetar) na mesa do Mac.
Execução de backup com a sua unidade
A Iomega recomenda que sejam feitos backups periódicos do sistema e backups mais freqüentes de dados
para garantir que seus dados mais importantes estejam sempre protegidos. A freqüência da execução de
backups deve basear-se na importância de seus dados. Para proteger seus dados, você pode simplesmente
arrastar e soltar cópias de seus arquivos importantes na unidade ou pode usar um software de backup para
programar backups regulares.
Formatação da unidade em Mac OS
A unidade é enviada com o formato NTFS. Use o Utilitário de disco para reformatar a unidade Mac OS
Extended Journaled.

19
OBS: as instruções a seguir funcionam para Mac OS X, versão 10.4 ou superior. Para Mac OS X versão 10.1
a 10.3.9, use o Utilitário de disco, Apagar para formatar a unidade. Consulte a Ajuda do Mac se precisar de
instruções mais detalhadas.
1. Selecione
Aplicativos → Utilitários → Utilitário de disco
2. Na coluna à esquerda, clique no ícone da unidade para o Disco rígido Iomega. Certifique-se de clicar no
ícone de unidade laranja, e não no ícone de volume.
3. Selecione a guia Partição
.
4. Selecione Mac OS Extended (Journaled) no menu suspenso Formatar
.
5. Clique no botão Opções
.
6. Selecione o tipo de partição necessário para o seu Mac:
Tabela de partição GUID para boot em um computador Macintosh Intel-based
Mapa de partição Apple para um Mac PowerPC-based
7. Clique em
OK.
8. Clique no botão Partição. A unidade estará pronta para uso quando a formatação estiver concluída.
Solução de problemas
A unidade não aparece em Meu computador, no Windows Explorer ou na mesa do Mac.
• Tente reiniciar seu computador.
• Certifique-se de que esteja utilizando o cabo USB que acompanha sua unidade
.
• Conecte o cabo de dados diretamente à porta do computador ou à placa USB. Não conecte o cabo de
dados da unidade a um hub ou teclado.
Visite a área de suporte do site www.iomega.com para obter ajuda adicional na solução de problemas.
Manual completo do usuário
Está disponível na área de Suporte e Downloads no site www.iomega.com a versão completa do manual do
usuário em formato HTML.

20
De drive gebruiken
De drive loskoppelen
WAARSCHUWING! Koppel de drive nooit los tijdens een gegevensoverdracht (wanneer het statuslampje van
de drive-activiteit knippert). Zo vermijdt u dat er gegevens verloren gaan.
PC-gebruikers: Gebruik het pictogram Hardware veilig verwijderen op de Taakbalk van Windows voordat u
de drive loskoppelt.
Mac-gebruikers: Sleep het diskpictogram naar het pictogram van de Prullenmand (Verwijder schijf) op het
Mac-bureaublad.
Back-ups maken met uw drive
Iomega raadt u aan regelmatig een back-up te maken van uw systeem en nog regelmatiger een back-up van
uw gegevens, zodat u er altijd op kunt vertrouwen dat uw kritieke gegevens zijn veiliggesteld. De regelmaat
waarmee u back-ups maakt, stemt u het beste af op het belang van uw gegevens. U kunt uw gegevens
eenvoudig beschermen door kopieën van uw bestanden naar de drive te verslepen of door gebruik te maken
van back-upsoftware om regelmatig back-ups te plannen.
De drive formatteren voor Mac OS
Bij de levering is de drive geformatteerd als een NTFS-drive. Gebruik Disk Utility (Schijfhulpprogramma) om de drive
opnieuw te formatteren met de indeling Mac OS Extended (Journaled)
.
OPMERKING: de volgende instructies werken voor Mac OS X, versie 10.4 of hoger. Voor Mac OS X versie 10.1 tot en met
10.3.9 gebruikt u Disk Utility (Schijfhulpprogramma), Erase (Wis) om de drive te formatteren. Raadpleeg de Help van Mac
voor meer gedetailleerde instructies.
1. Selecteer Applications
→
Utilities
→
Disk Utility
(Programma’s
→
Hulpprogramma’s
→
Schijfhulpprogramma)
2. Klik in de linkerkolom op het drivepictogram van de Iomega Hard Drive. Let erop dat u op het oranje drivepictogram
klikt (niet op het volumepictogram).
3. Selecteer het tabblad Partition (Partitioneer).
4. Selecteer Mac OS Extended (Journaled) in het menu Format (Indeling).
La pagina si sta caricando...
La pagina si sta caricando...
La pagina si sta caricando...
La pagina si sta caricando...
La pagina si sta caricando...
La pagina si sta caricando...
La pagina si sta caricando...
La pagina si sta caricando...
La pagina si sta caricando...
La pagina si sta caricando...
La pagina si sta caricando...
La pagina si sta caricando...
La pagina si sta caricando...
La pagina si sta caricando...
La pagina si sta caricando...
La pagina si sta caricando...
-
 1
1
-
 2
2
-
 3
3
-
 4
4
-
 5
5
-
 6
6
-
 7
7
-
 8
8
-
 9
9
-
 10
10
-
 11
11
-
 12
12
-
 13
13
-
 14
14
-
 15
15
-
 16
16
-
 17
17
-
 18
18
-
 19
19
-
 20
20
-
 21
21
-
 22
22
-
 23
23
-
 24
24
-
 25
25
-
 26
26
-
 27
27
-
 28
28
-
 29
29
-
 30
30
-
 31
31
-
 32
32
-
 33
33
-
 34
34
-
 35
35
-
 36
36


in altre lingue
- English: Iomega eGo Portable Quick start guide
- français: Iomega eGo Portable Guide de démarrage rapide
- español: Iomega eGo Portable Guía de inicio rápido
- Deutsch: Iomega eGo Portable Schnellstartanleitung
- Nederlands: Iomega eGo Portable Snelstartgids
- português: Iomega eGo Portable Guia rápido
Documenti correlati
-
Iomega DESKTOP USB 2.0 Manuale del proprietario
-
Iomega eGo Portable Guida Rapida
-
Iomega EN55022 Manuale utente
-
-
-
-
-
Iomega USB 2.0 Manuale utente
-
-