LevelOne CamCon FCS-3000 Quick Installation Manual
- Categoria
- Telecamere di sicurezza
- Tipo
- Quick Installation Manual
Questo manuale è adatto anche per

LevelOne IP Camera
Wired/Wireless Network Camera
Quick Installation Guide
English Ελληνικά
Deutsch Svenska
Français Slovenščina
Español
한국어
Nederlands 繁體中文
Italiano Русский
Português ﻲﺑﺮﻋ
Dansk
This guide covers only the most common situations. All detail
information is described in the user manual.

Viewing System Requirements
z Windows 98SE, Millennium Edition (ME), 2000,XP and VISTA
operating systems
z Browser: Internet Explorer 5.5 or above
NOTE:
All the captured images of installation mentioned in this user manual
were based on Windows XP operating system. For installation on
other Windows OS, e.g. Windows 98SE, all the procedures remains
the same.

Figure 1-1

Figure 1-2
Figure 1-3

Figure 1-4
Figure 1-5

Figure 2-1
Figure 2-2
Figure 2-3

Figure 2-4
Figure 3-1

Using the Software CD to configure the camera
Power on your PC and insert the CD-ROM
The setup page should load automatically. If it does not, please
select your CD-ROM drive manually to open the setup page.
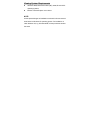
Select “Install Software”->“Installation Wizard” to initiate the
installation.(Fifure1-1)
Read the license agreement thoroughly then click ”I Agree”
(Figure 1-2)
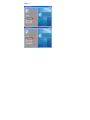
Click “Next” to start the installation.( Figure 1-3)
If you wish to install the software program in an alternate
location, click “Browse”, otherwise click “Install” to move on to
the next step. (Figure 1-4)
Click “Close” to complete the software installation.(Figure 1-5)
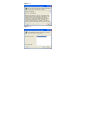
Run “Installation Wizard”. (Figure 2-1)
The Installation Wizard will show MAC address and an IP
Address of available LevelOne Network Cameras. Highlight
the MAC address and double click to link to the selected
device.(Figure 2-2)
The default user name of CCD Network camera is “root” and
password is the MAC address (in capital letters) while CMOS
Network camera will not ask for any account and password.
The following screen would appear automatically. Click “Yes”
and proceed. LevelOne Network Cameras should be active by
now. (Figure 2-3)
Congratulations, you can use the camera through the network
to view the video.(Figure 2-4)
Installing IP CamSecure
Click ”IP CamSecure” and follow the onscreen instruction or refer to
the user’s manual to complete installation.(Figure 3-1)
English

Benutzung der Software CD um die Kamera zu
konfigurieren
Schalten sie ihren PC ein und legen sie die CD ein.
Die CD sollte automatisch starten, wenn nicht, dann wählen
sie ihr CD-Rom Laufwerk aus und starten sie das Setup
manuell.
Wählen sie “Install Software”->“Installation Wizard”, um mit
der Installation zu beginnen. (Figure1-1)
Lesen Sie den Lizenzvertrag und klicken Sie “I Agree” (Figure 1-2)
Klicken sie “Next”, um die Installation zu starten. (Figure1-3)
Wenn sie die Software in einem anderen Ordner speichern
wollen, klicken sie “Browse”, andernfalls klicken sie “Install”,
um zum nächsten Schritt zu gelangen. (Figure1-4)
Klicken sie “Close”, um die Installation abzuschliessen.
(Figure1-5)
Führen Sie “Installation Wizard” aus. (Figure 2-1)
Der Installation Wizard eine MAC-Adresse und eine
IP-Adresse der verfügbaren LevelOne-Netzwerkkameras
anzeigen. Markieren sie die MAC-Adresse und doppelklicken,
um sich mit dem gewählten Gerät zu verbinden. (Figure2-2)
Der voreingestellte Username für die CCD-NetzwerkkKamera
ist “root” und das Passwort ist die MAC Adresse in
Großbuchstaben während die CMOS-Netzwerkkamera nicht
nach dem Konto und Passwort fragt.
Diese Seite wird nach erfolgreichem Login automatisch
angezeigt.Klicken sie “Yes” um fortzufahren. Die
LevelOne-Netzwerkkameras sollten nun aktiv sein.
(Figure2-3)
Herzlichen Glückwunsch, sie können die Kamera über das
Netzwerk benutzen, um das Video anzuzeigen. (Figure2-4)
Installing IP CamSecure
Klicken Sie”IP CamSecure” und folgen die den Anweiseungen oder
schauen Sie in die Anleitung um die Installation
abzuschliessen.(Figure 3-1)
Deutsch

Using the Software CD to configure the camera
Allumez votre ordinateur. et insérez le CD-ROM
La page de configuration devrait se charger automatiquement.
Sinon, veuillez sélectionner votre unité CD-ROM
manuellement pour ouvrir la page de configuration.
Cliquez sur “Install Software”->“Installation Wizard” (Figure
1-1)
Lisez avec attention l'accord de licence puis cliquez sur “I
Agree” (Figure 1-2)
Cliquez sur “Next” pour lancer l'installation. (Figure 1-3)
Si vous voulez installer le programme logiciel sur un autre
emplacement, cliquez sur “Browse”, sinon cliquez sur “Install”
pour passer à l'étape suivante. (Figure 1-4)
Cliquez sur “Close” pour terminer l'installation des logiciels.
(Figure 1-5)
Lancez “Installation Wizard” (Figure 2-1)
L'Installation Wizard affiche une adresse MAC et une
adresse IP pour les Caméras Réseau LevelOne disponibles.
Sélectionnez l'adresse MAC et double cliquez pour lier au
dispositif choisi. (Figure 2-2)
Le nom d’utilisateur par défaut pour la caméra réseau CCD est
“root”, le mot de passe est l’adresse MAC (en majuscules),
tandis que la caméra réseau CMOS ne demande pas de
compte ni de mot de passe.
L'écran suivant devrait s'afficher automatiquement une fois
que vous vous êtes connecté avec succès. Cliquez sur “Yes”
et continuez. Les caméras réseau LevelOne doivent
maintenant être actives. (Figure 2-3)
Félicitations, vous pouvez utiliser la caméra par le biais du
réseau pour afficher la vidéo. (Figure 2-4)
Installation IP CamSecure
Français

Cliquez sur “IP CamSecure” et suivez les instructions sur l’écran ou
regardez le manuel pour completer l’installation. (Figure3-1)
Use el CD del software para configurar la cámara
Encienda el PC e introduzca el CD-ROM.
La página de instalación se cargará automáticamente. Si no lo
hace, seleccione la unidad CD-ROM manualmente para abrir
la página de instalación.
Seleccione “Install Software”->“Installation Wizard” para
iniciar la instalación. (Figura 1-1)
Lea completamente el acuerdo de licencia y haga clic en “I
Agree” (Figura 1-2)
Haga clic en “Next” para iniciar la instalación (Figura 1-3)
Si desea instalar el programa en otra ubicación, pulse
“Browse”, si no, pulse “Install” para continuar con la
instalación. (Figura 1-4)
Pulse “Close” para finalizar la instalación. (Figura 1-5)
Ejecute “Installation Wizard” (Figura 2-1)
El Installation Wizard de IP mostrará la Dirección MAC y la
Dirección IP de las cámaras LevelOne disponibles. Resalte la
dirección MAC y haga doble clic para enlazar con el
dispositivo seleccionado. (Figura 2-2)
El nombre de usuario predeterminado de la cámara de red
CCD es “root”, y la contraseña es la dirección MAC (en
mayúsculas), mientras que las cámaras de red CMOS no
solicitarán contraseña.
Tras iniciar una sesión con éxito, aparecerá automáticamente
la siguiente pantalla. Haga clic en “Yes” y continúe. Las
cámaras LevelOne deben estar activas ahora. (Figura 2-3)
Enhorabuena, puede usar la cámara a través de la red para
ver imágenes. (Figura 2-4)
Instalar IP CamSecure
Haga clic en ”IP CamSecure”. Siga las instrucciones en pantalla o
Español

consulte el manual del usuario para completar la
instalación.(Figure3-1)
De software-cd gebruiken om de camera te
configureren
Schakel uw pc in en plaats de cd-rom
De installatiepagina moet normaal automatisch worden
geladen. Als dat niet het geval is, selecteer dan uw
cd-romstation handmatig om de installatiepagina te openen.
Selecteer “Install Software”->“Installation Wizard” om de
installatie te starten. (Figuur 1-1)
Lees aandachtig de gebruiksrechtovereenkomst en klik
vervolgens op “I Agree” (Figuur 1-2)
Klik op “Next” om de installatie te starten. (Figuur 1-3)
Als u het softwareprogramma op een andere locatie wilt
installeren, klikt u op “Browse”.Klik anders op “Install” om
naar de volgende stap te gaan. (Figuur 1-4)
Klik op “Close” om de software-installatie te voltooien. (Figuur
1-5)
Start de “Installation Wizard”. (Figuur 2-1)
De Installation Wizard zal een MAC adres en een IP adres
weergeven van de beschikbare LevelOne-netwerkcamera's.
Markeer het MAC-adres en dubbelklik om een verbinding te
maken met het geselecteerde apparaat (Figuur 2-2)
De standaardgebruikersnaam van de CCD-netwerkcamera is
“root“ en het wachtwoord is het MAC-adres (in hoofdletters). De
CMOS-netwerkcamera zal geen account of wachtwoord vragen.
Het volgende scherm verschijnt automatisch, nadat u
succesvol hebt ingelogd.Klik “Yes” en ga verder. De
LevelOne-netwerkcamera zou nu actief moeten zijn. (Figuur
2-3)
Gefeliciteerd, u kunt de camera gebruiken via het netwerk om
de video weer te geven. (Figuur 2-4)
IP CamSecure installeren
Klik op ”IP CamSecure”. Volg de instructies op het scherm of
Dutch

raadpleeg de gebruikershandleiding om de installatie te
voltooien.(Figure3-1)
Utilizzare il Software CD per configurare la camera
Accendere il PC e inserire il CD-ROM
La pagina di configurazione dovrebbe avviarsi
automaticamente. In caso contrario, selezionare manualmente
l’unità CD-ROM e aprire la pagina di Configurazione.
Selezionare “Install Software”->“Installation Wizard” per
avviare l’installazione. (Figura 1-1)
Leggere accuratamente il Contratto di licenza e poi fare clic su
“I Agree”. (Figura 1-2)
Fare clic su “Next” per avviare l’installazione. (Figura 1-3)
Se si preferisce installare il software su un percorso diverso,
fare clic su “Browse”, diversamente fare clic su “Install” per
procedere alla fase successiva. (Figura 1-4)
Fare clic su “Close” per completare l’installazione del software.
(Figura 1-5)
Eseguire la procedura “Installation Wizard”. (Figura 2-1)
La procedura “Installation Wizard” mostrerà gli indirizzi MAC e
gli indirizzi IP delle telecamere di rete LevelOne disponibili.
Evidenziare l’indirizzo MAC e fare doppio clic per eseguire il
collegamento al dispositivo selezionato. (Figura 2-2)
Il nome utente predefinito della telecamera di rete CCD è “root”
e la password è l’indirizzo MAC (in maiuscolo), mentre la
telecamera di rete CMOS non richiederà account e password.
La schermata che segue dovrebbe apparire automaticamente
dopo avere eseguito l’accesso. Fare clic su “Yes” e procedere.
Adesso le telecamere di rete LevelOne dovrebbero essere
attive. (Figura 2-3)
Congratulazioni, adesso si posono usare le telecamere
attraverso la rete per vedere il video. (Figura 2-4)
Installazione di IP CamSecure
Fare clic su “IP CamSecure”. Seguire le istruzioni su schermo
oppure fare riferimento al manuale d’uso per completare la
Italiano

procedura d'installazione. (Figure3-1)
Usando o software em CD para configurar a
câmera
Ligue o PC e insira o CD-ROM
A página de instalação deve aparecer automaticamente. Do
contrário, selecione manualmente a unidade de CD-ROM e
abra a página de instalação.
Selecione “Install Software”->“Installation Wizard” para
iniciar a instalação. (Figura 1-1)
Leia o todo o contrato de licença e, a seguir, clique em “I
Agree” (Figura 1-2)
Clique em “Next” para iniciar a instalação. (Figura 1-3)
Se desejar instalar o programa de software em outro local,
clique em “Browse”; do contrário, clique em “Install” para ir à
página seguinte. (Figura 1-4)
Clique em “Close” para concluir a instalação do software.
(Figura 1-5)
Execute o “Installation Wizard”. (Figura 2-1)
O Installation Wizard mostrará o endereço MAC e um
endereço IP disponível das câmeras de rede LevelOne.
Realce o endereço MAC e clique duas para ver o dispositivo
selecionado. (Figura 2-2)
O nome de usuário padrão da câmera de rede CCD é “root” e
a senha é o endereço MAC (em letras maiúsculas) enquanto
que a câmera de rede CMOS não pedirá nenhuma conta ou
senha.
A tela seguinte deve aparecer automaticamente depois do
login bem-sucedido. Clique em “Yes” e continue. Agora, as
câmeras de rede LevelOne devem estar ativas. (Figura 2-3)
Parabéns, agora você pode usar a câmera através da rede
para ver vídeo. (Figura 2-4)
Português

Instalando IP CamSecure
Clique ”IP CamSecure” e siga na tela as instruções ou siga o
manual para completa instalação. (Figura 3-1)
Konfiguration af kamera v.h.a. software CD
Tænd for din computer og indsæt CD-Rom
Opsætnings siden starter automatisk. Hvis ikke, venligst vælg
dit CD-Rom drev manuelt og at åbne denne side.
Klik på “Install Software”->“Installation Wizard” for at starte
installationen. (Figur 1-1)
Læs licensaftalen grundigt igennem og klik derefter på “I
Agree” (Figur 1-2).
Klik på “Next” for at starte installationen (Figur 1-3).
Hvis du ønsker at installere softwaren på en anden lokation,
klik “Browse”, ellers klik “Install” for at komme til næste trin
(Figur 1-4).
Klik “Close” for at færdiggøre softwrea installation (Figur 1-5).
Kør “Installation Wizard” (Figur 2-1).
Installation Wizard viser en MAC adresse og en IP adresse
på de tilgængelige LevelOne netværkskameraer. Marker MAC
adressen og dobbeltklik på linket til den valgte enhed (Figur
2-2).
Det fabriksindstillede brugernavn på CCD-netværkskameraer
er “root” og adgangskoden er MAC-adressen (med store
bogstaver), mens CMOS-netværkskameraer ikke forlanger
brugernavn og adgangskode.
Den følgende skærm fremkommer automatisk efter vellykket
login. Klik “Install” og forsæt. LevelOne netværkskameraerne
skulle være aktive nu (Figur 2-3).
Tillykke, du kan nu bruge kameraet gennem netværket til at se
video (Figure 2-4).
Dansk

Installering af IP CamSecure
Klik ”IP CamSecure” og følg skærm instruktionerne eller
referer til bruger manualen for at fuldføre installationen. (Figur
3-1)
Χρήση του CD Λογισμικού για τη ρύθμιση της
κάμερας
Ενεργοποιήστε τον υπολογιστή και τοποθετήστε το CD-ROM.
Η σελίδα ρυθμίσεων θα πρέπει να φορτώσει αυτόματα. Αν όχι,
παρακαλούμε επιλέξτε χειροκίνητα τη μονάδα CD-ROM για να
ανοίξετε την σελίδα ρυθμίσεων.
επιλέξτε “Install Software”->“Installation Wizard” για να
ξεκινήσει η εγκατάσταση.(Εικόνα 1-1)
Διαβάστε προσεκτικά την άδεια χρήσης και κάντε κλικ στο ”I
Agree” (Εικόνα 1-2)
Κάντε κλικ στο “Next” για να ξεκινήσει η εγκατάσταση (Εικόνα
1-3).
Αν θέλετε να πραγματοποιήσετε την εγκατάσταση του
προγράμματος σε διαφορετική θέση, κάντε κλικ στο “Browse”,
διαφορετικά κάντε κλικ στο “Install” για να μεταβείτε στο
επόμενο βήμα
. (Εικόνα 1-4)
Κάντε κλικ στο “Close” για να ολοκληρώσετε την εγκατάσταση
λογισμικού (Εικόνα 1-5).
Εκτελέσετε το “Installation Wizard”. (Εικόνα 2-1)
Ο Installation Wizard θα εμφανίσει τη διεύθυνση MAC και μια
διεύθυνση IP των διαθέσιμων δικτυακών καμερών της
LevelOne.Επιλέξτε τη διεύθυνση MAC και κάντε διπλό κλικ για
σύνδεση με την επιλεγμένη συσκευή. (Εικόνα 2-2)
Το προεπιλεγμένο όνομα χρήστη της δικτυακής κάμερας CCD
είναι “root” και ο κωδικός πρόσβασης είναι η διεύθυνση MAC
(με κεφαλαία) ενώ η Δικτυακή
κάμερα CMOS δε θα ζητήσει
όνομα χρήστη και κωδικό πρόσβασης.
Μετά την επιτυχημένη σύνδεση, θα εμφανιστεί αυτόματα η
παρακάτω οθόνη.Κάντε κλικ στο “Yes” και συνεχίστε.Τώρα θα
πρέπει να είναι ενεργές οι Δικτυακές κάμερες της LevelOne.
(Εικόνα 2-3)
Συγχαρητήρια, μπορείτε να χρησιμοποιήσετε την κάμερα μέσω
του δικτύου για
την παρακολούθηση εικόνας.(Εικόνα 2-4)
Ελληνικά

Εγκατάσταση “IP CamSecure”
Κάντε Click στο “IP CamSecure” και ακολουθήστε της οδηγίες στην
οθόνη ή απευθυνθείτε στις οδηγίες εγκατάστασης. (φωτογ. 3-1)
Använda programvaru-CD-skivan för att
konfigurera kameran
Sätt på din PC och sätt in skivan i CD-ROM-enheten.
Installationssidan ska laddas automatiskt. Om inte, välj din
CD-ROM-enhet manuellt för att öppna installationssidan.
Välj “Install Software”->“Installation Wizard” för att initiera
installationen (Figur 1-1).
Läs igenom licensavtalet och klicka sedan på “I Agree” (Figur
1-2)
Klicka på “Next” för att starta installationen (Figur 1-3).
Om du vill installera programvaran på en annan plats klickar du
på “Browse”. I annat fall klickar du på “Install” för att gå vidare
till nästa steg (Figur 1-4).
Klicka på “Close” för att slutföra programvaruinstallationen
(Figur 1-5).
Kör “Installations Wizard” (figur 2-1)
Installations Wizard kommer att visa MAC address och en IP
Address för tillgängliga LevelOne-nätverkskameror. Markera
MAC-adressen och dubbelklicka för att länka den markerade
enheten. (Figur 2-2).
Standardanvändarnamn för CCD nätverkskamera är “root” och
lösenordet är MAC-adressen (med stora bokstäver) medan
CMOS nätverkskamera inte kommer att fråga efter något konto
eller lösenord.
Följande skärm visas automatiskt efter slutförd inloggning.
Klicka på “Yes” och fortsätt. LevelOne-nätverkskameror ska nu
vara aktiva (Figur 2-3).
Grattis, nu kan du använda kameran genom nätverket för att
visa video (Figur 2-4).
Installera IP CamSecure
Svenska

Klicka på ”IP CamSecure” och följ instruktionerna på skärmen eller
se bruksanvisningen för att slutföra installationen (figur 3-1).
Nastavitev kamere z instalacijskim CD-ROM-om
Vključite vaš računalnik in vstavite CD-ROM
Program se zažene samodejno, v nasprotnem primeru izberite
DC-ROM disk za zagon programa
Izberite “Install Software”->“Installation Wizard” za zagon za
zagon instalacije instalacije (Figure 1-1)
Natančno si preberite licenčno pogodbo in kliknite “I Agree”.
(Figure 1-2)
Kliknite “Next” za začetek instalacije. (Figure 1-3)
Če želite program naložiti na drugo lokacijo, kliknite “Browse”,
drugače kliknite “Install” za nadaljevanje. (Figure 1-4)
Kliknite “Close” za dokončanje instalacije programa. (Figure
1-5)
Zaženite Installation Wizard. (Figure 2-1)
Installation Wizard vam bo izpisal MAC naslove in IP naslove
razpoložljivih LevelOne mrežnih kamer. Označite željeni MAC
naslov in dvoklinkite na povezavo do ženele naprave. (Figure
2-2)
Prednastavljeno uporabniško ime (user name) CCD mrežne
kamere je “root”, geslo (password) pa je MAC naslov (velike
črke), medtem, ko CMOS mrežna kamera ne bo zahtevala
nobenega računa ali gesla.
Po uspešni prijavi se pojavi okno, kjer klinite “Yes” in nadaljujte.
Sedaj je LevelOne Mrežna kamera pripravljena za uporabo.
(Figure 2-3)
Čestitamo, kamero in ogled videa lahko sedaj uporabljate
preko lokalnega omrežja.(Figure 2-4)
Instalacija programa IP CamSecure
Kliknite ”IP CamSecure” in sledite navodilom na zaslonu ali pa
Slovenščina

odprite daljša navodila za uporabo (na priloženem CD-ROM-u) za
dokončanje instalacije. (Figure 3-1)
소프트웨어
CD-ROM
을
사용하여
카메라
구성하기
PC 를 켜고 CD-ROM 을 넣습니다.
설치 페이지가 자동으로 로드됩니다. 그렇지 않으면
CD-ROM 드라이브를 수동으로 선택하여 설치 페이지를
여십시오.
“Install Software”->“Installation Wizard” 를 선택하여
설치를 시작합니다. (Figure 1-1)
사용권 계약을 자세히 읽고 “I Agree” 를 클릭합니다.
(Figure 1-2)
“Next” 를 클릭하여 설치를 시작합니다. (Figure 1-3)
소프트웨어 프로그램을 다른 위치에 설치하려면 “Browse”
를 클릭하고, 다음 단계로
진행하려면 “Install” 을
클릭합니다. (Figure 1-4)
“Close” 를 클릭하여 소프트웨어 설치를 완료합니다. (Figure
1-5)
“Installation Wizard” 를 실행합니다. (그림 2-1)
Installation Wizard 가 사용 가능한 LevelOne 네트워크
카메라의 MAC 주소와 IP 주소를 알려줍니다. 선택한
장치에 연결하려면 MAC 주소를 강조 표시하고 두 번
클릭합니다. (Figure 2-2)
CCD 네트워크 카메라의 기본 사용자 이름은 “root”이고,
암호는 MAC 주소(대문자)이며, CMOS 네트워크 카메라는
계정과 암호를 요구하지 않습니다.
성공적으로 로그인하면 다음 화면이 자동으로 나타납니다.
"Yes"를 클릭하고 계속 진행합니다. 이제 LevelOne
네트워크 카메라가 활성화됩니다. (그림 2-3)
축하합니다. 네트워크를 통해 카메라를 사용하여 비디오를
볼 수 있습니다. (Figure 2-4)
Installing IP CamSecure
한국어

"IP 카메라 보안"을 클릭하고 화면상의 지시를 따르거나, 사용자
메뉴얼을 참조하여 설치를 완료하세요.(Figure 3-1)
軟體安裝
將包裝內所附的 CD-ROM 放入光碟機中
螢幕會自動出現安裝畫面. 如果沒看到安裝畫面,請到光碟片的
路徑中,手動安裝。
點選“Install Software”->“Installation Wizard”,並開始安裝。
(Figure1-1)
詳讀軟體授權合約後點選”I Agree”。(Figure1-2)
點選“Next”。(Figure1-3)
如果你要改變軟體安裝路徑,請點選“Browse”;否則就直接點
選“Install”,繼續安裝。(Figure1-4)
點選“Close”,完成軟體安裝程序。(Figure1-5)
執行”Insatllation Wizard”。(Figure2-1)
出現 Installation Wizard 的畫面,並偵測到網路上已架設完成的
攝影機,及詳列 MAC address 與 IP Address。滑鼠雙擊欲設定
的攝影機的 MAC address,連結至該網頁。 (Figure2-2)
CCD 網路攝影機的預設帳號為”root”,密碼為該網路攝影機的
MAC address(大寫字母),CMOS 網路攝影機則不會詢問任何帳
號及密碼。
當您成功登入後,會自動跳出 ActiveX 詢問視窗;點選”
Yes”。
(Figure2-3)
恭喜您,您已經可以開始使用此台網路攝影機了。(Figure2-4)
安裝
IP CamSecure
點選”IP CamSecure”, 依照顯示的步驟或參閱使用手冊完成安裝。
(Figure3-1)
繁體中文
La pagina si sta caricando...
La pagina si sta caricando...
La pagina si sta caricando...
-
 1
1
-
 2
2
-
 3
3
-
 4
4
-
 5
5
-
 6
6
-
 7
7
-
 8
8
-
 9
9
-
 10
10
-
 11
11
-
 12
12
-
 13
13
-
 14
14
-
 15
15
-
 16
16
-
 17
17
-
 18
18
-
 19
19
-
 20
20
-
 21
21
-
 22
22
-
 23
23


LevelOne CamCon FCS-3000 Quick Installation Manual
- Categoria
- Telecamere di sicurezza
- Tipo
- Quick Installation Manual
- Questo manuale è adatto anche per
in altre lingue
- English: LevelOne CamCon FCS-3000
- français: LevelOne CamCon FCS-3000
- español: LevelOne CamCon FCS-3000
- Deutsch: LevelOne CamCon FCS-3000
- русский: LevelOne CamCon FCS-3000
- Nederlands: LevelOne CamCon FCS-3000
- português: LevelOne CamCon FCS-3000
- dansk: LevelOne CamCon FCS-3000
- svenska: LevelOne CamCon FCS-3000
Documenti correlati
-
LevelOne 4 Series Quick Installation Manual
-
-
-
-
-
-
LevelOne FPS-1033 Quick Installation Manual
-
LevelOne WPC-0600 Quick Installation Manual
-
-