Toshiba RAS-B13E2KVG-E Manuale del proprietario
- Categoria
- Condizionatori d'aria a sistema split
- Tipo
- Manuale del proprietario

1133450203
OWNER’S MANUAL ENGLISHENGLISH
ITALIANOITALIANO
AIR CONDITIONER (SPLIT TYPE)
For general public use
Indoor unit
RAS-B13E2KVG-E1
Outdoor unit
RAS-13E2AVG-E
01_OM_1133450203_EN.indd 101_OM_1133450203_EN.indd 1 28/2/2566 BE 15:4328/2/2566 BE 15:43

1
PRECAUTIONS FOR SAFETY
Read the precautions in
this manual carefully before
operating the unit. This appliance is fi lled with R32.
Warning indications on the air conditioner unit
Warning indication Description
CAUTION
BURST HAZARD
Open the service valves
before the operation,
otherwise there might be
the burst.
CAUTION
BURST HAZARD
Open the service valves before the operation,
otherwise there might be the burst.
●Keep this manual where the operator can easily fi nd it.
●Read the precautions in this manual carefully before operating the unit.
●This appliance is intended to be used by expert or trained users in shops, in light
industry and on farms, or for commercial use by lay persons.
●The precautions described herein are classifi ed as DANGER, WARNING and
CAUTION. They both contain important information regarding safety. Be sure to
observe all precautions without fail.
DANGER
●Do not install, repair, open or remove the cover. It may expose you to
dangerous voltages. Ask the dealer or the specialist to do this.
●Turning off the power supply will not prevent potential electric shock.
●The appliance shall be installed in accordance with national wiring regulation.
●Means for disconnection from the supply having a contact separation of at least
3 mm in all poles must be incorporated in the fi xed wiring.
●The appliance must be stored in a room without continuously operating ignition
sources (for example, open fl ames, an operating gas appliance or an operating
electric heater).
●In order to avoid fi re, explosion or injury, do not operate the unit when harmful
gases (e.g. fl ammable or corrosive) are detected near the unit.
WARNING
●Do not expose your body directly to cool or warm air for a long time.
●Do not insert your fi nger or any article into the air inlet/outlet.
●When an abnormality (burning smell, etc.) occurs, stop the air conditioner and
disconnect the power supply or turn off the breaker.
●This appliance can be used by children aged from 8 years and above and
persons with reduced physical, sensory or mental capabilities or lack of
experience and knowledge if they have been given supervision or instruction
concerning use of the appliance in a safe way and understand the hazards
involved. Children shall not play with the appliance. Cleaning and user
maintenance shall not be made by children without supervision.
01_OM_1133450203_EN.indd 101_OM_1133450203_EN.indd 1 28/2/2566 BE 15:4328/2/2566 BE 15:43

2
PRECAUTIONS FOR SAFETY
●This appliance is not intended for use by person (including children) with
reduced physical, sensory or mental capabilities, or lack of experience and
knowledge, unless they have been given supervision or instruction concerning
use of the appliance by a person responsible for their safety.
●The air conditioner must be installed, maintained, repaired and removed by a
qualifi ed installer or qualifi ed service person. When any of these jobs is to be
done, ask a qualifi ed installer or qualifi ed service person to do them for you.
●Children should be supervised to ensure that they do not play with the
appliance.
●Do not use any refrigerant different from the one specifi ed (R32) for complement
or replacement. Otherwise, abnormally high pressure may be generated in the
refrigeration cycle, which may result in a failure or explosion of the product or an
injury to your body.
●Do not use means to accelerate the defrosting process or to clean, other than
those recommended by the manufacturer.
●The appliance shall be stored in a room without continuously operating ignition
sources (for example: open fl ames, an operating gas appliance or an operating
electric heater).
●Be aware that refrigerants may not contain an odour.
●Do not pierce or burn as the appliance is pressurized. Do not expose the
appliance to heat, fl ames, sparks, or other sources or ignition. Else, it may
explode and cause injury or death.
●Do not add any other devices without factory advice.
CAUTION
●Do not wash the unit with water. It may cause an electric shock.
●Do not use this air conditioner for other purposes such as preserving food,
breeding animal, etc.
●Do not step or put anything on the indoor/outdoor unit. It may cause an injury or
damage the unit.
●Do not touch aluminium fi n because it may cause an injury.
●Before cleaning the unit, turn off the main switch or the circuit breaker.
●When the unit won’t be used for a long time, turn off the main switch or the
circuit breaker.
●It is recommended that maintenance be performed by a specialist when the unit
has been operated for a long time.
●The manufacturer shall not assume any liability for the damage caused by not
observing the description of this manual.
EN
01_OM_1133450203_EN.indd 201_OM_1133450203_EN.indd 2 28/2/2566 BE 15:4328/2/2566 BE 15:43

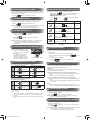
SWING
FAN
FIX
QUIET
ECO
Hi POWER
8°C
1
$4
6
5
)
&
#
!
"
.
+
2
3
7
%
(
9
~
-
,
8
3
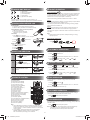
Preparing Filters
1. Open the air inlet grille and remove the air fi lters.
2. Attach the fi lters. (see detail in the Installation Manual).
Loading Batteries (when use wireless operation.)
1. Remove the slide cover.
2. Insert 2 new batteries (AAA type)
following the (+) and (–) positions.
Clock Setup
1. Push by tip of the pencil.
If timer indication is fl ashing, go to the next step 2.
2. Press or : adjust the time.
3. Press : Set the time.
Remote Control Reset
Push by tip of the pencil or
1. Remove the batteries.
2. Press .
3. Insert the batteries.
PREPARATION BEFORE USE
2
AIR FLOW DIRECTION
3
Note:
●The provided Remote Controller is a wireless type, which also can be
used as a wire. Please see “How to Connect The Remote Controller
for Wired Operation”, located in installation instruction, in case of wired
control is required.
●In wire operation, remote controller will return to initial condition
(PRESET, TIMER and CLOCK will return to initial condition)
when user shutdown power supply of Air conditioner.
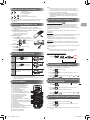
REMOTE CONTROL
4
1Infrared signal emitter
2Start/Stop button
3Mode select button (MODE)
4Temperature button (TEMP)
5Fan speed button (FAN)
6Swing louver button (SWING)
7Set louver button (FIX)
88°C Heating Operation (8°C)
9On timer button (ON)
!Off timer button (OFF)
"Setup button (SET)
#Clear button (CLR)
$Memory and Preset button (PRESET)
%Silent operation button (SILENT)
&High power button (Hi POWER)
(Eco button (ECO)
)
Quiet button (QUIET)
~
Comfort sleep button (COMFORT SLEEP)
+Filter reset button (FILTER)
,Set clock button (CLOCK)
-Check button (CHECK)
.Reset button (RESET)
SILENT OPERATION
5
SILENT OPERATION ( )
Keep outdoor unit operating silently to ensure either yourself or neighborhood
will have a tight sleep in nighttime. By this feature, the heating capacity will
be optimized to deliver such silent experience. The silent operation can be
selected from one of two purposes (Silent 1 and Silent 2).
There are three setting parameters: Standard level > Silent 1 > Silent 2
Silent 1:
Though operating silently, the Heating (or Cooling) capacity is still prioritized to
ensure having sufficient comfort inside the room.
This setting is a perfect balance between the Heating (or Cooling) capacity
and the Sound level of outdoor unit.
Silent 2:
Compromising the Heating (or Cooling) capacity to the Sound level in any
circumstance where the outdoor unit’s sound level is highly prioritized.
This setting has a purpose to reduce the maximum sound level of outdoor unit
by 4 dB(A).
Note:
●While activating of Silent operation, inadequate heating (or cooling)
capacity may occur.
Silent Operation (Outdoor Unit)
Press
SILENT#1 SILENT#2 None
AUTOMATIC OPERATION
6
To automatically select cooling, heating or fan only operation
1. Press
02'(
: Select Auto A.
2. Press : Set the desired temperature. Min. 17°C, Max. 30°C.
3. Press
)$1
: Select AUTO, LOW , LOW+ , MED ,
MED+ or HIGH .
DRY OPERATION
8
For dehumidifi cation, a moderate cooling performance is controlled
automatically.
1. Press
02'(
: Select Dry .
2. Press : Set the desired temperature. Min. 17°C, Max. 30°C.
Note: Dry mode fan speed is set to Auto only.
Hi POWER OPERATION
9
To automatically control room temperature and airfl ow for faster cooling or
heating operation (except in DRY and FAN ONLY mode)
Press
+L32:(5
: Start and stop the operation.
ECO OPERATION
10
To automatically control room temperature to save energy (except in DRY and
FAN ONLY mode)
Press
ECO
: Start and stop the operation.
Note: Cooling operation; the set temperature will increase automatically
1 degree/hour for 2 hours (maximum 2 degrees increase).
For heating operation the set temperature will decrease.
1Press
),;
: Move the louver in
the desired vertical direction.
2Press
6:,1*
: Swing the
air automatically and press again to
stop.
3For horizontal direction, adjust
manually.
Note:
●Do not move the louver manually by others.
●The louver may automation positioning by some operation mode.
INDOOR UNIT DISPLAY
1
●Display brightness can be adjusted, follow procedure on %.
w Require Wireless LAN connecting adapter which available as accessory.
1ECO (White)
2Wi-Fi access (White) w
3Hi POWER (White)
4Timer (White)
5Operation mode (White)
1. Press
02'(
: Select Cool , Heat or Fan only .
2. Press : Set the desired temperature. Min. 17°C, Max. 30°C.
Fan Only: No temperature indication
3. Press
)$1
: Select AUTO, LOW , LOW+ , MED ,
MED+ or HIGH .
COOLING / HEATING / FAN ONLY OPERATION
7
01_OM_1133450203_EN.indd 301_OM_1133450203_EN.indd 3 28/2/2566 BE 15:4328/2/2566 BE 15:43

4
1. Press 8°C button to change to 8°C set temperature heating
operation.
2. Press to adjust setting temperature from 5°C to 13°C.
Note: 8°C will operate in Heating mode only. If Air conditioner performs in
cooling operation (including automatic cooling) or dry operation it will
change to heating operating.
TEMPORARY OPERATION
8°C OPERATION
12
11
In case of the misplaced or discharged
remote control
●Pressing the RESET button, the unit
can start or stop without using the
remote control.
●Operation mode is set on AUTOMATIC
operation, preset temperature is 24°C
and fan operation is automatic speed.
TIMER OPERATION
13
Set the timer when the air conditioner is operating.
Setting the ON Timer Setting the OFF Timer
1
Press : Set the desired ON
timer.
Press : Set the desired
OFF timer.
2
Press : Set the timer. Press : Set the timer.
3
Press : Cancel the timer. Press : Cancel the timer.
Daily timer allows the user to set both the ON & OFF timers and will be
activated on a daily basis.
Setting Daily Timer
1
Press : Set the ON timer.
3
Press .
2
Press : Set the OFF timer.
4
Press button during
the ( or ) mark fl ashing.
●During the daily timer is activating, both arrows ( , ) are indicated.
Note:
●Keep the remote control in accessible transmission to the indoor unit;
otherwise, the time lag of up to 15 minutes will occur.
●The setting will be saved for the next same operation.
PRESET OPERATION
15
Set your preferred operation for future use. The setting will be memorized by
the unit for future operation (except airfl ow direction).
1. Select your preferred operation.
2. Press and hold for 3 seconds to memorize the setting.
The P mark displays.
3. Press : Operate the preset operation.
AUTO RESTART FUNCTION SETTING
16
This product is designed so that, after a power failure, it can restart
automatically in the same operating mode as before the power failure.
Information
The product is shipped with Auto Restart function in the ON position.
Turn it OFF if this function is not required.
How to turn OFF the Auto Restart Function
●Press and hold the [OPERATION] button on the indoor unit for 3 seconds
(3 beep sounds but OPERATION lamp does not blink).
How to turn ON the Auto Restart Function
●Press and hold the [OPERATION] button on the indoor unit for 3 seconds
(3 beep sounds and OPERATION lamp blink 5 time/sec for 5 seconds).
Note:
●In case of ON timer or OFF timer are set, AUTO RESTART OPERATION
does not activate.
To operate at super low fan speed for quiet operation (except in DRY mode)
Press
48,(7
: Start and stop the operation.
Note: Under certain conditions, QUIET operation may not provide adequate
cooling due to low sound features.
For comfortable sleep, automatically control air fl ow and automatically
turn OFF.
Press : Select 1, 3, 5 or 9 hrs for OFF timer operation.
Note: The cooling operation, the set temperature will increase automatically
1 degree/hour for 2 hours (maximum 2 degrees increase).
For heating operation, the set temperature will decrease.
QUIET OPERATION
17
COMFORT SLEEP OPERATION
18
Firstly, turn off the circuit breaker.
Indoor Unit and Remote Control
●Clean the indoor unit and the remote control with a wet cloth when
needed.
●No benzine, thinner, polishing powder or chemically-treated duster.
Air fi lters
Clean every 2 weeks.
1. Open the air inlet grille.
2. Remove the air fi lters.
3. Vacuum or wash and then dry them.
4. Reinstall the air fi lters and close the air inlet grille.
MAINTENANCE
19
DISPLAY LAMP BRIGHTNESS ADJUSTMENT
14
To decrease the display lamp brightness or turn it off.
1. Press and hold
)$1
for 3 seconds until brightness level ( , ,
or ) is shown on remote control LCD then release the button.
2. Press Rise or
Decrease
to adjust brightness in 4 levels.
Remote control
LCD Operation display Brightness
Lamp illuminates full brightness.
100%
Lamp illuminates 50% brightness.
50%
Lamp illuminates 50% brightness and the
operation lamp is turned off.
50%
All lamps are turned off.
All turned off
●In the examples of and , the lamp illuminates for 5 seconds before
going off.
SELF CLEANING OPERATION
(COOL AND DRY OPERATION ONLY)
20
To protect bad smell caused by the humidity in the indoor unit.
1. If the button is pressed once during “Cool” or “Dry” mode,
the fan will continue to run for other 30 minutes, then it will turn off
automatically. This will reduce the moisture in the indoor unit.
2. To stop the unit immediately, press the more 2 times within
30 seconds.
OPERATION /
RESET Button
EN
01_OM_1133450203_EN.indd 401_OM_1133450203_EN.indd 4 28/2/2566 BE 15:4328/2/2566 BE 15:43

5
12
OPERATION AND PERFORMANCE
MANUAL DEFROST OPERATION
22
21
The unit does not operate. Cooling or Heating is abnormally low.
●The power main switch is
turned off.
●The circuit breaker is
activated to cut off the power
supply.
●Stoppage of electric current
●ON timer is set.
●The fi lters are blocked with dust.
●The temperature has been set
improperly.
●The windows or doors are opened.
●The air inlet or outlet of the
outdoor unit is blocked.
●The fan speed is too low.
●The operation mode is FAN or DRY
●POWER SELECTION function is
set 75% or 50% (This function is
depend on remote controller).
TROUBLESHOOTING (CHECK POINT)
23
REMOTE CONTROL A-B SELECTION
24
To separate using of remote control for each indoor unit in case of
2 air conditioners are installed nearly.
Remote Control B Setup.
1. Press RESET button on the indoor unit to turn the air conditioner ON.
2. Point the remote control at the indoor unit.
3. Push and hold button on the Remote Control by the tip of the
pencil. “00” will be shown on the display. (Picture 1)
4. Press
02'(
during pushing . “B” will show on the display and
“00” will disappear and the air conditioner will turn OFF.
The Remote Control B is memorized. (Picture 2)
Note: 1. Repeat above step to reset Remote Control to be A.
2. Remote Control A has not “A” display.
3. Default setting of Remote Control from factory is A.
1. Three-minute protection feature: To prevent the unit from being activated
for 3 minutes when suddenly restarted or switched to ON.
2. Preheating operation: Warm up the unit for 5 minutes before the heating
operation starts.
3. Warm air control: When the room temperature reaches the set
temperature, the fan speed is automatically reduced and the outdoor unit
will stop.
4. Automatic defrosting: Fans will stop during defrost operation.
5. Heating capacity: Heat is absorbed from outdoors and released into
the room. When the outdoor temperature is too low, use another
recommended heating apparatus in combination with the air conditioner.
6. Consideration for accumulated snow: Select the position for outdoor unit
where it will not be subjected to snow drifts, accumulation of leaves or
other seasonal debris.
7. Some minor cracking sound may occur when unit operating.
This is normal because the cracking sound may be caused by
expansion/contraction of plastic.
Note: Item 2 to 6 for Heating model
Air conditioner operating conditions
Temp.
Operation Outdoor Temperature Room Temperature
Heating –15°C ~ 24°C Less than 28°C
Cooling –15°C ~ 46°C 21°C ~ 32°C
Dry –15°C ~ 46°C 17°C ~ 32°C
To defrosting the heat exchanger of the outdoor unit during Heating operation.
Press and hold
SET
: for 5 sec. then remote control display will show
[] as picture 1 for 2 sec.
01_OM_1133450203_EN.indd 501_OM_1133450203_EN.indd 5 28/2/2566 BE 15:4328/2/2566 BE 15:43

1
PRECAUZIONI PER LA SICUREZZA
Leggere attentamente le
precauzioni contenute nel
presente manuale prima di
azionare l’unità.
Questo apparecchio è riempito
di R32.
Indicazioni di avvertenza sul condizionatore
Indicazioni di avvertenza Descrizione
CAUTION
BURST HAZARD
Open the service valves
before the operation,
otherwise there might be
the burst.
ATTENZIONE
PERICOLO DI SCOPPIO
Aprire le valvole di servizio prima dell’operazione,
in caso contrario, si potrebbe verifi care uno scoppio.
●Conservare il presente manuale in un luogo in cui l’operatore lo possa trovare.
●Leggere attentamente le precauzioni contenute nel presente manuale prima di
azionare l’unità.
●Il presente apparecchio deve essere utilizzato da utenti esperti o formati nei
negozi, nel settore dell’illuminazione e in aziende agricole oppure per uso
commerciale dai non addetti ai lavori.
●
Le precauzioni qui descritte sono state classifi cati come PERICOLO, AVVERTENZA
e ATTENZIONE. Contengono importanti informazioni riguardanti la sicurezza.
Assicurarsi di osservare attentamente tutte le precauzioni.
PERICOLO
●Non installare, riparare, aprire o rimuovere il coperchio. Ci si potrebbe esporre
a tensioni pericolose. Chiedere al rivenditore o a uno specialista di effettuare
questa operazione.
●Lo spegnimento dell’alimentazione non evita il potenziale pericolo di scosse
elettriche.
●L’apparecchio verrà installato conformemente alle norme di cablaggio nazionali.
●Nel cablaggio fi sso deve essere incluso uno strumento per lo scollegamento
dall’alimentazione, munito di una separazione dei contatti di almeno 3 mm in
tutti i poli.
●L’apparecchio deve essere conservato in un ambiente privo di fonti di
accensione continuamente in funzione (ad esempio, fi amme libere,
apparecchiature a gas o stufe elettriche).
●Al fi ne di evitare incendi, esplosioni o lesioni, non azionare l’unità quando
vengono rilevati gas nocivi (ad esempio, infi ammabili o corrosivi) in prossimità
dell’apparecchio.
AVVERTENZA
●
Non esporre il corpo direttamente all’aria fredda o calda per un lungo periodo di tempo.
●Non infi lare le dita o oggetti vari nella presa di ingresso/uscita aria.
●Quando si verifi ca un evento anomalo (odore di bruciato, ecc.), spegnere
il condizionatore d’aria e scollegare l’alimentazione elettrica, o spegnere
l’interruttore di circuito.
IT
02_OM_1133450203_IT.indd 102_OM_1133450203_IT.indd 1 28/2/2566 BE 15:4428/2/2566 BE 15:44

2
PRECAUZIONI PER LA SICUREZZA
●Questo apparecchio non è destinato ad essere utilizzato da parte di bambini
di età inferiore a 8 anni e di persone con capacità fi siche, sensoriali o mentali
ridotte, o prive di esperienza e conoscenza, tranne in caso di supervisione o
istruzione sull’uso dell’apparecchio in modo sicuro e comprendendone i pericoli.
I bambini non devono giocare con l’apparecchio. La pulizia e la manutenzione
dell’utente non deve essere effettuata da bambini senza sorveglianza.
●
Questo apparecchio non deve essere usato da persone (inclusi i bambini) con
capacità fi siche, sensoriali o mentali ridotte, o che mancano di esperienza e
conoscenza, a meno che non abbiano ricevuto una supervisione o istruzioni
sull’uso dell’apparecchio da parte di una persona responsabile della loro sicurezza.
●Il condizionatore deve essere installato, riparato, rimosso e ne deve essere
effettuata la manutenzione da un installatore qualifi cato o da un incaricato
all’assistenza qualifi cato. Qualora debba essere intrapresa una delle
operazioni menzionate, rivolgersi a un installatore qualifi cato o a un incaricato
all’assistenza qualifi cato.
●I bambini devono ricevere supervisione per assicurare che non giochino con
l’apparecchio.
●Per il rabbocco o la sostituzione non utilizzare liquido refrigerante diverso
da quello specifi cato (R32). In caso contrario nel circuito di refrigerazione si
potrebbe creare una pressione anomala con la conseguente possibilità di
guasto o esplosione oltre che di lesione.
●Non utilizzare liquidi per accelerare il processo di scongelamento o per pulire
diversi da quelli raccomandati dal produttore.
●L’apparecchio deve essere conservato in un ambiente senza sorgenti di innesco
a funzionamento continuo (ad esempio, fi amme libere, un apparecchio a gas in
funzione o una stufa elettrica in funzione).
●I refrigeranti potrebbero non contenere odore.
●Non forare o bruciare in quanto l’apparecchio è sotto pressione. Non esporre
l’apparecchio a calore, fi amme, scintille o altre fonti di accensione. In caso
contrario, potrebbe esplodere e provocare lesioni o la morte.
●Non aggiungere altri dispositivi senza consiglio di fabbrica.
ATTENZIONE
●Non lavare l’unità con acqua. Si potrebbe ricevere una scossa elettrica.
●Non utilizzare questo condizionatore d’aria per altri scopi, quali la conservazione
del cibo, ecc.
●Non camminare e non collocare alcun oggetto sull’unità interna/esterna.
Si potrebbero provocare incidenti o danni all’unità.
●Non toccare l’aletta in alluminio perché ci si potrebbe ferire.
●Prima di pulire l’unità, spegnere l’interruttore di alimentazione principale o
l’interruttore di circuito.
●Se l’unità non verrà utilizzata per un lungo periodo di tempo, spegnere
l’interruttore principale o l’interruttore di circuito.
●Si consiglia di effettuare operazioni di manutenzione da parte di uno specialista
quando l’unità viene utilizzata da molto tempo.
●Il produttore è sollevato da qualsiasi responsabilità per eventuali danni causati
dall’inosservanza delle istruzioni fornite in questo manuale.
02_OM_1133450203_IT.indd 202_OM_1133450203_IT.indd 2 28/2/2566 BE 15:4428/2/2566 BE 15:44

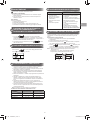
SWING
FAN
FIX
QUIET
ECO
Hi POWER
8°C
1
$4
6
5
)
&
#
!
"
.
+
2
3
7
%
(
9
~
-
,
8
3
Preparazione dei fi ltri
1. Aprire la griglia della presa d’aria e rimuovere i fi ltri dell’aria.
2. Collegare i fi ltri. (per informazioni dettagliate consultare Manuale di
Installazione).
Caricamento della batterie (durante l’operazione wireless)
1. Rimuovere il coperchio scorrevole.
2. Inserire 2 nuove batterie (tipo AAA)
rispettando le posizioni (+) e (–).
Impostazione orologio
1. Premere con la punta di una matita.
Se l’indicazione del timer lampeggia, andare al punto 2.
2. Premere o : per impostare l’ora.
3. Premere : Impostare il timer.
Reset telecomando
Premere con la punta di una matita.
1. Togliere la batteria.
2. Premere .
3. Inserire la batteria.
PREPARATIVI PRIMA DELL’USO
2
DIREZIONE FLUSSO D’ARIA
3
Nota:
●Il telecomando fornito è wireless ma può anche essere utilizzato con
un cavo. Si prega di vedere "Come collegare il telecomando per il
funzionamento cablato", che si trova nelle istruzioni di installazione, nel
caso in cui sia richiesto il controllo cablato.
●Nelle operazioni di cablaggio, il telecomando tornerà alle condizioni
iniziali (PRESET, TIMER e CLOCK (OROLOGIO) torneranno alle
impostazioni iniziali) quando l’utente scollegherà l’alimentazione dal
condizionatore.
TELECOMANDO
4
1Emettitore di segnali infrarossi
2Tasto di accensione/spegnimento
3Tasto di selezione del modo (MODE)
4Tasto TEMPERATURE (TEMP)
5Tasto di regolazione della velocità del
ventilatore (FAN)
6Tasto di oscillazione feritoie di
alimentazione (SWING)
7Tasto di regolazione della griglia (FIX)
8Funzionamento Riscaldamento 8°C (8°C)
9Tasto di accensione a timer (ON)
!Tasto di spegnimento a timer (OFF)
"Tasto di impostazione (SET)
#Tasto di annulla (CLR)
$Tasto di memorizzazione e preselezione
(PRESET)
%
Tasto di funzionamento Silenzioso (SILENT)
&Tasto di funzionamento a potenza elevata
(Hi POWER)
(Tasto ECO (ECO)
)
Tasto QUIET (Silenzioso)
~
Tasto Comfort per la notte (COMFORT SLEEP)
+Tasto di reset fi ltro (FILTER)
,Tasto di impostazione orologio (CLOCK)
-Tasto di controllo (CHECK)
.Pulsante di reset (RESET)
FUNZIONAMENTO SILENZIOSO
5
FUNZIONAMENTO SILENZIOSO ( )
Tenere l’unità esterna in funzione in modo silenzioso per garantire a tutti
sonno profondo nelle ore notturne. Con questa funzione, la capacità
di riscaldamento viene ottimizzata per offrire un’esperienza silenziosa.
Funzionamento silenzioso può essere selezionato con una delle due opzioni
(Silenzioso 1 e Silenzioso 2).
Vi sono tre parametri di impostazione: Livello standard > Silenzioso 1 >
Silenzioso 2
Silenzioso 1:
Pur operando silenziosamente, la capacità di riscaldamento (o raffreddamento)
è ancora prioritaria per garantire un comfort sufficiente all’interno
dell’ambiente.
Questa impostazione è un perfetto bilanciamento tra la capacità di
riscaldamento (o di raffreddamento) e il livello sonoro dell’unità esterna.
Silenzioso 2:
Ridurre la capacità di riscaldamento (o raffreddamento) al livello sonoro in
qualsiasi circostanza in cui il livello sonoro dell’unità esterna sia altamente
prioritario.
Questa impostazione ha lo scopo di ridurre il livello sonoro massimo dell’unità
esterna di 4 dB (A).
Nota:
●Quando si attiva Funzionamento silenzioso, può succedere che la
capacità di riscaldamento (o raffreddamento) sia inadeguata.
Funzionamento Silenzioso (Unità Esterna)
Premere
SILENZIOSO#1 SILENZIOSO#2 Nessuno
FUNZIONAMENTO AUTOMATICO
6
Per selezionare automaticamente il raffreddamento, il riscaldamento o la
ventilazione e per controllare la velocità del ventilatore.
1. Premere
02'(
: Selezionare Auto A.
2. Premere : Impostare la temperatura desiderata. Min. 17°C,
Max. 30°C.
3. Premere
)$1
: Selezionare AUTO, LOW , LOW+ , MED ,
MED+ o HIGH .
FUNZIONAMENTO IN DEUMIDIFICAZIONE
8
Per la deumidifi cazione è prevista una moderata azione di raffreddamento con
controllo automatico.
1. Premere
02'(
: Selezionare Deumidifi cazione .
2. Premere : Impostare la temperatura desiderata. Min. 17°C,
Max. 30°C.
Nota: In modalità Deumidifi cazione, la velocità della ventola è impostata solo
su Auto.
1Premere
),;
: Spostare
il defl ettore di ventilazione nella
direzione verticale desiderata.
2Premere
6:,1*
: Orientare l’aria
automaticamente e premere di nuovo
per fermare.
3Per la direzione orizzontale, regolare
manualmente.
Nota:
●Non spostare manualmente le feritoie di ventilazione.
●Quando si utilizza la modalità di funzionamento, è possibile posizionare
la leva automaticamente.
DISPLAY DELL’UNITÀ INTERNA
1
●La luminosità del display può essere regolata. Seguire la procedura su %.
w Richiede adattatore di connessione LAN wireless, disponibile come
accessorio.
1ECO (Bianco)
2Accesso Wi-Fi (Bianco) w
3Hi POWER (Bianco)
4Timer (Bianco)
5Modalità di funzionamento (Bianco)
1. Premere
02'(
: Selezionare Raffreddamento , Riscaldamento
o Sola ventilazione .
2. Premere : Impostare la temperatura desiderata. Min. 17°C,
Max. 30°C.
Solo ventilazione: Indicazione di temperatura assente
3. Premere
)$1
: Selezionare AUTO, LOW , LOW+ , MED ,
MED+ o HIGH .
RAFFREDDAMENTO / RISCALDAMENTO /
SOLA VENTILAZIONE
7
IT
02_OM_1133450203_IT.indd 302_OM_1133450203_IT.indd 3 28/2/2566 BE 15:4428/2/2566 BE 15:44

4
1. Premere il pulsante 8°C per cambiare a 8°C la temperatura
impostata in funzionamento di riscaldamento.
2. Premere per regolare la temperatura impostata da
5°C a 13°C.
Nota: 8°C funziona solo in modalità di riscaldamento. Se il condizionatore
d’aria funziona in raffreddamento (compreso il raffreddamento
automatico) o in deumidifi cazione, passa al funzionamento in
riscaldamento.
FUNZIONAMENTO TEMPORANEO
FUNZIONAMENTO a 8°C
12
11
Qualora il telecomando fosse
temporaneamente indisponibile o scarico
●Premendo il tasto RESET, l’unità può
accendersi o spegnersi senza usare il
telecomando.
●La modalità di funzionamento è
impostata su AUTOMATICA, la
temperatura reimpostata è di 24°C
e il funzionamento della ventola è
impostato sulla velocità automatica.
FUNZIONAMENTO DEL TIMER
13
Impostare il timer quando il condizionatore è in funzione.
Impostazione del timer ON Impostazione del timer OFF
1
Premere : Impostare il timer
ON.
Premere : Impostare il timer
OFF.
2
Premere : Impostare il
timer. Premere : Impostare il timer.
3
Premere : Annullare il timer. Premere : Annullare il timer.
Il timer quotidiano consente all’utente di impostare entrambi i timer ON e
OFF e sarà attivato solo su base quotidiana.
Impostazione timer quotidiano
1
Premere : Impostazione del
timer ON.
3
Premere .
2
Premere : Impostazione del
timer OFF.
4
Premere tasto durante
il lampeggia ( o ).
●Durante l’attivazione del timer quotidiano sono indicate entrambe le
frecce ( , ).
Nota:
●Posizionare il telecomando in modo che riesca a trasmettere il segnale
all’unità interna, altrimenti si può verifi care un ritardo temporale fi no a
15 minuti.
●L’impostazione verrà salvata per il prossimo funzionamento dello stesso
tipo.
FUNZIONE PRESET
15
Impostare il funzionamento preferito per riutilizzarlo in futuro. L’impostazione
verrà memorizzata dall’unità per il funzionamento futuro (tranne la direzione
del fl usso dell’aria).
1. Selezionare la modalità di funzionamento preferenziale.
2. Per memorizzare l’impostazione tenere premuto per più di
3 secondi.
Viene visualizzato il simbolo P.
3. Premere : Usare la funzione di preselezione.
IMPOSTAZIONE FUNZIONE DI RIAVVIO AUTOMATICO
16
Questo prodotto è progettato in modo da riavviarsi automaticamente,
dopo un’interruzione di alimentazione mantenendo lo stesso modo di
funzionamento impostato prima dell’interruzione.
Informazioni
Il prodotto è stato spedito con la funzione di riavvio automatico in posizione ON.
Spegnere OFF quando è necessario.
Come portare su OFF (Acceso) la funzione di riavvio automatico
●Premere e tenere premuto per 3 secondi iltasto [OPERATION] dell’unità
interna,
(si ud ranno 3 bip ma la spia OPERATION non lampeggerà).
Come portare su ON (Acceso) la funzione di riavvio automatico
●Premere e tenere premuto per 3 secondi iltasto [OPERATION] dell’unità
interna,
(si ud ranno 3 bip e la spia OPERATION lampeggerà per 5 volte/secondo
per 5 secondi).
Nota:
●Sia quando il timer è impostato su ON (Acceso) sia quando è su OFF
(Spento), la FUNZIONE DI RIACCENSIONE AUTOMATICA non si attiva.
Per utilizzare la ventola a velocità molto bassa per funzionamento silenzioso
(in modalità DEUMIDIFICAZIONE)
Premere
48,(7
: Accendere e spegnere la funzione.
Nota: In determinate condizioni, il funzionamento QUIET potrebbe non
consentire un raffreddamento adeguato.
Per risparmiare energia di notte, controllare automaticamente il fl usso dell’aria
e OFF automaticamente l’unità.
Premere : Selezionare 1, 3, 5 o 9 ore per il funzionamento del
timer OFF.
Nota: Raffreddamento; la temperatura impostata aumenterà automaticamente
di 1 grado all’ora per 2 h (aumento massimo di 2 gradi).
Per il riscaldamento le temperatura impostate diminuiranno.
FUNZIONAMENTO QUIET
17
FUNZIONAMENTO COMFORT SLEEP
18
REGOLAZIONE LUMINOSITÀ DELLA SPIA DEL DISPLAY
14
Per diminuire la luminosità della spia del display o spegnerlo.
1. Tenere premuto
)$1
per 3 secondi fi nché il livello di luminosità
( , , or ) non viene visualizzato sul display LCD del
telecomando, quindi rilasciare il tasto.
2. Premere Sollevare o
Più basso
per regolare la luminosità in
4 livelli.
LCD del
telecomando Display di funzionamento Luminosità
La spia si illumina alla massima luminosità.
100%
La spia si illumina con il 50% di potenza.
50%
La spia si illumina con il 50% di potenza e la
spia di funzionamento si spegne.
50%
Tutte le spie sono spente.
Tutto spento
●In caso di impostazione di o , la spia si illumina per 5 secondi prima
di spegnersi.
Tasto OPERATION / RESET
FUNZIONAMENTO Hi POWER
9
Per controllare automaticamente la temperatura ambiente e il fl usso dell’aria
e ottenere un’azione di raffreddamento e riscaldamento più rapida (tranne che
nelle modalità DRY e FAN ONLY)
Premere
+L32:(5
: Accendere e spegnere la funzione.
FUNZIONAMENTO ECO
10
Per controllare automaticamente la temperatura ambiente, in modo da
risparmiare energia (tranne che nelle modalità DRY e FAN ONLY)
Premere
ECO
: Accendere e spegnere la funzione.
Nota: Raffreddamento; la temperatura impostata aumenterà automaticamente
di 1 grado all’ora per 2 h (aumento massimo di 2 gradi).
Per il riscaldamento le temperatura impostate diminuiranno.
02_OM_1133450203_IT.indd 402_OM_1133450203_IT.indd 4 28/2/2566 BE 15:4428/2/2566 BE 15:44

5
12
FUNZIONAMENTO E PRESTAZIONI
22
SELEZIONE A-B DEL TELECOMANDO
24
Comando da utilizzare in caso 2 condizionatori siano installati in prossimità
l’uno dell’altro, in modo da separarli tramite il telecomando di ogni unità
interna.
Impostazione di B sul telecomando
1. Premere il tasto RESET dell’unità interna per ACCENDERE il
condizionatore.
2. Puntare il telecomando verso l’unità interna.
3. Premere e tenere premuto il tasto del telecomando con la punta di
una matita. Sul display verrà visualizzato “00”. (Immagine 1)
4. Premere
02'(
contemporaneamente al tasto . Sul display verrà
visualizzato “B”, “00” scomparirà e il condizionatore VERRÀ SPENTO.
Viene memorizzata l’indicazione “B” del telecomando. (Immagine 2)
Nota: 1. Ripetere il punto precedente per impostare nuovamente il
telecomando su A.
2. L’indicazione “A” non viene mai visualizzata sul display.
3. L’impostazione predefi nita del telecomando è su A.
1. Funzione di protezione per tre minuti: Ritarda l’avviamento dell’unità
venga per 3 minuti a seguito di una riattivazione improvvisa.
2. Funzione di preriscaldamento: Riscaldare l’unità per 5 minuti prima che
abbia inizio la funzione di riscaldamento.
3. Controllo dell’aria calda: Quando la temperatura ambiente raggiunge
il valore impostato, la velocità del ventilatore viene automaticamente
ridotta e l’unità esterna si arresta.
4. Sbrinamento automatico: I ventilatori si spengono durante l’operazione di
sbrinamento.
5. Capacità di riscaldamento: Il calore viene assorbito dall’esterno e
rilasciato nel locale. Quando la temperatura esterna è troppo bassa,
usare un altro apparecchio di riscaldamento insieme al condizionatore
d’aria.
6. Considerazioni relative all’accumulo di neve: Per l’unità esterna,
scegliere una posizione in cui essa non risulti soggetta all’accumulo di
neve, foglie o detriti associati alle varie stagioni.
7. Durante il funzionamento dell’unità potrebbero udirsi dei rumori di urti.
Tutto ciò è normale, in quanto tali rumori sono causati dall’espansione/
contrazione della plastica.
Nota: Procedura da 2 a 6 per il modello per riscaldamento
Condizioni di funzionamento del condizionatore d’aria
Temp.
Funzionamento Temperatura esterna Temperatura ambiente
Riscaldamento –15°C ~ 24°C Inferiore a 28°C
Raffreddamento –15°C ~ 46°C 21°C ~ 32°C
Deumidifi cazione –15°C ~ 46°C 17°C ~ 32°C
FUNZIONE DI PULIZIA AUTOMATICA
(SOLO RAFFREDDAMENTO
E
FUNZIONAMENTO IN DEUMIDIFICAZIONE)
20
Per evitare i cattivi odori causati dall’umidità nell’unità interna
1. Se il tasto viene premuto una volta nella modalità
“Raffreddamento” o “Deumidifi cazione”, il ventilatore resta in funzione
per altri 30 minuti, quindi si spegne automaticamente. In questo modo si
avrà una riduzione dell’umidità nell’unità interna.
2. Per arrestare l’unità immediatamente, premere più di due
volte entro 30 secondi.
Prima di tutto, spegnere l’interruttore di circuito.
Unità interna e telecomando
●Pulire l’unità interna e il telecomando con uno strofi naccio bagnato,
quando necessario.
●Non usare benzina, diluenti, detersivi o strofi nacci sottoposti a un
trattamento chimico.
Filtri dell’aria
Pulire ogni 2 settimane.
1. Aprire la griglia di ingresso aria.
2. Rimuovere i fi ltri dell’aria.
3. Pulire con un aspirapolvere o lavare, quindi asciugare i fi ltri.
4. Reinstallare i fi ltri dell’aria e chiudere la griglia di ingresso dell’aria.
MANUTENZIONE
19
FUNZIONAMENTO SBRINAMENTO MANUALE
21
Per sbrinare lo scambiatore di calore dell’unità esterna durante il riscaldamento.
Tenere premuto
SET
: per 5 sec. quindi il display del telecomando
mostra [ ] come immagine 1 per 2 sec.
L’unità non funziona. Il raffreddamento o il riscaldamento è
anormalmente basso.
●L’interruttore di alimentazione
principale è spento.
●L’interruttore di circuito è
attivato per interrompere
l’alimentazione.
●Interruzione della corrente
elettrica
●Il timer ON è impostato.
●I fi ltri sono ostruiti dalla polvere.
●La temperatura è stata impostata in
modo errato.
●Le fi nestre o le porte sono aperte.
●La presa di entrata o di uscita dell’aria
dell’unità esterna è ostruita.
●La velocità del ventilatore è troppo
bassa.
●La modalità di funzionamento è
FAN o DRY
●POWER SELECTION function è
impostato su 75% o 50% (questa
funzione dipende dal telecomando).
SOLUZIONE DEI PROBLEMI (PUNTO DI CONTROLLO)
23
IT
02_OM_1133450203_IT.indd 502_OM_1133450203_IT.indd 5 28/2/2566 BE 15:4428/2/2566 BE 15:44

1133450203
02_OM_1133450203_IT.indd 602_OM_1133450203_IT.indd 6 28/2/2566 BE 15:4428/2/2566 BE 15:44
-
 1
1
-
 2
2
-
 3
3
-
 4
4
-
 5
5
-
 6
6
-
 7
7
-
 8
8
-
 9
9
-
 10
10
-
 11
11
-
 12
12


Toshiba RAS-B13E2KVG-E Manuale del proprietario
- Categoria
- Condizionatori d'aria a sistema split
- Tipo
- Manuale del proprietario
in altre lingue
Documenti correlati
Altri documenti
-
Emmeti X-REVO XX19W-21 Manuale del proprietario
-
Panasonic CSVZ9SKE Manuale del proprietario
-
Hitachi RAC-25WED Manuale utente
-
Comfee MAESTRALE (CF-ABW12A IU / CF-ABW12A OU) Manuale del proprietario
-
-
Panasonic CS-Z9SKEWM Manuale del proprietario
-
-