
Bedienungsanleitung
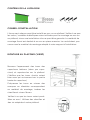
celexon Rollo Chroma Key
Green Screen
Vielen Dank für den Kauf dieses Produkts.
Für eine optimale Leistung und Sicherheit lesen Sie diese Anweisungen bitte sorgfältig
durch, bevor Sie dieses Produkt anschließen oder betreiben. Bitte bewahren Sie diese
Anleitung für eine spätere Verwendung auf.
Version: 32422_031

1
Diese Bedienungsanleitung dient dazu, Sie mit der Funktionsweise dieses
Produktes vertraut zu machen. Bewahren Sie diese Anleitung daher gut auf,
damit Sie jederzeit darauf zugreifen können.
• Bitte beachten Sie vor der Montage das beiliegende Datenblatt mit weite-
ren Sicherheits- und Verwendungshinweisen.
• Beginnen Sie nicht mit der Montage, bevor Sie die komplette Bedienungs-
anleitung gelesen und diese verstanden haben.
• Führen Sie die Installation mit einer weiteren Person durch um eine sichere
Montage zu gewährleisten.
• Entnehmen die das Produkt der Verpackung und entfernen alle Verpa-
ckungsmaterialien. Achten Sie darauf, dass sich kein Verpackungsmateri-
al am oder im Produkt bendet. Sollten Sie Verpackungsbeschädigungen
feststellen, prüfen Sie zusätzlich ob Beschädigungen am Produkt zu nden
sind. Sollten Sie äußerliche Beschädigungen an dem Gerät oder unerwar-
tete oder unübliche Funktionsweisen feststellen, darf das Produkt nicht
weiter genutzt werden. Kontaktieren Sie umgehend den Händler, bei dem
Sie das Produkt gekauft haben oder celexon direkt (Web: www.celexon.de,
Mail: info@celexon.de) für weitere Informationen.
• Um einen störungsfreien Betrieb sicherzustellen, darf das Produkt aus-
schließlich in Innenbereichen eingesetzt werden, es ist NICHT zur Nutzung
im Freien geeignet.
• Die Nutzung des Geräts und Zubehörteile ist Kindern unter 16 Jahren ver-
boten.
• Sorgen Sie dafür, dass keine Kinder mit dem Produkt spielen oder sich
ohne Aufsicht in dessen Nähe aufhalten. Personen dürfen sich nicht unter
dem Produkt (hängende Lasten) aufhalten.
• Ein Umbauen oder Verändern des Produktes ist untersagt und beeinträch-
tigt die Produktsicherheit!
• Achtung Verletzungsgefahr! Öffnen Sie das Produkt niemals eigenmäch-
tig. Führen Sie Reparaturen nie selbst aus!
• Dieses Produkt darf nur in unverändertem, unbeschädigtem Originalzus-
tand verwendet werden.
• Verwenden Sie das Produkt nicht in der Nähe von Gas- oder Wassergerät-
schaften oder in staubiger Umgebung.
• Behandeln Sie das Produkt sorgfältig. Es kann durch Stöße, Schläge oder
WARNHINWEISE

2
Fall aus bereits geringer Höhe beschädigt werden
• Halten Sie das Produkt fern von Feuchtigkeit und Hitze.
• Tauchen Sie das Produkt niemals in Wasser oder andere Flüssigkeiten.
• Verwenden Sie das Produkt nur in seiner bestimmungsgemäßen Art und
Weise. Eine anderweitige Verwendung kann zu Personenschäden, Beschä-
digungen am Produkt oder dessen Umgebung führen.
• Ziehen Sie die Schrauben fest, aber überdrehen diese nicht. Ein zu fes-
te Anziehen (z.B. Durch Verwendung eines Akkuschraubendrehers) kann
Schäden verursachen und den sicheren Halt der Leinwand beeinträchtigen.
• Hängende Lasten müssen mindestens zweimal jährlich auf Festigkeit und
Tragfähigkeit geprüft werden. Achten Sie besonders auf die seitlichen Kap-
pen. Diese dürfen nicht beschädigt oder gerissen sein, sonst muss das Pro-
dukt unmittelbar demontiert werden, da die Last komplett über die Kap-
pen getragen wird!
• Bei Nichtbeachtung obiger Anweisungen kann es zu Personenschäden und
Beschädigungen des Produktes oder Geräten die daran angeschlossen
sind kommen. Auch kann bei fehlerhafter Installation oder Verwendung die
Garantie erlöschen.
• Wenn Sie beim Verwenden des Produktes unsicher sind, kontaktieren Sie
Fachpersonal, Ihren Händler oder celexon direkt (Web: www.celexon.de,
Mail: info@celexon.de).
• Technische Änderungen und Irrtümer vorbehalten.
Der Hersteller übernimmt keine Verantwortung für Sachschäden oder Perso-
nenschäden, wenn die Leinwand außerhalb der empfohlenen Spezikationen
verwendet wird, oder bei unsachgemäßer Installation. Verwenden Sie diese
Leinwand nicht in der Nähe von Heizungen oder Klimaanlagen. Montieren Sie
das Produkt ebenfalls nicht in direktem Sonnenlicht oder vor einem Fenster.
Aufgrund der temperaturempndlichen PVC Oberäche kann es zu nachhalti-
ger Beschädigung des Projektionstuchs kommen.
Wir empfehlen Ihnen, nach der Lieferung ca. 2 Stunden mit der Montage zu
warten. So kann sich die Leinwand akklimatisieren; besonders wenn die Lein-
wand von kalter in eine warme Umgebung (oder umgekehrt) gebracht wird.
Bitte vermeiden Sie jegliche Flecken auf der Tuchoberäche. Diese könnten
sich möglicherweise nicht mehr entfernen lassen. Die Projektionsäche nach
jeder Nutzung stets wieder einfahren.

3
HAFTUNGSAUSSCHLUSS
Die Angaben in diesem Dokument können ohne vorherige Ankündigung durch
den Hersteller geändert werden. Änderungen werden jeweils in den folgenden
Versionen dieses Handbuchs ergänzt. Irrtümer ausgeschlossen.
PFLEGEHINWEIS
Reinigen Sie die Leinwand NIEMALS mit Alkohol oder anderen Reinigungsmit-
teln, die Lösungsmittel enthalten. Benutzen Sie nur ein weiches und sauberes
Tuch. Mit einer milden Seifenlauge (max. 5%) kann gegebenenfalls Schmutz
von der Oberäche entfernt werden. Vermeiden Sie unbedingt den Kontakt
mit spitzen oder scharfen Gegenständen. Diese könnten das Projektionstuch
nachhaltig beschädigen. Weitere Hinweise entnehmen Sie den beiliegenden
Leinwandhinweisen.

4
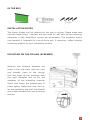
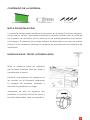
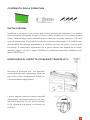
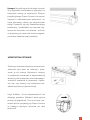
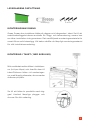
INSTALLATIONSHINWEIS
Der Green Screen kann an der Wand oder Decke installiert werden. Bitte ach-
ten Sie darauf, dass die metallischen Unterlegplatten / Scheiben auch bei der
Wand- und Deckenmontage verwendet werden, da sonst keine sichere Instal-
lation gewährleistet werden kann. Das beiliegende Montagematerial ist für eine
massive Steinwand gedacht. Beschaffen Sie sich ggf. passendes Montagema-
terial für Ihren Installationsuntergrund.
LIEFERUMFANG
1x Green Screen 4x Kunststoff-Dübel 4x Schrauben
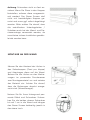
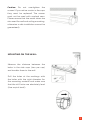
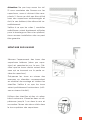
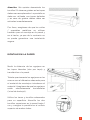
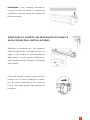
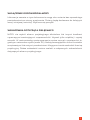
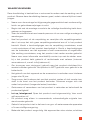
MONTAGE AN DER DECKE (GESCHRAUBT)
Messen Sie den Abstand der Löcher in
den Seitenkappen (Zwei pro Kappe)
und übertragen diese auf die Decke.
Bohren Sie die Löcher an den Mar-
kierungen im passenden Durchmes-
ser zum Montagematerial vor, setzten
dieses ein und schrauben den Green
Screen fest.
Achten Sie auf Parallelität der Löcher
zur Wand! Nutzen Sie für Ihren Unter-
grund passende Dübel und Schrauben.

5
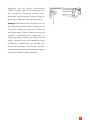
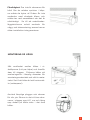
Achtung: Schrauben nicht zu fest an-
ziehen! Wenn Sie Risse in den Kappen
feststellen, müssen diese ausgewech-
selt werden! Der Green Screen darf
nicht mit beschädigten Kappen ge-
nutzt und muss ggf. sofort abgehängt
werden. Bitte achten Sie darauf, dass
die metallischen Unterlegplatten /
Scheiben auch bei der Wand- und De-
ckenmontage verwendet werden, da
sonst keine sichere Installation gewähr-
leistet werden kann.
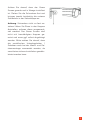
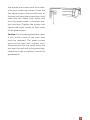
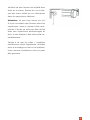
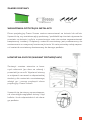
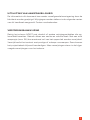
Messen Sie den Abstand der Löcher in
den Seitenkappen (Zwei pro Kappe)
und übertragen diese auf die Wand.
Bohren Sie die Löcher an den Markie-
rungen im passenden Durchmesser
zum Montagematerial vor und setzten
das Material ein. Achten Sie darauf,
dass die Bohrungen absolut waage-
recht sind (Wasserwaage!).
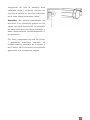
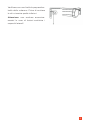
MONTAGE AN DER WAND
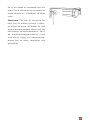
Nutzen Sie für Ihren Untergrund pas-
sende Dübel und Schrauben. Schrau-
ben Sie die beiden oberen Schrauben
bis auf 1 cm in die Wand und hängen
den Green Screen beidseitig jeweils in
das obere Loch.

6
Achten Sie darauf, dass der Green
Screen gerade und in Waage installiert
ist. Ziehen Sie die Schrauben fest und
bringen jeweils beidseitig die unteren
Schrauben in der Seitenkappe an.
Achtung: Schrauben nicht zu fest an-
ziehen! Wenn Sie Risse in den Kappen
feststellen, müssen diese ausgewech-
selt werden! Der Green Screen darf
nicht mit beschädigten Kappen ge-
nutzt und muss ggf. sofort abgehängt
werden. Bitte achten Sie darauf, dass
die metallischen Unterlegplatten /
Scheiben auch bei der Wand- und De-
ckenmontage verwendet werden, da
sonst keine sichere Installation gewähr-
leistet werden kann.

7
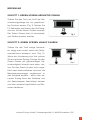
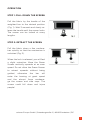
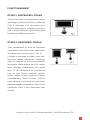
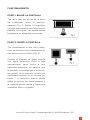
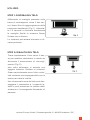
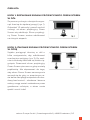
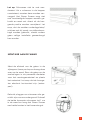
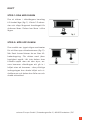
BEDIENUNG
Ziehen Sie das Tuch am Griff der Be-
schwerungsstange bis zur gewünsch-
ten Position heraus (Fig. 1). Warten Sie
1-2 Sekunden und lassen den Griff lang-
sam los, bis der Green Screen arretiert.
Der Green Screen kann in verschiede-
nen Stufen arretiert werden.
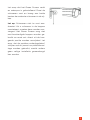
Ziehen Sie das Tuch einige Zentime-
ter zügig nach unten, damit der Rollo-
mechanismus entsperrt wird (Fig. 2).
Wenn die Arretierung sich löst, spüren
Sie ein leichten Einzug. Führen Sie den
Green Screen mit gleichmäßiger Ge-
schwindigkeit lotrecht nach oben. Las-
sen Sie den Green Screen nicht unge-
führt nach oben einfahren, da sonst die
Beschwerungsstange ungebremst in
das Gehäuse einfährt - durch den ab-
rupten Einzug kann das Gehäuse und
die Seitenkappen beschädigt werden
und die Leinwand herabfallen und Per-
sonen verletzen!
SCHRITT 2: GREEN SCREEN HINAUF FAHREN
SCHRITT 1: GREEN SCREEN HERUNTER ZIEHEN
celexon Europe GmbH | Gutenbergstraße 2 | 48282 Emsdetten | DE

User manual
celexon Manual Chroma Key Green
Screen
Thank you for purchasing this product.
For optimum performance and safety, please read these instructions carefully
before connecting or operating this product. Please retain these instructions for future
reference.
Version: 32422_031

1
The purpose of these operating instructions is to familiarise you with the ope-
ration of this product. Therefore, keep these instructions in a safe place so that
you can refer to it at any time.
• The purpose of these operating instructions is to familiarise you with the
operation of this product. Therefore, keep these instructions in a safe place
so that you can refer to it at any time.
• Before installation, please refer to the enclosed data sheet for further
safety and use instructions.
• Do not begin installation until you have fully read and understood the
complete operating instructions.
• This product should only be installed by qualied personnel with
mechanical and electrical knowledge.
• Carry out the installation with another person to ensure safe installation.
• Remove the product from its packaging and remove all packaging
materials.
• Make sure that no packaging material is on or in the product. If you notice
any damage to the packaging, also check for damage to the product.
• If you notice any external damage to the appliance or any unexpected
or unusual functioning, do not use the product further. Immediately cont-
act the dealer from whom you purchased the product or celexon directly
(Web: www.celexon.co.uk, Mail: info@celexon.co.uk) for further informati-
on.
• To ensure trouble-free operation, the product may only be used indoors. It
is NOT suitable for outdoor use.
• The use of the appliance and accessories is forbidden to children under 16
years of age.
• Ensure that no children play with the appliance or are in the vicinity
without supervision.
• Modifying or altering the product may compromise product safety.
• Caution: Risk of injury! Never open the product yourself unauthorised.
Never carry out repairs yourself!
• This product can only be used under the standard technical parameters.
• Do not use the product near corrosive gas, water or in a dusty environment.
WARNINGS

2
• Handle the product with care. It can be damaged by knocks, blows or
drops from even a small height.
• Keep the product away from moisture and heat. Never immerse the
product in water or other liquids.
• Use the product only in the manner for which it is intended. Use for any
other purpose may result in damage to the product or its surroundings.
• Carry out the installation with another person to ensure safe installation.
• Tighten the screws, but do not overtighten them. Overtightening (e.g.tigh-
tening using a cordless screwdriver) can cause damage and and impair the
secure hold of the screen.
• Suspended loads must be checked at least twice a year for strength and
load-bearing capacity at least twice a year.
• Children should not use the screen or play under it unsupervised.
• Failure to follow the above instructions may result in personal injury and
damage to the product or equipment. Incorrect installation or use may also
invalidate the warranty
• If you are unsure about the use of the product, please contact your
• specialist personnel, your dealer or celexon directly (Web:
www.celexon.co.uk, Mail: info@celexon.co.uk)
• Technical changes and errors expected.
The manufacturer accepts no responsibility for damage to property or perso-
nal injury if the screen is used outside the recommended specications or for
improper installation. Do not use this screen near heaters or air conditioners.
Also do not mount product in direct sunlight or in front of a window. Due to the
temperature-sensitive PVC surface, the projection screen may be permanently
damaged.
We recommend that you wait approx. 2 hours after delivery before installing
the projection screen.This allows the projection screen to acclimatise, especial-
ly if the screen is moved from a cold to a warm environment.
Please avoid any stains on the surface of the screen. These may not be able to
be removed.

3
DISCLAIMER
The information in this document is subject to change without notice by the
manufacturer.Changes will be added to subsequent versions of this manual.
The manufacturer does not guarantee or warrant for the correctness of the
information in this document.
CARE INSTRUCTIONS
NEVER clean the screen with alcohol or other cleaning agents that contain
solvents. Use only a soft and clean cloth. A mild soap solution (max 5%) may
be used to remove dirt from the surface. Avoid contact with sharp or pointed
objects as these could permanently damage the projection screen
fabric. Further instructions can be found in the enclosed projection screen
instructions.

4
INSTALLATION NOTES
The Green Screen can be installed on the wall or ceiling. Please make sure
that the metal shims / washers are also used for wall and ceiling mounting,
otherwise a safe installation cannot be guaranteed. The enclosed moun-
ting material is intended for a solid stone wall. If necessary, obtain suitable
mounting material for your installation surface.
IN THE BOX
1x Green Screen 4x plastic dowels 4x screws
MOUNTING ON THE CEILING (SCREWED)
Measure the distance between the
holes in the side caps (two per cap)
and transfer them to the ceiling.
Drill the holes at the markings with
the right diameter drill bit for the
diameter of the mounting material,
insert and screw the greenscreen in
place tightly. Make sure that the ho-
les are parallel to the wall! Use dowels
and screws suitable for your mounting
surface.

5
Caution: Do not overtighten the
screws! If you notice cracks in the caps
they must be replaced! The screen
must not be used with cracked caps.
Please ensure that the metal shims are
also used for wall and ceiling mounting,
otherwise a safe installation cannot be
guaranteed).
Measure the distance between the
holes in the side caps (two per cap)
and transfer them to the wall.
Drill the holes at the markings with
the holes with the right diameter for
the mounting material and make sure
that the drill holes are absolutely level
(Use a spirit level!)
MOUNTING ON THE WALL

6
Use dowels and screws that are suitab-
le for your mounting surface. Screw the
two upper screws into the wall most of
the way and hang the screen from both
sides into the upper hole. Make sure
that the greenscreen is installed stra-
ight and level. Tighten the screws and
tighten the lower screws on both sides
of the greenscreen.
Caution: Do not overtighten the screws!
If you notice cracks in the caps they
must be replaced! The green screen
must not be used with cracked caps.
Please ensure that the metal shims are
also used for wall and ceiling mounting,
otherwise a safe installation cannot be
guaranteed).

7
OPERATION
Pull the fabric by the handle of the
weighted bar to the desired position
(Fig. 1). Wait 3 seconds and slowly re-
lease the handle until the screen locks.
The screen can be locked at many
lengths.
Pull the fabric down a few centime-
tres quickly so that the mechanism is
unlocked (Fig. 2).
When the lock is released, you will feel
a slight retraction. Move the Green
Screen vertically upwards at an even
speed. Do not allow the Green Screen
to retract upwards without being
guided, otherwise the bar will
enter the housing at great speed
and the abrupt force candama-
ge the screen and side caps. The
screen could fall down and injure
people!
STEP 2: RETRACT THE SCREEN
STEP 1: PULL DOWN THE SCREEN
celexon Europe GmbH | Gutenbergstraße 2 | 48282 Emsdetten | DE

Manuel d’utilisation
Écran à fond vert
celexon manuel Chroma Key
Nous vous remercions d‘avoir acheté cet article.
Pour des performances et une sécurité optimales, veuillez lire attentivement ces ins-
tructions avant d’installer ou d‘utiliser ce produit. Veuillez conserver ce manuel pour une
utilisation ultérieure.
Version: 32422_031

1
Ce mode d’emploi a pour but de vous familiariser avec le fonctionnement de ce
produit. Conservez donc soigneusement ce manuel an de pouvoir y accéder
à tout moment.
• Avant de procéder au montage, veuillez consulter la che technique jointe
contenant d’autres consignes de sécurité et d’utilisation.
• Ne commencez pas le montage avant d’avoir lu et compris l’intégralité du
mode d’emploi.
• Effectuez l’installation avec une autre personne an de garantir un mon-
tage sûr.
• Retirez le produit de son emballage et enlevez tous les matériaux d’em-
ballage. Veillez à ce qu’aucun matériau d’emballage ne se trouve sur ou
dans le produit. Si vous constatez des dommages sur l’emballage, vériez
également si le produit est endommagé. Si vous constatez des dommages
extérieurs sur le produit ou un fonctionnement inattendu ou inhabituel,
l’écran ne doit plus être utilisé. Contactez immédiatement le revendeur
chez qui vous avez acheté le produit ou directement le fabricant celexon
(Web: www.celexon.fr, Mail: info@celexon.fr) pour plus d’informations.
• Pour garantir un fonctionnement sans problème, le produit doit être utilisé
exclusivement à l’intérieur, il n’est PAS adapté à une utilisation en extérieur.
• L’utilisation de l’appareil et de ses accessoires est interdite aux enfants de
moins de 16 ans.
• Veillez à ce que les enfants ne jouent pas avec le produit et ne se trouvent
pas à proximité sans surveillance. Les personnes ne doivent pas se tenir
sous le produit (charges suspendues).
• Toute transformation ou modication du produit est interdite et porte at-
teinte à la sécurité du produit!
• Attention au risque de blessure! Ne démontez jamais le produit de votre
propre chef. N’effectuez jamais de réparations vous-même!
• Ce produit ne doit être utilisé que dans son état d’origine, non modié et
non endommagé.
• N’utilisez pas le produit à proximité d’appareils à gaz ou à eau ou dans un
environnement poussiéreux.
• Manipulez le produit avec soin. Il peut être endommagé par des chocs, des
coups ou des chutes, même de faible hauteur.
• Gardez le produit à l’abri de l’humidité et de la chaleur.
AVERTISSEMENTS

2
• Ne plongez jamais le produit dans l’eau ou dans d’autres liquides.
• N’utilisez le produit que de la manière pour laquelle il a été conçu. Toute
autre utilisation peut entraîner des blessures corporelles, des dommages
au produit ou à son environnement.
• Lorsque vous serrez les vis, ne les serrez pas trop. Un serrage excessif (par
exemple à l’aide d’une visseuse électrique) peut entraîner des dommages
et compromettre la bonne tenue de l’écran.
• Les charges suspendues doivent être contrôlées au moins deux fois par
an pour vérier leur solidité et leur capacité de charge. Faites particuliè-
rement attention aux capuchons latéraux. Ceux-ci ne doivent pas être en-
dommagés ou ssurés, sinon le produit doit être immédiatement démonté,
car la charge est entièrement supportée par les capuchons!
• Le non-respect des instructions ci-dessus peut entraîner des dommages
corporels et endommager le produit ou les appareils qui y sont raccordés.
La garantie peut également être annulée en cas d’installation ou d’utilisa-
tion incorrecte.
• Si vous avez des doutes sur l’utilisation du produit, contactez le person-
nel spécialisé, votre revendeur ou le fabricant celexon directement (Web:
www.celexon.fr, mail: info@celexon.fr).
• Sous réserve de modications techniques et d’erreurs.
Le fabricant décline toute responsabilité en cas de dommages maté-
riels ou corporels si l’écran est utilisé en dehors des spécications re-
commandées ou s’il n’est pas installé correctement. N’utilisez pas cet
écran à proximité d’un chauffage ou d’un climatiseur. N’installez pas
non plus le produit à la lumière directe du soleil ou devant une fenêtre.
En raison de la surface en PVC sensible à la température, la toile de projection
peut être endommagée de manière durable.
Nous vous recommandons d’attendre environ 2 heures après la livraison avant
de procéder au montage. Cela permet à la toile de s’acclimater ; en particulier
lorsque la toile est déplacée d’un environnement froid à un environnement
chaud (ou inversement).
Veuillez éviter de faire des tâches sur la surface de la toile. Celles-ci pourraient
ne plus pouvoir être enlevées. Remontez toujours la toile après chaque utili-
sation.

3
AVIS DE NON-RESPONSABILITÉ
Les informations contenues dans ce document peuvent être modiées sans
préavis par le fabricant. Les modications seront toujours ajoutées dans les
versions suivantes de ce manuel. Toute erreur est exclue.
CONSEIL D‘ENTRETIEN
Ne nettoyez JAMAIS la toile avec de l’alcool ou d’autres produits de nettoyage
contenant des solvants. Utilisez uniquement un chiffon doux et propre. Une
solution savonneuse douce (max. 5%) peut éventuellement éliminer la saleté
de la surface. Évitez absolument tout contact avec des objets pointus ou tran-
chants. Ceux-ci pourraient endommager durablement la toile de projection.
Pour de plus amples informations, veuillez consulter les instructions relatives
à l’écran.
La pagina si sta caricando...
La pagina si sta caricando...
La pagina si sta caricando...
La pagina si sta caricando...
La pagina si sta caricando...
La pagina si sta caricando...
La pagina si sta caricando...
La pagina si sta caricando...
La pagina si sta caricando...
La pagina si sta caricando...
La pagina si sta caricando...
La pagina si sta caricando...
La pagina si sta caricando...
La pagina si sta caricando...
La pagina si sta caricando...
La pagina si sta caricando...
La pagina si sta caricando...
La pagina si sta caricando...
La pagina si sta caricando...
La pagina si sta caricando...
La pagina si sta caricando...
La pagina si sta caricando...
La pagina si sta caricando...
La pagina si sta caricando...
La pagina si sta caricando...
La pagina si sta caricando...
La pagina si sta caricando...
La pagina si sta caricando...
La pagina si sta caricando...
La pagina si sta caricando...
La pagina si sta caricando...
La pagina si sta caricando...
La pagina si sta caricando...
La pagina si sta caricando...
La pagina si sta caricando...
La pagina si sta caricando...
La pagina si sta caricando...
La pagina si sta caricando...
La pagina si sta caricando...
La pagina si sta caricando...
La pagina si sta caricando...
La pagina si sta caricando...
La pagina si sta caricando...
La pagina si sta caricando...
-
 1
1
-
 2
2
-
 3
3
-
 4
4
-
 5
5
-
 6
6
-
 7
7
-
 8
8
-
 9
9
-
 10
10
-
 11
11
-
 12
12
-
 13
13
-
 14
14
-
 15
15
-
 16
16
-
 17
17
-
 18
18
-
 19
19
-
 20
20
-
 21
21
-
 22
22
-
 23
23
-
 24
24
-
 25
25
-
 26
26
-
 27
27
-
 28
28
-
 29
29
-
 30
30
-
 31
31
-
 32
32
-
 33
33
-
 34
34
-
 35
35
-
 36
36
-
 37
37
-
 38
38
-
 39
39
-
 40
40
-
 41
41
-
 42
42
-
 43
43
-
 44
44
-
 45
45
-
 46
46
-
 47
47
-
 48
48
-
 49
49
-
 50
50
-
 51
51
-
 52
52
-
 53
53
-
 54
54
-
 55
55
-
 56
56
-
 57
57
-
 58
58
-
 59
59
-
 60
60
-
 61
61
-
 62
62
-
 63
63
-
 64
64


Celexon Rollo Chroma Key Green Screen 200 x 190cm Manuale del proprietario
- Tipo
- Manuale del proprietario
- Questo manuale è adatto anche per
in altre lingue
- français: Celexon Rollo Chroma Key Green Screen 200 x 190cm Le manuel du propriétaire
- español: Celexon Rollo Chroma Key Green Screen 200 x 190cm El manual del propietario
- Deutsch: Celexon Rollo Chroma Key Green Screen 200 x 190cm Bedienungsanleitung
- Nederlands: Celexon Rollo Chroma Key Green Screen 200 x 190cm de handleiding
- polski: Celexon Rollo Chroma Key Green Screen 200 x 190cm Instrukcja obsługi
- svenska: Celexon Rollo Chroma Key Green Screen 200 x 190cm Bruksanvisning
Documenti correlati
-
Celexon Leinwand Motor Professional 160 x 160 cm Manuale del proprietario
-
-
-
-
-
-
-
-
-