
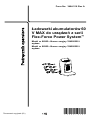
Form No. 3464-318 Rev A
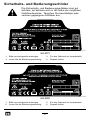
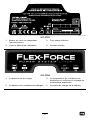
Flex-Force Power System™ 60V MAXBattery Chargers
86902 , 86905
Flex-Force Power System™ 60 V MAXAkkuladegeräte
Cargadores de batería Flex-Force PowerSystem™ 60 V MÁX
Chargeurs de batterie Flex-Force PowerSystem™ de 60 V MAX
Caricabatterie Flex-Force Power System™60 V MAX
Flex-Force Power System™ 60 V MAXacculaders
Flex-Force Power System™-batteriladere,
maks. 60 V
Ładowarki akumulatorów 60 V MAXdo urządzeń z serii Flex-Force PowerSystem™
*3464-318*

Flex-Force Power System™ 60 V MAXbatteriladdare
*3464-318*

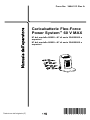
Form No. 3464-309 Rev A
Flex-Force Power System
™
60V MAX Battery Chargers
Model No. 86902 —Serial No. 324000000 and Up
Model No. 86905 —Serial No. 324000000 and Up
Original Instructions (EN)
*3464-309*

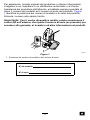
Introduction
These chargers and battery packs are intended to be used by homeowners
and professional operators. These battery packs are designed to be
charged only by Flex-Force 60V lithium-ion battery chargers. These
chargers are designed to charge only Flex-Force 60V lithium-ion battery
packs. They are not designed to charge any other batteries. Using these
products for purposes other than their intended use could prove dangerous
to you and bystanders.
Read this information carefully to learn how to operate and maintain
your product properly and to avoid injury and product damage. Y ou are
responsible for operating the product properly and safely .
Original Instructions (EN)
Printed in China
All Rights Reserved
*3464-309*

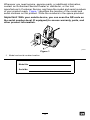
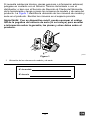
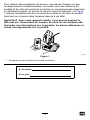
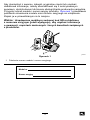
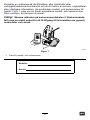
Whenever you need service, genuine parts, or additional information,
contact an Authorized Service Dealer or distributor , or the tool
manufacturer ’ s Customer Service, and have the model and serial numbers
of your product ready . Figure 1 identies the location of the model and
serial numbers on the product. W rite the numbers in the space provided.
Important: W ith your mobile device, you can scan the QR code on
the serial number decal (if equipped) to access warranty , parts, and
other product information.
g450101
Figure 1
1. Model and serial number location.
Model No.
Serial No.
3

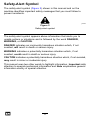
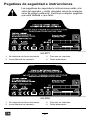
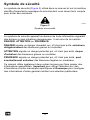
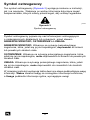
Safety-Alert Symbol
The safety-alert symbol ( Figure 2 ) shown in this manual and on the
machine identies important safety messages that you must follow to
prevent accidents.
g000502
Figure 2
Safety-alert symbol
The safety-alert symbol appears above information that alerts you to
unsafe actions or situations and is followed by the word DANGER ,
W ARNING , or CAUTION .
DANGER indicates an imminently hazardous situation which, if not
avoided, will result in death or serious injury .
W ARNING indicates a potentially hazardous situation which, if not
avoided, could result in death or serious injury .
CAUTION indicates a potentially hazardous situation which, if not avoided,
may result in minor or moderate injury .
This manual uses two other words to highlight information. Important calls
attention to special mechanical information and Note emphasizes general
information worthy of special attention.
4

Safety
IMPORT ANT SAFETY INSTRUCTIONS1. SA VE THESE INSTRUCTIONS—This manual contains important
safety and operating instructions for Flex-Force 60V lithium-ion
battery packs and Flex-Force 60V lithium-ion battery chargers.
2. Before using the battery charger , read all the instructions and
cautionary markings on the battery charger , battery pack, and
product using the battery pack.
3. CAUTION—T o reduce risk of injury , charge Flex-Force 60V
lithium-ion battery packs with Flex-Force 60V lithium-ion battery
chargers only . Other brands of battery packs may burst, causing
personal injury and damage.
4. W ARNING—Plugging the battery charger into an outlet that is not
100 to 240 V can cause a re or electric shock. Do not plug the
battery charger into an outlet other than 100 to 240 V . For a dif ferent
style of connection, use an attachment plug adapter of the proper
conguration for the power outlet if needed.
I. T raining
1. Do not allow children or untrained people to operate or service this
device. Allow only people who are responsible, trained, familiar with
the instructions, and physically capable to operate or service the
device.
2. Do not allow children to use or play with the battery pack or battery
charger; local regulations may restrict the age of the operator .
II. Preparation
1. Use appliances only with specically designated battery packs.
Using other types of battery packs may create a risk of injury and/or
re.
2. Do not use a damaged or modied battery pack or battery charger .
It may exhibit unpredictable behavior , resulting in re, explosion,
or risk of injury .
3. If the supply cord to the battery charger is damaged, contact an
Authorized Service Dealer or distributor to replace it.
III. Operation
1. Charge the battery pack with only the battery charger specied by
the tool manufacturer . A charger suitable for 1 type of battery pack
may create a risk of re when used with another battery pack.
5

2. Charge the battery pack in a well-ventilated area only .
3. Follow all charging instructions and do not charge the battery pack
outside of the temperature range specied in the instructions.
Otherwise, you may damage the battery pack and increase the risk
of re.
4. Under abusive conditions, the battery pack may eject liquid; avoid
contact. If you accidently come into contact with the liquid, ush with
water . If the liquid contacts your eyes, seek medical help. Liquid
ejected from the battery pack may cause irritation or burns.
5. Do not expose a battery pack or tool to re or excessive temperature.
Exposure to re or temperature above 130°C (265°F) may cause
explosion.
6. CAUTION—A mistreated battery pack may present a risk of re,
explosion, or chemical burn.
•Do not disassemble the battery pack.
•Replace the battery pack with a genuine Flex-Force battery pack
only; using another type of battery pack may cause a re or risk
of injury .
•Keep battery packs out of the reach of children and in the original
packaging until you are ready to use them.
IV . Maintenance and Storage
1. Do not allow children to clean or maintain the battery charger .
2. When the battery pack is not in use, keep it away from metal objects
such as paper clips, coins, keys, nails, and screws that can make a
connection from 1 terminal to another . Shorting the battery terminals
may cause burns or a re.
3. Do not attempt to repair the battery pack or battery charger . Have
an Authorized Service Dealer or distributor perform service on the
battery pack or battery charger using identical replacement parts to
ensure that the product is safely maintained.
4. Check with local codes for possible special battery disposal
instructions.
SA VE THESE INSTRUCTIONS
6

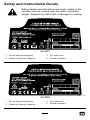
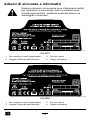
Safety and Instructional Decals
Safety decals and instructions are easily visible to the
operator and are located near any area of potential
danger . Replace any decal that is damaged or missing.
decal161-3777
161-3777
1. Do not dispose improperly 3. For indoor use
2. Read the Operator ’ s Manual .
4. Double insulated
decal161-3783
161-3783
1. Do not dispose improperly 3. For indoor use
2. Read the Operator ’ s Manual .
4. Double insulated
7

decal161-3784
161-3784
1. The battery pack is charging. 3. The battery pack is over or under the
appropriate temperature range.
2. The battery pack is fully charged. 4. Battery pack charging fault
8

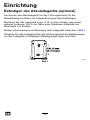
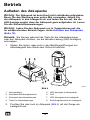
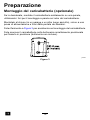
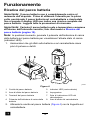
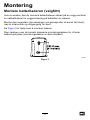
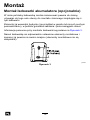
Setup
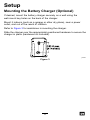
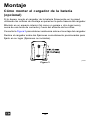
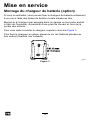
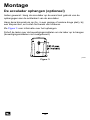
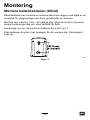
Mounting the Battery Charger (Optional)
If desired, mount the battery charger securely on a wall using the
wall-mount key holes on the back of the charger .
Mount it indoors (such as a garage or other dry place), near a power
outlet, and out of the reach of children.
Refer to Figure 3 for assistance in mounting the charger .
Slide the charger over the appropriately positioned hardware to secure the
charger in place (hardware not included).
g290534
Figure 3
9

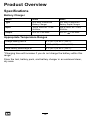
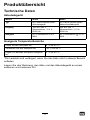
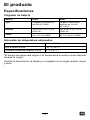
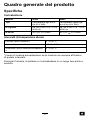
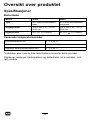
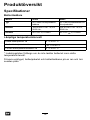
Product Overview
Specications
Battery Charger
Model 86902 86905
T ype 60V MAX Lithium-Ion
Battery Charger
60V MAX Lithium-Ion
Battery Rapid Charger
Input
100 to 240V AC ~2.0A
50/60Hz,
100 to 240V AC ~5.0A,
50/60Hz
Output 60V DC 2.0A MAX 60V DC 5.5A MAX
Appropriate T emperature Ranges
Charge battery pack at 5°C (41°F) to 40°C (104°F)*
Use battery pack at
-30°C (-22°F) to 49°C (120°F)
Store battery pack/charger at 5°C (41°F) to 40°C (104°F)*
*Charging time will increase if you do not charge the battery within this
range.
Store the tool, battery pack, and battery charger in an enclosed clean,
dry area.
10

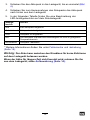
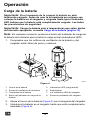
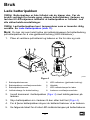
Operation
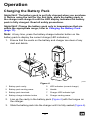
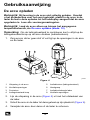
Charging the Battery Pack
Important: The battery pack is not fully charged when you purchase
it. Before using the tool for the rst time, place the battery pack in
the charger and charge it until the LED display indicates the battery
pack is fully charged. Read all safety precautions.
Important: Charge the battery pack only in temperatures that are
within the appropriate range; refer to Charging the Battery Pack
( page 1 1 ) .
Note: At any time, press the battery-charge-indicator button on the
battery pack to display the current charge (LED indicators).
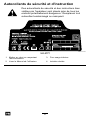
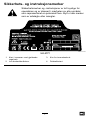
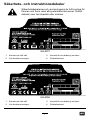
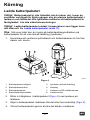
1. Ensure that the vents on the battery and charger are clear of any
dust and debris.
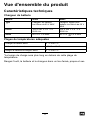
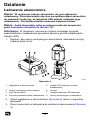
g290533
Figure 4
1. Battery pack cavity
5. LED indicators (current charge)
2. Battery pack venting areas 6. Handle
3. Battery pack terminals
7. Charger LED indicator light
4. Battery-charge-indicator button
8. Charger venting areas
2. Line up the cavity in the battery pack ( Figure 4 ) with the tongue on
the charger .
3. Slide the battery pack into the charger until it is fully seated ( Figure 4 ).
1 1

4. T o remove the battery pack, slide the battery backward out of the
charger .
5. Refer to the following table to interpret the LED indicator light on
the battery charger .
Indicator
light
Indicates
Of f
No battery pack inserted
Green
blinking
Battery pack is charging
Green
Battery pack is charged
Red
Battery pack and/or battery charger is over or under the appropriate
temperature range
Red blinking
Battery pack charging fault*
*Refer to T roubleshooting ( page 14 ) for more information.
Important: The battery can be left on the charger for short periods
between uses.
If the battery will not be used for longer periods, remove the battery
from the charger; refer to Storage ( page 13 ) .
12

Maintenance
Maintenance and servicing are not required under normal conditions.
When you clean the surface of the equipment, wipe it only with a dry cloth.
Do not disassemble the equipment; if it is damaged, contact your
Authorized Service Dealer or distributor .
Storage
Important: Store the tool, battery pack, and charger only in
temperatures that are within the appropriate range; refer to
Specications ( page 10 ) .
Important: If you are storing the tool for a year or longer , remove the
battery pack from the tool and charge the battery pack until 2 or 3
LED indicators turn green on the battery . Do not store a fully charged
or fully depleted battery . When you are ready to use the tool again,
charge the battery pack until the left indicator light turns green on
the charger or all 4 LED indicators turn green on the battery .
•Disconnect the product from the power supply (i.e., remove the battery
pack) and check for damage after use.
•Clean all foreign material from the product.
•Do not store any machine with the battery pack installed.
•When not in use, store the tool, battery pack, and battery charger out
of the reach of children.
•Keep the tool, battery pack, and battery charger away from corrosive
agents, such as garden chemicals and de-icing salts.
•T o reduce the risk of serious personal injury , do not store the battery
pack outside or in vehicles.
•Store the tool, battery pack, and battery charger in an enclosed clean,
dry area.
13

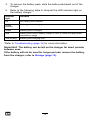
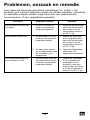
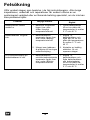
T roubleshooting
Perform only the steps described in these instructions. All further
inspection, maintenance, and repair work must be performed by an
authorized service center or a similarly qualied specialist if you cannot
solve the problem yourself.
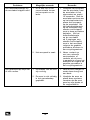
Problem
Possible Cause Corrective Action
The battery pack loses
charge quickly .
1. The battery pack is over
or under the appropriate
temperature range.
1. Move the battery pack
to a place where it is
dry and the temperature
is between 5°C (41°F)
and 40°C (104°F).
1. The battery charger
is over or under
the appropriate
temperature range.
1. Unplug the battery
charger and move it to
a place where it is dry
and the temperature
is between 5°C (41°F)
and 40°C (104°F).
The battery charger is not
working.
2. The outlet that the
battery charger is
plugged into does not
have power .
2. Contact your licensed
electrician to repair the
outlet.
The LED indicator light on
the battery charger is red.
1. The battery charger
and/or battery pack
is over or under
the appropriate
temperature range.
1. Unplug the battery
charger and move the
battery charger and
battery pack to a place
where it is dry and the
temperature is between
5°C (41°F) and 40°C
(104°F).
14

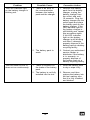
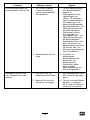
Problem
Possible Cause Corrective Action
1. There is an error in
the communication
between the battery
pack and the charger .
1. Remove the battery
pack from the battery
charger , unplug the
battery charger from
the outlet, and wait
10 seconds. Plug the
battery charger into the
outlet again and place
the battery pack on the
battery charger . If the
LED indicator light on
the battery charger is
still blinking red, repeat
this procedure again.
If the LED indicator
light on the battery
charger is still blinking
red after 2 attempts,
properly dispose of the
battery pack at a battery
recycling facility .
The LED indicator light
on the battery charger is
blinking red.
2. The battery pack is
weak.
2. Contact your authorized
service dealer or
distributor if the battery
is in warranty , or
properly dispose of
the battery pack at a
battery recycling facility .
1. There is moisture on
the leads of the battery
pack.
1. Allow the battery pack
to dry or wipe it dry .
The tool does not run or
does not run continuously .
2. The battery is not fully
installed into the tool.
2. Remove and then
replace the battery into
the tool making sure
that it is fully installed
and latched.
15

Notes:

Notes:

Notes:
La pagina si sta caricando...
La pagina si sta caricando...
La pagina si sta caricando...
La pagina si sta caricando...
La pagina si sta caricando...
La pagina si sta caricando...
La pagina si sta caricando...
La pagina si sta caricando...
La pagina si sta caricando...
La pagina si sta caricando...
La pagina si sta caricando...
La pagina si sta caricando...
La pagina si sta caricando...
La pagina si sta caricando...
La pagina si sta caricando...
La pagina si sta caricando...
La pagina si sta caricando...
La pagina si sta caricando...
La pagina si sta caricando...
La pagina si sta caricando...
La pagina si sta caricando...
La pagina si sta caricando...
La pagina si sta caricando...
La pagina si sta caricando...
La pagina si sta caricando...
La pagina si sta caricando...
La pagina si sta caricando...
La pagina si sta caricando...
La pagina si sta caricando...
La pagina si sta caricando...
La pagina si sta caricando...
La pagina si sta caricando...
La pagina si sta caricando...
La pagina si sta caricando...
La pagina si sta caricando...
La pagina si sta caricando...
La pagina si sta caricando...
La pagina si sta caricando...
La pagina si sta caricando...
La pagina si sta caricando...
La pagina si sta caricando...
La pagina si sta caricando...
La pagina si sta caricando...
La pagina si sta caricando...
La pagina si sta caricando...
La pagina si sta caricando...
La pagina si sta caricando...
La pagina si sta caricando...
La pagina si sta caricando...
La pagina si sta caricando...
La pagina si sta caricando...
La pagina si sta caricando...
La pagina si sta caricando...
La pagina si sta caricando...
La pagina si sta caricando...
La pagina si sta caricando...
La pagina si sta caricando...
La pagina si sta caricando...
La pagina si sta caricando...
La pagina si sta caricando...
La pagina si sta caricando...
La pagina si sta caricando...
La pagina si sta caricando...
La pagina si sta caricando...
La pagina si sta caricando...
La pagina si sta caricando...
La pagina si sta caricando...
La pagina si sta caricando...
La pagina si sta caricando...
La pagina si sta caricando...
La pagina si sta caricando...
La pagina si sta caricando...
La pagina si sta caricando...
La pagina si sta caricando...
La pagina si sta caricando...
La pagina si sta caricando...
La pagina si sta caricando...
La pagina si sta caricando...
La pagina si sta caricando...
La pagina si sta caricando...
La pagina si sta caricando...
La pagina si sta caricando...
La pagina si sta caricando...
La pagina si sta caricando...
La pagina si sta caricando...
La pagina si sta caricando...
La pagina si sta caricando...
La pagina si sta caricando...
La pagina si sta caricando...
La pagina si sta caricando...
La pagina si sta caricando...
La pagina si sta caricando...
La pagina si sta caricando...
La pagina si sta caricando...
La pagina si sta caricando...
La pagina si sta caricando...
La pagina si sta caricando...
La pagina si sta caricando...
La pagina si sta caricando...
La pagina si sta caricando...
La pagina si sta caricando...
La pagina si sta caricando...
La pagina si sta caricando...
La pagina si sta caricando...
La pagina si sta caricando...
La pagina si sta caricando...
La pagina si sta caricando...
La pagina si sta caricando...
La pagina si sta caricando...
La pagina si sta caricando...
La pagina si sta caricando...
La pagina si sta caricando...
La pagina si sta caricando...
La pagina si sta caricando...
La pagina si sta caricando...
La pagina si sta caricando...
La pagina si sta caricando...
La pagina si sta caricando...
La pagina si sta caricando...
La pagina si sta caricando...
La pagina si sta caricando...
La pagina si sta caricando...
La pagina si sta caricando...
La pagina si sta caricando...
La pagina si sta caricando...
La pagina si sta caricando...
La pagina si sta caricando...
La pagina si sta caricando...
-
 1
1
-
 2
2
-
 3
3
-
 4
4
-
 5
5
-
 6
6
-
 7
7
-
 8
8
-
 9
9
-
 10
10
-
 11
11
-
 12
12
-
 13
13
-
 14
14
-
 15
15
-
 16
16
-
 17
17
-
 18
18
-
 19
19
-
 20
20
-
 21
21
-
 22
22
-
 23
23
-
 24
24
-
 25
25
-
 26
26
-
 27
27
-
 28
28
-
 29
29
-
 30
30
-
 31
31
-
 32
32
-
 33
33
-
 34
34
-
 35
35
-
 36
36
-
 37
37
-
 38
38
-
 39
39
-
 40
40
-
 41
41
-
 42
42
-
 43
43
-
 44
44
-
 45
45
-
 46
46
-
 47
47
-
 48
48
-
 49
49
-
 50
50
-
 51
51
-
 52
52
-
 53
53
-
 54
54
-
 55
55
-
 56
56
-
 57
57
-
 58
58
-
 59
59
-
 60
60
-
 61
61
-
 62
62
-
 63
63
-
 64
64
-
 65
65
-
 66
66
-
 67
67
-
 68
68
-
 69
69
-
 70
70
-
 71
71
-
 72
72
-
 73
73
-
 74
74
-
 75
75
-
 76
76
-
 77
77
-
 78
78
-
 79
79
-
 80
80
-
 81
81
-
 82
82
-
 83
83
-
 84
84
-
 85
85
-
 86
86
-
 87
87
-
 88
88
-
 89
89
-
 90
90
-
 91
91
-
 92
92
-
 93
93
-
 94
94
-
 95
95
-
 96
96
-
 97
97
-
 98
98
-
 99
99
-
 100
100
-
 101
101
-
 102
102
-
 103
103
-
 104
104
-
 105
105
-
 106
106
-
 107
107
-
 108
108
-
 109
109
-
 110
110
-
 111
111
-
 112
112
-
 113
113
-
 114
114
-
 115
115
-
 116
116
-
 117
117
-
 118
118
-
 119
119
-
 120
120
-
 121
121
-
 122
122
-
 123
123
-
 124
124
-
 125
125
-
 126
126
-
 127
127
-
 128
128
-
 129
129
-
 130
130
-
 131
131
-
 132
132
-
 133
133
-
 134
134
-
 135
135
-
 136
136
-
 137
137
-
 138
138
-
 139
139
-
 140
140
-
 141
141
-
 142
142
-
 143
143
-
 144
144
-
 145
145
-
 146
146
-
 147
147
-
 148
148


Toro Flex-Force Power System 2 AMP 60V MAX Battery Charger Manuale utente
- Tipo
- Manuale utente
- Questo manuale è adatto anche per
in altre lingue
- français: Toro Flex-Force Power System 2 AMP 60V MAX Battery Charger Manuel utilisateur
- español: Toro Flex-Force Power System 2 AMP 60V MAX Battery Charger Manual de usuario
- Deutsch: Toro Flex-Force Power System 2 AMP 60V MAX Battery Charger Benutzerhandbuch
- Nederlands: Toro Flex-Force Power System 2 AMP 60V MAX Battery Charger Handleiding
- dansk: Toro Flex-Force Power System 2 AMP 60V MAX Battery Charger Brugermanual
- polski: Toro Flex-Force Power System 2 AMP 60V MAX Battery Charger Instrukcja obsługi
Documenti correlati
-
Toro Flex-Force Power System 2 AMP 60V MAX Battery Charger Manuale utente
-
Toro Flex-Force Power System 1 AMP 60V MAX Battery Charger Manuale utente
-
Toro Flex-Force Power System 6.0Ah 60V MAX Battery Pack Manuale utente
-
Toro Flex-Force Power System Manuale utente
-
-
-
-
-
Toro Electric Battery Leaf Blower 60V MAX* Flex-Force Power System 51825T - Tool Only Manuale utente
-