IKEA FINPUTSAD Integrated Dishwasher Manuale utente
- Categoria
- Lavastoviglie
- Tipo
- Manuale utente


5
Safety Information
Table of contents
ENGLISH
Before using the appliance, read these
safety instructions. Keep them nearby for
future reference.
These instructions and the appliance itself
provide important safety warnings, to be
observed at all times. The manufacturer
declines any liability for failure to observe
these safety instructions, for inappropriate
use of the appliance or incorrect setting of
controls.
Very young children (0-3 years) should
be kept away from the appliance. Young
children (3-8 years) should be kept away
from the appliance unless continuously
supervised. Children from 8 years old and
above and persons with reduced physical,
sensory or mental capabilities or lack of
experience and knowledge can use this
appliance only if they are supervised or
have been given instructions on safe use
and understand the hazards involved.
Children must not play with the appliance.
Cleaning and user maintenance must
not be carried out by children without
supervision.
PERMITTED USE
CAUTION: the appliance is not intended
to be operated by means of an external
switching device, such as a timer, or
separate remote controlled system.
This appliance is intended to be used in
household and similar applications such
as: sta kitchen areas in shops, oces and
other working environments; farm houses;
by clients in hotels, motels, bed & breakfast
and other residential environments.
This appliance is not for professional
use. Do not use the appliance outdoors.
The maximum number of place settings
is shown in the product sheet.
The door should not be left in the
open position - risk of tripping. The open
appliance door can only support the weight
of the loaded rack when pulled out. Do not
rest objects on the door or sit or stand on
it.
WARNING: Dishwasher detergents are
strongly alkaline. They can be extremely
dangerous if swallowed. Avoid contact with
the skin and eyes and keep children away
from the dishwasher when the door is
open. Check that the detergent receptacle
is empty after completion of the wash cycle.
WARNING: Knives and other utensils
with sharp points must be loaded in the
basket with their points down or placed in a
horizontal position - risk of cuts.
Do not store explosive or ammable
substances (e.g. gasoline or aerosol cans)
inside or near the appliance - risk of re.
The appliance must be used only to wash
domestic dishes in accordance with the
instructions in this manual. The water
in the appliance is not potable. Use only
detergent and rinse additives designed for
an automatic dishwasher. When adding
a water softener (salt), run one cycle
immediately with the machine empty,
to avoid corrosion damage to internal
parts. Store the detergent, rinse aid and
salt out of reach of children. Shut o the
water supply and unplug or disconnect the
power before servicing and maintenance.
Disconnect the water and electricity supply
in the event of any malfunction.
INSTALLATION
The appliance must be handled and
installed by two or more persons - risk of
injury. Use protective gloves to unpack and
install - risk of cuts.
Installation, including water supply (if
any), electrical connections and repairs
must be carried out by a qualied
technician. Do not repair or replace any
part of the appliance unless specically
stated in the user manual. Keep children
Safety Information 5
Product description 7
Control panel 7
First Use 7
Loading the racks 9
Daily Use 10
Functions 10
Cleaning and maintenance 12
What to do if ... 13
After-Sales Service 14
Techincal data 15
Environmental concerns 15
Installation 16
IKEA GUARANTEE 17
GB

ENGLISH 6
away from the installation site. After
unpacking the appliance, make sure that it
has not been damaged during transport.
In the event of problems, contact the
dealer or your nearest After-sales Service.
Once installed, packaging waste (plastic,
styrofoam parts etc.) must be stored out
of reach of children - risk of suocation.
The appliance must be disconnected from
the power supply before any installation
operation - risk of electrical shock. During
installation, make sure the appliance does
not damage the power cable - risk of re or
electrical shock. Only activate the appliance
when the installation has been completed.
Connect the dishwasher to the water mains
using only new hose sets. The old hose sets
should not be reused.
All hoses must be securely clamped
to prevent them coming loose during
operation.
All local waterboard regulations must be
complied with. Water supply pressure
0.05 - 1.0 MPa.
The appliance must be placed against
the wall or built into furniture to limit the
access to its rearside.
For dishwashers having ventilation
openings in the base, the openings must
not be obstructed by a carpet.
If installing the dishwasher at the end
of a row of units making the side panel
accessible, the hinge area must be covered
to avoid risk of injury.
The inlet water temperature depends on
the dishwasher model. If the installed inlet
hose is marked “25°C Max”, the maximum
allowed water temperature is 25°C. For all
other models the maximum allowed water
temperature is 60°C. Do not cut hoses
and, in the case of appliances tted with
a waterstop system, do not immerse the
plastic casing containing the inlet hose
in water. If hoses are not long enough,
contact your local dealer. Make sure the
inlet and drain hoses are kink-free and are
not crushed. Before using the applinace
for the rst time, check the water inlet and
drain hose for leaks. Make sure that the
four feet are stable and resting on the oor,
adjusting them as required, and check that
the dishwasher is perfectly levelled using a
spirit level.
Use the appliance only when the covers
shown on diagram 19 in the installation
booklet are correctly assembled - risk of
injury.
ELECTRICAL WARNINGS
The rating plate is on the edge of the
dishwasher door (visible when the door is
open).
It must be possible to disconnect
the appliance from the power supply by
unplugging it if plug is accessible, or by
a multi-pole switch installed upstream of
the socket in accordance with the wiring
rules and the appliance must be earthed in
conformity with national electrical safety
standards.
Do not use extension leads, multiple
sockets or adapters. The electrical
components must not be accessible to
the user after installation. Do not use the
appliance when you are wet or barefoot.
Do not operate this appliance if it has a
damaged power cable or plug, if it is not
working properly, or if it has been damaged
or dropped.
If the supply cord is damaged, it must
be replaced with an identical one by the
manufacturer, its service agent or similarly
qualied persons in order to avoid a hazard
- risk of electrical shock.
If the tted plug is not suitable for your
socket outlet, contact a qualied technician.
Do not pull the power supply cable. Do not
immerse the mains cord or plug in water.
Keep the cord away from hot surfaces.
CLEANING AND MAINTENANCE
WARNING: Ensure that the appliance
is switched o and disconnected from
the power supply before performing any
maintenance operation. To avoid risk
of personal injury use protective gloves
(risk of laceration) and safety shoes (risk
of contusion); be sure to handle by two
persons (reduce load); never use steam
cleaning equipment (risk of electric shock).
Non-professional repairs not authorized
by the manufacturer could result in a
risk to health and safety, for which the
manufacturer cannot be held liable. Any
defect or damage caused from non-
professional repairs or maintenance will
not be covered by the guarantee, the terms
of which are outlined in the document
delivered with the unit.

ENGLISH 7
Product description
1 Upper rack
2 Cutlery rack
3 Foldable aps
4 Upper rack height adjuster
5 Upper sprayer arm
6 Lower rack
7 Lower sprayer arm
8 Filter Assembly
9 Salt reservoir
10 Detergent and Rinse Aid dispensers
11 Control pannel
Control panel
First Use
Advice regarding the rst time use
After installation, remove the stoppers from the racks and the
retaining elastic elements from the upper rack
Filling the salt reservoir
The use of salt prevents the formation of LIMESCALE on the
dishes andon the machine’s functional components.
• It is mandatory that THE SALT RESERVOIR BE NEVER EMPTY.
• It is important to set the water hardness.
The salt reservoir is located in the lower part of the dishwasher
(see PRODUCT DESCRIPTION) and should be lled when the
SALT REFILL indicator light
ENGLISH
7
Control panel
Product description
1. Upper rack
2. �������
3. Upper rack height adjuster
4. Upper sprayer arm
5. Lower rack
6. Cutlery basket
7. Lower sprayer arm
8. Filter Assembly
9. Salt reservoir
10. Detergent and Rinse Aid dispensers
11. Rating plate
12. Control panel
1
2
3
4
5
6
10
7
11
9
8
First use
ADVICE REGARDING THE FIRST TIME USE
After installation, remove the stoppers from the racks and the
retaining elastic elements from the upper rack.
FILLING THE SALT RESERVOIR
The use of salt prevents the formation of LIMESCALE on the
dishes andon the machine’s functional components.
• It is important that the salt reservoir be never empty.
• It is important to set the water hardness.
The salt reservoir is located in the lower part of the
dishwasher (see PRODUCT DESCRIPTION) and should be
filled when the SALT REFILL indicator light in the
control panel is lit .
1. Remove the lower rack and
unscrew the reservoir cap
(anticlockwise).
2. Only the first time you do this: fill
the salt reservoir with water.
3. Position the funnel (see figure)
and fill the salt reservoir right up
to its edge (approximately 1 kg);
it is not unusual for a little water to
leak out.
4. Remove the funnel and wipe any
salt residue away from the
opening.
1. On-Off/Reset button with indicator light
2. Program selection button
3. Salt refill indicator ligh
4. Rinse Aid refill indicator ligh
5. Program number and delay time indicator
6. Tablet indicator light
7. Display
8. Half Load indicator light
9. Half Load button
10. Delay button
11. START/Pause button with indicator light / Tab
1 2 3 4 5 6 7 8 9 10 11
3sec
h
in the control panel is lit .
1. Remove the lower rack and
unscrew the reservoir cap
(anticlockwise).
2. Only the rst time you do this:
ll the salt reservoir with water.
3. Position the funnel (see gure)
and ll the salt reservoir right up
to its edge (approximately 1 kg); it
is not unusual for a little water to
leak out.
4. Remove the funnel and wipe
any salt residue away from the
opening.
1 On-O/Reset button with indicator light
2 Program selection button
3 Salt rell indicator ligh
4 Rinse Aid rell indicator ligh
5 Program number and delay time indicator
6 Tablet indicator light
7 Display
8 Flexible Wash indicator light
9 Flexible Wash button
10 Delay button
11 Short Time button with indicator light
12 Extra Dry button with indicator light
13 START/Pause button with indicator light / Tab
ENGLISH
7
Control panel
Product description
1. Upper rack
2. �������
3. Upper rack height adjuster
4. Upper sprayer arm
5. Lower rack
6. Cutlery basket
7. Lower sprayer arm
8. Filter Assembly
9. Salt reservoir
10. Detergent and Rinse Aid dispensers
11. Rating plate
12. Control panel
1
2
3
4
5
6
10
7
11
9
8
First use
ADVICE REGARDING THE FIRST TIME USE
After installation, remove the stoppers from the racks and the
retaining elastic elements from the upper rack.
FILLING THE SALT RESERVOIR
The use of salt prevents the formation of LIMESCALE on the
dishes andon the machine’s functional components.
• It is important that the salt reservoir be never empty.
• It is important to set the water hardness.
The salt reservoir is located in the lower part of the
dishwasher (see PRODUCT DESCRIPTION) and should be
filled when the SALT REFILL indicator light in the
control panel is lit .
1. Remove the lower rack and
unscrew the reservoir cap
(anticlockwise).
2. Only the first time you do this: fill
the salt reservoir with water.
3. Position the funnel (see figure)
and fill the salt reservoir right up
to its edge (approximately 1 kg);
it is not unusual for a little water to
leak out.
4. Remove the funnel and wipe any
salt residue away from the
opening.
1. On-Off/Reset button with indicator light
2. Program selection button
3. Salt refill indicator ligh
4. Rinse Aid refill indicator ligh
5. Program number and delay time indicator
6. Tablet indicator light
7. Display
8. Half Load indicator light
9. Half Load button
10. Delay button
11. START/Pause button with indicator light / Tab
1 2 3 4 5 6 7 8 9 10 11
3sec
h
1 2 3 4 5 6 8 9 10 11 12 13
7
2
65°
1
50°
56
10 PROGRAMS
3
50°
4
45°
7
50°
8
65°
10
50°-60° 50°
9
65°
h
3sec
4
2
7
8
10
1
3
5
6
9
11
0000 000 00000
Service:

ENGLISH 8
Make sure the cap is screwed on tightly, so that no detergent
can get into the container during the wash program (this could
damage the water softener beyond repair).
As soon as this procedure is complete, run a program without
loading. The “Pre-Wash” program alone is NOT SUFFICIENT
Residual saline solution or grains of salt can lead to corrosion,
irreparably damaging the stainless steel components.
The guarantee is not applicable if faults are caused by such
circumstances.
Only use salt that has been specically designed for
dishwashers. If the salt container is not lled, the water
softener and the heating element may be damaged
as a result of limescale accumulation. Using of Salt is
recommended with any type of dishwasher detergent.
Whenever you need to add salt, it is mandatory to complete
the procedure before the beginning of the washing cycle to
avoid corrosion.
Setting the water hardness
To allow the water softener to work in a perfect way, it is
essential that the water hardness setting is based on the actual
water hardness in your house. This information can be obtained
from your local water supplier. The factory sets the default
water hardness
• Switch on the appliance by pressing the ON/OFF button.
• Switch o the appliance by pressing the ON/OFF button.
• Hold down button
ENGLISH
8
• Switch on the appliance by pressing the ON/OFF button.
• Switch off the appliance by pressing the ON/OFF button.
• Hold down button for 5 seconds, until you hear a beep.
• Switch on the appliance by pressing the ON/OFF button.
•
•
The current selection level number and the salt indicator light
������
Press button to select the desired hardness level (see
WATER HARDNESS TABLE).
• Switch off the appliance by pressing the ON/OFF button.
Setting is complete!
Water Hardness Table
Level °dH
German degrees
°fH
French degrees
1 Soft 0 - 6 0 - 10
2 Medium 7 - 11 11 - 20
3 Average 12 - 17 21 - 30
4 Hard 18 - 34 31 - 60
5 Very hard 35 - 50 61 - 90
Make sure the cap is screwed on tightly, so that no detergent can
get into the container during the wash program (this could damage
the water softener beyond repair).
As soon as this procedure is complete, run a program without
loading. The “Pre-Wash” program alone is NOT������
Residual saline solution or grains of salt can lead to corrosion,
irreparably damaging the stainless steel components.
The guarantee is not applicable if faults are caused by such
circumstances.
��������������������������������s.
��������������������������������
heating element may be damaged as a result.
Whenever you need to add salt, it is mandatory to complete
the procedure before the beginning of the washing cycle.
SETTING THE WATER HARDNESS
To allow the water softener to work in a perfect way, it is essential
that the water hardness setting is based on the actual water hard-
ness in your house. This information can be obtained from your local
water supplier. The factory setting is for average (3) water hardness.
FILLING THE RINSE AID DISPENSER
Rinse aid makes dish DRYING easier. The rinse aid dispenser A
should be lled when the RINSE AID REFILL indicator light
in the control panel is lit.
1. Open the dispenser B by pressing and pulling up the tab on
the lid.
2. Carefully introduce the rinse aid as far as the maximum
(110 ml) reference notch of the lling space - avoid spilling it.
If this happens, clean the spill immediately with a dry cloth.
3. Press the lid down until you hear a click to close it.
NEVER pour the rinse aid directly into the tub.
A
B
ADJUSTING THE DOSAGE OF RINSE AID
If you are not completely satised with the drying results, you can
adjust the quantity of rinse aid used.
• Switch the dishwasher on using the ON/OFF button.
• Switch it off using the ON/OFF button.
• Press button three times - a beep will be heard.
• Switch it on using the ON/OFF button.
•
•
The current selection level number and rinse aid indicator light ash.
Press button to select the level of rinse aid quantity to be
supplied.
• Switch it off using the ON/OFF button.
Setting is complete!
If the rinse aid level is set to ZERO (ECO), no rinse aid will be
supplied. The LOW RINSE AID indicator light will not be lit if you
run out of rinse aid. A maximum of 5 levels can be set according to
the dishwasher model. The factory setting is specic to the model,
please follow instruction above to check this for your machine.
•If you see bluish streaks on the dishes, set a low number (1-2).
• If there are drops of water or limescale marks on the dishes,
set a high number (3-4).
FILLING THE DETERGENT DISPENSER
������������������������������
dishwashers.
To achieve the best washing and drying results, the combined
useof detergent, rinse aid liquid and rened salt is required.
We recommend using detergents that do not contain phosphates
or chlorine, as these products are harmful to the environment.
Good washing results also depend on the correct amount of
detergent being used.
Exceeding the stated amount does not result in a more effective
wash and increases environmental pollution.
The amount can be adjusted to the soil level. In the case of
normally soiled items, use approximately either 35g (powder
detergent) or 35ml (liquid detergent) and additional tea spoon of
detergent directly inside the tub. If tablets are used, one tablet
will be enough.
If the crockery is only lightly soiled or if it has been rinsed with
water before being placed in the dishwasher, reduce the amount
of detergent used accordingly (minimum 25 g/ml) e.g. skip the
powder/gel putted inside the tub.
To open the detergent dispenser
press button A.
Introduce the detergent into
the dry dispenser B only.
Place the amount of detergent
for pre-washing directly inside
the tub.
A
B
1.
2.
When measuring out the detergent refer to the mentioned ear-
lier information to add the proper quantity. Inside the dispenser
B there are indications to help the detergent dosing.
Remove detergent residues from the edges of the dispenser
and close the cover until it clicks.
3. Close the lid of the detergent dispenser by pulling it up until
the closing device is secured in place.
The detergent dispenser automatically opens up at the right time
according to the program. If all-in-one detergents are used, we
recommend using the TABLET button, because it adjusts the
program so that the best washing and drying results are always
achieved.
for 5 seconds, until you hear a beep.
• Switch on the appliance by pressing quickly the ON/OFF
button.
• The current selection level number and the salt indicator light
both ash
• Press button
ENGLISH
8
• Switch on the appliance by pressing the ON/OFF button.
• Switch off the appliance by pressing the ON/OFF button.
• Hold down button for 5 seconds, until you hear a beep.
• Switch on the appliance by pressing the ON/OFF button.
•
•
The current selection level number and the salt indicator light
������
Press button to select the desired hardness level (see
WATER HARDNESS TABLE).
• Switch off the appliance by pressing the ON/OFF button.
Setting is complete!
Water Hardness Table
Level °dH
German degrees
°fH
French degrees
1 Soft 0 - 6 0 - 10
2 Medium 7 - 11 11 - 20
3 Average 12 - 17 21 - 30
4 Hard 18 - 34 31 - 60
5 Very hard 35 - 50 61 - 90
Make sure the cap is screwed on tightly, so that no detergent can
get into the container during the wash program (this could damage
the water softener beyond repair).
As soon as this procedure is complete, run a program without
loading. The “Pre-Wash” program alone is NOT������
Residual saline solution or grains of salt can lead to corrosion,
irreparably damaging the stainless steel components.
The guarantee is not applicable if faults are caused by such
circumstances.
��������������������������������s.
��������������������������������
heating element may be damaged as a result.
Whenever you need to add salt, it is mandatory to complete
the procedure before the beginning of the washing cycle.
SETTING THE WATER HARDNESS
To allow the water softener to work in a perfect way, it is essential
that the water hardness setting is based on the actual water hard-
ness in your house. This information can be obtained from your local
water supplier. The factory setting is for average (3) water hardness.
FILLING THE RINSE AID DISPENSER
Rinse aid makes dish DRYING easier. The rinse aid dispenser A
should be lled when the RINSE AID REFILL indicator light
in the control panel is lit.
1. Open the dispenser B by pressing and pulling up the tab on
the lid.
2. Carefully introduce the rinse aid as far as the maximum
(110 ml) reference notch of the lling space - avoid spilling it.
If this happens, clean the spill immediately with a dry cloth.
3. Press the lid down until you hear a click to close it.
NEVER pour the rinse aid directly into the tub.
A
B
ADJUSTING THE DOSAGE OF RINSE AID
If you are not completely satised with the drying results, you can
adjust the quantity of rinse aid used.
• Switch the dishwasher on using the ON/OFF button.
• Switch it off using the ON/OFF button.
• Press button three times - a beep will be heard.
• Switch it on using the ON/OFF button.
•
•
The current selection level number and rinse aid indicator light ash.
Press button to select the level of rinse aid quantity to be
supplied.
• Switch it off using the ON/OFF button.
Setting is complete!
If the rinse aid level is set to ZERO (ECO), no rinse aid will be
supplied. The LOW RINSE AID indicator light will not be lit if you
run out of rinse aid. A maximum of 5 levels can be set according to
the dishwasher model. The factory setting is specic to the model,
please follow instruction above to check this for your machine.
•If you see bluish streaks on the dishes, set a low number (1-2).
• If there are drops of water or limescale marks on the dishes,
set a high number (3-4).
FILLING THE DETERGENT DISPENSER
������������������������������
dishwashers.
To achieve the best washing and drying results, the combined
useof detergent, rinse aid liquid and rened salt is required.
We recommend using detergents that do not contain phosphates
or chlorine, as these products are harmful to the environment.
Good washing results also depend on the correct amount of
detergent being used.
Exceeding the stated amount does not result in a more effective
wash and increases environmental pollution.
The amount can be adjusted to the soil level. In the case of
normally soiled items, use approximately either 35g (powder
detergent) or 35ml (liquid detergent) and additional tea spoon of
detergent directly inside the tub. If tablets are used, one tablet
will be enough.
If the crockery is only lightly soiled or if it has been rinsed with
water before being placed in the dishwasher, reduce the amount
of detergent used accordingly (minimum 25 g/ml) e.g. skip the
powder/gel putted inside the tub.
To open the detergent dispenser
press button A.
Introduce the detergent into
the dry dispenser B only.
Place the amount of detergent
for pre-washing directly inside
the tub.
A
B
1.
2.
When measuring out the detergent refer to the mentioned ear-
lier information to add the proper quantity. Inside the dispenser
B there are indications to help the detergent dosing.
Remove detergent residues from the edges of the dispenser
and close the cover until it clicks.
3. Close the lid of the detergent dispenser by pulling it up until
the closing device is secured in place.
The detergent dispenser automatically opens up at the right time
according to the program. If all-in-one detergents are used, we
recommend using the TABLET button, because it adjusts the
program so that the best washing and drying results are always
achieved.
to select the desired hardness level (see
WATER HARDNESS TABLE).
• Switch o the appliance by pressing the ON/OFF button.
Setting is complete!
Water Hardness Table
Level °dH
German
degrees
°fH
French
degrees
°Clark
English
degrees
1 Soft 0 - 6 0 - 10 0 - 7
2 Medium 7 - 11 11 - 20 8 - 14
3 Average 12 - 16 21 - 29 15 - 20
4 Hard 17 - 34 30 - 60 21 - 42
5 Very hard 35 - 50 61 - 90 43 - 62
Filling the rinse aid dispenser
Rinse aid makes dish DRYING easier. The rinse aid dispenser A
should be lled when the RINSE AID REFILL indicator light
ENGLISH
7
Control panel
Product description
1. Upper rack
2. �������
3. Upper rack height adjuster
4. Upper sprayer arm
5. Lower rack
6. Cutlery basket
7. Lower sprayer arm
8. Filter Assembly
9. Salt reservoir
10. Detergent and Rinse Aid dispensers
11. Rating plate
12. Control panel
1
2
3
4
5
6
10
7
11
9
8
First use
ADVICE REGARDING THE FIRST TIME USE
After installation, remove the stoppers from the racks and the
retaining elastic elements from the upper rack.
FILLING THE SALT RESERVOIR
The use of salt prevents the formation of LIMESCALE on the
dishes andon the machine’s functional components.
• It is important that the salt reservoir be never empty.
• It is important to set the water hardness.
The salt reservoir is located in the lower part of the
dishwasher (see PRODUCT DESCRIPTION) and should be
filled when the SALT REFILL indicator light in the
control panel is lit .
1. Remove the lower rack and
unscrew the reservoir cap
(anticlockwise).
2. Only the first time you do this: fill
the salt reservoir with water.
3. Position the funnel (see figure)
and fill the salt reservoir right up
to its edge (approximately 1 kg);
it is not unusual for a little water to
leak out.
4. Remove the funnel and wipe any
salt residue away from the
opening.
1. On-Off/Reset button with indicator light
2. Program selection button
3. Salt refill indicator ligh
4. Rinse Aid refill indicator ligh
5. Program number and delay time indicator
6. Tablet indicator light
7. Display
8. Half Load indicator light
9. Half Load button
10. Delay button
11. START/Pause button with indicator light / Tab
1 2 3 4 5 6 7 8 9 10 11
3sec
h
in
the control panel is lit.
ENGLISH
8
• Switch on the appliance by pressing the ON/OFF button.
• Switch off the appliance by pressing the ON/OFF button.
• Hold down button for 5 seconds, until you hear a beep.
• Switch on the appliance by pressing the ON/OFF button.
•
•
The current selection level number and the salt indicator light
������
Press button to select the desired hardness level (see
WATER HARDNESS TABLE).
• Switch off the appliance by pressing the ON/OFF button.
Setting is complete!
Water Hardness Table
Level °dH
German degrees
°fH
French degrees
1 Soft 0 - 6 0 - 10
2 Medium 7 - 11 11 - 20
3 Average 12 - 17 21 - 30
4 Hard 18 - 34 31 - 60
5 Very hard 35 - 50 61 - 90
Make sure the cap is screwed on tightly, so that no detergent can
get into the container during the wash program (this could damage
the water softener beyond repair).
As soon as this procedure is complete, run a program without
loading. The “Pre-Wash” program alone is NOT������
Residual saline solution or grains of salt can lead to corrosion,
irreparably damaging the stainless steel components.
The guarantee is not applicable if faults are caused by such
circumstances.
��������������������������������s.
��������������������������������
heating element may be damaged as a result.
Whenever you need to add salt, it is mandatory to complete
the procedure before the beginning of the washing cycle.
SETTING THE WATER HARDNESS
To allow the water softener to work in a perfect way, it is essential
that the water hardness setting is based on the actual water hard-
ness in your house. This information can be obtained from your local
water supplier. The factory setting is for average (3) water hardness.
FILLING THE RINSE AID DISPENSER
Rinse aid makes dish DRYING easier. The rinse aid dispenser A
should be lled when the RINSE AID REFILL indicator light
in the control panel is lit.
1. Open the dispenser B by pressing and pulling up the tab on
the lid.
2. Carefully introduce the rinse aid as far as the maximum
(110 ml) reference notch of the lling space - avoid spilling it.
If this happens, clean the spill immediately with a dry cloth.
3. Press the lid down until you hear a click to close it.
NEVER pour the rinse aid directly into the tub.
A
B
ADJUSTING THE DOSAGE OF RINSE AID
If you are not completely satised with the drying results, you can
adjust the quantity of rinse aid used.
• Switch the dishwasher on using the ON/OFF button.
• Switch it off using the ON/OFF button.
• Press button three times - a beep will be heard.
• Switch it on using the ON/OFF button.
•
•
The current selection level number and rinse aid indicator light ash.
Press button to select the level of rinse aid quantity to be
supplied.
• Switch it off using the ON/OFF button.
Setting is complete!
If the rinse aid level is set to ZERO (ECO), no rinse aid will be
supplied. The LOW RINSE AID indicator light will not be lit if you
run out of rinse aid. A maximum of 5 levels can be set according to
the dishwasher model. The factory setting is specic to the model,
please follow instruction above to check this for your machine.
•If you see bluish streaks on the dishes, set a low number (1-2).
• If there are drops of water or limescale marks on the dishes,
set a high number (3-4).
FILLING THE DETERGENT DISPENSER
������������������������������
dishwashers.
To achieve the best washing and drying results, the combined
useof detergent, rinse aid liquid and rened salt is required.
We recommend using detergents that do not contain phosphates
or chlorine, as these products are harmful to the environment.
Good washing results also depend on the correct amount of
detergent being used.
Exceeding the stated amount does not result in a more effective
wash and increases environmental pollution.
The amount can be adjusted to the soil level. In the case of
normally soiled items, use approximately either 35g (powder
detergent) or 35ml (liquid detergent) and additional tea spoon of
detergent directly inside the tub. If tablets are used, one tablet
will be enough.
If the crockery is only lightly soiled or if it has been rinsed with
water before being placed in the dishwasher, reduce the amount
of detergent used accordingly (minimum 25 g/ml) e.g. skip the
powder/gel putted inside the tub.
To open the detergent dispenser
press button A.
Introduce the detergent into
the dry dispenser B only.
Place the amount of detergent
for pre-washing directly inside
the tub.
A
B
1.
2.
When measuring out the detergent refer to the mentioned ear-
lier information to add the proper quantity. Inside the dispenser
B there are indications to help the detergent dosing.
Remove detergent residues from the edges of the dispenser
and close the cover until it clicks.
3. Close the lid of the detergent dispenser by pulling it up until
the closing device is secured in place.
The detergent dispenser automatically opens up at the right time
according to the program. If all-in-one detergents are used, we
recommend using the TABLET button, because it adjusts the
program so that the best washing and drying results are always
achieved.
BA
1. Open the dispenser B by pressing and pulling up the tab on
the lid.
2. Carefully introduce the rinse aid as far as the maximum (110
ml) reference notch of the lling space - avoid spilling it. If this
happens, clean the spill immediately with a dry cloth.
3. Press the lid down until you hear a click to close it.
NEVER pour the rinse aid directly into the tub.
Adjusting the dosage of rinse aid
If you are not completely satised with the drying results, you
can adjust the quantity of rinse aid used.
• Switch the dishwasher on using the ON/OFF button.
• Switch it o using the ON/OFF button.
• Press button
ENGLISH
8
• Switch on the appliance by pressing the ON/OFF button.
• Switch off the appliance by pressing the ON/OFF button.
• Hold down button for 5 seconds, until you hear a beep.
• Switch on the appliance by pressing the ON/OFF button.
•
•
The current selection level number and the salt indicator light
������
Press button to select the desired hardness level (see
WATER HARDNESS TABLE).
• Switch off the appliance by pressing the ON/OFF button.
Setting is complete!
Water Hardness Table
Level °dH
German degrees
°fH
French degrees
1 Soft 0 - 6 0 - 10
2 Medium 7 - 11 11 - 20
3 Average 12 - 17 21 - 30
4 Hard 18 - 34 31 - 60
5 Very hard 35 - 50 61 - 90
Make sure the cap is screwed on tightly, so that no detergent can
get into the container during the wash program (this could damage
the water softener beyond repair).
As soon as this procedure is complete, run a program without
loading. The “Pre-Wash” program alone is NOT������
Residual saline solution or grains of salt can lead to corrosion,
irreparably damaging the stainless steel components.
The guarantee is not applicable if faults are caused by such
circumstances.
��������������������������������s.
��������������������������������
heating element may be damaged as a result.
Whenever you need to add salt, it is mandatory to complete
the procedure before the beginning of the washing cycle.
SETTING THE WATER HARDNESS
To allow the water softener to work in a perfect way, it is essential
that the water hardness setting is based on the actual water hard-
ness in your house. This information can be obtained from your local
water supplier. The factory setting is for average (3) water hardness.
FILLING THE RINSE AID DISPENSER
Rinse aid makes dish DRYING easier. The rinse aid dispenser A
should be lled when the RINSE AID REFILL indicator light
in the control panel is lit.
1. Open the dispenser B by pressing and pulling up the tab on
the lid.
2. Carefully introduce the rinse aid as far as the maximum
(110 ml) reference notch of the lling space - avoid spilling it.
If this happens, clean the spill immediately with a dry cloth.
3. Press the lid down until you hear a click to close it.
NEVER pour the rinse aid directly into the tub.
A
B
ADJUSTING THE DOSAGE OF RINSE AID
If you are not completely satised with the drying results, you can
adjust the quantity of rinse aid used.
• Switch the dishwasher on using the ON/OFF button.
• Switch it off using the ON/OFF button.
• Press button three times - a beep will be heard.
• Switch it on using the ON/OFF button.
•
•
The current selection level number and rinse aid indicator light ash.
Press button to select the level of rinse aid quantity to be
supplied.
• Switch it off using the ON/OFF button.
Setting is complete!
If the rinse aid level is set to ZERO (ECO), no rinse aid will be
supplied. The LOW RINSE AID indicator light will not be lit if you
run out of rinse aid. A maximum of 5 levels can be set according to
the dishwasher model. The factory setting is specic to the model,
please follow instruction above to check this for your machine.
•If you see bluish streaks on the dishes, set a low number (1-2).
• If there are drops of water or limescale marks on the dishes,
set a high number (3-4).
FILLING THE DETERGENT DISPENSER
������������������������������
dishwashers.
To achieve the best washing and drying results, the combined
useof detergent, rinse aid liquid and rened salt is required.
We recommend using detergents that do not contain phosphates
or chlorine, as these products are harmful to the environment.
Good washing results also depend on the correct amount of
detergent being used.
Exceeding the stated amount does not result in a more effective
wash and increases environmental pollution.
The amount can be adjusted to the soil level. In the case of
normally soiled items, use approximately either 35g (powder
detergent) or 35ml (liquid detergent) and additional tea spoon of
detergent directly inside the tub. If tablets are used, one tablet
will be enough.
If the crockery is only lightly soiled or if it has been rinsed with
water before being placed in the dishwasher, reduce the amount
of detergent used accordingly (minimum 25 g/ml) e.g. skip the
powder/gel putted inside the tub.
To open the detergent dispenser
press button A.
Introduce the detergent into
the dry dispenser B only.
Place the amount of detergent
for pre-washing directly inside
the tub.
A
B
1.
2.
When measuring out the detergent refer to the mentioned ear-
lier information to add the proper quantity. Inside the dispenser
B there are indications to help the detergent dosing.
Remove detergent residues from the edges of the dispenser
and close the cover until it clicks.
3. Close the lid of the detergent dispenser by pulling it up until
the closing device is secured in place.
The detergent dispenser automatically opens up at the right time
according to the program. If all-in-one detergents are used, we
recommend using the TABLET button, because it adjusts the
program so that the best washing and drying results are always
achieved.
three times - a beep will be heard.
• Switch it on using the ON/OFF button.
• The current selection level number and rinse aid indicator
light ash.
• Press button
ENGLISH
8
• Switch on the appliance by pressing the ON/OFF button.
• Switch off the appliance by pressing the ON/OFF button.
• Hold down button for 5 seconds, until you hear a beep.
• Switch on the appliance by pressing the ON/OFF button.
•
•
The current selection level number and the salt indicator light
������
Press button to select the desired hardness level (see
WATER HARDNESS TABLE).
• Switch off the appliance by pressing the ON/OFF button.
Setting is complete!
Water Hardness Table
Level °dH
German degrees
°fH
French degrees
1 Soft 0 - 6 0 - 10
2 Medium 7 - 11 11 - 20
3 Average 12 - 17 21 - 30
4 Hard 18 - 34 31 - 60
5 Very hard 35 - 50 61 - 90
Make sure the cap is screwed on tightly, so that no detergent can
get into the container during the wash program (this could damage
the water softener beyond repair).
As soon as this procedure is complete, run a program without
loading. The “Pre-Wash” program alone is NOT������
Residual saline solution or grains of salt can lead to corrosion,
irreparably damaging the stainless steel components.
The guarantee is not applicable if faults are caused by such
circumstances.
��������������������������������s.
��������������������������������
heating element may be damaged as a result.
Whenever you need to add salt, it is mandatory to complete
the procedure before the beginning of the washing cycle.
SETTING THE WATER HARDNESS
To allow the water softener to work in a perfect way, it is essential
that the water hardness setting is based on the actual water hard-
ness in your house. This information can be obtained from your local
water supplier. The factory setting is for average (3) water hardness.
FILLING THE RINSE AID DISPENSER
Rinse aid makes dish DRYING easier. The rinse aid dispenser A
should be lled when the RINSE AID REFILL indicator light
in the control panel is lit.
1. Open the dispenser B by pressing and pulling up the tab on
the lid.
2. Carefully introduce the rinse aid as far as the maximum
(110 ml) reference notch of the lling space - avoid spilling it.
If this happens, clean the spill immediately with a dry cloth.
3. Press the lid down until you hear a click to close it.
NEVER pour the rinse aid directly into the tub.
A
B
ADJUSTING THE DOSAGE OF RINSE AID
If you are not completely satised with the drying results, you can
adjust the quantity of rinse aid used.
• Switch the dishwasher on using the ON/OFF button.
• Switch it off using the ON/OFF button.
• Press button three times - a beep will be heard.
• Switch it on using the ON/OFF button.
•
•
The current selection level number and rinse aid indicator light ash.
Press button to select the level of rinse aid quantity to be
supplied.
• Switch it off using the ON/OFF button.
Setting is complete!
If the rinse aid level is set to ZERO (ECO), no rinse aid will be
supplied. The LOW RINSE AID indicator light will not be lit if you
run out of rinse aid. A maximum of 5 levels can be set according to
the dishwasher model. The factory setting is specic to the model,
please follow instruction above to check this for your machine.
•If you see bluish streaks on the dishes, set a low number (1-2).
• If there are drops of water or limescale marks on the dishes,
set a high number (3-4).
FILLING THE DETERGENT DISPENSER
������������������������������
dishwashers.
To achieve the best washing and drying results, the combined
useof detergent, rinse aid liquid and rened salt is required.
We recommend using detergents that do not contain phosphates
or chlorine, as these products are harmful to the environment.
Good washing results also depend on the correct amount of
detergent being used.
Exceeding the stated amount does not result in a more effective
wash and increases environmental pollution.
The amount can be adjusted to the soil level. In the case of
normally soiled items, use approximately either 35g (powder
detergent) or 35ml (liquid detergent) and additional tea spoon of
detergent directly inside the tub. If tablets are used, one tablet
will be enough.
If the crockery is only lightly soiled or if it has been rinsed with
water before being placed in the dishwasher, reduce the amount
of detergent used accordingly (minimum 25 g/ml) e.g. skip the
powder/gel putted inside the tub.
To open the detergent dispenser
press button A.
Introduce the detergent into
the dry dispenser B only.
Place the amount of detergent
for pre-washing directly inside
the tub.
A
B
1.
2.
When measuring out the detergent refer to the mentioned ear-
lier information to add the proper quantity. Inside the dispenser
B there are indications to help the detergent dosing.
Remove detergent residues from the edges of the dispenser
and close the cover until it clicks.
3. Close the lid of the detergent dispenser by pulling it up until
the closing device is secured in place.
The detergent dispenser automatically opens up at the right time
according to the program. If all-in-one detergents are used, we
recommend using the TABLET button, because it adjusts the
program so that the best washing and drying results are always
achieved.
to select the level of rinse aid quantity to be
supplied.
• Switch it o using the ON/OFF button.
Setting is complete!
If the rinse aid level is set to ZERO, no rinse aid will be supplied.
The LOW RINSE AID indicator light will not be lit if you run out
of rinse aid. A maximum of 5 levels can be set according to the
dishwasher model. The factory setting is specic to the model,
please follow instruction above to check this for your machine.
• If you see bluish streaks on the dishes, set a low number (1-2).
• If there are drops of water or limescale marks on the dishes,
set a high number (3-4).
Filling the detergent dispenser
To achieve the best washing and drying results, the combined
useof detergent, rinse aid liquid and rened salt is required. We
recommend using detergents that do not contain phosphates
or chlorine, as these products are harmful to the environment.
Good washing results also depend on the correct amount of
detergent being used.
Exceeding the stated amount does not result in a more eective
wash and increases environmental pollution. The amount can
be adjusted to the soil level. In the case of normally soiled items,
use approximately either 25g (powder detergent) or 25ml (liquid
detergent) and additional tea spoon of detergent directly inside
the tub. If tablets are used, one tablet will be enough.
If the crockery is only lightly soiled or if it has been rinsed
with water before being placed in the dishwasher, reduce the
amount of detergent used accordingly (minimum 25 g/ml) e.g.
skip the powder/gel putted inside the tub.
ENGLISH
8
• Switch on the appliance by pressing the ON/OFF button.
• Switch off the appliance by pressing the ON/OFF button.
• Hold down button for 5 seconds, until you hear a beep.
• Switch on the appliance by pressing the ON/OFF button.
•
•
The current selection level number and the salt indicator light
������
Press button to select the desired hardness level (see
WATER HARDNESS TABLE).
• Switch off the appliance by pressing the ON/OFF button.
Setting is complete!
Water Hardness Table
Level °dH
German degrees
°fH
French degrees
1 Soft 0 - 6 0 - 10
2 Medium 7 - 11 11 - 20
3 Average 12 - 17 21 - 30
4 Hard 18 - 34 31 - 60
5 Very hard 35 - 50 61 - 90
Make sure the cap is screwed on tightly, so that no detergent can
get into the container during the wash program (this could damage
the water softener beyond repair).
As soon as this procedure is complete, run a program without
loading. The “Pre-Wash” program alone is NOT������
Residual saline solution or grains of salt can lead to corrosion,
irreparably damaging the stainless steel components.
The guarantee is not applicable if faults are caused by such
circumstances.
��������������������������������s.
��������������������������������
heating element may be damaged as a result.
Whenever you need to add salt, it is mandatory to complete
the procedure before the beginning of the washing cycle.
SETTING THE WATER HARDNESS
To allow the water softener to work in a perfect way, it is essential
that the water hardness setting is based on the actual water hard-
ness in your house. This information can be obtained from your local
water supplier. The factory setting is for average (3) water hardness.
FILLING THE RINSE AID DISPENSER
Rinse aid makes dish DRYING easier. The rinse aid dispenser A
should be lled when the RINSE AID REFILL indicator light
in the control panel is lit.
1. Open the dispenser B by pressing and pulling up the tab on
the lid.
2. Carefully introduce the rinse aid as far as the maximum
(110 ml) reference notch of the lling space - avoid spilling it.
If this happens, clean the spill immediately with a dry cloth.
3. Press the lid down until you hear a click to close it.
NEVER pour the rinse aid directly into the tub.
A
B
ADJUSTING THE DOSAGE OF RINSE AID
If you are not completely satised with the drying results, you can
adjust the quantity of rinse aid used.
• Switch the dishwasher on using the ON/OFF button.
• Switch it off using the ON/OFF button.
• Press button three times - a beep will be heard.
• Switch it on using the ON/OFF button.
•
•
The current selection level number and rinse aid indicator light ash.
Press button to select the level of rinse aid quantity to be
supplied.
• Switch it off using the ON/OFF button.
Setting is complete!
If the rinse aid level is set to ZERO (ECO), no rinse aid will be
supplied. The LOW RINSE AID indicator light will not be lit if you
run out of rinse aid. A maximum of 5 levels can be set according to
the dishwasher model. The factory setting is specic to the model,
please follow instruction above to check this for your machine.
•If you see bluish streaks on the dishes, set a low number (1-2).
• If there are drops of water or limescale marks on the dishes,
set a high number (3-4).
FILLING THE DETERGENT DISPENSER
������������������������������
dishwashers.
To achieve the best washing and drying results, the combined
useof detergent, rinse aid liquid and rened salt is required.
We recommend using detergents that do not contain phosphates
or chlorine, as these products are harmful to the environment.
Good washing results also depend on the correct amount of
detergent being used.
Exceeding the stated amount does not result in a more effective
wash and increases environmental pollution.
The amount can be adjusted to the soil level. In the case of
normally soiled items, use approximately either 35g (powder
detergent) or 35ml (liquid detergent) and additional tea spoon of
detergent directly inside the tub. If tablets are used, one tablet
will be enough.
If the crockery is only lightly soiled or if it has been rinsed with
water before being placed in the dishwasher, reduce the amount
of detergent used accordingly (minimum 25 g/ml) e.g. skip the
powder/gel putted inside the tub.
To open the detergent dispenser
press button A.
Introduce the detergent into
the dry dispenser B only.
Place the amount of detergent
for pre-washing directly inside
the tub.
A
B
1.
2.
When measuring out the detergent refer to the mentioned ear-
lier information to add the proper quantity. Inside the dispenser
B there are indications to help the detergent dosing.
Remove detergent residues from the edges of the dispenser
and close the cover until it clicks.
3. Close the lid of the detergent dispenser by pulling it up until
the closing device is secured in place.
The detergent dispenser automatically opens up at the right time
according to the program. If all-in-one detergents are used, we
recommend using the TABLET button, because it adjusts the
program so that the best washing and drying results are always
achieved.
D
C
To open the detergent
dispenser press button C.
Introduce the detergent
into the dry dispenser D
only.
Place the amount of
detergent for
pre-washing directly
inside the tub.
1. When measuring out the detergent refer to the mentioned
earlier information to add the proper quantity. Inside the
dispenser D there are indications to help the detergent
dosing.
2. Remove detergent residues from the edges of the dispenser
and close the cover until it clicks.
3. Close the lid of the detergent dispenser by pulling it up until
the closing device is secured in place.
The detergent dispenser automatically opens up at the right
time according to the program. If all-in-one detergents are used,
we recommend using the TABLET button, because it adjusts the
program so that the best washing and drying results are always
achieved.

ENGLISH 9
Tips
Before loading the baskets, remove all food residues from
the crockery and empty the glasses. You do not need to rinse
beforehand under running water. Arrange the crockery so that
it is held in place rmly and does not tip over; and arrange
the containers with the openings facing downwards and the
concave/convex parts placed obliquely, thus allowing the water
to reach every surface and ow freely.
Warning: lids, handles, trays and frying pans do not prevent the
sprayer arms from rotating.
Place any small items in the cutlery basket. Very soiled dishes
and pans should be placed in the lower basket because in this
sector the water sprays are stronger and allow a higher washing
performance.
After loading the appliance, make sure that the sprayer arms
can cotate freely.
EN
10
LOADING THE RACKS
TIPS
Before loading the baskets, remove all food residues from the
crockery and empty the glasses. You do not need to rinse before-
hand under running water.
Arrange the crockery so that it is held in place rmly and does
not tip over; and arrange the containers with the openings facing
downwards and the concave/convex parts placed obliquely, thus
allowing the water to reach every surface and ow freely.
Warning: lids, handles, trays and frying pans do not prevent the
sprayer arms from rotating.
Place any small items in the cutlery basket. Very soiled dishes
and pans should be placed in the lower basket because in this
sector the water sprays are stronger and allow a higher washing
performance.
After loading the appliance, make sure that the sprayer arms can
cotate freely.
CUTLERY RACK
The third rack was designed to house
the cutlery.
Arrange the cutlery as shown in the
gure.
A separate arrangement of the cutlery
makes collection easier after washing
and
improves washing and drying per-
formance.
Knives and other utensils with sharp
edges must be positioned with the
blades facing downwards.
UPPER RACK
Load delicate and light dishes: glasses,
cups, saucers, low salad bowls.
The upper rack has tip-up supports
which can be used in a vertical position
when arranging tea/ dessert saucers
or in a lower position to load bowls and
food containers.
(loading example for the upper rack)
ADJUSTING THE HEIGHT OF THE UPPER RACK
The height of the upper basket can be adju-
sted: high position to place bulky crockery
in the lower basket and low position to make
the most of the tip-up compartments by cre-
ating more space upwards.
The upper rack is equipped with a Upper
Rack height adjuster (see gure), without
pressing the levers, lift it up by simply holding
the rack sides, as soon as the rack is stable
in its upper position. To restore to the lower
position, press the levers (A) at the sides of
the rack and move the basket downwards.
We strongly recommend that you do not adjust the height of
the rack when it is loaded.
NEVER raise or lower the basket on one side only.
FOLDABLE FLAPS WITH ADJUSTABLE POSITION
The side foldable aps can be fold or unfold
to optimize the arrangement of crockery
inside the rack.
Wine glasses can be placed safely in the
foldable aps by inserting the stem of each
glass into the corresponding slots.
Depending on the model:
•to unfold the aps there is needed to slide
it up and rotate or release it from the snaps
and pull it down.
•to fold the aps there is needed to rotate
it and slide aps down or pull it up and
attach aps to the snaps.
LOWER RACK
For pots, lids, plates, salad bowls, cutlery etc....
Large plates and lids should ideally be
placed at the sides to avoid interferen-
ces with the spray arm.
The lower rack has tip-up supports
which can be used in a vertical position
when arranging plates or in a horizontal
position (lower) to load pans and salad
bowls easily.
(loading example for the lower rack)
UNSUITABLE CROCKERY
• Wooden crockery and cutlery.
• Delicate decorated glasses, artistic handicraft and antique crockery.
Their decorations are not resistant.
•Parts in synthetic material which do not withstand high temperatures.
• Copper and tin crockery.
• Crockery soiled with ash, wax, lubricating grease or ink.
The colours of glass decorations and aluminium/silver pieces can
change and fade during the washing process. Some types of glass (e.g.
crystal objects) can become opaque after a number of wash cycles too.
DAMAGE TO GLASS AND CROCKERY
• Only use glasses and porcelain guaranteed by the manufacturer
as dishwasher safe.
• Use a delicate detergent suitable for crockery
• Collect glasses and cutlery from the dishwasher as soon as the
wash cycle is over.
HYGIENE
To avoid odour and sediment which can be accumulated in the
dishwasher please run a high temperature program at least once
a month. Use a tea spoon of detergent and run it without the loading
to clean your appliance.
TIPS ON ENERGY SAVING
• When the household dishwasher is used according to the manu-
facturer’s instructions, washing tableware in a dishwasher usu-
ally consumes less energy and water than hand dishwashing.
•In order to maximize dishwasher efciency it is recommended to
initiate the wash cycle once dishwasher is fully loaded. Loading
the household dishwasher up to the capacity indicated by the man-
ufacturer will contribute to energy and water savings. Information
on correct loading of tableware can be found in Loading chapter.
In case of partial loading it is recommended to use dedicated wash
options if available (Half load/ Zone Wash, Multizone), illing up only
selected racks. Incorrect loading or overloading the dishwasher may
increase resources usage (such as water, energy and time, as well
as increase noise level), reducing cleaning and drying performance.
• Manual pre-rinsing of tableware items leads to increased water
and energy consumption and is not recommended.
Cutlery rack
The third rack was designed to house
the cutlery.
Arrange the cutlery as shown in the
gure.
A separate arrangement of the
cutlery makes collection easier after
washing and improves washing and
drying performance.
Knives and other utensils with
sharp edges must be positioned
with the blades facing downwards.
EN
10
LOADING THE RACKS
TIPS
Before loading the baskets, remove all food residues from the
crockery and empty the glasses. You do not need to rinse before-
hand under running water.
Arrange the crockery so that it is held in place rmly and does
not tip over; and arrange the containers with the openings facing
downwards and the concave/convex parts placed obliquely, thus
allowing the water to reach every surface and ow freely.
Warning: lids, handles, trays and frying pans do not prevent the
sprayer arms from rotating.
Place any small items in the cutlery basket. Very soiled dishes
and pans should be placed in the lower basket because in this
sector the water sprays are stronger and allow a higher washing
performance.
After loading the appliance, make sure that the sprayer arms can
cotate freely.
CUTLERY RACK
The third rack was designed to house
the cutlery.
Arrange the cutlery as shown in the
gure.
A separate arrangement of the cutlery
makes collection easier after washing
and
improves washing and drying per-
formance.
Knives and other utensils with sharp
edges must be positioned with the
blades facing downwards.
UPPER RACK
Load delicate and light dishes: glasses,
cups, saucers, low salad bowls.
The upper rack has tip-up supports
which can be used in a vertical position
when arranging tea/ dessert saucers
or in a lower position to load bowls and
food containers.
(loading example for the upper rack)
ADJUSTING THE HEIGHT OF THE UPPER RACK
The height of the upper basket can be adju-
sted: high position to place bulky crockery
in the lower basket and low position to make
the most of the tip-up compartments by cre-
ating more space upwards.
The upper rack is equipped with a Upper
Rack height adjuster (see gure), without
pressing the levers, lift it up by simply holding
the rack sides, as soon as the rack is stable
in its upper position. To restore to the lower
position, press the levers (A) at the sides of
the rack and move the basket downwards.
We strongly recommend that you do not adjust the height of
the rack when it is loaded.
NEVER raise or lower the basket on one side only.
FOLDABLE FLAPS WITH ADJUSTABLE POSITION
The side foldable aps can be fold or unfold
to optimize the arrangement of crockery
inside the rack.
Wine glasses can be placed safely in the
foldable aps by inserting the stem of each
glass into the corresponding slots.
Depending on the model:
•to unfold the aps there is needed to slide
it up and rotate or release it from the snaps
and pull it down.
•to fold the aps there is needed to rotate
it and slide aps down or pull it up and
attach aps to the snaps.
LOWER RACK
For pots, lids, plates, salad bowls, cutlery etc....
Large plates and lids should ideally be
placed at the sides to avoid interferen-
ces with the spray arm.
The lower rack has tip-up supports
which can be used in a vertical position
when arranging plates or in a horizontal
position (lower) to load pans and salad
bowls easily.
(loading example for the lower rack)
UNSUITABLE CROCKERY
• Wooden crockery and cutlery.
• Delicate decorated glasses, artistic handicraft and antique crockery.
Their decorations are not resistant.
•Parts in synthetic material which do not withstand high temperatures.
• Copper and tin crockery.
• Crockery soiled with ash, wax, lubricating grease or ink.
The colours of glass decorations and aluminium/silver pieces can
change and fade during the washing process. Some types of glass (e.g.
crystal objects) can become opaque after a number of wash cycles too.
DAMAGE TO GLASS AND CROCKERY
• Only use glasses and porcelain guaranteed by the manufacturer
as dishwasher safe.
• Use a delicate detergent suitable for crockery
• Collect glasses and cutlery from the dishwasher as soon as the
wash cycle is over.
HYGIENE
To avoid odour and sediment which can be accumulated in the
dishwasher please run a high temperature program at least once
a month. Use a tea spoon of detergent and run it without the loading
to clean your appliance.
TIPS ON ENERGY SAVING
• When the household dishwasher is used according to the manu-
facturer’s instructions, washing tableware in a dishwasher usu-
ally consumes less energy and water than hand dishwashing.
•In order to maximize dishwasher efciency it is recommended to
initiate the wash cycle once dishwasher is fully loaded. Loading
the household dishwasher up to the capacity indicated by the man-
ufacturer will contribute to energy and water savings. Information
on correct loading of tableware can be found in Loading chapter.
In case of partial loading it is recommended to use dedicated wash
options if available (Half load/ Zone Wash, Multizone), illing up only
selected racks. Incorrect loading or overloading the dishwasher may
increase resources usage (such as water, energy and time, as well
as increase noise level), reducing cleaning and drying performance.
• Manual pre-rinsing of tableware items leads to increased water
and energy consumption and is not recommended.
Upper rack
Load delicate and light dishes:
glasses, cups, saucers, low salad
bowls.
The upper rack has tip-up supports
which can be used in a vertical
position when arranging tea/ dessert
saucers or in a lower position to load
bowls and food containers.
(loading example for the upper rack)
EN
10
LOADING THE RACKS
TIPS
Before loading the baskets, remove all food residues from the
crockery and empty the glasses. You do not need to rinse before-
hand under running water.
Arrange the crockery so that it is held in place rmly and does
not tip over; and arrange the containers with the openings facing
downwards and the concave/convex parts placed obliquely, thus
allowing the water to reach every surface and ow freely.
Warning: lids, handles, trays and frying pans do not prevent the
sprayer arms from rotating.
Place any small items in the cutlery basket. Very soiled dishes
and pans should be placed in the lower basket because in this
sector the water sprays are stronger and allow a higher washing
performance.
After loading the appliance, make sure that the sprayer arms can
cotate freely.
CUTLERY RACK
The third rack was designed to house
the cutlery.
Arrange the cutlery as shown in the
gure.
A separate arrangement of the cutlery
makes collection easier after washing
and
improves washing and drying per-
formance.
Knives and other utensils with sharp
edges must be positioned with the
blades facing downwards.
UPPER RACK
Load delicate and light dishes: glasses,
cups, saucers, low salad bowls.
The upper rack has tip-up supports
which can be used in a vertical position
when arranging tea/ dessert saucers
or in a lower position to load bowls and
food containers.
(loading example for the upper rack)
ADJUSTING THE HEIGHT OF THE UPPER RACK
The height of the upper basket can be adju-
sted: high position to place bulky crockery
in the lower basket and low position to make
the most of the tip-up compartments by cre-
ating more space upwards.
The upper rack is equipped with a Upper
Rack height adjuster (see gure), without
pressing the levers, lift it up by simply holding
the rack sides, as soon as the rack is stable
in its upper position. To restore to the lower
position, press the levers (A) at the sides of
the rack and move the basket downwards.
We strongly recommend that you do not adjust the height of
the rack when it is loaded.
NEVER raise or lower the basket on one side only.
FOLDABLE FLAPS WITH ADJUSTABLE POSITION
The side foldable aps can be fold or unfold
to optimize the arrangement of crockery
inside the rack.
Wine glasses can be placed safely in the
foldable aps by inserting the stem of each
glass into the corresponding slots.
Depending on the model:
•to unfold the aps there is needed to slide
it up and rotate or release it from the snaps
and pull it down.
•to fold the aps there is needed to rotate
it and slide aps down or pull it up and
attach aps to the snaps.
LOWER RACK
For pots, lids, plates, salad bowls, cutlery etc....
Large plates and lids should ideally be
placed at the sides to avoid interferen-
ces with the spray arm.
The lower rack has tip-up supports
which can be used in a vertical position
when arranging plates or in a horizontal
position (lower) to load pans and salad
bowls easily.
(loading example for the lower rack)
UNSUITABLE CROCKERY
• Wooden crockery and cutlery.
• Delicate decorated glasses, artistic handicraft and antique crockery.
Their decorations are not resistant.
•Parts in synthetic material which do not withstand high temperatures.
• Copper and tin crockery.
• Crockery soiled with ash, wax, lubricating grease or ink.
The colours of glass decorations and aluminium/silver pieces can
change and fade during the washing process. Some types of glass (e.g.
crystal objects) can become opaque after a number of wash cycles too.
DAMAGE TO GLASS AND CROCKERY
• Only use glasses and porcelain guaranteed by the manufacturer
as dishwasher safe.
• Use a delicate detergent suitable for crockery
• Collect glasses and cutlery from the dishwasher as soon as the
wash cycle is over.
HYGIENE
To avoid odour and sediment which can be accumulated in the
dishwasher please run a high temperature program at least once
a month. Use a tea spoon of detergent and run it without the loading
to clean your appliance.
TIPS ON ENERGY SAVING
• When the household dishwasher is used according to the manu-
facturer’s instructions, washing tableware in a dishwasher usu-
ally consumes less energy and water than hand dishwashing.
•In order to maximize dishwasher efciency it is recommended to
initiate the wash cycle once dishwasher is fully loaded. Loading
the household dishwasher up to the capacity indicated by the man-
ufacturer will contribute to energy and water savings. Information
on correct loading of tableware can be found in Loading chapter.
In case of partial loading it is recommended to use dedicated wash
options if available (Half load/ Zone Wash, Multizone), illing up only
selected racks. Incorrect loading or overloading the dishwasher may
increase resources usage (such as water, energy and time, as well
as increase noise level), reducing cleaning and drying performance.
• Manual pre-rinsing of tableware items leads to increased water
and energy consumption and is not recommended.
Adjusting the height of the upper
rack
The height of the upper rack can be
adjusted:
high position to place bulky crockery
in the lower basket and low position
to make the most of the tip-up
supports by creating more space
upwards and avoid collision with the
items
loaded into lower rack.d avoid
collision with the items
loaded into lower rack.
The upper rack is equipped with a Upper Rack height adjuster
(see gure), without pressing the levers, lift it up by simply
holding the rack sides, as soon as the rack is stable in its upper
position.
To restore to the lower position, press the levers A at the sides of
the rack and move the basket downwards.
We strongly recommend that you do not adjust the height of
the rack when it is loaded. NEVER raise or lower the basket
on one side only.
Foldable aps with adjustable position
The side foldable aps can be fold or
unfold to optimize the arrangement of
crockery inside the rack.
Wine glasses can be placed safely in the
foldable aps by inserting the stem of
each glass into the corresponding slots.
Depending on the model:
• to unfold the aps there is needed to
slide it up and rotate or release it from
the snaps and pull it down.
• to fold the aps there is needed to
rotate it and slide aps down or pull it
up and attach aps to the snaps.
EN
10
LOADING THE RACKS
TIPS
Before loading the baskets, remove all food residues from the
crockery and empty the glasses. You do not need to rinse before-
hand under running water.
Arrange the crockery so that it is held in place rmly and does
not tip over; and arrange the containers with the openings facing
downwards and the concave/convex parts placed obliquely, thus
allowing the water to reach every surface and ow freely.
Warning: lids, handles, trays and frying pans do not prevent the
sprayer arms from rotating.
Place any small items in the cutlery basket. Very soiled dishes
and pans should be placed in the lower basket because in this
sector the water sprays are stronger and allow a higher washing
performance.
After loading the appliance, make sure that the sprayer arms can
cotate freely.
CUTLERY RACK
The third rack was designed to house
the cutlery.
Arrange the cutlery as shown in the
gure.
A separate arrangement of the cutlery
makes collection easier after washing
and
improves washing and drying per-
formance.
Knives and other utensils with sharp
edges must be positioned with the
blades facing downwards.
UPPER RACK
Load delicate and light dishes: glasses,
cups, saucers, low salad bowls.
The upper rack has tip-up supports
which can be used in a vertical position
when arranging tea/ dessert saucers
or in a lower position to load bowls and
food containers.
(loading example for the upper rack)
ADJUSTING THE HEIGHT OF THE UPPER RACK
The height of the upper basket can be adju-
sted: high position to place bulky crockery
in the lower basket and low position to make
the most of the tip-up compartments by cre-
ating more space upwards.
The upper rack is equipped with a Upper
Rack height adjuster (see gure), without
pressing the levers, lift it up by simply holding
the rack sides, as soon as the rack is stable
in its upper position. To restore to the lower
position, press the levers (A) at the sides of
the rack and move the basket downwards.
We strongly recommend that you do not adjust the height of
the rack when it is loaded.
NEVER raise or lower the basket on one side only.
FOLDABLE FLAPS WITH ADJUSTABLE POSITION
The side foldable aps can be fold or unfold
to optimize the arrangement of crockery
inside the rack.
Wine glasses can be placed safely in the
foldable aps by inserting the stem of each
glass into the corresponding slots.
Depending on the model:
•to unfold the aps there is needed to slide
it up and rotate or release it from the snaps
and pull it down.
•to fold the aps there is needed to rotate
it and slide aps down or pull it up and
attach aps to the snaps.
LOWER RACK
For pots, lids, plates, salad bowls, cutlery etc....
Large plates and lids should ideally be
placed at the sides to avoid interferen-
ces with the spray arm.
The lower rack has tip-up supports
which can be used in a vertical position
when arranging plates or in a horizontal
position (lower) to load pans and salad
bowls easily.
(loading example for the lower rack)
UNSUITABLE CROCKERY
• Wooden crockery and cutlery.
• Delicate decorated glasses, artistic handicraft and antique crockery.
Their decorations are not resistant.
•Parts in synthetic material which do not withstand high temperatures.
• Copper and tin crockery.
• Crockery soiled with ash, wax, lubricating grease or ink.
The colours of glass decorations and aluminium/silver pieces can
change and fade during the washing process. Some types of glass (e.g.
crystal objects) can become opaque after a number of wash cycles too.
DAMAGE TO GLASS AND CROCKERY
• Only use glasses and porcelain guaranteed by the manufacturer
as dishwasher safe.
• Use a delicate detergent suitable for crockery
• Collect glasses and cutlery from the dishwasher as soon as the
wash cycle is over.
HYGIENE
To avoid odour and sediment which can be accumulated in the
dishwasher please run a high temperature program at least once
a month. Use a tea spoon of detergent and run it without the loading
to clean your appliance.
TIPS ON ENERGY SAVING
• When the household dishwasher is used according to the manu-
facturer’s instructions, washing tableware in a dishwasher usu-
ally consumes less energy and water than hand dishwashing.
•In order to maximize dishwasher efciency it is recommended to
initiate the wash cycle once dishwasher is fully loaded. Loading
the household dishwasher up to the capacity indicated by the man-
ufacturer will contribute to energy and water savings. Information
on correct loading of tableware can be found in Loading chapter.
In case of partial loading it is recommended to use dedicated wash
options if available (Half load/ Zone Wash, Multizone), illing up only
selected racks. Incorrect loading or overloading the dishwasher may
increase resources usage (such as water, energy and time, as well
as increase noise level), reducing cleaning and drying performance.
• Manual pre-rinsing of tableware items leads to increased water
and energy consumption and is not recommended.
Lower rack
For pots, lids, plates, salad bowls, cutlery
etc...
Large plates and lids should ideally be
placed at the sides to avoid interferences
with the spray arm.
The lower rack has tip-up supports
which can be used in a vertical position
when arranging plates or in a horizontal
position (lower) to load pans and salad
bowls easily.
(loading example for the lower rack)
Unsuitable crockery
• Wooden crockery and cutlery.
• Delicate decorated glasses, artistic handicraft and antique
crockery. Their decorations are not resistant.
• Parts in synthetic material which do not withstand high
temperatures.
• Copper and tin crockery.
• Crockery soiled with ash, wax, lubricating grease or ink.
The colours of glass decorations and aluminium/silver pieces can
change and fade during the washing process. Some types of glass
(e.g. crystal objects) can become opaque after a number of wash
cycles too.
Damage to glass and crockery
• Only use glasses and porcelain guaranteed by the manufacturer
as dishwasher safe.
• Use a delicate detergent suitable for crockery
• Collect glasses and cutlery from the dishwasher as soon as the
wash cycle is over.
Hygiene
To avoid odour and sediment which can be accumulated in the
dishwasher please run a high temperature program at least once a
month. Use a tea spoon of detergent and run it without the loading
to clean your appliance.
Tips on energy saving
• When the household dishwasher is used according to
the manufacturer’s instructions, washing tableware in a
dishwasher usually consumes less energy and water than
hand dishwashing.
• In order to maximize dishwasher eciency it is recommended
to initiate the wash cycle once dishwasher is fully loaded.
Loading the household dishwasher up to the capacity
indicated by the manufacturer will contribute to energy and
water savings. Information on correct loading of tableware
can be found in Loading chapter. In case of partial loading it
is recommended to use dedicated wash options if available
(Flexible wash), illing up only selected racks. Incorrect loading
or overloading the dishwasher may increase resources usage
(such as water, energy and time, as well as increase noise level),
reducing cleaning and drying performance.
• Manual pre-rinsing of tableware items leads to increased water
and energy consumption and is not recommended.
Loading the racks

ENGLISH 10
1. Check water connection
Check that the dishwasher is connected to the water supply
and that the tap is open.
2. Switch on the dishwasher
Open the door and press the ON/OFF button.
3. Load the racks (see LOADING THE RACKS)
4. Filling the detergent dispenser
(see PROGRAMS TABLE).
5. Choose the program and customise the cycle
Select the most appropriate program in accordance with
the type of crockery and its soiling level (see PROGRAMS
DESCRIPTION) by pressing the button.
Select the desired options (see FUNCTIONS).
6. Start
Start the wash cycle by pressing START/Pause button (led
is lit) and closing the door within 4 sec. When the program
starts you hear a single beep. If the door was not closed
within 4sec., the alarm sound will be played. In this case,
open the door, press START/Pause button and close the door
again within 4 sec.
7. End of wash cycle
The end of the wash cycle is indicated by beeps and by the
ashing of the wash cycle number on the display. Open the
door and switch o the appliance by pressing the ON/OFF
button.
Wait for a few minutes before removing the crockery - to
avoid burns. Unload the racks, beginning with the lower one.
The machine will switch o automatically during certain
extended periods of inactivity, in order to minimise
electricity consumption. If the crockery is only lightly soiled
or if it has been rinsed with water before being placed in the
dishwasher, reduce the amount of detergent used
accordingly.
Modifying a running program
If a wrong program was selected, it is possible to change it,
provided that it has only just begun: open the door, press and
hold the ON/OFF button, the machine will switch o.
Switch the machine back on using the ON/OFF button and select
the new wash cycle and any desired options; Start the wash
cycle by pressing START/Pause button and closing the door
within 4 sec.
Adding extra crockery
Without switching o the machine, open the door (START/
Pause led starts blinking) (be ware of HOT steam!) and place the
crockery inside the dishwasher. Press the START/Pause button
and close the door within 4 sec., the cycle will resume from the
point at which it was interrupted.
Accidental interruptions
If the door is opened during the wash cycle, or if there is a
power cut, the cycle stops. Press the START/Pause button and
close the door within 4 sec., the cycle will resume from the point
at which it was interrupted.
Daily Use
EN
11
OPTIONS AND FUNCTIONS
OPTIONS can be selected directly by pressing the corresponding button (see CONTROL PANEL).
If an option is not compatible with the selected program see PROGRAMS TABLE, the corresponding LED ashes rapidly 3 times
and beeps will sound. The option will not be enabled.
TABLET (Tab)
This setting allows you to optimize the performance of
the program according to the type of detergent used.
Press the START/PAUSE button for 3 seconds (the
corresponding symbol will light up) if you use combined
detergents in tablet form (rinse aid, salt and detergent in
1 dose).
If you use powder or liquid detergent, this option
should be off.
NaturalDry
NaturalDry is a convection drying system which automatically
opens the door during/after drying phase to ensure exceptional
drying performance every day. Door opens at the temperature
that is safe to your kitchen furniture, thus door will not be opened
when the option of SHORT TIME is on.
As additional steam protection, special designed protection foil is
added together with the dishwasher. To see how to mount protec-
tion foil please refer to (INSTALLATION GUIDE).
NaturalDry functionality could be disabled by the user as follows:
1. Go to the Dishwasher software menu pressing and holding
button (6 sec).
2. You are currently in Light Control Menu (please refer to
OPERATION INDICATOR description), if you don’t want to
change anything please press and hold button (until one of
the two letters appears on the display)
3. You switched to NaturalDry Control Menu, you could change
status of NaturalDry functionality by pressing button:
E – enabled d – disabled
To conrm the change and exit from the Control Menu please
press and hold button (3 sec).
DELAY
The start time of the program may be delayed for a period
of time between 1 and 12 hours.
1. Press the DELAY button: the corresponding «h» symbol
appears on the display; each time you press the button,
the time (1h, 2h, etc. up to max. 12h) from the start of
the selected wash cycle will be increased.
2. Select the wash program, press the START/PAUSE
button and within 4 seconds close the door: the timer
will begin counting down.
3. Once this time has elapsed, the indicator light «h»
switches off and the wash cycle begins.
To adjust the delay time and select a shorter period of time,
press the DELAY button. To cancel it, press the button
repeatedly until the selected delayed start indicator light
«h» switches off.
The DELAY function cannot be set once a wash cycle
has been started.
FLEXI WASH
If there are not many dishes to be washed, a half loading
may be used in order to save water, electricity and
detergent.
Select the program and then press the FLEXI WASH button:
the symbol of the chosen rack will appear on the display.
By default the appliance washes dishes in all racks.
To wash only the specic rack, press this button repeatedly:
shown on the display (only lower rack)
shown on the display (only upper rack)
shown on the display (only cutlery rack)
shown on the display (option is OFF and the appliance will
wash dishes in all racks).
Remember to load the upper or lower rack only, and to
reduce the amount of detergent accordingly.
If upper rack is removed, please apply detergent
directly to tub instead of detergent dispenser.
SHORT TIME
This option can be used to reduce the duration of the main
programs while maintaining the same washing and drying
performance levels.
After selecting the program, press the SHORT TIME button
and the indicator light will switch on. To deselect the option,
press the same button again.
EXTRA DRY
To improve the drying of the dishes, after selecting the
program, press the EXTRA DRY button and the indicator
light comes on.
A higher temperature during the nal rinse and an extended
drying phase allow for improving drying. To deselect the
option, press the same button again. The EXTRA DRY
option results in the lengthening of the wash cycle.
OPERATION INDICATOR
A LED light projected on the oor indicates that the
dishwasher is working. One of the following operating
modes can be selected:
a) Disabled function.
b) When the cycle starts the light goes on for few seconds,
stays off during the cycle and ashes at the end of the
cycle.
c) The light stays on during the cycle and ashes at the
end of the cycle (default mode).
If the delayed start was set, the light goes on either for the
rst few seconds or the entire duration of the countdown,
based on whether mode b) or c) was set.
The light goes off every time the door is opened. To select
the mode you prefer, switch on the machine, hold down
button P until one of the three letters appears on the display,
press button P until you reach the desired letter (or mode),
hold down button P to conrm the selection.
Note: If NaturalDry is active and it opens the door, then
Operation Indicator will not ash at the end of cycle.
FLEXIBLE WASH
If there are not many dishes to be washed, a half
loading may be used in order to save water, electricity
and detergent.
Select the program and then press the FLEXIBLE
WASH button: the symbol of the chosen rack will
appear on the display.
By default the appliance washes dishes in all racks.
To wash only the specic rack, press this button
repeatedly:
EN
11
OPTIONS AND FUNCTIONS
OPTIONS can be selected directly by pressing the corresponding button (see CONTROL PANEL).
If an option is not compatible with the selected program see PROGRAMS TABLE, the corresponding LED ashes rapidly 3 times
and beeps will sound. The option will not be enabled.
TABLET (Tab)
This setting allows you to optimize the performance of
the program according to the type of detergent used.
Press the START/PAUSE button for 3 seconds (the
corresponding symbol will light up) if you use combined
detergents in tablet form (rinse aid, salt and detergent in
1 dose).
If you use powder or liquid detergent, this option
should be off.
NaturalDry
NaturalDry is a convection drying system which automatically
opens the door during/after drying phase to ensure exceptional
drying performance every day. Door opens at the temperature
that is safe to your kitchen furniture, thus door will not be opened
when the option of SHORT TIME is on.
As additional steam protection, special designed protection foil is
added together with the dishwasher. To see how to mount protec-
tion foil please refer to (INSTALLATION GUIDE).
NaturalDry functionality could be disabled by the user as follows:
1. Go to the Dishwasher software menu pressing and holding
button (6 sec).
2. You are currently in Light Control Menu (please refer to
OPERATION INDICATOR description), if you don’t want to
change anything please press and hold button (until one of
the two letters appears on the display)
3. You switched to NaturalDry Control Menu, you could change
status of NaturalDry functionality by pressing button:
E – enabled d – disabled
To conrm the change and exit from the Control Menu please
press and hold button (3 sec).
DELAY
The start time of the program may be delayed for a period
of time between 1 and 12 hours.
1. Press the DELAY button: the corresponding «h» symbol
appears on the display; each time you press the button,
the time (1h, 2h, etc. up to max. 12h) from the start of
the selected wash cycle will be increased.
2. Select the wash program, press the START/PAUSE
button and within 4 seconds close the door: the timer
will begin counting down.
3. Once this time has elapsed, the indicator light «h»
switches off and the wash cycle begins.
To adjust the delay time and select a shorter period of time,
press the DELAY button. To cancel it, press the button
repeatedly until the selected delayed start indicator light
«h» switches off.
The DELAY function cannot be set once a wash cycle
has been started.
FLEXI WASH
If there are not many dishes to be washed, a half loading
may be used in order to save water, electricity and
detergent.
Select the program and then press the FLEXI WASH button:
the symbol of the chosen rack will appear on the display.
By default the appliance washes dishes in all racks.
To wash only the specic rack, press this button repeatedly:
shown on the display (only lower rack)
shown on the display (only upper rack)
shown on the display (only cutlery rack)
shown on the display (option is OFF and the appliance will
wash dishes in all racks).
Remember to load the upper or lower rack only, and to
reduce the amount of detergent accordingly.
If upper rack is removed, please apply detergent
directly to tub instead of detergent dispenser.
SHORT TIME
This option can be used to reduce the duration of the main
programs while maintaining the same washing and drying
performance levels.
After selecting the program, press the SHORT TIME button
and the indicator light will switch on. To deselect the option,
press the same button again.
EXTRA DRY
To improve the drying of the dishes, after selecting the
program, press the EXTRA DRY button and the indicator
light comes on.
A higher temperature during the nal rinse and an extended
drying phase allow for improving drying. To deselect the
option, press the same button again. The EXTRA DRY
option results in the lengthening of the wash cycle.
OPERATION INDICATOR
A LED light projected on the oor indicates that the
dishwasher is working. One of the following operating
modes can be selected:
a) Disabled function.
b) When the cycle starts the light goes on for few seconds,
stays off during the cycle and ashes at the end of the
cycle.
c) The light stays on during the cycle and ashes at the
end of the cycle (default mode).
If the delayed start was set, the light goes on either for the
rst few seconds or the entire duration of the countdown,
based on whether mode b) or c) was set.
The light goes off every time the door is opened. To select
the mode you prefer, switch on the machine, hold down
button P until one of the three letters appears on the display,
press button P until you reach the desired letter (or mode),
hold down button P to conrm the selection.
Note: If NaturalDry is active and it opens the door, then
Operation Indicator will not ash at the end of cycle.
shown on the display (only lower rack)
shown on the display (only upper rack)
shown on the display (only cutlery rack)
shown on the display (option is OFF and the appliance
will wash dishes in all racks).
Remember to load the upper or lower rack only, and to reduce
the amount of detergent accordingly. If upper rack is removed,
please apply detergent directly to tub instead of detergent
dispenser.
9
ENGLISH
1. Press the DELAY button: the corresponding «h» symbol
appears on the display; each time you press the button,
the time (1h, 2h, etc. up to max. 12h) from the start of
the selected wash cycle will be increased.
2. Select the wash program, press the START/PAUSE
button and within 4 seconds close the door: the timer
will begin counting down.
3. Once this time has elapsed, the indicator light «h»
switches off and the wash cycle begins.
To adjust the delay time and select a shorter period of time,
press the DELAY button. To cancel it, press the button
repeatedly until the selected delayed start indicator light
«h» switches off.
The DELAY function cannot be set once a wash cycle
has been started.
NaturalDry
Door opening system NaturalDry is a convection drying system
which automatically opens the door during/after drying phase to
ensure exceptional drying performance every day. Door opens at
the temperature that is safe to your kitchen furniture.
As additional steam protection, special designed protection foil is
added together with the dishwasher. To see how to mount protec-
tion foil please refer to (INSTALLATION GUIDE).
NaturalDry functionality could be disabled by the user as follows:
1. Go to the Dishwasher software menu pressing and holding
button (6 sec).
2. You switched to NaturalDry Control Menu, you could change
status of NaturalDry functionality by pressing button:
E – enabled d – disabled
To conrm the change and exit from the Control Menu please
press and hold button (3 sec).
DELAY
The start time of the program may be delayed for a period
of time between 1 and 12 hours.
Program
Drying
phase
Natural
Dry
Available
options *)
Duration of
wash pro-
gram
(h:min)**)
Water
consumption
(litres/cycle)
Energy
consumption
(kWh/cycle)
50° 2:45 12.0 0.92
1 Eco
2 Conventional
wash and dry 55° 2:00 15.0 1.35
3Intensive 65° - 2:30 15.0 1.50
4Fast 50° -- 0:55 11.5 1.10
5Sanitizing 65° - 1:40 11.5 1.30
6Pre-Wash
-
-- 0:10 4.5 0.01
7Self-Clean 65° --0:50 8.0 0.80
ECO program data is measured under laboratory conditions according to European Standard EN 60436:2019.
Note for Test Laboratories: For information on comparative EN testing conditions, please send an email to the following
address: [email protected]
Pre-treatment of the dishes is not needed before any of the programs.
*) Not all options can be used simultaneously.
**) Values given for programes other than the eco program are indicative only. The actual time may vary depending on many
factors such as temperature and pressure of the incoming water, room temperature, amount of detergent, quantity and type of
load, load balancing, additional selected options and sensor calibration.
Standby consumption: Left-on mode consumption: 5 W - Off mode consumption: 0.5 W
PROGRAMS DESCRIPTION
DELAY
The start time of the program may be delayed for a
period of time between 1 and 12 hours.
1. Press the DELAY button: the corresponding «h»
symbol appears on the display; each time you press
the button, the time (1h, 2h, etc. up to max. 12h) from
the start of the selected wash cycle will be increased.
2. Select the wash program, press the START/PAUSE
button and within 4 seconds close the door: the timer
will begin counting down.
3. Once this time has elapsed, the indicator light «h»
switches o and the wash cycle begins.
To adjust the delay time and select a shorter period
of time, press the DELAY button. To cancel it, press
the button repeatedly until the selected delayed start
indicator light «h» switches o.
The DELAY function cannot be set once a wash
cycle has been started.
EN
11
OPTIONS AND FUNCTIONS
OPTIONS can be selected directly by pressing the corresponding button (see CONTROL PANEL).
If an option is not compatible with the selected program see PROGRAMS TABLE, the corresponding LED ashes rapidly 3 times
and beeps will sound. The option will not be enabled.
TABLET (Tab)
This setting allows you to optimize the performance of
the program according to the type of detergent used.
Press the START/PAUSE button for 3 seconds (the
corresponding symbol will light up) if you use combined
detergents in tablet form (rinse aid, salt and detergent in
1 dose).
If you use powder or liquid detergent, this option
should be off.
NaturalDry
NaturalDry is a convection drying system which automatically
opens the door during/after drying phase to ensure exceptional
drying performance every day. Door opens at the temperature
that is safe to your kitchen furniture, thus door will not be opened
when the option of SHORT TIME is on.
As additional steam protection, special designed protection foil is
added together with the dishwasher. To see how to mount protec-
tion foil please refer to (INSTALLATION GUIDE).
NaturalDry functionality could be disabled by the user as follows:
1. Go to the Dishwasher software menu pressing and holding
button (6 sec).
2. You are currently in Light Control Menu (please refer to
OPERATION INDICATOR description), if you don’t want to
change anything please press and hold button (until one of
the two letters appears on the display)
3. You switched to NaturalDry Control Menu, you could change
status of NaturalDry functionality by pressing button:
E – enabled d – disabled
To conrm the change and exit from the Control Menu please
press and hold button (3 sec).
DELAY
The start time of the program may be delayed for a period
of time between 1 and 12 hours.
1. Press the DELAY button: the corresponding «h» symbol
appears on the display; each time you press the button,
the time (1h, 2h, etc. up to max. 12h) from the start of
the selected wash cycle will be increased.
2. Select the wash program, press the START/PAUSE
button and within 4 seconds close the door: the timer
will begin counting down.
3. Once this time has elapsed, the indicator light «h»
switches off and the wash cycle begins.
To adjust the delay time and select a shorter period of time,
press the DELAY button. To cancel it, press the button
repeatedly until the selected delayed start indicator light
«h» switches off.
The DELAY function cannot be set once a wash cycle
has been started.
FLEXI WASH
If there are not many dishes to be washed, a half loading
may be used in order to save water, electricity and
detergent.
Select the program and then press the FLEXI WASH button:
the symbol of the chosen rack will appear on the display.
By default the appliance washes dishes in all racks.
To wash only the specic rack, press this button repeatedly:
shown on the display (only lower rack)
shown on the display (only upper rack)
shown on the display (only cutlery rack)
shown on the display (option is OFF and the appliance will
wash dishes in all racks).
Remember to load the upper or lower rack only, and to
reduce the amount of detergent accordingly.
If upper rack is removed, please apply detergent
directly to tub instead of detergent dispenser.
SHORT TIME
This option can be used to reduce the duration of the main
programs while maintaining the same washing and drying
performance levels.
After selecting the program, press the SHORT TIME button
and the indicator light will switch on. To deselect the option,
press the same button again.
EXTRA DRY
To improve the drying of the dishes, after selecting the
program, press the EXTRA DRY button and the indicator
light comes on.
A higher temperature during the nal rinse and an extended
drying phase allow for improving drying. To deselect the
option, press the same button again. The EXTRA DRY
option results in the lengthening of the wash cycle.
OPERATION INDICATOR
A LED light projected on the oor indicates that the
dishwasher is working. One of the following operating
modes can be selected:
a) Disabled function.
b) When the cycle starts the light goes on for few seconds,
stays off during the cycle and ashes at the end of the
cycle.
c) The light stays on during the cycle and ashes at the
end of the cycle (default mode).
If the delayed start was set, the light goes on either for the
rst few seconds or the entire duration of the countdown,
based on whether mode b) or c) was set.
The light goes off every time the door is opened. To select
the mode you prefer, switch on the machine, hold down
button P until one of the three letters appears on the display,
press button P until you reach the desired letter (or mode),
hold down button P to conrm the selection.
Note: If NaturalDry is active and it opens the door, then
Operation Indicator will not ash at the end of cycle.
SHORT TIME
This option can be used to reduce the duration of the
main programs while maintaining the same washing
and drying performance levels. After selecting the
program, press the SHORT TIME button and the
indicator light will switch on. To deselect the option,
press the same button again.
EN
11
OPTIONS AND FUNCTIONS
OPTIONS can be selected directly by pressing the corresponding button (see CONTROL PANEL).
If an option is not compatible with the selected program see PROGRAMS TABLE, the corresponding LED ashes rapidly 3 times
and beeps will sound. The option will not be enabled.
TABLET (Tab)
This setting allows you to optimize the performance of
the program according to the type of detergent used.
Press the START/PAUSE button for 3 seconds (the
corresponding symbol will light up) if you use combined
detergents in tablet form (rinse aid, salt and detergent in
1 dose).
If you use powder or liquid detergent, this option
should be off.
NaturalDry
NaturalDry is a convection drying system which automatically
opens the door during/after drying phase to ensure exceptional
drying performance every day. Door opens at the temperature
that is safe to your kitchen furniture, thus door will not be opened
when the option of SHORT TIME is on.
As additional steam protection, special designed protection foil is
added together with the dishwasher. To see how to mount protec-
tion foil please refer to (INSTALLATION GUIDE).
NaturalDry functionality could be disabled by the user as follows:
1. Go to the Dishwasher software menu pressing and holding
button (6 sec).
2. You are currently in Light Control Menu (please refer to
OPERATION INDICATOR description), if you don’t want to
change anything please press and hold button (until one of
the two letters appears on the display)
3. You switched to NaturalDry Control Menu, you could change
status of NaturalDry functionality by pressing button:
E – enabled d – disabled
To conrm the change and exit from the Control Menu please
press and hold button (3 sec).
DELAY
The start time of the program may be delayed for a period
of time between 1 and 12 hours.
1. Press the DELAY button: the corresponding «h» symbol
appears on the display; each time you press the button,
the time (1h, 2h, etc. up to max. 12h) from the start of
the selected wash cycle will be increased.
2. Select the wash program, press the START/PAUSE
button and within 4 seconds close the door: the timer
will begin counting down.
3. Once this time has elapsed, the indicator light «h»
switches off and the wash cycle begins.
To adjust the delay time and select a shorter period of time,
press the DELAY button. To cancel it, press the button
repeatedly until the selected delayed start indicator light
«h» switches off.
The DELAY function cannot be set once a wash cycle
has been started.
FLEXI WASH
If there are not many dishes to be washed, a half loading
may be used in order to save water, electricity and
detergent.
Select the program and then press the FLEXI WASH button:
the symbol of the chosen rack will appear on the display.
By default the appliance washes dishes in all racks.
To wash only the specic rack, press this button repeatedly:
shown on the display (only lower rack)
shown on the display (only upper rack)
shown on the display (only cutlery rack)
shown on the display (option is OFF and the appliance will
wash dishes in all racks).
Remember to load the upper or lower rack only, and to
reduce the amount of detergent accordingly.
If upper rack is removed, please apply detergent
directly to tub instead of detergent dispenser.
SHORT TIME
This option can be used to reduce the duration of the main
programs while maintaining the same washing and drying
performance levels.
After selecting the program, press the SHORT TIME button
and the indicator light will switch on. To deselect the option,
press the same button again.
EXTRA DRY
To improve the drying of the dishes, after selecting the
program, press the EXTRA DRY button and the indicator
light comes on.
A higher temperature during the nal rinse and an extended
drying phase allow for improving drying. To deselect the
option, press the same button again. The EXTRA DRY
option results in the lengthening of the wash cycle.
OPERATION INDICATOR
A LED light projected on the oor indicates that the
dishwasher is working. One of the following operating
modes can be selected:
a) Disabled function.
b) When the cycle starts the light goes on for few seconds,
stays off during the cycle and ashes at the end of the
cycle.
c) The light stays on during the cycle and ashes at the
end of the cycle (default mode).
If the delayed start was set, the light goes on either for the
rst few seconds or the entire duration of the countdown,
based on whether mode b) or c) was set.
The light goes off every time the door is opened. To select
the mode you prefer, switch on the machine, hold down
button P until one of the three letters appears on the display,
press button P until you reach the desired letter (or mode),
hold down button P to conrm the selection.
Note: If NaturalDry is active and it opens the door, then
Operation Indicator will not ash at the end of cycle.
EXTRA DRY
To improve the drying of the dishes, after selecting
the program, press the EXTRA DRY button and the
indicator light comes on. A higher temperature
during the nal rinse and an extended drying phase
allow for improving drying. To deselect the option,
press the same button again. The EXTRA DRY option
results in the lengthening of the wash cycle.
1. CHECK WATER CONNECTION
Check that the dishwasher is connected to the water supply
and that the tap is open.
2. SWITCH ON THE DISHWASHER
Open the door and press the ON/OFF button.
3.
4.
LOAD THE RACKS (see LOADING THE RACKS)
FILLING THE DETERGENT DISPENSER
(see PROGRAMS TABLE).
5.
6.
7.
CHOOSE THE PROGRAM AND CUSTOMISE THE CYCLE
Select the most appropriate program in accordance with the
type of crockery and its soiling level (see PROGRAMS
DESCRIPTION) by pressing the button.
Select the desired options (see OPTIONS AND FUNCTIONS).
START
Start the wash cycle by pressing START/Pause button (led
is lit) and closing the door within 4 sec. When the program
starts you hear a single beep. If the door was not closed within
4sec., the alarm sound will be played. In this case, open the
door, press START/Pause button and close the door again
within 4 sec.
END OF WASH CYCLE
The end of the wash cycle is indicated by beeps and by the
ashing of the wash cycle number on the display. Open the
door and switch off the appliance by pressing the ON/OFF
button.
Wait for a few minutes before removing the crockery - to avoid
burns. Unload the racks, beginning with the lower one.
The machine will switch off automatically during certain
extended periods of inactivity, in order to minimise electri-
city consumption. If the crockery is only lightly soiled or
if it has been rinsed with water before being placed in the
dishwasher, reduce the amount of detergent used accordingly.
MODIFYING A RUNNING PROGRAM
If a wrong program was selected, it is possible to change it, pro-
vided that it has only just begun: open the door, press and hold
the ON/OFF button, the machine will switch off.
Switch the machine back on using the ON/OFF button and select
the new wash cycle and any desired options; Start the wash cycle
by pressing START/Pause button and closing the door within 4 sec.
ADDING EXTRA CROCKERY
Without switching off the machine, open the door (START/Pause
led starts blinking) (be ware of HOT steam!) and place the
crockery inside the dishwasher. Press the START/Pause button
and close the door within 4 sec., the cycle will resume from the
point at which it was interrupted.
ACCIDENTAL INTERRUPTIONS
If the door is opened during the wash cycle, or if there is a power
cut, the cycle stops. Press the START/Pause button and close
the door within 4 sec., the cycle will resume from the point at
which it was interrupted.
DAILY USE
Functions
1. ECO - Normally soiled crockery. Standard program, the most efficient in terms of its combined energy and water
consumption.
2. NORMAL - Mixed soil. For normally soiled dishes with dried food residues.
3. INTENSIVE - Program recommended for heavily soiled crockery, especially suitable for pans and saucepans (not to be used
for delicate items).
4. PRE-WASH - Use to refresh crockery planned to be washed later. No detergent to be used with this program.
5. FAST - Normally soiled crockery. Everyday cycle, that ensures optimal cleaning performance in shorter time.
6. SANITIZING - Normally or heavily soiled crockery, with additional antibacterial wash. Can be used to perform
maintenance of the dishwasher.
7. SELF- CLEAN - Program to be used to perform maintenance of the dishwasher. It cleans the interior of the appliance
using hot water.
OPTIONS can be selected directly by pressing the corresponding button (see CONTROL PANEL).
If an option is not compatible with the selected program see PROGRAMS TABLE, the corresponding LED � � � �rapidly 3 times
and beeps will sound. The option will not be enabled.
HALF LOAD
If there are not many dishes to be washed, a half load
cycle may be used in order to save water, electricity and
detergent. Select the program and press the HALF LOAD
button: the indicator light will light up. Press the HALF
LOAD button to deselect this option.
Remember to halve the amount of detergent.
To adjust the delay time and select a shorter period of time,
press the DELAY button. To cancel it, press the button
repeatedly until the selected delayed start indicator light
«h» switches off.
The DELAY function cannot be set once a wash cycle
has been started.
TABLET (Tab)
This setting allows you to optimize the performance of
the program according to the type of detergent used.
Press the START/PAUSE button for 3 seconds (the
corresponding symbol will light up) if you use combined
detergents in tablet form (rinse aid, salt and detergent in
1 dose).
If you use powder or liquid detergent, this option
should be off.
1. Go to the Dishwasher software menu pressing and holding
button (6 sec).
2. You switched to NaturalDry Control Menu, you could change
status of NaturalDry functionality by pressing button:
E – enabled d – disabled
To conrm the change and exit from the Control Menu please
press and hold button (3 sec).
TABLET (Tab)
This setting allows you to optimize the performance
of the program according to the type of detergent
used. Press the START/PAUSE button for 3 seconds
(the corresponding symbol will light up) if you use
combined detergents in tablet form (rinse aid, salt
and detergent in 1 dose).
If you use powder or liquid detergent, this option
should be o.
EN
11
OPTIONS AND FUNCTIONS
OPTIONS can be selected directly by pressing the corresponding button (see CONTROL PANEL).
If an option is not compatible with the selected program see PROGRAMS TABLE, the corresponding LED ashes rapidly 3 times
and beeps will sound. The option will not be enabled.
TABLET (Tab)
This setting allows you to optimize the performance of
the program according to the type of detergent used.
Press the START/PAUSE button for 3 seconds (the
corresponding symbol will light up) if you use combined
detergents in tablet form (rinse aid, salt and detergent in
1 dose).
If you use powder or liquid detergent, this option
should be off.
NaturalDry
NaturalDry is a convection drying system which automatically
opens the door during/after drying phase to ensure exceptional
drying performance every day. Door opens at the temperature
that is safe to your kitchen furniture, thus door will not be opened
when the option of SHORT TIME is on.
As additional steam protection, special designed protection foil is
added together with the dishwasher. To see how to mount protec-
tion foil please refer to (INSTALLATION GUIDE).
NaturalDry functionality could be disabled by the user as follows:
1. Go to the Dishwasher software menu pressing and holding
button (6 sec).
2. You are currently in Light Control Menu (please refer to
OPERATION INDICATOR description), if you don’t want to
change anything please press and hold button (until one of
the two letters appears on the display)
3. You switched to NaturalDry Control Menu, you could change
status of NaturalDry functionality by pressing button:
E – enabled d – disabled
To conrm the change and exit from the Control Menu please
press and hold button (3 sec).
DELAY
The start time of the program may be delayed for a period
of time between 1 and 12 hours.
1. Press the DELAY button: the corresponding «h» symbol
appears on the display; each time you press the button,
the time (1h, 2h, etc. up to max. 12h) from the start of
the selected wash cycle will be increased.
2. Select the wash program, press the START/PAUSE
button and within 4 seconds close the door: the timer
will begin counting down.
3. Once this time has elapsed, the indicator light «h»
switches off and the wash cycle begins.
To adjust the delay time and select a shorter period of time,
press the DELAY button. To cancel it, press the button
repeatedly until the selected delayed start indicator light
«h» switches off.
The DELAY function cannot be set once a wash cycle
has been started.
FLEXI WASH
If there are not many dishes to be washed, a half loading
may be used in order to save water, electricity and
detergent.
Select the program and then press the FLEXI WASH button:
the symbol of the chosen rack will appear on the display.
By default the appliance washes dishes in all racks.
To wash only the specic rack, press this button repeatedly:
shown on the display (only lower rack)
shown on the display (only upper rack)
shown on the display (only cutlery rack)
shown on the display (option is OFF and the appliance will
wash dishes in all racks).
Remember to load the upper or lower rack only, and to
reduce the amount of detergent accordingly.
If upper rack is removed, please apply detergent
directly to tub instead of detergent dispenser.
SHORT TIME
This option can be used to reduce the duration of the main
programs while maintaining the same washing and drying
performance levels.
After selecting the program, press the SHORT TIME button
and the indicator light will switch on. To deselect the option,
press the same button again.
EXTRA DRY
To improve the drying of the dishes, after selecting the
program, press the EXTRA DRY button and the indicator
light comes on.
A higher temperature during the nal rinse and an extended
drying phase allow for improving drying. To deselect the
option, press the same button again. The EXTRA DRY
option results in the lengthening of the wash cycle.
OPERATION INDICATOR
A LED light projected on the oor indicates that the
dishwasher is working. One of the following operating
modes can be selected:
a) Disabled function.
b) When the cycle starts the light goes on for few seconds,
stays off during the cycle and ashes at the end of the
cycle.
c) The light stays on during the cycle and ashes at the
end of the cycle (default mode).
If the delayed start was set, the light goes on either for the
rst few seconds or the entire duration of the countdown,
based on whether mode b) or c) was set.
The light goes off every time the door is opened. To select
the mode you prefer, switch on the machine, hold down
button P until one of the three letters appears on the display,
press button P until you reach the desired letter (or mode),
hold down button P to conrm the selection.
Note: If NaturalDry is active and it opens the door, then
Operation Indicator will not ash at the end of cycle.
OPERATION INDICATOR
A LED light projected on the oor indicates that
the dishwasher is working. One of the following
operating modes can be selected:
a) Disabled function.
b) When the cycle starts the light goes on for a few
seconds, stays o during the cycle and ashes at the
end of the cycle.
c) The light stays on during the cycle and ashes at
the end of the cycle (default mode).
If the delayed start was set, the light goes on either
for the rst few seconds or the entire duration of the
countdown, based on whether mode b) or c) was set.
The light goes o every time the door is opened.
To select the mode you prefer, switch on the machine,
hold down button
ENGLISH
8
• Switch on the appliance by pressing the ON/OFF button.
• Switch off the appliance by pressing the ON/OFF button.
• Hold down button for 5 seconds, until you hear a beep.
• Switch on the appliance by pressing the ON/OFF button.
•
•
The current selection level number and the salt indicator light
������
Press button to select the desired hardness level (see
WATER HARDNESS TABLE).
• Switch off the appliance by pressing the ON/OFF button.
Setting is complete!
Water Hardness Table
Level °dH
German degrees
°fH
French degrees
1 Soft 0 - 6 0 - 10
2 Medium 7 - 11 11 - 20
3 Average 12 - 17 21 - 30
4 Hard 18 - 34 31 - 60
5 Very hard 35 - 50 61 - 90
Make sure the cap is screwed on tightly, so that no detergent can
get into the container during the wash program (this could damage
the water softener beyond repair).
As soon as this procedure is complete, run a program without
loading. The “Pre-Wash” program alone is NOT������
Residual saline solution or grains of salt can lead to corrosion,
irreparably damaging the stainless steel components.
The guarantee is not applicable if faults are caused by such
circumstances.
��������������������������������s.
��������������������������������
heating element may be damaged as a result.
Whenever you need to add salt, it is mandatory to complete
the procedure before the beginning of the washing cycle.
SETTING THE WATER HARDNESS
To allow the water softener to work in a perfect way, it is essential
that the water hardness setting is based on the actual water hard-
ness in your house. This information can be obtained from your local
water supplier. The factory setting is for average (3) water hardness.
FILLING THE RINSE AID DISPENSER
Rinse aid makes dish DRYING easier. The rinse aid dispenser A
should be lled when the RINSE AID REFILL indicator light
in the control panel is lit.
1. Open the dispenser B by pressing and pulling up the tab on
the lid.
2. Carefully introduce the rinse aid as far as the maximum
(110 ml) reference notch of the lling space - avoid spilling it.
If this happens, clean the spill immediately with a dry cloth.
3. Press the lid down until you hear a click to close it.
NEVER pour the rinse aid directly into the tub.
A
B
ADJUSTING THE DOSAGE OF RINSE AID
If you are not completely satised with the drying results, you can
adjust the quantity of rinse aid used.
• Switch the dishwasher on using the ON/OFF button.
• Switch it off using the ON/OFF button.
• Press button three times - a beep will be heard.
• Switch it on using the ON/OFF button.
•
•
The current selection level number and rinse aid indicator light ash.
Press button to select the level of rinse aid quantity to be
supplied.
• Switch it off using the ON/OFF button.
Setting is complete!
If the rinse aid level is set to ZERO (ECO), no rinse aid will be
supplied. The LOW RINSE AID indicator light will not be lit if you
run out of rinse aid. A maximum of 5 levels can be set according to
the dishwasher model. The factory setting is specic to the model,
please follow instruction above to check this for your machine.
•If you see bluish streaks on the dishes, set a low number (1-2).
• If there are drops of water or limescale marks on the dishes,
set a high number (3-4).
FILLING THE DETERGENT DISPENSER
������������������������������
dishwashers.
To achieve the best washing and drying results, the combined
useof detergent, rinse aid liquid and rened salt is required.
We recommend using detergents that do not contain phosphates
or chlorine, as these products are harmful to the environment.
Good washing results also depend on the correct amount of
detergent being used.
Exceeding the stated amount does not result in a more effective
wash and increases environmental pollution.
The amount can be adjusted to the soil level. In the case of
normally soiled items, use approximately either 35g (powder
detergent) or 35ml (liquid detergent) and additional tea spoon of
detergent directly inside the tub. If tablets are used, one tablet
will be enough.
If the crockery is only lightly soiled or if it has been rinsed with
water before being placed in the dishwasher, reduce the amount
of detergent used accordingly (minimum 25 g/ml) e.g. skip the
powder/gel putted inside the tub.
To open the detergent dispenser
press button A.
Introduce the detergent into
the dry dispenser B only.
Place the amount of detergent
for pre-washing directly inside
the tub.
A
B
1.
2.
When measuring out the detergent refer to the mentioned ear-
lier information to add the proper quantity. Inside the dispenser
B there are indications to help the detergent dosing.
Remove detergent residues from the edges of the dispenser
and close the cover until it clicks.
3. Close the lid of the detergent dispenser by pulling it up until
the closing device is secured in place.
The detergent dispenser automatically opens up at the right time
according to the program. If all-in-one detergents are used, we
recommend using the TABLET button, because it adjusts the
program so that the best washing and drying results are always
achieved.
until one of the three letters
Functions

ENGLISH 11
appears on the display, press button
ENGLISH
8
• Switch on the appliance by pressing the ON/OFF button.
• Switch off the appliance by pressing the ON/OFF button.
• Hold down button for 5 seconds, until you hear a beep.
• Switch on the appliance by pressing the ON/OFF button.
•
•
The current selection level number and the salt indicator light
������
Press button to select the desired hardness level (see
WATER HARDNESS TABLE).
• Switch off the appliance by pressing the ON/OFF button.
Setting is complete!
Water Hardness Table
Level °dH
German degrees
°fH
French degrees
1 Soft 0 - 6 0 - 10
2 Medium 7 - 11 11 - 20
3 Average 12 - 17 21 - 30
4 Hard 18 - 34 31 - 60
5 Very hard 35 - 50 61 - 90
Make sure the cap is screwed on tightly, so that no detergent can
get into the container during the wash program (this could damage
the water softener beyond repair).
As soon as this procedure is complete, run a program without
loading. The “Pre-Wash” program alone is NOT������
Residual saline solution or grains of salt can lead to corrosion,
irreparably damaging the stainless steel components.
The guarantee is not applicable if faults are caused by such
circumstances.
��������������������������������s.
��������������������������������
heating element may be damaged as a result.
Whenever you need to add salt, it is mandatory to complete
the procedure before the beginning of the washing cycle.
SETTING THE WATER HARDNESS
To allow the water softener to work in a perfect way, it is essential
that the water hardness setting is based on the actual water hard-
ness in your house. This information can be obtained from your local
water supplier. The factory setting is for average (3) water hardness.
FILLING THE RINSE AID DISPENSER
Rinse aid makes dish DRYING easier. The rinse aid dispenser A
should be lled when the RINSE AID REFILL indicator light
in the control panel is lit.
1. Open the dispenser B by pressing and pulling up the tab on
the lid.
2. Carefully introduce the rinse aid as far as the maximum
(110 ml) reference notch of the lling space - avoid spilling it.
If this happens, clean the spill immediately with a dry cloth.
3. Press the lid down until you hear a click to close it.
NEVER pour the rinse aid directly into the tub.
A
B
ADJUSTING THE DOSAGE OF RINSE AID
If you are not completely satised with the drying results, you can
adjust the quantity of rinse aid used.
• Switch the dishwasher on using the ON/OFF button.
• Switch it off using the ON/OFF button.
• Press button three times - a beep will be heard.
• Switch it on using the ON/OFF button.
•
•
The current selection level number and rinse aid indicator light ash.
Press button to select the level of rinse aid quantity to be
supplied.
• Switch it off using the ON/OFF button.
Setting is complete!
If the rinse aid level is set to ZERO (ECO), no rinse aid will be
supplied. The LOW RINSE AID indicator light will not be lit if you
run out of rinse aid. A maximum of 5 levels can be set according to
the dishwasher model. The factory setting is specic to the model,
please follow instruction above to check this for your machine.
•If you see bluish streaks on the dishes, set a low number (1-2).
• If there are drops of water or limescale marks on the dishes,
set a high number (3-4).
FILLING THE DETERGENT DISPENSER
������������������������������
dishwashers.
To achieve the best washing and drying results, the combined
useof detergent, rinse aid liquid and rened salt is required.
We recommend using detergents that do not contain phosphates
or chlorine, as these products are harmful to the environment.
Good washing results also depend on the correct amount of
detergent being used.
Exceeding the stated amount does not result in a more effective
wash and increases environmental pollution.
The amount can be adjusted to the soil level. In the case of
normally soiled items, use approximately either 35g (powder
detergent) or 35ml (liquid detergent) and additional tea spoon of
detergent directly inside the tub. If tablets are used, one tablet
will be enough.
If the crockery is only lightly soiled or if it has been rinsed with
water before being placed in the dishwasher, reduce the amount
of detergent used accordingly (minimum 25 g/ml) e.g. skip the
powder/gel putted inside the tub.
To open the detergent dispenser
press button A.
Introduce the detergent into
the dry dispenser B only.
Place the amount of detergent
for pre-washing directly inside
the tub.
A
B
1.
2.
When measuring out the detergent refer to the mentioned ear-
lier information to add the proper quantity. Inside the dispenser
B there are indications to help the detergent dosing.
Remove detergent residues from the edges of the dispenser
and close the cover until it clicks.
3. Close the lid of the detergent dispenser by pulling it up until
the closing device is secured in place.
The detergent dispenser automatically opens up at the right time
according to the program. If all-in-one detergents are used, we
recommend using the TABLET button, because it adjusts the
program so that the best washing and drying results are always
achieved.
until you
reach the desired letter (or mode), hold down button
ENGLISH
8
• Switch on the appliance by pressing the ON/OFF button.
• Switch off the appliance by pressing the ON/OFF button.
• Hold down button for 5 seconds, until you hear a beep.
• Switch on the appliance by pressing the ON/OFF button.
•
•
The current selection level number and the salt indicator light
������
Press button to select the desired hardness level (see
WATER HARDNESS TABLE).
• Switch off the appliance by pressing the ON/OFF button.
Setting is complete!
Water Hardness Table
Level °dH
German degrees
°fH
French degrees
1 Soft 0 - 6 0 - 10
2 Medium 7 - 11 11 - 20
3 Average 12 - 17 21 - 30
4 Hard 18 - 34 31 - 60
5 Very hard 35 - 50 61 - 90
Make sure the cap is screwed on tightly, so that no detergent can
get into the container during the wash program (this could damage
the water softener beyond repair).
As soon as this procedure is complete, run a program without
loading. The “Pre-Wash” program alone is NOT������
Residual saline solution or grains of salt can lead to corrosion,
irreparably damaging the stainless steel components.
The guarantee is not applicable if faults are caused by such
circumstances.
��������������������������������s.
��������������������������������
heating element may be damaged as a result.
Whenever you need to add salt, it is mandatory to complete
the procedure before the beginning of the washing cycle.
SETTING THE WATER HARDNESS
To allow the water softener to work in a perfect way, it is essential
that the water hardness setting is based on the actual water hard-
ness in your house. This information can be obtained from your local
water supplier. The factory setting is for average (3) water hardness.
FILLING THE RINSE AID DISPENSER
Rinse aid makes dish DRYING easier. The rinse aid dispenser A
should be lled when the RINSE AID REFILL indicator light
in the control panel is lit.
1. Open the dispenser B by pressing and pulling up the tab on
the lid.
2. Carefully introduce the rinse aid as far as the maximum
(110 ml) reference notch of the lling space - avoid spilling it.
If this happens, clean the spill immediately with a dry cloth.
3. Press the lid down until you hear a click to close it.
NEVER pour the rinse aid directly into the tub.
A
B
ADJUSTING THE DOSAGE OF RINSE AID
If you are not completely satised with the drying results, you can
adjust the quantity of rinse aid used.
• Switch the dishwasher on using the ON/OFF button.
• Switch it off using the ON/OFF button.
• Press button three times - a beep will be heard.
• Switch it on using the ON/OFF button.
•
•
The current selection level number and rinse aid indicator light ash.
Press button to select the level of rinse aid quantity to be
supplied.
• Switch it off using the ON/OFF button.
Setting is complete!
If the rinse aid level is set to ZERO (ECO), no rinse aid will be
supplied. The LOW RINSE AID indicator light will not be lit if you
run out of rinse aid. A maximum of 5 levels can be set according to
the dishwasher model. The factory setting is specic to the model,
please follow instruction above to check this for your machine.
•If you see bluish streaks on the dishes, set a low number (1-2).
• If there are drops of water or limescale marks on the dishes,
set a high number (3-4).
FILLING THE DETERGENT DISPENSER
������������������������������
dishwashers.
To achieve the best washing and drying results, the combined
useof detergent, rinse aid liquid and rened salt is required.
We recommend using detergents that do not contain phosphates
or chlorine, as these products are harmful to the environment.
Good washing results also depend on the correct amount of
detergent being used.
Exceeding the stated amount does not result in a more effective
wash and increases environmental pollution.
The amount can be adjusted to the soil level. In the case of
normally soiled items, use approximately either 35g (powder
detergent) or 35ml (liquid detergent) and additional tea spoon of
detergent directly inside the tub. If tablets are used, one tablet
will be enough.
If the crockery is only lightly soiled or if it has been rinsed with
water before being placed in the dishwasher, reduce the amount
of detergent used accordingly (minimum 25 g/ml) e.g. skip the
powder/gel putted inside the tub.
To open the detergent dispenser
press button A.
Introduce the detergent into
the dry dispenser B only.
Place the amount of detergent
for pre-washing directly inside
the tub.
A
B
1.
2.
When measuring out the detergent refer to the mentioned ear-
lier information to add the proper quantity. Inside the dispenser
B there are indications to help the detergent dosing.
Remove detergent residues from the edges of the dispenser
and close the cover until it clicks.
3. Close the lid of the detergent dispenser by pulling it up until
the closing device is secured in place.
The detergent dispenser automatically opens up at the right time
according to the program. If all-in-one detergents are used, we
recommend using the TABLET button, because it adjusts the
program so that the best washing and drying results are always
achieved.
to conrm the selection.
Note: If NaturalDry is active and it opens the door, then
Operation Indicator will not ash at the end of cycle.
NATURALDRY
Door opening system NaturalDry is a convection drying system
which automatically opens the door during/after drying phase
to ensure exceptional drying performance every day. Door
opens at the temperature that is safe to your kitchen furniture.
As additional steam protection, special designed protection foil
is added together with the dishwasher. To see how to mount
protection foil please refer to (INSTALLATION GUIDE).
NaturalDry functionality could be disabled by the user as
follows:
1. Go to the Operation Indicator menu as in last step, press and
hold
ENGLISH
8
• Switch on the appliance by pressing the ON/OFF button.
• Switch off the appliance by pressing the ON/OFF button.
• Hold down button for 5 seconds, until you hear a beep.
• Switch on the appliance by pressing the ON/OFF button.
•
•
The current selection level number and the salt indicator light
������
Press button to select the desired hardness level (see
WATER HARDNESS TABLE).
• Switch off the appliance by pressing the ON/OFF button.
Setting is complete!
Water Hardness Table
Level °dH
German degrees
°fH
French degrees
1 Soft 0 - 6 0 - 10
2 Medium 7 - 11 11 - 20
3 Average 12 - 17 21 - 30
4 Hard 18 - 34 31 - 60
5 Very hard 35 - 50 61 - 90
Make sure the cap is screwed on tightly, so that no detergent can
get into the container during the wash program (this could damage
the water softener beyond repair).
As soon as this procedure is complete, run a program without
loading. The “Pre-Wash” program alone is NOT������
Residual saline solution or grains of salt can lead to corrosion,
irreparably damaging the stainless steel components.
The guarantee is not applicable if faults are caused by such
circumstances.
��������������������������������s.
��������������������������������
heating element may be damaged as a result.
Whenever you need to add salt, it is mandatory to complete
the procedure before the beginning of the washing cycle.
SETTING THE WATER HARDNESS
To allow the water softener to work in a perfect way, it is essential
that the water hardness setting is based on the actual water hard-
ness in your house. This information can be obtained from your local
water supplier. The factory setting is for average (3) water hardness.
FILLING THE RINSE AID DISPENSER
Rinse aid makes dish DRYING easier. The rinse aid dispenser A
should be lled when the RINSE AID REFILL indicator light
in the control panel is lit.
1. Open the dispenser B by pressing and pulling up the tab on
the lid.
2. Carefully introduce the rinse aid as far as the maximum
(110 ml) reference notch of the lling space - avoid spilling it.
If this happens, clean the spill immediately with a dry cloth.
3. Press the lid down until you hear a click to close it.
NEVER pour the rinse aid directly into the tub.
A
B
ADJUSTING THE DOSAGE OF RINSE AID
If you are not completely satised with the drying results, you can
adjust the quantity of rinse aid used.
• Switch the dishwasher on using the ON/OFF button.
• Switch it off using the ON/OFF button.
• Press button three times - a beep will be heard.
• Switch it on using the ON/OFF button.
•
•
The current selection level number and rinse aid indicator light ash.
Press button to select the level of rinse aid quantity to be
supplied.
• Switch it off using the ON/OFF button.
Setting is complete!
If the rinse aid level is set to ZERO (ECO), no rinse aid will be
supplied. The LOW RINSE AID indicator light will not be lit if you
run out of rinse aid. A maximum of 5 levels can be set according to
the dishwasher model. The factory setting is specic to the model,
please follow instruction above to check this for your machine.
•If you see bluish streaks on the dishes, set a low number (1-2).
• If there are drops of water or limescale marks on the dishes,
set a high number (3-4).
FILLING THE DETERGENT DISPENSER
������������������������������
dishwashers.
To achieve the best washing and drying results, the combined
useof detergent, rinse aid liquid and rened salt is required.
We recommend using detergents that do not contain phosphates
or chlorine, as these products are harmful to the environment.
Good washing results also depend on the correct amount of
detergent being used.
Exceeding the stated amount does not result in a more effective
wash and increases environmental pollution.
The amount can be adjusted to the soil level. In the case of
normally soiled items, use approximately either 35g (powder
detergent) or 35ml (liquid detergent) and additional tea spoon of
detergent directly inside the tub. If tablets are used, one tablet
will be enough.
If the crockery is only lightly soiled or if it has been rinsed with
water before being placed in the dishwasher, reduce the amount
of detergent used accordingly (minimum 25 g/ml) e.g. skip the
powder/gel putted inside the tub.
To open the detergent dispenser
press button A.
Introduce the detergent into
the dry dispenser B only.
Place the amount of detergent
for pre-washing directly inside
the tub.
A
B
1.
2.
When measuring out the detergent refer to the mentioned ear-
lier information to add the proper quantity. Inside the dispenser
B there are indications to help the detergent dosing.
Remove detergent residues from the edges of the dispenser
and close the cover until it clicks.
3. Close the lid of the detergent dispenser by pulling it up until
the closing device is secured in place.
The detergent dispenser automatically opens up at the right time
according to the program. If all-in-one detergents are used, we
recommend using the TABLET button, because it adjusts the
program so that the best washing and drying results are always
achieved.
until menu appears.
2. Press and hold
ENGLISH
8
• Switch on the appliance by pressing the ON/OFF button.
• Switch off the appliance by pressing the ON/OFF button.
• Hold down button for 5 seconds, until you hear a beep.
• Switch on the appliance by pressing the ON/OFF button.
•
•
The current selection level number and the salt indicator light
������
Press button to select the desired hardness level (see
WATER HARDNESS TABLE).
• Switch off the appliance by pressing the ON/OFF button.
Setting is complete!
Water Hardness Table
Level °dH
German degrees
°fH
French degrees
1 Soft 0 - 6 0 - 10
2 Medium 7 - 11 11 - 20
3 Average 12 - 17 21 - 30
4 Hard 18 - 34 31 - 60
5 Very hard 35 - 50 61 - 90
Make sure the cap is screwed on tightly, so that no detergent can
get into the container during the wash program (this could damage
the water softener beyond repair).
As soon as this procedure is complete, run a program without
loading. The “Pre-Wash” program alone is NOT������
Residual saline solution or grains of salt can lead to corrosion,
irreparably damaging the stainless steel components.
The guarantee is not applicable if faults are caused by such
circumstances.
��������������������������������s.
��������������������������������
heating element may be damaged as a result.
Whenever you need to add salt, it is mandatory to complete
the procedure before the beginning of the washing cycle.
SETTING THE WATER HARDNESS
To allow the water softener to work in a perfect way, it is essential
that the water hardness setting is based on the actual water hard-
ness in your house. This information can be obtained from your local
water supplier. The factory setting is for average (3) water hardness.
FILLING THE RINSE AID DISPENSER
Rinse aid makes dish DRYING easier. The rinse aid dispenser A
should be lled when the RINSE AID REFILL indicator light
in the control panel is lit.
1. Open the dispenser B by pressing and pulling up the tab on
the lid.
2. Carefully introduce the rinse aid as far as the maximum
(110 ml) reference notch of the lling space - avoid spilling it.
If this happens, clean the spill immediately with a dry cloth.
3. Press the lid down until you hear a click to close it.
NEVER pour the rinse aid directly into the tub.
A
B
ADJUSTING THE DOSAGE OF RINSE AID
If you are not completely satised with the drying results, you can
adjust the quantity of rinse aid used.
• Switch the dishwasher on using the ON/OFF button.
• Switch it off using the ON/OFF button.
• Press button three times - a beep will be heard.
• Switch it on using the ON/OFF button.
•
•
The current selection level number and rinse aid indicator light ash.
Press button to select the level of rinse aid quantity to be
supplied.
• Switch it off using the ON/OFF button.
Setting is complete!
If the rinse aid level is set to ZERO (ECO), no rinse aid will be
supplied. The LOW RINSE AID indicator light will not be lit if you
run out of rinse aid. A maximum of 5 levels can be set according to
the dishwasher model. The factory setting is specic to the model,
please follow instruction above to check this for your machine.
•If you see bluish streaks on the dishes, set a low number (1-2).
• If there are drops of water or limescale marks on the dishes,
set a high number (3-4).
FILLING THE DETERGENT DISPENSER
������������������������������
dishwashers.
To achieve the best washing and drying results, the combined
useof detergent, rinse aid liquid and rened salt is required.
We recommend using detergents that do not contain phosphates
or chlorine, as these products are harmful to the environment.
Good washing results also depend on the correct amount of
detergent being used.
Exceeding the stated amount does not result in a more effective
wash and increases environmental pollution.
The amount can be adjusted to the soil level. In the case of
normally soiled items, use approximately either 35g (powder
detergent) or 35ml (liquid detergent) and additional tea spoon of
detergent directly inside the tub. If tablets are used, one tablet
will be enough.
If the crockery is only lightly soiled or if it has been rinsed with
water before being placed in the dishwasher, reduce the amount
of detergent used accordingly (minimum 25 g/ml) e.g. skip the
powder/gel putted inside the tub.
To open the detergent dispenser
press button A.
Introduce the detergent into
the dry dispenser B only.
Place the amount of detergent
for pre-washing directly inside
the tub.
A
B
1.
2.
When measuring out the detergent refer to the mentioned ear-
lier information to add the proper quantity. Inside the dispenser
B there are indications to help the detergent dosing.
Remove detergent residues from the edges of the dispenser
and close the cover until it clicks.
3. Close the lid of the detergent dispenser by pulling it up until
the closing device is secured in place.
The detergent dispenser automatically opens up at the right time
according to the program. If all-in-one detergents are used, we
recommend using the TABLET button, because it adjusts the
program so that the best washing and drying results are always
achieved.
again for 6 seconds to reach the
NaturalDry menu.
3. You switched to NaturalDry Control Menu, you could change
status of NaturalDry functionality by pressing button:
ENGLISH
8
• Switch on the appliance by pressing the ON/OFF button.
• Switch off the appliance by pressing the ON/OFF button.
• Hold down button for 5 seconds, until you hear a beep.
• Switch on the appliance by pressing the ON/OFF button.
•
•
The current selection level number and the salt indicator light
������
Press button to select the desired hardness level (see
WATER HARDNESS TABLE).
• Switch off the appliance by pressing the ON/OFF button.
Setting is complete!
Water Hardness Table
Level °dH
German degrees
°fH
French degrees
1 Soft 0 - 6 0 - 10
2 Medium 7 - 11 11 - 20
3 Average 12 - 17 21 - 30
4 Hard 18 - 34 31 - 60
5 Very hard 35 - 50 61 - 90
Make sure the cap is screwed on tightly, so that no detergent can
get into the container during the wash program (this could damage
the water softener beyond repair).
As soon as this procedure is complete, run a program without
loading. The “Pre-Wash” program alone is NOT������
Residual saline solution or grains of salt can lead to corrosion,
irreparably damaging the stainless steel components.
The guarantee is not applicable if faults are caused by such
circumstances.
��������������������������������s.
��������������������������������
heating element may be damaged as a result.
Whenever you need to add salt, it is mandatory to complete
the procedure before the beginning of the washing cycle.
SETTING THE WATER HARDNESS
To allow the water softener to work in a perfect way, it is essential
that the water hardness setting is based on the actual water hard-
ness in your house. This information can be obtained from your local
water supplier. The factory setting is for average (3) water hardness.
FILLING THE RINSE AID DISPENSER
Rinse aid makes dish DRYING easier. The rinse aid dispenser A
should be lled when the RINSE AID REFILL indicator light
in the control panel is lit.
1. Open the dispenser B by pressing and pulling up the tab on
the lid.
2. Carefully introduce the rinse aid as far as the maximum
(110 ml) reference notch of the lling space - avoid spilling it.
If this happens, clean the spill immediately with a dry cloth.
3. Press the lid down until you hear a click to close it.
NEVER pour the rinse aid directly into the tub.
A
B
ADJUSTING THE DOSAGE OF RINSE AID
If you are not completely satised with the drying results, you can
adjust the quantity of rinse aid used.
• Switch the dishwasher on using the ON/OFF button.
• Switch it off using the ON/OFF button.
• Press button three times - a beep will be heard.
• Switch it on using the ON/OFF button.
•
•
The current selection level number and rinse aid indicator light ash.
Press button to select the level of rinse aid quantity to be
supplied.
• Switch it off using the ON/OFF button.
Setting is complete!
If the rinse aid level is set to ZERO (ECO), no rinse aid will be
supplied. The LOW RINSE AID indicator light will not be lit if you
run out of rinse aid. A maximum of 5 levels can be set according to
the dishwasher model. The factory setting is specic to the model,
please follow instruction above to check this for your machine.
•If you see bluish streaks on the dishes, set a low number (1-2).
• If there are drops of water or limescale marks on the dishes,
set a high number (3-4).
FILLING THE DETERGENT DISPENSER
������������������������������
dishwashers.
To achieve the best washing and drying results, the combined
useof detergent, rinse aid liquid and rened salt is required.
We recommend using detergents that do not contain phosphates
or chlorine, as these products are harmful to the environment.
Good washing results also depend on the correct amount of
detergent being used.
Exceeding the stated amount does not result in a more effective
wash and increases environmental pollution.
The amount can be adjusted to the soil level. In the case of
normally soiled items, use approximately either 35g (powder
detergent) or 35ml (liquid detergent) and additional tea spoon of
detergent directly inside the tub. If tablets are used, one tablet
will be enough.
If the crockery is only lightly soiled or if it has been rinsed with
water before being placed in the dishwasher, reduce the amount
of detergent used accordingly (minimum 25 g/ml) e.g. skip the
powder/gel putted inside the tub.
To open the detergent dispenser
press button A.
Introduce the detergent into
the dry dispenser B only.
Place the amount of detergent
for pre-washing directly inside
the tub.
A
B
1.
2.
When measuring out the detergent refer to the mentioned ear-
lier information to add the proper quantity. Inside the dispenser
B there are indications to help the detergent dosing.
Remove detergent residues from the edges of the dispenser
and close the cover until it clicks.
3. Close the lid of the detergent dispenser by pulling it up until
the closing device is secured in place.
The detergent dispenser automatically opens up at the right time
according to the program. If all-in-one detergents are used, we
recommend using the TABLET button, because it adjusts the
program so that the best washing and drying results are always
achieved.
E – enabled d – disabled
To conrm the change and exit from the Control Menu
please press and hold
ENGLISH
8
• Switch on the appliance by pressing the ON/OFF button.
• Switch off the appliance by pressing the ON/OFF button.
• Hold down button for 5 seconds, until you hear a beep.
• Switch on the appliance by pressing the ON/OFF button.
•
•
The current selection level number and the salt indicator light
������
Press button to select the desired hardness level (see
WATER HARDNESS TABLE).
• Switch off the appliance by pressing the ON/OFF button.
Setting is complete!
Water Hardness Table
Level °dH
German degrees
°fH
French degrees
1 Soft 0 - 6 0 - 10
2 Medium 7 - 11 11 - 20
3 Average 12 - 17 21 - 30
4 Hard 18 - 34 31 - 60
5 Very hard 35 - 50 61 - 90
Make sure the cap is screwed on tightly, so that no detergent can
get into the container during the wash program (this could damage
the water softener beyond repair).
As soon as this procedure is complete, run a program without
loading. The “Pre-Wash” program alone is NOT������
Residual saline solution or grains of salt can lead to corrosion,
irreparably damaging the stainless steel components.
The guarantee is not applicable if faults are caused by such
circumstances.
��������������������������������s.
��������������������������������
heating element may be damaged as a result.
Whenever you need to add salt, it is mandatory to complete
the procedure before the beginning of the washing cycle.
SETTING THE WATER HARDNESS
To allow the water softener to work in a perfect way, it is essential
that the water hardness setting is based on the actual water hard-
ness in your house. This information can be obtained from your local
water supplier. The factory setting is for average (3) water hardness.
FILLING THE RINSE AID DISPENSER
Rinse aid makes dish DRYING easier. The rinse aid dispenser A
should be lled when the RINSE AID REFILL indicator light
in the control panel is lit.
1. Open the dispenser B by pressing and pulling up the tab on
the lid.
2. Carefully introduce the rinse aid as far as the maximum
(110 ml) reference notch of the lling space - avoid spilling it.
If this happens, clean the spill immediately with a dry cloth.
3. Press the lid down until you hear a click to close it.
NEVER pour the rinse aid directly into the tub.
A
B
ADJUSTING THE DOSAGE OF RINSE AID
If you are not completely satised with the drying results, you can
adjust the quantity of rinse aid used.
• Switch the dishwasher on using the ON/OFF button.
• Switch it off using the ON/OFF button.
• Press button three times - a beep will be heard.
• Switch it on using the ON/OFF button.
•
•
The current selection level number and rinse aid indicator light ash.
Press button to select the level of rinse aid quantity to be
supplied.
• Switch it off using the ON/OFF button.
Setting is complete!
If the rinse aid level is set to ZERO (ECO), no rinse aid will be
supplied. The LOW RINSE AID indicator light will not be lit if you
run out of rinse aid. A maximum of 5 levels can be set according to
the dishwasher model. The factory setting is specic to the model,
please follow instruction above to check this for your machine.
•If you see bluish streaks on the dishes, set a low number (1-2).
• If there are drops of water or limescale marks on the dishes,
set a high number (3-4).
FILLING THE DETERGENT DISPENSER
������������������������������
dishwashers.
To achieve the best washing and drying results, the combined
useof detergent, rinse aid liquid and rened salt is required.
We recommend using detergents that do not contain phosphates
or chlorine, as these products are harmful to the environment.
Good washing results also depend on the correct amount of
detergent being used.
Exceeding the stated amount does not result in a more effective
wash and increases environmental pollution.
The amount can be adjusted to the soil level. In the case of
normally soiled items, use approximately either 35g (powder
detergent) or 35ml (liquid detergent) and additional tea spoon of
detergent directly inside the tub. If tablets are used, one tablet
will be enough.
If the crockery is only lightly soiled or if it has been rinsed with
water before being placed in the dishwasher, reduce the amount
of detergent used accordingly (minimum 25 g/ml) e.g. skip the
powder/gel putted inside the tub.
To open the detergent dispenser
press button A.
Introduce the detergent into
the dry dispenser B only.
Place the amount of detergent
for pre-washing directly inside
the tub.
A
B
1.
2.
When measuring out the detergent refer to the mentioned ear-
lier information to add the proper quantity. Inside the dispenser
B there are indications to help the detergent dosing.
Remove detergent residues from the edges of the dispenser
and close the cover until it clicks.
3. Close the lid of the detergent dispenser by pulling it up until
the closing device is secured in place.
The detergent dispenser automatically opens up at the right time
according to the program. If all-in-one detergents are used, we
recommend using the TABLET button, because it adjusts the
program so that the best washing and drying results are always
achieved.
button (3 sec).
DOOR OPENING
Eco 50° after 165 min
AUTO 50°- 60° 80-170 min*
Intensive 65° end of cycle
Fast wash 30’ 50° N/A
Fast wash and dry 50° end of cycle
Glass 45° end of cycle
Silent 50° (Night program) end of cycle
Sanitizing 65° N/A
Pre-Wash N/A
Self-Clean 65° N/A
* depending on settings
Program Drying
phase
Natural
Dry
Available
functions *)
Duration of
wash program
(h:min)**)
Water
consumption
(litres/cycle)
Energy
consumption
(kWh/cycle)
1 Eco
EN
9
To open the detergent dispenser
press button C.
Introduce the detergent into
the dry dispenser D only.
Place the amount of detergent
for pre-washing directly inside
the tub.
1. When measuring out the detergent refer to the mentioned ear-
lier information to add the proper quantity. Inside the dispenser
C there are indications to help the detergent dosing.
2. Remove detergent residues from the edges of the dispenser
and close the cover until it clicks.
3. Close the lid of the detergent dispenser by pulling it up until
the closing device is secured in place.
The detergent dispenser automatically opens up at the right time
according to the program. If all-in-one detergents are used, we
recommend using the TABLET button, because it adjusts the
program so that the best washing and drying results are always
achieved.
C
D
PROGRAMS TABLE
ECO program data is measured under laboratory conditions according to European Standard EN 60436:2019.
Note for Test Laboratories: For information on comparative EN testing conditions, please send an email to the following address:
Pre-treatment of the dishes is not needed before any of the programs.
*) Not all options can be used simultaneously.
**) Values given for programes other than the eco program are indicative only. The actual time may vary depending on many factors such as temperature
and pressure of the incoming water, room temperature, amount of detergent, quantity and type of load, load balancing, additional selected options and
sensor calibration.
Standby consumption: Left-on mode consumption: 5 W - Off mode consumption: 0.5 W
PROGRAMS DESCRIPTION
1. ECO -
bined energy and water consumption, and that it is used to assess compliance with the EU Ecodesign legislation.
2. AUTO - For normally soiled dishes with dried food residues. Senses the level of soiling on the dishes and adjusts the program accor-
dingly. When the sensor is detecting the soil level an animation appears in the display and the cycle duration is updated.
3. INTENSIVE -
Program recommended for heavily soiled crockery, especially suitable for pans and saucepans (not to be used for delicate items).
4. FAST WASH 30’ - Program to be used for half load of lightly-soiled dishes with no dried food residues.
5. FAST WASH AND DRY
- Normally soiled crockery. Everyday cycle, that ensures optimal cleaning and drying performance in shorter time.
6. GLASS - Program for delicate items, which are more sensitive to high temperatures, for example glasses and cups.
7. SILENT -
Suitable for night-time operation of the appliance. Ensures optimal cleaning and drying performance with the lowest noise emission.
8. SANITIZING - Normally or heavily soiled crockery, with additional antibacterial wash. Can be used to perform maintenance of the
dishwasher.
9. PRE-WASH - Use to refresh crockery planned to be washed later. No detergent to be used with this program.
10. SELF-CLEAN - Program to be used to perform maintenance of the dishwasher. It cleans the interior of the appliance using hot water.
Notes:
Please note that cycle FAST WASH is dedicated for lightly soiled dishes.
Program
Drying
phase
Natural
Dry
Available
options *)
Duration of
wash
program
(h:min)**)
Water
consumption
(litres/cycle)
Energy
consumption
(kWh/cycle)
1Eco 3:40 8.7 0.66
2Auto 1:20 - 3:00 7.0 - 14.0 0.70 - 1.10
3Intensive 2:40 17.0 1.30
4 Fast wash 30’ -- 0:30 9.0 0.50
5 1:20 10.0 1.10
6Glass 1:40 12.0 1.00
7Silent 3:35 16.5 1.00
8Sanitizing - 1:40 12.0 1.30
9Pre-Wash -- 0:10 4.5 0.01
10 Self- Clean -- 0:50 9.5 0.70
50°
9
ENGLISH
1. Press the DELAY button: the corresponding «h» symbol
appears on the display; each time you press the button,
the time (1h, 2h, etc. up to max. 12h) from the start of
the selected wash cycle will be increased.
2. Select the wash program, press the START/PAUSE
button and within 4 seconds close the door: the timer
will begin counting down.
3. Once this time has elapsed, the indicator light «h»
switches off and the wash cycle begins.
To adjust the delay time and select a shorter period of time,
press the DELAY button. To cancel it, press the button
repeatedly until the selected delayed start indicator light
«h» switches off.
The DELAY function cannot be set once a wash cycle
has been started.
NaturalDry
Door opening system NaturalDry is a convection drying system
which automatically opens the door during/after drying phase to
ensure exceptional drying performance every day. Door opens at
the temperature that is safe to your kitchen furniture.
As additional steam protection, special designed protection foil is
added together with the dishwasher. To see how to mount protec-
tion foil please refer to (INSTALLATION GUIDE).
NaturalDry functionality could be disabled by the user as follows:
1. Go to the Dishwasher software menu pressing and holding
button (6 sec).
2. You switched to NaturalDry Control Menu, you could change
status of NaturalDry functionality by pressing button:
E – enabled d – disabled
To conrm the change and exit from the Control Menu please
press and hold button (3 sec).
DELAY
The start time of the program may be delayed for a period
of time between 1 and 12 hours.
Program
Drying
phase
Natural
Dry
Available
options *)
Duration of
wash pro-
gram
(h:min)**)
Water
consumption
(litres/cycle)
Energy
consumption
(kWh/cycle)
50° 2:45 12.0 0.92
1 Eco
2 Conventional
wash and dry 55° 2:00 15.0 1.35
3Intensive 65° - 2:30 15.0 1.50
4Fast 50° -- 0:55 11.5 1.10
5Sanitizing 65° - 1:40 11.5 1.30
6Pre-Wash
-
-- 0:10 4.5 0.01
7Self-Clean 65° --0:50 8.0 0.80
ECO program data is measured under laboratory conditions according to European Standard EN 60436:2019.
Note for Test Laboratories: For information on comparative EN testing conditions, please send an email to the following
address: [email protected]
Pre-treatment of the dishes is not needed before any of the programs.
*) Not all options can be used simultaneously.
**) Values given for programes other than the eco program are indicative only. The actual time may vary depending on many
factors such as temperature and pressure of the incoming water, room temperature, amount of detergent, quantity and type of
load, load balancing, additional selected options and sensor calibration.
Standby consumption: Left-on mode consumption: 5 W - Off mode consumption: 0.5 W
PROGRAMS DESCRIPTION
EN
9
To open the detergent dispenser
press button C.
Introduce the detergent into
the dry dispenser D only.
Place the amount of detergent
for pre-washing directly inside
the tub.
1. When measuring out the detergent refer to the mentioned ear-
lier information to add the proper quantity. Inside the dispenser
C there are indications to help the detergent dosing.
2. Remove detergent residues from the edges of the dispenser
and close the cover until it clicks.
3. Close the lid of the detergent dispenser by pulling it up until
the closing device is secured in place.
The detergent dispenser automatically opens up at the right time
according to the program. If all-in-one detergents are used, we
recommend using the TABLET button, because it adjusts the
program so that the best washing and drying results are always
achieved.
C
D
PROGRAMS TABLE
ECO program data is measured under laboratory conditions according to European Standard EN 60436:2019.
Note for Test Laboratories: For information on comparative EN testing conditions, please send an email to the following address:
Pre-treatment of the dishes is not needed before any of the programs.
*) Not all options can be used simultaneously.
**) Values given for programes other than the eco program are indicative only. The actual time may vary depending on many factors such as temperature
and pressure of the incoming water, room temperature, amount of detergent, quantity and type of load, load balancing, additional selected options and
sensor calibration.
Standby consumption: Left-on mode consumption: 5 W - Off mode consumption: 0.5 W
PROGRAMS DESCRIPTION
1. ECO -
bined energy and water consumption, and that it is used to assess compliance with the EU Ecodesign legislation.
2. AUTO - For normally soiled dishes with dried food residues. Senses the level of soiling on the dishes and adjusts the program accor-
dingly. When the sensor is detecting the soil level an animation appears in the display and the cycle duration is updated.
3. INTENSIVE -
Program recommended for heavily soiled crockery, especially suitable for pans and saucepans (not to be used for delicate items).
4. FAST WASH 30’ - Program to be used for half load of lightly-soiled dishes with no dried food residues.
5. FAST WASH AND DRY
- Normally soiled crockery. Everyday cycle, that ensures optimal cleaning and drying performance in shorter time.
6. GLASS - Program for delicate items, which are more sensitive to high temperatures, for example glasses and cups.
7. SILENT -
Suitable for night-time operation of the appliance. Ensures optimal cleaning and drying performance with the lowest noise emission.
8. SANITIZING - Normally or heavily soiled crockery, with additional antibacterial wash. Can be used to perform maintenance of the
dishwasher.
9. PRE-WASH - Use to refresh crockery planned to be washed later. No detergent to be used with this program.
10. SELF-CLEAN - Program to be used to perform maintenance of the dishwasher. It cleans the interior of the appliance using hot water.
Notes:
Please note that cycle FAST WASH is dedicated for lightly soiled dishes.
Program
Drying
phase
Natural
Dry
Available
options *)
Duration of
wash
program
(h:min)**)
Water
consumption
(litres/cycle)
Energy
consumption
(kWh/cycle)
1Eco 3:40 8.7 0.66
2Auto 1:20 - 3:00 7.0 - 14.0 0.70 - 1.10
3Intensive 2:40 17.0 1.30
4 Fast wash 30’ -- 0:30 9.0 0.50
5 1:20 10.0 1.10
6Glass 1:40 12.0 1.00
7Silent 3:35 16.5 1.00
8Sanitizing - 1:40 12.0 1.30
9Pre-Wash -- 0:10 4.5 0.01
10 Self- Clean -- 0:50 9.5 0.70
3:40 8.7 0.59
2 Auto
EN
9
To open the detergent dispenser
press button C.
Introduce the detergent into
the dry dispenser D only.
Place the amount of detergent
for pre-washing directly inside
the tub.
1. When measuring out the detergent refer to the mentioned ear-
lier information to add the proper quantity. Inside the dispenser
C there are indications to help the detergent dosing.
2. Remove detergent residues from the edges of the dispenser
and close the cover until it clicks.
3. Close the lid of the detergent dispenser by pulling it up until
the closing device is secured in place.
The detergent dispenser automatically opens up at the right time
according to the program. If all-in-one detergents are used, we
recommend using the TABLET button, because it adjusts the
program so that the best washing and drying results are always
achieved.
C
D
PROGRAMS TABLE
ECO program data is measured under laboratory conditions according to European Standard EN 60436:2019.
Note for Test Laboratories: For information on comparative EN testing conditions, please send an email to the following address:
Pre-treatment of the dishes is not needed before any of the programs.
*) Not all options can be used simultaneously.
**) Values given for programes other than the eco program are indicative only. The actual time may vary depending on many factors such as temperature
and pressure of the incoming water, room temperature, amount of detergent, quantity and type of load, load balancing, additional selected options and
sensor calibration.
Standby consumption: Left-on mode consumption: 5 W - Off mode consumption: 0.5 W
PROGRAMS DESCRIPTION
1. ECO -
bined energy and water consumption, and that it is used to assess compliance with the EU Ecodesign legislation.
2. AUTO - For normally soiled dishes with dried food residues. Senses the level of soiling on the dishes and adjusts the program accor-
dingly. When the sensor is detecting the soil level an animation appears in the display and the cycle duration is updated.
3. INTENSIVE -
Program recommended for heavily soiled crockery, especially suitable for pans and saucepans (not to be used for delicate items).
4. FAST WASH 30’ - Program to be used for half load of lightly-soiled dishes with no dried food residues.
5. FAST WASH AND DRY
- Normally soiled crockery. Everyday cycle, that ensures optimal cleaning and drying performance in shorter time.
6. GLASS - Program for delicate items, which are more sensitive to high temperatures, for example glasses and cups.
7. SILENT -
Suitable for night-time operation of the appliance. Ensures optimal cleaning and drying performance with the lowest noise emission.
8. SANITIZING - Normally or heavily soiled crockery, with additional antibacterial wash. Can be used to perform maintenance of the
dishwasher.
9. PRE-WASH - Use to refresh crockery planned to be washed later. No detergent to be used with this program.
10. SELF-CLEAN - Program to be used to perform maintenance of the dishwasher. It cleans the interior of the appliance using hot water.
Notes:
Please note that cycle FAST WASH is dedicated for lightly soiled dishes.
Program
Drying
phase
Natural
Dry
Available
options *)
Duration of
wash
program
(h:min)**)
Water
consumption
(litres/cycle)
Energy
consumption
(kWh/cycle)
1Eco 3:40 8.7 0.66
2Auto 1:20 - 3:00 7.0 - 14.0 0.70 - 1.10
3Intensive 2:40 17.0 1.30
4 Fast wash 30’ -- 0:30 9.0 0.50
5 1:20 10.0 1.10
6Glass 1:40 12.0 1.00
7Silent 3:35 16.5 1.00
8Sanitizing - 1:40 12.0 1.30
9Pre-Wash -- 0:10 4.5 0.01
10 Self- Clean -- 0:50 9.5 0.70
50-60°
9
ENGLISH
1. Press the DELAY button: the corresponding «h» symbol
appears on the display; each time you press the button,
the time (1h, 2h, etc. up to max. 12h) from the start of
the selected wash cycle will be increased.
2. Select the wash program, press the START/PAUSE
button and within 4 seconds close the door: the timer
will begin counting down.
3. Once this time has elapsed, the indicator light «h»
switches off and the wash cycle begins.
To adjust the delay time and select a shorter period of time,
press the DELAY button. To cancel it, press the button
repeatedly until the selected delayed start indicator light
«h» switches off.
The DELAY function cannot be set once a wash cycle
has been started.
NaturalDry
Door opening system NaturalDry is a convection drying system
which automatically opens the door during/after drying phase to
ensure exceptional drying performance every day. Door opens at
the temperature that is safe to your kitchen furniture.
As additional steam protection, special designed protection foil is
added together with the dishwasher. To see how to mount protec-
tion foil please refer to (INSTALLATION GUIDE).
NaturalDry functionality could be disabled by the user as follows:
1. Go to the Dishwasher software menu pressing and holding
button (6 sec).
2. You switched to NaturalDry Control Menu, you could change
status of NaturalDry functionality by pressing button:
E – enabled d – disabled
To conrm the change and exit from the Control Menu please
press and hold button (3 sec).
DELAY
The start time of the program may be delayed for a period
of time between 1 and 12 hours.
Program
Drying
phase
Natural
Dry
Available
options *)
Duration of
wash pro-
gram
(h:min)**)
Water
consumption
(litres/cycle)
Energy
consumption
(kWh/cycle)
50° 2:45 12.0 0.92
1 Eco
2 Conventional
wash and dry 55° 2:00 15.0 1.35
3Intensive 65° - 2:30 15.0 1.50
4Fast 50° -- 0:55 11.5 1.10
5Sanitizing 65° - 1:40 11.5 1.30
6Pre-Wash
-
-- 0:10 4.5 0.01
7Self-Clean 65° --0:50 8.0 0.80
ECO program data is measured under laboratory conditions according to European Standard EN 60436:2019.
Note for Test Laboratories: For information on comparative EN testing conditions, please send an email to the following
address: [email protected]
Pre-treatment of the dishes is not needed before any of the programs.
*) Not all options can be used simultaneously.
**) Values given for programes other than the eco program are indicative only. The actual time may vary depending on many
factors such as temperature and pressure of the incoming water, room temperature, amount of detergent, quantity and type of
load, load balancing, additional selected options and sensor calibration.
Standby consumption: Left-on mode consumption: 5 W - Off mode consumption: 0.5 W
PROGRAMS DESCRIPTION
EN
9
To open the detergent dispenser
press button C.
Introduce the detergent into
the dry dispenser D only.
Place the amount of detergent
for pre-washing directly inside
the tub.
1. When measuring out the detergent refer to the mentioned ear-
lier information to add the proper quantity. Inside the dispenser
C there are indications to help the detergent dosing.
2. Remove detergent residues from the edges of the dispenser
and close the cover until it clicks.
3. Close the lid of the detergent dispenser by pulling it up until
the closing device is secured in place.
The detergent dispenser automatically opens up at the right time
according to the program. If all-in-one detergents are used, we
recommend using the TABLET button, because it adjusts the
program so that the best washing and drying results are always
achieved.
C
D
PROGRAMS TABLE
ECO program data is measured under laboratory conditions according to European Standard EN 60436:2019.
Note for Test Laboratories: For information on comparative EN testing conditions, please send an email to the following address:
Pre-treatment of the dishes is not needed before any of the programs.
*) Not all options can be used simultaneously.
**) Values given for programes other than the eco program are indicative only. The actual time may vary depending on many factors such as temperature
and pressure of the incoming water, room temperature, amount of detergent, quantity and type of load, load balancing, additional selected options and
sensor calibration.
Standby consumption: Left-on mode consumption: 5 W - Off mode consumption: 0.5 W
PROGRAMS DESCRIPTION
1. ECO -
bined energy and water consumption, and that it is used to assess compliance with the EU Ecodesign legislation.
2. AUTO - For normally soiled dishes with dried food residues. Senses the level of soiling on the dishes and adjusts the program accor-
dingly. When the sensor is detecting the soil level an animation appears in the display and the cycle duration is updated.
3. INTENSIVE -
Program recommended for heavily soiled crockery, especially suitable for pans and saucepans (not to be used for delicate items).
4. FAST WASH 30’ - Program to be used for half load of lightly-soiled dishes with no dried food residues.
5. FAST WASH AND DRY
- Normally soiled crockery. Everyday cycle, that ensures optimal cleaning and drying performance in shorter time.
6. GLASS - Program for delicate items, which are more sensitive to high temperatures, for example glasses and cups.
7. SILENT -
Suitable for night-time operation of the appliance. Ensures optimal cleaning and drying performance with the lowest noise emission.
8. SANITIZING - Normally or heavily soiled crockery, with additional antibacterial wash. Can be used to perform maintenance of the
dishwasher.
9. PRE-WASH - Use to refresh crockery planned to be washed later. No detergent to be used with this program.
10. SELF-CLEAN - Program to be used to perform maintenance of the dishwasher. It cleans the interior of the appliance using hot water.
Notes:
Please note that cycle FAST WASH is dedicated for lightly soiled dishes.
Program
Drying
phase
Natural
Dry
Available
options *)
Duration of
wash
program
(h:min)**)
Water
consumption
(litres/cycle)
Energy
consumption
(kWh/cycle)
1Eco 3:40 8.7 0.66
2Auto 1:20 - 3:00 7.0 - 14.0 0.70 - 1.10
3Intensive 2:40 17.0 1.30
4 Fast wash 30’ -- 0:30 9.0 0.50
5 1:20 10.0 1.10
6Glass 1:40 12.0 1.00
7Silent 3:35 16.5 1.00
8Sanitizing - 1:40 12.0 1.30
9Pre-Wash -- 0:10 4.5 0.01
10 Self- Clean -- 0:50 9.5 0.70
1:20 - 3:00 7.0 - 14.0 0.70 - 1.10
3 Intensive
EN
9
To open the detergent dispenser
press button C.
Introduce the detergent into
the dry dispenser D only.
Place the amount of detergent
for pre-washing directly inside
the tub.
1. When measuring out the detergent refer to the mentioned ear-
lier information to add the proper quantity. Inside the dispenser
C there are indications to help the detergent dosing.
2. Remove detergent residues from the edges of the dispenser
and close the cover until it clicks.
3. Close the lid of the detergent dispenser by pulling it up until
the closing device is secured in place.
The detergent dispenser automatically opens up at the right time
according to the program. If all-in-one detergents are used, we
recommend using the TABLET button, because it adjusts the
program so that the best washing and drying results are always
achieved.
C
D
PROGRAMS TABLE
ECO program data is measured under laboratory conditions according to European Standard EN 60436:2019.
Note for Test Laboratories: For information on comparative EN testing conditions, please send an email to the following address:
Pre-treatment of the dishes is not needed before any of the programs.
*) Not all options can be used simultaneously.
**) Values given for programes other than the eco program are indicative only. The actual time may vary depending on many factors such as temperature
and pressure of the incoming water, room temperature, amount of detergent, quantity and type of load, load balancing, additional selected options and
sensor calibration.
Standby consumption: Left-on mode consumption: 5 W - Off mode consumption: 0.5 W
PROGRAMS DESCRIPTION
1. ECO -
bined energy and water consumption, and that it is used to assess compliance with the EU Ecodesign legislation.
2. AUTO - For normally soiled dishes with dried food residues. Senses the level of soiling on the dishes and adjusts the program accor-
dingly. When the sensor is detecting the soil level an animation appears in the display and the cycle duration is updated.
3. INTENSIVE -
Program recommended for heavily soiled crockery, especially suitable for pans and saucepans (not to be used for delicate items).
4. FAST WASH 30’ - Program to be used for half load of lightly-soiled dishes with no dried food residues.
5. FAST WASH AND DRY
- Normally soiled crockery. Everyday cycle, that ensures optimal cleaning and drying performance in shorter time.
6. GLASS - Program for delicate items, which are more sensitive to high temperatures, for example glasses and cups.
7. SILENT -
Suitable for night-time operation of the appliance. Ensures optimal cleaning and drying performance with the lowest noise emission.
8. SANITIZING - Normally or heavily soiled crockery, with additional antibacterial wash. Can be used to perform maintenance of the
dishwasher.
9. PRE-WASH - Use to refresh crockery planned to be washed later. No detergent to be used with this program.
10. SELF-CLEAN - Program to be used to perform maintenance of the dishwasher. It cleans the interior of the appliance using hot water.
Notes:
Please note that cycle FAST WASH is dedicated for lightly soiled dishes.
Program
Drying
phase
Natural
Dry
Available
options *)
Duration of
wash
program
(h:min)**)
Water
consumption
(litres/cycle)
Energy
consumption
(kWh/cycle)
1Eco 3:40 8.7 0.66
2Auto 1:20 - 3:00 7.0 - 14.0 0.70 - 1.10
3Intensive 2:40 17.0 1.30
4 Fast wash 30’ -- 0:30 9.0 0.50
5 1:20 10.0 1.10
6Glass 1:40 12.0 1.00
7Silent 3:35 16.5 1.00
8Sanitizing - 1:40 12.0 1.30
9Pre-Wash -- 0:10 4.5 0.01
10 Self- Clean -- 0:50 9.5 0.70
65°
9
ENGLISH
1. Press the DELAY button: the corresponding «h» symbol
appears on the display; each time you press the button,
the time (1h, 2h, etc. up to max. 12h) from the start of
the selected wash cycle will be increased.
2. Select the wash program, press the START/PAUSE
button and within 4 seconds close the door: the timer
will begin counting down.
3. Once this time has elapsed, the indicator light «h»
switches off and the wash cycle begins.
To adjust the delay time and select a shorter period of time,
press the DELAY button. To cancel it, press the button
repeatedly until the selected delayed start indicator light
«h» switches off.
The DELAY function cannot be set once a wash cycle
has been started.
NaturalDry
Door opening system NaturalDry is a convection drying system
which automatically opens the door during/after drying phase to
ensure exceptional drying performance every day. Door opens at
the temperature that is safe to your kitchen furniture.
As additional steam protection, special designed protection foil is
added together with the dishwasher. To see how to mount protec-
tion foil please refer to (INSTALLATION GUIDE).
NaturalDry functionality could be disabled by the user as follows:
1. Go to the Dishwasher software menu pressing and holding
button (6 sec).
2. You switched to NaturalDry Control Menu, you could change
status of NaturalDry functionality by pressing button:
E – enabled d – disabled
To conrm the change and exit from the Control Menu please
press and hold button (3 sec).
DELAY
The start time of the program may be delayed for a period
of time between 1 and 12 hours.
Program
Drying
phase
Natural
Dry
Available
options *)
Duration of
wash pro-
gram
(h:min)**)
Water
consumption
(litres/cycle)
Energy
consumption
(kWh/cycle)
50° 2:45 12.0 0.92
1 Eco
2 Conventional
wash and dry 55° 2:00 15.0 1.35
3Intensive 65° - 2:30 15.0 1.50
4Fast 50° -- 0:55 11.5 1.10
5Sanitizing 65° - 1:40 11.5 1.30
6Pre-Wash
-
-- 0:10 4.5 0.01
7Self-Clean 65° --0:50 8.0 0.80
ECO program data is measured under laboratory conditions according to European Standard EN 60436:2019.
Note for Test Laboratories: For information on comparative EN testing conditions, please send an email to the following
address: [email protected]
Pre-treatment of the dishes is not needed before any of the programs.
*) Not all options can be used simultaneously.
**) Values given for programes other than the eco program are indicative only. The actual time may vary depending on many
factors such as temperature and pressure of the incoming water, room temperature, amount of detergent, quantity and type of
load, load balancing, additional selected options and sensor calibration.
Standby consumption: Left-on mode consumption: 5 W - Off mode consumption: 0.5 W
PROGRAMS DESCRIPTION
EN
9
To open the detergent dispenser
press button C.
Introduce the detergent into
the dry dispenser D only.
Place the amount of detergent
for pre-washing directly inside
the tub.
1. When measuring out the detergent refer to the mentioned ear-
lier information to add the proper quantity. Inside the dispenser
C there are indications to help the detergent dosing.
2. Remove detergent residues from the edges of the dispenser
and close the cover until it clicks.
3. Close the lid of the detergent dispenser by pulling it up until
the closing device is secured in place.
The detergent dispenser automatically opens up at the right time
according to the program. If all-in-one detergents are used, we
recommend using the TABLET button, because it adjusts the
program so that the best washing and drying results are always
achieved.
C
D
PROGRAMS TABLE
ECO program data is measured under laboratory conditions according to European Standard EN 60436:2019.
Note for Test Laboratories: For information on comparative EN testing conditions, please send an email to the following address:
Pre-treatment of the dishes is not needed before any of the programs.
*) Not all options can be used simultaneously.
**) Values given for programes other than the eco program are indicative only. The actual time may vary depending on many factors such as temperature
and pressure of the incoming water, room temperature, amount of detergent, quantity and type of load, load balancing, additional selected options and
sensor calibration.
Standby consumption: Left-on mode consumption: 5 W - Off mode consumption: 0.5 W
PROGRAMS DESCRIPTION
1. ECO -
bined energy and water consumption, and that it is used to assess compliance with the EU Ecodesign legislation.
2. AUTO - For normally soiled dishes with dried food residues. Senses the level of soiling on the dishes and adjusts the program accor-
dingly. When the sensor is detecting the soil level an animation appears in the display and the cycle duration is updated.
3. INTENSIVE -
Program recommended for heavily soiled crockery, especially suitable for pans and saucepans (not to be used for delicate items).
4. FAST WASH 30’ - Program to be used for half load of lightly-soiled dishes with no dried food residues.
5. FAST WASH AND DRY
- Normally soiled crockery. Everyday cycle, that ensures optimal cleaning and drying performance in shorter time.
6. GLASS - Program for delicate items, which are more sensitive to high temperatures, for example glasses and cups.
7. SILENT -
Suitable for night-time operation of the appliance. Ensures optimal cleaning and drying performance with the lowest noise emission.
8. SANITIZING - Normally or heavily soiled crockery, with additional antibacterial wash. Can be used to perform maintenance of the
dishwasher.
9. PRE-WASH - Use to refresh crockery planned to be washed later. No detergent to be used with this program.
10. SELF-CLEAN - Program to be used to perform maintenance of the dishwasher. It cleans the interior of the appliance using hot water.
Notes:
Please note that cycle FAST WASH is dedicated for lightly soiled dishes.
Program
Drying
phase
Natural
Dry
Available
options *)
Duration of
wash
program
(h:min)**)
Water
consumption
(litres/cycle)
Energy
consumption
(kWh/cycle)
1Eco 3:40 8.7 0.66
2Auto 1:20 - 3:00 7.0 - 14.0 0.70 - 1.10
3Intensive 2:40 17.0 1.30
4 Fast wash 30’ -- 0:30 9.0 0.50
5 1:20 10.0 1.10
6Glass 1:40 12.0 1.00
7Silent 3:35 16.5 1.00
8Sanitizing - 1:40 12.0 1.30
9Pre-Wash -- 0:10 4.5 0.01
10 Self- Clean -- 0:50 9.5 0.70
2:40 17.0 1.30
4 Fast wash 30’
EN
9
To open the detergent dispenser
press button C.
Introduce the detergent into
the dry dispenser D only.
Place the amount of detergent
for pre-washing directly inside
the tub.
1. When measuring out the detergent refer to the mentioned ear-
lier information to add the proper quantity. Inside the dispenser
C there are indications to help the detergent dosing.
2. Remove detergent residues from the edges of the dispenser
and close the cover until it clicks.
3. Close the lid of the detergent dispenser by pulling it up until
the closing device is secured in place.
The detergent dispenser automatically opens up at the right time
according to the program. If all-in-one detergents are used, we
recommend using the TABLET button, because it adjusts the
program so that the best washing and drying results are always
achieved.
C
D
PROGRAMS TABLE
ECO program data is measured under laboratory conditions according to European Standard EN 60436:2019.
Note for Test Laboratories: For information on comparative EN testing conditions, please send an email to the following address:
Pre-treatment of the dishes is not needed before any of the programs.
*) Not all options can be used simultaneously.
**) Values given for programes other than the eco program are indicative only. The actual time may vary depending on many factors such as temperature
and pressure of the incoming water, room temperature, amount of detergent, quantity and type of load, load balancing, additional selected options and
sensor calibration.
Standby consumption: Left-on mode consumption: 5 W - Off mode consumption: 0.5 W
PROGRAMS DESCRIPTION
1. ECO -
bined energy and water consumption, and that it is used to assess compliance with the EU Ecodesign legislation.
2. AUTO - For normally soiled dishes with dried food residues. Senses the level of soiling on the dishes and adjusts the program accor-
dingly. When the sensor is detecting the soil level an animation appears in the display and the cycle duration is updated.
3. INTENSIVE -
Program recommended for heavily soiled crockery, especially suitable for pans and saucepans (not to be used for delicate items).
4. FAST WASH 30’ - Program to be used for half load of lightly-soiled dishes with no dried food residues.
5. FAST WASH AND DRY
- Normally soiled crockery. Everyday cycle, that ensures optimal cleaning and drying performance in shorter time.
6. GLASS - Program for delicate items, which are more sensitive to high temperatures, for example glasses and cups.
7. SILENT -
Suitable for night-time operation of the appliance. Ensures optimal cleaning and drying performance with the lowest noise emission.
8. SANITIZING - Normally or heavily soiled crockery, with additional antibacterial wash. Can be used to perform maintenance of the
dishwasher.
9. PRE-WASH - Use to refresh crockery planned to be washed later. No detergent to be used with this program.
10. SELF-CLEAN - Program to be used to perform maintenance of the dishwasher. It cleans the interior of the appliance using hot water.
Notes:
Please note that cycle FAST WASH is dedicated for lightly soiled dishes.
Program
Drying
phase
Natural
Dry
Available
options *)
Duration of
wash
program
(h:min)**)
Water
consumption
(litres/cycle)
Energy
consumption
(kWh/cycle)
1Eco 3:40 8.7 0.66
2Auto 1:20 - 3:00 7.0 - 14.0 0.70 - 1.10
3Intensive 2:40 17.0 1.30
4 Fast wash 30’ -- 0:30 9.0 0.50
5 1:20 10.0 1.10
6Glass 1:40 12.0 1.00
7Silent 3:35 16.5 1.00
8Sanitizing - 1:40 12.0 1.30
9Pre-Wash -- 0:10 4.5 0.01
10 Self- Clean -- 0:50 9.5 0.70
50° - -
EN
9
To open the detergent dispenser
press button C.
Introduce the detergent into
the dry dispenser D only.
Place the amount of detergent
for pre-washing directly inside
the tub.
1. When measuring out the detergent refer to the mentioned ear-
lier information to add the proper quantity. Inside the dispenser
C there are indications to help the detergent dosing.
2. Remove detergent residues from the edges of the dispenser
and close the cover until it clicks.
3. Close the lid of the detergent dispenser by pulling it up until
the closing device is secured in place.
The detergent dispenser automatically opens up at the right time
according to the program. If all-in-one detergents are used, we
recommend using the TABLET button, because it adjusts the
program so that the best washing and drying results are always
achieved.
C
D
PROGRAMS TABLE
ECO program data is measured under laboratory conditions according to European Standard EN 60436:2019.
Note for Test Laboratories: For information on comparative EN testing conditions, please send an email to the following address:
Pre-treatment of the dishes is not needed before any of the programs.
*) Not all options can be used simultaneously.
**) Values given for programes other than the eco program are indicative only. The actual time may vary depending on many factors such as temperature
and pressure of the incoming water, room temperature, amount of detergent, quantity and type of load, load balancing, additional selected options and
sensor calibration.
Standby consumption: Left-on mode consumption: 5 W - Off mode consumption: 0.5 W
PROGRAMS DESCRIPTION
1. ECO -
bined energy and water consumption, and that it is used to assess compliance with the EU Ecodesign legislation.
2. AUTO - For normally soiled dishes with dried food residues. Senses the level of soiling on the dishes and adjusts the program accor-
dingly. When the sensor is detecting the soil level an animation appears in the display and the cycle duration is updated.
3. INTENSIVE -
Program recommended for heavily soiled crockery, especially suitable for pans and saucepans (not to be used for delicate items).
4. FAST WASH 30’ - Program to be used for half load of lightly-soiled dishes with no dried food residues.
5. FAST WASH AND DRY
- Normally soiled crockery. Everyday cycle, that ensures optimal cleaning and drying performance in shorter time.
6. GLASS - Program for delicate items, which are more sensitive to high temperatures, for example glasses and cups.
7. SILENT -
Suitable for night-time operation of the appliance. Ensures optimal cleaning and drying performance with the lowest noise emission.
8. SANITIZING - Normally or heavily soiled crockery, with additional antibacterial wash. Can be used to perform maintenance of the
dishwasher.
9. PRE-WASH - Use to refresh crockery planned to be washed later. No detergent to be used with this program.
10. SELF-CLEAN - Program to be used to perform maintenance of the dishwasher. It cleans the interior of the appliance using hot water.
Notes:
Please note that cycle FAST WASH is dedicated for lightly soiled dishes.
Program
Drying
phase
Natural
Dry
Available
options *)
Duration of
wash
program
(h:min)**)
Water
consumption
(litres/cycle)
Energy
consumption
(kWh/cycle)
1Eco 3:40 8.7 0.66
2Auto 1:20 - 3:00 7.0 - 14.0 0.70 - 1.10
3Intensive 2:40 17.0 1.30
4 Fast wash 30’ -- 0:30 9.0 0.50
5 1:20 10.0 1.10
6Glass 1:40 12.0 1.00
7Silent 3:35 16.5 1.00
8Sanitizing - 1:40 12.0 1.30
9Pre-Wash -- 0:10 4.5 0.01
10 Self- Clean -- 0:50 9.5 0.70
0:30 9.0 0.50
5 Fast wash and Dry
EN
9
To open the detergent dispenser
press button C.
Introduce the detergent into
the dry dispenser D only.
Place the amount of detergent
for pre-washing directly inside
the tub.
1. When measuring out the detergent refer to the mentioned ear-
lier information to add the proper quantity. Inside the dispenser
C there are indications to help the detergent dosing.
2. Remove detergent residues from the edges of the dispenser
and close the cover until it clicks.
3. Close the lid of the detergent dispenser by pulling it up until
the closing device is secured in place.
The detergent dispenser automatically opens up at the right time
according to the program. If all-in-one detergents are used, we
recommend using the TABLET button, because it adjusts the
program so that the best washing and drying results are always
achieved.
C
D
PROGRAMS TABLE
ECO program data is measured under laboratory conditions according to European Standard EN 60436:2019.
Note for Test Laboratories: For information on comparative EN testing conditions, please send an email to the following address:
Pre-treatment of the dishes is not needed before any of the programs.
*) Not all options can be used simultaneously.
**) Values given for programes other than the eco program are indicative only. The actual time may vary depending on many factors such as temperature
and pressure of the incoming water, room temperature, amount of detergent, quantity and type of load, load balancing, additional selected options and
sensor calibration.
Standby consumption: Left-on mode consumption: 5 W - Off mode consumption: 0.5 W
PROGRAMS DESCRIPTION
1. ECO -
bined energy and water consumption, and that it is used to assess compliance with the EU Ecodesign legislation.
2. AUTO - For normally soiled dishes with dried food residues. Senses the level of soiling on the dishes and adjusts the program accor-
dingly. When the sensor is detecting the soil level an animation appears in the display and the cycle duration is updated.
3. INTENSIVE -
Program recommended for heavily soiled crockery, especially suitable for pans and saucepans (not to be used for delicate items).
4. FAST WASH 30’ - Program to be used for half load of lightly-soiled dishes with no dried food residues.
5. FAST WASH AND DRY
- Normally soiled crockery. Everyday cycle, that ensures optimal cleaning and drying performance in shorter time.
6. GLASS - Program for delicate items, which are more sensitive to high temperatures, for example glasses and cups.
7. SILENT -
Suitable for night-time operation of the appliance. Ensures optimal cleaning and drying performance with the lowest noise emission.
8. SANITIZING - Normally or heavily soiled crockery, with additional antibacterial wash. Can be used to perform maintenance of the
dishwasher.
9. PRE-WASH - Use to refresh crockery planned to be washed later. No detergent to be used with this program.
10. SELF-CLEAN - Program to be used to perform maintenance of the dishwasher. It cleans the interior of the appliance using hot water.
Notes:
Please note that cycle FAST WASH is dedicated for lightly soiled dishes.
Program
Drying
phase
Natural
Dry
Available
options *)
Duration of
wash
program
(h:min)**)
Water
consumption
(litres/cycle)
Energy
consumption
(kWh/cycle)
1Eco 3:40 8.7 0.66
2Auto 1:20 - 3:00 7.0 - 14.0 0.70 - 1.10
3Intensive 2:40 17.0 1.30
4 Fast wash 30’ -- 0:30 9.0 0.50
5 1:20 10.0 1.10
6Glass 1:40 12.0 1.00
7Silent 3:35 16.5 1.00
8Sanitizing - 1:40 12.0 1.30
9Pre-Wash -- 0:10 4.5 0.01
10 Self- Clean -- 0:50 9.5 0.70
50°
9
ENGLISH
1. Press the DELAY button: the corresponding «h» symbol
appears on the display; each time you press the button,
the time (1h, 2h, etc. up to max. 12h) from the start of
the selected wash cycle will be increased.
2. Select the wash program, press the START/PAUSE
button and within 4 seconds close the door: the timer
will begin counting down.
3. Once this time has elapsed, the indicator light «h»
switches off and the wash cycle begins.
To adjust the delay time and select a shorter period of time,
press the DELAY button. To cancel it, press the button
repeatedly until the selected delayed start indicator light
«h» switches off.
The DELAY function cannot be set once a wash cycle
has been started.
NaturalDry
Door opening system NaturalDry is a convection drying system
which automatically opens the door during/after drying phase to
ensure exceptional drying performance every day. Door opens at
the temperature that is safe to your kitchen furniture.
As additional steam protection, special designed protection foil is
added together with the dishwasher. To see how to mount protec-
tion foil please refer to (INSTALLATION GUIDE).
NaturalDry functionality could be disabled by the user as follows:
1. Go to the Dishwasher software menu pressing and holding
button (6 sec).
2. You switched to NaturalDry Control Menu, you could change
status of NaturalDry functionality by pressing button:
E – enabled d – disabled
To conrm the change and exit from the Control Menu please
press and hold button (3 sec).
DELAY
The start time of the program may be delayed for a period
of time between 1 and 12 hours.
Program
Drying
phase
Natural
Dry
Available
options *)
Duration of
wash pro-
gram
(h:min)**)
Water
consumption
(litres/cycle)
Energy
consumption
(kWh/cycle)
50° 2:45 12.0 0.92
1 Eco
2 Conventional
wash and dry 55° 2:00 15.0 1.35
3Intensive 65° - 2:30 15.0 1.50
4Fast 50° -- 0:55 11.5 1.10
5Sanitizing 65° - 1:40 11.5 1.30
6Pre-Wash
-
-- 0:10 4.5 0.01
7Self-Clean 65° --0:50 8.0 0.80
ECO program data is measured under laboratory conditions according to European Standard EN 60436:2019.
Note for Test Laboratories: For information on comparative EN testing conditions, please send an email to the following
address: [email protected]
Pre-treatment of the dishes is not needed before any of the programs.
*) Not all options can be used simultaneously.
**) Values given for programes other than the eco program are indicative only. The actual time may vary depending on many
factors such as temperature and pressure of the incoming water, room temperature, amount of detergent, quantity and type of
load, load balancing, additional selected options and sensor calibration.
Standby consumption: Left-on mode consumption: 5 W - Off mode consumption: 0.5 W
PROGRAMS DESCRIPTION
9
ENGLISH
1. Press the DELAY button: the corresponding «h» symbol
appears on the display; each time you press the button,
the time (1h, 2h, etc. up to max. 12h) from the start of
the selected wash cycle will be increased.
2. Select the wash program, press the START/PAUSE
button and within 4 seconds close the door: the timer
will begin counting down.
3. Once this time has elapsed, the indicator light «h»
switches off and the wash cycle begins.
To adjust the delay time and select a shorter period of time,
press the DELAY button. To cancel it, press the button
repeatedly until the selected delayed start indicator light
«h» switches off.
The DELAY function cannot be set once a wash cycle
has been started.
NaturalDry
Door opening system NaturalDry is a convection drying system
which automatically opens the door during/after drying phase to
ensure exceptional drying performance every day. Door opens at
the temperature that is safe to your kitchen furniture.
As additional steam protection, special designed protection foil is
added together with the dishwasher. To see how to mount protec-
tion foil please refer to (INSTALLATION GUIDE).
NaturalDry functionality could be disabled by the user as follows:
1. Go to the Dishwasher software menu pressing and holding
button (6 sec).
2. You switched to NaturalDry Control Menu, you could change
status of NaturalDry functionality by pressing button:
E – enabled d – disabled
To conrm the change and exit from the Control Menu please
press and hold button (3 sec).
DELAY
The start time of the program may be delayed for a period
of time between 1 and 12 hours.
Program
Drying
phase
Natural
Dry
Available
options *)
Duration of
wash pro-
gram
(h:min)**)
Water
consumption
(litres/cycle)
Energy
consumption
(kWh/cycle)
50° 2:45 12.0 0.92
1 Eco
2 Conventional
wash and dry 55° 2:00 15.0 1.35
3Intensive 65° - 2:30 15.0 1.50
4Fast 50° -- 0:55 11.5 1.10
5Sanitizing 65° - 1:40 11.5 1.30
6Pre-Wash
-
-- 0:10 4.5 0.01
7Self-Clean 65° --0:50 8.0 0.80
ECO program data is measured under laboratory conditions according to European Standard EN 60436:2019.
Note for Test Laboratories: For information on comparative EN testing conditions, please send an email to the following
address: [email protected]
Pre-treatment of the dishes is not needed before any of the programs.
*) Not all options can be used simultaneously.
**) Values given for programes other than the eco program are indicative only. The actual time may vary depending on many
factors such as temperature and pressure of the incoming water, room temperature, amount of detergent, quantity and type of
load, load balancing, additional selected options and sensor calibration.
Standby consumption: Left-on mode consumption: 5 W - Off mode consumption: 0.5 W
PROGRAMS DESCRIPTION
EN
9
To open the detergent dispenser
press button C.
Introduce the detergent into
the dry dispenser D only.
Place the amount of detergent
for pre-washing directly inside
the tub.
1. When measuring out the detergent refer to the mentioned ear-
lier information to add the proper quantity. Inside the dispenser
C there are indications to help the detergent dosing.
2. Remove detergent residues from the edges of the dispenser
and close the cover until it clicks.
3. Close the lid of the detergent dispenser by pulling it up until
the closing device is secured in place.
The detergent dispenser automatically opens up at the right time
according to the program. If all-in-one detergents are used, we
recommend using the TABLET button, because it adjusts the
program so that the best washing and drying results are always
achieved.
C
D
PROGRAMS TABLE
ECO program data is measured under laboratory conditions according to European Standard EN 60436:2019.
Note for Test Laboratories: For information on comparative EN testing conditions, please send an email to the following address:
Pre-treatment of the dishes is not needed before any of the programs.
*) Not all options can be used simultaneously.
**) Values given for programes other than the eco program are indicative only. The actual time may vary depending on many factors such as temperature
and pressure of the incoming water, room temperature, amount of detergent, quantity and type of load, load balancing, additional selected options and
sensor calibration.
Standby consumption: Left-on mode consumption: 5 W - Off mode consumption: 0.5 W
PROGRAMS DESCRIPTION
1. ECO -
bined energy and water consumption, and that it is used to assess compliance with the EU Ecodesign legislation.
2. AUTO - For normally soiled dishes with dried food residues. Senses the level of soiling on the dishes and adjusts the program accor-
dingly. When the sensor is detecting the soil level an animation appears in the display and the cycle duration is updated.
3. INTENSIVE -
Program recommended for heavily soiled crockery, especially suitable for pans and saucepans (not to be used for delicate items).
4. FAST WASH 30’ - Program to be used for half load of lightly-soiled dishes with no dried food residues.
5. FAST WASH AND DRY
- Normally soiled crockery. Everyday cycle, that ensures optimal cleaning and drying performance in shorter time.
6. GLASS - Program for delicate items, which are more sensitive to high temperatures, for example glasses and cups.
7. SILENT -
Suitable for night-time operation of the appliance. Ensures optimal cleaning and drying performance with the lowest noise emission.
8. SANITIZING - Normally or heavily soiled crockery, with additional antibacterial wash. Can be used to perform maintenance of the
dishwasher.
9. PRE-WASH - Use to refresh crockery planned to be washed later. No detergent to be used with this program.
10. SELF-CLEAN - Program to be used to perform maintenance of the dishwasher. It cleans the interior of the appliance using hot water.
Notes:
Please note that cycle FAST WASH is dedicated for lightly soiled dishes.
Program
Drying
phase
Natural
Dry
Available
options *)
Duration of
wash
program
(h:min)**)
Water
consumption
(litres/cycle)
Energy
consumption
(kWh/cycle)
1Eco 3:40 8.7 0.66
2Auto 1:20 - 3:00 7.0 - 14.0 0.70 - 1.10
3Intensive 2:40 17.0 1.30
4 Fast wash 30’ -- 0:30 9.0 0.50
5 1:20 10.0 1.10
6Glass 1:40 12.0 1.00
7Silent 3:35 16.5 1.00
8Sanitizing - 1:40 12.0 1.30
9Pre-Wash -- 0:10 4.5 0.01
10 Self- Clean -- 0:50 9.5 0.70
1:20 10.0 1.10
6 Glass
EN
9
To open the detergent dispenser
press button C.
Introduce the detergent into
the dry dispenser D only.
Place the amount of detergent
for pre-washing directly inside
the tub.
1. When measuring out the detergent refer to the mentioned ear-
lier information to add the proper quantity. Inside the dispenser
C there are indications to help the detergent dosing.
2. Remove detergent residues from the edges of the dispenser
and close the cover until it clicks.
3. Close the lid of the detergent dispenser by pulling it up until
the closing device is secured in place.
The detergent dispenser automatically opens up at the right time
according to the program. If all-in-one detergents are used, we
recommend using the TABLET button, because it adjusts the
program so that the best washing and drying results are always
achieved.
C
D
PROGRAMS TABLE
ECO program data is measured under laboratory conditions according to European Standard EN 60436:2019.
Note for Test Laboratories: For information on comparative EN testing conditions, please send an email to the following address:
Pre-treatment of the dishes is not needed before any of the programs.
*) Not all options can be used simultaneously.
**) Values given for programes other than the eco program are indicative only. The actual time may vary depending on many factors such as temperature
and pressure of the incoming water, room temperature, amount of detergent, quantity and type of load, load balancing, additional selected options and
sensor calibration.
Standby consumption: Left-on mode consumption: 5 W - Off mode consumption: 0.5 W
PROGRAMS DESCRIPTION
1. ECO -
bined energy and water consumption, and that it is used to assess compliance with the EU Ecodesign legislation.
2. AUTO - For normally soiled dishes with dried food residues. Senses the level of soiling on the dishes and adjusts the program accor-
dingly. When the sensor is detecting the soil level an animation appears in the display and the cycle duration is updated.
3. INTENSIVE -
Program recommended for heavily soiled crockery, especially suitable for pans and saucepans (not to be used for delicate items).
4. FAST WASH 30’ - Program to be used for half load of lightly-soiled dishes with no dried food residues.
5. FAST WASH AND DRY
- Normally soiled crockery. Everyday cycle, that ensures optimal cleaning and drying performance in shorter time.
6. GLASS - Program for delicate items, which are more sensitive to high temperatures, for example glasses and cups.
7. SILENT -
Suitable for night-time operation of the appliance. Ensures optimal cleaning and drying performance with the lowest noise emission.
8. SANITIZING - Normally or heavily soiled crockery, with additional antibacterial wash. Can be used to perform maintenance of the
dishwasher.
9. PRE-WASH - Use to refresh crockery planned to be washed later. No detergent to be used with this program.
10. SELF-CLEAN - Program to be used to perform maintenance of the dishwasher. It cleans the interior of the appliance using hot water.
Notes:
Please note that cycle FAST WASH is dedicated for lightly soiled dishes.
Program
Drying
phase
Natural
Dry
Available
options *)
Duration of
wash
program
(h:min)**)
Water
consumption
(litres/cycle)
Energy
consumption
(kWh/cycle)
1Eco 3:40 8.7 0.66
2Auto 1:20 - 3:00 7.0 - 14.0 0.70 - 1.10
3Intensive 2:40 17.0 1.30
4 Fast wash 30’ -- 0:30 9.0 0.50
5 1:20 10.0 1.10
6Glass 1:40 12.0 1.00
7Silent 3:35 16.5 1.00
8Sanitizing - 1:40 12.0 1.30
9Pre-Wash -- 0:10 4.5 0.01
10 Self- Clean -- 0:50 9.5 0.70
45°
9
ENGLISH
1. Press the DELAY button: the corresponding «h» symbol
appears on the display; each time you press the button,
the time (1h, 2h, etc. up to max. 12h) from the start of
the selected wash cycle will be increased.
2. Select the wash program, press the START/PAUSE
button and within 4 seconds close the door: the timer
will begin counting down.
3. Once this time has elapsed, the indicator light «h»
switches off and the wash cycle begins.
To adjust the delay time and select a shorter period of time,
press the DELAY button. To cancel it, press the button
repeatedly until the selected delayed start indicator light
«h» switches off.
The DELAY function cannot be set once a wash cycle
has been started.
NaturalDry
Door opening system NaturalDry is a convection drying system
which automatically opens the door during/after drying phase to
ensure exceptional drying performance every day. Door opens at
the temperature that is safe to your kitchen furniture.
As additional steam protection, special designed protection foil is
added together with the dishwasher. To see how to mount protec-
tion foil please refer to (INSTALLATION GUIDE).
NaturalDry functionality could be disabled by the user as follows:
1. Go to the Dishwasher software menu pressing and holding
button (6 sec).
2. You switched to NaturalDry Control Menu, you could change
status of NaturalDry functionality by pressing button:
E – enabled d – disabled
To conrm the change and exit from the Control Menu please
press and hold button (3 sec).
DELAY
The start time of the program may be delayed for a period
of time between 1 and 12 hours.
Program
Drying
phase
Natural
Dry
Available
options *)
Duration of
wash pro-
gram
(h:min)**)
Water
consumption
(litres/cycle)
Energy
consumption
(kWh/cycle)
50° 2:45 12.0 0.92
1 Eco
2 Conventional
wash and dry 55° 2:00 15.0 1.35
3Intensive 65° - 2:30 15.0 1.50
4Fast 50° -- 0:55 11.5 1.10
5Sanitizing 65° - 1:40 11.5 1.30
6Pre-Wash
-
-- 0:10 4.5 0.01
7Self-Clean 65° --0:50 8.0 0.80
ECO program data is measured under laboratory conditions according to European Standard EN 60436:2019.
Note for Test Laboratories: For information on comparative EN testing conditions, please send an email to the following
address: [email protected]
Pre-treatment of the dishes is not needed before any of the programs.
*) Not all options can be used simultaneously.
**) Values given for programes other than the eco program are indicative only. The actual time may vary depending on many
factors such as temperature and pressure of the incoming water, room temperature, amount of detergent, quantity and type of
load, load balancing, additional selected options and sensor calibration.
Standby consumption: Left-on mode consumption: 5 W - Off mode consumption: 0.5 W
PROGRAMS DESCRIPTION
EN
9
To open the detergent dispenser
press button C.
Introduce the detergent into
the dry dispenser D only.
Place the amount of detergent
for pre-washing directly inside
the tub.
1. When measuring out the detergent refer to the mentioned ear-
lier information to add the proper quantity. Inside the dispenser
C there are indications to help the detergent dosing.
2. Remove detergent residues from the edges of the dispenser
and close the cover until it clicks.
3. Close the lid of the detergent dispenser by pulling it up until
the closing device is secured in place.
The detergent dispenser automatically opens up at the right time
according to the program. If all-in-one detergents are used, we
recommend using the TABLET button, because it adjusts the
program so that the best washing and drying results are always
achieved.
C
D
PROGRAMS TABLE
ECO program data is measured under laboratory conditions according to European Standard EN 60436:2019.
Note for Test Laboratories: For information on comparative EN testing conditions, please send an email to the following address:
Pre-treatment of the dishes is not needed before any of the programs.
*) Not all options can be used simultaneously.
**) Values given for programes other than the eco program are indicative only. The actual time may vary depending on many factors such as temperature
and pressure of the incoming water, room temperature, amount of detergent, quantity and type of load, load balancing, additional selected options and
sensor calibration.
Standby consumption: Left-on mode consumption: 5 W - Off mode consumption: 0.5 W
PROGRAMS DESCRIPTION
1. ECO -
bined energy and water consumption, and that it is used to assess compliance with the EU Ecodesign legislation.
2. AUTO - For normally soiled dishes with dried food residues. Senses the level of soiling on the dishes and adjusts the program accor-
dingly. When the sensor is detecting the soil level an animation appears in the display and the cycle duration is updated.
3. INTENSIVE -
Program recommended for heavily soiled crockery, especially suitable for pans and saucepans (not to be used for delicate items).
4. FAST WASH 30’ - Program to be used for half load of lightly-soiled dishes with no dried food residues.
5. FAST WASH AND DRY
- Normally soiled crockery. Everyday cycle, that ensures optimal cleaning and drying performance in shorter time.
6. GLASS - Program for delicate items, which are more sensitive to high temperatures, for example glasses and cups.
7. SILENT -
Suitable for night-time operation of the appliance. Ensures optimal cleaning and drying performance with the lowest noise emission.
8. SANITIZING - Normally or heavily soiled crockery, with additional antibacterial wash. Can be used to perform maintenance of the
dishwasher.
9. PRE-WASH - Use to refresh crockery planned to be washed later. No detergent to be used with this program.
10. SELF-CLEAN - Program to be used to perform maintenance of the dishwasher. It cleans the interior of the appliance using hot water.
Notes:
Please note that cycle FAST WASH is dedicated for lightly soiled dishes.
Program
Drying
phase
Natural
Dry
Available
options *)
Duration of
wash
program
(h:min)**)
Water
consumption
(litres/cycle)
Energy
consumption
(kWh/cycle)
1Eco 3:40 8.7 0.66
2Auto 1:20 - 3:00 7.0 - 14.0 0.70 - 1.10
3Intensive 2:40 17.0 1.30
4 Fast wash 30’ -- 0:30 9.0 0.50
5 1:20 10.0 1.10
6Glass 1:40 12.0 1.00
7Silent 3:35 16.5 1.00
8Sanitizing - 1:40 12.0 1.30
9Pre-Wash -- 0:10 4.5 0.01
10 Self- Clean -- 0:50 9.5 0.70
1:40 12.0 1.00
7 Silent
EN
9
To open the detergent dispenser
press button C.
Introduce the detergent into
the dry dispenser D only.
Place the amount of detergent
for pre-washing directly inside
the tub.
1. When measuring out the detergent refer to the mentioned ear-
lier information to add the proper quantity. Inside the dispenser
C there are indications to help the detergent dosing.
2. Remove detergent residues from the edges of the dispenser
and close the cover until it clicks.
3. Close the lid of the detergent dispenser by pulling it up until
the closing device is secured in place.
The detergent dispenser automatically opens up at the right time
according to the program. If all-in-one detergents are used, we
recommend using the TABLET button, because it adjusts the
program so that the best washing and drying results are always
achieved.
C
D
PROGRAMS TABLE
ECO program data is measured under laboratory conditions according to European Standard EN 60436:2019.
Note for Test Laboratories: For information on comparative EN testing conditions, please send an email to the following address:
Pre-treatment of the dishes is not needed before any of the programs.
*) Not all options can be used simultaneously.
**) Values given for programes other than the eco program are indicative only. The actual time may vary depending on many factors such as temperature
and pressure of the incoming water, room temperature, amount of detergent, quantity and type of load, load balancing, additional selected options and
sensor calibration.
Standby consumption: Left-on mode consumption: 5 W - Off mode consumption: 0.5 W
PROGRAMS DESCRIPTION
1. ECO -
bined energy and water consumption, and that it is used to assess compliance with the EU Ecodesign legislation.
2. AUTO - For normally soiled dishes with dried food residues. Senses the level of soiling on the dishes and adjusts the program accor-
dingly. When the sensor is detecting the soil level an animation appears in the display and the cycle duration is updated.
3. INTENSIVE -
Program recommended for heavily soiled crockery, especially suitable for pans and saucepans (not to be used for delicate items).
4. FAST WASH 30’ - Program to be used for half load of lightly-soiled dishes with no dried food residues.
5. FAST WASH AND DRY
- Normally soiled crockery. Everyday cycle, that ensures optimal cleaning and drying performance in shorter time.
6. GLASS - Program for delicate items, which are more sensitive to high temperatures, for example glasses and cups.
7. SILENT -
Suitable for night-time operation of the appliance. Ensures optimal cleaning and drying performance with the lowest noise emission.
8. SANITIZING - Normally or heavily soiled crockery, with additional antibacterial wash. Can be used to perform maintenance of the
dishwasher.
9. PRE-WASH - Use to refresh crockery planned to be washed later. No detergent to be used with this program.
10. SELF-CLEAN - Program to be used to perform maintenance of the dishwasher. It cleans the interior of the appliance using hot water.
Notes:
Please note that cycle FAST WASH is dedicated for lightly soiled dishes.
Program
Drying
phase
Natural
Dry
Available
options *)
Duration of
wash
program
(h:min)**)
Water
consumption
(litres/cycle)
Energy
consumption
(kWh/cycle)
1Eco 3:40 8.7 0.66
2Auto 1:20 - 3:00 7.0 - 14.0 0.70 - 1.10
3Intensive 2:40 17.0 1.30
4 Fast wash 30’ -- 0:30 9.0 0.50
5 1:20 10.0 1.10
6Glass 1:40 12.0 1.00
7Silent 3:35 16.5 1.00
8Sanitizing - 1:40 12.0 1.30
9Pre-Wash -- 0:10 4.5 0.01
10 Self- Clean -- 0:50 9.5 0.70
50°
9
ENGLISH
1. Press the DELAY button: the corresponding «h» symbol
appears on the display; each time you press the button,
the time (1h, 2h, etc. up to max. 12h) from the start of
the selected wash cycle will be increased.
2. Select the wash program, press the START/PAUSE
button and within 4 seconds close the door: the timer
will begin counting down.
3. Once this time has elapsed, the indicator light «h»
switches off and the wash cycle begins.
To adjust the delay time and select a shorter period of time,
press the DELAY button. To cancel it, press the button
repeatedly until the selected delayed start indicator light
«h» switches off.
The DELAY function cannot be set once a wash cycle
has been started.
NaturalDry
Door opening system NaturalDry is a convection drying system
which automatically opens the door during/after drying phase to
ensure exceptional drying performance every day. Door opens at
the temperature that is safe to your kitchen furniture.
As additional steam protection, special designed protection foil is
added together with the dishwasher. To see how to mount protec-
tion foil please refer to (INSTALLATION GUIDE).
NaturalDry functionality could be disabled by the user as follows:
1. Go to the Dishwasher software menu pressing and holding
button (6 sec).
2. You switched to NaturalDry Control Menu, you could change
status of NaturalDry functionality by pressing button:
E – enabled d – disabled
To conrm the change and exit from the Control Menu please
press and hold button (3 sec).
DELAY
The start time of the program may be delayed for a period
of time between 1 and 12 hours.
Program
Drying
phase
Natural
Dry
Available
options *)
Duration of
wash pro-
gram
(h:min)**)
Water
consumption
(litres/cycle)
Energy
consumption
(kWh/cycle)
50° 2:45 12.0 0.92
1 Eco
2 Conventional
wash and dry 55° 2:00 15.0 1.35
3Intensive 65° - 2:30 15.0 1.50
4Fast 50° -- 0:55 11.5 1.10
5Sanitizing 65° - 1:40 11.5 1.30
6Pre-Wash
-
-- 0:10 4.5 0.01
7Self-Clean 65° --0:50 8.0 0.80
ECO program data is measured under laboratory conditions according to European Standard EN 60436:2019.
Note for Test Laboratories: For information on comparative EN testing conditions, please send an email to the following
address: [email protected]
Pre-treatment of the dishes is not needed before any of the programs.
*) Not all options can be used simultaneously.
**) Values given for programes other than the eco program are indicative only. The actual time may vary depending on many
factors such as temperature and pressure of the incoming water, room temperature, amount of detergent, quantity and type of
load, load balancing, additional selected options and sensor calibration.
Standby consumption: Left-on mode consumption: 5 W - Off mode consumption: 0.5 W
PROGRAMS DESCRIPTION
9
ENGLISH
1. Press the DELAY button: the corresponding «h» symbol
appears on the display; each time you press the button,
the time (1h, 2h, etc. up to max. 12h) from the start of
the selected wash cycle will be increased.
2. Select the wash program, press the START/PAUSE
button and within 4 seconds close the door: the timer
will begin counting down.
3. Once this time has elapsed, the indicator light «h»
switches off and the wash cycle begins.
To adjust the delay time and select a shorter period of time,
press the DELAY button. To cancel it, press the button
repeatedly until the selected delayed start indicator light
«h» switches off.
The DELAY function cannot be set once a wash cycle
has been started.
NaturalDry
Door opening system NaturalDry is a convection drying system
which automatically opens the door during/after drying phase to
ensure exceptional drying performance every day. Door opens at
the temperature that is safe to your kitchen furniture.
As additional steam protection, special designed protection foil is
added together with the dishwasher. To see how to mount protec-
tion foil please refer to (INSTALLATION GUIDE).
NaturalDry functionality could be disabled by the user as follows:
1. Go to the Dishwasher software menu pressing and holding
button (6 sec).
2. You switched to NaturalDry Control Menu, you could change
status of NaturalDry functionality by pressing button:
E – enabled d – disabled
To conrm the change and exit from the Control Menu please
press and hold button (3 sec).
DELAY
The start time of the program may be delayed for a period
of time between 1 and 12 hours.
Program
Drying
phase
Natural
Dry
Available
options *)
Duration of
wash pro-
gram
(h:min)**)
Water
consumption
(litres/cycle)
Energy
consumption
(kWh/cycle)
50° 2:45 12.0 0.92
1 Eco
2 Conventional
wash and dry 55° 2:00 15.0 1.35
3Intensive 65° - 2:30 15.0 1.50
4Fast 50° -- 0:55 11.5 1.10
5Sanitizing 65° - 1:40 11.5 1.30
6Pre-Wash
-
-- 0:10 4.5 0.01
7Self-Clean 65° --0:50 8.0 0.80
ECO program data is measured under laboratory conditions according to European Standard EN 60436:2019.
Note for Test Laboratories: For information on comparative EN testing conditions, please send an email to the following
address: [email protected]
Pre-treatment of the dishes is not needed before any of the programs.
*) Not all options can be used simultaneously.
**) Values given for programes other than the eco program are indicative only. The actual time may vary depending on many
factors such as temperature and pressure of the incoming water, room temperature, amount of detergent, quantity and type of
load, load balancing, additional selected options and sensor calibration.
Standby consumption: Left-on mode consumption: 5 W - Off mode consumption: 0.5 W
PROGRAMS DESCRIPTION
EN
9
To open the detergent dispenser
press button C.
Introduce the detergent into
the dry dispenser D only.
Place the amount of detergent
for pre-washing directly inside
the tub.
1. When measuring out the detergent refer to the mentioned ear-
lier information to add the proper quantity. Inside the dispenser
C there are indications to help the detergent dosing.
2. Remove detergent residues from the edges of the dispenser
and close the cover until it clicks.
3. Close the lid of the detergent dispenser by pulling it up until
the closing device is secured in place.
The detergent dispenser automatically opens up at the right time
according to the program. If all-in-one detergents are used, we
recommend using the TABLET button, because it adjusts the
program so that the best washing and drying results are always
achieved.
C
D
PROGRAMS TABLE
ECO program data is measured under laboratory conditions according to European Standard EN 60436:2019.
Note for Test Laboratories: For information on comparative EN testing conditions, please send an email to the following address:
Pre-treatment of the dishes is not needed before any of the programs.
*) Not all options can be used simultaneously.
**) Values given for programes other than the eco program are indicative only. The actual time may vary depending on many factors such as temperature
and pressure of the incoming water, room temperature, amount of detergent, quantity and type of load, load balancing, additional selected options and
sensor calibration.
Standby consumption: Left-on mode consumption: 5 W - Off mode consumption: 0.5 W
PROGRAMS DESCRIPTION
1. ECO -
bined energy and water consumption, and that it is used to assess compliance with the EU Ecodesign legislation.
2. AUTO - For normally soiled dishes with dried food residues. Senses the level of soiling on the dishes and adjusts the program accor-
dingly. When the sensor is detecting the soil level an animation appears in the display and the cycle duration is updated.
3. INTENSIVE -
Program recommended for heavily soiled crockery, especially suitable for pans and saucepans (not to be used for delicate items).
4. FAST WASH 30’ - Program to be used for half load of lightly-soiled dishes with no dried food residues.
5. FAST WASH AND DRY
- Normally soiled crockery. Everyday cycle, that ensures optimal cleaning and drying performance in shorter time.
6. GLASS - Program for delicate items, which are more sensitive to high temperatures, for example glasses and cups.
7. SILENT -
Suitable for night-time operation of the appliance. Ensures optimal cleaning and drying performance with the lowest noise emission.
8. SANITIZING - Normally or heavily soiled crockery, with additional antibacterial wash. Can be used to perform maintenance of the
dishwasher.
9. PRE-WASH - Use to refresh crockery planned to be washed later. No detergent to be used with this program.
10. SELF-CLEAN - Program to be used to perform maintenance of the dishwasher. It cleans the interior of the appliance using hot water.
Notes:
Please note that cycle FAST WASH is dedicated for lightly soiled dishes.
Program
Drying
phase
Natural
Dry
Available
options *)
Duration of
wash
program
(h:min)**)
Water
consumption
(litres/cycle)
Energy
consumption
(kWh/cycle)
1Eco 3:40 8.7 0.66
2Auto 1:20 - 3:00 7.0 - 14.0 0.70 - 1.10
3Intensive 2:40 17.0 1.30
4 Fast wash 30’ -- 0:30 9.0 0.50
5 1:20 10.0 1.10
6Glass 1:40 12.0 1.00
7Silent 3:35 16.5 1.00
8Sanitizing - 1:40 12.0 1.30
9Pre-Wash -- 0:10 4.5 0.01
10 Self- Clean -- 0:50 9.5 0.70
3:35 16.5 1.00
8 Sanitizing
EN
9
To open the detergent dispenser
press button C.
Introduce the detergent into
the dry dispenser D only.
Place the amount of detergent
for pre-washing directly inside
the tub.
1. When measuring out the detergent refer to the mentioned ear-
lier information to add the proper quantity. Inside the dispenser
C there are indications to help the detergent dosing.
2. Remove detergent residues from the edges of the dispenser
and close the cover until it clicks.
3. Close the lid of the detergent dispenser by pulling it up until
the closing device is secured in place.
The detergent dispenser automatically opens up at the right time
according to the program. If all-in-one detergents are used, we
recommend using the TABLET button, because it adjusts the
program so that the best washing and drying results are always
achieved.
C
D
PROGRAMS TABLE
ECO program data is measured under laboratory conditions according to European Standard EN 60436:2019.
Note for Test Laboratories: For information on comparative EN testing conditions, please send an email to the following address:
Pre-treatment of the dishes is not needed before any of the programs.
*) Not all options can be used simultaneously.
**) Values given for programes other than the eco program are indicative only. The actual time may vary depending on many factors such as temperature
and pressure of the incoming water, room temperature, amount of detergent, quantity and type of load, load balancing, additional selected options and
sensor calibration.
Standby consumption: Left-on mode consumption: 5 W - Off mode consumption: 0.5 W
PROGRAMS DESCRIPTION
1. ECO -
bined energy and water consumption, and that it is used to assess compliance with the EU Ecodesign legislation.
2. AUTO - For normally soiled dishes with dried food residues. Senses the level of soiling on the dishes and adjusts the program accor-
dingly. When the sensor is detecting the soil level an animation appears in the display and the cycle duration is updated.
3. INTENSIVE -
Program recommended for heavily soiled crockery, especially suitable for pans and saucepans (not to be used for delicate items).
4. FAST WASH 30’ - Program to be used for half load of lightly-soiled dishes with no dried food residues.
5. FAST WASH AND DRY
- Normally soiled crockery. Everyday cycle, that ensures optimal cleaning and drying performance in shorter time.
6. GLASS - Program for delicate items, which are more sensitive to high temperatures, for example glasses and cups.
7. SILENT -
Suitable for night-time operation of the appliance. Ensures optimal cleaning and drying performance with the lowest noise emission.
8. SANITIZING - Normally or heavily soiled crockery, with additional antibacterial wash. Can be used to perform maintenance of the
dishwasher.
9. PRE-WASH - Use to refresh crockery planned to be washed later. No detergent to be used with this program.
10. SELF-CLEAN - Program to be used to perform maintenance of the dishwasher. It cleans the interior of the appliance using hot water.
Notes:
Please note that cycle FAST WASH is dedicated for lightly soiled dishes.
Program
Drying
phase
Natural
Dry
Available
options *)
Duration of
wash
program
(h:min)**)
Water
consumption
(litres/cycle)
Energy
consumption
(kWh/cycle)
1Eco 3:40 8.7 0.66
2Auto 1:20 - 3:00 7.0 - 14.0 0.70 - 1.10
3Intensive 2:40 17.0 1.30
4 Fast wash 30’ -- 0:30 9.0 0.50
5 1:20 10.0 1.10
6Glass 1:40 12.0 1.00
7Silent 3:35 16.5 1.00
8Sanitizing - 1:40 12.0 1.30
9Pre-Wash -- 0:10 4.5 0.01
10 Self- Clean -- 0:50 9.5 0.70
65°
9
ENGLISH
1. Press the DELAY button: the corresponding «h» symbol
appears on the display; each time you press the button,
the time (1h, 2h, etc. up to max. 12h) from the start of
the selected wash cycle will be increased.
2. Select the wash program, press the START/PAUSE
button and within 4 seconds close the door: the timer
will begin counting down.
3. Once this time has elapsed, the indicator light «h»
switches off and the wash cycle begins.
To adjust the delay time and select a shorter period of time,
press the DELAY button. To cancel it, press the button
repeatedly until the selected delayed start indicator light
«h» switches off.
The DELAY function cannot be set once a wash cycle
has been started.
NaturalDry
Door opening system NaturalDry is a convection drying system
which automatically opens the door during/after drying phase to
ensure exceptional drying performance every day. Door opens at
the temperature that is safe to your kitchen furniture.
As additional steam protection, special designed protection foil is
added together with the dishwasher. To see how to mount protec-
tion foil please refer to (INSTALLATION GUIDE).
NaturalDry functionality could be disabled by the user as follows:
1. Go to the Dishwasher software menu pressing and holding
button (6 sec).
2. You switched to NaturalDry Control Menu, you could change
status of NaturalDry functionality by pressing button:
E – enabled d – disabled
To conrm the change and exit from the Control Menu please
press and hold button (3 sec).
DELAY
The start time of the program may be delayed for a period
of time between 1 and 12 hours.
Program
Drying
phase
Natural
Dry
Available
options *)
Duration of
wash pro-
gram
(h:min)**)
Water
consumption
(litres/cycle)
Energy
consumption
(kWh/cycle)
50° 2:45 12.0 0.92
1 Eco
2 Conventional
wash and dry 55° 2:00 15.0 1.35
3Intensive 65° - 2:30 15.0 1.50
4Fast 50° -- 0:55 11.5 1.10
5Sanitizing 65° - 1:40 11.5 1.30
6Pre-Wash
-
-- 0:10 4.5 0.01
7Self-Clean 65° --0:50 8.0 0.80
ECO program data is measured under laboratory conditions according to European Standard EN 60436:2019.
Note for Test Laboratories: For information on comparative EN testing conditions, please send an email to the following
address: [email protected]
Pre-treatment of the dishes is not needed before any of the programs.
*) Not all options can be used simultaneously.
**) Values given for programes other than the eco program are indicative only. The actual time may vary depending on many
factors such as temperature and pressure of the incoming water, room temperature, amount of detergent, quantity and type of
load, load balancing, additional selected options and sensor calibration.
Standby consumption: Left-on mode consumption: 5 W - Off mode consumption: 0.5 W
PROGRAMS DESCRIPTION
-
EN
9
To open the detergent dispenser
press button C.
Introduce the detergent into
the dry dispenser D only.
Place the amount of detergent
for pre-washing directly inside
the tub.
1. When measuring out the detergent refer to the mentioned ear-
lier information to add the proper quantity. Inside the dispenser
C there are indications to help the detergent dosing.
2. Remove detergent residues from the edges of the dispenser
and close the cover until it clicks.
3. Close the lid of the detergent dispenser by pulling it up until
the closing device is secured in place.
The detergent dispenser automatically opens up at the right time
according to the program. If all-in-one detergents are used, we
recommend using the TABLET button, because it adjusts the
program so that the best washing and drying results are always
achieved.
C
D
PROGRAMS TABLE
ECO program data is measured under laboratory conditions according to European Standard EN 60436:2019.
Note for Test Laboratories: For information on comparative EN testing conditions, please send an email to the following address:
Pre-treatment of the dishes is not needed before any of the programs.
*) Not all options can be used simultaneously.
**) Values given for programes other than the eco program are indicative only. The actual time may vary depending on many factors such as temperature
and pressure of the incoming water, room temperature, amount of detergent, quantity and type of load, load balancing, additional selected options and
sensor calibration.
Standby consumption: Left-on mode consumption: 5 W - Off mode consumption: 0.5 W
PROGRAMS DESCRIPTION
1. ECO -
bined energy and water consumption, and that it is used to assess compliance with the EU Ecodesign legislation.
2. AUTO - For normally soiled dishes with dried food residues. Senses the level of soiling on the dishes and adjusts the program accor-
dingly. When the sensor is detecting the soil level an animation appears in the display and the cycle duration is updated.
3. INTENSIVE -
Program recommended for heavily soiled crockery, especially suitable for pans and saucepans (not to be used for delicate items).
4. FAST WASH 30’ - Program to be used for half load of lightly-soiled dishes with no dried food residues.
5. FAST WASH AND DRY
- Normally soiled crockery. Everyday cycle, that ensures optimal cleaning and drying performance in shorter time.
6. GLASS - Program for delicate items, which are more sensitive to high temperatures, for example glasses and cups.
7. SILENT -
Suitable for night-time operation of the appliance. Ensures optimal cleaning and drying performance with the lowest noise emission.
8. SANITIZING - Normally or heavily soiled crockery, with additional antibacterial wash. Can be used to perform maintenance of the
dishwasher.
9. PRE-WASH - Use to refresh crockery planned to be washed later. No detergent to be used with this program.
10. SELF-CLEAN - Program to be used to perform maintenance of the dishwasher. It cleans the interior of the appliance using hot water.
Notes:
Please note that cycle FAST WASH is dedicated for lightly soiled dishes.
Program
Drying
phase
Natural
Dry
Available
options *)
Duration of
wash
program
(h:min)**)
Water
consumption
(litres/cycle)
Energy
consumption
(kWh/cycle)
1Eco 3:40 8.7 0.66
2Auto 1:20 - 3:00 7.0 - 14.0 0.70 - 1.10
3Intensive 2:40 17.0 1.30
4 Fast wash 30’ -- 0:30 9.0 0.50
5 1:20 10.0 1.10
6Glass 1:40 12.0 1.00
7Silent 3:35 16.5 1.00
8Sanitizing - 1:40 12.0 1.30
9Pre-Wash -- 0:10 4.5 0.01
10 Self- Clean -- 0:50 9.5 0.70
1:40 12.0 1.30
9 Pre-Wash
EN
9
To open the detergent dispenser
press button C.
Introduce the detergent into
the dry dispenser D only.
Place the amount of detergent
for pre-washing directly inside
the tub.
1. When measuring out the detergent refer to the mentioned ear-
lier information to add the proper quantity. Inside the dispenser
C there are indications to help the detergent dosing.
2. Remove detergent residues from the edges of the dispenser
and close the cover until it clicks.
3. Close the lid of the detergent dispenser by pulling it up until
the closing device is secured in place.
The detergent dispenser automatically opens up at the right time
according to the program. If all-in-one detergents are used, we
recommend using the TABLET button, because it adjusts the
program so that the best washing and drying results are always
achieved.
C
D
PROGRAMS TABLE
ECO program data is measured under laboratory conditions according to European Standard EN 60436:2019.
Note for Test Laboratories: For information on comparative EN testing conditions, please send an email to the following address:
Pre-treatment of the dishes is not needed before any of the programs.
*) Not all options can be used simultaneously.
**) Values given for programes other than the eco program are indicative only. The actual time may vary depending on many factors such as temperature
and pressure of the incoming water, room temperature, amount of detergent, quantity and type of load, load balancing, additional selected options and
sensor calibration.
Standby consumption: Left-on mode consumption: 5 W - Off mode consumption: 0.5 W
PROGRAMS DESCRIPTION
1. ECO -
bined energy and water consumption, and that it is used to assess compliance with the EU Ecodesign legislation.
2. AUTO - For normally soiled dishes with dried food residues. Senses the level of soiling on the dishes and adjusts the program accor-
dingly. When the sensor is detecting the soil level an animation appears in the display and the cycle duration is updated.
3. INTENSIVE -
Program recommended for heavily soiled crockery, especially suitable for pans and saucepans (not to be used for delicate items).
4. FAST WASH 30’ - Program to be used for half load of lightly-soiled dishes with no dried food residues.
5. FAST WASH AND DRY
- Normally soiled crockery. Everyday cycle, that ensures optimal cleaning and drying performance in shorter time.
6. GLASS - Program for delicate items, which are more sensitive to high temperatures, for example glasses and cups.
7. SILENT -
Suitable for night-time operation of the appliance. Ensures optimal cleaning and drying performance with the lowest noise emission.
8. SANITIZING - Normally or heavily soiled crockery, with additional antibacterial wash. Can be used to perform maintenance of the
dishwasher.
9. PRE-WASH - Use to refresh crockery planned to be washed later. No detergent to be used with this program.
10. SELF-CLEAN - Program to be used to perform maintenance of the dishwasher. It cleans the interior of the appliance using hot water.
Notes:
Please note that cycle FAST WASH is dedicated for lightly soiled dishes.
Program
Drying
phase
Natural
Dry
Available
options *)
Duration of
wash
program
(h:min)**)
Water
consumption
(litres/cycle)
Energy
consumption
(kWh/cycle)
1Eco 3:40 8.7 0.66
2Auto 1:20 - 3:00 7.0 - 14.0 0.70 - 1.10
3Intensive 2:40 17.0 1.30
4 Fast wash 30’ -- 0:30 9.0 0.50
5 1:20 10.0 1.10
6Glass 1:40 12.0 1.00
7Silent 3:35 16.5 1.00
8Sanitizing - 1:40 12.0 1.30
9Pre-Wash -- 0:10 4.5 0.01
10 Self- Clean -- 0:50 9.5 0.70
- -
EN
9
To open the detergent dispenser
press button C.
Introduce the detergent into
the dry dispenser D only.
Place the amount of detergent
for pre-washing directly inside
the tub.
1. When measuring out the detergent refer to the mentioned ear-
lier information to add the proper quantity. Inside the dispenser
C there are indications to help the detergent dosing.
2. Remove detergent residues from the edges of the dispenser
and close the cover until it clicks.
3. Close the lid of the detergent dispenser by pulling it up until
the closing device is secured in place.
The detergent dispenser automatically opens up at the right time
according to the program. If all-in-one detergents are used, we
recommend using the TABLET button, because it adjusts the
program so that the best washing and drying results are always
achieved.
C
D
PROGRAMS TABLE
ECO program data is measured under laboratory conditions according to European Standard EN 60436:2019.
Note for Test Laboratories: For information on comparative EN testing conditions, please send an email to the following address:
Pre-treatment of the dishes is not needed before any of the programs.
*) Not all options can be used simultaneously.
**) Values given for programes other than the eco program are indicative only. The actual time may vary depending on many factors such as temperature
and pressure of the incoming water, room temperature, amount of detergent, quantity and type of load, load balancing, additional selected options and
sensor calibration.
Standby consumption: Left-on mode consumption: 5 W - Off mode consumption: 0.5 W
PROGRAMS DESCRIPTION
1. ECO -
bined energy and water consumption, and that it is used to assess compliance with the EU Ecodesign legislation.
2. AUTO - For normally soiled dishes with dried food residues. Senses the level of soiling on the dishes and adjusts the program accor-
dingly. When the sensor is detecting the soil level an animation appears in the display and the cycle duration is updated.
3. INTENSIVE -
Program recommended for heavily soiled crockery, especially suitable for pans and saucepans (not to be used for delicate items).
4. FAST WASH 30’ - Program to be used for half load of lightly-soiled dishes with no dried food residues.
5. FAST WASH AND DRY
- Normally soiled crockery. Everyday cycle, that ensures optimal cleaning and drying performance in shorter time.
6. GLASS - Program for delicate items, which are more sensitive to high temperatures, for example glasses and cups.
7. SILENT -
Suitable for night-time operation of the appliance. Ensures optimal cleaning and drying performance with the lowest noise emission.
8. SANITIZING - Normally or heavily soiled crockery, with additional antibacterial wash. Can be used to perform maintenance of the
dishwasher.
9. PRE-WASH - Use to refresh crockery planned to be washed later. No detergent to be used with this program.
10. SELF-CLEAN - Program to be used to perform maintenance of the dishwasher. It cleans the interior of the appliance using hot water.
Notes:
Please note that cycle FAST WASH is dedicated for lightly soiled dishes.
Program
Drying
phase
Natural
Dry
Available
options *)
Duration of
wash
program
(h:min)**)
Water
consumption
(litres/cycle)
Energy
consumption
(kWh/cycle)
1Eco 3:40 8.7 0.66
2Auto 1:20 - 3:00 7.0 - 14.0 0.70 - 1.10
3Intensive 2:40 17.0 1.30
4 Fast wash 30’ -- 0:30 9.0 0.50
5 1:20 10.0 1.10
6Glass 1:40 12.0 1.00
7Silent 3:35 16.5 1.00
8Sanitizing - 1:40 12.0 1.30
9Pre-Wash -- 0:10 4.5 0.01
10 Self- Clean -- 0:50 9.5 0.70
0:10 4.5 0.01
10 Self-Clean
EN
9
To open the detergent dispenser
press button C.
Introduce the detergent into
the dry dispenser D only.
Place the amount of detergent
for pre-washing directly inside
the tub.
1. When measuring out the detergent refer to the mentioned ear-
lier information to add the proper quantity. Inside the dispenser
C there are indications to help the detergent dosing.
2. Remove detergent residues from the edges of the dispenser
and close the cover until it clicks.
3. Close the lid of the detergent dispenser by pulling it up until
the closing device is secured in place.
The detergent dispenser automatically opens up at the right time
according to the program. If all-in-one detergents are used, we
recommend using the TABLET button, because it adjusts the
program so that the best washing and drying results are always
achieved.
C
D
PROGRAMS TABLE
ECO program data is measured under laboratory conditions according to European Standard EN 60436:2019.
Note for Test Laboratories: For information on comparative EN testing conditions, please send an email to the following address:
Pre-treatment of the dishes is not needed before any of the programs.
*) Not all options can be used simultaneously.
**) Values given for programes other than the eco program are indicative only. The actual time may vary depending on many factors such as temperature
and pressure of the incoming water, room temperature, amount of detergent, quantity and type of load, load balancing, additional selected options and
sensor calibration.
Standby consumption: Left-on mode consumption: 5 W - Off mode consumption: 0.5 W
PROGRAMS DESCRIPTION
1. ECO -
bined energy and water consumption, and that it is used to assess compliance with the EU Ecodesign legislation.
2. AUTO - For normally soiled dishes with dried food residues. Senses the level of soiling on the dishes and adjusts the program accor-
dingly. When the sensor is detecting the soil level an animation appears in the display and the cycle duration is updated.
3. INTENSIVE -
Program recommended for heavily soiled crockery, especially suitable for pans and saucepans (not to be used for delicate items).
4. FAST WASH 30’ - Program to be used for half load of lightly-soiled dishes with no dried food residues.
5. FAST WASH AND DRY
- Normally soiled crockery. Everyday cycle, that ensures optimal cleaning and drying performance in shorter time.
6. GLASS - Program for delicate items, which are more sensitive to high temperatures, for example glasses and cups.
7. SILENT -
Suitable for night-time operation of the appliance. Ensures optimal cleaning and drying performance with the lowest noise emission.
8. SANITIZING - Normally or heavily soiled crockery, with additional antibacterial wash. Can be used to perform maintenance of the
dishwasher.
9. PRE-WASH - Use to refresh crockery planned to be washed later. No detergent to be used with this program.
10. SELF-CLEAN - Program to be used to perform maintenance of the dishwasher. It cleans the interior of the appliance using hot water.
Notes:
Please note that cycle FAST WASH is dedicated for lightly soiled dishes.
Program
Drying
phase
Natural
Dry
Available
options *)
Duration of
wash
program
(h:min)**)
Water
consumption
(litres/cycle)
Energy
consumption
(kWh/cycle)
1Eco 3:40 8.7 0.66
2Auto 1:20 - 3:00 7.0 - 14.0 0.70 - 1.10
3Intensive 2:40 17.0 1.30
4 Fast wash 30’ -- 0:30 9.0 0.50
5 1:20 10.0 1.10
6Glass 1:40 12.0 1.00
7Silent 3:35 16.5 1.00
8Sanitizing - 1:40 12.0 1.30
9Pre-Wash -- 0:10 4.5 0.01
10 Self- Clean -- 0:50 9.5 0.70
65° - -
EN
9
To open the detergent dispenser
press button C.
Introduce the detergent into
the dry dispenser D only.
Place the amount of detergent
for pre-washing directly inside
the tub.
1. When measuring out the detergent refer to the mentioned ear-
lier information to add the proper quantity. Inside the dispenser
C there are indications to help the detergent dosing.
2. Remove detergent residues from the edges of the dispenser
and close the cover until it clicks.
3. Close the lid of the detergent dispenser by pulling it up until
the closing device is secured in place.
The detergent dispenser automatically opens up at the right time
according to the program. If all-in-one detergents are used, we
recommend using the TABLET button, because it adjusts the
program so that the best washing and drying results are always
achieved.
C
D
PROGRAMS TABLE
ECO program data is measured under laboratory conditions according to European Standard EN 60436:2019.
Note for Test Laboratories: For information on comparative EN testing conditions, please send an email to the following address:
Pre-treatment of the dishes is not needed before any of the programs.
*) Not all options can be used simultaneously.
**) Values given for programes other than the eco program are indicative only. The actual time may vary depending on many factors such as temperature
and pressure of the incoming water, room temperature, amount of detergent, quantity and type of load, load balancing, additional selected options and
sensor calibration.
Standby consumption: Left-on mode consumption: 5 W - Off mode consumption: 0.5 W
PROGRAMS DESCRIPTION
1. ECO -
bined energy and water consumption, and that it is used to assess compliance with the EU Ecodesign legislation.
2. AUTO - For normally soiled dishes with dried food residues. Senses the level of soiling on the dishes and adjusts the program accor-
dingly. When the sensor is detecting the soil level an animation appears in the display and the cycle duration is updated.
3. INTENSIVE -
Program recommended for heavily soiled crockery, especially suitable for pans and saucepans (not to be used for delicate items).
4. FAST WASH 30’ - Program to be used for half load of lightly-soiled dishes with no dried food residues.
5. FAST WASH AND DRY
- Normally soiled crockery. Everyday cycle, that ensures optimal cleaning and drying performance in shorter time.
6. GLASS - Program for delicate items, which are more sensitive to high temperatures, for example glasses and cups.
7. SILENT -
Suitable for night-time operation of the appliance. Ensures optimal cleaning and drying performance with the lowest noise emission.
8. SANITIZING - Normally or heavily soiled crockery, with additional antibacterial wash. Can be used to perform maintenance of the
dishwasher.
9. PRE-WASH - Use to refresh crockery planned to be washed later. No detergent to be used with this program.
10. SELF-CLEAN - Program to be used to perform maintenance of the dishwasher. It cleans the interior of the appliance using hot water.
Notes:
Please note that cycle FAST WASH is dedicated for lightly soiled dishes.
Program
Drying
phase
Natural
Dry
Available
options *)
Duration of
wash
program
(h:min)**)
Water
consumption
(litres/cycle)
Energy
consumption
(kWh/cycle)
1Eco 3:40 8.7 0.66
2Auto 1:20 - 3:00 7.0 - 14.0 0.70 - 1.10
3Intensive 2:40 17.0 1.30
4 Fast wash 30’ -- 0:30 9.0 0.50
5 1:20 10.0 1.10
6Glass 1:40 12.0 1.00
7Silent 3:35 16.5 1.00
8Sanitizing - 1:40 12.0 1.30
9Pre-Wash -- 0:10 4.5 0.01
10 Self- Clean -- 0:50 9.5 0.70
0:50 9.5 0.70
ECO program data is measured under laboratory conditions
according to European Standard EN 60436:2019.
Note for Test Laboratories: For information on comparative
EN testing conditions, please send an email to the following
address: [email protected]
Pre-treatment of the dishes is not needed before any of the
programs.
*) Not all options can be used simultaneously.
**) Values given for programes other than the eco program are
indicative only. The actual time may vary depending on many
factors such as temperature and pressure of the incoming
water, room temperature, amount of detergent, quantity and
type of load, load balancing, additional selected options and
sensor calibration.
1. ECO - Eco program is suitable to clean normally soiled
tableware, that for this use, it is the most ecient program
in terms of its combined energy and water consumption,
and that it is used to assess compliance with the EU
Ecodesign legislation.
2. AUTO - For normally soiled dishes with dried food residues.
Senses the level of soiling on the dishes and adjusts the
program accordingly. When the sensor is detecting the
soil level an animation appears in the display and the cycle
duration is updated.
3. INTENSIVE - Program recommended for heavily soiled
crockery, especially suitable for pans and saucepans (not to
be used for delicate items).
4. FAST WASH 30’ - Program to be used for half load of lightly-
soiled dishes with no dried food residues.
5. FAST WASH AND DRY - Normally soiled crockery. Everyday
cycle, that ensures optimal cleaning and drying performance
in shorter time.
6. GLASS - Program for delicate items, which are more
sensitive to high temperatures, for example glasses and
cups.
7. SILENT - Suitable for night-time operation of the appliance.
Ensures optimal cleaning and drying performance with the
lowest noise emission.
8. SANITIZING - Normally or heavily soiled crockery, with
additional antibacterial wash. Can be used to perform
maintenance of the dishwasher.
9. PRE-WASH - Use to refresh crockery planned to be washed
later. No detergent to be used with this program.
10. SELF-CLEAN - Program to be used to perform maintenance
of the dishwasher, to be carried out only when the
dishwasher is EMPTY using specic detergents designed for
dishwasher maintenance
Notes: Please note that cycle FAST WASH is dedicated for lightly
soiled dishes.
OPTIONS can be selected directly by pressing the corresponding
button (see CONTROL PANEL).
If an option is not compatible with the selected program see
PROGRAMS TABLE, the corresponding LED rapidly 3 times
and beeps will sound. The option will not be enabled.

ENGLISH 12
ATTENTION: Always unplug the appliance when cleaning it and
when performing maintenance work. Do not use ammable
liquids to clean the machine.
Cleaning the dishwasher
Any marks on the inside of the appliance may be removed using
a cloth dampened with water and a little vinegar.
The external surfaces of the machine and the control panel
can be cleaned using a non-abrasive cloth which has been
dampened with water. Do not use solvents or abrasive products.
Preventing unpleasant odours
Always keep the door of the appliance ajar in order to avoid
moisture from forming and being trapped inside the machine.
Clean the seals around the door and detergent dispensers
regularly using a damp sponge. This will avoid food becoming
trapped in the seals, which is the main cause behind the
formation of unpleasant odours.
Cheking the water supply hose
Check the inlet hose regularly for brittleness and cracks. If
damaged, replace it by a new hose available through our After-
Sales Service or your specialist dealer. Depending on the hose
type:
ENGLISH
10
Cleaning and maintenance
ATTENTION: Always unplug the appliance when cleaning it
and when performing maintenance work. Do not use flammable
liquids to clean the machine.
CLEANING THE DISHWASHER
Any marks on the inside of the appliance may be
removed using a cloth dampened with water and
a little vinegar.
The external surfaces of the machine and the
control panel can be cleaned using a non-abrasive
cloth which has been dampened with water. Do
not use solvents or abrasive products.
PREVENTING UNPLEASANT ODOURS
Always keep the door of the appliance ajar in order to avoid mo-
isture from forming and being trapped inside the machine.
Clean the seals around the door and detergent dispensers regu-
larly using a damp sponge. This will avoid food becoming trapped
in the seals, which is the main cause behind the formation of
unpleasant odours.
CHEKING THE WATER SUPPLY HOSE
Check the inlet hose regularly for brittleness and cracks. If dama-
ged, replace it by a new hose available through our After-Sales
Service or your specialist dealer. Depending on the hose type:
If the inlet hose has a transparent coating, periodically check if
the colour intensifies locall . If yes, the hose may have a leak and
should be replaced.
For water stop hoses: check the small safety valve inspection
window (see arrow). If it is red, the water stop function was trig-
gered, and the hose must be replaced by a new one.
For unscrewing this hose, press the release button while unscre-
wing the hose.
CLEANING THE WATER INLET HOSE
If the water hoses are new or have not been used for an exten-
ded period of time, let the water run to make sure it is clear and
free of impurities before performing the necessary connections. If
this precaution is not taken, the water inlet could become blocked
and damage the dishwasher.
CLEANING THE FILTER ASSEMBLY
Regularly clean the filter assembly so that the filters do not clo
and that the waste water flows away correctl .
Using dishwasher with clogged lters or foreign objects inside l-
tration system or sprayarms may cause unit malfunction resulting
in lose of performance, noisy work or higher resources usage.
The filter assembly consists of three filters which remove foo
residues from the washing water and then recirculate the water:
to obtain the best washing results, you need to keep them clean.
The dishwasher must not be used without lters or if the
lter is loose.
At least once per month or after each 30 cycles, check the filter
assembly and if necessary clean it thoroughly under running
water, using a non-metallic brush and following the instructions
below:
1. Turn the cylindrical filter A in an anti-clockwise direction and
pull it out (Fig 1).
2. Remove the cup filter B by exerting a slight pressure on the
side flaps (Fig 2).
3. Slide out the stainless-steel plate filter C (Fig 3).
4. In case you find foreign objects (such as broken glass, porc -
lain, bones, fruit seeds etc.) please remove them carefully.
5. Inspect the trap and remove any food residues. NEVER RE-
MOVE the wash-cycle pump protection (black detail) (Fig 4).
After cleaning the filters, replace the filter assembly and fix it
position correctly; this is essential for maintaining the efficient
operation of the dishwasher.
CLEANING THE SPRAY ARMS
On occasions, food residue may
become encrusted onto the
spray arms and block the holes
used to spray the water. It is
therefore recommended that you
check the arms from time to time
and clean them with a small
non-metallic brush.
To remove the upper spray arm,
turn the plastic locking ring in an
anti-clockwise direction.
The upper spray arm should be
replaced so that the side with
the greater number of holes is
facing upwards.
The lower spray arm may be
removed by pulling it upwards.
WATER SOFTENING SYSTEM
Water softener automatically reduces water hardness, conse-
quently preventing scale buildup on heater, contributing also to
better cleaning efficienc . This system regenerates itself with salt,
therefore it is required to refill salt container when empt . Frequen-
cy
of regeneration depends on water hardness level setting - by
default regeneration takes place once per 5 Eco cycles with water
hardness level set to 3. Regeneration process starts in final rins
and finishes in drying phase, before cycle ends
Single regeneration consumes: ~3.5L of water; takes up to 5 addi-
tional minutes for the cycle; consumes below 0.005kWh of energy.
A
A
B
C
12
34
If the inlet hose has a transparent coating, periodically check if
the colour intensies locall . If yes, the hose may have a leak and
should be replaced.
For water stop hoses: check the small safety valve inspection
window (see arrow). If it is red, the water stop function was
triggered, and the hose must be replaced by a new one. For
unscrewing this hose, press the release button while unscrewing
the hose.
Cleaning the water inlet hose
If the water hoses are new or have not been used for an
extended period of time, let the water run to make sure it is
clear and free of impurities before performing the necessary
connections. If this precaution is not taken, the water inlet could
become blocked and damage the dishwasher.
Cleaning the lter assembly
Regularly clean the lter assembly so that the lters do not close
and that the waste water ows away correctly.
Using dishwasher with clogged lters or foreign objects inside
ltration system or sprayarms may cause unit malfunction
resulting in lose of performance, noisy work or higher resources
usage.
The lter assembly consists of three lters which remove foo
residues from the washing water and then recirculate the water:
to obtain the best washing results, you need to keep them clean.
The dishwasher must not be used without lters or if the
lter is loose.
At least once per month or after each 30 cycles, check the lter
assembly and if necessary clean it thoroughly under running water,
using a non-metallic brush and following the instructions below:
1. Turn the cylindrical lter A in an anti-clockwise direction
and pull it out (Fig 1).
2. Remove the cup lter B by exerting a slight pressure on the
side aps (Fig 2).
3. Slide out the stainless-steel plate lter C (Fig 3).
4. In case you nd foreign objects (such as broken glass,
porc - lain, bones, fruit seeds etc.) please remove them
carefully.
5. Inspect the trap and remove any food residues. NEVER
REMOVE the wash-cycle pump protection (black detail)
(Fig 4).
EN
13
CLEANING THE FILTER ASSEMBLY
Regularly clean the lter assembly so that the lters do not clog
and that the waste water ows away correctly.
Using dishwasher with clogged lters or foreign objects inside l-
tration system or sprayarms may cause unit malfunction resulting
in lose of performance, noisy work or higher resources usage.
The lter assembly consists of three lters which remove food
residues from the washing water and then recirculate the water:
to obtain the best washing results, you need to keep them clean.
The dishwasher must not be used without lters or if the
lter is loose.
At least once per month or after each 30 cycles, check the lter
assembly and if necessary clean it thoroughly under running water,
using a non-metallic brush and following the instructions below:
1. Turn the cylindrical lter A in an anti-clockwise direction and
pull it out (Fig 1).
2. Remove the cup lter B by exerting a slight pressure on the
side aps (Fig 2).
3. Slide out the stainless-steel plate lter C (Fig 3).
4. In case you nd foreign objects (such as broken glass, porce-
lain, bones, fruit seeds etc.) please remove them carefully.
5. Inspect the trap and remove any food residues. NEVER
REMOVE the wash-cycle pump protection (black detail) (Fig 4).
After cleaning the lters, re-place the lter assembly and x it in
position correctly; this is essential for maintaining the efcient
operation of the dishwasher.
CLEANING THE SPRAY ARMS
On occasions, food residue may
become encrusted onto the spray
arms and block the holes used
to spray the water. It is therefore
recommended that you check the
arms from time to time and clean
them with a small non-metallic
brush.
To remove the upper spray arm,
turn the plastic locking ring in an
anti-clockwise direction.
The upper spray arm should be replaced so that the side with the
greater number of holes is facing upwards.
The lower spray arm may be
removed by pulling it upwards.
WATER SOFTENING SYSTEM
Water softener automatically reduces water hardness, conse-
quently preventing scale buildup on heater, contributing also to
better cleaning efciency. This system regenerates itself with
salt,
therefore it is required to rell salt container when empty.
Frequency
of regeneration depends on water hardness level set-
ting - by default regeneration takes place once per 5 Eco cycles
with water hardness level set to 3. Regeneration process starts in
nal rinse and nishes in drying phase, before cycle ends.
• Single regeneration consumes: ~3.5L of water;
• Takes up to 5 additional minutes for the cycle;
• Consumes below 0.005kWh of energy.
1 2
3 4
AA
B
C
TROUBLESHOOTING
In case your dishwasher doesn’t work properly, check if the problem can be solved by going through the following list.
For other errors or issues please contact authorized After-sales Service which contact details can be found in the warranty
booklet. The manufacturer ensures the availability of spare parts for at least 10 years after production date of this appliance.
PROBLEMS POSSIBLE CAUSES SOLUTIONS
Salt indicator is lit
Salt reservoir is empty. (After rell
the salt indicator may remain lit for
several wash cycles).
Rell reservoir with salt (for more information - see page 8).
Adjust water hardness - see table, page 8.
Rinse aid indicator is lit
Rinse aid dispenser is empty. (After
rell the rinse aid indicator may
remain lit for several wash cycles).
Rell dispenser with rinse aid (for more information - see page 8).
The dishwasher won’t start or
does not respond to com-
mands.
The appliance has not been
plugged in properly. Insert the plug into the socket.
Power outage. The dishwasher starts automatically when the power returns.
The dishwasher door is not closed. Vigorously push the door until you hear the “click”.
It does not respond to commands.
Display shows: 9 or 12 and
On/Off LED is blinking rapidly.
Switch off the appliance by pressing the ON/OFF button, switch it back
on after approximately one minute and reset the program.
If problem persists, unplug the appliance for 1 minute, then plug it back in.
After cleaning the lters, replace the lter assembly and x it
position correctly; this is essential for maintaining the ecient
operation of the dishwasher.
EN
13
CLEANING THE FILTER ASSEMBLY
Regularly clean the lter assembly so that the lters do not clog
and that the waste water ows away correctly.
Using dishwasher with clogged lters or foreign objects inside l-
tration system or sprayarms may cause unit malfunction resulting
in lose of performance, noisy work or higher resources usage.
The lter assembly consists of three lters which remove food
residues from the washing water and then recirculate the water:
to obtain the best washing results, you need to keep them clean.
The dishwasher must not be used without lters or if the
lter is loose.
At least once per month or after each 30 cycles, check the lter
assembly and if necessary clean it thoroughly under running water,
using a non-metallic brush and following the instructions below:
1. Turn the cylindrical lter A in an anti-clockwise direction and
pull it out (Fig 1).
2. Remove the cup lter B by exerting a slight pressure on the
side aps (Fig 2).
3. Slide out the stainless-steel plate lter C (Fig 3).
4. In case you nd foreign objects (such as broken glass, porce-
lain, bones, fruit seeds etc.) please remove them carefully.
5. Inspect the trap and remove any food residues. NEVER
REMOVE the wash-cycle pump protection (black detail) (Fig 4).
After cleaning the lters, re-place the lter assembly and x it in
position correctly; this is essential for maintaining the efcient
operation of the dishwasher.
CLEANING THE SPRAY ARMS
On occasions, food residue may
become encrusted onto the spray
arms and block the holes used
to spray the water. It is therefore
recommended that you check the
arms from time to time and clean
them with a small non-metallic
brush.
To remove the upper spray arm,
turn the plastic locking ring in an
anti-clockwise direction.
The upper spray arm should be replaced so that the side with the
greater number of holes is facing upwards.
The lower spray arm may be
removed by pulling it upwards.
WATER SOFTENING SYSTEM
Water softener automatically reduces water hardness, conse-
quently preventing scale buildup on heater, contributing also to
better cleaning efciency. This system regenerates itself with
salt,
therefore it is required to rell salt container when empty.
Frequency
of regeneration depends on water hardness level set-
ting - by default regeneration takes place once per 5 Eco cycles
with water hardness level set to 3. Regeneration process starts in
nal rinse and nishes in drying phase, before cycle ends.
• Single regeneration consumes: ~3.5L of water;
• Takes up to 5 additional minutes for the cycle;
• Consumes below 0.005kWh of energy.
1 2
3 4
AA
B
C
TROUBLESHOOTING
In case your dishwasher doesn’t work properly, check if the problem can be solved by going through the following list.
For other errors or issues please contact authorized After-sales Service which contact details can be found in the warranty
booklet. The manufacturer ensures the availability of spare parts for at least 10 years after production date of this appliance.
PROBLEMS POSSIBLE CAUSES SOLUTIONS
Salt indicator is lit
Salt reservoir is empty. (After rell
the salt indicator may remain lit for
several wash cycles).
Rell reservoir with salt (for more information - see page 8).
Adjust water hardness - see table, page 8.
Rinse aid indicator is lit
Rinse aid dispenser is empty. (After
rell the rinse aid indicator may
remain lit for several wash cycles).
Rell dispenser with rinse aid (for more information - see page 8).
The dishwasher won’t start or
does not respond to com-
mands.
The appliance has not been
plugged in properly. Insert the plug into the socket.
Power outage. The dishwasher starts automatically when the power returns.
The dishwasher door is not closed. Vigorously push the door until you hear the “click”.
It does not respond to commands.
Display shows: 9 or 12 and
On/Off LED is blinking rapidly.
Switch off the appliance by pressing the ON/OFF button, switch it back
on after approximately one minute and reset the program.
If problem persists, unplug the appliance for 1 minute, then plug it back in.
Cleaning the spray arms
On occasions, food residue may
become encrusted onto the spray
arms and block the holes used to spray
the water. It is therefore recommended
that you check the arms from time to
time and clean them with a small non-
metallic brush.
To remove the upper spray arm, turn
the plastic locking ring in an anti-
clockwise direction. The upper spray
arm should be replaced so that the
side with the greater number of holes
is facing upwards.
The lower spray arm may be removed
by pulling it upwards.
Water softening system
Water softener automatically reduces water hardness,
consequently preventing scale buildup on heater, contributing
also to better cleaning ecienc . This system regenerates itself
with salt, therefore it is required to rell salt container when
empt . Frequency of regeneration depends on water hardness
level setting - by default regeneration takes place once per 5 Eco
cycles with water hardness level set to 3. Regeneration process
starts in nal rins and nishes in drying phase, before cycle ends
Single regeneration consumes: ~3.5L of water; takes up to 5
additional minutes for the cycle; consumes below 0.005kWh of
energy.
Cleaning and maintenance

ENGLISH 13
What to do if ...
In case your dishwasher doesn’t work properly, check if the problem can be solved by going through the
following list. For other errors or issues please contact authorized After-sales Service which contact details can
be found in the warranty booklet. Spare parts will be available for a period of either up to 7 or up to 10 years,
according to the specic regulation requirements.
The spare parts can be found: https://parts-selfservice.whirlpool.com/en/landing
Problems... Possible causes... Solutions...
Salt indicator is lit
Salt reservoir is empty. (After
rell the salt indicator may
remain lit for several wash
cycles).
Rell reservoir with sal (for more information - see page 8).
Adjust water hardness - see table, page 8.
Rinse aid indicator is lit
Rinse aid dispenser is empty.
(After rell the rinse aid indicator
may remain lit for several wash
cycles).
Rell dispenser with rinse aid (for more information - see
page 8).
The dishwasher won’t start
or does not respond to
commands.
The appliance has not been
plugged in properly. Insert the plug into the socket.
Power outage. The dishwasher starts automatically when the power returns.
The dishwasher door is not
closed Vigorously push the door until you hear the “click”.
It does not respond to
commands. Display shows: 9 or
12 and On/O LED is blinking
rapidly.
Switch o the appliance by pressing the ON/OFF button,
switch it back on after approximately one minute and reset
the program. If problem persists, unplug the appliance for 1
minute, then plug it back in.
The dishwasher won’t drain.
Display shows: 3 and
On/O LED is blinking
rapidly
The wash cycle has not nished
yet Wait until the wash cycle nishes
The drain hose is bent. Check that the drain hose is not bent (see INSTALLATION).
The sink drain pipe is blocked. Clean the sink drain pipe.
The lter is clogged up with food
residues. Clean the lter (see CLEANING THE FILTER ASSEMBLY).
The dishwasher makes
excessive noise.
The dishes are rattling against
each. Arrange the crockery correctly (see LOADING THE RACKS).
An excessive amount of foam
has been produced. The detergent has not been measured out correctly or it is not
suitable for use in dishwashers (see FILLING THE DETERGENT
DISPENSER). Reset the current cycle by switching OFF the
dishwasher, then switch it on again, select a new program,
press START/Pause and close the door within 4 seconds.
Please do not add any detergent.
The dishes are not clean.
The crockery has not been
arranged properly. Arrange the crockery correctly (see LOADING THE RACKS).
The spray arms cannot rotate
freely, being hindered by the
dishes.
Arrange the crockery correctly (see LOADING THE RACKS).
The wash cycle is too gentle and/
or detergent eciency is low. Select an appropriate wash cycle (see PROGRAMS TABLE).
An excessive amount of foam
has been produced. The detergent has not been measured out correctly or it is not
suitable for use in dishwashers (see FILLING THE DETERGENT
DISPENSER).
The cap on the rinse aid
compartment has not been shut
correctly.
Make sure the cap of the rinse aid dispenser is closed.
The lter is soiled or clogged Clean the lter assembly (see CARE AND MAINTENANCE).
There is no salt. Fill the salt reservoir (see FILLING THE SALT RESERVOIR).

ENGLISH 14
What to do if ...
After-Sales Service
Problems... Possible causes... Solutions...
The dishwasher does not ll
the water.
Display shows: H
6 and On/O LED is blinking
rapidly
No water in the water supply or
the tap is closed. Make sure there is water in the water supply or the tap
running.
The inlet hose is bent. Make sure the inlet hose is not bent (see INSTALLATION)
reprogram the dishwasher and reboot.
The sieve in the water inlet hose
is clogged; it is necessary to
clean it.
After having carried out the verication and cleaning, turn o
and turn on the dishwasher and restart a new program.
Dishwasher nishes the cycle
prematurely.
Display shows: 5 (15) and On/
O LED is blinking rapidly
Drain hose positioned too low
or siphoning into home sewage
system
Check if end of drain hose is placed at correct height (see
INSTALLATION). Check for siphoning into home sewage
system, install air admittance valve if necessary.
Air in water supply Check water supply for leaks or other issues letting air inside.
The door doesn’t lock.
Racks are not inserted
completely Verify that racks are inserted completely.
The door lock is not engaged. Vigorously push the door until you hear the “clack” sound.
Dishes have not been dried.
Selected program has no drying
phase. Verify in the programs table if the selected program has
drying phase.
Rinse aid has run out or the
dosage is not adequate. Add the rinse aid or adjust the dosage levels higher (see
FILLING THE RINSE AID DISPENSER).
Dishes are made of non-stick or
plastic. The presence of drops of water it is normal (see TIPS).
Dishes and glasses show
limescale or a whitish lm
Salt level is too low. Fill the salt reservoir (see FILLING THE SALT RESERVOIR).
Adjustment of the water
hardness
is not adequate.
Increase the values (see WATER HARDNESS TABLE).
Cap of the salt reservoir is not
properly closed. Check the salt reservoir cap.
Rinse aid has run out or the
dosage is insucient Add the rinse aid or adjust the dosage levels higher.
Dishes and glasses have a
bluish tinge or blue streakes
Rinse aid dosage is excessive Adjust the dosage rates to lower values.
If, after carrying out the above checks, the fault persists,
disconnect the mains plug and turn o the water tap. Contact
the After-sales Service (see warranty).
Before contacting our After-Sales Service, take note of the
following:
- the description of the fault,
- the appliance type and model,
- the service code (the number indicated on the adhesive
rating plate) inside the door on the right-hand side:

ENGLISH 15
Techincal data
Product dimensions
(mm)
Height mm 820
Width mm 448
Depth mm 555
Performances
Voltage V 220/240
Frequency Hz 50
Energy eciency class C
Cleaning performance index 1,13
Drying performance index 1,07
Water supply pressure, max Bar 10
Water supply pressure, min Bar 0,5
Energy consumption kWh/100 cycles 59
Water supply, max inlet water temp. °C 70
Number of place settings 10
Power consumption in delay start W 4
Power consumption in standby mode W 0,5
Water consumption l/cycle 8,7
Noise level dB(A) re 1 pW 41
Noise class B
Environmental concerns
Disposal of packaging materials
The packaging material is 100% recyclable and is marked with
the recycle symbol . The various parts of the packaging must
therefore be disposed of responsibly and in full compliance with
local authority regulations governing waste disposal.
Disposal of household appliances
This appliance is manufactured with recyclable or reusable
materials. Dispose of it in accordance with local waste disposal
regulations. For further information on the treatment, recovery
and recycling of household electrical appliances, contact your
local authority, the collection service for household waste or
the store where you purchased the appliance. This appliance
is marked in compliance with European Directive 2012/19/EU,
Waste Electrical and Electronic Equipment (WEEE) and with the
Waste Electrical and Electronic Equipment regulations 2013 (as
amended). By ensuring this product is disposed of correctly, you
will help prevent negative consequences for the environment
and human health.
The symbol on the product or on the accompanying
documentation indicates that it should not be treated as
domestic waste but must be taken to an appropriate collection
center for the recycling of electrical and electronic equipment.
Energy saving tips
ECO programme is suitable to clean normally soiled tableware,
that for this use, it is the most ecient programme in terms of
its combined energy and water consumption, and that it is used
to assess compliance with the EU Ecodesign legislation.
Loading the household dishwasher up to the capacity
indicated by the manufacturer will contribute to energy and
water savings. The manual pre-rinsing of tableware items
leads to increased water and energy consumption and is not
recommended. Washing tableware in a household dishwasher
usually consumes less energy and water in the use phase than
hand dishwashing when the household dishwasher is used
according to the manufacturer’s instructions.

ENGLISH 16
Installation
ATTENTION: If the appliance must be moved at any time, keep
it in an upright position; if absolutely necessary, it may be tilted
onto its back.
Connecting the water supply
Adaptation of the water supply for installation should only be
performed by a qualied technician.
The water inlet and outlet hoses may be positioned towards the
right or the left in order to achieve the best possible installation.
Make sure the dishwasher does not bend or squash the hoses.
Connecting the water inlet hose
• Run the water until it is perfectly clear.
• Screw the inlet hose tightly into position and turn on the tap.
If the inlet hose is not long enough, contact a specialist store or
an authorised technician.
The water pressure must be within the values indicated in the
Technical Data table - otherwise the dishwasher may be function
properly.
Make sure the hose is not bent or compressed.
Specications for the connection of the water
Water supply cold or hot (max. 60°C)
Water intake 3/4”
Power of water
Pressure
0.05 ÷ 1 MPa (0.5 ÷ 10 bar)
7.25 – 145 psi
Supply hose:
Connecting the water outlet hose
Connect the outlet hose to a drain duct with a minimum
diameter of 2 cm A.
INSTALLATION
ENGLISH
ATTENTION: If the appliance must be moved at any time, keep it
in an upright position; if absolutely necessary, it may be tilted onto
its back.
CONNECTING THE WATER SUPPLY
Adaptation of the water supply for installation should only be
performed by a qualified technician
The water inlet and outlet hoses may be positioned towards the
right or the left in order to achieve the best possible installation.
Make sure the dishwasher does not bend or squash the hoses.
CONNECTING THE WATER INLET HOSE
• Run the water until it is perfectly clear.
• Screw the inlet hose tightly into position and turn on the tap.
If the inlet hose is not long enough, contact a specialist store or
an authorised technician.
The water pressure must be within the values indicated in the
Technical Data table - otherwise the dishwasher may be function
properly.
Make sure the hose is not bent or compressed.
SPECIFICATIONS FOR THE CONNECTION OF THE WATER
SUPPLY HOSE:
CONNECTING THE WATER OUTLET HOSE
Connect the outlet hose to a drain duct with a minimum diameter
of 2 cm A.
The outlet hose connection must be at a height ranging from
40 to 80 cm from the floor or surface where the dishwasher rests
Before connecting the water outlet hose to the sink drain, remove
the plastic plug B.
ANTI-FLOODING PROTECTION
Anti-flooding protection. To ensure floods do not occu , the dishwasher
is provided with a special system which blocks the water supply in
the event of anomalies or leaks from inside the appliance.
Some models are also equipped with the supplementary safety
device New Aqua Stop, which guarantees anti-flooding protectio
even in the event of a supply hose rupture.
Under no circumstances should the water inlet hose be cut as it
contains live electrical parts.
ELECTRICAL CONNECTION
WARNING: Under no circumstances should the water inlet
hose be cut as it contains live electrical parts.
Before inserting the plug into the electrical socket, make sure that:
• The socket is earth and complies with current regulations;
• The socket can withstand the maximum load of the applian-
ce as shown on the data plate located on the inside of the door
(see PRODUCT DESCRIPTION).
• The power supply voltage falls within the values indicated on
the data plate on the inside of the door.
• The socket is compatible with the plug of the appliance.
If this is not the case, ask an authorised technician to replace the
plug (see AFTER-SALES SERVICE). Do not use extension ca-
bles or multiple sockets. Once the appliance has been installed,
the power supply cable and the electrical socket should be easily
accessible.
The cable should not be bent or compressed.
If the power supply cable is damaged, have it replaced by the
manufacturer or its authorised Technical Assistance Service in
order to prevent all potential hazards.
The Company shall not be held responsible for any incidents, if
these regulations are not observed.
POSITIONING AND LEVELLING
1.
2.
Position the dishwasher on a level sturdy floo . If the floor i
uneven, the front feet of the appliance may be adjusted until
it reaches a horizontal position. If the appliance is levelled
correctly, it will be more stable and much less likely to move or
cause vibrations and noise while it is operating.
Before recessing the dishwasher, stick the adhesive transparent
strip under the wooden shelf in order to protect it from any con-
densation which may form.
3.
4.
Place the dishwasher so that its sides or back panel are in
contact with the adjacent cabinets or the wall. This appliance
can also be recessed under a single worktop.
To adjust the height of the rear foot, turn the red hexagonal
bushing on the lower central part at the front of the dishwasher
using a hexagonal spanner with an opening of 8 mm. Turn the
spanner in a clockwise direction to increase the height and in
an anticlockwise direction to decrease it.
DIMENSIONS AND CAPACITY:
MIN 40 cm
MAX 80 cm
WATER SUPPLY cold or hot (max. 60°C)
WATER INTAKE 3/4”
POWER OF WATER
PRESSURE
0.05 ÷ 1 MPa (0.5 ÷ 10 bar)
7.25 – 145 psi
WIDTH 598 mm
HEIGHT 820 mm
DEPTH 555 mm
CAPACITY 13 standard place-settings
The outlet hose connection must be at a height ranging from
40 to 80 cm from the oor or surface where the dishwasher
rests Before connecting the water outlet hose to the sink drain,
remove the plastic plug B.
Anti-ooding protection
Anti-ooding protection. To ensure oods do not occu, the
dishwasher is provided with a special system which blocks the
water supply in the event of anomalies or leaks from inside the
appliance.
Some models are also equipped with the supplementary safety
device New Aqua Stop, which guarantees anti-ooding protectio
even in the event of a supply hose rupture.
Under no circumstances should the water inlet hose be cut as it
contains live electrical parts.
Electrical connection
WARNING: Under no circumstances should the water inlet
hose be cut as it contains live electrical parts.
Before inserting the plug into the electrical socket, make sure
that:
• The socket is earth and complies with current regulations;
• The socket can
INSTALLATION
ENGLISH
ATTENTION: If the appliance must be moved at any time, keep it
in an upright position; if absolutely necessary, it may be tilted onto
its back.
CONNECTING THE WATER SUPPLY
Adaptation of the water supply for installation should only be
performed by a qualified technician
The water inlet and outlet hoses may be positioned towards the
right or the left in order to achieve the best possible installation.
Make sure the dishwasher does not bend or squash the hoses.
CONNECTING THE WATER INLET HOSE
• Run the water until it is perfectly clear.
• Screw the inlet hose tightly into position and turn on the tap.
If the inlet hose is not long enough, contact a specialist store or
an authorised technician.
The water pressure must be within the values indicated in the
Technical Data table - otherwise the dishwasher may be function
properly.
Make sure the hose is not bent or compressed.
SPECIFICATIONS FOR THE CONNECTION OF THE WATER
SUPPLY HOSE:
CONNECTING THE WATER OUTLET HOSE
Connect the outlet hose to a drain duct with a minimum diameter
of 2 cm A.
The outlet hose connection must be at a height ranging from
40 to 80 cm from the floor or surface where the dishwasher rests
Before connecting the water outlet hose to the sink drain, remove
the plastic plug B.
ANTI-FLOODING PROTECTION
Anti-flooding protection. To ensure floods do not occu , the dishwasher
is provided with a special system which blocks the water supply in
the event of anomalies or leaks from inside the appliance.
Some models are also equipped with the supplementary safety
device New Aqua Stop, which guarantees anti-flooding protectio
even in the event of a supply hose rupture.
Under no circumstances should the water inlet hose be cut as it
contains live electrical parts.
ELECTRICAL CONNECTION
WARNING: Under no circumstances should the water inlet
hose be cut as it contains live electrical parts.
Before inserting the plug into the electrical socket, make sure that:
• The socket is earth and complies with current regulations;
• The socket can withstand the maximum load of the applian-
ce as shown on the data plate located on the inside of the door
(see PRODUCT DESCRIPTION).
• The power supply voltage falls within the values indicated on
the data plate on the inside of the door.
• The socket is compatible with the plug of the appliance.
If this is not the case, ask an authorised technician to replace the
plug (see AFTER-SALES SERVICE). Do not use extension ca-
bles or multiple sockets. Once the appliance has been installed,
the power supply cable and the electrical socket should be easily
accessible.
The cable should not be bent or compressed.
If the power supply cable is damaged, have it replaced by the
manufacturer or its authorised Technical Assistance Service in
order to prevent all potential hazards.
The Company shall not be held responsible for any incidents, if
these regulations are not observed.
POSITIONING AND LEVELLING
1.
2.
Position the dishwasher on a level sturdy floo . If the floor i
uneven, the front feet of the appliance may be adjusted until
it reaches a horizontal position. If the appliance is levelled
correctly, it will be more stable and much less likely to move or
cause vibrations and noise while it is operating.
Before recessing the dishwasher, stick the adhesive transparent
strip under the wooden shelf in order to protect it from any con-
densation which may form.
3.
4.
Place the dishwasher so that its sides or back panel are in
contact with the adjacent cabinets or the wall. This appliance
can also be recessed under a single worktop.
To adjust the height of the rear foot, turn the red hexagonal
bushing on the lower central part at the front of the dishwasher
using a hexagonal spanner with an opening of 8 mm. Turn the
spanner in a clockwise direction to increase the height and in
an anticlockwise direction to decrease it.
DIMENSIONS AND CAPACITY:
MIN 40 cm
MAX 80 cm
WATER SUPPLY cold or hot (max. 60°C)
WATER INTAKE 3/4”
POWER OF WATER
PRESSURE
0.05 ÷ 1 MPa (0.5 ÷ 10 bar)
7.25 – 145 psi
WIDTH 598 mm
HEIGHT 820 mm
DEPTH 555 mm
CAPACITY 13 standard place-settings
withstand the maximum load of the
appliance as shown on the data plate located on the inside of
the door (see PRODUCT DESCRIPTION).
• The power supply voltage falls within the values indicated on
the data plate on the inside of the door.
• The socket is compatible with the plug of the appliance.
If this is not the case, ask an authorised technician to replace the
plug (see AFTER-SALES SERVICE). Do not use extension cables
or multiple sockets. Once the appliance has been installed, the
power supply cable and the electrical socket should be easily
accessible.
The cable should not be bent or compressed.
If the power supply cable is damaged, have it replaced by the
manufacturer or its authorised Technical Assistance Service in
order to prevent all potential hazards.
The Company shall not be held responsible for any incidents, if
these regulations are not observed.
Positioning and levelling
1. Position the dishwasher on a level sturdy oo . If the oor i
uneven, the front feet of the appliance may be adjusted until
it reaches a horizontal position. If the appliance is levelled
correctly, it will be more stable and much less likely to move
or cause vibrations and noise while it is operating.
2. Before recessing the dishwasher, stick the adhesive
transparent strip under the wooden shelf in order to protect
it from any condensation which may form.
3. Place the dishwasher so that its sides or back panel are in
contact with the adjacent cabinets or the wall. This appliance
can also be recessed under a single worktop.
4. To adjust the height of the rear foot, turn the red hexagonal
bushing on the lower central part at the front of the
dishwasher using a hexagonal spanner with an opening of 8
mm. Turn the spanner in a clockwise direction to increase the
height and in an anticlockwise direction to decrease it.
Dimensions and capacity:
Width 448 mm
Height 820 mm
Depth 555 mm
Capacity 10 standard place-settings

ENGLISH 17
IKEA GUARANTEE
How long is the IKEA guarantee valid?
This guarantee is valid for ve years from the original date of
purchase of your appliance at IKEA. The original sales receipt,
is required as proof of purchase. If service work is carried out
under guarantee, this will not extend the guarantee period for the
appliance.
Who will execute the service?
IKEA service provider will provide the service through its own
service operations or authorized service partner network.
What does this guarantee cover?
The guarantee covers faults of the appliance, which have been
caused by faulty construction or material faults from the date
of purchase from IKEA. This guarantee applies to domestic use
only. The exceptions are specied under the headline “What is not
covered under this guarantee?” Within the guarantee period, the
costs to remedy the fault e.g. repairs, parts, labour and travel will
be covered, provided that the appliance is accessible for repair
without special expenditure. On these conditions the EU guidelines
(Nr. 99/44/EG) and the respective local regulations are applicable.
Replaced parts become the property of IKEA.
What will IKEA do to correct the problem?
IKEA appointed Service Provider will examine the product and
decide, at its sole discretion, if it is covered under this guarantee. If
considered covered, IKEA Service Provider or its authorized service
partner through its own service operations, will then, at its sole
discretion, either repair the defective product or replace it with the
same or a comparable product.
What is not covered under this guarantee?
• Normal wear and tear.
• Deliberate or negligent damage, damage caused by failure
to observe operating instructions, incorrect installation or by
connection to the wrong voltage, damage caused by chemical
or electrochemical reaction, rust, corrosion or water damage
including but not limited to damage caused by excessive
lime in the water supply, damage caused by abnormal
environmental conditions.
• Consumable parts including batteries and lamps.
• Non-functional and decorative parts which do not aect
normal use of the appliance, including any scratches and
possible color dierences.
• Accidental damage caused by foreign objects or substances
and cleaning or unblocking of lters, drainage systems or soap
drawers.
• Damage to the following parts: ceramic glass, accessories,
crockery and cutlery baskets, feed and drainage pipes, seals,
lamps and lamp covers, screens, knobs, casings and parts of
casings. Unless such damages can be proved to have been
caused by production faults.
• Cases where no fault could be found during a technician’s visit.
• Repairs not carried out by our appointed service providers
and/or an authorized service contractual partner or where
non-original parts have been used.
• Repairs caused by installation which is faulty or not according
to specication.
• The use of the appliance in a non-domestic environment i.e.
professional use.
• Transportation damages. If a customer transports the product
to his home or another address, IKEA is not liable for any
damage that may occur during transport. However, if IKEA
delivers the product to the customer’s delivery address, then
damage to the product that occurs during this delivery will be
covered by IKEA.
• Cost for carrying out the initial installation of the IKEA
appliance.
• However, if an IKEA appointed Service Provider or its
authorized service partner repairs or replaces the appliance
under the terms of this guarantee, the appointed Service
Provider or its authorized service partner will reinstall the
repaired appliance or install the replacement, if necessary.
• This does not apply within Ireland, customer should contact
the local IKEA dedicated after sales line or the appointed
Service Provider for further information.
(just for GB)
These restrictions do not apply to fault-free work carried out by
a qualied specialist using our original parts in order to adapt
the appliance to the technical safety specications of another EU
country.
How country law applies
The IKEA guarantee gives you specic legal rights, which cover
or exceed all the local legal demands. However these conditions
do not limit in any way consumer rights described in the local
legislation.
Area of validity
For appliances which are purchased in one EU country and taken to
another EU country, the services will be provided in the framework
of the guarantee conditions normal in the new country.
An obligation to carry out services in the framework of the
guarantee exists only if the appliance complies and is installed in
accordance with:
- the technical specications of the country in which the
guarantee claim is made;
- the Assembly Instructions and User Manual Safety Information.
The dedicated AFTER SALES for IKEA appliances
Please don’t hesitate to contact IKEA appointed Authorized Service
Centre to:
• make a service request under this guarantee;
• ask for clarications on installation of the IKEA appliance in the
dedicated IKEA kitchen furniture;
• ask for clarication on functions of IKEA appliances.
To ensure that we provide you with the best assistance, please read
carefully the Assembly Instructions and/or the User Manual before
contacting us.
How to reach us if you need our service
Please refer to the last page
of this manual for the full list
of IKEA appointed Authorized
Service Centre and relative
national phone numbers.
In order to provide you a quicker service, we recommend
to use the specic phone numbers listed on this manual.
Always refer to the numbers listed in the booklet of the
specic appliance you need an assistance for. Please also
always refer to the IKEA article number (8 digit code) and
12 digit service number placed on the rating plate of your
appliance.
SAVE THE SALES RECEIPT!
It is your proof of purchase and required for the guarantee
to apply. The sales receipt also reports the IKEA name and
article number (8 digit code) for each of the appliances you
have purchased.
Do you need extra help?
For any additional questions not related to After Sales of your
appliances please contact your nearest IKEA store call centre.
We recommend you read the appliance documentation carefully
before contacting us.

18
Sicherheitshinweise
Inhaltsverzeichnis
DEUTSCH
Diese Sicherheitsanweisungen vor dem
Gebrauch durchlesen. Diese Anweisungen
zum Nachschlagen leicht zugänglich
aufbewahren.
In diesen Anweisungen sowie auf dem Gerät
selbst werden wichtige Sicherheitshinweise
angegeben, die durchgelesen und stets
beachtet werden müssen. Der Hersteller
übernimmt keine Haftung für die
Nichtbeachtung dieser Sicherheitshinweise,
für unsachgemäße Verwendung des Geräts
oder falsche Bedienungseinstellung.
Babys und Kleinkinder (0-3 Jahre)
müssen vom Gerät ferngehalten werden.
Jüngere Kinder (3-8 Jahre) müssen vom
Gerät ferngehalten werden, es sei denn,
sie werden ständig beaufsichtigt. Dieses
Gerät darf von Kindern ab 8 Jahren sowie
Personen mit herabgesetzten physischen,
sensorischen oder geistigen Fähigkeiten
und Mangel an Erfahrung und Kenntnissen
nur unter Aufsicht oder nach ausreichender
Einweisung durch eine für ihre Sicherheit
verantwortliche Person verwendet werden.
Kinder dürfen nicht mit dem Gerät spielen.
Die Reinigung und Pege des Gerätes
darf von Kindern nicht ohne Aufsicht
durchgeführt werden.
ZULÄSSIGE NUTZUNG
VORSICHT: Das Gerät ist nicht
für den Betrieb mit einem externen
Schalter, wie Timer, oder separatem
Fernbedienungssystem konstruiert.
Dieses Gerät ist für
Haushaltsanwendungen und ähnliche
Anwendungen konzipiert, zum Beispiel:
Mitarbeiterküchen im Einzelhandel, in
Büros oder in anderen Arbeitsbereichen;
Gasthäuser; für Gäste in Hotels, Motels, Bed-
and-Breakfast-Anwendungen und anderen
Wohnumgebungen.
Dieses Gerät ist nicht für den
professionellen Gebrauch ausgelegt. Das
Gerät ist nicht für die Benutzung im Freien
geeignet.
Die maximale Anzahl an Geschirr ist auf
dem Produktdatenblatt gezeigt.
Die Tür sollte nicht in geöneter Stellung
bleiben - Stolpergefahr. Geönete Tür nur
mit ausgefahrenem Geschirrkorb (und
Geschirr) belasten. Nicht als Arbeitsplatte
oder Sitzgelegenheit verwenden, nicht
darauf stellen.
WARNUNG: Geschirrspülmittel sind
stark alkalisch. Sie können bei Verschlucken
äußerst gefährlich sein. Kontakt mit der
Haut und den Augen vermeiden und
Kinder von dem Geschirrspüler fern halten,
wenn die Tür geönet ist. Nach jedem
Waschzyklus prüfen, dass das Spülmittelfach
leer ist.
WARNUNG: Messer und andere
Utensilien mit scharfen Spitzen müssen
mit der Spitze nach unten in den Korb
oder in horizontaler Position in den
Geschirrspüler gelegt werden - Gefahr von
Schnittverletzungen.
Keine explosiven oder entzündbaren
Stoe (z.B. Benzin oder Sprühdosen)
in dem oder in der Nähe des Gerätes
lagern - Brandgefahr. Das Gerät darf
nur zum Spülen von Haushaltsgeschirr
gemäß den Anweisungen in diesem
Handbuch verwendet werden. Das
Wasser im Gerät ist kein Trinkwasser.
Nur Spülmittel und Klarspüler für
automatische Geschirrspüler verwenden.
Wird Wasserenthärter (Salz) zugegeben,
sofort einen Spülzyklus bei leerem Gerät
ausführen, um Korrosionsschäden an
innenliegenden Bauteilen zu vermeiden.
DE
Sicherheitshinweise 18
Produktbeschreibung 21
Bedienblende 21
Erster Gebrauch 21
Körbe beladen 23
Täglicher Gebrauch 24
Funktionen 25
Reinigung und pege 27
Was tun, wenn... 28
Kundenservice 29
Technische Daten 30
Hinweise zum Umweltschutz 30
Installation 31
IKEA GUARANTEE 32

DEUTSCH 19
Spülmittel, Klarspüler und Regeneriersalz
außerhalb der Reichweite von Kindern
aufbewahren. Vor Wartungsmaßnahmen
die Wasserzufuhr zudrehen und die
Stromversorgung ausstecken oder
unterbrechen. Bei Störungen die Wasser-
und Stromversorgung trennen.
INSTALLATION
Das Gerät muss von zwei oder
mehr Personen gehandhabt und
aufgestellt werden – Verletzungsgefahr.
Schutzhandschuhe zum Auspacken und
zur Installation des Geräts verwenden –
Schnittgefahr.
Die Installation, der Wasseranschluss
(falls vorhanden), der elektrische Anschluss
und eventuelle Reparaturen dürfen
nur von einer Fachkraft durchgeführt
werden. Das Gerät nicht selbst reparieren
und keine Teile austauschen, wenn dies
von der Bedienungsanleitung nicht
ausdrücklich vorgesehen ist. Kinder
vom Installationsort fern halten. Prüfen
Sie das Gerät nach dem Auspacken auf
Transportschäden. Bei auftretenden
Problemen wenden Sie sich bitte an Ihren
Händler oder den Kundenservice. Nach der
Installation müssen Verpackungsabfälle
(Kunststo, Styroporteile usw.)
außerhalb der Reichweite von Kindern
aufbewahrt werden - Erstickungsgefahr.
Das Gerät vor Installationsarbeiten
von der Stromversorgung trennen -
Stromschlaggefahr. Während der Installation
sicherstellen, das Netzkabel nicht mit
dem Gerät selbst zu beschädigen - Brand-
oder Stromschlaggefahr. Das Gerät erst
starten, wenn die Installationsarbeiten
abgeschlossen sind.
Zum Anschließen des Geschirrspülers an die
Wasserversorgung nur neue Schlauchsätze
verwenden. Keine alten Schlauchsätze
wiederverwenden.
Sämtliche Schläuche mit Schellen sichern,
damit sie sich während des Betriebs nicht
lösen.
Besondere Vorschriften des regionalen
Wasserwirtschaftsamts beachten.
Wasserzulaufdruck 0,05-1.0MPa.
Das Gerät muss an der Wand aufgestellt
oder in Möbel eingebaut werden, um den
Zugri auf seine Rückseite zu begrenzen.
Für Geschirrspüler mit Entlüftungsschlitzen
am Boden, dürfen die Schlitze nicht durch
einen Teppich verstopft sein.
Wenn der Geschirrspüler am Ende einer
Reihe von Einheiten installiert wird und die
Seitenverkleidung zugänglich gemacht wird,
muss der Scharnierbereich abgedeckt sein,
um Verletzungsgefahr zu vermeiden.
Die Wasserzulauftemperatur ist abhängig
von dem Geschirrspülermodell. Ist der
installierte Zulaufschlauch mit „25°C Max“
gekennzeichnet, beträgt die maximal
zulässige Wassertemperatur 25°C. Für
alle anderen Modelle ist die maximal
zugelassene Wassertemperatur 60°C.
Die Schläuche nicht schneiden und, bei
Geräten mit Wasserstoppsystem das
Kunststogehäuse mit dem Zulaufschlauch
nicht in Wasser tauchen. Den Fachhändler
kontaktieren, wenn die Schläuche zu kurz
sind. Zu- und Ablaufschlauch knickfrei
verlegen. Vor der ersten Verwendung
des Geräts den Wasserzulauf und den
Ablaufschlauch auf Undichtigkeiten prüfen.
Vergewissern Sie sich, dass die vier Füße fest
auf dem Boden auiegen. Stellen Sie diese
dementsprechend ein. Kontrollieren Sie mit
einer Wasserwaage, dass der Geschirrspüler
vollkommen eben und standfest ist.
Das Gerät nur verwenden, wenn die in
Abbildung 19 dargestellten Abdeckungen in
der Installationsanleitung richtig montiert
sind - Verletzungsgefahr.
HINWEISE ZUR ELEKTRIK
Das Typenschild bendet sich an der Kante
der Geschirrspülertür (bei oener Tür
sichtbar).
Es muss gemäß den Verdrahtungsregeln
möglich sein, den Netzstecker des Gerätes
zu ziehen, oder es mit einem Trennschalter,
welcher der Steckdose vorgeschaltet
ist, auszuschalten. Das Gerät muss im
Einklang mit den nationalen elektrischen
Sicherheitsbestimmungen geerdet sein.

DEUTSCH 20
Verwenden Sie keine
Verlängerungskabel, Mehrfachstecker oder
Adapter. Nach der Installation dürfen Strom
führende Teile für den Benutzer nicht mehr
zugänglich sein. Das Gerät nicht bedienen,
wenn Sie nasse Hände haben oder barfuß
sind. Das Gerät nicht verwenden, wenn das
Netzkabel oder der Stecker beschädigt sind,
wenn es nicht einwandfrei funktioniert,
wenn es heruntergefallen ist oder in
irgendeiner Weise beschädigt wurde.
Wenn das Netzkabel beschädigt ist, muss
es aus Sicherheitsgründen vom Hersteller,
von seinem Kundendienstvertreter oder
einer ähnlich qualizierten Fachkraft mit
einem identischen Kabel ersetzt werden -
Stromschlaggefahr.
Passt der mitgelieferte Stecker nicht zur
Steckdose, einen qualizierten Techniker
kontaktieren.
Ziehen Sie nicht am Netzkabel. Tauchen Sie
das Netzkabel oder den Stecker nicht ins
Wasser. Halten Sie das Netzkabel fern von
heißen Oberächen.
REINIGUNG UND PFLEGE
WARNUNG: Vor dem Durchführen
von Wartungsarbeiten ist sicherzustellen,
dass das Gerät ausgeschaltet und von
der Stromversorgung getrennt ist. Um
die Gefahr von Personenschäden zu
vermeiden, Schutzhandschuhe (Gefahr von
Schnittverletzungen) und Sicherheitsschuhe
(Quetschgefahr) tragen; unbedingt zu
zweit transportieren (Last reduzieren);
keine Dampfreinigungsgeräte verwenden
(Stromschlaggefahr). Nicht professionelle
und nicht vom Hersteller autorisierte
Reparaturen können ein Risiko für
Gesundheit und Sicherheit mit sich bringen,
wofür der Hersteller nicht haftbar gemacht
werden kann. Jegliche Mängel oder Schäden
infolge nicht professioneller Reparatur-
oder Wartungsarbeiten sind nicht durch die
Garantie abgedeckt, deren Bedingungen in
den Unterlagen angeführt sind, welche mit
dem Gerät mitgeliefert werden.
La pagina si sta caricando...
La pagina si sta caricando...
La pagina si sta caricando...
La pagina si sta caricando...
La pagina si sta caricando...
La pagina si sta caricando...
La pagina si sta caricando...
La pagina si sta caricando...
La pagina si sta caricando...
La pagina si sta caricando...
La pagina si sta caricando...
La pagina si sta caricando...
La pagina si sta caricando...
La pagina si sta caricando...
La pagina si sta caricando...
La pagina si sta caricando...
La pagina si sta caricando...
La pagina si sta caricando...
La pagina si sta caricando...
La pagina si sta caricando...
La pagina si sta caricando...
La pagina si sta caricando...
La pagina si sta caricando...
La pagina si sta caricando...
La pagina si sta caricando...
La pagina si sta caricando...
La pagina si sta caricando...
La pagina si sta caricando...
La pagina si sta caricando...
La pagina si sta caricando...
La pagina si sta caricando...
La pagina si sta caricando...
La pagina si sta caricando...
La pagina si sta caricando...
La pagina si sta caricando...
La pagina si sta caricando...
La pagina si sta caricando...
La pagina si sta caricando...
La pagina si sta caricando...
La pagina si sta caricando...
La pagina si sta caricando...
La pagina si sta caricando...
La pagina si sta caricando...
La pagina si sta caricando...
-
 1
1
-
 2
2
-
 3
3
-
 4
4
-
 5
5
-
 6
6
-
 7
7
-
 8
8
-
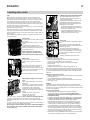 9
9
-
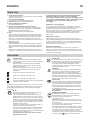 10
10
-
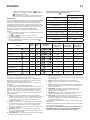 11
11
-
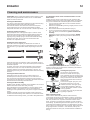 12
12
-
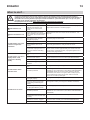 13
13
-
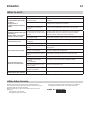 14
14
-
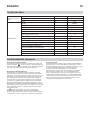 15
15
-
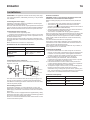 16
16
-
 17
17
-
 18
18
-
 19
19
-
 20
20
-
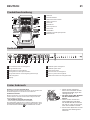 21
21
-
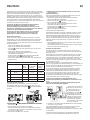 22
22
-
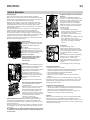 23
23
-
 24
24
-
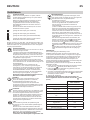 25
25
-
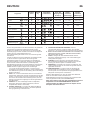 26
26
-
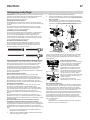 27
27
-
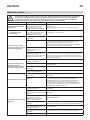 28
28
-
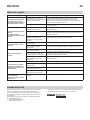 29
29
-
 30
30
-
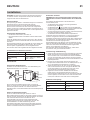 31
31
-
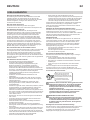 32
32
-
 33
33
-
 34
34
-
 35
35
-
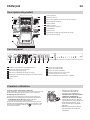 36
36
-
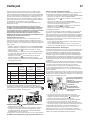 37
37
-
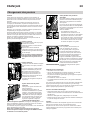 38
38
-
 39
39
-
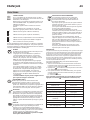 40
40
-
 41
41
-
 42
42
-
 43
43
-
 44
44
-
 45
45
-
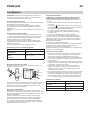 46
46
-
 47
47
-
 48
48
-
 49
49
-
 50
50
-
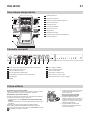 51
51
-
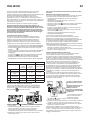 52
52
-
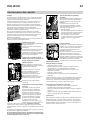 53
53
-
 54
54
-
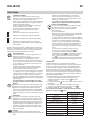 55
55
-
 56
56
-
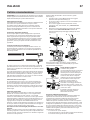 57
57
-
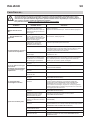 58
58
-
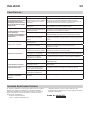 59
59
-
 60
60
-
 61
61
-
 62
62
-
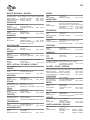 63
63
-
 64
64


IKEA FINPUTSAD Integrated Dishwasher Manuale utente
- Categoria
- Lavastoviglie
- Tipo
- Manuale utente