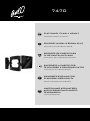
Bell'O 7470B Guida d'installazione
- Categoria
- Supporti da parete per schermi piatti
- Tipo
- Guida d'installazione

FLAT PANEL TV WALL MOUNT
INSTRUCTION MANUAL
SUPPORT MURAL D'ÉCRAN PLAT
MANUEL D'INSTRUCTIONS
SOPORTE DE PARED PARA
TV DE PANTALLA PLANA
MANUAL DE INSTRUCCIONES
SUPPORTO A PARETE PER
TELEVISORE A SCHERMO PIATTO
MANUALE DI ISTRUZIONI
WANDBEFESTIGUNG FÜR
FLACHBDILDSCHIRM+TV
ANLEITUNGSHANDBUCH
НАСТЕННЫЙ КРОНШТЕЙН
ДЛЯ ПЛОСКОПАНЕЛЬНОГО
ТЕЛЕВИЗОРА
ИНСТРУКЦИЯ
7470

2
PRECAUTIONS
If at any time you are unclear about the directions and believe you need further assistance,
contact Bell’O
®
at: 1-888-235-7646 (US/Canada) or +1-732-972-1333 (International) from
9am – 5pm EST.
•
NEVER EXCEED THE MAXIMUM LOAD CAPACITY OF 80 LBS (36 KG),
• This mounting bracket was designed to be installed and utilized ONLY as specified in this
manual. Bell’O International Corporation will not be responsible for failure to assemble as
directed or for the improper assembly, use, or handling of this product.
• Improper installation of this product may cause damage or serious injury. Bell'O
International Corporation cannot be liable for direct or indirect damage or injury caused
by incorrect mounting, incorrect use, or incorrect assembly.
• If the mounting bracket will be attached to any structure other than specified in this
manual, only a licensed professional contractor/installer should perform this installation.
The supporting structure must support, at minimum, four times the combined weight of
the mounting bracket and TV. It is the responsibility and liability of the installer to ensure
the suitability of the supporting structure.
• This mount with the included hardware is not UL listed for installation into metal studs. For the
availability of UL listed metal stud mounting hardware, monitor weight limit and installation
instructions please check www.bello.com, your retailer, or an installation professional.
• Check carefully to ensure that there are no missing or damaged parts. Never use defective
parts. To receive replacement or missing part(s) under this Warranty, visit our website at
www.bello.com or call our Customer Service Department at 1-888-779-7781. Please have
the model number, date code, part number(s) and your sales receipt or other proof of
purchase available for reference. Bell’O will ship you any necessary replacement parts in
the United States or Canada at our expense.
• Specifications are subject to change without notice.
• The maximum weight of your television cannot exceed the maximum weight rating of your
mount or any attached Bell'O
®
UL listed adapters sold separately, whichever is lower.

3
AVERTISSEMENTS
Pour toutes questions concernant les instructions ou pour tout besoin d'assistance, veuillez
communiquer avec Bell’O
®
au : 1-888-235-7646 (USA/Canada) ou +1-732-972-1333
(International) de 9h00 à 17h00 (heure de l'Est).
• NE JAMAIS DÉPASSER LA CAPACITÉ DE CHARGE MAXIMALE DE 36 KG (80 LBS).
• Ce support de fixation est conçu pour être posé et utilisé UNIQUEMENT comme indiqué dans
ce manuel. Bell’O International Corporation décline toute responsabilité en cas de pose non
conforme aux instructions ou d'assemblage, utilisation ou manipulation incorrects de ce
produit.
• Une pose incorrecte de ce produit peut entraîner des dommages matériels ou des
blessures graves. Bell'O International Corporation ne saurait être tenu responsable de
dommages matériels ou corporels directs ou indirects résultant d'une pose incorrecte,
d'une utilisation incorrecte ou d'un assemblage incorrect.
• Si le support de fixation doit être attaché à un structure autre que celles indiquées dans
ce manuel, la pose doit impérativement être confiée à un entrepreneur/installateur
professionnel agréé. La structure porteuse doit être capable de soutenir, au minimum,
quatre fois le poids combiné du support de fixation et du téléviseur. L'installateur a pour
charge et responsabilité de s'assurer que la structure porteuse convient.
• Ce support utilisé avec la visserie fournie n'est pas homologué UL pour la pose sur des
montants métalliques. Pour connaître la visserie de fixation sur montants métalliques
homologuée UL disponible, la limite de poids d'écran et les instructions de pose, veuillez
consulter www.bello.com, le revendeur ou un installateur professionnel.
• Contrôler avec soin qu'il n'y a aucune pièce manquante ou endommagée. Ne jamais utiliser
de pièces défectueuses. Pour obtenir des pièces de rechange ou manquantes dans le cadre
de cette garantie, veuillez visiter notre site Web à www.bello.com ou appeler notre Service
après-vente au 1-888-779-7781. Veillez à avoir le numéro de modèle, le code de date, les
références des pièces et le reçu de la vente ou autre justificatif d’achat à disposition. Bell’O
expédiera toutes les pièces de rechange nécessaires à ses propres frais aux États-Unis et
au Canada.
• Les caractéristiques sont sujettes à modification sans préavis.
• Le poids maximum du téléviseur ne doit pas dépasser la capacité de charge maximale
du support ni celle de tout adaptateur homologué UL Bell'O
®
vendu séparément
éventuellement fixé au téléviseur.

ADVERTENCIAS
Si en algún momento tiene dudas sobre las instrucciones y necesita asesoramiento
adicional, comuníquese con Bell’O
®
: 1-888-235-7646 (EE. UU. y Canadá) o
+1-732-972-1333 (desde otros lugares del mundo) de 9 a 17 hora del este.
•
NUNCA EXCEDA LA CAPACIDAD MÁXIMA DE CARGA DE 80 LBS (36 KG).
• Este soporte fue diseñado para ser instalado y utilizado ÚNICAMENTE como se indica en
el presente manual. Bell’O International Corporation no se hará responsable si el
producto no se ensambla tal como se indica ni de su ensamblaje, uso o manejo
incorrectos.
• La instalación incorrecta de este producto puede causar daños o lesiones graves. Bell'O
International Corporation no puede ser responsabilizada por los daños o lesiones directos
o indirectos causados por el montaje, uso o ensamblaje incorrectos.
• Si desea fijar el soporte a una estructura que no está especificada en este manual, la
instalación deberá realizarla un contratista o instalador profesional autorizado. La
estructura de soporte debe soportar, como mínimo, cuatro veces el peso combinado del
soporte y el TV. Es responsabilidad y obligación del instalador garantizar la idoneidad de
la estructura de soporte.
• Este soporte con los elementos incluidos no están en la lista del UL para la instalación en
montantes metálicos. Para verificar la disponibilidad de los elementos para el montaje
en montantes metálicos en la lista del UL, el límite de peso y las instrucciones de
instalación, ingrese a www.bello.com o consulte con su proveedor o instalador
profesional.
• Revise cuidadosamente el sistema para asegurarse de que no haya piezas faltantes o
dañadas. Nunca utilice piezas defectuosas. Para recibir el reemplazo o la(s) parte(s) o
pieza(s) faltante(s) cubiertas por la presente garantía, ingrese a nuestro sitio web
www.bello.com o llame a nuestro Departamento de atención al cliente al 1-888-779-7781.
Tenga a mano el número de modelo, código de fecha, número(s) de la parte o pieza y su
recibo de venta u otro comprobante de compra disponible como referencia. Bell’O le
enviará cualquier parte o pieza de reemplazo sin cargo en los Estados Unidos o Canadá.
• Las especificaciones están sujetas a cambios sin previo aviso.
• El peso máximo de su televisor no puede exceder la clasificación de peso máximo de su
soporte o cualquier adaptador Bell’O
®
adjunto y enumerado en la lista del UL que se
venda por separado, el que sea inferior.
4

PRECAUZIONI
Nel caso che, in qualsiasi momento, le istruzioni non dovessero risultare chiare o si
necessitasse di ulteriore assistenza, contattare Bell’O
®
al numero verde: 1-888-235-7646
(da USA/Canada) oppure al +1-732-972-1333 (da altri Paesi) dalle 9.00 - 17.00 (ora costa
orientale USA).
•
NON SUPERARE MAI LA MASSIMA CAPACITÀ DI CARICO, PARI A 36 KG.
• Questo supporto è stato progettato UNICAMENTE per essere installato e utilizzato come
specificato in questo manuale. Bell’O International Corporation non sarà responsabile nel
caso di incapacità a completare l'assemblaggio secondo le istruzioni fornite, o di
assemblaggio, uso o trasporto scorretto del prodotto.
• L'erronea installazione di questo prodotto può causare danni o seri incidenti. Bell'O
International Corporation non sarà responsabile di danni o incidenti diretti o indiretti
causati da un montaggio scorretto, utilizzo scorretto o assemblaggio scorretto.
• Se il supporto viene affrancato a una struttura diversa da quella specificata in questo manuale,
l'installazione deve essere effettuata esclusivamente da un tecnico/installatore professionista
autorizzato. La struttura di supporto deve essere in grado di sostenere almeno quattro volte il
peso combinato del supporto e del televisore. È responsabilità dell'installatore assicurare
l'idoneità della struttura di sostegno.
• Nel caso di installazione su montanti in metallo, questo supporto e la ferramenta relativa
non sono conformi agli standard UL. Per verificare la disponibilità di ferramenta, il peso
limite dello schermo e le istruzioni di installazione del supporto su montanti in metallo
conformi agli standard UL, consultare il sito www.bello.com, il rivenditore o
l'installatore.
• Verificare con attenzione che non vi siano pezzi mancanti o danneggiati. Non utilizzare mai
pezzi danneggiati. Per ottenere i pezzi mancanti o di sostituzione coperti da questa Garanzia,
visitare il nostro sito Web www.bello.com o chiamare il centro di assistenza clienti al numero
1-888-779-7781 (numero verde valido solo in Nord America). Si prega di avere a portata di
mano il numero del modello, il codice della data, i numeri dei pezzi in questione e la ricevuta
o altra prova d'acquisto. Bell’O invierà i pezzi di ricambio necessari, a proprie spese, negli
Stati Uniti o in Canada.
• Le specifiche sono soggette a modifiche senza preavviso.
• Il peso massimo del televisore non deve essere superiore alla classe di peso indicata
per il supporto o per qualunque adattatore per Bell'O
®
conforme agli standard UL venduto
separatamente, qualsiasi sia minore.
5

6
VORSICHTSMASSNAHMEN
Sollten Sie sich nicht ganz klar über die Anleitungen und der Ansicht sein, dass Sie
Unterstützung brauchen, setzen Sie sich bitte mit Bell’O
®
unter Telefonnummer
1-888-235-7646 (US/Kanada) oder + 1-732-972-1333 (International) zwischen 9 Uhr und
17 Uhr (Ostzeit) in Verbindung.
• BITTE NIE DIE HÖCHSTBELASTBARKEIT VON 36 KG (80 PFD) ÜBERSCHREITEN.
• Diese Konsole darf NUR so wie in diesen Anleitungen beschrieben installiert und
verwendet werden. Bell’O International Corporation ist nicht verantwortlich für Ihr
Versäumnis, dieses Produkt ordnungsgemäß entsprechend den Anleitungen zu montieren,
unsachgemäße Montagen. Verwendungen oder einen unsachgemäßen Umgang.
• Die unsachgemäße Installation dieses Produkts kann zu Schäden oder ernsten Verletzungen
führen. Bell'O International Corporation kann nicht für unmittelbare oder mittelbare Schäden
oder Verletzungen verantwortlich sein, die durch den unsachgemäßen Einsatz oder ein
unsachgemäße Montage bewirkt wurden.
• Falls die Konsole an Strukturen angebracht wird, die nicht denen in diesen Anleitungen
aufgeführten Konsolen entsprechen, darf nur ein qualifizierter Fachmann bzw. Installateur diese
Installation vornehmen. Die Tragkonstruktion muss mindestens viermal das Gesamtgewicht des
Fernsehers und der Konsole tragen können. Der Installateur trägt die Verantwortung und ist
haftpflichtig in Bezug auf die Sicherstellung, dass die Tragkonstruktion angemessen ist.
• Diese Halterung samt Eisenteilen ist nicht UL verzeichnet zur Installation in Metallbolzen.
Bitte sehen Sie bei www.bello.com nach, oder fragen Ihren Einzelhändler oder
Installateur für UL verzeichnete Eisenteile für Montagen, Gewichtsbegrenzungen und
Installationsanleitungen.
• Prüfen Sie sorgfältig, um sicherzustellen, dass keine Teile fehlen oder beschädigt sind. Bitte
nie beschädigte Teile einsetzen. Um Ersatzteile oder fehlende Teile gemäß dieser Garantie zu
erhalten, besuchen Sie bitte unsere Website www.bello.com oder rufen Sie unsere
Kundendienstabteilung unter 1-888-779-7781 an. Bitte haben Sie Ihre Modell-Nummer,
Datumscode, Teilenummer(n) und Ihre Verkaufsquittung oder sonstigen Kaufbeleg griffbereit
zum Verweis. Bell'O sendet Ihnen dann alle erforderlichen Ersatzteile in den Vereinigten
Staaten bzw. Kanada auf unsere Kosten zu.
• Die Spezifikationen unterliegen Änderungen ohne vorheriger Ankündigung.
• Das Höchstgewicht Ihres TVs darf nicht das Höchstgewichtsklasse Ihrer Halterung oder
allen daran befestigten Bell'O
®
UL verzeichneten, getrennt erhältlichen Adaptern
übersteigen, wobei das niedrigerere Gewicht maßgeblich ist.

ПРЕДУПРЕЖДЕНИЕ
Если вам понадобится помощь или что–то непонятно в инструкции, обратитесь в
фирму Bell’O
®
по телефону 1-888-235-7646 (США/Канада) или +1-732-972-1333 (для
международных звонков) с 9 утра до 5 вечера (время — восточное стандартное).
•
НИ ПРИ КАКИХ ОБСТОЯТЕЛЬСТВАХ НЕ ПРЕВЫШАТЬ МАКСИМАЛЬНУЮ НАГРУЗКУ
В 80 ФУНТОВ (36 КГ).
•
Этот настенный кронштейн был сконструирован для установки и использования ТОЛЬКО в
соответствии со спецификациями, приведенными в этом документе. Фирма Bell’O International
Corporation не будет нести ответственности за невыполнение инструкций по сборке или за
неправильную сборку, использование или эксплуатацию этого продукта.
•
Неправильная установка этого продукта может явиться причиной ущерба или серьезной
травмы . Фирма Bell'O International Corporation не может нести ответственность за прямой или
косвенный ущерб или травму из–за неправильной установки, эксплуатации или сборки.
•
Если настенный кронштейн будет крепиться к любой структуре, которая не специфицирована
в этом документе, то его должен устанавливать только лицензированный подрядчик,
специалист по таким установкам. Опорная структура должна выдерживать нагрузку, как
минимум в четыре раза превышающую суммарный вес кронштейна и телевизора. Установщик
несет юридическую и материальную ответственность за обеспечение соответствия опорной
структуры таким требованиям.
•
Этот кронштейн и прилагаемые детали не внесены в списки UL для установки на
металлические стойки. Для того чтобы выяснить, как можно приобрести внесенные в списки
UL детали для установки на металлические стойки, получить сведения об ограничениях на вес
монитора и инструкции по установке, обратитесь на сайт www.bello.com, к своему поставщику
или к профессиональному установщику.
• Тщательно проверьте, что все нужные детали имеются в наличии и что они не
повреждены. Никогда не используйте дефектные детали. Чтобы заменить поврежденные
детали или получить недостающие детали в соответствии с этой Гарантией, обратитесь
на наш сайт www.bello.com или позвоните в наш отдел обслуживания по телефону
1-888-779–7781. Для этого нужно знать номер модели, код даты, номер детали (деталей) и
иметь квитанцию или другое доказательство покупки для ссылок. Фирма Bell’O за свой
счет вышлет вам все необходимые для замены детали в пределах Соединенных Штатов
или Канады.
•
Спецификации могут быть изменены без предварительного уведомления.
•
Максимальный вес вашего телевизора не должен превышать наименьший вес из следующих
двух: максимальный вес, на который рассчитан ваш кронштейн, или максимальный вес, на
который рассчитаны любые крепящиеся продающиеся отдельно внесенные в списки UL
адаптеры Bell'O
®
.
7

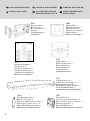
(EA)
Extension Arm, 1
Bras articulé, 1
Brazo de extensión, 1
Prolunga, 1
Verlängerungsarm, 1
Удлинитель, 1
(IT)
Installation Template, 1
Gabarit de pose, 1
Plantilla de instalación, 1
Schema di installazione, 1
Schablone für Installation, 1
Шаблон для установки, 1
(MP)
Monitor Plate, 1
Plaque de moniteur, 1
Placa del monitor, 1
Piastra per lo schermo, 1
Monitor-Platte, 1
Плата для монитора, 1
A
B
(AP)
Adapter Plates, 2
Plaques d'adaptation, 2
Placas adaptadoras, 2
Piastre-adattatore, 2
Adapter-Platten, 2
Адаптерные платы, 2
(EC)
Plastic End Caps,
4
Capuchons de bout en plastique,
4
Tapas de plástico para los extremos,
4
Paraspigoli in plastica,
4
Kunststoffendkappen,
4
Пластмассовые концевые колпачки,
4
8
(AA)
Wire Management Pins,
6
Barrettes de passe-fil,
6
Clavijas de administración de cables,
6
Spinotti per la gestione dei cavi,
6
Umfasst Drahtmanagementstifte,
6
Шпильки для укладки кабелей,
6
(LC)
Large Plastic Cover, 2
Grand capot en plastique, 2
Cubierta plástica grande, 2
Riverstimento grande in plastica, 2
Große Plastikabdeckung, 2
Большая пластмассовая крышка, 2
INCLUDED PARTS PIÈCES INCLUSES
PARTES INCLUIDAS
PARTI INCLUSE
ПОСТАВЛЯЕМЫЙ
КОМПЛЕКТ
IM LIEFERUMFANG
ENTHALTENE TEILE

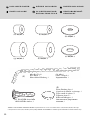
(G) M5 x 12mm, 6 (H) M5 x 22mm, 6 (I) M5 x 30mm, 6
(J) M6 x 14mm, 4 (K) M6 x 25mm, 4 (L) M6 x 35mm, 4
(M) M8 x 20mm, 4 (N) M8 x 30mm, 4 (O) M8 x 40mm, 4
(A)
M4 x
12mm, 6 (B)
M4 x
22mm, 6 (C)
M4 x
30mm, 6
(F) M4/M5, 10
(AG) M5 x 6mm, 4
(T) #14 X 65mm, 2
9
INCLUDED PARTS PIÈCES INCLUSES
PARTES INCLUIDAS
PARTI INCLUSE
ПОСТАВЛЯЕМЫЙ
КОМПЛЕКТ
IM LIEFERUMFANG
ENTHALTENE TEILE

TOGGLER
®
brand ALLIGATOR
®
SOLID-WALL ANCHORS are patented under one or more of US Patent numbers 5,161,296 and 5,938,385; and foreign
counterparts thereof and of 4,752,170. Other patents pending. TOGGLER and ALLIGATOR are worldwide registered trademarks of Mechanical Plastics Corp.
(U) TOGGLER
®
brand AF8
ALLIGATOR
®
Anchor,2
Allen Key Tool,
1
Llave Allen,
1
Inbusschlüssel-Werkzeug,
1
Clé Allen,
1
Chiave a brugola,
1
Торцевой ключ,
1
(Y)
(Z)
Plastic Finishing Caps,
2
Capuchons de finition en plastique,
2
Tapas-tornillo de plástico,
2
Tappini in plastica,
2
Kunststoffendkappen ,
2
Пластмассовые декоративные
колпачки,
2
(D) M4/M5, 6 (E) M4/M5, 6
(Q) M6/M8, 4
(P) M6/M8, 4
(S) M6/M8, 4
(R) M4/M5, 4
10
INCLUDED PARTS PIÈCES INCLUSES
PARTES INCLUIDAS
PARTI INCLUSE
ПОСТАВЛЯЕМЫЙ
КОМПЛЕКТ
IM LIEFERUMFANG
ENTHALTENE TEILE

NECESSARY TOOLS
OUTILLAGE NÉCESSAIRE
HERRAMIENTAS NECESARIAS
ATTREZZI NECESSARI
НЕОБХОДИМЫЕ ИНСТРУМЕНТЫ
ERFORDERLICHE WERKZEUGE
11
Level
Niveau
Nivel
Livella
Nivellierinstrument
Уровень
Phillips-head Screwdriver
Tournevis à tête Phillips
Destornillador philips (cruz)
Cacciavite Phillips
Kreuzschlitzschraubenzieher
Крестообразная отвертка
Drill
Perceuse
Taladro
Trapano
Bohrer
Дрель
Pencil
Crayon
Lápiz
Matita
Bleistift
Карандаш
Tape Measure
Ruban à mesurer
Cinta métrica
Metro
Messband
Рулетка
Masking Tape
Ruban de masquage
Cinta de enmascarar
Nastro adesivo
Abdeckband
Маскировочная лента
Ratchet Set
Clé à cliquet à douilles
Equipo de trinquete
Strumento Del Cricco
Schaltklinke Hilfsmittel
Набор инструментов с храповиком
Drill Bit: Wood:
5/32" (4mm), Masonry: 5/16" (8mm)
Foret Bois : 5/32 po (4 mm), Maçonnerie : 5/16 po (8 mm)
Broca para madera: 5/32" (4 mm), para mampostería: 5/16" (8 mm)
Punte trapano da legno: 4 mm; da muro: 8 mm
Bohrerspitze, Holz: 4 mm; Mauerwerk: 8 mm
Сверло – дерево: 5/32" (4 мм), каменная кладка: 5/16" (8 мм)
Stud Finder
Détecteur de montant
Localizador de montantes
Rilevatore di montanti
Bolzenfinder
Искатель стойки

12
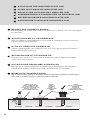
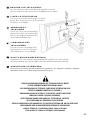
ATTACHING THE MONITOR PLATE (MP)
FIXER LA PLAQUE DE MONITEUR (MP)
CÓMO FIJAR LA PLACA DEL MONITOR (MP)
FISSAGGIO DELLA PIASTRA PER LO SCHERMO (MP)
BEFESTIGUNG DER MONITOR+PLATTE (MP)
КРЕПЛЕНИЕ ПЛАТЫ ДЛЯ МОНИТОРА (MP)
SELECT THE CORRECT SCREW
Before beginning, test several of the screws in your hardware kit to find the correct size and length for
your television.
SÉLECTIONNER LA VIS CORRECTE
Avant de commencer, essayer différentes vis du nécessaire de visserie pour trouver la section et la
longueur correctes pour le téléviseur.
ELIJA EL TORNILLO CORRECTO
Antes de comenzar, pruebe varios tornillos de su kit de accesorios para encontrar el de tamaño y
longitud indicados para su televisor.
SELEZIONARE LE VITI CORRETTE
Prima di iniziare, cercare tra le varie viti nel kit di ferramenta quelle di dimensione e lunghezza
corrette per il vostro televisore.
DIE RICHTIGE SCHRAUBE AUSWÄHLEN
Bevor Sie mit der Installation beginnen, sind mehrere der in Ihrem Eisenteil-Satz enthaltenen
Schrauben auszuprobieren, um die richtige Größe und Länge für Ihr TV zu ermitteln.
ВЫБЕРИТЕ НУЖНЫЙ ВИНТ
Перед тем как начать, проверьте несколько винтов из крепежного комплекта, чтобы выбрать
винт соответствующего размера и длины для вашего телевизора.
TELEVISION TÉLÉVISEUR TELEVISOR TELEVISORE FERNSEHER
ТЕЛЕВИЗОР
SPACER
DOUILLE D'ESPACEMENT
ESPACIADOR
DISTANZIALI
ABSTANDSHALTER
ПРОМЕЖУТОЧНОЕ КОЛЬЦО
MONITOR PLATE (MP)
PLAQUE DE MONITEUR (MP)
PLACA DEL MONITOR (MP)
PIASTRA PER LO SCHERMO (MP)
MONITOR-PLATTE (MP)
ПЛАТА ДЛЯ МОНИТОРА
(MP)
(MP)
(MP)
(MP)
WASHER
RONDELLE
ARANDELA
RONDELLE
DISTANZSCHEIBE
ШАЙБА

SS
13
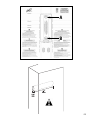
ENLEVER LES VIS DE SÉCURITÉ (SS)
La plaque de moniteur (MP) est livrée attachée au bras articulé (EA). Avant de commencer,
enlever les deux vis de sécurité (SS) comme sur l'illustration et séparer les deux éléments.
Ne pas jeter les vis de sécurité.
QUITE LOS TORNILLOS DE SEGURIDAD (SS)
La placa para la pantalla (MP) se envía ya instalada en el brazo de extensión (EA). Antes de
comenzar, retire los dos tornillos de seguridad (SS) tal como se muestra y separe las dos piezas.
No deseche los tornillos de seguridad.
RIMUOVERE LE VITI DI SICUREZZA (SS)
La piastra per lo schermo (MP) viene spedita pre-installata sulla prolunga (EA). Prima di iniziare,
rimuovere le due viti di sicurezza (SS), come illustrato, e separare i due componenti.
Non gettare le viti di sicurezza.
NEHMEN SIE DIE SICHERUNGSSCHRAUBEN AB (SS)
Die Monitorplatte (MP) ist bereits am Verlängerungsarm (EA) vorinstalliert im Lieferumfang mit
inbegriffen. Bevor Sie anfangen, bitte die beiden Sicherungsschrauben (SS) wie dargestellt
entfernen und die beiden Bestandteile trennen. Bitte die Sicherheitsschrauben nicht wegwerfen.
ОТВИНТИТЕ И ВЫТАЩИТЕ КРЕПЕЖНЫЕ ВИНТЫ (SS)
Плата для монитора (MP) поставляется прикрепленной к удлинителю (ЕА). Прежде всего
отвинтите и вытащите два крепежных винта (SS), как показано, и разъедините эти два
компонента. Не выбрасывайте крепежные винты.
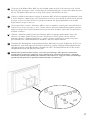
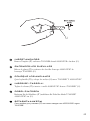
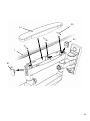
REMOVE THE SECURITY SCREWS (SS)
T
he Monitor Plate (MP) was shipped pre-installed to the Extension Arm (EA). Before you begin,
remove the two Security Screws (SS) as shown in and separate the two components.
Do not throw out the security screws.

75mm x 75mm
100mm x 100mm
200mm x 100mm
200mm x 150mm
200mm x 200mm
14
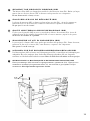
DECIDE IF ADAPTER PLATES (AP) ARE NECESSARY
Compare to the mounting holes on the back of your television.
DÉCIDER SI DES PLAQUES D'ADAPTATION (AP) SON
NÉCESSAIRES
Comparer aux trous de fixation au dos du téléviseur.
DETERMINE SI NECESITA LAS PLACAS ADAPTADORAS (AP)
Compare los orificios de montaje en la parte trasera de su televisor.
DECIDERE SE LE PIASTRE+ADATTORE (AP) SONO NECESSARIE
Verificare la corrispondenza tra la posizione dei fori sul retro del televisore e il supporto stesso.
ENTSCHEIDEN SIE SICH, OB ADAPTER+PLATTEN (AP)
ERFORDERLICH SIND.
Vergleichen Sie sie mit den Montagelöchern auf der Rückseite Ihres Fernsehers.
РЕШИТЕ, НУЖНЫ ЛИ АДАПТЕРНЫЕ ПЛАТЫ (AP)
Сравните с отверстиями для установки на задней панели телевизора.

AG
F
MP
MP
AP
AP
AG
F
200mm x200mm /
200mm x 150mm:
200x100:
15
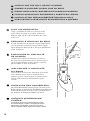
IF USING THE ADAPTER PLATES (AP):
Attach the Adapter Plates (AP) to the Monitor Plate (MP) using four small M5 Washers (F) and four
M
5 x 6mm Screws (AG).
SI LES PLAQUES D'ADAPTATION (AP) SONT UTILISÉES :
Fixer les plaques d'adaptation (AP) à la plaque de moniteur (MP) à l'aide de quatre petites
rondelles M5 (F) et de quatre vis M5 x 6 mm (AG).
SI USA LAS PLACAS ADAPTADORAS (AP):
Una las placas adaptadoras (AP) a la placa del monitor (MP) usando cuatro arandelas pequeñas M5 (F)
y cuatro tornillos M5 x 6 mm (AG).
SE LE PIASTRE+ADATTORE (AP) SONO NECESSARIE:
Fissare le piastre-adattatore (AP) alla piastra per lo schermo (MP) con quattro piccole rondelle (F)
e quattro viti M5 x 6 mm (AG).
FALLS SIE ADAPTER+ PLATTEN (AP) VERWENDEN:
Befestigen Sie die Adapter-Platten (AP) an der Monitor-Platte (MP) unter Einsatz von vier kleinen
M5 Distanzscheiben (F) und vier M5 x 6 mm Schrauben (AG).
ЕСЛИ ИСПОЛЬЗУЮТСЯ АДАПТЕРНЫЕ ПЛАТЫ (AP):
Прикрепите адаптерные платы (AP) к плате для монитора (MP), используя четыре маленькие
шайбы M5 (F) и четыре винта M5 x 6 мм (AG).

DO NOT OVER TIGHTEN SCREWS!
NE PAS FORCER SUR LES VIS !
NO AJUSTE DEMASIADO LOS TORNILLOS.
NON SERRARE ECCESSIVAMENTE LE VITI!
BITTE DIE SCHRAUBEN NICHT ZU FEST ZIEHEN!
НЕ ЗАТЯГИВАЙТЕ ВИНТЫ СЛИШКОМ СИЛЬНО!
16
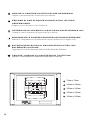
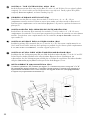
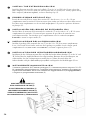
ATTACH MONITOR PLATE (MP) TO TELEVISION
Attach the Monitor Plate (MP) using the correct TV Mounting Screws and Washers as shown.
D
o not place the Washers between the monitor plate and the TV.
FIXER LA PLAQUE DE MONITEUR (MP) AU TÉLÉVISEUR
Fixer la plaque de moniteur (MP) avec les vis de fixation de TV et les rondelles correctes comme sur
l'illustration. Ne pas place pas de rondelle entre la plaque de moniteur et le téléviseur.
UNA LA PLACA DEL MONITOR (MP) AL TELEVISOR
Una la placa del monitor (MP) usando los tornillos de montaje para TV y las arandelas correctos, tal
como se muestra. No coloque las arandelas entre la placa del monitor y el TV.
FISSARE LA PIASTRA PER LO SCHERMO (MP) AL TELEVISORE
Fissare la piastra per lo schermo (MP) usando le viti e le rondelle adatte per il televisore, come illustrato.
Non posizionare le rondelle tra la piastra per il monitor e il televisore.
BEFESTIGEN SIE DIE MONITOR+PLATTE (MP) AN IHREM TV
Befestigen Sie die Monitor-Platte (MP) unter Einsatz der passenden TV-Befestigungsschrauben und
Distanzscheiben, wie dargestellt. Legen Sie die Distanzscheiben nicht zwischen die Monitor-Platte und
den Fernseher.
ПРИКРЕПИТЕ ПЛАТУ ДЛЯ МОНИТОРА (MP) К ТЕЛЕВИЗОРУ
Прикрепите плату для монитора (MP), используя требуемые для этого телевизора крепежные винты и
шайбы, как показано на рисунке. Между платой для монитора и телевизором нельзя устанавливать
шайбы.

17
U
se spacers if the Monitor Plate (MP) does not fit firmly against the back of the television, such as when
t
he back of the television is curved, contains larger recessed mounting holes, or some other obstruction is in
the way. The Monitor Plate must rest securely on the spacers, and should not be loose.
Utiliser les douilles d'espacement si la plaque de moniteur (MP) où les bras n'appuient pas fermement contre
le dos du téléviseur, comme lorsque le dos du téléviseur est incurvé, qu'il contient de grands trous de fixation
en retrait ou qu'il y a d'autres obstacles. La plaque de moniteur doit appuyer fermement sur les douilles
d'espacement et ne pas avoir de jeu.
Use los espaciadores si la placa del monitor (MP) no encaja con firmeza contra la parte trasera del televisor,
como en el caso en que esta parte es curva, contiene orificios de montaje embutidos más grandes o presenta
alguna otra obstrucción. La placa del monitor tiene que descansar de manera segura sobre los espaciadores y
no deben estar flojos.
Utilizzare i distanziali quando la piastra per il monitor (MP) non appoggia perfettamente al retro del
televisore, ad esempio quando la parte posteriore del televisore è ricurva, oppure è dotata di fori di
montaggio infossati e di dimensioni maggiori, o quando è presente qualche tipo di intralcio. La piastra
per lo schermo deve aderire fermamente ai distanziali, e non deve risultare allentata.
Verwenden Sie Abstandshalter, wenn die Monitor-Platte (MP) nicht fest gegen die Rückseite des TVs sitzt,
beispielsweise, wenn die Rückseite des Fernsehers gerundet ist, größere ausgesparte Befestigungslöcher hat,
oder falls irgend eine andere Blockierung vorhanden sein sollte. Die Monitor-Platte muss sicher auf den
Abtandshaltern liegen, und darf nicht locker sein.
Используйте промежуточные кольца, если плата для монитора (MP) прилегает неплотно к
задней панели телевизора, например, когда задняя панель телевизора не плоская, с довольно
большими глухими отверстиями для установки, или мешает что–то другое. Плата для монитора
должна плотно прилегать к промежуточным кольцам и не двигаться.

18
INSTALLING THE WALL MOUNT IN WOOD
POSER LE SUPPORT MURAL SUR DU BOIS
CÓMO INSTALAR EL SOPORTE DE PARED EN MADERA
INSTALLAZIONE DEL SUPPORTO A PARETE SU LEGNO
INSTALLATION DER WANDBEFESTIGUNG IN HOLZ
КРЕПЛЕНИЕ НАСТЕННОГО КРОНШТЕЙНА К ДЕРЕВУ
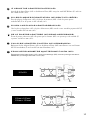
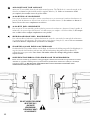
FIND THE WOOD STUD
Using a stud finder, find the exact location of the
stud to which you want to attach the wall mount.
Mark the right and left side to determine the center
of the stud.
TROUVER LE MONTANT EN BOIS
À l'aide d'un détecteur de montant, trouver l'emplacement
exact du montant sur lequel doit être attaché le support
mural. Marquer les bords gauche et droit pour déterminer le
centre du montant.
ENCUENTRE EL MONTANTE
DE MADERA
Utilizando un localizador de montantes, encuentre la
ubicación exacta del montante sobre el que desea fijar el
soporte de pared. Marque los lados derecho e izquierdo
para determinar el centro del montante.
INDIVIDUARE IL MONTANTE
DI LEGNO
Con l'ausilio di un rilevatore, individuare la posizione
esatta del montante al quale si intende fissare il
supporto a parete. Contrassegnare gli estremi sinistro
e destro del montante per determinarne il punto
centrale.
FINDEN SIE DEN HOLZBOLZEN
Mit einem Bolzenfinder können Sie den genauen Ort des
Bolzens finden, an dem Sie die Wandbefestigung befestigen
wollen. Markieren Sie die rechte sowie auch linke Seite,
um die Mitte des Bolzens bestimmen zu können.
НАЙДИТЕ ДЕРЕВЯННУЮ
СТОЙКУ
С помощью искателя стойки найдите точное
местоположение стойки, к которой вы хотите
прикрепить кронштейн. Отметьте правую и
левую стороны, чтобы определить центр стойки.

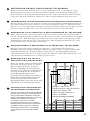
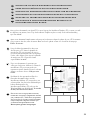
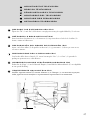
DETERMINE HEIGHT LOCATION OF TELEVISION
Measure the distance from the bracket holes to the top and bottom of the TV to determine the center
m
ounting position. Line up the center position with the Centerline on the Installation Template (IT).
M
easure from the floor up, and make small marks on the wall to help you determine the desired TV height.
Using a level, line up the Installation Template (IT) with your pencil markings and tape it into place.
DÉTERMINER L'EMPLACEMENT EN HAUTEUR DU TÉLÉVISEUR
Mesurer la distance entre les trous du support et le haut et le bas du téléviseur pour déterminer la position de
pose centrale. Aligner la position centrale avec l'axe central sur le gabarit de pose (IT). Mesurer la hauteur
depuis le sol et tracer de petits repères sur le mur pour marquer la hauteur souhaitée pour le téléviseur. À l'aide
d'un niveau, aligner le gabarit de pose (IT) sur les marquages et l'attacher avec du ruban adhésif.
DETERMINE LA ALTURA EN LA QUE COLOCARÁ EL TELEVISOR
Mida la distancia desde los orificios del soporte hasta las partes superior e inferior del TV para determinar la
posición centrada de la instalación. Alinee la posición centrada con la línea central de montaje en la plantilla
de instalación (IT). Mida desde el piso hacia arriba y haga unas pequeñas marcas en la pared para ayudarle a
determinar la altura deseada para el TV. Utilizando un nivel, alinee la plantilla de instalación (IT) con las
marcas del lápiz y sujete con cinta adhesiva en el lugar.
DETERMINARE LA POSIZIONE IN ALTEZZA DEL TELEVISORE
Misurare la distanza dai fori dei sostegni al punto superiore e a quello inferiore del televisore, per
determinare la posizione centrale di montaggio. Allineare la posizione centrale con il punto centrale dello
schema di installazione (IT). Prendere le misure partendo dal suolo, segnando leggermente sul muro
l'altezza desiderata del televisore. Con l'ausilio di una livella, allineare lo schema di installazione (IT) con il
segno in matita precedentemente fatto, e fissarlo con nastro adesivo.
BESTIMMEN SIE DIE STELLE
DER HÖHE DES FERNSEHERS
Messen Sie den Abstand von den Trägerlöchern
zum oberen und unteren Teil des TVs, um die
Mitte festzulegen. Richten Sie die mittlere
Position der Mittellinie mit der Installations-
Schablone aus (IT). Messen Sie vom Fußboden
nach oben und markieren Sie die Wand mit
kleinen Bleistiftmarkierungen, um die
gewünschte Höhe des Fernsehers bestimmen zu
können. Mit einem Nivellierinstrument wird
die Installationsschablone (IT) mit Ihren
Bleistiftmarkierungen ausgerichtet und mit dem
Abdeckband an der richtigen Stelle befestigt.
ОПРЕДЕЛИТЕ ПОЛОЖЕНИЕ
ТЕЛЕВИЗОРА ПО ВЫСОТЕ
Измерьте расстояние от отверстий кронштейна
до верха и низа телевизора, чтобы определить
центр установочного положения. Совместите
центр установочного положения с Centerline на
шаблоне для установки (IT). Измерьте
расстояние от пола вверх и сделайте
карандашом пометки на стене, что поможет
вам определить желаемую высоту положения
телевизора. Используя уровень, совместите
шаблон для установки (IT) с пометками на
стене и закрепите шаблон маскировочной
лентой.
• Height to center of TV
• Hauteur jusqu'au centre du téléviseur
• Altura para centrar el TV
• Altezza al centro del televisore
• Höhe zur TV-Mitte
• Высота до центра телевизора
IT
19

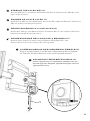
FOR MASONRY INSTALLATIONS, SEE PAGE 23.
POUR UNE POSE SUR DE LA MAÇONNERIE, VOIR PAGE 23.
PARA INSTALACIONES EN MAMPOSTERÍA CONSULTE LA PÁGINA 23.
PER INSTALLAZIONI A MURO, VEDERE A PAGINA 23.
FÜR INSTALLATIONEN IN MAUERWERK, SIEHE SEITE 23.
КРЕПЛЕНИЕ К КАМЕННОЙ КЛАДКЕ, СМ. СТР. 23.
20
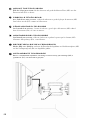
DRILL PILOT HOLES
Follow directions on the Installation Template (IT) carefully. Drill two holes 2.5"
(64mm) deep using a 5/32" (or 4mm) size drill bit in the “A” and “B” locations noted
on the Installation Template.
PERCER LES TROUS GUIDES
Suivre avec attention les instructions figurant sur le gabarit de pose (IT). Percer deux
trous de 64 mm (2,5 po) de profond avec un foret de 5/32 po (ou 4 mm) de diamètre
aux emplacements notés « A » et « B » sur le gabarit de pose.
TALADRE ORIFICIOS GUÍA
Siga atentamente las instrucciones de la plantilla de instalación (IT). Taladre dos
orificios de 2,5" (64 mm) de profundidad con una broca de 5/32" (4 mm) en las
ubicaciones "A" y "B" apuntadas en la plantilla de instalación.
TRAPANARE I FORI+PILOTA
Seguire con attenzione le istruzioni contenute sullo schema di installazione (IT).
Trapanare due fori profondi 64 mm, con una punta da 4 mm, nei punti “A” e “B”
indicati sullo schema di installazione.
FÜHREN SIE EINE VORBOHRUNG DURCH
Bitte achten Sie darauf, dass der Installationsschablone (IT) sorgfältig gefolgt wird.
Bohren Sie zwei 64 mm tiefe Löcher mit einer 4 mm großen Bohrerspitze in die "A"
und "B" Stellen auf der Installationsschablone.
ПРОСВЕРЛИТЕ УСТАНОВОЧНЫЕ ОТВЕРСТИЯ
Аккуратно и точно следуйте инструкциям , написанным на шаблоне для
установки (IT). Просверлите два отверстия глубиной 2.5" (64 мм), используя
сверло 5/32" (или 4 мм) в местах, обозначенных “A” и “B” на шаблоне для
установки.
La pagina si sta caricando...
La pagina si sta caricando...
La pagina si sta caricando...
La pagina si sta caricando...
La pagina si sta caricando...
La pagina si sta caricando...
La pagina si sta caricando...
La pagina si sta caricando...
La pagina si sta caricando...
La pagina si sta caricando...
La pagina si sta caricando...
La pagina si sta caricando...
La pagina si sta caricando...
La pagina si sta caricando...
La pagina si sta caricando...
La pagina si sta caricando...
La pagina si sta caricando...
La pagina si sta caricando...
La pagina si sta caricando...
La pagina si sta caricando...
-
 1
1
-
 2
2
-
 3
3
-
 4
4
-
 5
5
-
 6
6
-
 7
7
-
 8
8
-
 9
9
-
 10
10
-
 11
11
-
 12
12
-
 13
13
-
 14
14
-
 15
15
-
 16
16
-
 17
17
-
 18
18
-
 19
19
-
 20
20
-
 21
21
-
 22
22
-
 23
23
-
 24
24
-
 25
25
-
 26
26
-
 27
27
-
 28
28
-
 29
29
-
 30
30
-
 31
31
-
 32
32
-
 33
33
-
 34
34
-
 35
35
-
 36
36
-
 37
37
-
 38
38
-
 39
39
-
 40
40


Bell'O 7470B Guida d'installazione
- Categoria
- Supporti da parete per schermi piatti
- Tipo
- Guida d'installazione
in altre lingue
- français: Bell'O 7470B Guide d'installation
- español: Bell'O 7470B Guía de instalación
- Deutsch: Bell'O 7470B Installationsanleitung


