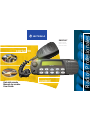
Motorola pro7100 Manuale utente
- Categoria
- Radio a due vie
- Tipo
- Manuale utente

PRO7100™
Radio Móvil
Rádio Móvel
Mobile Radio
Guía del usuario
Manual do usuário
User Guide
contacto
control
Radios Profesionales
Tan Dedicado Como Lo Es Usted
C
A, Motorola, Radios Profesionales, Serie PRO, PRO7100, Tan Dedicado
Como Lo Es Usted, y Call Alert son marcas de Motorola, Inc.
© 1999 Motorola, Inc. Todos los derechos reservados. Impreso en los
EE.UU.
A, Motorola, R‡dios Profissionais, SŽrie PRO, PRO7100, T‹o Dedicado
Quanto ƒ Voc•, e Call Alert s‹o marcas da Motorola, Inc.
© 1999 Motorola, Inc. Todos os direitos reservados. Impresso nos EUA.
A, Motorola, Professional Radio, PRO Series, PRO7100, As Dedicated As
You Are, and Call Alert are trademarks of Motorola, Inc.
© 1999 Motorola, Inc. All rights reserved. Printed in U.S.A.
68P81091C59-0
contacto
control
PRO7100

i
English
CONTENTS
CONTENTS
Computer Software Copyrights. . . . . . . . . .iii
Radio Overview . . . . . . . . . . . . . . . . . . . . .1
Parts of the Radio . . . . . . . . . . . . . . . . . . . .1
Optional Enhanced Keypad
Microphone (RMN4026) . . . . . . . . . . .2
On/Off/Volume Knob . . . . . . . . . . . . . . .3
Channel Selector/Menu Navigation
Buttons . . . . . . . . . . . . . . . . . . . . . . . . 3
LED Indicators . . . . . . . . . . . . . . . . . . . .3
Programmable Buttons . . . . . . . . . . . . .3
Push-to-Talk (PTT) Button. . . . . . . . . . .6
Microphone . . . . . . . . . . . . . . . . . . . . . .6
Menu Keys. . . . . . . . . . . . . . . . . . . . . . .6
Use with Enhanced Keypad
Microphone (RMN4026) . . . . . . . . . . .7
LCD Screen . . . . . . . . . . . . . . . . . . . . . .9
Audio Indicators for Programmable
Buttons . . . . . . . . . . . . . . . . . . . . . . . . . .10
Getting Started . . . . . . . . . . . . . . . . . . . .11
Turning the Radio On or Off . . . . . . . . . . .11
Adjusting the Volume . . . . . . . . . . . . . . . .11
Selecting a Zone. . . . . . . . . . . . . . . . . . . .12
Selecting a Radio Channel . . . . . . . . . . . .12
Sending a Call . . . . . . . . . . . . . . . . . . . . . 13
Receiving a Call . . . . . . . . . . . . . . . . . . . . 13
Radio Calls . . . . . . . . . . . . . . . . . . . . . . . 15
Making a Selective Call . . . . . . . . . . . . . . 15
Receiving a Selective Call . . . . . . . . . . . . 15
Sending a Call Alert™ Page. . . . . . . . . . . 16
Receiving a Call Alert Page . . . . . . . . . . . 16
Radio Check. . . . . . . . . . . . . . . . . . . . . . . 17
Sending a Status . . . . . . . . . . . . . . . . . . . 17
Sending a Message . . . . . . . . . . . . . . . . . 18
Receiving a Message . . . . . . . . . . . . . . . . 19
Sending an Emergency Alert . . . . . . . . . . 19
Selective Radio Inhibit . . . . . . . . . . . . . . . 20
Editing a Radio Call List . . . . . . . . . . . . . . 20
Repeater or Talkaround Mode . . . . . . . . . 21
Setting the Power Level . . . . . . . . . . . . . . 21
Name and Call/Message Tone Tagging. . 22
Scan. . . . . . . . . . . . . . . . . . . . . . . . . . . . . 25
Starting or Stopping Scan. . . . . . . . . . . . . 25
Talkback . . . . . . . . . . . . . . . . . . . . . . . . . . 26
Deleting a Nuisance Channel. . . . . . . . . . 26
Restoring a Channel to the Scan List . 26
Editing a Scan List . . . . . . . . . . . . . . . . . . 26
Adding or Deleting Channels
in a Scan List . . . . . . . . . . . . . . . . . . 27
Prioritizing a Channel in a Scan List . . 28
English.book Page i Thursday, August 12, 1999 9:03 AM

ii
English
CONTENTS
Setting Priority Channels. . . . . . . . . . . 28
Phone. . . . . . . . . . . . . . . . . . . . . . . . . . . . 31
Making a Phone Call . . . . . . . . . . . . . . . . 31
Modifying the Phone List . . . . . . . . . . . . . 32
Adding an Entry (when using the
enhanced keypad microphone
only) . . . . . . . . . . . . . . . . . . . . . . . . . 32
Deleting an Entry. . . . . . . . . . . . . . . . . 33
Editing an Entry (when using the
enhanced keypad microphone
only) . . . . . . . . . . . . . . . . . . . . . . . . . 34
Editing an Access/Deaccess Code
(when using the enhanced keypad
microphone only) . . . . . . . . . . . . . . . 35
Audio/Tone Settings. . . . . . . . . . . . . . . . 37
Utilities. . . . . . . . . . . . . . . . . . . . . . . . . . . 39
Setting the Time . . . . . . . . . . . . . . . . . . . . 41
Displaying the Time . . . . . . . . . . . . . . . . . 42
Selecting the Display Language. . . . . . . . 42
Safety and Warranty. . . . . . . . . . . . . . . . 43
Safe and Efficient Operation of Motorola
Two-Way Radios . . . . . . . . . . . . . . . . . . 43
Exposure to Radio Frequency
Energy . . . . . . . . . . . . . . . . . . . . . . . 43
Electromagnetic Interference/
Compatibility . . . . . . . . . . . . . . . . . . . . . 44
Operational Warnings . . . . . . . . . . . . . . . 44
Vehicles with an Air Bag. . . . . . . . . . . 44
Potentially Explosive Atmospheres. . . 44
Blasting Caps and Blasting Areas. . . . 45
Mobile Radio Operation and
EME Exposure. . . . . . . . . . . . . . . . . 45
Mobile Antenna Installation. . . . . . . . . 46
Control Station Operation. . . . . . . . . . . . . 46
Limited Warranty . . . . . . . . . . . . . . . . . . . 46
Accessories . . . . . . . . . . . . . . . . . . . . . . 51
Audio . . . . . . . . . . . . . . . . . . . . . . . . . . . . 51
Mounting . . . . . . . . . . . . . . . . . . . . . . . . . 51
Antennas . . . . . . . . . . . . . . . . . . . . . . . . . 52
Control Station . . . . . . . . . . . . . . . . . . . . . 52
English.book Page ii Thursday, August 12, 1999 9:03 AM

iii
English
CONTENTS
COMPUTER SOFTWARE
COPYRIGHTS
The Motorola products described in this
manual may include copyrighted Motorola
computer programs stored in semiconductor
memories or other media. Laws in the United
States and other countries preserve for
Motorola certain exclusive rights for
copyrighted computer programs including, but
not limited to, the exclusive right to copy or
reproduce in any form the copyrighted
computer program. Accordingly, any
copyrighted Motorola computer programs
contained in the Motorola products described
in this manual may not be copied, reproduced,
modified, reverse-engineered, or distributed in
any manner without the express written
permission of Motorola. Furthermore, the
purchase of Motorola products shall not be
deemed to grant either directly or by
implication, estoppel, or otherwise, any license
under the copyrights, patents or patent
applications of Motorola, except for the normal
non-exclusive license to use that arises by
operation of law in the sale of a product.
English.book Page iii Thursday, August 12, 1999 9:03 AM

iv
English
CONTENTS
Notes
English.book Page iv Thursday, August 12, 1999 9:03 AM

1
English
RADIO OVERVIEW
RADIO OVERVIEW
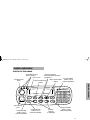
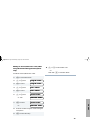
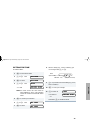
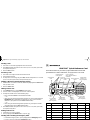
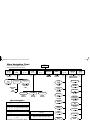
PARTS OF THE RADIO
Editing
Buttons
Menu Enter/Select
Button
(Interchangeable)
Programmable
Button 2 (P2)
(Interchangeable)
Programmable
Button 4 (P4)
(Interchangeable)
Programmable
Button 3 (P3)
LCD Screen
Red/Yellow/Green
LED Indicators
Menu Exit/Escape
Button
(Interchangeable)
Programmable
Button 1 (P1)
(Left/Right)
Microphone
Jack
Knob
On/Off/Volume
Channel Selector/
Menu Navigation Buttons
(Up/Down)
English.book Page 1 Thursday, August 12, 1999 9:03 AM

2
English
RADIO OVERVIEW
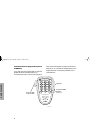
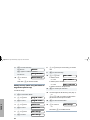
Optional Enhanced Keypad Microphone
(RMN4026)
Your radio may be ordered with an optional
DTMF (Dual-Tone Multi-Frequency)
microphone that has a direct entry keypad.
This enhanced keypad microphone has three
buttons (A, B, C) below the keypad that can be
programmed to conveniently activate select
radio features.
FL0830328O
Keypad
Push-to-Talk
(PTT) button
Programmable
Buttons
(A, B, C)
English.book Page 2 Thursday, August 12, 1999 9:03 AM

3
English
RADIO OVERVIEW
On/Off/Volume Knob
Turns the radio on or off, and adjusts the
radio’s volume.
Channel Selector/Menu Navigation Buttons
Used for channel scrolling. When in menu
mode, used for menu navigation.
LED Indicators
Indicates channel, scan, and monitor status, as
well as receipt of a selective call.
Programmable Buttons
Your radio has several programmable buttons.
Your dealer can program these buttons as
shortcuts to various radio features.
Check with your dealer for a complete list of
functions your radio supports.
Programmable buttons include the
g
,
h
,
i
, and
j
buttons (see page 1).
Some buttons can access up to two features,
depending on the type of button press:
•
short press
—quickly pressing and
releasing the programmable buttons
•
long press
—pressing and holding the
programmable buttons for a period of time
(default 1 1/2 seconds or programmed
value)
•
hold down
—pressing and holding down
the programmable buttons while checking
status or making adjustments
A summary of programmable radio features
and corresponding page references appears
beginning on page 4.
In the “Button” column, have your dealer record
the name of the programmable button next to
the feature that has been programmed to it.
The dealer can use the abbreviations (P1, P2,
P3, P4) shown in the radio illustration on
page 1.
Also, where appropriate, have your dealer
indicate whether the button press requires a
short press, a long press, or needs to be held
down.
y
or
z
English.book Page 3 Thursday, August 12, 1999 9:03 AM

4
English
RADIO OVERVIEW
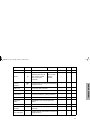
Function Indicator Short Press Long Press
Hold Down
Page Button
Volume Set — — —
Sound a tone
for adjusting
your radio’s
volume level.
11
Direct Zone
Access
— Direct entry to zone selection menu.
†
—12
Home Revert —
Takes you directly to a pre-programmed
zone/channel combination.
†
—13
Direct Channel
Access
—
Toggle the direct access channel feature.
†
(Enhanced keypad microphone required.)
—13
PRTT (Priority
Request-to-Talk)
—
Sends a priority access
request to the dispatcher.
—13
Emergency
E
Initiate Emergency Alert.
Cancel
Emergency
status.
—19
Power Level
B
Toggle transmit power level between High
and Low.
†
—21
Repeater/
Talkaround
J
Toggle between using a repeater or
transmitting directly to another radio.
†
—21
Scan/Nuisance
Channel Delete
G
Toggle scan on and off.
Delete a
nuisance
channel while
scanning.
—25
Phone
D
Access Phone Mode.
†
—31
†
This function is activated by
EITHER
a short
OR
a long press, but not both.
English.book Page 4 Thursday, August 12, 1999 9:03 AM

5
English
RADIO OVERVIEW
Speed Dial — Access your phone list directly.
†
—31
Monitor
C
Toggle silent monitor
operation (also turn off
open squelch monitor
when it has been
activated).
Turn on open
squelch
monitor.
——
Option Board
(if one is
installed)
N
Toggle between activating and deactivating
the option board.
†
——
Radio Call — Access the radio call menu.
†
——
Light — Adjust brightness level (off/low/med/high).
†
——
Auxiliary
Control (1/2)
—
Activates or deactivates a pin on the
accessory connector.
†
(See your dealer.)
——
Status — Direct entry to the status menu.
†
——
One-Touch
Status
—
Immediately sends a preprogrammed
status.
†
——
Message — Direct entry to the message menu.
†
——
One-Touch
Message
—
Immediately sends a preprogrammed
message.
†
——
Horn and Lights —
Toggles external alarm feature or cancels a
triggered alarm.
†
——
†
This function is activated by
EITHER
a short
OR
a long press, but not both.
Function Indicator Short Press Long Press
Hold Down
Page Button
English.book Page 5 Thursday, August 12, 1999 9:03 AM

6
English
RADIO OVERVIEW
Push-to-Talk (PTT) Button
Press and hold down this button to talk;
release it to listen.
Microphone
Hold the microphone 1 to 2 inches (2.5 to 5
cm) from your mouth, and speak clearly into it.
Menu Keys
Menu/Select Key
u
Used to enter Menu Mode. When in Menu
Mode, this key is also used to make menu
selections.
Exit Key
t
Used to move to the previous Menu level (short
press) or to exit Menu Mode (long press).
Up Key
y
and
Down Key
z
Used for channel scrolling. When in Menu
Mode, used for menu navigation.
Right Key
w
Moves the cursor right or inserts a space when
editing or Zone scrolling.
Left Key
v
Moves the cursor left or used as a backspace
key when editing or Zone scrolling.
Left
Up
Down Right
Menu/
Select
Exit
tyu
vzw
English.book Page 6 Thursday, August 12, 1999 9:03 AM

7
English
RADIO OVERVIEW
Use with Enhanced Keypad Microphone
(RMN4026
)
These keys are used to:
• Dial a phone number
• Make a radio call
• Enter information when programming radio
lists
• Directly access preprogrammed features
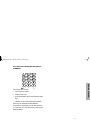
Each key can generate several different
characters. For example, to enter the character
“C,” press the
2
key three times. (Refer to the
following table.)
English.book Page 7 Thursday, August 12, 1999 9:03 AM

8
English
RADIO OVERVIEW
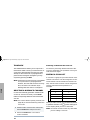
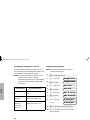
Entering Characters Using the Keypad
Number of Times Key is Pressed
Key
1234567891011 12 13 14 15 16 17
0
0( )<>
1
1&%# *
2
ABC2abc2ÀÁ ÂÇàáâç
3
DE F3def3ÈÉ Êèéêë
4
GH I4ghi4ÌÍ ìíîï
5
JKL5jkl5
6
MN O6mno6ÑÒ ÓÔñòóôö
7
PQRS7pqrs7
8
TUV8 tuv8ÙÚ Ûùú
9
WX YZ9wxyz9Y
y
*
*/+-=
#
#
Blank
Space
-.!?’”,; :
English.book Page 8 Thursday, August 12, 1999 9:03 AM

9
English
RADIO OVERVIEW
LCD Screen
The top screen row displays radio status
information:
Symbol Indication
A
Companding
The Companding
feature is activated.
When in narrow band,
this feature improves
audio quality.
B
Power Level
Low Power “ R “ or High
Power “ S “ is activated.
C
Carrier Squelch
(CSQ)
The radio is on a CSQ
channel, monitor is
active, or the
microphone is off-hook.
D
Phone
Phone Mode is
selected.
E
Emergency
An Emergency Alert is
being sent.
F
Call Received
A Selective Call or Call
Alert has been received.
G
Scan
The Scan feature is
active. Flashes when
Scan is suspended.
Priority 1 Scan
( flashing)
During Scan, indicates
that the scan has locked
on to a priority 1
channel.
H
Priority 2 Scan
( steady)
During Scan, indicates
that the scan has locked
on to a priority 2
channel.
Symbol Indication
English.book Page 9 Thursday, August 12, 1999 9:03 AM

10
English
RADIO OVERVIEW
AUDIO INDICATORS FOR
PROGRAMMABLE BUTTONS
In addition to having associated visual
indicators, some programmable buttons use
tones to indicate one of two modes:
J
Talkaround
The radio is not
transmitting through a
repeater.
K
Programming Mode
The radio is in Program
List editing mode.
M
Signal Strength
Indicates signal
strength. The more bars,
the stronger the signal.
N
Option Board
Option board is enabled.
Q
Not currently assigned.
L
Not currently assigned.
Symbol Indication
Low-High Tone
High-Low Tone
Button Low-High Tone High-Low Tone
Scan Start scan Stop scan
Power Level
High power
selected
Low power
selected
Option Board Enabled Disabled
Repeater/
Talkaround
Does not use
repeater
Uses repeater
English.book Page 10 Thursday, August 12, 1999 9:03 AM

11
English
GETTING STARTED
GETTING STARTED
TURNING THE RADIO ON OR OFF
ADJUSTING THE VOLUME
Turn the On/Off/Volume Control knob
clockwise to increase the volume, or
counterclockwise to decrease the volume.
–
or
–
ON OFF
Push the On/Off/
Volume Control knob
until you hear a click.
If power-up is
successful, you will
hear the Self-Test Pass
Tone.
If the radio fails to
power up, you will hear
the Self-Test Fail
Tone .
Push the On/Off/
Volume Control knob
until you hear a click and
the display clears.
1 Hold down the Volume Set button (see
page 4). You will hear a continuous tone.
2 Turn the On/Off/Volume Control knob to the
desired volume level.
3 Release the Volume Set button.
English.book Page 11 Thursday, August 12, 1999 9:03 AM

12
English
GETTING STARTED
SELECTING A ZONE
A zone is a group of up to 16 channels. Before
you can access a channel in a zone, you must
select the zone in one of three ways:
Method 1
Method 2 (if programmed by your dealer [see
pages 4-5]).
Method 3
SELECTING A RADIO CHANNEL
Your radio offers 128 channels (8 zones of 16
channels each).
Note: Due to government regulations, some
channels may not be programmed.
See your dealer for more information.
There are three ways to select a channel:
Method 1
1
u to enter Menu Mode.
2
y
or
z until
3
u to select
4
y
or
z until you see the desired zone
name.
5 u to select the zone.
1 Press the Direct Zone Access button.
2
y
or
z until you reach the desired zone.
3 u to select the zone.
ZZ
ZZ
oo
oo
nn
nn
ee
ee
ZZ
ZZ
oo
oo
nn
nn
ee
ee
Press v to select the previous zone. If
pressed while the first zone is selected, the
radio will wrap around to the last zone.
-or-
Press w to select the next zone. If pressed
while the last zone is selected, the radio will
wrap around to the first zone.
1 Select the appropriate Zone, if required.
2
y
or
z until you reach the desired
channel, shown on the screen.
English.book Page 12 Thursday, August 12, 1999 9:03 AM

13
English
GETTING STARTED
Method 2 (if programmed by your dealer [see
pages 4 -5]).
Method 3 (if programmed by your dealer [see
pages 4 -5]).
SENDING A CALL
If your system uses the request-to-talk feature,
use the following method to send a call:
RECEIVING A CALL
1 Press the Home Revert button.
1 Press the Direct Channel Access button.
2 Enter the desired channel using the enhanced
keypad microphone.
3 u to confirm your selection.
1 Turn your radio on.
2 y
or
z to select the desired channel.
3 Hold the microphone vertically 1 to 2 inches
(2.5 to 5 cm) from your mouth. Press the PTT
to talk; release it to listen.
1 Turn your radio on.
2 y
or
z to select the desired channel.
3 Press the PTT (for priority requests to talk, the
PRTT button) and wait for the talk permit tone.
4 Hold the microphone vertically 1 to 2 inches
(2.5 to 5 cm) from your mouth. Press the PTT
to talk; release it to listen.
5 Release the PTT to listen.
1 Turn your radio on.
2 Adjust the radio’s volume if necessary (see
page 11).
3 Select the desired channel.
4 To respond, hold the microphone vertically 1
to 2 inches (2.5 to 5 cm) from your mouth.
Press the PTT to talk; release it to listen.
English.book Page 13 Thursday, August 12, 1999 9:03 AM

14
English
GETTING STARTED
Notes
English.book Page 14 Thursday, August 12, 1999 9:03 AM

15
English
RADIO CALLS
RADIO CALLS
MAKING A SELECTIVE CALL
You can make a selective call to a particular radio
or group of radios, provided the signaling
protocol supports it.
To make a Selective Call:
RECEIVING A SELECTIVE CALL F
When you receive a selective call:
• You will hear two alert tones.
• The LED Indicator flashes yellow.
• The LCD screen displays F and the
preprogrammed name or ID of the calling
radio, if available.
1 u to enter Menu Mode.
2 y
or
z until
3 u to select
4 y
or
z until
5 u to select
6 y
or
z to locate the desired ID in the
Radio Call List.
–
or
–
when using the enhanced keypad microphone
only, enter the ID number of the radio you want
to call.
RR
RR
aa
aa
dd
dd
ii
ii
oo
oo
CC
CC
aa
aa
ll
ll
ll
ll
RR
RR
aa
aa
dd
dd
ii
ii
oo
oo
CC
CC
aa
aa
ll
ll
ll
ll
SS
SS
ee
ee
ll
ll
ee
ee
cc
cc
tt
tt
ii
ii
vv
vv
ee
ee
CC
CC
aa
aa
ll
ll
ll
ll
SS
SS
ee
ee
ll
ll
ee
ee
cc
cc
tt
tt
ii
ii
vv
vv
ee
ee
CC
CC
aa
aa
ll
ll
ll
ll
7 Press the PTT to send the call. The radio
sounds a continuous tone.
8 Press the PTT to talk; release it to listen.
9 When finished with the call,
t to return to
–or
–
Hold down t to exit Menu Mode.
SS
SS
ee
ee
ll
ll
ee
ee
cc
cc
tt
tt
ii
ii
vv
vv
ee
ee
CC
CC
aa
aa
ll
ll
ll
ll
English.book Page 15 Thursday, August 12, 1999 9:03 AM
La pagina sta caricando ...
La pagina sta caricando ...
La pagina sta caricando ...
La pagina sta caricando ...
La pagina sta caricando ...
La pagina sta caricando ...
La pagina sta caricando ...
La pagina sta caricando ...
La pagina sta caricando ...
La pagina sta caricando ...
La pagina sta caricando ...
La pagina sta caricando ...
La pagina sta caricando ...
La pagina sta caricando ...
La pagina sta caricando ...
La pagina sta caricando ...
La pagina sta caricando ...
La pagina sta caricando ...
La pagina sta caricando ...
La pagina sta caricando ...
La pagina sta caricando ...
La pagina sta caricando ...
La pagina sta caricando ...
La pagina sta caricando ...
La pagina sta caricando ...
La pagina sta caricando ...
La pagina sta caricando ...
La pagina sta caricando ...
La pagina sta caricando ...
La pagina sta caricando ...
La pagina sta caricando ...
La pagina sta caricando ...
La pagina sta caricando ...
La pagina sta caricando ...
La pagina sta caricando ...
La pagina sta caricando ...
La pagina sta caricando ...
La pagina sta caricando ...
La pagina sta caricando ...
La pagina sta caricando ...
-
 1
1
-
 2
2
-
 3
3
-
 4
4
-
 5
5
-
 6
6
-
 7
7
-
 8
8
-
 9
9
-
 10
10
-
 11
11
-
 12
12
-
 13
13
-
 14
14
-
 15
15
-
 16
16
-
 17
17
-
 18
18
-
 19
19
-
 20
20
-
 21
21
-
 22
22
-
 23
23
-
 24
24
-
 25
25
-
 26
26
-
 27
27
-
 28
28
-
 29
29
-
 30
30
-
 31
31
-
 32
32
-
 33
33
-
 34
34
-
 35
35
-
 36
36
-
 37
37
-
 38
38
-
 39
39
-
 40
40
-
 41
41
-
 42
42
-
 43
43
-
 44
44
-
 45
45
-
 46
46
-
 47
47
-
 48
48
-
 49
49
-
 50
50
-
 51
51
-
 52
52
-
 53
53
-
 54
54
-
 55
55
-
 56
56
-
 57
57
-
 58
58
-
 59
59
-
 60
60


Motorola pro7100 Manuale utente
- Categoria
- Radio a due vie
- Tipo
- Manuale utente
in altre lingue
- English: Motorola pro7100 User manual
Documenti correlati
-
Motorola GM160 Manuale utente
-
-
-
-
-
-
-
-
Motorola CP180 Basic User's Manual