Printek PrinterMaster 700 Printer Guida utente
- Categoria
- Stampanti a matrice di punti
- Tipo
- Guida utente

PrintMaster 700 Series Printer


I
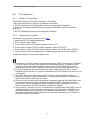
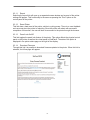
Important Safety Instructions (English)
Read the following instructions thoroughly before starting up your printer.
· Never carry out maintenance or repair work yourself. Always contact a qualified service technician.
· Keep this Operator’s Manual in a place which is easily accessible at all times.
· Place the printer on a solid and even base so that it cannot fall.
· Never place the printer in the vicinity of inflammable gas or explosive substances.
· Ensure the printer is connected to a socket with the correct mains voltage.
· Always disconnect the printer from the mains before opening the device to perform maintenance work
or remedy errors.
· Do not expose the printer to high temperatures, direct sunlight or dust.
· Keep all liquids away from the printer.
· Protect the printer from shock, impact and vibration.
Make sure that the printer and computer are switched off before connecting the data cable.
· The print head will become very hot during printing; avoid contact with the print head after printing has
finished.
· Do not perform any operation or action in any way other than those provided in this manual. When in
doubt, contact your dealer or your customer support.
The device and mains-socket must all times be easily accessible.

For Users of Printek Legacy Matrix Printers (all 85x and 86x series)
Printek has made every effort to ensure a smooth transition of the new PM700 series printers into
operations which presently incorporate our popular legacy matrix printer products. To this end, we have
attempted to use familiar conventions in the PM700 for key concepts such as forms definitions, tractor
switching, network services, etc.
Those users who are very ingrained with the operation and function of Printek’s previous flagship
models will want to review this section first to learn how to directly apply past Printek printer
experience to the operation of their new PM700.
Forms Configuration
As in all Printek model printers, a “FORM” is defined as a specific set of configuration parameters that the
printer uses to drive its printing actions. And like previous models, in the PM700 users may define and
store a number of different forms, using default names for them “Form0, Form1, …….., Form7”. Unlike
previous Printek models, however, only 8 total Forms are available, and users cannot choose and assign
other names to their forms in the PM700. The specific Form you want to be active in the printer can be
selected via the control panel or programmatically, as always. See page 23 for details on the methods
for configuring your PM700.
Tractor Assignment / Tractor Switching (applies to PM702 series only)
Unlike previous Printek models, there is no automatic tractor selection or tractor switching in the PM700
series printers. Tractor selection in the PM700 series is done manually by way of the lever on the
top/right side of the printer. Because of this, no tractor assignment is listed under the Forms menu.
To switch tractors, use the lever on the top/right side of the printer to select the tractor path you want to
use. Unlike Printek legacy models, the PM700 series will allow the use of single sheet paper.
PLEASE NOTE THAT IN PM702 CONFIGURATION THERE IS NO RELATIONSHIP BETWEEN THE
TRACTOR SELECTION AND THE FORM#. ALTHOUGH THE CONFIGURATION PRINTOUT MAY
INDICATE A CERTAIN TRACTOR ASSOCIATED WITH A FORM#, IN OPERATION A PRINTJOB
OCCURS ON THE MEDIA IN THE PRESENT MANUALLY-SELECTED TRACTOR PATH.
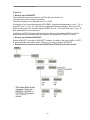
Network Print Services
Setting up your PM700 to work on your IBM or Unix network is the same as in Printek legacy printer
models. There are 7 print services which can be defined and selected, 3 of which are pre-configured for
the user. The naming convention used is exactly the same as in previous Printek models
The three predefined services are Printek_1, Printek_2 and Printek_3.
Printek_1 will load the parameters for Form0.
Printek_2 will load the parameters for Form1.
Printek_3 will load the parameters for Form2.
Emulations
The following print language emulations are available on the PM700;

Epson LQ2550/LQ2170, IBM XL 24, MTPL, Genicom ANSI, PJL
This list is somewhat different than previous Printek printer models. Most importantly, there is no specific
“Printek” emulation in the PM700. If your established print jobs were using Printek emulation, try “Epson”
emulation in the PM700 as a substitute. In most cases, use of the Epson emulation here will provide
identical printout results for users, as the command codes are very similar. Please contact Printek
Technical Support (800-368-4636 x422) if you are experiencing problems or if you have questions
regarding your specific situation.
NOTE THAT THE PM700 IS SHIPPED WITH EPSON EMULATION AS THE DEFAULT
CONFIGURATION.
Display
The printer message display is slightly different on the PM700 than on previous Printek models. Specific
functionality of the control panel and display is described starting on page 23.
PLEASE NOTE THAT IN PM702 CONFIGURATION THERE IS NO RELATIONSHIP BETWEEN THE
TRACTOR SELECTION AND THE FORM#. WHILE ONLINE, THE CONTROL PANEL DISPLAY WILL
ALTERNATE BETWEEN SHOWING PRESENT ACTIVE FORM# AND PRESENT ACTUAL PHYSICAL
TRACTOR SELECTED.
Configuration
In the PM700, configuration is possible via the front control panel or using a computing host, as always.
Configuration via the control panel is described starting on page 23.
In the case of the host-based approach (typically selected when multiple printer parameters need to be
configured), the PM700 has an on-board web page which is accessed using an Ethernet connection and
the web browser on your host computer.
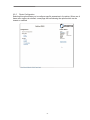
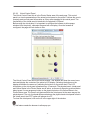
To connect to the printer via the web browser, you must first determine the IP address of the printer. This
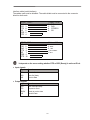
can be obtained by printing out a configuration page:
Install the ribbon cartridge (page 8) and load paper (page 14-default rear feed) into the printer.
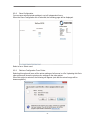
On the control panel of the printer push the SETUP button.
Push the Forms button (1)
Push the Print button (2)
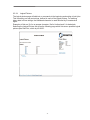
This will printout a configuration page of the printer. At the bottom of the printout under the listing ETH-
INT is the current IP address of the printer.
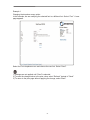
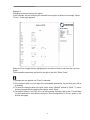
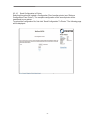
Open a web browser of your choice, i.e. Internet Explorer, Chrome, Firefox.
In the Address Bar of the web browser type the IP address obtained from the configuration printout and
select GO.
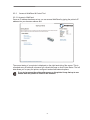
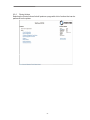
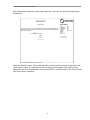
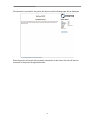
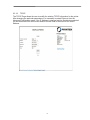
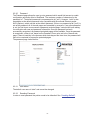
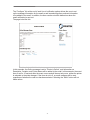
The opening screen of the web interface will appear, WebPanel PM700.
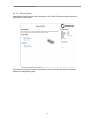
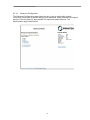
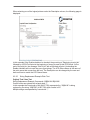
On the right side of the page is the Printer Status information. Below the status settings is a selection for
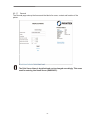
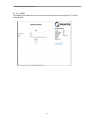
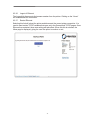
Virtual Control Panel. Click Virtual Control Panel. This will open another window that looks and
functions the same as the control panel on the front of the printer. All printer configurations that can be
done from the front control panel can be done using the Virtual Control Panel. Printer configuration
settings begin on page 23 of the manual.

IX
TRADEMARK ACKNOWLEDGEMENTS
“IBM” is a trademark of International Business Machines Corporation.
“EPSON” is a trademark of Epson America Incorporated.
“DEC” is a trademark of Digital Equipment Corporation.
“Centronics” is a trademark of Centronics Data Computer Corporation.
“DOS” is a trademark of Microsoft Corporation.
“SAP” is a trademark of SAP AG.
All references to “Windows” are trademarks of Microsoft Corporation.
All other product names and company names appearing in this manual are the registered trademarks or
trademarks of the individual companies.

1
TABLE OF CONTENTS
1 Printer at a glance ..................................................................................................................................1
1.1 Unpacking the printer..................................................................................................................... 1
1.2 Remove transport locks ................................................................................................................. 1
1.3 Prepare your printer ....................................................................................................................... 2
1.4 Parts description ............................................................................................................................ 4
2 Installation .............................................................................................................................................. 5
2.1 Placing the printer .......................................................................................................................... 5
2.2 Connecting the printer.................................................................................................................... 5
2.2.1 Parallel interface (IEEE 1284) ............................................................................................. 6
2.2.2 USB 2.0 (Full Speed)........................................................................................................... 6
2.2.3 Ethernet ............................................................................................................................... 6
2.2.4 Serial Interface (RS-232C) as option .................................................................................. 7
2.2.5 Connecting the power.......................................................................................................... 7
2.2.6 Switch on the printer............................................................................................................ 7
2.3 Installing the ribbon cartridge......................................................................................................... 8
3 Installing the paper ............................................................................................................................... 10
3.1 Adjusting the print gap for various form thicknesses................................................................... 10
3.2 Paper path introduction.................................................................................................................11
3.2.1 Cut sheet paper handling (front friction only) .....................................................................11
3.2.2 Fanfold paper handling...................................................................................................... 12
3.2.3 Top-Of-Form adjustment.................................................................................................... 16
4 Control Panel Operation ...........................................................................................................................17
4.1 This section left intentionally blank...................................................................................................... 17
4.2 Operation of the LCD Panel .............................................................................................................. 23
4.2.1 The LC display................................................................................................................... 23
4.2.2 Online mode ...................................................................................................................... 24
4.2.3 Offline mode....................................................................................................................... 24
4.2.4 Setup mode ....................................................................................................................... 25
4.2.5 Power on functions ............................................................................................................ 25
5 Setting parameters for the printer............................................................................................................... 26
5.1 This section left intentionally blank.............................................................................................. 26
5.2 Setting the parameters through the LCD Panel........................................................................... 29
5.2.1 Enabling access to menu mode ........................................................................................ 29
5.2.3 Menu configurations .......................................................................................................... 30
5.2.4 Menu handling ................................................................................................................... 32
5.2.5 Selecting the LC display language .................................................................................... 33
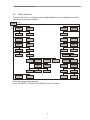
5.3 Menu structure ............................................................................................................................. 34
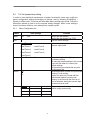
5.4 Full list parameters setting........................................................................................................... 35
5.4.1 Menu Configuration list...................................................................................................... 35
5.4.2 Advanced Menu................................................................................................................. 42
5.5 Display messages........................................................................................................................ 45
5.5.1 This section left intentionally blank.................................................................................... 45
5.5.2 Messages LCD Panel........................................................................................................ 46
6 Web Panel and Internal Ethernet Interface.......................................................................................... 47
6.1 Summary...................................................................................................................................... 47
6.1.1 Introduction ........................................................................................................................ 47
6.1.2 Supported Environments ................................................................................................... 47
6.1.3 Network Interface and Cabling .......................................................................................... 47
6.1.4 Connecting the Printer....................................................................................................... 47

2
6.1.5 Network Interface Status ................................................................................................... 47
6.2 IP Configuration ........................................................................................................................... 48
6.2.1 Network IP Configuration................................................................................................... 48
6.2.2 Assigning the IP Address................................................................................................... 48
6.3 WebPanel..................................................................................................................................... 50
6.3.1 Introduction ........................................................................................................................ 50
6.3.2 Web Browser ..................................................................................................................... 50
6.3.3 Access to WebPanel & Control Tool.................................................................................. 51
6.3.4 Printer Status ..................................................................................................................... 52
6.3.5 Printer Configuration.......................................................................................................... 53
6.3.6 Printer Actions.................................................................................................................... 56
6.3.7 Load Configuration ............................................................................................................ 57
6.3.8 Save Configuration ............................................................................................................ 58
6.3.9 Retrieve Configuration From Printer.................................................................................. 58
6.3.10 Send Configuration to Printer .......................................................................................... 59
6.3.11 Report .............................................................................................................................. 61
6.3.12 Reset Printer.................................................................................................................... 61
6.3.13 Panel Lock On/Off ........................................................................................................... 61
6.3.14 Download Firmware......................................................................................................... 61
6.3.15 Ethernet Status................................................................................................................ 64
6.3.16 Advanced Configuration .................................................................................................. 65
6.3.17 General ............................................................................................................................ 66
6.3.18 TCP/IP ............................................................................................................................. 67
6.3.19 SNMP............................................................................................................................... 68
6.3.20 Password ......................................................................................................................... 69
6.3.21 User Name....................................................................................................................... 69
6.3.22 Resetting Password......................................................................................................... 69
6.3.23 Email Notification............................................................................................................. 70
6.3.24 Logical Printers ................................................................................................................ 72
6.3.25 String Replacement Example Plain Text ......................................................................... 73
6.3.26 Logout of Ethernet ........................................................................................................... 74
6.3.27 Restart Ethernet ............................................................................................................. 74
6.3.28 Virtual Control Panel........................................................................................................ 75
7 Addendum............................................................................................................................................... 76
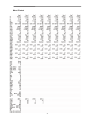
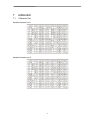
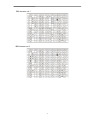
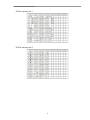
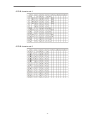
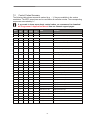
7.1 Character Set............................................................................................................................... 76
7.2 Control Codes Summary.............................................................................................................. 81
7.2.1 PJL commands .................................................................................................................. 90
7.2.2 Barcode.............................................................................................................................. 90
7.2.3 List of available MTPL barcodes ....................................................................................... 91
7.2.4 US Postnet barcode........................................................................................................... 91
7.2.5 Royal Mail Customer barcode ........................................................................................... 92
7.2.6 KIX barcode ....................................................................................................................... 92
7.2.7 USPS Intelligent Mail barcode........................................................................................... 92
7.2.8 LC printing.......................................................................................................................... 92
7.2.9 List of additional control Codes ......................................................................................... 94
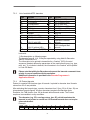
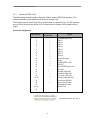
7.3 Interfaces Specifications .............................................................................................................. 95
7.3.1 Parallel I/O IEEE 1284....................................................................................................... 96
7.3.2 Ethernet I/O 10/100 Mulitprotocol...................................................................................... 97
7.3.3 USB 2.0 I/O – Full Speed .................................................................................................. 98
7.3.4 Optional Serial Interface RS232C ..................................................................................... 99
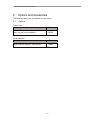
8 Options and accessories.........................................................................................................................104
8.1 Options....................................................................................................................................... 104
8.2 Consumables ............................................................................................................................. 105
8.3 Accessories................................................................................................................................ 105
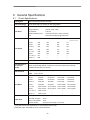
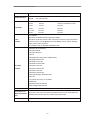
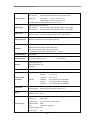
9 General Specifications ......................................................................................................................... 106
9.1 Printer Specifications ................................................................................................................. 106
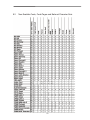
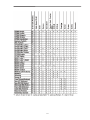
9.2 Non-Scalable Fonts, Code Pages and National Character Sets................................................110
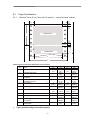
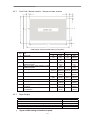
9.3 Paper Specifications ...................................................................................................................112

3
9.3.1 Standard Tractor (Front, Rear and Pull position) – narrow and wide versions ................112
9.3.2 Front Feed / Manual Insertion – Narrow and wide versions ............................................113
9.3.3 Paper Weights ..................................................................................................................113
10 Maintenance..................................................................................................................................... 114
10.1 Cleaning ....................................................................................................................................114
10.1.1 Cleaning and Vacuuming the Printer..............................................................................114
10.1.2 Cleaning the Paper Rollers.............................................................................................114
10.2 Troubleshooting ........................................................................................................................115
10.2.1 Print Quality Problems and Solutions.............................................................................115
10.2.2 Paper Handling Problems and Solutions .......................................................................116
10.2.3 Operating Problems and Solutions.................................................................................116
Symbols used Important information is highlighted in this manual by two
symbols.
CAUTION highlights information which must be observed in
order to prevent injuries to user and damage to the printer.
NOTE highlights general or additional information about a
specific topic.

1
1 Printer at a glance
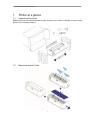
1.1 Unpacking the printer
Besides this manual, the package will contain: a power cord, a ribbon cartridge, a tractor, and 6
pieces of U-wire paper support.
1.2 Remove transport locks

2
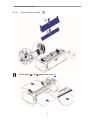
1.3 Prepare your printer
n!Front View
n!Rear View

3
n!For Fanfold
n!For Cut Sheets

4
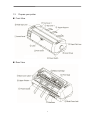
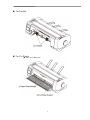
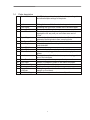
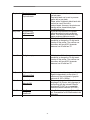
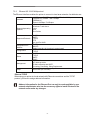
1.4 Parts description
1 Control Panel A LCD display and two keys indicates the operating status
and allows simple settings of the printer.
2 Latch Sliding it down unfolds the cut sheet support.
3 Front Cover Unlocking the front cover unfolds the cut sheets support.
4 Power Switch Turns on and off the printer.
5 Hand Wheel Turn the knob to load or clear the paper. It should be
inserted the full way until you can hears some sort of
“Click”.
6 Paper Support At slanted position, it stacks cut sheets; at flat position, it
separates fanfold printouts from incoming forms.
7 Top Covers 1&2 Protect the internal parts and reduce the noise.
8 Head Gap Lever Adjusts the gap between the print head and various
form thickness.
9 Paper Path Lever Selects various paper sources.
10 Upper Friction Guides the form when cut sheets or fanfold forms are used.
11 Power Socket A power cord is plugged into the socket to supply the
power.
12 Interfaces The interface cable of the host computer is plugged into
one of the interfaces.
13 Mute Cover Latch You must open it before you open the top cover 1.
14 Print Head Utilizes 24 needles to strike on ink ribbon and paper.
15 Ribbon Cartridge Holds the ink ribbon fabric.
16 Tractors Holds and transports fanfold forms.
17 Paper Guides
Left/Right
Sliding the guides varies the form width and the left
margin on a cut sheet.
18 Cut Sheet Support A flat surface supports a sheet or multi-part form.

5
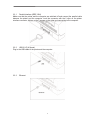
2 Installation
2.1 Placing the printer
Place the printer on a solid, flat, stable surface such that the printer sits firmly and cannot
move. Select an environment with sufficient ventilation, easy access to the control panel and
paper input areas as well as the printed output.
When selecting the printer location, observe the following additional requirements:
1) Never place the printer near to any flammable gas or explosive
substances.
2) Do not expose the printer to direct sunlight. If you cannot avoid
placing the printer near a window, protect it from the sunlight with a
curtain.
3) When connecting a computer to the printer, make sure the maximum
recommended cable length is not exceeded.
4) Ensure sufficient distance between the printer and any heating
devices/radiators.
5) Avoid exposing the printer to extreme temperature or air humidity
fluctuations. Above all, avoid dusty environments.
2.2 Connecting the printer
This printer is configured with a Parallel, USB and Ethernet interface as standard. An optional
Serial interface can be installed additionally.

6
2.2.1 Parallel interface (IEEE 1284)
Make sure that the printer and the computer are switched off and connect the parallel cable
between the printer and the computer. Lock the connector with the 2 clips on the printer
interface connector; tighten up the 2 screws on the other end connecting to the computer.
2.2.2 USB 2.0 (Full Speed)
Plug in the USB cable to the printer and the computer.
2.2.3 Ethernet

7
2.2.4 Serial Interface (RS-232C) as option
2.2.5 Connecting the power
Plug in the power cord to the printer power socket as shown in the diagram.
Connect the printer to the correct voltage power source.
The socket-outlet shall be installed near the equipment and shall
be easily accessible.
2.2.6 Switch on the printer
Switch on the printer as shown in the diagram.

8
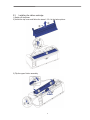
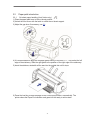
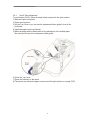
2.3 Installing the ribbon cartridge
1) Switch off the power.
2) Unfold the top cover and follow the steps 1.2.3.4 in the below picture.
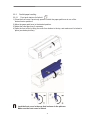
3) Flip the upper friction assembly

9
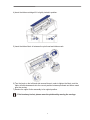
4) Insert the ribbon cartridge till it is tightly locked in position.
5) Insert the ribbon fabric in between the print head and ribbon mask.
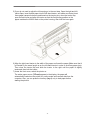
6) Turn the knob on the left hand side several times in order to tighten the fabric, and the
fabric will slide downwards into the correct position between printhead and ribbon mask
after the moving.
7) Restore the upper friction assembly to its original position.
Print head may be hot, please move the printhead by moving the carriage.

10
3 Installing the paper
The printer can handle either single sheets or continuous forms. The printer is able to print up
to 5 copies (original plus 5).
To ensure the print quality and protect the print head, set a proper print gap by the
gap lever (see 3.1) for the form thickness and do not load folded, damaged,
wrinkled, or curled paper.
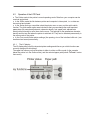
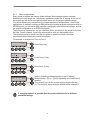
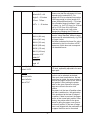
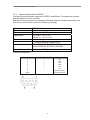
3.1 Adjusting the print gap for various form thicknesses
The print gap lever is on the left side of the printer inside the top cover.
Take care to adjust the print gap lever to a suitable position whenever you change the number
of copies being printed. Using the wrong print gap may cause print head damage or paper
jams.
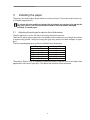
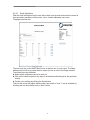
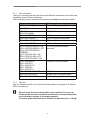
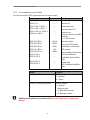
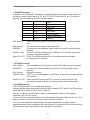
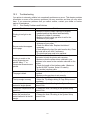
The recommended gap lever position for different form thickness is:
Paper type Lever position
1-part 1
Original + 1 copy 2
Original + 2 copies 3
Original + 3 copies 4
Original + 4 copies 5
Original + 5 copies 6
The position “Ribbon” only is suitable for loading the ribbon. When the lever is set higher than
appropriate it will result in poor print. The ribbon and head life will be shortened.

11
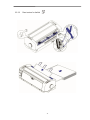
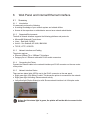
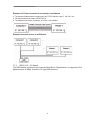
3.2 Paper path introduction
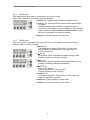
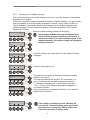
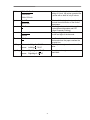
3.2.1 Cut sheet paper handling (front friction only)
1) Place the paper path lever to the cut sheet position.
2) Unlock the front cover with the latch to unfold the cut sheet support.
3) Adjust the gap lever if necessary; see 3.1.
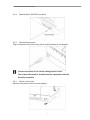
4) It is recommended to align the left paper guide exactly to the mark > I <. This marks the left
edge of the stationery. Slide the right guide to the position of the right edge of the stationery.
5) Insert the stationery straightly all the way into the guided slot until it stops.
6) Press the load key to feed the paper to the correct print position, automatically. The
printer clears the Paper End condition and goes into the ready or online state.
La pagina sta caricando ...
La pagina sta caricando ...
La pagina sta caricando ...
La pagina sta caricando ...
La pagina sta caricando ...
La pagina sta caricando ...
La pagina sta caricando ...
La pagina sta caricando ...
La pagina sta caricando ...
La pagina sta caricando ...
La pagina sta caricando ...
La pagina sta caricando ...
La pagina sta caricando ...
La pagina sta caricando ...
La pagina sta caricando ...
La pagina sta caricando ...
La pagina sta caricando ...
La pagina sta caricando ...
La pagina sta caricando ...
La pagina sta caricando ...
La pagina sta caricando ...
La pagina sta caricando ...
La pagina sta caricando ...
La pagina sta caricando ...
La pagina sta caricando ...
La pagina sta caricando ...
La pagina sta caricando ...
La pagina sta caricando ...
La pagina sta caricando ...
La pagina sta caricando ...
La pagina sta caricando ...
La pagina sta caricando ...
La pagina sta caricando ...
La pagina sta caricando ...
La pagina sta caricando ...
La pagina sta caricando ...
La pagina sta caricando ...
La pagina sta caricando ...
La pagina sta caricando ...
La pagina sta caricando ...
La pagina sta caricando ...
La pagina sta caricando ...
La pagina sta caricando ...
La pagina sta caricando ...
La pagina sta caricando ...
La pagina sta caricando ...
La pagina sta caricando ...
La pagina sta caricando ...
La pagina sta caricando ...
La pagina sta caricando ...
La pagina sta caricando ...
La pagina sta caricando ...
La pagina sta caricando ...
La pagina sta caricando ...
La pagina sta caricando ...
La pagina sta caricando ...
La pagina sta caricando ...
La pagina sta caricando ...
La pagina sta caricando ...
La pagina sta caricando ...
La pagina sta caricando ...
La pagina sta caricando ...
La pagina sta caricando ...
La pagina sta caricando ...
La pagina sta caricando ...
La pagina sta caricando ...
La pagina sta caricando ...
La pagina sta caricando ...
La pagina sta caricando ...
La pagina sta caricando ...
La pagina sta caricando ...
La pagina sta caricando ...
La pagina sta caricando ...
La pagina sta caricando ...
La pagina sta caricando ...
La pagina sta caricando ...
La pagina sta caricando ...
La pagina sta caricando ...
La pagina sta caricando ...
La pagina sta caricando ...
La pagina sta caricando ...
La pagina sta caricando ...
La pagina sta caricando ...
La pagina sta caricando ...
La pagina sta caricando ...
La pagina sta caricando ...
La pagina sta caricando ...
La pagina sta caricando ...
La pagina sta caricando ...
La pagina sta caricando ...
La pagina sta caricando ...
La pagina sta caricando ...
La pagina sta caricando ...
La pagina sta caricando ...
La pagina sta caricando ...
La pagina sta caricando ...
La pagina sta caricando ...
La pagina sta caricando ...
La pagina sta caricando ...
La pagina sta caricando ...
La pagina sta caricando ...
La pagina sta caricando ...
La pagina sta caricando ...
La pagina sta caricando ...
La pagina sta caricando ...
La pagina sta caricando ...
-
 1
1
-
 2
2
-
 3
3
-
 4
4
-
 5
5
-
 6
6
-
 7
7
-
 8
8
-
 9
9
-
 10
10
-
 11
11
-
 12
12
-
 13
13
-
 14
14
-
 15
15
-
 16
16
-
 17
17
-
 18
18
-
 19
19
-
 20
20
-
 21
21
-
 22
22
-
 23
23
-
 24
24
-
 25
25
-
 26
26
-
 27
27
-
 28
28
-
 29
29
-
 30
30
-
 31
31
-
 32
32
-
 33
33
-
 34
34
-
 35
35
-
 36
36
-
 37
37
-
 38
38
-
 39
39
-
 40
40
-
 41
41
-
 42
42
-
 43
43
-
 44
44
-
 45
45
-
 46
46
-
 47
47
-
 48
48
-
 49
49
-
 50
50
-
 51
51
-
 52
52
-
 53
53
-
 54
54
-
 55
55
-
 56
56
-
 57
57
-
 58
58
-
 59
59
-
 60
60
-
 61
61
-
 62
62
-
 63
63
-
 64
64
-
 65
65
-
 66
66
-
 67
67
-
 68
68
-
 69
69
-
 70
70
-
 71
71
-
 72
72
-
 73
73
-
 74
74
-
 75
75
-
 76
76
-
 77
77
-
 78
78
-
 79
79
-
 80
80
-
 81
81
-
 82
82
-
 83
83
-
 84
84
-
 85
85
-
 86
86
-
 87
87
-
 88
88
-
 89
89
-
 90
90
-
 91
91
-
 92
92
-
 93
93
-
 94
94
-
 95
95
-
 96
96
-
 97
97
-
 98
98
-
 99
99
-
 100
100
-
 101
101
-
 102
102
-
 103
103
-
 104
104
-
 105
105
-
 106
106
-
 107
107
-
 108
108
-
 109
109
-
 110
110
-
 111
111
-
 112
112
-
 113
113
-
 114
114
-
 115
115
-
 116
116
-
 117
117
-
 118
118
-
 119
119
-
 120
120
-
 121
121
-
 122
122
-
 123
123
-
 124
124
-
 125
125
-
 126
126


Printek PrinterMaster 700 Printer Guida utente
- Categoria
- Stampanti a matrice di punti
- Tipo
- Guida utente