
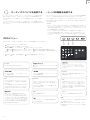
Schnellstartanleitung
Quick Start Guide
Guida Rapida
Guide de démarrage
rapide
Guía de inicio rápido
クイッ クス タートガ イド
Краткое руководство
пользователя
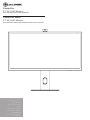
Clarity Pro
27” 4K UHD Monitor
WITH RETRACTABLE 8MP WEBCAM
Clarity Pro Touch
27” 4K UHD Monitor
WITH RETRACTABLE 8MP WEBCAM AND TOUCHSCREEN

Schnellstartanleitung
Quick Start Guide
Guida Rapida
Guide de démarrage rapide
Guía de inicio rápido
クイックス タートガ イド
Краткое руководство
пользователя

3
Content
English ................................................................................................................................................................................................................. 6
Deutsch ............................................................................................................................................................................................................... 11
Lenguas Españolas ......................................................................................................................................................................................... 16
Français ............................................................................................................................................................................................................. 21
Italiano ............................................................................................................................................................................................................... 26
日本語 ................................................................................................................................................................................................................. 31
русский язык ................................................................................................................................................................................................... 41
Designed in Australia. Manufactured in China

4
1
1
3
3
2
2

5
Studs M4 X 4
1
2
3
1
2

6
Contrast Ratio 1000:1
VESA Mounting 100 x 100mm
Display Colors 1.07B
Interface 1x DP 1.4, 2x HDMI 2.0, 1x Type-C, 2x USB-A,
1x USB-B, 1x Audio Out
Power Input DC 19V 7.89A
Audio Speakers: 5Wx2
Audio Out: Yes
Camera 8MP
MIC 4 MIC array
Touch
(Optional for
24C4KPDWT)
OGS Touch, supports 10 points
Low Blue Light Yes
Flicker Free Yes
USB PD Power Delivery Up to 65W power to host computer
1
4
8
5
9
6
10
7
11 12
2 3
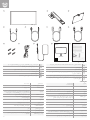
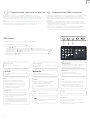
Package Contents
Clarity 27” UHD 4K Monitor
Stand Stem
Stand Base
1m USB-C to USB-C Cable (USB3.2 - Gen1)
1.5m USB-A to USB-B Cable
1.5m DisplayPort to DisplayPort Cable
1.5m HDMI to HDMI Cable
Screws x 4 (for Wall Mounting)
Power Cable (AC 100-240V, 50/60Hz)
Power Adapter
User Manual
Color Delta E Report
1
2
3
4
5
6
7
10
11
12
9
8
Model 27C4KPDW
27C4KPDWT
Screen Size 27”
Dimensions 624mm x 220mm x 565mm (L x W x H)
Weight 7.6 kgs
Material ABS, Glass, Aluminium
Power Adapter Input: AC 100-240V~, 50/60Hz
Output: DC 19V 7.89A, 150W (Max)
Aspect Ratio 16:9
Backlight QD
Brightness 400cd/m2 (Typ.), 350cd/m2(Min.)
Panel IPS
Resolution DP1.4: 3840*2160@60Hz
HDMI2.0: 3840*2160@60Hz
Refresh Rate 60Hz
Viewing Angle 178°(H) / 178°(V)
Specifications
Schnellstartanleitung
Quick Start Gu ide
Guida Rapida
Guide de démar-
rage rapide
Guía de inicio rápido
クイックス タ ート ガ イド
Краткое руководство
пользователя
Clarity Pro
27” 4K UHD Monitor
WITH RETRACTABLE 2MP WEBCAM

7
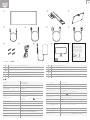
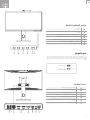
EN
2
1
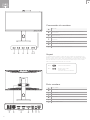
3 4 5 6 7
8 109 11 12 13 14
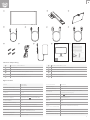
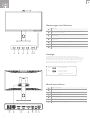
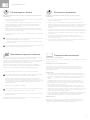
Webcam
Menu: Press to display OSD menu and enter sub-menus
Up/Left: Press to move Up/Left in menus
Down/Right: Press to move Down/Right in menus
Exit: Press to exit OSD menu
Power: Press to turn monitor on/o
LED Indicator and Power Button
1
2
3
Monitor Controls
USB-A Ports
USB-B Port
HDMI Ports
DisplayPort Port
USB-C Port
Audio Output For Headphones Or Powered Speakers
Power Input
Monitor Ports
8
9
10
11
12
13
14
Indicator Light
The indicator light shows steady white to indicate that the power is on and the
monitor is operating normally. The steady blue light indicates that there is no
video source, an invalid signal, or low voltage is detected. Please make sure that
your computer is turned on and all video cables are fully plugged in or connected.
White Operating Normally
No video source
Invalid signal
Low voltage is detected
Blue
4
5
6
7

8
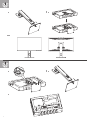
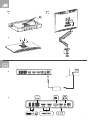
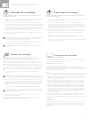
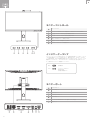
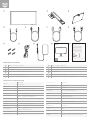
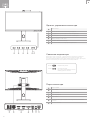
Unpacking and Assembly
1. Open the lid of the monitor box, remove the upper Styrofoam tray containing
the stand and place it to one side.
4. Carefully lift the monitor out of the Styrofoam tray and stand it on the desk
ready for use.
Warning: Do not put pressure on the display area of the monitor while
assembling or moving the monitor. The display screen is fragile - applying
force to it will break the display.
Keep the monitor box and Styrofoam packaging for future transportation
and storage of the monitor.
Warning: Ensure the stand has clicked into place before lifting the monitor.
Before unpacking the stand, ensure that the box is placed on a flat,
clear surface.
Refer to the diagrams on pages 6 and 7
2. Open the soft bag that protects the monitor to reveal where the stand
attaches to the rear of the monitor. Leave the monitor laying in the Styrofoam
tray to avoid damaging it while installing the stand.
3. Insert the top of the monitor stand into the mount on the rear of the monitor
and press downwards on the stand until it clicks into place. Do not use
excessive force to ensure that the monitor is not damaged.
Connecting the Power Cable
Connect the included power cable to the power connector, and then plug the
other end into a wall outlet.
Do not apply pressure to the rear of the monitor while fitting the mounting
accessory - downwards pressure on the screen may crack or otherwise
damage it.
1. Lay the monitor face down in its Styrofoam packaging tray.
2. Locate the mounting spacers in the accessory bag that comes with the
monitor. With the monitor laying in its Styrofoam tray, screw in the four
spacers into the holes in the recess where the stand attaches. Do not over
tighten - tightening the spacers too much may cause damage to the monitor.
3. Screw the VESA mounting accessory into the mounting spacers.
4. Carefully lift the monitor and mounting accessory out of the tray and place
into position.
Ensure there is 50mm clearance around all sides of the monitor when it is
installed to ensure that is does not overheat.
Do not attempt to lay the screen on any uneven surface including soft
surfaces such as carpet and seating while attaching the mounting
accessory - damage to the screen may occur.
Mounting Options
The monitor has 100 x 100mm spaced mounting holes to allow it to be mounted
to any compatible 100mm VESA standard monitor arm or wall mount accessory
(not included).
The mounting holes are recessed in the region on the back of the monitor where
the stand attaches and are hidden by the stand when it is installed. VESA mounts
cannot be used with the monitor while the stand is attached.
M4 threaded mounting spacers are included with the monitor which must be used
when mounting the monitor to a monitor arm or other mount. Mount the monitor
to a VESA mounting accessory as follows.
Connecting a Video Source
The monitor includes four video inputs which can be connected simultaneously.
To connect a computer or other source device, plug one of the included HDMI,
DisplayPort or USB-C cables into the computer and into a corresponding port on
the monitor.
Audio Output
The display features inbuilt speakers as well as an audio output jack to allow
headphones and external speakers to be connected. When an external audio
device is connected, the display’s on-board speakers will be disabled.
Connecting the Monitor
Disassembly and Storage
1. Open the lid of the monitor box, remove the upper Styrofoam tray and place it
to one side.
2. Place the soft bag over the monitor and lay it in face down in the Styrofoam
tray in the box. Ensure that the bag sits flat against the screen of the monitor
and is not folded over itself or bunched up. Excessive bunching of the bag
under the monitor screen may damage the screen when it is laid in the box.
Before disassembling the monitor, ensure that the box is placed on a flat,
clear surface.
3. Open the bag to reveal where the monitor attaches to the stand. Push the
monitor stand latch toward the top edge of the monitor and lift the base of the
stand upwards to release the stand from the monitor.
4. Close the bag and fold neatly over the rear of the monitor. Place the upper
Styrofoam tray on top of the monitor in the box.
5. Undo the screw, separating the base from the stand and place both pieces in
the upper foam packaging tray.
Notes:
- The USB-C connection will provide up to 65W of power to computers which
support USB Power Delivery (USB PD). This allows the computer to display
video on the monitor while being charged over a single cable. As a result, the
USB-C connection type is the best option if your computer has this capability.
- Depending on the capabilities of the computer it may not be able to provide 4K
at a full 60Hz refresh rate if connected to the monitor using HDMI. The USB-C
or DisplayPort connection should be used as a first preference if the computer
supports these connection types.
- Not all USB-C ports on computers support video output and/or charging using
USB PD. If your computer does not show video on the monitor or start charging
when connected to the monitor using USB-C, check that the USB-C port on
the computer supports DisplayPort Alternate Mode video output and USB PD
charging.
- Not all USB-C cables support video transfer or charging above 60W. It is
recommended that you use the USB-C cable supplied with the monitor to
avoid potential issues with cables that have been obtained separately.

9
Connecting the Monitor
EN
The display includes two USB A ports that can be used to attach USB peripherals
such as a keyboard, mouse or webcam to the computer.
In order for the computer to see devices attached to these ports, the computer
must be connected to either (or both) of the USB-C and/or USB-B ports.
Notes:
- If the computer is only connected to the USB-C port on the display the ports will
operate at USB 2.0 speeds because video trac shares the USB-C cable with
the USB data. This speed is sucient for most peripherals such as keyboards,
mice and webcams.
- If the computer is connected to the USB-B port on the display, the ports will
operate at USB 3.0 speeds. This is preferable if using high speed storage
devices such as external hard drives and USB flash drives.
The audio port on the display only supports output devices such as headphones
and speakers. It is not possible to connect microphones or other input devices to
this port. Headphones with built in microphones can be connected to this port,
however the microphone will not function.
To send audio from your computer to the display speakers or connected audio
device, select "27C4KPDW" as the audio destination in your computer's sound
settings.
Connecting Audio Devices Connecting USB Devices
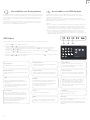
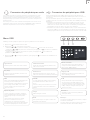
OSD Menu
1. Press to enter the OSD menu.
3. Press or to adjust the setting, then press to confirm your changes and exit.
2. Press or to browse functions.
• Highlight the desired function, then press to enter the sub-menu.
• Press or to browse sub-menus, then press to highlight the desired function.
• Press or to highlight an option, then press to confirm the settings and exit the current screen.
The OSD (On-Screen Display) lets you adjust the settings on your monitor.
2 3 4
Input Signal
3840*2160@60Hz
HDR
HDMI 1
Type-C
HDMI 2 DP
á
Note:
When picture-in-picture is enabled, the rotation
sensor will be disabled.
When the rotation sensor is turned on, rotating the
monitor will disable picture-in-picture.
Picture Settings
Adjust the monitor's Saturation, Sharpness and
Gamma.
Input Signal
Switches between video inputs.
Audio
You can mute or adjust the volume of the
monitor's speakers.
Colour Temperature
Adjust your monitor's colour temperature
between Warm, Cool and User Defined.
Brightness/Contrast
Adjust the Brightness, Shadow Balance and
Contrast.
HDR
Enables the monitor's HDR (High Dynamic
Range) mode, for more vivid colours.
Not all devices and programs support HDR
input, and may look too bright with this
enabled.
OSD Settings
Change the transparency of the OSD menu
and how long it stays on the screen.
Video Presets
Choose between picture presets, including
Standard, Reading, Movie, Night, Comfort,
SRGB and Adobe modes.
Picture in Picture (PIP)
Picture in Picture mode allows Clarity Pro to
display video from two sources at once.
Use this menu to select the sources and
choose how you would like them to be
displayed.
Rotation Sensor
When enabled, Clarity Pro will automatically
switch between portrait and landscape modes
when you rotate the screen.
This is not supported on all computers and
configurations. macOS users may have to
adjust the screen manually using DisplayLink
for portrait mode.
USB Options
You can upgrade your monitor's firmware via
USB, prevent your computer from powering
USB devices while in sleep mode, and switch
which USB port (C or B) Clarity Pro is using for
non-video data.
Language
Set OSD language.
Reset
Reset your monitor to factory default settings.

10
1. To use the in-built webcam, the monitor must be connected to your computer
via either its USB-C or USB-B port.
2. After connecting, navigate to “USB Switch” in the “USB” sub-menu of your
monitor’s option menu and select either “TYPE-C” or “TYPE-B” depending on
which cable you’ve connected.
3. Open any program which uses the webcam, and it will automatically pop-out of
the monitor.
a. You may have to switch from your laptop’s inbuilt webcam to “27C4KPDW”.
1. Use the scroll wheel on the rear of the webcam to adjust the framing.
2. To change picture settings such as brightness and contrast, use your
computer’s settings menu:
a. Windows: Settings -> Bluetooth & devices -> Cameras -> 27C4KPDW
b. macOS: Picture settings can only be adjusted via third-party applications.
c. ChromeOS: Picture settings can only be adjusted on a per-application basis.
The webcam will automatically retract when not being used by any program.
a. Do not try to physically push the webcam back into the monitor, you may
damage it.
b. If webcam does not retract, try unplugging it and plugging it back in.
Setting up the Webcam
Adjusting the Webcam
Retracting the Webcam
Symptom Solution
My computer
isn’t recognising
my webcam
• Try restarting your computer
• Navigate to USB Options -> Switch Active USB in Clarity Pro's OSD and
ensure the selected USB type is the one you're connecting with.
• Try unplugging/disconnecting/disabling other webcams.
My webcam isn’t
sliding out from
my monitor
• Check that the webcam named "27C4KPDW" is selected in your
computer's settings menu.
• Restart the application you want to use the webcam with.
• Ensure you have the correct webcam selected in your video software.
My webcam isn’t
retracting into
my monitor
• Try unplugging your computer from the monitor.
• Try opening and closing an application which uses the webcam.
EN
1. To use the touchscreen, the monitor must be connected to your computer via
either its USB-C or USB-B port.
2. After connecting, navigate to “USB Switch” in the “USB” sub-menu of your
monitor’s option menu and select either “TYPE-C” or “TYPE-B” depending on
which cable you’ve connected.
3. The touchscreen should be automatically recognised by your computer. If not,
consult our troubleshooting section below
Using the Touchscreen (27C4KPDWT Only)
Symptom Solution
My computer
isn’t reacting to
my touch
• Unplug your USB cable from your computer and plug it back in.
• Check you've selected the correct USB cable in your monitor's settings.
• Restart your computer
• Contact ALOGIC support if the above do not resolve your issue.
Warnings
• Only use the monitor indoors in dry locations. Do not use the monitor in damp
places or near water sources such as in bathrooms and kitchens.
• Store and use in a cool, dry, ventilated place. Do not place close to heat sources or
in direct sunlight.
• Ensure that the equipment is installed on a flat, stable surface. If placed on an
uneven or unsteady surface the monitor may fall and be damaged, cause personal
injury or damage other items.
• It is normal for the device to be slightly warm to touch during operation. Provide
adequate ventilation and do not cover the device while in operation.
• Do not cover or block the ventilation holes on the rear cover of the monitor. Do not
use on a bed, sofa, blanket or similar where the monitor may fall over or become
covered.
• The acceptable electrical supply voltage and frequency ranges are indicated on
the label on the rear cover of the monitor. Do not connect the monitor to power
sources which fall outside these limits.
• If the device will not be used for weeks or months, it is recommended that the
power be disconnected to save energy and protect the equipment from damage
caused by lightning strike induced power surges if a thunderstorm occurs.
• Do not insert foreign objects into the ventilation holes in the cover of the monitor as
damage, fire or electric shock could occur.
• The monitor contains no user serviceable parts. Disassembling or attempting to
repair this product yourself will void the warranty and expose you to the risk of
electric shock. If you suspect a fault with the device, please contact the seller you
purchased the product from or ALOGIC after sales support for assistance.
• Do not use the product if it becomes damaged as this could pose a risk of causing
damage to connected devices and expose you to electric shock.
• Do not crush, cut, pull or twist the mains power cord excessively. If the power cord
becomes damaged do not use the product until a replacement power cord can be
obtained. Using a damaged power cord may result in electric shock.
• Do not spray liquids on the monitor. Do not use chemicals such as solvents on
the surface of the monitor. Clean the monitor only by wiping with a clean, dry, soft,
scratch-avoiding microfibre cloth.
• Disassembling or failing to properly use and care for your device will void the
warranty on the product.
• ALOGIC bears no responsibility for damage to the device or incidental damages
arising from improper use or lack of care and is not liable for repair/replacement of
the device or other damages in these circumstances.
Troubleshooting
Symptom Solution
The power
button does not
light up when
pressed
• Verify that the mains power cord is securely attached to the power adapter,
is connected to a power outlet and the power outlet is switched on.
• Verify that the power adapter is securely connected to the rear of the
monitor.
The power
button lights up,
but nothing is
displayed on the
screen
• Disconnect the power adapter from the Monitor and reconnect in 2-3
minutes.
• Press and hold the power button for 5 seconds to reset the monitor
settings.
• Contact ALOGIC Support if the points above do not work.
Monitor does
not show HDMI
or DisplayPort
video from the
computer
• Check that an appropriate video cable is connected between the computer
and display and the correct input is selected on the monitor.
• Check your computer's settings to verify that it is detecting the monitor and
is outputting video to it.
Monitor does
not show USB-C
video from the
computer
• Verify that you are using the USB-C cable that came with the monitor.
• Check your computer's settings to verify that it is detecting the monitor and
is outputting video to it.
• Check that the USB-C port on your computer that the monitor is connected
to supports video output using DisplayPort Alternate Mode (DP Alt. Mode).
Laptop computer
does not charge
when connected
to the monitor
using USB-C
• Verify that the USB-C port on your computer supports charging using the
USB Power Delivery (USB-PD) standard.
• Some laptops require more than 65W of power to charge. These tend to
be high end graphics and gaming focused computers.
• If necessary, connect the power adapter that came with the computer to
your laptop in addition to the USB-C cable that is connected to the monitor.
The terms HDMl and HDMl High-Definition Multimedia lnterface, and the HDMI Logo are trademarks or registered trademarks of HDMI Licensing
Administrator, Inc. in the United States and other countries.
This device complies with part 15 of the FCC Rules. Operation is subject to the following two conditions:
(1) This device may not cause harmful interference,
(2) this device must accept any interference received, including interference that may cause undesired operation.
CAN ICES-3 (B)/NMB-3(B)

11
Kontrastverhältnis 1000:01:00
VESA-Montage 100 x 100mm
Farben der Anzeige 1.07B
Schnittstelle 1x DP 1.4, 2x HDMI 2.0, 1x Type-C, 2x USB-A,
1x USB-B, 1x Audioausgang
Eingang Stromversorgung 19V 7.89A
Audio Lautsprecher: 5Wx2
Audioausgang: Ja
Kamera 8MP
MIC 4 MIC
Touch
(optional für 24C4KPDWT) OGS Touch, 10-Punkt-Unterstützung
Geringes blaues Licht Ja
Flimmerfrei Ja
USB PD Power Delivery Bis zu 65W Stromversorgung zum Hostcomputer
1
4
8
5
9
6
10
7
11 12
2 3
Inhalt der Verpackung
Clarity 27” UHD 4K Monitor
Ständerstab
Basis des Ständers
1 m USB-C-zu-USB-C-Kabel (USB3.2 - Gen1)
USB-A auf USB-B-Kabel, 1,5 m
DisplayPort-zu-DisplayPort-Kabel, 1,5 m
HDMI-zu-HDMI-Kabel, 1,5 m
Schrauben x 4 (für die Wandbefestigung)
Netzkabel (AC 100-240V, 50/60Hz)
Adapter für das Netzteil
Handbuch für den Benutzer
Bericht Color Delta E
1
2
3
4
5
6
7
10
11
12
9
8
Modell 27C4KPDW
27C4KPDWT
Größe des Bildschirms 27”
Abmessungen des Bildschirms 624mm x 220mm x 565mm (L x B x H)
Gewicht 7,6 kgs
Material ABS, Glass, Aluminium
Elektrischer Adapter Eingang: AC 100-240V~, 50/60Hz
Ausgang: DC 19V 7,89A, 150W (Max)
Seitenverhältnis 16:9
Hintergrundbeleuchtung QD
Helligkeit 400cd/m2 (Typ.), 350cd/m2(Min.)
Panel IPS
Auflösung DP1.4: 3840*2160@60Hz
HDMI2.0 : 3840*2160@60Hz
Bildwiederholungsrate 60Hz
Betrachtungswinkel 178°(H) / 178°(V)
Eigenschaften
Schnellstartanleitung
Quick Start Gu ide
Guida Rapida
Guide de démar-
rage rapide
Guía de inicio rápido
クイックス タ ート ガ イド
Краткое руководство
пользователя
Clarity Pro
27” 4K UHD Monitor
WITH RETRACTABLE 2MP WEBCAM
DE

12
DE
2
1
3 4 5 6 7
8 109 11 12 13 14
Webcam
Menü: Drücken Sie, um das OSD-Menü anzuzeigen und in die
Untermenüs zu gelangen.
Oben/Links: Drücken Sie, um sich in den Menüs nach oben/links
zu bewegen.
Unten/Rechts: Drücken Sie, um sich in den Menüs nach unten/rechts
zu bewegen.
Beenden: Drücken Sie, um das OSD-Menü zu verlassen.
Ein/Aus: Drücken Sie, um den Monitor ein-/auszuschalten.
LED-Anzeige und Ein/Aus-Taste
1
2
3
Steuerungen des Monitors
USB-A-Anschlüsse
USB-B-Anschluss
HDMI-Anschlüsse
Display-Anschluss
USB-C-Anschluss
Audioausgang für Kopörer oder strombetriebene Lautsprecher.
Eingang für Stromversorgung
Monitoranschlüsse
8
9
10
11
12
13
14
Anzeige
Die LED-Anzeige leuchtet konstant weiß, um anzuzeigen, dass die
Stromversorgung eingeschaltet ist und der Monitor normal funktioniert. Eine
stetig blau leuchtende LED zeigt an, dass keine Videoquelle vorhanden ist,
ein ungültiges Signal vorliegt oder eine niedrige Spannung erkannt wurde.
Vergewissern Sie sich, dass Ihr Computer eingeschaltet ist und dass alle
Videokabel vollständig eingesteckt oder angeschlossen sind.
Weiß Normaler Betrieb
Keine Videoquelle
Ungültiges Signal
Eine niedrige Spannung wird
erkannt
Blau
4
5
6
7

13
DE
Auspacken und Zusammenbau
1. Önen Sie den Deckel der Monitorbox, nehmen Sie die obere Styroporplatte
mit dem Ständer heraus und legen Sie sie beiseite.
4. Ziehen Sie den Monitor vorsichtig aus der Styroporschale und legen Sie ihn
auf den Schreibtisch, um ihn zu verwenden.
Achtung: Üben Sie keinen Druck auf den Anzeigebereich des Monitors aus,
wenn Sie den Monitor zusammenbauen oder bewegen. Der Bildschirm ist
zerbrechlich, und jeglicher Druck auf den Bildschirm kann ihn zerbrechen.
Bewahren Sie den Monitorkarton und die Styroporverpackung für den
späteren Transport und die Lagerung des Monitors auf.
Achtung: Vergewissern Sie sich, dass der Ständer eingerastet ist, bevor Sie
den Monitor anheben.
Bevor Sie den Monitor auspacken, vergewissern Sie sich, dass die Box
auf einer ebenen, freien Fläche steht.
Beachten Sie die Diagramme auf den Seiten 6 und 7.
2. Önen Sie die weiche Tasche, die den Monitor schützt, um die Stelle
freizulegen, an der der Ständer an der Rückseite des Monitors befestigt
ist. Lassen Sie den Monitor auf der Styroporplatte liegen, damit er beim
Anbringen des Ständers nicht beschädigt wird.
3. Führen Sie den oberen Teil des Monitorständers in die Halterung auf der
Rückseite des Monitors ein und drücken Sie den Ständer nach unten,
bis er einrastet. Üben Sie nicht zu viel Kraft aus, um den Monitor nicht zu
beschädigen.
Anschließen des Netzkabels
Schließen Sie das mitgelieferte Netzkabel an den Netzanschluss an, und stecken
Sie das andere Ende in eine Steckdose.
Üben Sie beim Anbringen des Montagezubehörs keinen Druck auf die
Rückseite des Monitors aus - ein Druck nach unten auf den Bildschirm kann
Risse oder andere Schäden verursachen.
1. Legen Sie den Monitor mit der Vorderseite nach unten in seine Styropor-
Verpackungsschale.
2. Suchen Sie die Montageabstandshalter in der Zubehörtasche, die dem
Monitor beiliegt. Legen Sie den Monitor in die Styroporablage und schrauben
Sie die vier Abstandshalter in die Löcher in der Aussparung, an der der
Standfuß befestigt ist. Ziehen Sie die Abstandshalter nicht zu fest an - wenn
Sie sie zu fest anziehen, kann der Monitor beschädigt werden.
3. Schrauben Sie das VESA-Montagezubehör in die Montageabstandshalter.
4. Heben Sie den Monitor und das Montagezubehör vorsichtig aus dem Fach
und bringen Sie es in Position.
Achten Sie darauf, dass an allen Seiten des Monitors ein Abstand von 50 mm
eingehalten wird, um eine Überhitzung des Monitors zu vermeiden.
Versuchen Sie nicht, den Bildschirm beim Anbringen des Montagezubehörs
auf eine unebene Oberfläche zu legen, auch nicht auf weiche Oberflächen
wie Teppiche oder Sitzmöbel - der Bildschirm könnte beschädigt werden.
Montageoptionen
Der Monitor verfügt über 100 x 100 mm große Befestigungslöcher, mit
denen er an jedem kompatiblen 100-mm-VESA-Standard-Monitorarm oder
Wandmontagezubehör (nicht im Lieferumfang enthalten) befestigt werden kann.
Die Befestigungslöcher sind in den Bereich auf der Rückseite des Monitors
eingelassen, an dem der Standfuß befestigt wird, und werden durch den
Standfuß verdeckt, wenn er installiert ist. VESA-Halterungen können nicht mit
dem Monitor verwendet werden, wenn der Standfuß angebracht ist.
Im Lieferumfang des Monitors sind Abstandshalter mit M4-Gewinde enthalten,
die bei der Montage des Monitors an einem Monitorarm oder einer anderen
Halterung verwendet werden müssen. Befestigen Sie den Monitor wie folgt an
einem VESA-Montagezubehör.
Anschließen einer Videoquelle
Der Monitor verfügt über vier Videoeingänge, die gleichzeitig angeschlossen
werden können. Um einen Computer oder ein anderes Quellgerät anzuschließen,
stecken Sie eines der mitgelieferten HDMI-, DisplayPort- oder USB-C-Kabel in den
Computer und in einen entsprechenden Anschluss am Monitor.
Audio-Ausgang
Das Display verfügt über eingebaute Lautsprecher und eine
Audioausgangsbuchse, an die Kopörer und externe Lautsprecher
angeschlossen werden können. Wenn ein externes Audiogerät angeschlossen
ist, werden die eingebauten Lautsprecher des Displays deaktiviert.
Anschließen des Monitors
Demontage und Lagerung
1. Önen Sie den Deckel der Monitorbox, nehmen Sie die obere Styroporplatte
heraus und legen Sie sie beiseite.
2. Legen Sie die weiche Tasche auf den Monitor und legen Sie sie mit der
Vorderseite nach unten in die Styroporschale des Kartons. Achten Sie darauf,
dass die Tasche flach am Bildschirm des Monitors anliegt, nicht in sich
zusammengefaltet ist und nicht gestapelt wird. Wenn die Tasche zu stark
unter den Monitorbildschirm gefaltet wird, kann der Bildschirm beschädigt
werden, wenn er in die Box gelegt wird.
Bevor Sie den Monitor auseinanderbauen, vergewissern Sie sich, dass der
Karton auf einer ebenen und freien Fläche steht.
3. Önen Sie die Tasche, um zu sehen, wo der Monitor am Ständer befestigt ist.
Drücken Sie die Verriegelung des Monitorständers in Richtung der Oberkante
des Monitors und heben Sie die Basis des Ständers nach oben, um den
Ständer vom Monitor zu lösen.
4. Schließen Sie den Beutel und falten Sie ihn sauber über die Rückseite des
Monitors. Legen Sie die obere Styroporschale auf den Monitor im Karton.
5. Lösen Sie die Schraube, trennen Sie den Sockel vom Standfuß und legen Sie
beide Teile in die obere Styroporschale.
Hinweise:
- Der USB-C-Anschluss liefert bis zu 65 W Strom an Computer, die USB Power
Delivery (USB PD) unterstützen. Dadurch kann der Computer Videos auf dem
Monitor anzeigen, während er über ein einziges Kabel aufgeladen wird. Daher
ist der USB-C-Anschlusstyp die beste Option, wenn Ihr Computer über diese
Fähigkeit verfügt.
- Je nach den Fähigkeiten des Computers ist er möglicherweise nicht in der
Lage, 4K mit einer vollen Bildwiederholfrequenz von 60 Hz bereitzustellen,
wenn er über HDMI an den Monitor angeschlossen ist. Die USB-C- oder
DisplayPort-Verbindung sollte als erste Präferenz verwendet werden, wenn der
Computer diese Verbindungstypen unterstützt.
- Nicht alle USB-C-Anschlüsse an Computern unterstützen die Videoausgabe
und/oder das Aufladen über USB PD. Wenn Ihr Computer kein Video auf dem
Monitor anzeigt oder den Ladevorgang nicht startet, wenn er über USB-C
mit dem Monitor verbunden ist, überprüfen Sie, ob der USB-C-Anschluss am
Computer die Videoausgabe über DisplayPort Alternate Mode und das Laden
über USB PD unterstützt.
- Nicht alle USB-C-Kabel unterstützen die Videoübertragung oder das Aufladen
mit mehr als 60 W. Es wird empfohlen, das mit dem Monitor gelieferte USB-C-
Kabel zu verwenden, um mögliche Probleme mit separat erworbenen Kabeln
zu vermeiden.

14
DE
Der Bildschirm verfügt über zwei USB-Anschlüsse des Typs A, über die
USB-Peripheriegeräte wie Tastatur, Maus oder Webcam an den Computer
angeschlossen werden können.
Damit der Computer die an diesen Anschlüssen angeschlossenen Geräte
erkennen kann, muss der Computer an einen (oder beide) der USB-C- und/oder
USB-B-Anschlüsse angeschlossen sein.
Hinweise:
- Wenn der Computer nur mit dem USB-C-Anschluss des Displays verbunden ist,
arbeiten die Anschlüsse mit USB 2.0-Geschwindigkeit, da der Videoverkehr
das USB-C-Kabel mit den USB-Daten teilt. Diese Geschwindigkeit ist für die
meisten Peripheriegeräte wie Tastaturen, Mäuse und Webcams ausreichend.
- Wenn der Computer mit dem USB-B-Anschluss des Displays verbunden ist,
arbeiten die Anschlüsse mit USB 3.0-Geschwindigkeit. Dies ist vorteilhaft,
wenn Sie Hochgeschwindigkeits-Speichergeräte wie externe Festplatten und
USB-Flash-Laufwerke verwenden.
Der Audioanschluss des Monitors unterstützt nur Ausgabegeräte wie Kopörer
und Lautsprecher. Es ist nicht möglich, Mikrofone oder andere Eingabegeräte an
diesen Anschluss anzuschließen. Kopörer mit eingebautem Mikrofon können
an diesen Anschluss angeschlossen werden, das Mikrofon funktioniert dann
jedoch nicht.
Um Audiosignale von Ihrem Computer an die Display-Lautsprecher oder ein
angeschlossenes Audiogerät zu senden, wählen Sie in den Toneinstellungen
Ihres Computers "27C4KPDW" als Audioziel aus.
Anschließen von Audiogeräten Anschließen von USB-Geräten
OSD-Menü
1. Drücken Sie um das OSD-Menü aufzurufen.
3. Drücken Sie oder um die Einstellung anzupassen, und drücken Sie dann tum Ihre Änderungen zu
bestätigen und den Bildschirm zu verlassen.
2. Drücken Sie oder , um durch die Funktionen zu blättern.
• Markieren Sie die gewünschte Funktion, und drücken Sie dann um das Untermenü aufzurufen.
• Drücken Sie oder um die Untermenüs zu durchsuchen, und drücken Sie dann um die
gewünschte Funktion zu markieren.
• Drücken Sie oder t um eine Option zu markieren, und drücken Sie dann um die Einstellungen
zu bestätigen und den aktuellen Bildschirm zu verlassen.
Über das OSD (On-Screen-Display) können Sie die Einstellungen Ihres Monitors anpassen.
2 3 4
3840*2160@60Hz
HDR
HDMI 1
Type-C
HDMI 2 DP
á
Anmerkung:
Wenn die Bild-in-Bild-Funktion aktiviert ist, wird der
Rotationssensor deaktiviert.
Wenn der Rotationssensor eingeschaltet ist, wird
durch Drehen des Monitors die Bild-in-Bild-Funktion
deaktiviert.
Bildeinstellungen
Stellen Sie Sättigung, Schärfe und Gamma des
Monitors ein.
Eingangssignal
Schaltet zwischen den Videoeingängen um.
Audio
Sie können die Lautstärke der Lautsprecher
des Monitors stummschalten oder einstellen.
C.T-Einstellungen
Passen Sie die Farbtemperatur Ihres Monitors
zwischen Warm, Kühl und Benutzerdefiniert an.
Helligkeit/Kontrast
Passen Sie die Helligkeit, die Schattenbalance
und den Kontrast an.
HDR
Aktiviert den HDR-Modus (High Dynamic
Range) des Monitors, um lebendigere Farben
zu erhalten.
Nicht alle Geräte und Programme unterstützen
die HDR-Eingabe und können bei aktivierter
Option zu hell erscheinen.
OSD-Einstellungen
Ändern Sie die Transparenz des OSD-Menüs
und wie lange es auf dem Bildschirm bleibt.
Kontext.Modell
Wählen Sie zwischen Bildvoreinstellungen,
einschließlich Standard, Lesen, Film, Nacht,
Komfort, SRGB und Adobe.
PIP/PBP
Im Modus Bild im Bild kann Clarity Pro Videos
von zwei Quellen gleichzeitig anzeigen.
Verwenden Sie dieses Menü, um die Quellen
auszuwählen und festzulegen, wie sie
angezeigt werden sollen.
Schwerkr.Sens.
Wenn diese Funktion aktiviert ist, wechselt
Clarity Pro automatisch zwischen Hoch- und
Querformat, wenn Sie den Bildschirm drehen.
Dies wird nicht von allen Computern und
Konfigurationen unterstützt. macOS-Benutzer
müssen den Bildschirm möglicherweise
manuell mit DisplayLink für den
Hochformatmodus einstellen.
USBSie können die Firmware Ihres Monitors
über USB aktualisieren, verhindern, dass Ihr
Computer USB-Geräte im Ruhezustand mit
Strom versorgt, und umschalten, welchen
USB-Anschluss (C oder B) Clarity Pro für Nicht-
Videodaten verwendet.
Sprache
Legen Sie die OSD-Sprache fest.
Rücksetzen
Setzen Sie Ihren Monitor auf die
Werkseinstellungen zurück.
Eingangssignal

15
Anschließen von USB-Geräten
1. Um die integrierte Webcam verwenden zu können, muss der Monitor entweder
über den USB-C- oder den USB-B-Anschluss mit Ihrem Computer verbunden
sein.
2. Navigieren Sie nach dem Anschluss zu "USB Switch" im Untermenü "USB"
des Optionsmenüs Ihres Monitors und wählen Sie entweder "TYPE-C" oder
"TYPE-B", je nachdem, welches Kabel Sie angeschlossen haben.
3. Önen Sie ein beliebiges Programm, das die Webcam verwendet, und sie wird
automatisch aus dem Monitor herausspringen.
a. Möglicherweise müssen Sie von der eingebauten Webcam Ihres Laptops auf
"27C4KPDW" umschalten.
1. Verwenden Sie das Scrollrad auf der Rückseite der Webcam, um den
Bildausschnitt einzustellen.
2. Um Bildeinstellungen wie Helligkeit und Kontrast zu ändern, verwenden Sie
das Einstellungsmenü Ihres Computers:
a. a. Windows: Einstellungen -> Bluetooth & Geräte -> Kameras -> 27C4KPDW
b. macOS: Die Bildeinstellungen können nur über Drittanbieterprogramme
angepasst werden.
c. ChromeOS: Die Bildeinstellungen können nur pro Anwendung angepasst
werden.
Die Webcam wird automatisch eingezogen, wenn sie nicht von einem Programm
verwendet wird.
a. Versuchen Sie nicht, die Webcam physisch in den Monitor zurückzuschieben,
Sie könnten sie beschädigen.
b. Wenn sich die Webcam nicht einfahren lässt, versuchen Sie, sie auszustecken
und wieder einzustecken.
Einrichten der Webcam
Einstellen der Webcam
Einfahren der Webcam
Symptom Lösung
Mein Computer
erkennt meine
Webcam nicht
• Versuchen Sie, Ihren Computer neu zu starten
• Navigieren Sie im OSD von Clarity Pro zu USB-Optionen -> Aktiven USB
umschalten und vergewissern Sie sich, dass der ausgewählte USB-Typ
derjenige ist, mit dem Sie sich verbinden.
• Versuchen Sie, andere Webcams abzustecken/abzutrennen/zu
deaktivieren.
Meine Webcam
lässt sich nicht
aus dem Monitor
herausziehen
• Vergewissern Sie sich, dass die Webcam mit dem Namen "27C4KPDW" im
Einstellungsmenü Ihres Computers ausgewählt ist.
• Starten Sie die Anwendung, mit der Sie die Webcam verwenden möchten,
neu.
• Vergewissern Sie sich, dass Sie die richtige Webcam in Ihrer Videosoftware
ausgewählt haben.
Meine Webcam
lässt sich nicht in
meinen Monitor
ahren
• Trennen Sie den Computer versuchsweise vom Monitor.
• Versuchen Sie, eine Anwendung, die die Webcam verwendet, zu önen
und zu schließen.
DE
1. Um den Touchscreen zu verwenden, muss der Monitor entweder über den
USB-C- oder den USB-B-Anschluss mit Ihrem Computer verbunden sein.
2. Navigieren Sie nach dem Anschluss im Untermenü "USB" des Optionsmenüs
Ihres Monitors zu "USB-Schalter" und wählen Sie entweder "TYP-C" oder
"TYP-B", je nachdem, welches Kabel Sie angeschlossen haben.
3. Der Touchscreen sollte automatisch von Ihrem Computer erkannt werden. Ist
dies nicht der Fall, lesen Sie den Abschnitt zur Fehlerbehebung weiter unten
Verwenden des Touchscreens
(nur 27C4KPDWT)
Symptom Lösung
Mein Computer
reagiert nicht
auf meine
Berührungen
• Ziehen Sie das USB-Kabel vom Computer ab und schließen Sie es wieder an.
• Überprüfen Sie, ob Sie in den Einstellungen Ihres Monitors das richtige USB-
Kabel ausgewählt haben.
• Starten Sie Ihren Computer neu.
• Wenden Sie sich an den ALOGIC-Support, wenn die oben genannten
Maßnahmen Ihr Problem nicht beheben können.
Warnungen
• Verwenden Sie den Monitor nur in trockenen Innenräumen. Verwenden Sie den Monitor
nicht an feuchten Orten oder in der Nähe von Wasserquellen wie in Badezimmern und
Küchen.
• An einem kühlen, trockenen und belüfteten Ort lagern und verwenden. Nicht in der Nähe
von Wärmequellen oder in direktem Sonnenlicht aufstellen.
• Stellen Sie sicher, dass das Gerät auf einer ebenen, stabilen Oberfläche installiert wird.
Wenn der Monitor auf einer unebenen oder instabilen Oberfläche aufgestellt wird,
kann er herunterfallen und beschädigt werden, Verletzungen verursachen oder andere
Gegenstände beschädigen.
• Es ist normal, dass sich das Gerät während des Betriebs etwas warm anfühlt. Sorgen Sie
für ausreichende Belüftung und decken Sie das Gerät während des Betriebs nicht ab.
• Verdecken oder blockieren Sie nicht die Lüftungsönungen an der hinteren Abdeckung
des Monitors. Verwenden Sie es nicht auf einem Bett, Sofa, einer Decke oder ähnlichem,
wo der Monitor umfallen oder abgedeckt werden könnte.
• Die zulässige elektrische Versorgungsspannung und die Frequenzbereiche sind auf dem
Etikett auf der Rückseite des Monitors angegeben. Schließen Sie den Monitor nicht an
Stromquellen an, die außerhalb dieser Grenzen liegen.
• Wenn das Gerät wochen- oder monatelang nicht verwendet wird, wird empfohlen, die
Stromversorgung zu unterbrechen, um Energie zu sparen und das Gerät vor Schäden
durch Blitzeinschläge bei Gewitter zu schützen.
• Führen Sie keine Fremdkörper in die Lüftungsönungen in der Abdeckung des Monitors
ein, da dies zu Beschädigungen, Feuer oder elektrischen Schlägen führen könnte.
• Der Monitor enthält keine vom Benutzer zu wartenden Teile. Das Zerlegen oder der
Versuch, dieses Produkt selbst zu reparieren, führt zum Erlöschen der Garantie und setzt
Sie dem Risiko eines Stromschlags aus. Wenn Sie einen Fehler am Gerät vermuten,
wenden Sie sich bitte an den Verkäufer, bei dem Sie das Produkt gekauft haben, oder an
den ALOGIC-Kundendienst, um Unterstützung zu erhalten.
• Verwenden Sie das Produkt nicht, wenn es beschädigt ist, da dies ein Risiko darstellen
könnte, angeschlossene Geräte zu beschädigen und Sie einem Stromschlag auszusetzen.
• Quetschen, schneiden, ziehen oder verdrehen Sie das Netzkabel nicht übermäßig. Wenn
das Netzkabel beschädigt ist, verwenden Sie das Produkt nicht, bis ein Ersatzkabel
beschat werden kann. Die Verwendung eines beschädigten Netzkabels kann zu einem
Stromschlag führen.
• Sprühen Sie keine Flüssigkeiten auf den Monitor. Verwenden Sie keine Chemikalien
wie Lösungsmittel auf der Oberfläche des Monitors. Reinigen Sie den Monitor nur durch
Abwischen mit einem sauberen, trockenen, weichen, kratzerfreien Mikrofasertuch.
• Wenn Sie Ihr Gerät zerlegen oder nicht ordnungsgemäß verwenden und pflegen, erlischt
die Garantie für das Produkt.
• ALOGIC übernimmt keine Verantwortung für Schäden am Gerät oder zufällige Schäden,
die durch unsachgemäßen Gebrauch oder mangelnde Sorgfalt entstehen, und haftet
unter diesen Umständen nicht für Reparatur/Austausch des Geräts oder andere Schäden.
Fehlersuche
Symptom Lösung
Die Einschalttaste
leuchtet nicht auf,
wenn sie gedrückt
wird
• Vergewissern Sie sich, dass das Netzkabel fest mit dem Netzteil verbunden
ist, an eine Steckdose angeschlossen ist und die Steckdose eingeschaltet ist.
• Vergewissern Sie sich, dass der Netzadapter fest mit der Rückseite des
Monitors verbunden ist.
Die Einschalttaste
leuchtet auf, aber
auf dem Bild-
schirm wird nichts
angezeigt
• Trennen Sie den Netzadapter vom Monitor und schließen Sie ihn nach 2-3
Minuten wieder an.
• Halten Sie die Einschalttaste 5 Sekunden lang gedrückt, um die
Monitoreinstellungen zurückzusetzen.
• Wenden Sie sich an den ALOGIC-Support, wenn die oben genannten Punkte
nicht funktionieren.
Der Monitor zeigt
kein HDMI- oder
DisplayPort-Video
vom Computer an
• Vergewissern Sie sich, dass ein geeignetes Videokabel zwischen Computer
und Monitor angeschlossen und der richtige Eingang am Monitor ausgewählt
ist.
• Überprüfen Sie die Einstellungen Ihres Computers, um sicherzustellen, dass
er den Monitor erkennt und Video an ihn ausgibt.
Der Monitor zeigt
kein USB-C-Video
vom Computer an
• Vergewissern Sie sich, dass Sie das USB-C-Kabel verwenden, das mit dem
Monitor geliefert wurde.
• Überprüfen Sie die Einstellungen Ihres Computers, um sicherzustellen, dass
er den Monitor erkennt und Video an ihn ausgibt.
• Überprüfen Sie, ob der USB-C-Anschluss an Ihrem Computer, an den
der Monitor angeschlossen ist, die Videoausgabe über den DisplayPort-
Alternativmodus (DP Alt. Mode) unterstützt.
Der Laptop-Com-
puter wird nicht
aufgeladen, wenn
er über USB-C an
den Monitor
angeschlossen ist
• Stellen Sie sicher, dass der USB-C-Anschluss an Ihrem Computer das
Aufladen mit dem USB Power Delivery (USB-PD)-Standard unterstützt.
• Einige Laptops benötigen mehr als 65 W zum Aufladen. Dies sind in der
Regel High-End-Grafik- und Gaming-Computer.
• Verbinden Sie bei Bedarf zusätzlich zum USB-C-Kabel, das mit dem Monitor
verbunden ist, das mit dem Computer gelieferte Netzteil mit Ihrem Laptop.
Die Begrie HDMl und HDMl High-Definition Multimedia lnterface und das HDMI-Logo sind Warenzeichen oder eingetragene Warenzeichen von HDMI
Licensing Administrator, Inc. in den Vereinigten Staaten und anderen Ländern.
Dieses Gerät entspricht Teil 15 der FCC-Bestimmungen. Der Betrieb unterliegt den folgenden zwei Bedingungen:
(1)Dieses Gerät darf keine schädlichen Störungen verursachen,
(2)Dieses Gerät muss alle empfangenen Störungen akzeptieren, einschließlich Störungen, die einen unerwünschten Betrieb verursachen können.
CAN ICES-3 (B)/NMB-3(B)
HOCHAUFLÖSENDE MULTIMEDIA-SCHNITTSTELLE

16
Relación de contraste 1000:01:00
Montaje VESA 100 x 100mm
Colores de pantalla 1.07B
Interfaz 1x DP 1.4, 2x HDMI 2.0, 1x Tipo-C, 2x USB-A,
1x USB-B, 1x salida de audio
Entrada de alimentación CC 19V 7.89A
Audio Altavoces 5Wx2
Salida de audio: Sí
Cámara 8MP
MIC 4 MIC array
Táctil
(opcional para
24C4KPDWT)
OGS Touch, soporta 10 puntos
Luz azul baja Sí
Sin parpadeos Sí
USB PD Power Delivery Up to 65W power to host computer
1
4
8
5
9
6
10
7
11 12
2 3
Contenido del paquete
Monitor Clarity 27" UHD 4K
Soporte
Base de soporte
Cable USB-C a USB-C de 1 m (USB3.2 - Gen1)
Cable USB-A a USB-B de 1,5 m
Cable de DisplayPort a DisplayPort de 1,5 m
Cable HDMI a HDMI de 1,5 m
4 tornillos (para montaje en pared)
Cable de alimentación (CA 100-240 V, 50/60 Hz)
Adaptador de corriente
Manual del usuario
Informe Delta E en color
1
2
3
4
5
6
7
10
11
12
9
8
Modelo 27C4KPDW
27C4KPDWT
Tamaño de la pantalla 27”
Dimensiones 624 mm x 220 mm x 565 mm (largo x ancho x alto)
Peso 7,6 kgs
Material ABS, Cristal, Aluminio
Adaptador de corriente Entrada: AC 100-240V~, 50/60Hz
Salida: DC 19V 7,89A, 150W (Max)
Relación de aspecto 16:9
Luz de fondo QD
Brillo 400cd/m2 (Typ.), 350cd/m2(Min.)
Panel IPS
Resolución DP1.4: 3840*2160@60Hz
HDMI2.0: 3840*2160@60Hz
Frecuencia de actualización 60Hz
Ángulo de visión 178°(H) / 178°(V)
Especificaciones
Schnellstartanleitung
Quick Start Gu ide
Guida Rapida
Guide de démar-
rage rapide
Guía de inicio rápido
クイックス タ ート ガ イド
Краткое руководство
пользователя
Clarity Pro
27” 4K UHD Monitor
WITH RETRACTABLE 2MP WEBCAM

17
ES
2
1
3 4 5 6 7
8 109 11 12 13 14
Webcam
Menú: Pulse para mostrar el menú OSD y entrar en los submenús
Arriba/Izquierda: Pulse para moverse arriba/izquierda en los menús
Abajo/Derecha: Pulse para desplazarse hacia abajo/derecha en
los menús
Salir: Pulse para salir del menú OSD
Encendido: Pulse para encender/apagar el monitor
Indicador LED y botón de encendido
1
2
3
Controles del monitor
Puertos USB-A
Puerto USB-B
Puertos HDMI
Puerto DisplayPort
Puerto USB-C
Salida de audio para auriculares o altavoces
Entrada de alimentación
Puertos del monitor
8
9
10
11
12
13
14
Indicador luminoso
El indicador luminoso blanco fijo indica que la alimentación está conectada y que
el monitor funciona con normalidad. La luz azul fija indica que no hay fuente de
vídeo, que se ha detectado una señal no válida o una tensión baja. Asegúrese de
que el ordenador está encendido y de que todos los cables de vídeo están bien
enchufados o conectados.
Blanco Funcionamiento normal
No hay fuente de vídeo
Señal no válida
Se detecta baja tensión
Azul
4
5
6
7

18
Desembalaje y montaje
1. Abra la tapa de la caja del monitor, retire la bandeja superior de espuma de
poliestireno que contiene el soporte y colóquela a un lado.
4. Saque con cuidado el monitor de la bandeja de espuma de poliestireno y
colóquelo sobre el escritorio listo para su uso.
Advertencia: No ejerza presión sobre la zona de visualización del monitor
mientras lo monta o lo mueve. La pantalla es frágil y si se aplica fuerza
sobre ella se romperá.
Conserve la caja del monitor y el embalaje de espuma de poliestireno para
el futuro transporte y almacenamiento del monitor.
Advertencia: Asegúrese de que el soporte ha encajado en su sitio antes de
levantar el monitor.
Antes de desembalar el soporte, asegúrese de que la caja está colocada
sobre una superficie plana y despejada.
Consulte los diagramas de las páginas 6 y 7
2. Abra la bolsa blanda que protege el monitor para ver dónde se fija el soporte
en la parte posterior del monitor. Deja el monitor en la bandeja de espuma de
poliestireno para evitar dañarlo mientras instalas el soporte.
3. Inserte la parte superior del soporte del monitor en la montura de la parte
posterior del monitor y presione hacia abajo el soporte hasta que encaje en
su sitio. No ejerza demasiada fuerza para no dañar el monitor.
Conexión del cable de alimentación
Conecte el cable de alimentación incluido al conector de alimentación y enchufe
el otro extremo a una toma de corriente.
No ejerza presión sobre la parte posterior del monitor mientras coloca
el accesorio de montaje, ya que la presión ejercida hacia abajo sobre la
pantalla podría agrietarla o dañarla.
1. Coloque el monitor boca abajo en su bandeja de embalaje de espuma de
poliestireno.
2. Localice los espaciadores de montaje en la bolsa de accesorios que viene
con el monitor. Con el monitor colocado en su bandeja de espuma de
poliestireno, atornille los cuatro espaciadores en los orificios del hueco
donde se fija el soporte. No apriete demasiado los espaciadores, ya que
podrían dañar el monitor.
3. Atornille el accesorio de montaje VESA en los espaciadores de montaje.
4. Saque con cuidado el monitor y el accesorio de montaje de la bandeja y
colóquelos en su sitio.
Asegúrese de que haya 50 mm de espacio libre alrededor de todos los lados del
monitor cuando esté instalado para garantizar que no se sobrecaliente.
No intente colocar la pantalla sobre ninguna superficie irregular, incluidas
superficies blandas como alfombras y asientos, mientras coloca el
accesorio de montaje, ya que podría dañarse.
Opciones de montaje
El monitor dispone de orificios de montaje espaciados 100 x 100 mm que permiten
montarlo en cualquier brazo de monitor o accesorio de montaje en pared
compatible con el estándar VESA de 100 mm (no incluido).
Estos agujeros se encuentran en la zona de la parte posterior del monitor donde
se fija el soporte y quedan ocultos por éste cuando está instalado. Los soportes
VESA no se pueden utilizar con el monitor mientras el soporte esté montado.
Con el monitor se incluyen separadores de montaje roscados M4 que deben
utilizarse al montar el monitor en un brazo de monitor u otro soporte. Monte el
monitor en un accesorio de montaje VESA de la siguiente manera.
Conexión de una fuente de vídeo
El monitor incluye cuatro entradas de vídeo que pueden conectarse
simultáneamente. Para conectar un ordenador u otro dispositivo fuente, enchufe
uno de los cables HDMI, DisplayPort o USB-C incluidos en el ordenador y en un
puerto correspondiente del monitor.
Salida de audio
La pantalla incorpora altavoces y una toma de salida de audio para conectar
auriculares y altavoces externos. Cuando se conecta un dispositivo de audio
externo, los altavoces de la pantalla se desactivan.
Conexión del monitor
Desmontaje y almacenamiento
1. Abra la tapa de la caja del monitor, retire la bandeja superior de espuma de
poliestireno y colóquela a un lado.
2. Coloque la bolsa blanda sobre el monitor y colóquelo boca abajo en la
bandeja de espuma de poliestireno de la caja. Asegúrese de que la bolsa
quede plana contra la pantalla del monitor y que no esté doblada sobre sí
misma ni amontonada. Si la bolsa se amontona demasiado debajo de la
pantalla del monitor, ésta puede resultar dañada al colocarla en la caja.
Antes de desmontar el monitor, asegúrese de que la caja está colocada sobre
una superficie plana y despejada.
3. Abre la bolsa para ver dónde se fija el monitor al soporte. Empuje el pestillo
del soporte del monitor hacia el borde superior del monitor y levante la base
del soporte hacia arriba para liberar el soporte del monitor.
4. Cierre la bolsa y pliéguela cuidadosamente sobre la parte posterior del
monitor. Coloque la bandeja superior de espuma de poliestireno encima del
monitor en la caja.
5. Afloje el tornillo, separando la base del soporte y coloque ambas piezas en la
bandeja superior de embalaje de espuma.
Notas:
- La conexión USB-C proporcionará hasta 65 W de potencia a los ordenadores
compatibles con USB Power Delivery (USB PD). Esto permite que el ordenador
muestre vídeo en el monitor mientras se carga a través de un único cable.
Como resultado, el tipo de conexión USB-C es la mejor opción si tu ordenador
tiene esta capacidad.
- Dependiendo de las capacidades del ordenador, es posible que no pueda
proporcionar 4K a una frecuencia de actualización completa de 60 Hz si se
conecta al monitor mediante HDMI. La conexión USB-C o DisplayPort debe
utilizarse como primera preferencia si el ordenador admite estos tipos de
conexión.
- No todos los puertos USB-C de los ordenadores admiten salida de vídeo y/o
carga mediante USB PD. Si el ordenador no muestra vídeo en el monitor ni
inicia la carga cuando se conecta al monitor mediante USB-C, compruebe que
el puerto USB-C del ordenador admite la salida de vídeo DisplayPort Alternate
Mode y la carga mediante USB PD.
- No todos los cables USB-C admiten la transferencia de vídeo o la carga por
encima de 60 W. Se recomienda utilizar el cable USB-C suministrado con el
monitor para evitar posibles problemas con cables que se hayan obtenido por
separado.

19
Conexión del monitor
ES
La pantalla incluye dos puertos USB tipo A que pueden utilizarse para conectar
al ordenador periféricos USB como un teclado, un ratón o una webcam.
Para que el ordenador vea los dispositivos conectados a estos puertos, el
ordenador debe estar conectado a uno de los puertos USB-C y/o USB-B (o a
ambos).
Notas:
- Si el ordenador sólo está conectado al puerto USB-C de la pantalla, los
puertos funcionarán a velocidades USB 2.0 porque el tráfico de vídeo
comparte el cable USB-C con los datos USB. Esta velocidad es suficiente
para la mayoría de los periféricos como teclados, ratones y webcams.
- Si el ordenador está conectado al puerto USB-B de la pantalla, los puertos
funcionarán a velocidades USB 3.0. Esto es preferible si se utilizan
dispositivos de alta velocidad. Esto es preferible si se utilizan dispositivos de
almacenamiento de alta velocidad, como discos duros externos y unidades
flash USB.
El puerto de audio de la pantalla sólo admite dispositivos de salida como
auriculares y altavoces. No es posible conectar micrófonos u otros dispositivos
de entrada a este puerto. Los auriculares con micrófono incorporado pueden
conectarse a este puerto, pero el micrófono no funcionará.
Para enviar audio desde el ordenador a los altavoces de la pantalla o al
dispositivo de audio conectado, seleccione "27C4KPDW" como destino de audio
en la configuración de sonido del ordenador.
Conexión de dispositivos de audio Conexión de dispositivos USB
Menú OSD
1. Pulse para entrar en el menú OSD.
3. Pulse o para ajustar la configuración y, a continuación, pulse para confirmar los cambios y salir.
2. Pulse o para navegar por las funciones.
• Marque la función deseada y pulse para entrar en el submenú.
• Pulse o para navegar por los submenús y, a continuación, pulse para resaltar la función
deseada.
• Pulse o para resaltar una opción y, a continuación, pulse para confirmar los ajustes y salir de
la pantalla actual.
El menú OSD (On-Screen Display) permite ajustar la configuración del monitor.
2 3 4
3840*2160@60Hz
HDR
HDMI 1
Type-C
HDMI 2 DP
á
Nota:
Cuando la función de imagen en imagen está
activada, el sensor de rotación se desactiva.
Cuando el sensor de rotación está activado, al
girar el monitor se desactiva la función de imagen
en imagen.
Ajustes de Imagen
Ajusta la Saturación, Nitidez y Gamma del
monitor.
Señal de entrada
Cambia entre las entradas de vídeo.
Audio
Puede silenciar o ajustar el volumen de los
altavoces del monitor.
Configuración C.T.
Ajusta la temperatura de color de tu monitor
entre Cálido, Frío y Definido por el usuario.
Brillo/Contraste
Ajusta el Brillo, el Balance de Sombras y el
Contraste.
HDR
Activa el modo HDR (alto rango dinámico) del
monitor para obtener colores más vivos.
No todos los dispositivos y programas son
compatibles con la entrada HDR, por lo que
pueden verse demasiado brillantes con esta
opción activada.
Ajustes OSD
Cambia la transparencia del menú OSD y el
tiempo que permanece en pantalla.
Modo contextual
Elige entre los preajustes de imagen, incluidos
los modos Estándar, Lectura, Película, Noche,
Confort, SRGB y Adobe.
PIP/PBP
El modo Imagen en imagen permite a Clarity
Pro mostrar vídeo de dos fuentes a la vez.
Utilice este menú para seleccionar las fuentes
y elegir cómo desea que se muestren.
Sensor de rotación
Cuando está activado, Clarity Pro cambiará
automáticamente entre los modos vertical y
horizontal al girar la pantalla.
Esto no es compatible con todos los
ordenadores y configuraciones. Los usuarios
de macOS pueden tener que ajustar la pantalla
manualmente utilizando DisplayLink para el
modo vertical.
USB
Puedes actualizar el firmware del monitor
a través de USB, evitar que el ordenador
alimente dispositivos USB mientras está en
modo de suspensión y cambiar el puerto USB
(C o B) que utiliza Clarity Pro para los datos
que no son de vídeo.
Idioma
Configura el idioma del menú OSD.
Reiniciar
Restablece la configuración predeterminada de
fábrica del monitor.
Señal de entrada

20
1. Para utilizar la cámara web integrada, el monitor debe estar conectado al
ordenador a través de su puerto USB-C o USB-B.
2. Tras la conexión, ve a "Conmutador USB" en el submenú "USB" del menú de
opciones del monitor y selecciona "TIPO-C" o "TIPO-B" en función del cable
que hayas conectado.
3. Abra cualquier programa que utilice la webcam y ésta saldrá automáticamente
del monitor.
a. Puede que tengas que cambiar de la webcam integrada en tu portátil a
"27C4KPDW".
1. Utilice la rueda de desplazamiento situada en la parte posterior de la webcam
para ajustar el encuadre.
2. Para cambiar los ajustes de imagen, como el brillo y el contraste, utilice el menú
de configuración de su ordenador:
a. Windows: Configuración -> Bluetooth y dispositivos -> Cámaras -> 27C4KPDW
b. macOS: La configuración de la imagen sólo se puede ajustar a través de
aplicaciones de terceros.
c. ChromeOS: La configuración de la imagen sólo se puede ajustar a través de
aplicaciones.
La webcam se retraerá automáticamente cuando no esté siendo utilizada por
ningún programa.
a. No intente empujar físicamente la webcam hacia el monitor, podría dañarla.b.
If webcam does not retract, try unplugging it and plugging it back in.
b. Si la webcam no se retrae, intente desenchufarla y volver a enchufarla.
Configuración de la cámara web
Ajuste de la webcam
Cómo retraer la cámara web
Síntoma Solución
Mi ordenador
no reconoce mi
webcam
• Pruebe a reiniciar el ordenador
• Vaya a Opciones USB -> Cambiar USB activo en el menú OSD de Clarity
Pro y asegúrese de que el tipo de USB seleccionado es el que está
conectando.
• Intente desenchufar/desconectar/desactivar otras webcams.
Mi webcam no
se desliza fuera
de mi monitor
• Compruebe que la cámara web denominada "27C4KPDW" está
seleccionada en el menú de configuración de su ordenador.
• Reinicie la aplicación con la que desea utilizar la cámara web.
• Asegúrate de tener seleccionada la cámara web correcta en el software de
vídeo.
Mi webcam no
se retrae en mi
monitor
• Prueba a desconectar el ordenador del monitor.
• Prueba a abrir y cerrar una aplicación que utilice la webcam.
ES
1. Para utilizar la pantalla táctil, el monitor debe estar conectado al ordenador a
través de su puerto USB-C o USB-B.
2. Tras la conexión, ve a "Conmutador USB" en el submenú "USB" del menú de
opciones del monitor y selecciona "TIPO-C" o "TIPO-B" en función del cable
que hayas conectado.
3. El ordenador debería reconocer automáticamente la pantalla táctil. Si no es así,
consulta nuestra sección de solución de problemas a continuación
Uso de la pantalla táctil (sólo 27C4KPDWT)
Síntoma Solución
Mi ordenador
no reacciona
al tacto
• Desconecta el cable USB del ordenador y vuelve a conectarlo.
• Comprueba que has seleccionado el cable USB correcto en la
configuración del monitor.
• Reinicie su ordenador
• Póngase en contacto con el soporte de ALOGIC si lo anterior no resuelve
su problema.
Advertencias
• Utiliza el monitor solo en interiores y en lugares secos. No utilices el monitor en lugares
húmedos o cerca de fuentes de agua, como baños y cocinas.
• Guárdalo y utilízalo en un lugar fresco, seco y ventilado. No lo coloque cerca de fuentes
de calor ni bajo la luz directa del sol.
• Asegúrese de que el equipo está instalado sobre una superficie plana y estable. Si se
coloca sobre una superficie irregular o inestable, el monitor puede caerse y dañarse,
provocar lesiones personales o dañar otros objetos.
• Es normal que el aparato esté ligeramente caliente al tacto durante su funcionamiento.
Proporcione una ventilación adecuada y no cubra el aparato mientras esté en
funcionamiento.
• No cubra ni bloquee los orificios de ventilación de la cubierta posterior del monitor.
No lo utilice sobre una cama, sofá, manta o similar donde el monitor pueda caerse o
quedar cubierto.
• Los rangos de tensión y frecuencia de alimentación eléctrica aceptables se indican
en la etiqueta de la cubierta posterior del monitor. No conecte el monitor a fuentes de
alimentación que estén fuera de estos límites.
• Si el aparato no se va a utilizar durante semanas o meses, se recomienda
desconectarlo de la corriente para ahorrar energía y proteger el equipo de los daños
causados por sobretensiones inducidas por rayos en caso de tormenta eléctrica.
• No introduzca objetos extraños en los orificios de ventilación de la cubierta del monitor,
ya que podrían producirse daños, incendios o descargas eléctricas.
• El monitor no contiene piezas que el usuario pueda reparar. Si desmonta o intenta
reparar este producto usted mismo, anulará la garantía y se expondrá al riesgo de sufrir
una descarga eléctrica. Si sospecha que el aparato presenta algún fallo, póngase en
contacto con el vendedor al que compró el producto o con el servicio postventa de
ALOGIC para obtener ayuda.
• No utilice el producto si está dañado, ya que podría provocar daños en los dispositivos
conectados y exponerle a una descarga eléctrica.
• No aplaste, corte, tire o retuerza excesivamente el cable de alimentación. Si el cable
de alimentación se daña, no utilice el producto hasta que pueda obtener un cable de
alimentación de repuesto. El uso de un cable de alimentación dañado puede provocar
una descarga eléctrica.
• No rocíe líquidos sobre el monitor. No utilice productos químicos como disolventes
en la superficie del monitor. Limpie el monitor únicamente con un paño de microfibra
limpio, seco, suave y que no raye.
• Desmontar o no utilizar y cuidar adecuadamente su dispositivo anulará la garantía del
producto.
• ALOGIC no se hace responsable de los daños al dispositivo o daños incidentales
derivados de un uso inadecuado o falta de cuidado y no es responsable de la
reparación / sustitución del dispositivo u otros daños en estas circunstancias.
Solución de problemas
Síntoma Solución
El botón de
encendido no
se enciende al
pulsarlo
• Compruebe que el cable de alimentación esté bien conectado al adaptador
de corriente, que esté conectado a una toma de corriente y que la toma de
corriente esté encendida.
• Compruebe que el adaptador de corriente está bien conectado a la parte
posterior del monitor.
El botón de
encendido se
ilumina, pero no
se muestra nada
en la pantalla
• Desconecte el adaptador de corriente del monitor y vuelva a conectarlo en 2-3
minutos.
• Mantenga pulsado el botón de encendido durante 5 segundos para restablecer
la configuración del monitor.
• Póngase en contacto con el servicio de asistencia técnica de ALOGIC si los
puntos anteriores no funcionan.
El monitor
no muestra
vídeo HDMI o
DisplayPort desde
el ordenador
• Compruebe que hay un cable de vídeo adecuado conectado entre el ordenador
y la pantalla y que está seleccionada la entrada correcta en el monitor.
• Compruebe la configuración del ordenador para verificar que detecta el monitor
y le envía vídeo.
El monitor no
muestra vídeo
USB-C del
ordenador
• Compruebe que está utilizando el cable USB-C suministrado con el monitor.
• Comprueba la configuración del ordenador para verificar que detecta el monitor
y le envía vídeo.
• Compruebe que el puerto USB-C del ordenador al que está conectado el
monitor admite la salida de vídeo mediante el modo alternativo DisplayPort
(modo alternativo DP).
El ordenador
portátil no se
carga cuando se
conecta al monitor
mediante USB-C
• Comprueba que el puerto USB-C del ordenador admite la carga mediante el
estándar USB Power Delivery (USB-PD).
• Algunos portátiles necesitan más de 65 W de potencia para cargarse. Suelen ser
ordenadores de gama alta centrados en gráficos y juegos.
• Si es necesario, conecta el adaptador de corriente que viene con el ordenador a
tu portátil además del cable USB-C que está conectado al monitor.
Los términos HDMl y HDMl High-Definition Multimedia lnterface, y el logotipo HDMI son marcas comerciales o marcas registradas de HDMI Licensing
Administrator, Inc. en Estados Unidos y otros países.
Este dispositivo cumple la parte 15 de las normas de la FCC. Su funcionamiento está sujeto a las dos condiciones siguientes:
(1)Este dispositivo no puede causar interferencias perjudiciales,
(2)este dispositivo debe aceptar cualquier interferencia recibida, incluyendo interferencias que puedan causar un funcionamiento no deseado.
CAN ICES-3 (B)/NMB-3(B)
INTERFAZ MULTIMEDIA DE ALTA DEFINICIÓN
La pagina si sta caricando...
La pagina si sta caricando...
La pagina si sta caricando...
La pagina si sta caricando...
La pagina si sta caricando...
La pagina si sta caricando...
La pagina si sta caricando...
La pagina si sta caricando...
La pagina si sta caricando...
La pagina si sta caricando...
La pagina si sta caricando...
La pagina si sta caricando...
La pagina si sta caricando...
La pagina si sta caricando...
La pagina si sta caricando...
La pagina si sta caricando...
La pagina si sta caricando...
La pagina si sta caricando...
La pagina si sta caricando...
La pagina si sta caricando...
La pagina si sta caricando...
La pagina si sta caricando...
La pagina si sta caricando...
La pagina si sta caricando...
La pagina si sta caricando...
La pagina si sta caricando...
-
 1
1
-
 2
2
-
 3
3
-
 4
4
-
 5
5
-
 6
6
-
 7
7
-
 8
8
-
 9
9
-
 10
10
-
 11
11
-
 12
12
-
 13
13
-
 14
14
-
 15
15
-
 16
16
-
 17
17
-
 18
18
-
 19
19
-
 20
20
-
 21
21
-
 22
22
-
 23
23
-
 24
24
-
 25
25
-
 26
26
-
 27
27
-
 28
28
-
 29
29
-
 30
30
-
 31
31
-
 32
32
-
 33
33
-
 34
34
-
 35
35
-
 36
36
-
 37
37
-
 38
38
-
 39
39
-
 40
40
-
 41
41
-
 42
42
-
 43
43
-
 44
44
-
 45
45
-
 46
46


in altre lingue
- français: ALOGIC Clarity Pro Mode d'emploi
- español: ALOGIC Clarity Pro Guía del usuario
- Deutsch: ALOGIC Clarity Pro Benutzerhandbuch
- 日本語: ALOGIC Clarity Pro ユーザーガイド
Altri documenti
-
Philips 241B6QPYEB/00 Manuale utente
-
Philips 241P6VPJKEB/00 Manuale utente
-
GAME HERO HDR1000 Manuale utente
-
-
Philips 243B1JH/01 Manuale utente
-
-
Philips 45B1U6900C/00 Manuale utente
-
Lenovo A20270DL0 Manuale utente
-
-
Philips 326P1H/00 Manuale utente