AEG A82700GNX0 Manuale utente
- Categoria
- Frigoriferi combinati
- Tipo
- Manuale utente


CONTENTS
1. SAFETY INFORMATION...........................................................................................3
2. SAFETY INSTRUCTIONS.......................................................................................... 4
3. OPERATION.............................................................................................................. 6
4. DAILY USE..................................................................................................................8
5. CARE AND CLEANING............................................................................................ 8
6. TROUBLESHOOTING...............................................................................................9
7. INSTALLATION....................................................................................................... 11
8. TECHNICAL DATA..................................................................................................12
FOR PERFECT RESULTS
Thank you for choosing this AEG product. We have created it to give you
impeccable performance for many years, with innovative technologies that help
make life simpler features you might not find on ordinary appliances. Please
spend a few minutes reading to get the very best from it.
Visit our website for:
Get usage advice, brochures, trouble shooter, service information:
www.aeg.com/webselfservice
Register your product for better service:
www.registeraeg.com
Buy Accessories, Consumables and Original spare parts for your appliance:
www.aeg.com/shop
CUSTOMER CARE AND SERVICE
Always use original spare parts.
When contacting our Authorised Service Centre, ensure that you have the
following data available: Model, PNC, Serial Number.
The information can be found on the rating plate.
Warning / Caution-Safety information
General information and tips
Environmental information
Subject to change without notice.
www.aeg.com
2

1. SAFETY INFORMATION
Before the installation and use of the appliance,
carefully read the supplied instructions. The
manufacturer is not responsible for any injuries or
damages that are the result of incorrect installation or
usage. Always keep the instructions in a safe and
accessible location for future reference.
1.1 Children and vulnerable people safety
• This appliance can be used by children aged from 8
years and above and persons with reduced physical,
sensory or mental capabilities or lack of experience
and knowledge if they have been given supervision or
instruction concerning the use of the appliance in a
safe way and understand the hazards involved.
• Do not let children play with the appliance.
• Children shall not carry out cleaning and user
maintenance of the appliance without supervision.
• Keep all packaging away from children and dispose of
it appropriately.
1.2
General Safety
• This appliance is intended to be used in household
and similar applications such as:
– Farm houses; staff kitchen areas in shops, offices
and other working environments
– By clients in hotels, motels, bed and breakfast and
other residential type environments
• Keep ventilation openings, in the appliance enclosure
or in the built-in structure, clear of obstruction.
• Do not use mechanical devices or other means to
accelerate the defrosting process, other than those
recommended by the manufacturer.
• Do not damage the refrigerant circuit.
• Do not use electrical appliances inside the food
storage compartments of the appliance, unless they
are of the type recommended by the manufacturer.
ENGLISH
3

• Do not use water spray and steam to clean the
appliance.
• Clean the appliance with a moist soft cloth. Only use
neutral detergents. Do not use abrasive products,
abrasive cleaning pads, solvents or metal objects.
• Do not store explosive substances such as aerosol
cans with a flammable propellant in this appliance.
• If the supply cord is damaged, it must be replaced by
the manufacturer, its Authorised Service Centre or
similarly qualified persons in order to avoid a hazard.
2. SAFETY INSTRUCTIONS
2.1 Installation
WARNING!
Only a qualified person must
install this appliance.
• Remove all the packaging and the
transit bolts.
• Do not install or use a damaged
appliance.
• Follow the installation instruction
supplied with the appliance.
• Always take care when moving the
appliance as it is heavy. Always use
safety gloves and enclosed footwear.
• Make sure the air can circulate around
the appliance.
• Wait at least 4 hours before
connecting the appliance to the
power supply. This is to allow the oil
to flow back in the compressor.
• Do not install the appliance close to
radiators or cookers, oven or hobs.
• The rear of the appliance must stand
against the wall.
• Do not install the appliance where
there is direct sunlight.
• Do not install this appliance in areas
that are too humid or too colds, such
as the construction appendices,
garages or wine cellars.
• When you move the appliance, lift it
by the front edge to avoid scratching
the floor.
2.2 Electrical connection
WARNING!
Risk of fire and electrical
shock.
• The appliance must be earthed.
• Make sure that the electrical
information on the rating plate agrees
with the power supply. If not, contact
an electrician.
• Always use a correctly installed
shockproof socket.
• Do not use multi-plug adapters and
extension cables.
• Make sure not to cause damage to
the electrical components (e.g. mains
plug, mains cable, compressor).
Contact the Authorised Service
Centre or an electrician to change the
electrical components.
• The mains cable must stay below the
level of the mains plug.
• Connect the mains plug to the mains
socket only at the end of the
installation. Make sure that there is
access to the mains plug after the
installation.
• Do not pull the mains cable to
disconnect the appliance. Always pull
the mains plug.
2.3 Use
WARNING!
Risk of injury, burns,
electrical shock or fire.
www.aeg.com4

• Do not change the specification of
this appliance.
• Do not put electrical appliances (e.g.
ice cream makers) in the appliance
unless they are stated applicable by
the manufacturer.
• Be careful not to cause damage to
the refrigerant circuit. It contains
isobutane (R600a), a natural gas with a
high level of environmental
compatibility. This gas is flammable.
• If damage occurs to the refrigerant
circuit, make sure that there are no
flames and sources of ignition in the
room. Ventilate the room.
• Do not let hot items to touch the
plastic parts of the appliance.
• Do not put soft drinks in the freezer
compartment. This will create
pressure on the drink container.
• Do not store flammable gas and
liquid in the appliance.
• Do not put flammable products or
items that are wet with flammable
products in, near or on the appliance.
• Do not touch the compressor or the
condenser. They are hot.
• Do not remove or touch items from
the freezer compartment if your hands
are wet or damp.
• Do not freeze again food that has
been thawed.
• Obey the storage instructions on the
packaging of frozen food.
2.4 Internal light
• The type of lamp used for this
appliance is not suitable for
household room illumination
2.5 Care and cleaning
WARNING!
Risk of injury or damage to
the appliance.
• Before maintenance, deactivate the
appliance and disconnect the mains
plug from the mains socket.
• This appliance contains hydrocarbons
in the cooling unit. Only a qualified
person must do the maintenance and
the recharging of the unit.
• Regularly examine the drain of the
appliance and if necessary, clean it. If
the drain is blocked, defrosted water
collects in the bottom of the
appliance.
2.6 Disposal
WARNING!
Risk of injury or suffocation.
• Disconnect the appliance from the
mains supply.
• Cut off the mains cable and discard it.
• Remove the door to prevent children
and pets to be closed inside of the
appliance.
• The refrigerant circuit and the
insulation materials of this appliance
are ozone-friendly.
• The insulation foam contains
flammable gas. Contact your
municipal authority for information on
how to discard the appliance
correctly.
• Do not cause damage to the part of
the cooling unit that is near the heat
exchanger.
ENGLISH
5

3. OPERATION
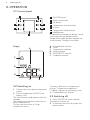
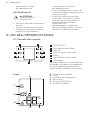
3.1 Control panel
1 2
3
4
7
6
5
1
ON/OFF button
2
Alarm reset button
3
OK button
4
Temperature warmer button
5
Display
6
Temperature colder button
7
Mode button
It is possible to change the button sound
volume by pressing Mode and the
temperature colder buttons together for
a few seconds. Change is reversible.
Display
A
BC
D
E
F
A. MinuteMinder function
B. Timer
C. Temperature indicator
D. Alarm indicator
E. FROSTMATIC function
F. ChildLock function
3.2 Switching on
1. Connect the mains plug to the power
socket.
2. Press the appliance ON/OFF if the
display is off.
The alarm buzzer could operate after few
seconds.
The temperature indicators show the set
default temperature.
To reset the alarm refer to "High
temperature alarm".
To select a different set temperature
refer to "Temperature regulation".
If "dEMo" appears on the display, refer
to "Troubleshooting" chapter.
3.3 Switching off
1. Press ON/OFF for a few seconds.
The display switches off.
2. Disconnect the mains plug from the
power socket.
www.aeg.com6

3.4 Temperature regulation
The set temperature of the freezer may
be adjusted by pressing the temperature
button.
Default temperature:
• -18°C for the freezer
The temperature indicator shows the set
temperature.
The set temperature will be
reached within 24 hours.
After a power failure the set
temperature remains stored.
3.5 High temperature alarm
An increase in the temperature in the
freezer compartment (for example due to
an earlier power failure) is indicated by:
• flashing of the alarm and freezer
temperature indicators;
• sounding of the buzzer.
Press any button to reset the alarm.
The buzzer switches off.
The freezer temperature indicator shows
the highest temperature reached for a
few seconds. Then show again the set
temperature.
The alarm indicator continues to flash
until the normal conditions are restored.
3.6 FROSTMATIC function
The FROSTMATIC function accelerates
the freezing of fresh food and, at the
same time, protects foodstuffs already
stored from undesirable warming.
1. Press Mode button until the
corresponding icon appears.
The FROSTMATIC indicator flashes.
2. Press OK button to confirm.
The FROSTMATIC indicator is shown.
The FROSTMATIC function
shuts off automatically after
52 hours.
To switch off the function
before its automatic end,
repeat the steps until the
FROSTMATIC indicator goes
off.
3.7 Door open alarm
An acoustic alarm will sound if the door
is left open for a few minutes. The door
open alarm conditions are indicated by:
• a flashing Alarm indicator;
• an acoustic buzzer.
When normal conditions are restored
(door closed), the alarm will stop. The
buzzer can also be switched off by
pressing any button.
3.8 MinuteMinder function
The MinuteMinder function is to be used
to set an acoustic alarm at the preferred
time, useful for example when a recipe
requires to cool down food products for
a certain length of time.
It is also useful when a reminder is
needed in order not to forget the bottles
placed in the freezer for fast cooling.
1. Press Mode until the corresponding
icon appears.
The MinuteMinder indicator flashes.
The Timer shows the set value (30
minutes) for a few seconds.
2. Press the Temperature colder or
Temperature warmer button to
change the Timer set value from 1 to
90 minutes.
3. Press OK to confirm.
The MinuteMinder indicator is shown.
The Timer starts to flash (min).
It is possible to change the time at any
time during the countdown and at the
end by pressing the Temperature colder
button and the Temperature warmer
button.
At the end of the countdown, the
MinuteMinder indicator flashes and an
audible alarm sounds. Press OK to switch
off the sound and terminate the function.
It is possible to deactivate the function at
any time during the countdown by
repeating the function steps, until the
indicator turns off.
3.9 ChildLock function
Activate the ChildLock function to lock
the buttons from unintentional
operation.
ENGLISH
7

1. Press Mode until the corresponding
icon appears.
The ChildLock indicator flashes.
2. Press OK to confirm.
The ChildLock indicator is shown.
To deactivate the ChildLock function,
repeat the procedure until the ChildLock
indicator goes off.
4. DAILY USE
WARNING!
Refer to Safety chapters.
4.1 Storage of frozen food
When first starting-up or after a period
out of use, before putting the products
in the compartment let the appliance run
at least 2 hours with the FROSTMATIC
function turned on. The freezer drawers
ensure that it is quick and easy to find
the food package you want. If large
quantities of food are to be stored,
remove all drawers except for the
bottom drawer which needs to be in
place to provide good air circulation. On
all shelves it is possible to place food
that protrude until 15 mm from the door.
WARNING!
In the event of accidental
defrosting, for example due
to a power failure, if the
power has been off for
longer that the value shown
in the technical
characteristics chart under
"rising time", the defrosted
food must be consumed
quickly or cooked
immediately and then re-
frozen (after cooling).
4.2 Freezing fresh food
The freezer compartment is suitable for
freezing fresh food and storing frozen
and deep-frozen food for a long time.
To freeze small amount of fresh foods it
is not necessary to change the present
setting.
To freeze fresh food activate the
FROSTMATIC function at least 24 hours
before placing the food to be frozen in
the freezer compartment.
Place the food to be frozen in the two
top compartments.
The maximum amount of food that can
be frozen in 24 hours is specified on the
rating plate, a label located on the inside
of the appliance.
The freezing process lasts 24 hours:
during this period do not add other food
to be frozen.
When the freezing process is completed,
return to the required temperature (see
"FROSTMATIC Function").
4.3 Cold accumulators
The freezer contains at least one cold
accumulator which increases storage
time in the event of a power cut or
breakdown.
5. CARE AND CLEANING
WARNING!
Refer to Safety chapters.
5.1 Cleaning the interior
Before using the appliance for the first
time, the interior and all internal
accessories should be washed with
lukewarm water and some neutral soap
www.aeg.com8

to remove the typical smell of a brand-
new product, then dried thoroughly.
CAUTION!
Do not use detergents,
abrasive powders, chlorine
or oil-based cleaners as they
will damage the finish.
5.2 Periodic cleaning
CAUTION!
Do not pull, move or
damage any pipes and/or
cables inside the cabinet.
CAUTION!
Take care of not to damage
the cooling system.
CAUTION!
When moving the cabinet,
lift it by the front edge to
avoid scratching the floor.
The equipment has to be cleaned
regularly:
1. Clean the inside and accessories with
lukewarm water and some neutral
soap.
2. Regularly check the door seals and
wipe clean to ensure they are clean
and free from debris.
3. Rinse and dry thoroughly.
4. If accessible, clean the condenser
and the compressor at the back of
the appliance with a brush.
This operation will improve the
performance of the appliance and
save electricity consumption.
5.3 Defrosting the freezer
The freezer compartment is frost free.
This means that there is no build up of
frost when it is in operation, neither on
the internal walls nor on the foods.
5.4 Periods of non-operation
When the appliance is not in use for long
periods, take the following precautions:
1. Disconnect the appliance from
electricity supply.
2. Remove all food.
3. Clean the appliance and all
accessories.
4. Leave the door/doors open to
prevent unpleasant smells.
6.
TROUBLESHOOTING
WARNING!
Refer to Safety chapters.
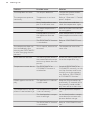
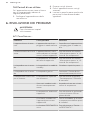
6.1 What to do if...
Problem Possible cause Solution
The appliance is noisy. The appliance is not sup-
ported properly.
Check if the appliance stands
stable.
Audible or visual alarm is
on.
The cabinet has been re-
cently switched on or the
temperature is still too
high.
Refer to "Door Open
Alarm"or "High Temperature
Alarm".
The temperature in the ap-
pliance is too high.
Refer to "Door Open
Alarm"or "High Temperature
Alarm".
The lamp does not work. The lamp is in stand-by
mode.
Close and open the door.
ENGLISH 9

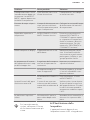
Problem Possible cause Solution
The lamp does not work. The lamp is defective. Contact the nearest Author-
ised Service Centre.
The compressor operates
continually.
Temperature is set incor-
rectly.
Refer to "Operation"/"Control
panel" chapter.
Many food products were
put in at the same time.
Wait a few hours and then
check the temperature again.
The room temperature is
too high.
Refer to climate class chart on
the rating plate.
Food products placed in
the appliance were too
warm.
Allow food products to cool to
room temperature before stor-
ing.
The FROSTMATIC function
is switched on.
Refer to "FROSTMATIC func-
tion".
The compressor does not
start immediately after
pressing the FROSTMATIC
or after changing the tem-
perature.
This is normal, no error has
occurred.
The compressor starts after
some time.
Water flows on the floor. The melting water outlet is
not connected to the evap-
orative tray above the com-
pressor.
Attach the melting water out-
let to the evaporative tray.
Temperature cannot be set. The FROSTMATIC or
COOLMATIC function is
switched on.
Switch off FROSTMATIC or
COOLMATIC manually, or wait
until the function resets auto-
matically to set the tempera-
ture. Refer to "FROSTMATIC
or COOLMATIC function".
DEMO appears on the dis-
play.
The appliance is in demon-
stration mode.
Keep the OK pressed for ap-
proximately 10 seconds until a
long sound is heard and dis-
play shuts off for a short time.
The temperature in the ap-
pliance is too low/too high.
The temperature regulator
is not set correctly.
Set a higher/lower tempera-
ture.
The food products temper-
ature is too high.
Let the food products temper-
ature decrease to room tem-
perature before storage.
The FROSTMATIC function
is switched on.
Refer to "FROSTMATIC func-
tion".
www.aeg.com10

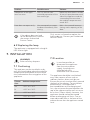
Problem Possible cause Solution
Side panels of the appli-
ance are warm.
This is a normal state
caused by operation of the
heat exchanger.
Make sure that there is at least
30 mm of space between each
side of the appliance and the
surrounding furniture when
the ambient temperature ex-
ceeds 38°C.
Door does not open easily. You attempted to re-open
the door immediately after
closing.
Wait a few seconds between
closing and re-opening of the
door.
If the advice does not lead
to the desired result, contact
the nearest Authorised
Service Centre.
6.2 Replacing the lamp
The appliance is equipped with a longlife
LED interior light.
Only service is allowed to replace the
lighting device. Contact your Authorised
Service Centre.
7. INSTALLATION
WARNING!
Refer to Safety chapters.
7.1 Positioning
This appliance can be installed in a dry,
well ventilated indoor where the ambient
temperature corresponds to the climate
class indicated on the rating plate of the
appliance:
Climate
class
Ambient temperature
SN +10°C to + 32°C
N +16°C to + 32°C
ST +16°C to + 38°C
T +16°C to + 43°C
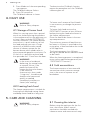
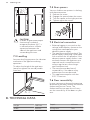
7.2 Location
It must be possible to
disconnect the appliance
from the mains power
supply; the plug must
therefore be easily
accessible after installation.
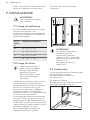
The appliance should be installed well
away from sources of heat such as
radiators, boilers, direct sunlight etc.
Ensure that air can circulate freely around
the back of the cabinet. To ensure best
performance, if the appliance is
positioned below an overhanging wall
unit, the minimum distance between the
top of the cabinet and the wall unit must
be at least 100mm. Ideally, however, the
appliance should not be positioned
below overhanging wall units. One or
more adjustable feet at the base of the
cabinet ensure that the appliance stands
level.
ENGLISH
11

A
B
100 mm
min
20 mm
CAUTION!
In order to guarantee proper
functioning in ambient
temperature above 38°C, it
is advised to have a 30mm
separation between the
sides of the appliance and
surrounding furniture.
7.3 Levelling
Accurate levelling prevents the vibration
and noise of the appliance during
operation.
To adjust the heigh of the appliance
loosen or tighten the two adjustable
front feet.
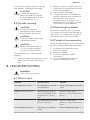
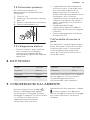
7.4 Rear spacers
You can find the two spacers in the bag
with documentation.
1. Release the screw.
2. Engage the spacer below the screw.
3. Turn the spacer to the right position.
4. Tighten again the screws.
2
4
1
3
7.5 Electrical connection
• Before plugging in, ensure that the
voltage and frequency shown on the
rating plate correspond to your
domestic power supply.
• The appliance must be earthed. The
power supply cable plug is provided
with a contact for this purpose. If the
domestic power supply socket is not
earthed, connect the appliance to a
separate earth in compliance with
current regulations, consulting a
qualified electrician.
• The manufacturer declines all
responsibility if the above safety
precautions are not observed.
• This appliance complies with the
E.E.C. Directives.
7.6 Door reversibility
In case you want to change the opening
direction of the door, contact the nearest
Authorised Service Centre. The
Authorised Service specialist will carry
out the reversibility of the doors at your
cost.
8.
TECHNICAL DATA
Height 1850 mm
Width 595 mm
Depth 668 mm
Rising time 28 h
www.aeg.com12

Voltage 230 - 240 V
Frequency 50 Hz
The technical information is situated in
the rating plate, on the external or
internal side of the appliance and in the
energy label.
9. ENVIRONMENTAL CONCERNS
Recycle the materials with the symbol .
Put the packaging in applicable
containers to recycle it. Help protect the
environment and human health and to
recycle waste of electrical and electronic
appliances. Do not dispose appliances
marked with the symbol with the
household waste. Return the product to
your local recycling facility or contact
your municipal office.
ENGLISH 13

INDICE
1. INFORMAZIONI DI SICUREZZA............................................................................ 15
2. ISTRUZIONI DI SICUREZZA....................................................................................16
3. USO DELL'APPARECCHIATURA........................................................................... 18
4. UTILIZZO QUOTIDIANO........................................................................................ 20
5. PULIZIA E CURA...................................................................................................... 21
6. RISOLUZIONE DEI PROBLEMI...............................................................................22
7. INSTALLAZIONE..................................................................................................... 24
8. DATI TECNICI..........................................................................................................25
PER RISULTATI PERFETTI
Grazie per aver scelto di acquistare questo prodotto AEG. Lo abbiamo creato per
fornirvi prestazioni impeccabili per molti anni, grazie a tecnologie innovative che
vi semplificheranno la vita - funzioni che non troverete sulle normali
apparecchiature. Vi invitiamo a dedicare qualche minuto alla lettura del presente
manuale, per conoscere come trarre il massimo vantaggio dall'utilizzo della vostra
apparecchiatura.
Visitate il nostro sito web per:
Ricevere consigli d'uso, scaricare i nostri opuscoli, eliminare eventuali
anomalie, ottenere informazioni sull'assistenza:
www.aeg.com/webselfservice
Registrare il vostro prodotto e ricevere un servizio migliore:
www.registeraeg.com
Acquistare accessori, materiali di consumo e ricambi originali per la vostra
apparecchiatura:
www.aeg.com/shop
SERVIZIO CLIENTI E MANUTENZIONE
Consigliamo sempre l’impiego di ricambi originali.
Quando si contatta il Centro di Assistenza autorizzato, accertarsi di disporre dei
seguenti dati: Modello, numero dell'apparecchio (PNC), numero di serie.
Le informazioni si trovano sulla targhetta di identificazione.
Avvertenza/Attenzione - Importanti Informazioni per la sicurezza
Informazioni e suggerimenti generali
Informazioni sull'ambiente
Con riserva di modifiche.
www.aeg.com
14

1. INFORMAZIONI DI SICUREZZA
Leggere attentamente le istruzioni fornite prima di
installare e utilizzare l'apparecchiatura. I produttori non
sono responsabili di eventuali lesioni o danni derivanti
da un'installazione o un uso scorretti. Conservare
sempre le istruzioni in un luogo sicuro e accessibile per
poterle consultare in futuro.
1.1 Sicurezza dei bambini e delle persone
vulnerabili
• Questa apparecchiatura può essere usata da bambini
a partire dagli 8 anni e da adulti con limitate capacità
fisiche, sensoriali o mentali o con scarsa esperienza o
conoscenza sull'uso dell'apparecchiatura, solamente
se sorvegliati o se istruiti relativamente all'uso
dell'apparecchiatura e se hanno compreso i rischi
coinvolti.
•
Non consentire ai bambini di giocare con
l'apparecchio.
• I bambini non devono eseguire interventi di pulizia e
manutenzione sull'apparecchiatura senza essere
supervisionati.
• Tenere gli imballaggi lontano dai bambini e smaltirli in
modo adeguato.
1.2
Avvertenze di sicurezza generali
• L'apparecchiatura è destinata all'uso domestico e
applicazioni simili, tra cui:
– case di campagna; cucine di negozi, uffici e altri
ambienti di lavoro
– clienti di hotel, motel, bed and breakfast e altri
ambienti residenziali
• Verificare che le aperture di ventilazione, sia
sull'apparecchiatura che nella struttura da incasso,
non siano ostruite.
ITALIANO
15

• Non usare dispositivi elettrici o altri mezzi artificiali
non raccomandati dal produttore allo scopo di
accelerare il processo di sbrinamento.
• Non danneggiare il circuito refrigerante.
• Non utilizzare apparecchiature elettriche all'interno
dei comparti di conservazione degli alimenti, ad
eccezione di quelli consigliati dal costruttore.
• Non nebulizzare acqua né utilizzare vapore per pulire
l'apparecchiatura.
• Pulire l'apparecchiatura con un panno inumidito e
morbido. Utilizzare solo detergenti neutri. Non usare
prodotti abrasivi, spugnette abrasive, solventi od
oggetti metallici.
• Non conservare in questa apparecchiatura sostanze
esplosive come bombolette spray contenenti un
propellente infiammabile.
• Se il cavo di alimentazione è danneggiato, deve
essere sostituito dal produttore, da un tecnico
autorizzato o da una persona qualificata per evitare
situazioni di pericolo.
2.
ISTRUZIONI DI SICUREZZA
2.1 Installazione
AVVERTENZA!
L’installazione
dell'apparecchiatura deve
essere eseguita da
personale qualificato.
• Togliere tutto l'imballaggio e i bulloni
per il trasporto.
• Non installare o utilizzare
l'apparecchiatura se è danneggiata.
• Attenersi alle istruzioni fornite insieme
all'apparecchiatura.
• Prestare sempre attenzione in fase di
spostamento dell'apparecchiatura,
dato che è pesante. Usare sempre i
guanti di sicurezza e le calzature
adeguate.
• Assicurarsi che l'aria possa circolare
liberamente attorno
all'apparecchiatura.
• Attendere almeno 4 ore prima di
collegare l'apparecchiatura
all'alimentazione. Questo serve a
consentire all'olio di fluire
nuovamente nel compressore.
• Non installare l'apparecchiatura in
prossimità di radiatori, fornelli, forni o
piani di cottura.
• La superficie posteriore
dell'apparecchiatura deve essere
appoggiata alla parete.
• Non installare l'apparecchiatura dove
sia esposta alla luce solare diretta.
• Non installare questa apparecchiatura
in luoghi troppo umidi o freddi, come
aggiunte strutturali, garage o cantine.
• Quando si sposta l'apparecchiatura,
sollevarla dal bordo anteriore, così da
non graffiare il pavimento.
www.aeg.com
16

2.2 Collegamento elettrico
AVVERTENZA!
Rischio di incendio e scossa
elettrica.
• L'apparecchiatura deve disporre di
una messa a terra.
• Verificare che i dati elettrici riportati
sulla targhetta dei dati corrispondano
a quelli dell'impianto. In caso
contrario, contattare un elettricista.
• Utilizzare sempre una presa elettrica
con contatto di protezione
correttamente installata.
• Non utilizzare prese multiple e
prolunghe.
• Accertarsi di non danneggiare i
componenti elettrici (ad es. la spina di
alimentazione, il cavo di
alimentazione, il compressore).
Contattare il Centro di Assistenza
Autorizzato o un elettricista per
sostituire i componenti elettrici.
• Il cavo di alimentazione deve
rimanere sotto il livello della spina di
alimentazione.
• Inserire la spina di alimentazione nella
presa solo al termine
dell'installazione. Verificare che la
spina di alimentazione rimanga
accessibile dopo l'installazione.
• Non tirare il cavo di alimentazione per
scollegare l’apparecchiatura. Tirare
solo la spina.
2.3 Utilizzo
AVVERTENZA!
Rischio di lesioni, scottature
o scosse elettriche.
• Non modificare le specifiche tecniche
dell'apparecchiatura.
• Non introdurre apparecchiature
elettriche (ad es. gelatiere)
nell'apparecchiatura se non
specificamente consentito dal
produttore.
• Fare attenzione a non danneggiare il
circuito refrigerante. Esso contiene
isobutano (R600a), un gas naturale
con un alto livello di compatibilità
ambientale, tuttavia il gas è
infiammabile.
• Nel caso di danno al circuito
refrigerante, assicurarsi che non si
sviluppino fiamme libere e scintille nel
locale. Aerare bene l'ambiente.
• Non appoggiare oggetti
incandescenti sulle parti in plastica
dell'apparecchiatura.
• Non introdurre bevande analcoliche
nel vano congelatore. Si verrà a creare
una pressione nel contenitore della
bevanda.
• Non conservare gas e liquidi
infiammabili nell'apparecchiatura.
• Non appoggiare o tenere liquidi o
materiali infiammabili, né oggetti
facilmente incendiabili
sull'apparecchiatura, al suo interno o
nelle immediate vicinanze.
• Non toccare il compressore o il
condensatore. Sono incandescenti.
• Non togliere o toccare gli oggetti nel
vano congelatore con le mani
bagnate o umide.
• Non ricongelare del cibo
precedentemente scongelato.
• Attenersi alle istruzioni per la
conservazione riportate sulla
confezione del cibo surgelato.
2.4 Luce interna
• Il tipo di lampadina utilizzata per
questa apparecchiatura non può
essere utilizzato per l'illuminazione
domestica
2.5 Pulizia e cura
AVVERTENZA!
Vi è il rischio di ferirsi o
danneggiare
l'apparecchiatura.
• Prima di eseguire qualunque
intervento di manutenzione, spegnere
l'apparecchiatura ed estrarre la spina
dalla presa.
• L'unità refrigerante di questa
apparecchiatura contiene idrocarburi.
L’unità deve essere ricaricata ed
ispezionata esclusivamente da
personale qualificato.
• Controllare regolarmente lo scarico
dell'apparecchiatura e, se necessario,
pulirlo. L'ostruzione dello scarico può
causare un deposito di acqua di
ITALIANO
17

sbrinamento sul fondo
dell'apparecchiatura.
2.6 Smaltimento
AVVERTENZA!
Rischio di lesioni o
soffocamento.
• Staccare la spina dall'alimentazione
elettrica.
• Tagliare il cavo di rete e smaltirlo.
• Rimuovere la porta per evitare che
bambini e animali domestici
rimangano chiusi all’interno
dell’apparecchiatura.
• Il circuito refrigerante e i materiali di
isolamento di questa apparecchiatura
rispettano l'ozono.
• La schiuma isolante contiene gas
infiammabili. Contattare le autorità
locali per ricevere informazioni su
come smaltire correttamente
l'apparecchiatura.
• Non danneggiare i componenti
dell'unità refrigerante che si trovano
vicino allo scambiatore di calore.
3. USO DELL'APPARECCHIATURA
3.1 Pannello dei comandi
1 2
3
4
7
6
5
1
Tasto ON/OFF
2
Tasto azzeramento allarme
3
Tasto OK
4
Tasto Temperatura più calda
5
Display
6
Tasto Temperatura più fresca
7
Tasto Mode
È possibile modificare il volume del tasto
premendo i tasti Mode e di temperatura
più fresca contemporaneamente per
alcuni secondi. La modifica è reversibile.
Display
A
BC
D
E
F
A. Funzione MinuteMinder
B. Timer
C. Indicatore della temperatura
D. Spia allarme
E. Funzione FROSTMATIC
F. Funzione ChildLock
www.aeg.com18

3.2 Accensione
1. Inserire la spina nella presa di
alimentazione.
2. Premere il tasto ON/OFF
dell'apparecchiatura se il display è
spento.
Il segnale acustico d'allarme potrebbe
attivarsi dopo alcuni secondi.
Gli indicatori di temperatura visualizzano
la temperatura impostata predefinita.
Per resettare l'allarme, fare riferimento
alla sezione "Allarme di alta
temperatura".
Per selezionare una temperatura diversa,
fare riferimento alla sezione
"Regolazione della temperatura".
Se sul display appare "dEMo", fare
riferimento al capitolo "Risoluzione
problemi".
3.3 Spegnimento
1. Premere ON/OFF per alcuni secondi.
Il display si spegne.
2. Scollegare la spina dalla presa di
corrente.
3.4 Regolazione della
temperatura
È possibile regolare la temperatura
impostata del congelatore premendo il
tasto temperatura.
Temperatura predefinita:
• -18°C per il congelatore
L'indicatore della temperatura mostra la
temperatura impostata.
La temperatura impostata
verrà raggiunta entro 24 ore.
Dopo un'interruzione di
corrente la temperatura
impostata rimane in
memoria.
3.5 Allarme di alta
temperatura
Un aumento di temperatura nel vano
congelatore (per esempio a causa di una
precedente interruzione
dell'alimentazione elettrica) è indicato
da:
• lampeggiamento delle spie di allarme
e della temperatura del congelatore;
• un segnale acustico.
Premere un tasto qualsiasi per resettare
l'allarme.
Il segnale acustico si spegne.
L'indicatore della temperatura del
congelatore visualizza per alcuni secondi
la temperatura più alta raggiunta, quindi
viene nuovamente visualizzata la
temperatura impostata.
La spia di allarme continua a
lampeggiare fino al ripristino delle
condizioni normali.
3.6 Funzione FROSTMATIC
La funzione FROSTMATIC accelera il
congelamento di alimenti freschi e, al
tempo stesso, protegge gli alimenti già
conservati da riscaldamenti indesiderati.
1. Premere il tasto Mode finché non
appare l'icona corrispondente.
La spia FROSTMATIC lampeggia.
2. Premere il tasto OK per confermare.
La spia FROSTMATIC viene visualizzata.
La funzione FROSTMATIC si
disattiva automaticamente
dopo 52 ore.
Per disattivare la funzione
anticipatamente, ripetere la
procedura finché la spia
FROSTMATIC non si
spegne.
3.7 Allarme porta aperta
Se la porta è lasciata aperta per alcuni
minuti, viene emesso un segnale
acustico. Le condizioni di allarme della
porta aperta sono indicate da:
• indicatore allarme lampeggiante;
• segnale acustico.
Al ripristino delle condizioni normali
(porta chiusa), l'allarme si interrompe. È
possibile disattivare il segnale acustico
premendo qualsiasi tasto.
3.8 Funzione MinuteMinder
La funzione MinuteMinder serve per
impostare un segnale acustico in un
preciso momento, utile per esempio
ITALIANO
19

quando una pietanza richiede il
raffreddamento di un alimento per un
certo periodo di tempo.
È utile anche quando è necessario un
promemoria per non dimenticare le
bottiglie sistemate nel congelatore per
un rapido raffreddamento.
1. Premere Mode finché non appare
l'icona corrispondente.
La spia MinuteMinder lampeggia.
Il timer visualizza il valore impostato (30
minuti) per alcuni secondi.
2. Premere il tasto Temperatura più
fredda o Temperatura più calda per
modificare il valore preimpostato del
timer da 1 a 90 minuti.
3. Premere OK per confermare.
La spia MinuteMinder viene visualizzata.
Il Timer inizia a lampeggiare (min).
È possibile modificare l'ora in qualsiasi
momento durante il conto alla rovescia e
alla fine premendo il tasto Temperatura
più fresca ed il Tasto temperatura più
calda.
Al termine del conto alla rovescia la spia
MinuteMinder lampeggia e viene
emesso un segnale acustico. Premere
OK per spegnere il segnale acustico e
porre fine alla funzione.
È possibile disattivare la funzione in
qualsiasi momento durante il conto alla
rovescia ripetendo i passaggi della
funzione fino allo spegnimento della
spia.
3.9 Funzione ChildLock
Attivare la funzione ChildLock per evitare
che i tasti vengano premuti
accidentalmente.
1. Premere Mode finché non appare
l'icona corrispondente.
La spia ChildLock lampeggia.
2. Premere OK per confermare.
La spia ChildLock viene visualizzata.
Per disattivare la funzione ChildLock,
ripetere la procedura finché la spia
ChildLock si spegne.
4. UTILIZZO QUOTIDIANO
AVVERTENZA!
Fare riferimento ai capitoli
sulla sicurezza.
4.1 Conservazione dei
surgelati
Al primo avvio o dopo un periodo di non
utilizzo, lasciare in funzione
l'apparecchiatura per almeno 2 ore
attivando la funzione FROSTMATIC
prima di introdurre gli alimenti. I cassetti
del congelatore consentono di
individuare rapidamente e facilmente la
confezione di alimenti desiderata. Se
occorre conservare grandi quantità di
cibo, si consiglia di rimuovere tutti i
cassetti ad eccezione del cassetto
inferiore, la cui presenza è necessaria per
assicurare la buona circolazione dell'aria.
Su tutti i ripiani è possibile posizionare
alimenti fino a una sporgenza massima di
15 mm dalla porta.
AVVERTENZA!
In caso di sbrinamento
accidentale, per esempio a
causa di un'interruzione
dell'alimentazione elettrica,
se l'alimentazione manca
per un periodo superiore al
valore indicato nella tabella
dei dati tecnici sotto
"Tempo di risalita", il cibo
scongelato deve essere
consumato rapidamente o
cucinato immediatamente e
quindi ricongelato (dopo il
raffreddamento).
4.2 Congelamento di alimenti
freschi
Il vano congelatore è adatto al
congelamento di cibi freschi e alla
conservazione a lungo termine di
alimenti congelati e surgelati.
Per congelare piccole quantità di
alimenti freschi non è necessario
modificare l'impostazione corrente.
www.aeg.com
20
La pagina si sta caricando...
La pagina si sta caricando...
La pagina si sta caricando...
La pagina si sta caricando...
La pagina si sta caricando...
La pagina si sta caricando...
La pagina si sta caricando...
La pagina si sta caricando...
-
 1
1
-
 2
2
-
 3
3
-
 4
4
-
 5
5
-
 6
6
-
 7
7
-
 8
8
-
 9
9
-
 10
10
-
 11
11
-
 12
12
-
 13
13
-
 14
14
-
 15
15
-
 16
16
-
 17
17
-
 18
18
-
 19
19
-
 20
20
-
 21
21
-
 22
22
-
 23
23
-
 24
24
-
 25
25
-
 26
26
-
 27
27
-
 28
28


AEG A82700GNX0 Manuale utente
- Categoria
- Frigoriferi combinati
- Tipo
- Manuale utente
in altre lingue
- English: AEG A82700GNX0 User manual