
EN 8VHU0DQXDO
IT MANUALE PER L’UTENTE
PL
(;6-(,:
(;6-(,:
(;6-(,:

8
9
11
12
13
14
20
20
21
24
25
26
9.
10.
11.
12.
13.
14.

,5.30:/
:(-,;@05:;9<*;065:
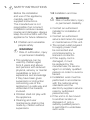
)LMVYL[OLPUZ[HSSH[PVU
HUK\ZLVM[OLHWWSPHUJL
JHYLM\SS`YLHK[OL
Z\WWSPLKPUZ[Y\J[PVUZ
;OLTHU\MHJ[\YLYPZUV[
YLZWVUZPISLPMHUPUJVYYLJ[
PUZ[HSSH[PVUHUK\ZLJH\ZLZ
PUQ\YPLZHUKKHTHNLZ(S^H`Z
RLLW[OLPUZ[Y\J[PVUZ^P[O[OL
HWWSPHUJLMVYM\[\YLYLMLYLUJL
*OPSKYLUHUK]\SULYHISL
WLVWSLZHML[`
>(9505.
9PZRVMZ\MMVJH[PVUPUQ\Y`
VYWLYTHULU[KPZHIPSP[`
;OPZHWWSPHUJLJHUIL
\ZLKI`JOPSKYLUHNLK
MYVT`LHYZHUKHIV]L
HUKWLYZVUZ^P[OYLK\JLK
WO`ZPJHSZLUZVY`VYTLU[HS
JHWHIPSP[PLZVYSHJRVM
L_WLYPLUJLHUKRUV^SLKNL
PM[OL`OH]LILLUNP]LU
Z\WLY]PZPVUVYPUZ[Y\J[PVU
JVUJLYUPUN\ZLVM[OL
HWWSPHUJLPUHZHML^H`HUK
\UKLYZ[HUK[OLOHaHYKZ
PU]VS]LK
*OPSKYLUZOHSSUV[WSH`^P[O
[OLHWWSPHUJL
*SLHUPUNHUK\ZLY
THPU[LUHUJLZOHSSUV[IL
THKLI`JOPSKYLU^P[OV\[
Z\WLY]PZPVU
0UZ[HSSH[PVUHUK<ZL
>(9505.
9PZRVMZ\MMVJH[PVUPUQ\Y`
VYWLYTHULU[KPZHIPSP[`
*VU[HJ[HUH\[OVYPZLK
PUZ[HSSLYMVYPUZ[HSSH[PVUVM
[OPZ\UP[
*VU[HJ[HUH\[OVYPZLK
ZLY]PJL[LJOUPJPHUMVYYLWHPY
VYTHPU[LUHUJLVM[OPZ\UP[
;OLZVJRL[V\[SL[YLX\PYLK
[VZ\WWS`WV^LYT\Z[
ILJVUULJ[LKHUK
JVTTPZZPVULKI`H
SPJLUJLKJVU[YHJ[VY
0M[OLZ\WWS`JVYKPZ
KHTHNLKP[T\Z[
ILYLWSHJLKI`[OL
THU\MHJ[\YLYP[ZZLY]PJL
HNLU[VYZPTPSHYS`X\HSPÄLK
WLYZVUZPUVYKLY[VH]VPKH
OHaHYK
0UZ[HSSH[PVU^VYRT\Z[IL
WLYMVYTLKPUHJJVYKHUJL
^P[O[OLUH[PVUHS^PYPUN
Z[HUKHYKZHUK[OL
LSLJ[YPJP[`Z\WWSPLYZZLY]PJL
Y\SLZI`H\[OVYPZLK
WLYZVUULSVUS`
0M[OL\UP[PZ[VILTV]LK
[VHUV[OLYSVJH[PVUVY
KPZWVZLKVMVUS`H
Z\P[HIS`X\HSPÄLKWLYZVU
PZWLYTP[[LK[V\UKLY[HRL
Z\JO^VYR

^^^LSLJ[YVS\_JVT
0M`V\UV[PJLHU\U\ZHS
ZP[\H[PVUZ\JOHZHI\YUPUN
ZTLSSWSLHZLZ^P[JOVMM[OL
WV^LY[V[OLHPYJVUKP[PVULY
HUKJVU[HJ[HU,SLJ[YVS\_
ZLY]PJLHNLU[0M[OPZ
HIUVYTHSZ[H[\ZJVU[PU\LZ
[OLHPYJVUKP[PVULYTH`IL
KHTHNLKVYL]LUJH\ZL
LSLJ[YPJZOVJRVYÄYL
+VUV[VWLYH[L[OLHPY
JVUKP[PVULY^P[O^L[OHUKZ
;OPZTH`JH\ZLLSLJ[YPJ
ZOVJR
+VUV[KHTHNLVYJ\[
VMM[OLWV^LYJVYKVY
V[OLY^PYLZ0M[OPZVJJ\YZ
WSLHZLOH]LP[YLWHPYLKVY
YLWSHJLKI`HUHJJYLKP[LK
[LJOUPJPHU
+VUV[JVUULJ[[OPZHPY
JVUKP[PVULY[VHT\S[PV\[SL[
WV^LYIVHYK
7SLHZLZ^P[JOVMM[OL
WV^LYZ\WWS`[V[OLHPY
JVUKP[PVULYPMP[PZUV[[V
IL\ZLKMVYHUL_[LUKLK
WLYPVK6[OLY^PZLP[^PSS
HJJ\T\SH[LK\Z[HUKTH`
JH\ZLHÄYL
)LMVYLJSLHUPUN[OL
HPYJVUKP[PVULYWSLHZL
KPZJVUULJ[[OLWV^LY
Z\WWS`PUVYKLY[VLSPTPUH[L
[OLWVZZPIPSP[`VMLSLJ[YPJ
ZOVJR
;OLWV^LYZ\WWS`ZOV\SK
ILTH[JOLK^P[O[OLHPY
JVUKP[PVULYHJJVYKPUN[V
[OLPUZ[HSSH[PVUTHU\HS
(PYJVUKP[PVULYZWYV]PKLK
^P[OHZ\WWS`JVYKZOV\SK
ILJVUULJ[LKKPYLJ[S`
[VHWV^LYV\[SL[^P[OH
Z\P[HISLZHML[`Z^P[JO(PY
JVUKP[PVULYZ[OH[HYLOHYK
^PYLKT\Z[ILJVUULJ[LK
[VHZ\P[HISLZHML[`JPYJ\P[
IYLHRLYHJJVYKPUN[V[OL
PUZ[HSSH[PVUTHU\HS
7SLHZLLUZ\YL[OH[[OL
WV^LYZ\WWS`[V[OLHPY
JVUKP[PVULYPZZ[HISLHUK
TLL[Z[OLYLX\PYLTLU[Z
ZL[V\[PU[OLPUZ[HSSH[PVU
THU\HS
(S^H`ZLUZ\YL[OLWYVK\J[
PZPUZ[HSSLK^P[OHWWYVWYPH[L
LHY[OPUN
-VYZHML[`ILZ\YL[V[\YU
VMM[OLJPYJ\P[IYLHRLY
ILMVYLWLYMVYTPUNHU`
THPU[LUHUJLVYJSLHUPUN
VY^OLU[OLWYVK\J[
PZUV[\ZLKMVYHU
L_[LUKLKWLYPVKVM[PTL
(JJ\T\SH[LKK\Z[TH`
JH\ZLÄYLVYLSLJ[YPJZOVJR
:LSLJ[[OLTVZ[HWWYVWYPH[L
[LTWLYH[\YL0[JHUZH]L
LSLJ[YPJP[`

,5.30:/
+VUV[RLLW^PUKV^Z
HUKKVVYZVWLUMVYHSVUN
[PTLK\YPUNVWLYH[PVU0[
^PSSYLZ\S[PUPUZ\MÄJPLU[
WLYMVYTHUJL
+VUV[ISVJR[OLHPYPUSL[
VYV\[SL[0[^PSSYLZ\S[PU
PUZ\MÄJPLU[WLYMVYTHUJL
HUKJH\ZLTHSM\UJ[PVUZ
2LLWJVTI\Z[PISLTH[LYPHSZ
H^H`MYVT[OL\UP[ZH[SLHZ[
T0[TH`JH\ZLÄYL
+VUV[Z[LWVU[OL[VWVM
[OLV\[KVVY\UP[VYWSHJL
OLH]`[OPUNZVUP[0[TH`
JH\ZLKHTHNLVYPUQ\Y`
+VUV[H[[LTW[[VYLWHPY[OL
HPYJVUKP[PVULYI``V\YZLSM
0UJVYYLJ[YLWHPYZTH`JH\ZL
LSLJ[YPJZOVJRVYÄYL7SLHZL
JVU[HJ[`V\YSVJHSH\[OVYPZLK
ZLY]PJLJLU[YL
+VUV[PUZLY[`V\YOHUKZVY
VIQLJ[ZPU[V[OLHPYPUSL[VY
V\[SL[0[TH`JH\ZLPUQ\Y`
+VUV[L_WVZLHUPTHSZVY
WSHU[ZKPYLJ[S`[V[OLHPYÅV^
+VUV[\ZL[OL\UP[MVYHU`
V[OLYW\YWVZLZ\JOHZ
WYLZLY]PUNMVVKVYKY`PUN
JSV[OLZ
+VUV[ZWSHZO^H[LYVU[OL
HPYJVUKP[PVULY0[TH`JH\ZL
LSLJ[YPJZOVJRVYTHSM\UJ[PVU
-VYZHML[`ILZ\YL[V[\YU
VMM[OLJPYJ\P[IYLHRLY
ILMVYLWLYMVYTPUNHU`
THPU[LUHUJLVYJSLHUPUN
VY^OLU[OLWYVK\J[
PZUV[\ZLKMVYHU
L_[LUKLKWLYPVKVM[PTL
(JJ\T\SH[LKK\Z[TH`
JH\ZLÄYLVYLSLJ[YPJZOVJR
0UZ[HSSZ:LY]PJLZTHPU[HPUZ
YLWHPYLZJOLJRZMVYSLHRZVY
KLJVTTPZZPVUZLX\PWTLU[
HUKWYVK\J[YLJ`JSPUNZOV\SK
ILJHYYPLKV\[I`UH[\YHS
WLYZVUZ[OH[OVSK[OLYLSL]HU[
JLY[PÄJH[LZ
3LHRJOLJRZ^P[O[OL
MVSSV^PUNMYLX\LUJ`!^OLYL
HSLHRHNLKL[LJ[PVUZ`Z[LT
PZPUZ[HSSLKH[SLHZ[L]LY`
TVU[OZ
6WLYH[VYZVMLX\PWTLU[^OPJO
PZYLX\PYLK[VILJOLJRLK
MVYSLHRZZOHSSLZ[HISPZOHUK
THPU[HPUYLJVYKZMVYLHJO
WPLJLVMZ\JOLX\PWTLU[
;OPZ\UP[JVU[HPUZH9(
YLMYPNLYHU[Å\PK^P[OH.>7
LX\HS[V9LMYPNLYHU[
^LPNO[! e2.
KLWLUKPUNVUKPMMLYLU[
TVKLSZ

^^^LSLJ[YVS\_JVT
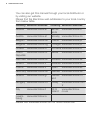
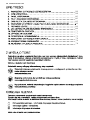
@V\JHUHSZVNL[[OPZTHU\HS[OYV\NO`V\YSVJHSKPZ[YPI\[VYVY
I`]PZP[PUNV\Y^LIZP[L
7SLHZLÄUK[OL,SLJ[YVS\_^LIHKKYLZZLZ[V`V\YSVJHSJV\U[Y`
MYVTILSV^[HISL
*V\U[Y` >LIZP[LHKKYLZZ *V\U[Y` >LIZP[LHKKYLZZ
(SIHUPH ^^^LSLJ[YVS\_HS 5L[OLY
SHUKZ
^^^LSLJ[YVS\_US
(\Z[YPH ^^^LSLJ[YVS\_H[ 5VY^H` ^^^LSLJ[YVS\_UV
)LSNP\T ^^^LSLJ[YVS\_IL 7VSHUK ^^^LSLJ[YVS\_WS
)\SNHYPH ^^^LSLJ[YVS\_IN 7VY[\NHS ^^^LSLJ[YVS\_W[
*YVH[PH ^^^LSLJ[YVS\_OY 9VTHUPH ^^^LSLJ[YVS\_YV
*aLJO
9LW\ISPR
^^^LSLJ[YVS\_Ja :LYIPH ^^^LSLJ[YVS\_YZ
+LUTHYR ^^^LSLJ[YVS\_KR :SV]HRPH ^^^LSLJ[YVS\_ZR
-PUSHUK ^^^LSLJ[YVS\_Ä :SV]LUPH ^^^LSLJ[YVS\_ZS
-YHUJL ^^^LSLJ[YVS\_MY :WHPU ^^^LSLJ[YVS\_LZ
.LYTHU` ^^^LSLJ[YVS\_KL :^LKLU ^^^LSLJ[YVS\_ZL
.YLLJL ^^^LSLJ[YVS\_NY :^P[aLY
SHUK
^^^LSLJ[YVS\_JO
/\UNHY` ^^^LSLJ[YVS\_O\ ;\YRL` ^^^LSLJ[YVS\_JVT
[Y
0[HS` ^^^LSLJ[YVS\_P[ <2
0YLSHUK
^^^LSLJ[YVS\_
JV\R
3\_LT
IV\YN
^^^LSLJ[YVS\_S\
7SLHZL]PZP[^^^LSLJ[YVS\_JVTMVYTVYLPUMVYHT[PVU

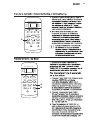
2.1 Console Type
4
10
TEMP
AUTO
COOL
DRY
HEAT
FAN
HIGH
LOW
MODE
FAN SPEED
VERTICAL/
SWING
TIMER ON
SLEEP
ON/OFF
TIMER OFF
RESET LOCK
SET TEMPERATURE( C)
FOLLOW
ME
TURBO
HORIZONTAL/
SWING
MED
1
11
2
5
6
7
8
9
3
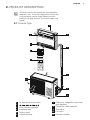
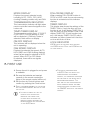
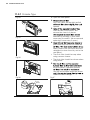
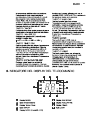
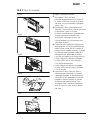
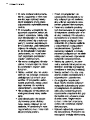
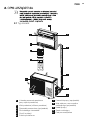
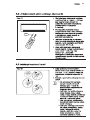
1 Air flow louver (at air outlet)
2
3 Wire controller (optional)
4 Installation part
5 Display panel
6 Connecting pipe
7 Drain hose, refrigerant connecting
pipe (optional)
8 Connective cable (optional)
9 Stop valve
10 Fan hood
11 Remote controller
All the pictures in this manual are for explanation
purposes only. The actual shape of the indoor unit
you purchased may be slight different on front
panel and display window. The actual shape shall
prevail.
2. PRODUCT DESCRIPTION
7ENGLISH

8 www.electrolux.com
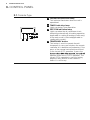
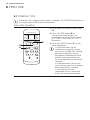
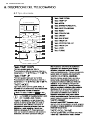
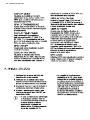
3.1 Console Type
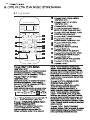
1 OPERATION indication lamp
This indicator illuminates when the unit is
operational.
2 TIMER indication lamp
Lights up during Timer operation.
3 DEF./FAN indication lamp
Lights up when the air conditioner starts
defrosting automatically in heating operation
(applicable to cooling & heating models only)
or fan only mode is selected(applicable to
cooling only models).
4 TEMPORARY button
This button is used to operate the unit
temporarily in case you misplace the remote
controller or its batteries are exhausted. One
press of the manual control button will lead
to the forced AUTO operation. If press the
operate under forced COOL operation. The
forced COOL operation is used for testing
purposes only, please do not choose it
unless it is necessary.
1 2
3
4
3. CONTROL PANEL

9 ENGLISH
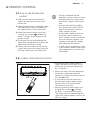
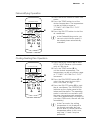
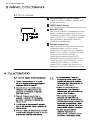
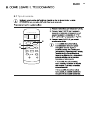
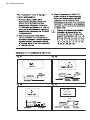
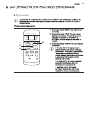
4.2 Location of the Remote Control
Fig.01
Max. 8m
t Keep the remote control where its
signal can reach the receiver of the
indoor unit (a maximum distance of
8 m is allowed).
t When you select the timer operation,
the remote control automatically
transmits a signal to the indoor unit at
the speci
ed time.
t If you keep the remote control in a
position that hinders proper signal
transmission, a time lag of up to
15 minutes may occur.
t When the remote control sends out
a signal, the symbol
will blink
for about 1 second on the display.
The indoor unit will acknowledge the
signal with a beep when it receives an
effective signal.
4.1 How to use the Remote
control
1. Keep the remote control where its
signal can reach the receiver of the
indoor unit.
2. When operate the air conditioner, make
sure the remote control is pointing to
the signal receiver of the indoor unit.
3. When the remote control sends out
a signal, the symbol
will blink for
about 1 second on the display of the
remote control.
4. The indoor unit will acknowledge the
signal with a beep when it receives the
signal from the remote control.
5. Please press the button of the remote
control and resend the signal if you did
not hear a beep from the indoor unit.
t The air conditioner will not
operate if curtains, doors or other
materials block the signals from
the remote control to the indoor
unit.
t Prevent any liquid from falling
into the remote control. Do not
expose the remote control to
direct sunlight or heat.
t If the infrared signal receiver on
the indoor unit is exposed to
direct sunlight, the air conditioner
may not function properly. Use
curtains to prevent the sunlight
from falling on the receiver.
t If other electrical appliances react
to the remote control, either move
these appliances or consult your
local dealer.
4. REMOTE CONTROL

10 www.electrolux.com
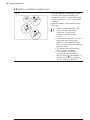
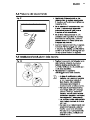
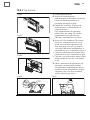
4.3 Battery installation/replacement
Fig.02 t Slide the battery compartment cover
off and insert two new alkaline dry
batteries (2x AAA 1.5 Volt). Make sure
that the polarity of (+) or (-) is installed
correctly.
t Slide the battery compartment cover
back on.
t When changing batteries, do
not use old or varied ones,
otherwise, it may cause
problems with the remote
control.
t If the remote control is not used
for a long time, remove the
batteries as old batteries may
leak or corrode and damage the
remote control.
t The battery life during normal
use is about six months.
t If the remote control does
not operate normally,please
remove and re t the batteries. If
abnormal operation continues,
replace with new batteries.

11ENGLISH
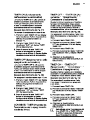
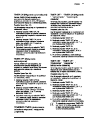
5.1 Console Type
TEMP
AUTO
COOL
DRY
HEAT
FAN
HIGH
LOW
MODE
FAN SPEED
VERTICAL/
SWING
TIMER ON
SLEEP
ON/OFF
TIMER OFF
RESET LOCK
SET TEMPERATURE( C)
FOLLOW
ME
TURBO
HORIZONTAL/
SWING
MED
1
3
4
5
6
7
2
9
8
10
11
12
13
14
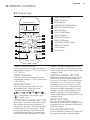
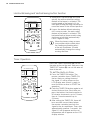
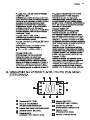
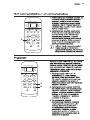
1 TEMP DOWN Button
2 TEMP UP Button
3 MODE Button
4 HORIZONTAL/SWING Button
5 VERTICAL/SWING Button
6 RESET Button
7 FOLLOW ME Button
8 ON/OFF Button
9 FAN SPEED Button
10 TIMER ON Button
11 ECONOMY/SLEEP Button
12 TIMER OFF Button
13 LOCK Button
14 Turbo Button
TEMP DOWN Button
Push this button to decrease the indoor
temperature setting in 1°C(2°F) increments
to 17°C(62°F).
TEMP UP Button
Push this button to increase the indoor
temperature setting in 1°C(2°F) increments
to 30°C(88°F).
MODE BUTTON
Each time the button is pressed, the
operation mode is selected in the
sequence of the following:
Heat mode is for reverse cycle
models only.
HORIZONTAL/SWING BUTTON
When press the button once and quickly,
the air flow direction setting feature of
the louver is activated. The moving angle
of the louver is 6º for each press. Keep
pressing the button to move the louver
to the desired position. If keep pressing
the button without releasing for 2 more
seconds, the auto swing feature of the
louver is activated. The horizontal louver
would swing up/down automatically. Press
it again to stop.
VERTICAL/SWING BUTTON
When press the button once and quickly,
the air flow direction setting feature of
the louver is activated.The moving angle
of the louver is 6º for each press. Keep
pressing the button to move the louver
to the desired position. If keep pressing
the button without releasing for 2 more
seconds, the auto swing feature of the
louver is activated. The vertical louver
would swing right/left automatically. Press
it again to stop.
RESET BUTTON
Once the recessed RESET button is
pressed, all of the current settings will be
cancelled and the controller will return to
the initial settings.
FOLLOW ME BUTTON
Push this button to initiate the Follow Me
function, the remote controller begins
AUTO COOL DRY HEAT FAN
5. REMOTE CONTROL

to detect the actual temperature at its
location. The remote controller will send
this signal to the air conditioner every
3 minutes interval until press the Follow
Me button again. The air conditioner will
beep to indicate the Follow Me feature
has ended if it does not receive the signal
during any 7 minutes interval.
ON/OFF BUTTON
Operation starts when this button is
pressed and stops when the button is
pressed again.
FAN SPEED BUTTON
Used to select the fan speed in four steps.
TIMER ON BUTTON
Press this button to activate the Auto-on
time setting. Each press will increase the
time setting in 30 minutes increments, up
to 10 hours, then at 1 hour increments up
to 24 hours. To cancel the Auto-on time
setting, just press the button until the time
setting is 0.0.
ECONOMY/SLEEP BUTTON
Press this button to activate the Energy-
Saving mode. Press again to stop
the function. This function is available
on COOL, HEAT or AUTO mode only
and maintain the most comfortable
temperature for you.
TIMER OFF BUTTON
Press this button to activate the Auto-off
time setting. Each press will increase the
time setting in 30 minutes increments, up
to 10 hours, then at 1 hour increments up
to 24 hours. To cancel the Auto-off time
setting, just press the button until the time
setting is 0.0.
LOCK BUTTON
When you press the Lock button,all
current settings are locked in and the
remote controller does not accept any
operation except that of the Lock. Press
again to cancel the Lock mode.
TURBO BUTTON
Push this button to activate the Turbo
function which enables the unit to reach
the preset temperature at cooling or
heating operation in the shortest time(if
the unit has no this function, there is no
corresponding operation happened when
press Turbo button.)
AUTO LOW HIGHMED
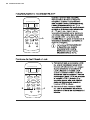
6. REMOTE CONTROL DISPLAY INDICATOR
TIMER ON OFF
SET TEMPERATURE
1
3 4
5
6
7
2
9
8
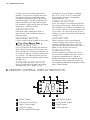
1 MODE display
2 Transmission Indicator
3 Temp./Timer display
4 ON/OFF display
5 MODE display(FAN mode)
6 FAN SPEED display
7 FOLLOW ME display
8 TIMER display
9 LOCK Indicator
12 www.electrolux.com

13 ENGLISH
MODE +0:73(@
+PZWSH`Z[OLJ\YYLU[ZLSLJ[LKTVKL
0UJS\KPUN(<;6*663+9@/,(;
JVVSPUNOLH[PUNTVKLSZVUS`HUK-(5
;9(5:40::06505+0*(;69
;OPZ[YHUZTPZZPVUPUKPJH[VY^PSSSPNO[^OLU
YLTV[LJVU[YVSSLY[YHUZTP[ZZPNUHSZ[V[OL
PUKVVY\UP[
;,47;04,9+0:73(@
;OL[LTWLYH[\YLZL[[PUNMYVT*-
[V*-VY[PTLYZL[[PUNeO
^PSSILKPZWSH`LK0M-(5VUS`TVKLPZ
ZLSLJ[LK[OLYL^PSSILUVKPZWSH`
656--+0:73(@
;OPZPUKPJH[VY^PSSILKPZWSH`LK^OLU[OL
\UP[PZVWLYH[PUN
-(5:7,,++0:73(@
+PZWSH`Z[OLZLSLJ[LKMHUZWLLK!(<;6
/0./4,+HUK36>5V[OPUNKPZWSH`Z
^OLU[OLMHUZWLLKPZZLSLJ[LKPU(<;6
ZWLLK>OLU(<;6VY+9@4VKL
PZZLSLJ[LK[OLYL^PSSILUVZPNUHSZ
KPZWSH`LK
-6336>4,+0:73(@
>OLUWYLZZPUN-6336>4,I\[[VUPU
*663VY/,(;TVKL[OLYLTV[LZLUZPUN
M\UJ[PVUPZHJ[P]H[LKHUK[OPZPUKPJH[VY
KPZWSH`Z
;04,9+0:73(@
;OPZKPZWSH`HYLHZOV^Z[OLZL[[PUNZVM[OL
;04,9;OH[PZPMVUS`[OL(\[VVU[PTL
M\UJ[PVUPZZL[P[^PSSKPZWSH`;04,9650M
VUS`[OL(\[VVMM[PTLM\UJ[PVUPZZL[P[^PSS
KPZWSH`;04,96--0MIV[OM\UJ[PVUZHYL
ZL[P[^PSSKPZWSH`;04,9656--^OPJO
PUKPJH[LZ`V\OH]LJOVZLUIV[O[OL(\[V
VU[PTLHUK(\[VVMM[PTL
36*205+0*(;69
36*2+0:73(@0:+0:73(@,+>/,57<:/05.
;/,36*2)<;;657<:/;/,36*2)<;;65
;6*3,(9+0:73(@
-09:;<:,
,UZ\YL[OL\UP[PZWS\NNLKPUHUKWV^LY
PZH]HPSHISL
)LZ\YL[OLIH[[LYPLZHYLPUZLY[LK
JVYYLJ[S`PU[OLYLTV[LJVU[YVS[OL
SPNO[ZVU[OLYLTV[LJVU[YVS^PSSILVU
:L[[OL[PTLI`*VU[YVSI\[[VUZHUK
JVUÄYTI`WYLZZPUN[OL*SVJRI\[[VU
7605;;/,9,46;,*65;963;6;/,05+669
<50;(5+79,::656--)<;;65;6;<95
;/,<50;65
05*(:,6-,5,9.@*<;6--69
796+<*;:/<;+6>5>/,5
9,46=05.;/,76>,9*69+
69,=,5>/,5*/(5.05.;/,
9,46;,*65;963)(;;,90,:;/,
40*96796*,::69>0339,;<95)(*2
;6;/,(<;646+,
;
/,+,-(<3;67,9(;05.46+,
0:(<;665*,@6<:,3,*;;/,
67,9(;05.46+,>0;/9,46;,
*65;963;/,67,9(;05.*65+0;065:
>033),:(=,+05;/,05+669<50;»:
40*96*647<;,94,469@;/,
5,?;;04,;/,(09*65+0;065,9>033
:;(9;67,9(;05.<5+,9;/,:(4,
*65+0;065:>/,5@6<:0473@7<:/
;/,656--)<;;656-;/,9,46;,
*65;963

14 www.electrolux.com
8.1 CONSOLE TYPE
Ensure the unit is plugged in and power is available. The OPERATION indicator on
the display panel of the indoor unit illuminates.
Automatic Operation
TEMP
AUTO
COOL
DRY
HEAT
FAN
HIGH
LOW
MODE
FAN SPEED
VERTICAL/
SWING
TIMER ON
SLEEP
ON/OFF
TIMER OFF
RESET LOCK
SET TEMPERATURE( C)
FOLLOW
ME
TURBO
HORIZONTAL/
SWING
MED
A
B
C
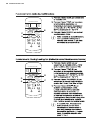
1. Press the MODE button to select Auto
(A).
2. Press the TEMP button (B) to
set the desired temperature. The
temperature can be set within a range
of 17ºC/62ºF~30ºC/88ºF in 1ºC/2ºF
increments.
3. Press the ON/OFF button (C) to start
the air conditioner.
t*OUIF"VUPNPEFUIFBJS
conditioner can logically choose
UIFNPEFPG$PPMJOH'BO)FBUJOH
and Dehumidifying by sensing
the difference between the actual
ambient room temperature and
the set temperature on the remote
controller.
t*OUIF"VUPNPEFZPVDBOOPU
switch the fan speed. It has already
been automatically controlled.
t*GUIF"VUPNPEFJTOPU
DPNGPSUBCMFGPSZPVUIFEFTJred
mode can be selected manually.
8. FIRST USE

15 ENGLISH
Dehumidifying Operation
TEMP
AUTO
COOL
DRY
HEAT
FAN
HIGH
LOW
MODE
FAN SPEED
VERTICAL/
SWING
TIMER ON
SLEEP
ON/OFF
TIMER OFF
RESET LOCK
SET TEMPERATURE( C)
FOLLOW
ME
TURBO
HORIZONTAL/
SWING
MED
A
B
C
1. Press the MODE button to select DRY
mode.
2. Press the TEMP button to set the
desired temperature. The temperature
can be set within a range of
17ºC/62ºF~30ºC/88ºF in 1ºC/2ºF
increments.
3. Press the ON/OFF button to start the
air conditioner.
In the Dehumidifying mode, you
can not switch the fan speed. It
has already been automatically
controlled.
Cooling/Heating/Fan Operation
TEMP
AUTO
COOL
DRY
HEAT
FAN
HIGH
LOW
MODE
FAN SPEED
VERTICAL/
SWING
TIMER ON
SLEEP
ON/OFF
TIMER OFF
RESET LOCK
SET TEMPERATURE( C)
FOLLOW
ME
TURBO
HORIZONTAL/
SWING
MED
A
B
C
D
1. Press the MODE button (A) to select
COOL, HEAT (Reverse cycle models
only) or FAN mode.
2. Press the TEMP button (B) to
set the desired temperature. The
temperature can be set within a range
of 17ºC/62ºF~30ºC/88ºF in 1ºC/2ºF
increments.
3. Press the FAN SPEED button (C) to
select the fan speed in four steps -
Auto, Low, Med, or High.
4. Press the ON/OFF button (D) to start
the air conditioner. The OPERATION
indicator on the display panel of the
indoor unit illuminates. The operating
mode is selected in accordance with
the room temperature and operation
starts after approximately 3 minutes (If
you select FAN mode, the unit will start
immediately).
In the Fan mode, the setting
temperature is not displayed in
the remote controller and you
are not able to control the room
temperature either. In this case,
only step 1, 3 and 4 may be
performed.

16 www.electrolux.com
Horizontal/swing and Vertical/swing button function
TEMP
AUTO
COOL
DRY
HEAT
FAN
HIGH
LOW
MODE
FAN SPEED
VERTICAL/
SWING
TIMER ON
SLEEP
ON/OFF
TIMER OFF
RESET LOCK
SET TEMPERATURE( C)
FOLLOW
ME
TURBO
HORIZONTAL/
SWING
MED
A
1. When press the button (A) once and
quickly, the air flow direction setting
feature of the louver is activated. The
moving angle of the louver is 6º for
each press.Keep pressing the button to
move the louver to the desired position.
2. If press the button without releasing
for 2 more seconds, the auto swing
feature of the louver is activated. The
horizontal/vertical louver would swing
(up/down or left/right) automatically.
Press it again to stop.
When the louver swing or move
to a position which would affect
the cooling and heating effect
of the air conditioner, it would
automatically change the swing/
moving direction.
Timer Operation
TEMP
AUTO
COOL
DRY
HEAT
FAN
HIGH
LOW
MODE
FAN SPEED
VERTICAL/
SWING
TIMER ON
SLEEP
ON/OFF
TIMER OFF
RESET LOCK
SET TEMPERATURE( C)
FOLLOW
ME
TURBO
HORIZONTAL/
SWING
MED
A
B
Press the TIMER ON button (A) can set
the auto-on time of the unit. And press the
TIMER OFF button (B) can set the auto-off
time of the unit.
To set the Auto-on time.
1. Press the TIMER ON button. The
remote controller shows TIMER ON,
the last Auto-on setting time and
the signal “h” will be shown on the
LCD display area. Now it is ready to
reset the Auto-on time to START the
operation.
2. Push the TIMER ON button again to set
desired Auto-on time. Each time you
press the button, the time increases in
30 minutes increments, up to 10 hours,
then at 1 hour increments up to
24 hours.
3. After setting the TIMER ON, there will
be a one-half second delay before
the remote controller transmits the
signal to the air conditioner. Then, after
approximately another 2 seconds, the
signal “h” will disappear and the set
temperature will re-appear on the LCD
display window.

17 ENGLISH
To set the Auto-off time.
1. Press the TIMER OFF button. The
remote controller shows TIMER OFF,
the last Auto-off setting time and
the signal “h” will be shown on the
LCD display area. Now it is ready to
reset the Auto-off time to START the
operation.
2. Push the TIMER OFF button again
to set desired Auto-off time. Each
time you press the button, the time
increases in 30 minutes increments, up
to 10 hours, then at 1 hour increments
up to 24 hours.
3. After setting the TIMER OFF, there will
be a one-half second delay before
the remote controller transmits the
signal to the air conditioner. Then, after
approximately another 2 seconds, the
signal “h” will disappear and the set
temperature will re-appear on the LCD
display window.
The effective operation time set by
the remote controller for the timer
function is limited to the following
settings: 0.5, 1.0, 1.5, 2.0, 2.5,
3.0, 3.5, 4.0, 4.5, 5.0, 5.5, 6.0,
6.5, 7.0, 7.5, 8.0, 8.5, 9.0, 9.5, 10,
11, 12, 13, 14, 15, 16, 17, 18, 19,
20, 21, 22, 23 and 24.
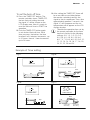
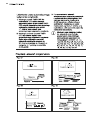
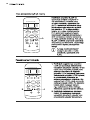
Example of Timer setting
Fig.07
Fig.08
Fig.08
Fig.10
h
TIMER ON
Off
Start
Set
6 hours later
TIMER ON OFF
Start
Stop
On
Set
2 hours later
after setting
10 hours later
after setting
h
h
Stop
On
Set 10 hours later
TIMER OFF
h
TIMER ON OFF
Start
Stop
Off
Set
2 hours later
after setting
5 hours later
after setting

18 www.electrolux.com
TIMER ON (Auto-on Operation)
The TIMER ON feature is useful when
you want the unit to turn on automatically
before say when you return home. The
air conditioner will automatically start
operating at the set time.
Example (refer to Fig.07):
To start the air conditioner in 6 hours.
1. Press the TIMER ON button, the last
setting of starting operation time and
the signal “h” will show on the display
area.
2. Press the TIMER ON button to display
“6:0h” on the TIMER ON display of the
remote controller.
3. Wait for 3 seconds and the TIMER
ON indicator stops flashing and this
function is activated. The digital display
area will show the temperature again.
TIMER OFF (Auto-off Operation)
The TIMER OFF feature is useful when you
want the unit to turn off automatically after
you go to bed. The air conditioner will stop
automatically at the set time.
Example (refer to Fig.08):
To stop the air conditioner in 10 hours.
1. Press the TIMER OFF button, the last
setting of stopping operation time and
the signal “h” will show on the display
area.
2. Press the TIMER OFF button to display
“10h” on the TIMER OFF display of the
remote controller.
3. Wait for 3 seconds and the TIMER
OFF indicator stops flashing and this
function is activated. The digital display
area will show the temperature again.3
COMBINED TIMER (Setting
both ON and OFF timers
simultaneously)
TIMER OFF ė TIMER ON (On ė
Stop ė Start operation)
This feature is useful when you want to
stop the air conditioner after you go to
bed, and start it again in the morning when
you wake up or when you return home.
Example (refer to Fig.09):
To stop the air conditioner 2 hours after
setting and start it again 10 hours after
setting.
1. Press the TIMER OFF button.
2. Press the TIMER OFF button again to
display 2.0h on the TIMER OFF display.
3. Press the TIMER ON button.
4. Press the TIMER ON button again to
display 10h on the TIMER ON display.
5. Wait for the remote control to display
the setting temperature.
TIMER ON ė TIMER OFF
(Off ė Start ė Stop operation)
This feature is useful when you want to
start the air conditioner before you wake
up and stop it after you leave the house.
Example (refer to Fig.10):
To start the air conditioner 2 hours after
setting, and stop it 5 hours after setting.
1. Press the TIMER ON button.
2. Press the TIMER ON button again to
display 2.0h on the TIMER ON display.
3. Press the TIMER OFF button.
4. Press the TIMER OFF button again to
display 5.0h on the TIMER OFF display.
5. Wait for the remote control to
display the setting temperature.
The timer setting(TIMER ON or
TIMER OFF) that in sequence
occurs directly after the set time will

19 ENGLISH
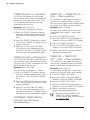
ECONOMY/SLEEP OPERATION
TEMP
AUTO
COOL
DRY
HEAT
FAN
HIGH
LOW
MODE
FAN SPEED
VERTICAL/
SWING
TIMER ON
SLEEP
ON/OFF
TIMER OFF
RESET LOCK
SET TEMPERATURE( C)
FOLLOW
ME
TURBO
HORIZONTAL/
SWING
MED
A
When you press the SLEEP button (A),
the economic running function will be
activated.During Cooling, Heating or
AUTO operation, the set temperature
of the air conditioner owill automatically
increase or decrease 1C per hour for
2 hours. After 2 hours, the set point will
continue at that temperature and the fan
motor will be set to LOW speed. The
sleep mode function can maintain the
most comfortable temperature and save
more energy for you.
The ECONOMY/SLEEP function
is only available under Cooling,
Heating and AUTO operation.
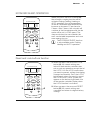
Reset and Lock buttons function
TEMP
AUTO
COOL
DRY
HEAT
FAN
HIGH
LOW
MODE
FAN SPEED
VERTICAL/
SWING
TIMER ON
SLEEP
ON/OFF
TIMER OFF
RESET LOCK
SET TEMPERATURE( C)
FOLLOW
ME
TURBO
HORIZONTAL/
SWING
MED
B
A
1. When you press the recessed LOCK
button (A), all current settings are
locked in and remote controller does
not accept any operation except that of
the LOCK. Use the LOCK mode when
you want to prevent settings from being
changed accidentally. Press the LOCK
button again when you want to cancel
the LOCK mode. A lock symbol will
appear on the bottom right hand side
of the remote controller display when
the LOCK function is activated.
2. When you press the recessed RESET
button (B), all current settings are
cancelled and return to original factory
settings.

20 www.electrolux.com
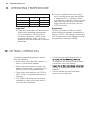
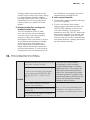
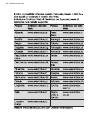
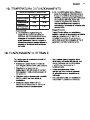
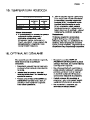
9. OPERATING TEMPERATURE
Operating temperature ranges
ind OOr s ide
(°C)
Outd OOr side
(°C)
COOLing Operati On 17~32 0~50
h eating Operati On 0~30 -15~30
d
rying Operati On 10~32 0~50
Important!
1. Optimum performance will be achieved
within these operating temperatures.
If air conditioner is used outside of
the above conditions, certain safety
protection features might come into
operation and cause the unit to function
abnormally.
2. If the air conditioner runs for a long
time in cooling mode and the humidity
is high(over 80%), condensed water
may drip out of the unit. Please sets the
vertical air flow louver to its maximum
angle (vertically to the floor), and set
HIGH fan mode.
Suggestion:
For the unit adopts an Electric Heater,
when the outside ambient temperature is
below 0ºC(32ºF), we strongly recommend
you to keep the machine plugged in order
to guarantee it running smoothly.
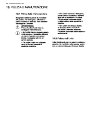
10. OPTIMAL OPERATION
To achieve optimal performance, please
note the following:
t Adjust the air flow direction correctly so
that it is not forwards people.
t Adjust the temperature to achieve the
highest comfort level. Do not adjust the
unit to excessive temperature levels.
t Close doors and windows on COOL or
HEAT modes, or performance may be
reduced.
t Use TIMER ON button on the remote
controller to select a time you want to
start your air conditioner.
t Do not put any object near air inlet or
conditioner may be reduced and the air
conditioner may stop running.
t
cooling or heating performance may be
reduced.
t Do not operate unit with horizontal
louvre in closed position.
La pagina sta caricando ...
La pagina sta caricando ...
La pagina sta caricando ...
La pagina sta caricando ...
La pagina sta caricando ...
La pagina sta caricando ...
La pagina sta caricando ...
La pagina sta caricando ...
La pagina sta caricando ...
La pagina sta caricando ...
La pagina sta caricando ...
La pagina sta caricando ...
La pagina sta caricando ...
La pagina sta caricando ...
La pagina sta caricando ...
La pagina sta caricando ...
La pagina sta caricando ...
La pagina sta caricando ...
La pagina sta caricando ...
La pagina sta caricando ...
La pagina sta caricando ...
La pagina sta caricando ...
La pagina sta caricando ...
La pagina sta caricando ...
La pagina sta caricando ...
La pagina sta caricando ...
La pagina sta caricando ...
La pagina sta caricando ...
La pagina sta caricando ...
La pagina sta caricando ...
La pagina sta caricando ...
La pagina sta caricando ...
La pagina sta caricando ...
La pagina sta caricando ...
La pagina sta caricando ...
La pagina sta caricando ...
La pagina sta caricando ...
La pagina sta caricando ...
La pagina sta caricando ...
La pagina sta caricando ...
La pagina sta caricando ...
La pagina sta caricando ...
La pagina sta caricando ...
La pagina sta caricando ...
La pagina sta caricando ...
La pagina sta caricando ...
La pagina sta caricando ...
La pagina sta caricando ...
La pagina sta caricando ...
La pagina sta caricando ...
La pagina sta caricando ...
La pagina sta caricando ...
La pagina sta caricando ...
La pagina sta caricando ...
La pagina sta caricando ...
La pagina sta caricando ...
La pagina sta caricando ...
La pagina sta caricando ...
La pagina sta caricando ...
La pagina sta caricando ...
-
 1
1
-
 2
2
-
 3
3
-
 4
4
-
 5
5
-
 6
6
-
 7
7
-
 8
8
-
 9
9
-
 10
10
-
 11
11
-
 12
12
-
 13
13
-
 14
14
-
 15
15
-
 16
16
-
 17
17
-
 18
18
-
 19
19
-
 20
20
-
 21
21
-
 22
22
-
 23
23
-
 24
24
-
 25
25
-
 26
26
-
 27
27
-
 28
28
-
 29
29
-
 30
30
-
 31
31
-
 32
32
-
 33
33
-
 34
34
-
 35
35
-
 36
36
-
 37
37
-
 38
38
-
 39
39
-
 40
40
-
 41
41
-
 42
42
-
 43
43
-
 44
44
-
 45
45
-
 46
46
-
 47
47
-
 48
48
-
 49
49
-
 50
50
-
 51
51
-
 52
52
-
 53
53
-
 54
54
-
 55
55
-
 56
56
-
 57
57
-
 58
58
-
 59
59
-
 60
60
-
 61
61
-
 62
62
-
 63
63
-
 64
64
-
 65
65
-
 66
66
-
 67
67
-
 68
68
-
 69
69
-
 70
70
-
 71
71
-
 72
72
-
 73
73
-
 74
74
-
 75
75
-
 76
76
-
 77
77
-
 78
78
-
 79
79
-
 80
80


in altre lingue
Documenti correlati
Altri documenti
-
Sharp AE-A9KR Manuale utente
-
Haier AD182MMERA Istruzioni per l'uso
-
Hughes & Kettner TubeMeister 18 Head Istruzioni per l'uso
-
Techly ICA-TR6 Manuale utente
-
VonHaus 3500251 Manuale utente
-
Panasonic NNSD452W Istruzioni per l'uso
-
Infinity BASSLINK DC Guida Rapida
-
Noirot KFN2543FDAJ Manuale utente
-
Denver DAB-56C Manuale utente