
Instructions
Gaku
TheMaMoNouchies®

Deutsch Seite 4
English Page 7
Français Page 10
Italiano Pagina 13
Zeichnungen Seite 16
Drawings Page 16
Dessins Page 16
Disegni Pagina 16
3
Montageanleitung
Wichtig: Bitte vor der Montage aufmerksam lesen, gegebenen-
falls auch die beiliegende Touch Tronic Information, insbesondere
den Abschnitt: „Anschließen der Lampe“. Bewahren Sie bitte beide
Unterlagen auf!
Mounting Instructions
Important: Please read the following instructions carefully before
use. Where applicable, please also read the enclosed information
on the Touch Tronic transformer, especially the section headed
”Connecting up the lamp“. Keep both documents in a safe place
for future reference.
Instructions de montage
Important: A lire attentivement avant le montage et, le cas
échéant, également les informations Touch Tronic ci-jointes, en
particulier le passage «branchement de la lampe». Prière de
bien conserver les deux instructions!
Istruzioni di montaggio
Importante: Prima di procedere con il montaggio, leggere
attentamente anche il foglio informativo Touch Tronic, in particolare
il paragrafo “Collegamento della lampada”. Conservare entrambe
le istruzioni!
2

Wichtige Information zum Papier
Das Papier dieser Lampe ist ein unbehandeltes Naturprodukt;
kleinere Einschlüssse und Verdickungen sind produktionstechnisch
bedingt. Der Papierschirm wird in aufwendiger Handarbeit (bis
zu acht verschiedene Arbeitsgänge) in einem patentierten
Verfahren hergestellt, das auf einer traditionellen japanischen
Textilfärbetechnik beruht. Obwohl alle Papierschirme gleich
aussehen, ist jeder ein Unikat.
Um das Papier zu schützen, sollten folgende Punkte beachtet
werden:
• Unbedingt vor Feuchtigkeit schützen, d.h. weder in Feuchträumen
noch in Küchen usw. aufstellen.
• Vermeiden Sie extreme Sonneneinstrahlung und starke Zugluft.
• Das Papier ist ein empfindliches Material, kann aber durch
vorsichtiges Auseinanderziehen in Form gebracht werden.
Sie sollten das Papier jedoch nicht überdehnen, da es sonst
die Spannung verliert und nicht mehr die gewünschte Form
zurückerhält.
• Bitte öffnen Sie eine Papierrolle nicht gegen die Spannung; dies
führt zum Knicken der Papierfasern.
Der Papierschirm erhält in manchen Fällen erst nach einiger Zeit
seine endgültige Form, da sich das Papier aushängen muss. Kleine
Dellen, die evtl. durch Berührungen entstanden sind, verschwinden
leicht durch vorsichtiges Drücken von der Gegenseite des
Papiers.
Deutsch
Deutsch
4
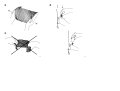
Montageanleitung
Bitte nehmen Sie die Lampe sehr vorsichtig aus der Verpackung
und achten Sie darauf, dass der Papierschirm nicht verletzt wird.
Achtung: Schließen Sie die Lampe erst nach dem Aufstellen an
das Netz an.
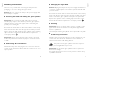
Einsetzen des Leuchtmittels und Glaszylinders
Achtung: Das neue Leuchtmittel nicht mit bloßen Händen
berühren. Die Leuchte darf niemals ohne Schutzglaszylinder
betrieben werden – Brandgefahr!
Greifen Sie mit einer Hand in die seitliche Öffnung und halten
Sie die Fassung fest, während Sie mit der anderen Hand das
Leuchtmittel einsetzen und anschließend den Glaszylinder von
oben über das Leuchtmittel auf die Federn der Fassung schieben.
Achten Sie auf festen Sitz.
Wichtig: Achten Sie bitte stets darauf, dass der Papierschirm in
allen dafür vorgesehenen Halterungen aufgehängt ist. Das Papier
darf auf keinen Fall Fassung oder Leuchtmittel berühren.
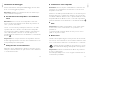
Anschließen des Transformators
Wickeln Sie das Lampenkabel ab und stecken Sie die beiden
Kabelstecker in die Buchsen des Transformators. Achten Sie auf
festen Sitz.
▲
▲
5
3
1
2

English
7
Deutsch
6
Wechsel des Leuchtmittels
Achtung: Den Netzstecker ziehen und die Lampe vollständig
abkühlen lassen. Das neue Leuchtmittel nicht mit bloßen Händen
berühren.
Greifen Sie mit einer Hand in eine der Papieröffnungen und
halten Sie die Fassung fest, während Sie mit der anderen Hand
von oben den Glaszylinder abnehmen und das alte Leuchtmittel
ersetzen. Den Glaszylinder wieder in die Federn der Fassung
schieben. Achten Sie auf festen Sitz.
Pflege
Wichtig: Den Papierschirm unter keinen Umständen feucht
abwischen. Bitte nur mit einem Staubwedel, Pinsel o.ä. reinigen.
Die Metallteile sowie der Glaszylinder können mit einem
trockenen Tuch abgestaubt werden.
Technische Daten
230/125 Volt. Niederdruck-Halogen 12 Volt, 50 Watt, Sockel
GY 6,35. Mit elektronischem Transformator-Sensor-Dimmer
Touch Tronic oder elektronischem Transformator mit Schieberegler.
Das Symbol auf dem Glaszylinder weist darauf hin, dass
unbedingt ein Niederdruck-Leuchtmittel eingesetzt
werden muß.
Wichtig: Ein zerbrochener Schutzglaszylinder muss unbedingt
ersetzt werden.
Eventuell notwendige Reparaturen dürfen nur von einer Elektro-
fachkraft durchgeführt werden
▲
▲
▲
3
Important information about the paper
The paper used in this lamp is a natural, untreated product.
Minor surface flaws are a result of the manufacturing process.
The paper shade is hand-made, by a patented process (requiring
up to eight different treatments) based on a traditional Japanese
method of textile dyeing.The results look superficially similar, but
in fact, each shade is unique.
To protect the paper, the following points should be noted:
• Avoid exposure to damp: do not use the lamp in bathrooms,
kitchens or other rooms where condensation may occur.
• Avoid exposure to strong sunlight or draughts.
• Although the Paper is a sensitive material, it can, if necessary, be
pulled out gently.
Do not overstretch the paper, otherwise it will lose its elasticity
and become unable to regain its shape.
• Do not unfold the paper in the ”wrong“ direction (i.e. against
the crease), as this will damage the fibres.
In some cases, the shade takes some time to assume its proper
shape, as the paper has to hang and relax for a while.
Touching the surface may cause shallow dents – these can be
removed by gently pushing them out from the opposite side
with your fingers.
1
2

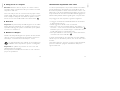
Changing the light bulb
Caution: Unplug the lamp from the power supply and allow it to
cool down completely. Do not touch the replacement bulb with
your bare hands.
Reach into the shade with one hand and hold the socket steady.
Now reach into the shade from the opposite end with your other
hand to detach the glass cylinder and replace the spent bulb.
Replace the cylinder on the retaining clip around the socket.
Ensure that the bulb and cylinder are securely in position.
Cleaning
Important: Never use damp cloths, sponges or similar on the
paper shade. Clean the shade if necessary with a light feather
duster or paintbrush.
The metal parts and the glass cylinder can be wiped with a dry cloth.
Technical specification
230/125 volts. Low-pressure halogen, 12 volts, 50 watts, GY 6,35
socket. Touch Tronic electronic transformer-sensor-dimmer, or
electronic transformer with sliding dimmer.
This symbol on the glass cylinder means that only low-
pressure light bulbs may be used.
Important: The protective glass cylinder must be replaced in
the event of damage.
Any repairs that may become necessary must be carried out by
a qualified electrician.
English
English
8 9
▲ ▲
Mounting Instructions
Please be very careful when removing the lamp from the
packaging, so as not to damage the paper shade.
Caution: Do not connect the lamp to the power supply until
the assembly is complete.
Inserting the bulb and fitting the glass cylinder
Important: Do not touch the bulb with your bare hands.
The lamp may only be used with the protective glass cylinder;
otherwise there is a risk of the paper shade overheating and
possibly even catching fire.
Reach into the shade with one hand and hold the socket steady.
Now reach into the shade from the opposite end with your other
hand to insert the bulb and fit the glass cylinder on the retaining
clip around the socket. Ensure that the bulb and cylinder are
securely in position.
Important: Always ensure that the paper shade is properly
hooked in position. Never allow the paper to touch the socket
or bulb.
Connecting the transformer
Unwind the lamp cable and plug the two connectors into the
sockets on the transformer. Ensure that the connectors are secu-
rely in position.
▲
▲
▲
3
3

Français
Français
10 11
Instructions de montage
Retirer la lampe avec prudence de son emballage et veiller à ne
pas abîmer la feuille de papier.
Attention: Ne connecter la lampe au réseau électrique qu’une
fois l’installation terminée.
Insertion de l’ampoule et du cylindre en verre
Attention: Ne pas toucher la nouvelle ampoule à la main nue!
Faire attention à ne jamais faire fonctionner la lampe sans le
cylindre de protection en verre – danger de feu!
Passer une main par une des ouvertures dans le papier et main-
tenir la douille, insérer l’ampoule avec l’autre main et fixer ensuite
le cylindre de protection en verre par le haut sur l’ampoule dans
les ressorts de la douille.Veiller à une fixation ferme.
Important: Faire attention à ce que la feuille de papier soit bien
accrochée dans tous les crochets prévus. S’assurer que le papier
ne touche surtout pas la douille ou l’ampoule.
Connexion du transformateur
Dérouler le câble de la lampe et enficher les deux fiches du câble
dans les prises du transformateur.Veiller à une fixation ferme.
▲▲
Informations importantes concernant le papier
Le papier de cette lampe est un produit naturel non-traité; des
petits enveloppements ou épaississements sont dus au procédé
technique. La feuille de papier est fabriquée en opérations
manuelles laborieuses (jusqu’à huit opérations sont nécessaires)
selon un procédé breveté s’inspirant des techniques traditionnelles
japonaises de la teinture. En apparence identique, chaque feuille
est unique.
Pour protéger le papier, veuillez respecter les indications suivantes:
• Il est indispensable de protéger le papier de l’humidité, c.à.d.
de ne pas l’utiliser dans des pièces humides ou cuisines etc.
• Eviter l’exposition à un ensoleillement extrème ou à de forts
courants d’air.
• Le papier est un matériel sensible mais peut être formé par de
prudents étirages.
Eviter de trop étirer le papier sinon il perd sa tension et ne
reprend pas la forme souhaitée.
• Ne pas défaire la feuille de papier à contre-sens de la tension;
sinon les fibres du papier cassent.
Parfois la feuille de papier prend sa forme définitive après quelques
temps seulement étant donné que le papier doit se défroncer.
De petits enfoncements causés éventuellement par un contact
imprudent disparaissent facilement en appuyant légèrement sur
le côté opposé du papier.
2
13

IItaliano
13
Français
12
Changement de l’ampoule
Attention: Retirer la fiche de la prise de courant et laisser
refroidir la lampe complètement. Ne pas toucher la nouvelle
ampoule à la main nue.
Passer une main par une des ouvertures dans le papier et main-
tenir la douille, retirer par le haut le cylindre en verre avec l’autre
main et remplacer l’ampoule usée. Refixer le cylindre en verre
dans les ressorts de la douille.Veiller à une fixation ferme.
Entretien
Important: Ne jamais nettoyer la feuille de papier avec un chiffon
humide. Nettoyer uniquement avec un plumeau, un pinceau ou
équivalent. Nettoyage des parties en métal ainsi que du cylindre
en verre avec un chiffon sec.
Données techniques
230/125 volts. Ampoule halogène basse pression 12 volts, 50 watts,
culot GY 6,35. Avec transformateur-sensor-dimmer Touch Tronic
électronique ou transformateur électronique à curseur.
Le symbole imprimé sur le cylindre en verre indique que
l’utilisation d’une ampoule basse pression est obligatoire.
Important: Un cylindre de protection en verre cassé doit
obligatoirement être remplacé.
Des réparations éventuellement nécessaires ne sont à effectuer
que par un spécialiste.m
▲
Informazioni importanti sulla carta
La carta di questa lampada è un prodotto naturale non trattato;
piccole imperfezioni e ispessimenti sono dovuti alla tecnica di
lavorazione. Il paralume è frutto di una lavorazione a mano com-
plicata (fino a otto diversi trattamenti), brevettata, che si basa su
un procedimento di colorazione dei tessili tradizionale giapponese.
Sebbene tutti i paralumi sembrino uguali, ognuno è un pezzo unico.
Per proteggere la carta, rispettare i seguenti accorgimenti:
• Proteggere assolutamente dall’umidità. Evitare la sistemazione
in luoghi umidi, cucine etc.
• Evitare raggi di sole diretti e forti correnti d‘aria.
• Sebbene la carta sia un materiale delicato, può tuttavia – se
necessario – essere messa in forma tirandola attentamente.
Attenzione però a non tenderla troppo, si otterrebbe una
perdita della tensione e quindi della forma.
• Non aprire il cilindro in carta nel senso contrario alla tensione,
causerebbe una rottura delle fibre.
In alcuni casi il paralume in carta prende la sua forma definitiva
soltanto dopo un determinato periodo, visto che la carta si deve
stendere.
Lievi ammaccature che dovessero sorgere toccando la lampada,
spariscono facilmente spingendo delicatamente dalla parte
opposta della carta.
1
2
3
▲▲

IItaliano
IItaliano
14 15
Sostituzione della lampadina
Attenzione: Staccare la spina di alimentazione e attendere che
la lampada sia completamente fredda. Non toccare la nuova
lampadina a mani nude.
Attraverso una delle aperture laterali tenere con una mano il porta-
lampada, rimuovere con l’altra mano attraverso la seconda aper-
tura laterale dall’alto il cilindro in vetro e quindi sostituire la vecchia
lampadina. Rifissare il cilindro in vetro con le molle sul portalam-
pada. Fare attenzione che sia saldamente e correttamente inserito.
Cura
Importante: Non pulire mai il paralume con un panno umido.
Se necessario, usare esclusivamente uno spolverino o un
pennello etc.
Le parti in metallo nonché il cilindro in vetro possono essere
puliti con un panno asciutto.
Dati tecnici
230/125 volt. Lampadina alogena a bassa pressione 12 volt, 50 watt,
base GY 6,35. Con trasformatore-sensore-dimmer elettronico Touch
Tronic o trasformatore elettronico con interruttore a scorrimento.
Il simbolo riportato sul cilindro in vetro indica che è consen-
tito esclusivamente l’impiego di lampadine a bassa pressione.
Importante: Sostituire assolutamente il cilindro di protezione
in vetro se danneggiato.
Eventuali riparazioni possono essere eseguite esclusivamente da
un elettricista specializzato.
▲
▲
Istruzioni di montaggio
Estrarre attentamente la lampada dall‘imballaggio facendo atten-
zione a non danneggiare il paralume.
Attenzione: Effettuare il collegamento alla rete soltanto dopo
avere posizionato la lampada!
Inserimento della lampadina e del cilindro in
vetro
Attenzione: Non toccare la nuova lampadina a mani nude.
Non accendere mai la lampada senza cilindro di protezione in
vetro – pericolo di incendio!
Tenere con una mano il portalampada attraverso una delle
aperture nella carta e inserire con l’altra mano la lampadina.
Successivamente applicare dall’alto il cilindro di protezione in
vetro sulla lampadina e fissarlo con le molle disposte sul
portalampada. Fare attenzione che sia saldamente e correttamente
inserito.
Importante: Fare sempre attenzione che il paralume sia fissato
in tutti i supporti previsti. La carta non deve assolutamente toccare
né il portalampada né la lampadina.
Collegamento del trasformatore
Distendere il cavo della lampada e inserire le due spine del cavo
nelle prese del trasformatore. Le spine devono essere saldamente
e correttamente inserite.
▲
▲▲
3
3

16
1
2
17
3

Ingo Maurer GmbH
Kaiserstrasse 47
80801 München
Tel. 089-381606-0
Fax 089-381606 20
September 1998 Made in Germany
-
 1
1
-
 2
2
-
 3
3
-
 4
4
-
 5
5
-
 6
6
-
 7
7
-
 8
8
-
 9
9
-
 10
10


in altre lingue
- English: Ingo Maurer Gaku Operating instructions
- français: Ingo Maurer Gaku Mode d'emploi
- Deutsch: Ingo Maurer Gaku Bedienungsanleitung
Documenti correlati
-
Ingo Maurer Wo-Tum-Bu 3 Istruzioni per l'uso
-
-
-
-
-
-
-
-
-
