ATEN VS1804T Guida Rapida
- Categoria
- Video splitter
- Tipo
- Guida Rapida
Questo manuale è adatto anche per

VS1804T / VS1808T 4/8-Port HDMI Over Cat 5 Splitter Quick Start Guide www.aten.com
Répartiteur sur câble de catégorie 5 HDMI à 4/8 ports VS1804T / VS1808T – Guide de démarrage rapide www.aten.com
VS1804T / VS1808T 4/8-Port HDMI-Splitter Over Cat 5 Kurzanleitung www.aten.com
Repartidor de señal HDMI sobre Cat. 5 de 4/8 puertos VS1804T / VS1808T Guía rápida www.aten.com
Splitter HDMI Over Cat 5 a 4/8 porte VS1804T / VS1808T – Guida rapida www.aten.com
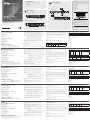
Hardware Installation
B
A. VS1804T / VS1808T Front View
B. VS1804T / VS1808T Rear View
Package Contents
1 VS1804T/VS1808T 4/8-Port HDMI Over Cat 5 Splitter
1 Power Adapter
1 Foot Pad Set (4 pcs)
1 Mounting Kit
1 User Instructions
2 3 4 5 6
1
POWERHDMI IN
EDI D
LEAR N
HDMI OUT
88PPOORRTT MMOODDEELL NN OO.. VVSS 11 880088 TT
1
2
4 5 6 7
3
VS1808T Rear (parent)
HDMI Out
HDMI
HDMI In
VS1808T Rear (child)
2
3
4
5
6
1
Receiving Devices
(VE800AR or VB802)
© Copyright 2014 ATEN® International Co., Ltd.
ATEN and the ATEN logo are trademarks of ATEN International Co., Ltd. All rights reserved.
All other trademarks are the property of their respective owners.
This product is RoHS compliant.
Part No. PAPE-1285-343G Printing Date: 12/2014
4/8-Port HDMI Over Cat 5 Splitter
Quick Start Guide
VS1804T / VS1808T
ATEN VanCryst™
Important Notice
Considering environmental protection, ATEN does not provide a fully
printed user manual for this product. If the information contained in the
Quick Start Guide is not enough for you to confi gure and operate your
product, please visit our website www.aten.com, and download
the full user manual.
Online Registration
http://eservice.aten.com
Technical Phone Support
International:
886-2-86926959
North America:
1-888-999-ATEN Ext: 4988
United Kingdom:
44-8-4481-58923
All information, documentation, firmware, software utilities, and
specifi cations contained in this package are subject to change without
prior notification by the manufacturer. Please visit our website http://
www.aten.com/download/?cid=dds for the most up-to-date versions.
EMC Information
FEDERAL COMMUNICATIONS COMMISSION INTERFERENCE STATEMENT:
This equipment has been tested and found to comply with the limits for a Class A
digital device, pursuant to Part 15 of the FCC Rules. These limits are designed to provide
reasonable protection against harmful interference when the equipment is operated
in a commercial environment. This equipment generates, uses, and can radiate radio
frequency energy and, if not installed and used in accordance with the instruction
manual, may cause harmful interference to radio communications. Operation of this
equipment in a residential area is likely to cause harmful interference in which case the
user will be required to correct the interference at his own expense.
FCC Caution: Any changes or modifi cations not expressly approved by the party
responsible for compliance could void the user's authority to operate this equipment.
CE Warning: This is a class A product. In a domestic environment this product may cause
radio interference in which case the user may be required to take adequate measures.
Suggestion: Shielded twisted pair (STP) cables must be used with the unit to ensure
compliance with FCC & CE standards.
The following contains information that relates to China:
Hardware Review
A
Hardware Review
A
A. VS1804T / VS1808T Front View
1. Port LEDs
2. HDMI Out LED
3. HDMI In LED
4. EDID Learn Pushbutton
5. EDID Learn LED
6. Power LED
B. VS1804T / VS1808T Rear View
1. Grounding Terminal
2. Power Jack
3. EDID Mode Switch
4. TMDS / DDC Out Ports
5. Local HDMI Out Port
6. Local HDMI In Port
7. Serial RS-232 Port
Hardware Installation
B
1. Ground the VS1804T / VS1808T by connecting one end of the
grounding wire to the grounding terminal, located on the unit’s back
panel, and the other end of the wire to a grounded object.
Description de l’appareil
A
A. VS1804T / VS1808T – Vue avant
1. Voyants des ports
2. Voyant de sortie HDMI
3. Voyant d’entrée HDMI
4. Bouton-poussoir d’apprentissage EDID
5. Voyant d’apprentissage EDID
6. Voyant d’alimentation
B. VS1804T / VS1808T – Vue arrière
1. Prise de terre
2. Prise d’alimentation
3. Commutateur de mode EDID
4. Ports de sortie TMDS / DDC
5. Port de sortie HDMI local
6. Port d’entrée HDMI local
7. Port série RS-232
Installation du matériel
B
1. Raccordez le répartiteur VS1804T / VS1808T à la terre en reliant une
extrémité du câble de mise à la terre à la prise de terre situé à l’arrière
de l’unité et l’autre extrémité à un objet correctement mis à la terre.
2. Utilisez un câble HDMI pour relier votre périphérique source HDMI au
Hardwareübersicht
A
A. Vorderseitige Ansicht des VS1804T / VS1808T
1. Port-LEDs
2. LED-Anzeige des HDMI-Ausgangs
3. LED-Anzeige des HDMI-Eingangs
4. Taste für EDID-Abfrage
5. LED-Anzeige für EDID-Abfrage
6. LED-Betriebsanzeige
B. Rückseitige Ansicht des VS1804T / VS1808T
1. Erdungsanschluss
2. Stromeingangsbuchse
3. EDID-Moduswahlschalter
4. TMDS- / DDC-Ausgänge
5. Lokaler HDMI-Ausgang
6. Lokaler HDMI-Eingang
7. Serieller RS-232-Port
Hardware installieren
B
1. Erden Sie den VS1804T / VS1808T mithilfe des Erdleiters. Verbinden
Sie dazu das eine Ende des Leiters mit der Erdungsschelle auf der
Geräterückseite und das andere Ende mit einem geerdeten Gegenstand.
Presentación del hardware
A
A. VS1804T / VS1808T – Vista frontal
1. Indicadores LED de los puertos
2. Indicador LED de salida HDMI
3. Indicador LED de entrada HDMI
4. Botón de petición de EDID
5. Indicador de petición de EDID
6. Indicador de alimentación
B. VS1804T / VS1808T – Vista posterior
1. Toma de tierra
2. Entrada de alimentación
3. Conmutador del modo EDID
4. Puertos de salida TMDS / DDC
5. Puerto de salida HDMI local
6. Puerto de entrada HDMI local
7. Puerto serie RS-232
Instalar el hardware
B
1. Conecte el VS1804T / VS1808T a tierra. Para ello, conecte un extremo
del cable de tierra incluido a la toma de tierra ubicada en el panel
Hardware
A
A. Vista anteriore del VS1804T/VS1808T
1. LED delle porte
2. LED uscita HDMI
3. LED ingresso HDMI
4. Pulsante apprendimento EDID
5. LED apprendimento EDID
6. LED d’alimentazione
B. Vista posteriore del VS1804T/VS1808T
1. Terminale di messa a terra
2. Presa d’alimentazione
3. Interruttore modalità EDID
4. Porte d’uscita TMDS/DDC
5. Porta d’uscita HDMI locale
6. Porta d’ingresso HDMI locale
7. Porta seriale RS-232
Installazione dell’hardware
B
1. Utilizzare il fi lo in dotazione per la messa a terra del VS1804T/VS1808T,
collegando un’estremità del fi lo al terminale di messa a terra collocato
sul pannello posteriore dell’unità e l’altra estremità a un dispositivo
dotato di adeguata messa a terra.
2. Use HDMI cable to connect your HDMI source device to the VS1804T /
VS1808T’s HDMI In port, located on the unit’s rear panel.
3. Use HDMI cable to connect your local HDMI display device to the
VS1804T / VS1808T’s HDMI Out port, located on the unit’s rear panel.
4. Use a Cat 5e/6 cable to connect the VS1804T / VS1808T’s TMDS/DDC
Out port, located on the unit’s rear panel, to the Receiving Devices.
Note: 1. If you need to use EDID Bypass and/or HDCP authentication,
connect another Cat 5e/6 cable between the VS1804T /
VS1808T and receiving unit.
2. Single Cat 5e/6 cable connections support EDID switch
position 3.
3. Compatible receiving devices are VB802 and VE800AR.
5. If you are using a serial controller, connect it to the VS1804T /
VS1808T’s RS-232 Serial port, located on the unit’s rear panel.
6. Using the power adapter supplied with this package, connect the
VS1804T / VS1808T to an DC power outlet.
7. Turn on the source, displays, and receiving devices.
EDID Operation
The EDID Mode switch currently provides four options:
(Default Mode)
In position 0, the VS1804T / VS1808T will use the default ATEN EDID.
port d’entrée HDMI du VS1804T / VS1808T, situé à l’arrière de l’unité.
3. Utilisez un câble HDMI pour relier votre périphérique d’affi chage HDMI
local au port de sortie HDMI du VS1804T / VS1808T, situé à l’arrière de
l’unité.
4. Utilisez un câble de catégorie 5e/6 pour connecter le port de
sortie TMDS du VS1804T / VS1808T situé à l’arrière de l’unité aux
périphériques de réception.
Remarque : 1. Si vous avez besoin d’utiliser le contournement du mode
EDID et/ou l’authentifi cation HDCP, connectez un autre
câble de catégorie 5e/6 entre le VS1804T / VS1808T et
l’unité réceptrice.
2. Les connexions réalisées avec un seul câble de catégorie
5e prennent en charge le réglage du commutateur EDID
dans position 3.
3. Les périphériques compatibles sont le VB802 et le
VE800AR.
5. Si vous utilisez un contrôleur série, connectez-le au port série du
VS1804T / VS1808T, situé à l’arrière de l’unité.
6. Branchez le VS1804T / VS1808T sur une prise de courant à l’aide de
l’adaptateur secteur fourni.
7. Allumez les périphériques source, d’affi chage et de réception.
Fonctionnement du mode EDID
Le commutateur de mode EDID offre actuellement quatre options :
2. Verbinden Sie die HDMI-Signalquelle mit dem HDMI-Eingang auf der
Rückseite des VS1804T / VS1808T. Verwenden Sie dazu ein HDMI-
Kabel.
3. Verbinden Sie Ihr HDMI-Anzeigegerät mit dem HDMI-Ausgang auf
der Rückseite des VS1804T / VS1808T. Verwenden Sie dazu ein HDMI-
Kabel.
4. Verbinden Sie die Empfangsgeräte mit dem TMDS-Ausgang auf der
Rückseite des VS1804T / VS1808T. Verwenden Sie dazu Kat. 5e-/6-
Kabel.
Hinweis: 1. Wenn Sie die EDID-Bypass-Funktion bzw. HDCP-
Authentifi zierung verwenden möchten, verbinden Sie ein
weiteres Kat. 5e/6-Kabel mit dem VS1804T / VS1808T und
der Empfangseinheit.
2. Für Verbindungen über ein einziges Kat. 5e/6-Kabel wählen
Sie die Position 3 am EDID-Schalter.
3. Kompatible Empfangsgeräte sind der VB802 und der
VE800AR.
5. Wenn Sie einen seriellen Controller verwenden möchten, verbinden Sie
diesen mit dem seriellen RS-232-Port auf der Rückseite des VS1804T /
VS1808T.
6. Verbinden Sie den VS1804T / VS1808T mithilfe des mitgelieferten
Netzteils mit einer Steckdose.
7. Schalten Sie die Signalquelle, die Anzeigegeräte und die
Empfangsgeräte ein.
posterior y el otro extremo a un objeto correctamente conectado a
tierra.
2. Use un cable HDMI para conectar el dispositivo fuente al puerto de
entrada HDMI situado en el panel posterior del VS1804T / VS1808T.
3. Use un cable HDMI para conectar el dispositivo de visualización local
al puerto de salida HDMI situado en el panel posterior del VS1804T /
VS1808T.
4. Use un cable de Cat. 5e/6 para conectar la salida TMDS ubicada en el
panel posterior del VS1804T / VS1808T a los dispositivos de recepción.
Nota: 1. Si desea utilizar las funciones de Bypass EDID y de
autenticación HDCP, conecte otro cable de Cat. 5e/6 entre el
VS1804T / VS1808T y la unidad receptora.
2. Las conexiones con un solo cable de Cat. 5e/6 admiten un
ajuste del conmutador de EDID en la posición 3.
3. Los dispositivos de recepción compatibles son el VB802 y el
VE800AR.
5. Si desea emplear una controladora serie, conéctela al puerto serie
RS-232 situado en el panel posterior del VS1804T / VS1808T.
6. Conecte el VS1804T / VS1808T a una toma eléctrica mediante el
adaptador de alimentación incluido.
7. Encienda el dispositivo fuente, las pantallas y los dispositivos de
recepción.
2. Utilizzare un cavo HDMI per collegare il dispositivo HDMI sorgente alla
porta d’ingresso HDMI del VS1804T/VS1808T collocata sul pannello
posteriore dell’unità.
3. Utilizzare un cavo HDMI per collegare il dispositivo locale di
visualizzazione HDMI alla porta d’uscita HDMI del VS1804T/VS1808T
collocata sul pannello posteriore dell’unità.
4. Utilizzare un cavo Cat 5e/6 per connettere la porta d’uscita TMDS
del VS1804T/VS1808T collocata sul pannello posteriore dell’unità ai
dispositivi riceventi.
Nota: 1. Per utilizzare il bypass EDID e/o l’autenticazione HDCP,
collegare un altro cavo Cat 5e/6 tra il VS1804T/VS1808T e
l’unità ricevente.
2. Le connessioni con singolo cavo Cat 5e/6 supportano la
posizione di commutazione EDID 3.
3. Dispositivi di ricezione compatibili sono il VB802 e il VE800AR.
5. Se si sta utilizzando un controller seriale, collegarlo alla porta seriale
RS-232 del VS1804T/VS1808T collocata sul pannello posteriore
dell’unità.
6. Utilizzare l’alimentatore in dotazione per connettere il VS1804T/
VS1808T a una presa di corrente DC.
7. accendere i dispositivi di visualizzazione, quelli sorgente e quelli
riceventi.
(Learning Mode)
In position 1, the VS1804T / VS1808T will learn and store the current EDID
of the local display. When the VS1804T / VS1808T is in EDID Learn mode
(position 1), press and release the EDID Learn pushbutton, located on the
unit’s front panel. The EDID Learn LED fl ashes green for a few seconds,
then lights solid green for 2 seconds to indicate that the local displays
EDID has been learned and stored to replace default EDID.
(Port 1 Mode)
In position 2, the VS1804T / VS1808T’s will automatically detect the EDID
of the display connected to Port 1.
(Single Cat 5 Mode)
Position 3 is used for single Cat 5e/6 cable connections.
Note: Positions 4—7 are reserved for future upgrades.
Serial Commands
Cmd Output Num1 Control Enter Description
sw o yy
*
l1
on
off
↙
↙
Turn on Output Port yy
Turn off Output Port yy
(yy:01~08,*,l1)
(Mode par défaut)
En position 0, le VS1804T / VS1808T utilisera les données EDID ATEN par
défaut.
(Mode apprentissage)
En position 1, le VS1804T / VS1808T apprendra et stockera les données
EDID de l’écran local. Lorsque le VS1804T / VS1808T est en mode
apprentissage EDID (position 1), appuyez brièvement sur le bouton-
poussoir d’apprentissage EDID situé sur le panneau avant de l’unité. Le
voyant d’apprentissage EDID clignote en vert pendant quelques secondes
puis reste allumé en vert pendant 2 secondes pour indiquer que les
données EDID de l’écran local sont en train d’être apprises et stockées
pour remplacer les données EDID par défaut.
(Mode Port 1)
En position 2, le VS1804T / VS1808T détectera automatiquement les
données EDID de l’écran connecté au Port 1.
(Mode câble de catégorie 5 unique)
La position 3 est utilisée pour les connexions réalisées avec un seul câble
de catégorie 5e/6.
Remarque : Les positions 4—7 sont réservées à des mises à niveau
ultérieures.
EDID-Funktion
Der EDID-Auswahlschalter besitzt vier Positionen:
(Standardeinstellung)
In der Position 0 verwendet der VS1804T / VS1808T die Standard-ATEN-
EDID.
(Abfragemodus)
In der Position 1 fragt der VS1804T / VS1808T die EDID des lokalen
Displays ab und speichert sie. Nachdem Sie den Schalter am VS1804T /
VS1808T in den Abfragemodus (Position 1) gestellt haben, drücken Sie
kurz die EDID-Abfragetaste auf der Gerätevorderseite. Daraufhin blinkt die
EDID-Abfrageanzeige einige Sekunden lang grün. Daraufhin bleibt sie 2
Sekunden lang grün erleuchtet, um anzuzeigen, dass die EDID des lokalen
Displays abgefragt und gespeichert (und somit die Standard-EDID ersetzt)
wurde.
(Port 1-Abfrage)
In der Position 2 fragt der VS1804T / VS1808T die EDID des Displays ab,
das an Port 1 angeschlossen ist.
(Ein einziges Kat. 5-Kabel)
Die Position 3 dient für Verbindungen über ein einziges Kat. 5e/6-Kabel.
Funcionamiento EDID
El conmutador EDID actualmente admite cuatro opciones:
(Modo predeterminado)
En la posición 0, el VS1804T / VS1808T utiliza el EDID predeterminado de
ATEN.
(Modo de petición)
En la posición 1, el VS1804T / VS1808T pide el EDID de la pantalla local
y lo almacena. Cuando el VS1804T / VS1808T se encuentre en modo de
petición de EDID (posición 1), pulse y suelte el botón de petición de EDID
ubicado en el panel frontal de la unidad. El indicador LED de petición
de EDID parpadea en verde durante algunos segundos para permanecer
iluminado en verde durante 2 segundos. Ello indica que se ha obtenido
y almacenado el EDID de la pantalla local (sobrescribiendo el EDID
predeterminado).
(Modo de Puerto 1)
En la posición 2, el VS1804T / VS1808T pide el EDID de la pantalla
conectada al puerto 1 y lo almacena.
(Modo de un único cable de Cat. 5)
La posición 3 se utiliza para conexiones por un único cable de Cat. 5e/6.
Nota: Las posiciones 4 a 7 están reservadas para futuras actualizaciones.
Funzionamento EDID
Attualmente, l’interruttore di modalità EDID offre quattro opzioni:
(Modalità predefi nita)
In posizione 0, il VS1804T / VS1808T utilizzerà l’ATEN EDID predefi nito.
(Modalità di apprendimento)
In posizione 1, il VS1804T/VS1808T apprenderà e memorizzerà l’EDID
corrente dello schermo locale. Quando il VS1804T/VS1808T è in modalità
EDID di apprendimento (posizione 1), premere e rilasciare il pulsante
di apprendimento EDID sul pannello anteriore dell’unità. Il LED di
apprendimento EDID si illumina di verde per alcuni secondi, poi rimane
stabilmente verde per 2 secondi a indicare che gli schermi locali EDID sono
stati appresi e memorizzati per sostituire l’EDID predefi nito.
(Modalità porta 1)
In posizione 2, il VS1804T/VS1808T rileva automaticamente l’EDID dello
schermo collegato alla porta 1.
(Modalità Cat 5 singolo)
La posizione 3 è utilizzata per i collegamenti con cavo Cat 5e/6 singolo.
Nota: le posizioni da 4 a 7 sono riservate per futuri aggiornamenti.
CEC Commands
Cmd Control Enter Description
cec auto ↙Turn on CEC control channel
cec off ↙Turn off CEC control channel
RS-232 Setting
RS-232 Serial Control Protocol
Baud Rate: 19200
Data Bit: 8 bits
Parity: None
Stop Bit: 1 bit
Flow Control: None
Commandes série
Cmd Sortie Num1 Contrôle Entrée Description
sw o yy
*
l1
on
off
↙
↙
activation du port de
sortie yy
Désactivation du port de
sortie yy
(yy : 01~08, *, l1)
CEC Commands
Cmd Contrôle Entrée Description
cec auto ↙activation du canal de contrôle
CEC
cec off ↙Désactivation du canal de
contrôle CEC
Paramètres RS-232
Protocole de contrôle série RS-232
Débit en bauds : 19200
Bits de données : 8 bits
Parité : aucune
Bits d’arrêt : 1 bit
Contrôle de fl ux : aucun
Hinweis: Die Positionen 4 bis 7 sind für zukünftige Aktualisierungen
vorgesehen.
Serielle Befehle
Befehl Ausgang Num1 Steuerung Eingabe Beschreibung
sw o yy
*
l1
ein
aus
↙
↙
Ausgang yy
einschalten
Ausgang yy
ausschalten
(yy:01 bis 08,*,l1)
CEC-Befehle
Befehl Steue-rung Ein-gabe Beschreibung
cec autom ↙CEC-Steuerkanal einschalten
cec aus ↙CEC-Steuerkanal ausschalten
RS-232-Einstellungen
Serielles RS-232-Protokoll
Übertragungsgeschwindigkeit (Baud): 19200
Datenbits: 8 Bit
Parität: Ohne
Stoppbits: 1 Bit
Flusssteuerung: Ohne
Comandos de puerto serie
Cmd Salida Num1 Control Introduzca Descripción
sw o yy
*
l1
on
off
↙
↙
activa el puerto de
salida yy
Desactiva el puerto de
salida yy
(yy:01 a 08,*,l1)
CEC-Befehle
Cmd Control Intro-duzca Descripción
cec auto ↙activa el canal de control CEC
cec off ↙Desactiva el canal de control CEC
Confi guración RS-232
Protocolo para puerto serie RS-232
Velocidad (Baudios): 19200
Bits de datos: 8 bits
Paridad: Sin
Bits de parada: 1 bit
Control de fl ujo: Sin
Comandi seriali
Cmd Uscita Num1 Controllo Invio Descrizione
sw o yy
*
l1
on
off
↙
↙
Attiva uscita su porta yy
Disattiva uscita su porta yy
(yy:01~08,*,l1)
Comandi CEC
Cmd Controllo Invio Descrizione
cec auto ↙Attiva canale controllo CEC
cec off ↙Disattiva canale controllo CEC
Impostazione RS-232
Protocollo di controllo seriale RS-232
Baud Rate: 19200
Bit di dati: 8 bit
Parità: nessuna
Bit di stop: 1 bit
Controllo di fl usso: nessuno
La pagina si sta caricando...
-
 1
1
-
 2
2


ATEN VS1804T Guida Rapida
- Categoria
- Video splitter
- Tipo
- Guida Rapida
- Questo manuale è adatto anche per
in altre lingue
- English: ATEN VS1804T Quick start guide
- français: ATEN VS1804T Guide de démarrage rapide
- español: ATEN VS1804T Guía de inicio rápido
- Deutsch: ATEN VS1804T Schnellstartanleitung
- русский: ATEN VS1804T Инструкция по началу работы
- português: ATEN VS1804T Guia rápido
- 日本語: ATEN VS1804T クイックスタートガイド