Yamaha CD-S303RK Manuale utente
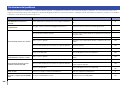
- Categoria
- Lettore CD
- Tipo
- Manuale utente
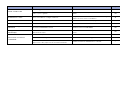
Questo manuale è adatto anche per

Owner’s Manual
Mode d’emploi
Benutzerhandbuch
Bruksanvisning
Manuale di istruzioni
Manual de instrucciones
Gebruikershandleiding
Руководство пользователя
Compact Disc Player
Lecteur Compact Disc
Проигрыватель компакт дисков
CD-S303
EN
FR
DE
SV
IT
ES
NL
RU
English
Français
Deutsch
Svenska
Italiano
Español
Nederlands
Русский

2En
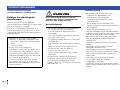
Please read these precautions carefully before
proceeding.
Be sure to follow the instructions
Please carefully read and observe the following
precautions to avoid harm to people or damage
to your personal property.
After reading this document thoroughly, please
retain it in a location that anyone using the
product can access at any time.
WARNING
These precautions alert you to the possibility
of death or serious injury to yourself or others.
If you notice any abnormality
• If any of the following abnormalities occur,
immediately shut down the power.
- The power cord or plug becomes damaged.
- Unusual smells, noise or smoke are emitted
from the product.
- An object or some water has been dropped
into the product.
- Cracks or other damage appear on the
product.
- There is a sudden loss of sound during use of
the product.
Follow the steps below to shut down the power.
- Turn off the power to this product.
- Disconnect the power cord plug from the AC
outlet.
Continuing to use the product as-is may result
in fire, electrical shock or damage to the
product. Request inspection or repair
immediately.
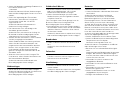
Power supply
• Do not damage the power cord.
- Do not place the power cord near heat
sources such as heaters.
- Do not forcefully bend or modify the power
cord.
- Do not damage the power cord.
- Do not place heavy objects on the power
cord.
- Do not staple the power cord.
Using a frayed power cord with the core wire
exposed may result in fire, electrical shock or
damage to the product.
• During lightning or electrical storms, do not
touch this product, power plug or power cord.
Otherwise, electrical shock may be caused.
• Use the voltage specified for this product.
Using an incorrect voltage may result in fire,
electrical shock or damage to the product.
• Be sure to use only the item listed below to
supply power:
- Included power cord
Otherwise, fire, burns or damage to the product
may be caused.
• Do not use the following Included accessory
with other devices.
- Power cord
Otherwise, fire, burns or damage to the product
may be caused.
• Check the power cord plug periodically and
remove any dirt or dust that may have
accumulated.
Otherwise, fire or electrical shock may be
caused.
• Be sure to fully insert the power cord plug into
an AC outlet.
Otherwise, electrical shock, or fire or damage to
the product due to short circuit may be caused.
• Insert the power cord plug into the AC outlet
that is visible and easily accessible.
If some trouble or malfunction occurs, you
should be able to immediately disconnect the
plug from the AC outlet easily. Even when the
PRECAUTIONS
• Contact the following customer center for
inspection or repair.
- The store you purchased the product
- Yamaha dealer
• This product is intended for use as a general
household device. Do not use it in any field or
activity requiring a high degree of reliability in
relation to human lives or valuable assets.
• Please note that Yamaha cannot accept any
liability for any losses resulting from improper
use or unauthorized modification of the
product.

En 3
power switch is turned off, as long as the power
cord is not unplugged from the wall AC outlet,
the product is not disconnected from the power
source completely.
• If you plan not to use the product for a long
period of time, remove the power cord plug
from the AC outlets.
Otherwise, fire or damage to the product may
be caused.
Do not disassemble
• Do not modify or disassemble this product.
Otherwise, fire, electrical shock, injury or
damage to the product may be caused.
Water warning
• Do not use this product in damp or wet
conditions, such as a bathroom or rainy outdoor
location.
• Do not place on this product any containers
(such as vases or medicine bottles) that contain
liquids.
If liquid spills into the product, fire, electrical
shock or damage to the product may be caused.
• Do not insert the power cord plug into or
remove it from the AC outlet with wet hands. Do
not handle this product with wet hands.
Otherwise, electrical shock or damage to the
product may be caused.
Fire warning
• Do not handle open flames near this product.
Otherwise, fire may be caused.
Vision loss
• Do not look into the laser beam.
If the laser beam hits your eyes, vision loss may
be caused.
Handling
• Do not drop this product or apply any strong
impact to the product.
Otherwise, fire, electrical shock or damage to
the product may be caused.
Batteries
• Do not swallow batteries.
• Keep batteries away from children.
Otherwise, they may swallow the batteries by
accident. Leaking battery liquid may cause loss
of vision or inflammation. If the battery case on
this product is not completely sealed, stop using
the product and keep it away from children. If
someone has swallowed a battery by accident,
consult a physician immediately. If a battery is
swallowed, it can cause serious chemical burns
or melting of body tissue within two hours, leading
to possible death.
• Do not throw batteries into an open fire.
• Do not expose batteries to high temperatures,
such as direct sunlight or an open fire.
Otherwise, they may explode, resulting in fire or
injury.
• If battery liquid is leaking, do not touch the
liquid.
Otherwise, loss of vision or chemical burns may
be caused. If you touch the battery liquid, wash
it away with water immediately, and consult a
physician.
• Do not use batteries other than the specified
type.
• Do not use old and new batteries together.
• Do not use different types of batteries together.
• Do not insert batteries in an orientation opposite
from the polarity indication.
• Do not break down the battery.
• Do not charge non-rechargeable dry cell
batteries.
Otherwise, they may explode or battery liquid
may leak, resulting in fires, burns, loss of vision,
inflammation, or damage to the product. If you
touch the battery liquid, wash it away with water
immediately, and consult a physician.
• Do not carry the batteries in a pocket or bag or
store them along with a piece of metal.
Otherwise, the batteries may short-circuit,
leading to an explosion or leaking liquid, which
could result in fires, loss of vision, or injuries.
• If you plan not to use the product for a long
period of time, or if the batteries are completely
discharged, remove them from the remote
control.
Otherwise, battery liquid may leak, possibly
resulting in loss of vision, inflammatory injury, or
damage to the product.
• Before you store or discard the batteries, apply
a piece of tape to the connectors to insulate
them.
If the battery connectors come into contact with
other batteries or metallic objects, they may
explode or battery liquid may leak, possibly
resulting in fire, burns, loss of vision, or
inflammatory injury.

4En
CAUTION
These precautions alert you to the possibility
of physical injury to yourself or others.
Power supply
• If the power cord plug inserted into the AC
outlet is wiggly or loose, do not use that outlet.
Otherwise, fire, electrical shock or burns may
be caused.
• When removing the power cord plug from the
product or an outlet, always hold the plug itself
and not the cord.
Otherwise, the power cord may be damaged,
resulting in fire or electrical shock.
Installation
• Do not place this product in an unstable
position or a location subject to vibration.
Otherwise, the product may fall or tip over,
resulting in injuries or damage to the product.
• Do not block the heat dissipation of this product
when installing it.
- Do not cover the product with a cloth or table
cloth.
- Do not install the product on a carpet or rug.
- Make sure that the top surface faces up. Do
not install the product on its sides or upside
down.
- Do not use the product in a confined, poorly-
ventilated location.
Inadequate ventilation may result in
overheating inside the product, possibly
causing damage and fire or malfunction.
Make sure that there is adequate space around
the product at least 2.5 cm above, 2.5 cm at the
sides and 2.5 cm behind.
• During earthquakes, stay away from this
product.
Otherwise, the product may fall or tip over,
resulting in injuries.
• Before moving this product, be sure to turn off
the power switch and remove all connected
cables.
Otherwise, the cables might be caught by a
foot or hand, and the product may fall or tip
over, resulting in injuries or damage to the
product.
Connections
• If you plan to connect external devices, first
read the owner’s manual for each device, and
connect them in accordance with the
instructions.
If you do not follow the instructions correctly,
injury or damage to the product may be
caused.
Hearing loss
• Do not expose yourself to high volume sound
for an extended period of time.Otherwise,
hearing loss may be caused. If you experience
any hearing abnormality, consult a physician.
• If you plan to connect this product to any other
devices, first turn off the power to all devices.
Otherwise, hearing loss, electrical shock or
damage to the product may be caused.
• When turning on the power to the audio system,
always turn on the power to the power amplifier
LAST. When turning off the power to the audio
system, turn off the power to the power
amplifier FIRST.
Otherwise, hearing loss or damage to the
product may be caused.
Maintenance
• Before cleaning the product, be sure to remove
the power cord plug from the AC outlet.
Otherwise, electrical shock may be caused.
Handling
• Do not insert your hands or fingers in any gaps
or openings on this product.
Otherwise, injury may be caused.
• Do not drop a foreign object, such as a piece of
metal or paper, into any gap on this product.
Otherwise, fire, electrical shock or damage to
the product may be caused.
• Do not apply the following excessive force to
this product.
- Resting your weight on this product
- Placing heavy objects on this product
- Stacking up this product
- Applying excessive force to the buttons,
switches, or I/O connectors
Otherwise, injury or damage to the product may
be caused.
• Do not pull connected cables.
Otherwise, the product may fall or tip over,
resulting in injuries or damage to the product.

En 5
NOTICE
Follow the precautions below to avoid malfunction
and damage to this product and to prevent the
loss of data.
Power supply
• If you plan not to use this product for a long
period of time, remove the power cord plug
from the AC outlet. Even when [A] (Power) on
the front panel is turned off, a small amount of
current still flows through this product.
Installation
• Depending on the environment in which you
use the product, a phone, radio or TV may
generate noise. In that case, change the
product location or orientation, or the
surrounding environment.
• Do not install this product in a place subject to:
- Direct sunlight
- Extremely high or low temperatures
- Excessive dust
Otherwise, malfunction or damage to the
product may be caused.
• Do not install this product in a place where
condensation can form due to rapid, drastic
changes in ambient temperature. Using the
product while condensation is present may
cause damage to the product. If there is a
reason to believe that condensation might have
occurred on or in this product, leave it for
several hours without turning on the power.
You can start using the product when the
condensation has completely dried.
Handling
• Do not place any vinyl, plastic or rubber
products on this product. Otherwise, the panel
may be discolored or deteriorate.
Maintenance
• Use a dry, soft cloth to clean this product. Do
not use benzine, thinner, detergent or chemical
rag to clean the surface of the product.
Otherwise, the surface may be discolored or
deteriorate.
NOTE
This section describes precautions to be
observed during use, functional restrictions, and
supplemental information that may be helpful for
you.
Disposal or transfer
• If you plan to transfer ownership of this product,
include this document and the supplied
accessories along with the product.
• Follow the rules of your local authority to
dispose of this product and its accessories.
• Follow the rules of your local authority to
dispose of used batteries.
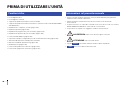
Precautions for use
Important information
WARNING
Use of controls or adjustments or performance of
procedures other than those specified herein may
result in hazardous radiation exposure.

6En
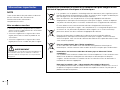
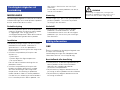
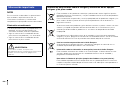
(weee_battery_eu_en_02)
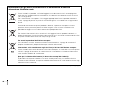
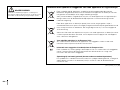
Information for users on collection and disposal of old equipment and used batteries:
These symbols on the products, packaging, and/or accompanying documents mean that used
electrical and electronic products and batteries should not be mixed with general household waste.
For proper treatment, recovery and recycling of old products and used batteries, please take them to
applicable collection points, in accordance with your national legislation.
By disposing of these products and batteries correctly, you will help to save valuable resources and
prevent any potential negative effects on human health and the environment which could otherwise
arise from inappropriate waste handling.
For more information about collection and recycling of old products and batteries, please contact
your local municipality, your waste disposal service or the point of sale where you purchased the
items.
For business users in the European Union:
If you wish to discard electrical and electronic equipment, please contact your dealer or supplier for
further information.
Information on Disposal in other Countries outside the European Union:
These symbols are only valid in the European Union. If you wish to discard these items, please
contact your local authorities or dealer and ask for the correct method of disposal.
Note for the battery symbol (bottom two symbol examples):
This symbol might be used in combination with a chemical symbol. In this case it complies with the
requirement set by the EU Battery Directive for the chemical involved.

En 7
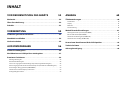
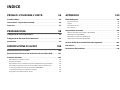
CONTENTS
BEFORE USING THE UNIT 8
Features . . . . . . . . . . . . . . . . . . . . . . . . . . . . . . . . . . . . . . . . . . . . . . . . . . . . . . . . . 8
About this manual. . . . . . . . . . . . . . . . . . . . . . . . . . . . . . . . . . . . . . . . . . . . . . . . 8
Accessories . . . . . . . . . . . . . . . . . . . . . . . . . . . . . . . . . . . . . . . . . . . . . . . . . . . . . . 9
PREPARATION 10
Connecting to an amplifier. . . . . . . . . . . . . . . . . . . . . . . . . . . . . . . . . . . . . . .10
Connecting the power cord . . . . . . . . . . . . . . . . . . . . . . . . . . . . . . . . . . . . . .10
Turning on the power . . . . . . . . . . . . . . . . . . . . . . . . . . . . . . . . . . . . . . . . . . .11
PLAYING AUDIO 12
Playing an audio CD . . . . . . . . . . . . . . . . . . . . . . . . . . . . . . . . . . . . . . . . . . . . .12
Playing music files stored on your USB flash drive . . . . . . . . . . . . . . . . .13
Advanced functions . . . . . . . . . . . . . . . . . . . . . . . . . . . . . . . . . . . . . . . . . . . . .14
Random-sequence playback . . . . . . . . . . . . . . . . . . . . . . . . . . . . . . . . . . . . . . . . . . . . . . . . . . . . . . . . . 14
Repeat playback . . . . . . . . . . . . . . . . . . . . . . . . . . . . . . . . . . . . . . . . . . . . . . . . . . . . . . . . . . . . . . . . . . . . . 14
Playing tracks in the specified order (Program playback) . . . . . . . . . . . . . . . . . . . . . . . . . . . . . . 14
Playing a specified part repeatedly (A-B Repeat playback) . . . . . . . . . . . . . . . . . . . . . . . . . . . . . 15
Enjoying high-quality sound playback (PURE DIRECT) . . . . . . . . . . . . . . . . . . . . . . . . . . . . . . . . . 15
Switching information on the display. . . . . . . . . . . . . . . . . . . . . . . . . . . . . . . . . . . . . . . . . . . . . . . . . 15
Changing the display brightness . . . . . . . . . . . . . . . . . . . . . . . . . . . . . . . . . . . . . . . . . . . . . . . . . . . . . 15
APPENDIX 16
Part names . . . . . . . . . . . . . . . . . . . . . . . . . . . . . . . . . . . . . . . . . . . . . . . . . . . . .16
Front panel. . . . . . . . . . . . . . . . . . . . . . . . . . . . . . . . . . . . . . . . . . . . . . . . . . . . . . . . . . . . . . . . . . . . . . . . . . . 16
Display. . . . . . . . . . . . . . . . . . . . . . . . . . . . . . . . . . . . . . . . . . . . . . . . . . . . . . . . . . . . . . . . . . . . . . . . . . . . . . . 17
Rear panel . . . . . . . . . . . . . . . . . . . . . . . . . . . . . . . . . . . . . . . . . . . . . . . . . . . . . . . . . . . . . . . . . . . . . . . . . . . 17
Remote control. . . . . . . . . . . . . . . . . . . . . . . . . . . . . . . . . . . . . . . . . . . . . . . . . . . . . . . . . . . . . . . . . . . . . . . 18
Advanced settings . . . . . . . . . . . . . . . . . . . . . . . . . . . . . . . . . . . . . . . . . . . . . .19
Playback Mode Memory (PLAY MEM). . . . . . . . . . . . . . . . . . . . . . . . . . . . . . . . . . . . . . . . . . . . . . . . . . 19
Ready Mode (RDY MODE). . . . . . . . . . . . . . . . . . . . . . . . . . . . . . . . . . . . . . . . . . . . . . . . . . . . . . . . . . . . . 19
Automatic Playback (AUTO PLAY) . . . . . . . . . . . . . . . . . . . . . . . . . . . . . . . . . . . . . . . . . . . . . . . . . . . . . 19
Auto Power Standby (AUTO STBY) . . . . . . . . . . . . . . . . . . . . . . . . . . . . . . . . . . . . . . . . . . . . . . . . . . . . 19
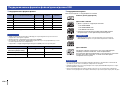
Supported file formats/discs/USB flash drives. . . . . . . . . . . . . . . . . . . . .20
Specifications. . . . . . . . . . . . . . . . . . . . . . . . . . . . . . . . . . . . . . . . . . . . . . . . . . .21
Troubleshooting . . . . . . . . . . . . . . . . . . . . . . . . . . . . . . . . . . . . . . . . . . . . . . . .22

8En
BEFORE USING THE UNIT
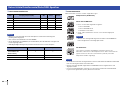
• Optical digital output
• Coaxial digital output
• Supports playback of CD-R and CD-RW discs
• Supports playback of files stored on USB flash drives or data CDs (MP3/WMA/AAC/
WAV/FLAC)
• Random-sequence playback (page 14)
• Repeat playback (page 14)
• Program playback (audio CDs only) (page 14)
• A-B Repeat playback (audio CDs only) (page 15)
• PURE DIRECT function (page 15)
• Configurable display settings (items to be displayed/brightness) (page 15)
• Remote-controlled Standby On/Off
• Playback Mode Memory (page 19)
• Ready mode (page 19)
• Automatic Playback function (page 19)
• Auto Power Standby function (page 19)
• This manual explains operations performed primarily on the supplied remote control.
• All illustrations in this manual are provided for the purpose of operational instruction.
• In this manual, a music CD is referred to as an audio CD, and a CD that contains
MP3/WMA/AAC/WAV/FLAC data is referred to as a data CD.
• Specifications and appearance are subject to change without notice.
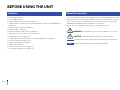
•
WARNING
is intended to alert you to the risk of death or serious injury.
• CAUTION is intended to alert you to the risk of personal injury.
• should be observed to avoid malfunction and damage to this product.
• provide supplemental information that might be handy.
Features About this manual
Notice
Note

En 9
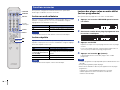
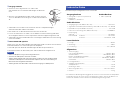
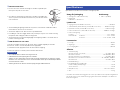
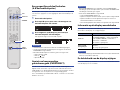
• Remote control
• Power cord
• RCA stereo cable
• Batteries (AA, R6, UM-3) (x2)
• Owner’s Manual (this manual)
Accessories
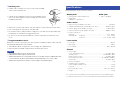
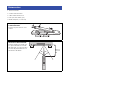
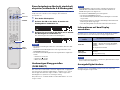
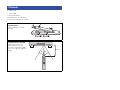
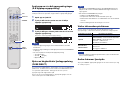
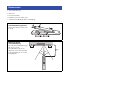
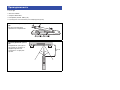
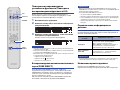
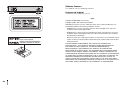
Inserting batteries into the
remote control
Insert the batteries in the proper
orientation.
Remote control operating
range
Point the remote control toward
the remote control sensor on
the unit from within the range
shown in the figure on the right.
Batteries (AA, R6, UM-3)
30° 30°
Within
6m

10 En
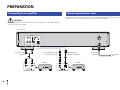
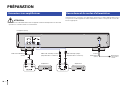
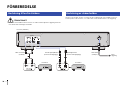
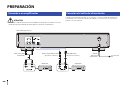
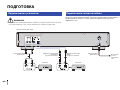
PREPARATION
CAUTION
• Do not plug the power cord of this unit and other connected devices into AC outlets until all non-
power connections are complete.
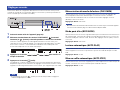
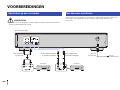
After all the connections are complete, connect the supplied power cord to the AC IN
connector on this unit, and then plug the other end into an AC outlet.
Connecting to an amplifier Connecting the power cord
AmplifierAmplifier
RCA stereo cable
(supplied)
Coaxial digital audio cable
(commercially available)
Optical digital cable
(commercially available) To an AC wall
outlet
This unit (rear)
Power cord
(supplied)

En 11
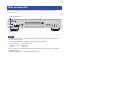
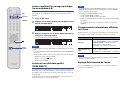
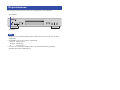
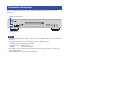
To turn on the power to the unit, press A (Power) on the front panel.
Note
• If you press A (Power) on the remote control while the power to the unit is on, the unit will enter
Standby mode.
• The power indicator on the unit operates as follows:
Brightly lit: Power is on
Dimly lit: Standby mode
Off: Power is off
• This unit features an Auto Power Standby function that saves power consumption (page 19).
(Default: Auto Power Standby On)
Turning on the power
A (Power)
Power indicator

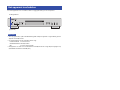
12 En
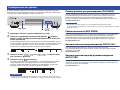
CD/USB
OPEN/CLOSE
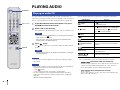
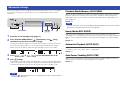
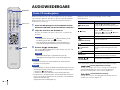
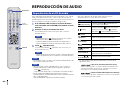
PLAYING AUDIO
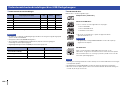
This unit enables you to play data CDs as well as audio CDs. For
information on the type of CDs that can be played on this unit, please
refer to “Supported file formats/discs/USB flash drives” (page 20).
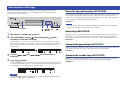
1If the USB indicator on the front panel is lit, press
CD/USB to switch to Disc mode.
2Place a CD on the disc tray.
Press OPEN/CLOSE repeatedly to open and close the disc tray.
Note
• You can also press (Open/Close) on the front panel repeatedly to
open and close the disc tray.
• When the unit is ready to play an audio CD, the playback media
indicator (CD) on the display lights up.
3Press (Play).
The (Play) indicator on the display lights up and playback
starts.
Note
• During audio file playback, the playback media indicator reflecting the
file format lights up.
Notice
• Do not insert your hand or finger into the disc tray slot. Doing so might
cause injury.
Note
• After you place a CD on the disc tray, the disc tray will close and playback
will start if you perform one of the following operations:
– Press (Play).
– Press a numeric key that corresponds to a track number.
• You can configure the unit so that playback automatically starts when
power to the unit is turned on or when you switch to Disc or USB mode
(page 19).
(Default: Automatic Playback On)
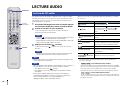
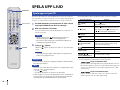
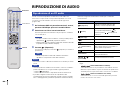
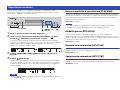
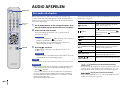
Use the following remote control keys to navigate the operation.
* The control buttons on the front panel function as follows:
(Skip backward/Search backward):
Skips back to the previous track. Skips back to the top of the
current track if pressed during playback. It also searches
tracks backward if you press and hold the button.
(Skip forward/Search forward):
Skips to the next track. It also searches tracks forward if you
press and hold the button.
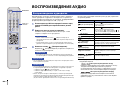
Playing an audio CD
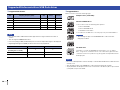
Available keys Function
(Play) The (Play) indicator on the display lights
up and playback starts.
(Pause)
The (Pause) indicator on the display lights
up and playback pauses. alternatively,
press to resume playback.
(Stop) Stops playback.
(Search backward)* Searches tracks backward.
(Search forward)* Searches tracks forward.
(Skip backward)*
Skips back to the previous track. Skips back to
the top of the current track if pressed during
playback.
(Skip forward)* Skips to the next track.
Numeric keys Enter a track number to directly select the
corresponding track.
FOLDER ,
(Data CDs only) Enable you to select a folder.
Numeric keys

En 13
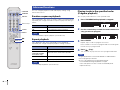
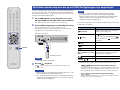
CD/USB
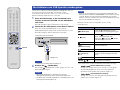
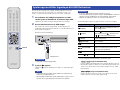
You can play music files (stored on your USB flash drive) on this
unit. For information on the supported USB flash drives, please
refer to “Supported file formats/discs/USB flash drives” (page 20).
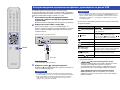
1If the USB indicator on the front panel is off, press
CD/USB to switch to USB mode.
The USB indicator on the front panel lights up orange.
2Connect the USB flash drive to the USB jack.
When the unit is ready for playback, the playback media
indicator (USB) on the display lights up, and the USB indicator
on the front panel lights up green.
Notice
• Do not use USB extension cables.
3Press (Play).
The (Play) indicator on the display lights up and playback
starts.
Note
• During audio file playback, the playback media indicator reflecting the
file format lights up.
• If compatible music files are stored on your USB flash drive, the unit
will play them in chronological order based on date of creation.
Notice
• Do not remove the USB flash drive during playback, or while the information
display on the front panel is indicating “USB READING”. In this case, first
press CD/USB to switch to Disc mode, make sure that the USB indicator
turns off, and then remove the flash drive.
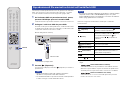
Use the following remote control keys to navigate the operation.
* The control buttons on the front panel function as follows:
(Skip backward/Search backward):
Skips back to the previous track. Skips back to the top of the
current track if pressed during playback. It also searches
tracks backward if you press and hold the button.
(Skip forward/Search forward):
Skips to the next track. It also searches tracks forward if you
press and hold the button.
Playing music files stored on your USB flash drive
This unit (front panel)
USB flash drive
Available keys Function
(Play) The (Play) indicator on the display lights
up and playback starts.
(Pause)
The (Pause) indicator on the display lights
up and playback pauses. alternatively,
press to resume playback.
(Stop) Stops playback.
(Search backward)* Searches tracks backward.
(Search forward)* Searches tracks forward.
(Skip backward)*
Skips back to the previous track. Skips back to
the top of the current track if pressed during
playback.
(Skip forward)* Skips to the next track.
FOLDER , Enable you to select a folder.

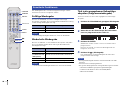
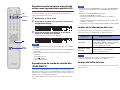
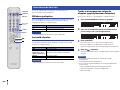
14 En
RANDOM
CLEAR
ENTER
REPEAT
PROGRAM
You can configure playback mode and display settings using
advanced functions.
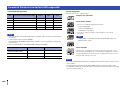
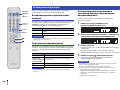
Random-sequence playback
Press RANDOM to play tracks in random order. Pressing RANDOM
repeatedly will change the Random-sequence playback setting as
follows:
Note
• To cancel Random-sequence playback, open the disc tray.
Repeat playback
Press REPEAT to play tracks repeatedly. Pressing REPEAT
repeatedly will change the Repeat playback setting as follows:
Note
• To cancel Repeat playback, open the disc tray.
Playing tracks in the specified order
(Program playback)
You can play audio CD tracks in the specified order.
1Press PROGRAM while playback is stopped.
2Use the numeric keys to enter the track number of a
song you want to program.
3Press ENTER.
Repeat steps 2 and 3 to program each track.
Press CLEAR to cancel each programmed track starting with
the last track you programmed.
4Press (Play).
The unit starts to play the tracks in the programmed order.
Note
• Program playback does not work with data CDs or USB flash drives.
• You can program up to 24 tracks.
• Do one of the following to clear all programmed tracks:
– Press CLEAR while Program playback is stopped.
– Turn off the power to the unit or set the unit in Standby mode.
– Open the disc tray.
Advanced functions
Indicator Setting
RNDM Plays all tracks in random order.
Off Turns off Random-sequence playback.
Indicator Setting
REP Plays one track repeatedly.
REP FOLDER
(Data CDs and USB
flash drives only)
Plays tracks in the current folder repeatedly.
REP ALL Plays all tracks repeatedly.
Off Turns off Repeat playback.
TRACKTEXT AAC WAV FLAC RESUM RDY TOTAL REMAIN RNDM REP FOLDER ALL A - BCD PROG
TRACKTEXT AAC WAV FLAC RESUM RDY TOTAL REMAIN RNDM REP FOLDER ALL A - BCD PROG
Numeric keys

En 15
A/B
PURE
DIRECT
DISPLAY
DIMMER
Playing a specified part repeatedly
(A-B Repeat playback)
You can specify the start and end points of a track during audio CD
playback to play the specified part repeatedly.
1Play an audio CD.
2Press A/B at the point you want to start Repeat
playback.
3Press A/B again at the point you want to end Repeat
playback.
The unit starts Repeat playback.
Note
• Repeat playback does not work with data CDs or USB flash drives.
• You cannot specify the A-B Repeat setting when the PURE DIRECT
function is turned on.
• Do one of the following to cancel A-B Repeat playback:
– Press A/B again.
– Press (Stop).
– Open the disc tray.
Enjoying high-quality sound playback
(PURE DIRECT)
If the PURE DIRECT function is turned on, digital audio will not be
output. In this way, the PURE DIRECT function reduces noise that
would affect sound quality, enabling you to enjoy playback of high-
quality sound.
Pressing PURE DIRECT repeatedly will toggle between PURE
DIRECT on and off.
Note
• To use the PURE DIRECT function, connect the ANALOG OUT jacks on
the rear panel to the amplifier. The DIGITAL OUT jacks will not output any
signals.
• When the PURE DIRECT function is turned on:
– The PURE DIRECT indicator lights up.
– The front panel display will be turned off while content is playing.
– Only a minimum number of indicators and messages will appear while
you are operating the unit.
– This setting will be maintained after you turn off the power to the unit.
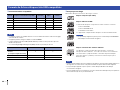
Switching information on the display
Pressing DISPLAY repeatedly during playback will switch the
information on the display as follows:
Note
• The information display indicates up to 64 characters (1-byte alphanumeric
characters and several symbols).
Changing the display brightness
Press DIMMER repeatedly to switch between four stages of display
brightness.
TEXT AAC WAV FLAC RESUM RDY TOTAL REMAIN RNDM FOLDER ALLPROG CD TRACK REP
TEXT AAC WAV FLAC RESUM RDY TOTAL REMAIN RNDM FOLDER ALLPROG CD TRACK REP
Playback media Information on the display
Audio CD
Elapsed time Remaining time of the current
track (TRACK REMAIN) Total remaining time on
the CD (TOTAL REMAIN) Tra ck n a me*
Artist name* Album title*
* If CD-text has been embedded
Data CD,
USB flash drive
Elapsed time Track name* Artist name*
Album title*
* If tags have been embedded

16 En
APPENDIX
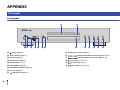
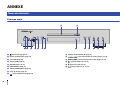
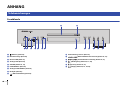
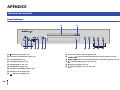
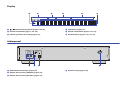
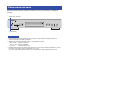
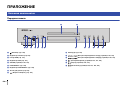
Front panel
1A (Power) (page 11)
2Power indicator (page 11)
3USB jack (page 13)
4USB indicator (page 13)
5CD/USB (pages 12, 13)
6PURE DIRECT (page 15)
7PURE DIRECT indicator (page 15)
8Disc tray (page 12)
9 (Open/Close) (page 12)
0Remote control sensor (page 9)
A (Skip backward/Search backward) (pages 12, 13)
B (Skip forward/Search forward) (pages 12, 13)
C (Play) (pages 12, 13, 14)
D (Pause) (pages 12, 13)
E (Stop) (pages 12, 13, 14, 15)
Part names
1 2 3 4 7 0
8 9
5 6 A B C D E

En 17
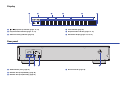
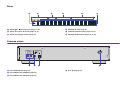
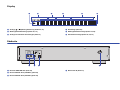
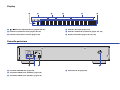
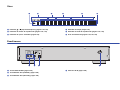
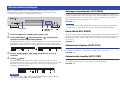
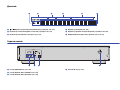
Display
1 / (Play/Pause) indicator (pages 12, 13)
2Playback media indicator (pages 12, 13)
3Advanced setting indicator (page 19)
4Time indicator (page 15)
5Playback mode indicator (pages 14, 15)
6Information display (pages 14, 15, 19)
Rear panel
1ANALOG OUT jacks (page 10)
2DIGITAL OUT jack (COAXIAL) (page 10)
3DIGITAL OUT jack (OPTICAL) (page 10)
4AC IN connector (page 10)
TRACKCD TEXT AAC WAV FLAC RESUM RDY TOTAL REMAIN PROG RNDM REP FOLDER ALL A - B
1 62 3 54
2 3 41

18 En
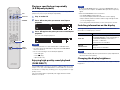
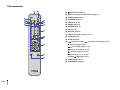
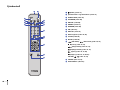
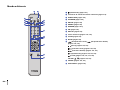
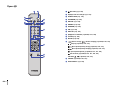
Remote control
1A (Power) (page 11)
2Remote control signal transmitter (page 9)
3OPEN/CLOSE (page 12)
4PROGRAM (page 14)
5REPEAT (page 14)
6DIMMER (page 15)
7RANDOM (page 14)
8A/B (page 15)
9DISPLAY (page 15)
0Numeric keys (pages 12, 14)
ACLEAR (page 14)
BENTER (page 14)
C (Search backward), (Search forward) (pages 12, 13)
(Pause) (pages 12, 13)
(Skip backward) (pages 12, 13)
(Skip forward) (pages 12, 13)
(Play) (pages 12, 13, 14)
(Stop) (pages 12, 13, 14, 15)
FOLDER , (pages 12, 13)
DCD/USB (pages 12, 13)
EPURE DIRECT (page 15)
3
4
9
0
C
7
8
A
B
D
E
6
5
21

En 19
This section explains how to configure various advanced functions. You can configure
most of these settings from the front panel. (Some settings require remote control
operation.)
1Place the unit in Standby mode (page 11).
2Press and hold PURE DIRECT, (Open/Close), and (Play),
simultaneously for three seconds or longer.
The following indicator appears on the information display of the front panel, and
the unit enters setting mode. You can set the Playback Mode Memory, Ready
Mode, Automatic Playback, and Auto Power Standby functions in this order.
3Press or to turn the function on or off.
4Press (Stop).
The setting is confirmed, and the next parameter is automatically selected. Repeat
steps 3 and 4. When all settings are complete, the following indicator appears on
the information display of the front panel, and the unit enters Standby mode.
Note
• If you press (Play) during this process, the setting at that point will be confirmed, and the
unit will enter Standby mode.
Playback Mode Memory (PLAY MEM)
With this function enabled, the unit retains the Repeat playback and Random-sequence
playback settings even after the power to the unit is turned off. When the Playback
Mode Memory function is turned on, the Advanced setting indicator (RESUM) on the
display lights up.
Default: Off
Note
• If you turn on the power to the unit after enabling the Playback Mode Memory function, the unit will
play the most recently-played track or file from the beginning.
Ready Mode (RDY MODE)
With this function enabled, the unit pauses each time the playback of a track has
completed. You can start playback of the next track when you choose. When the Ready
Mode function is enabled, the Advanced setting indicator (RDY) on the display lights
up.
Default: Off
Automatic Playback (AUTO PLAY)
With this function enabled, the unit automatically starts playback when power to the unit
is turned on or when you switch to Disc or USB mode.
Default: On
Auto Power Standby (AUTO STBY)
With this function enabled, the unit automatically enters Standby mode if you do not
interact with it for 20 minutes after the playback has stopped.
Default: On
Advanced settings
PURE DIRECT
TRACKTEXT AAC WAV FLAC RESUM RDY TOTAL REMAIN RNDM REP FOLDER ALLPROG CD TRACKTEXT AAC WAV FLAC RESUM RDY TOTAL REMAIN RNDM REP FOLDER ALLPROG CD
CD TRACK REP TEXT AAC WAV FLAC RESUM RDY TOTAL REMAIN RNDM FOLDER ALLPROG

20 En
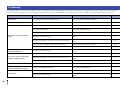
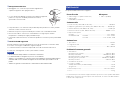
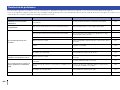
❑Supported file formats
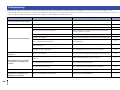
* Linear PCM format only.
Note
• Files on a data CD or USB flash drive will be played in chronological order based on date of
creation.
• This unit supports ISO9660 format discs.
• If the unit is playing a VBR (variable bitrate) file, an accurate elapsed time might not be displayed.
• Digital Rights Management (DRM) encoded content cannot be played back.
❑Supported discs
Please use discs with the following logos.
Notice
• Do not use odd-shaped discs or discs with tape or a decal attached. Otherwise, malfunction of the
unit may occur.
• This unit might not play some CD-RW discs or discs that were improperly recorded.
• To play back an 8-cm CD, place it in the inner recessed area of the disc tray. Do not put a normal
(12-cm) CD on top of an 8-cm CD.
Supported file formats/discs/USB flash drives
File Sampling frequency (kHz) Bit depth
(bit)
Bitrate
(kbps)
Number of
channels
MP3 32/44.1/48 — 32-320 2
WMA 32/44.1/48 — 48-192 2
AAC 32/44.1/48 — 8-320 2
WAV * 32/44.1/48/64/88.2/96 16/24 — 2
FLAC 32/44.1/48/64/88.2/96 16/24 — 2
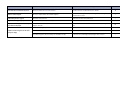
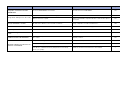
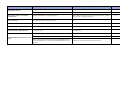
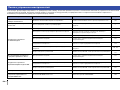
Data CD USB flash drive
Number of folder hierarchies
(including the root folder) 99
Number of folders 999 999
Number of files 1100 65535
Compact discs (audio CDs)
CD-R and CD-RW discs
• Discs with one of the following descriptions:
FOR CONSUMER
FOR CONSUMER USE
FOR MUSIC USE ONLY
• For CD-R or CD-RW discs, the unit plays only the finalized discs.
Note
• This unit might not play some CD-R/CD-RW discs or discs that were
improperly recorded.
CD-TEXT discs
These discs contain embedded text information, such as album
titles, song names, and artist names. This information (alphanumeric
characters and some symbols only) along with the elapsed time will
be displayed.
La pagina si sta caricando...
La pagina si sta caricando...
La pagina si sta caricando...
La pagina si sta caricando...
La pagina si sta caricando...
La pagina si sta caricando...
La pagina si sta caricando...
La pagina si sta caricando...
La pagina si sta caricando...
La pagina si sta caricando...
La pagina si sta caricando...
La pagina si sta caricando...
La pagina si sta caricando...
La pagina si sta caricando...
La pagina si sta caricando...
La pagina si sta caricando...
La pagina si sta caricando...
La pagina si sta caricando...
La pagina si sta caricando...
La pagina si sta caricando...
La pagina si sta caricando...
La pagina si sta caricando...
La pagina si sta caricando...
La pagina si sta caricando...
La pagina si sta caricando...
La pagina si sta caricando...
La pagina si sta caricando...
La pagina si sta caricando...
La pagina si sta caricando...
La pagina si sta caricando...
La pagina si sta caricando...
La pagina si sta caricando...
La pagina si sta caricando...
La pagina si sta caricando...
La pagina si sta caricando...
La pagina si sta caricando...
La pagina si sta caricando...
La pagina si sta caricando...
La pagina si sta caricando...
La pagina si sta caricando...
La pagina si sta caricando...
La pagina si sta caricando...
La pagina si sta caricando...
La pagina si sta caricando...
La pagina si sta caricando...
La pagina si sta caricando...
La pagina si sta caricando...
La pagina si sta caricando...
La pagina si sta caricando...
La pagina si sta caricando...
La pagina si sta caricando...
La pagina si sta caricando...
La pagina si sta caricando...
La pagina si sta caricando...
La pagina si sta caricando...
La pagina si sta caricando...
La pagina si sta caricando...
La pagina si sta caricando...
La pagina si sta caricando...
La pagina si sta caricando...
La pagina si sta caricando...
La pagina si sta caricando...
La pagina si sta caricando...
La pagina si sta caricando...
La pagina si sta caricando...
La pagina si sta caricando...
La pagina si sta caricando...
La pagina si sta caricando...
La pagina si sta caricando...
La pagina si sta caricando...
La pagina si sta caricando...
La pagina si sta caricando...
La pagina si sta caricando...
La pagina si sta caricando...
La pagina si sta caricando...
La pagina si sta caricando...
La pagina si sta caricando...
La pagina si sta caricando...
La pagina si sta caricando...
La pagina si sta caricando...
La pagina si sta caricando...
La pagina si sta caricando...
La pagina si sta caricando...
La pagina si sta caricando...
La pagina si sta caricando...
La pagina si sta caricando...
La pagina si sta caricando...
La pagina si sta caricando...
La pagina si sta caricando...
La pagina si sta caricando...
La pagina si sta caricando...
La pagina si sta caricando...
La pagina si sta caricando...
La pagina si sta caricando...
La pagina si sta caricando...
La pagina si sta caricando...
La pagina si sta caricando...
La pagina si sta caricando...
La pagina si sta caricando...
La pagina si sta caricando...
La pagina si sta caricando...
La pagina si sta caricando...
La pagina si sta caricando...
La pagina si sta caricando...
La pagina si sta caricando...
La pagina si sta caricando...
La pagina si sta caricando...
La pagina si sta caricando...
La pagina si sta caricando...
La pagina si sta caricando...
La pagina si sta caricando...
La pagina si sta caricando...
La pagina si sta caricando...
La pagina si sta caricando...
La pagina si sta caricando...
La pagina si sta caricando...
La pagina si sta caricando...
La pagina si sta caricando...
La pagina si sta caricando...
La pagina si sta caricando...
La pagina si sta caricando...
La pagina si sta caricando...
La pagina si sta caricando...
La pagina si sta caricando...
La pagina si sta caricando...
La pagina si sta caricando...
La pagina si sta caricando...
La pagina si sta caricando...
La pagina si sta caricando...
La pagina si sta caricando...
La pagina si sta caricando...
La pagina si sta caricando...
La pagina si sta caricando...
La pagina si sta caricando...
La pagina si sta caricando...
La pagina si sta caricando...
La pagina si sta caricando...
La pagina si sta caricando...
La pagina si sta caricando...
La pagina si sta caricando...
La pagina si sta caricando...
La pagina si sta caricando...
La pagina si sta caricando...
La pagina si sta caricando...
La pagina si sta caricando...
La pagina si sta caricando...
La pagina si sta caricando...
La pagina si sta caricando...
La pagina si sta caricando...
La pagina si sta caricando...
La pagina si sta caricando...
La pagina si sta caricando...
La pagina si sta caricando...
La pagina si sta caricando...
La pagina si sta caricando...
La pagina si sta caricando...
La pagina si sta caricando...
La pagina si sta caricando...
La pagina si sta caricando...
La pagina si sta caricando...
-
 1
1
-
 2
2
-
 3
3
-
 4
4
-
 5
5
-
 6
6
-
 7
7
-
 8
8
-
 9
9
-
 10
10
-
 11
11
-
 12
12
-
 13
13
-
 14
14
-
 15
15
-
 16
16
-
 17
17
-
 18
18
-
 19
19
-
 20
20
-
 21
21
-
 22
22
-
 23
23
-
 24
24
-
 25
25
-
 26
26
-
 27
27
-
 28
28
-
 29
29
-
 30
30
-
 31
31
-
 32
32
-
 33
33
-
 34
34
-
 35
35
-
 36
36
-
 37
37
-
 38
38
-
 39
39
-
 40
40
-
 41
41
-
 42
42
-
 43
43
-
 44
44
-
 45
45
-
 46
46
-
 47
47
-
 48
48
-
 49
49
-
 50
50
-
 51
51
-
 52
52
-
 53
53
-
 54
54
-
 55
55
-
 56
56
-
 57
57
-
 58
58
-
 59
59
-
 60
60
-
 61
61
-
 62
62
-
 63
63
-
 64
64
-
 65
65
-
 66
66
-
 67
67
-
 68
68
-
 69
69
-
 70
70
-
 71
71
-
 72
72
-
 73
73
-
 74
74
-
 75
75
-
 76
76
-
 77
77
-
 78
78
-
 79
79
-
 80
80
-
 81
81
-
 82
82
-
 83
83
-
 84
84
-
 85
85
-
 86
86
-
 87
87
-
 88
88
-
 89
89
-
 90
90
-
 91
91
-
 92
92
-
 93
93
-
 94
94
-
 95
95
-
 96
96
-
 97
97
-
 98
98
-
 99
99
-
 100
100
-
 101
101
-
 102
102
-
 103
103
-
 104
104
-
 105
105
-
 106
106
-
 107
107
-
 108
108
-
 109
109
-
 110
110
-
 111
111
-
 112
112
-
 113
113
-
 114
114
-
 115
115
-
 116
116
-
 117
117
-
 118
118
-
 119
119
-
 120
120
-
 121
121
-
 122
122
-
 123
123
-
 124
124
-
 125
125
-
 126
126
-
 127
127
-
 128
128
-
 129
129
-
 130
130
-
 131
131
-
 132
132
-
 133
133
-
 134
134
-
 135
135
-
 136
136
-
 137
137
-
 138
138
-
 139
139
-
 140
140
-
 141
141
-
 142
142
-
 143
143
-
 144
144
-
 145
145
-
 146
146
-
 147
147
-
 148
148
-
 149
149
-
 150
150
-
 151
151
-
 152
152
-
 153
153
-
 154
154
-
 155
155
-
 156
156
-
 157
157
-
 158
158
-
 159
159
-
 160
160
-
 161
161
-
 162
162
-
 163
163
-
 164
164
-
 165
165
-
 166
166
-
 167
167
-
 168
168
-
 169
169
-
 170
170
-
 171
171
-
 172
172
-
 173
173
-
 174
174
-
 175
175
-
 176
176
-
 177
177
-
 178
178
-
 179
179
-
 180
180


Yamaha CD-S303RK Manuale utente
- Categoria
- Lettore CD
- Tipo
- Manuale utente
- Questo manuale è adatto anche per
in altre lingue
- English: Yamaha CD-S303RK User manual
- français: Yamaha CD-S303RK Manuel utilisateur
- español: Yamaha CD-S303RK Manual de usuario
- Deutsch: Yamaha CD-S303RK Benutzerhandbuch
- русский: Yamaha CD-S303RK Руководство пользователя
- Nederlands: Yamaha CD-S303RK Handleiding
- dansk: Yamaha CD-S303RK Brugermanual
- svenska: Yamaha CD-S303RK Användarmanual
- suomi: Yamaha CD-S303RK Ohjekirja