La pagina si sta caricando...
La pagina si sta caricando...

3
(IT-CH)
INTRODUZIONE
1) Leggere attentamente le avvertenze contenute nel presente libretto in quanto forniscono importanti indicazioni riguardanti
l’installazione, l’uso e la manutenzione. Conservare con cura questo libretto per ogni ulteriore consultazione dei vari
operatori.
2) Dopo aver tolto l’imballaggio, assicurarsi dell’integrità dell’apparecchiatura. In caso di dubbio non utilizzarla e rivolgersi a
personale qualificato. Gli elementi dell’imballo (sacchetti in plastica, polistirolo espanso, chiodi etc.) non devono essere
lasciati alla portata dei bambini in quanto potenziali fonti di pericolo.
3) Prima di collegare l’apparecchiatura accertarsi che i dati di targa siano rispondenti a quelli della rete di distribuzione
elettrica ed idrica.
4) L’installazione deve essere effettuata da personale qualificato secondo le indicazioni del costruttore.
5) Questa apparecchiatura dovrà essere destinata solo all’uso per il quale è stata concepita. Ogni altro utilizzo è da
considerarsi improprio quindi pericoloso.
6) L’apparecchiatura deve essere utilizzata solo da persone addestrate all’uso della stessa.
7) Non lasciare la macchina in ambienti con temperatura inferiore a 0°C.
8) Il grado di protezione della macchina è IPX4 e quindi non deve essere lavata con getti d’acqua diretti e ad alta pressione.
9) Solo il personale qualificato può accedere al quadro comandi, dopo aver tolto la tensione.
(GB-IE)
INTRODUCTION
1) Read the instructions in this booklet carefully as they provide important information, use and maintenance. Keep the
booklet to hand in a safe place so that it can be consulted by other operators.
2) After removing the packing material, check that all the equipment is present and intact. If there is any doubt, do not use it
and contact qualified personnel. The packing elements (plastic bags, foam polystyrene, nails, etc.) should be kept away
from children, because they are dangerous.
3) Before switching the equipment on, make sure that the model plate data conforms to that of the electrical and water
distribution network.
4) Installation should be carried out by qualified personnel according to the manufacturer’s instructions.
5) This equipment must be destined to the use which it has been conceived for. Any other application should be considered
improper and consequently dangerous.
6) The equipment should be used by personnel trained for its use only.
7) Do not leave the machine in an environment at temperatures lower than 0°C.
8) The protection of the machine is IPX4, therefore it should not be washed with high pressure and directed water jets.
9) Qualified personnel only can access the control panel, after having disconnected the machine from the primary current
supply.
(DE-AT-CH)
EINFÜHRUNG
1) Lesen Sie die Bedienungsanleitungen sorgfältig durch, da sie wertvolle Hinweise in Bezug auf die Installation, den
Betrieb und die Wartung enthalten . Bewahren Sie diese Broschüre gut auf, damit sie dem Bediener jederzeit zur
Verfügung steht.
2) Nach dem Auspacken den perfekten Zustand des Gerätes kontrollieren; im Zweifelsfall sich an Fachleute wenden.
Verpackungselemente (Kunststoffsäcke, Schaumelemente, Nägel, usw.) entfernen, damit sie nicht gefährlich werden
können.
3) Vor dem Anklemmen des Gerätes die auf dem Leistungsschild angegebenen Werte mit denen des Stromnetzes
vergleichen.
4) Die Installation soll nach den Angaben des Fabrikanten durch Fachkräfte erfolgen.
5) Die Geräte sind für den dafürvorgesehenen Verwendungszweck einzusetzen: jegliche andere Verwendung ist ungeeignet
und kann gefährlich sein.
6) Die Geräte sind durch eigens geschultes Personal zu bedienen.
7) Geräte niemals in Räumen mit einer Temperatur unter 0° C aufstellen.
8) Der Isolationsgrad des Gerätes ist IPX4; es ist eine Säuberung mit Wasserstrahl oder Hochdruck-Wasser nicht
zugelassen.
9) Die Schaltblenden am Gerät dürfen nur von konzessionierten Fachkräften und nur nach Ausschalten des Hauptschalters
abgenommen weden.
La pagina si sta caricando...
La pagina si sta caricando...
La pagina si sta caricando...

7
(IT-CH)
• La targhetta caratteristiche (Fig. 1-1) si trova sul fianco dx della macchina. Essa contiene tutti i dati necessari per l’installazione.
(GB-IE)
• The specifications tag (Fig. 1-1) is placed on the right-hand panel of the machine. It contains all the neccessary data to install the
appliance.
(DE-AT-CH)
• Das Maschinenschild (Bild. 1-1) befindet sich an der Rechtseite des Gerätes. Es enthält alle für die Aufstellung notwendigen
Daten.
(FR-BE)
• La plaquette (Fig. 1-1) comportant les caractéristiques de l’appareil est placée sur le côté droit. Elle indique toutes les données
nécessaires à la mise en place de la machine.
(ES)
• La placa de características (Fig. 1-1) está ubicada en el flanco derecho de la máquina. Contiene todos los datos necesarios para
la instalación.
(PT)
• A etiqueta com os dados técnicos (Fig. 1-1) está localizada na lateral direita da maquina. Tal etiqueta contém todos os dados
nescessários para a instalação.
(NL)
• Het typeplaatje (Afb. 1-1) bevindt zich aan de rechterkant van de machine. Hier staan alle gegevens op die benodigd zijn voor
de installatie.
Fig. 1-1
1. (IT-CH) DATI TECNICI – (GB-IE) TECHNICAL DATA – (DE-AT-CH) TECHNISCE DATEN –
(FR-BE) DONNES TECHNIQUES – (ES) CARACTERISTICAS TECNICAS – (PT) DADOS TÉCNICOS –
(NL) TECHNISCHE GEGEVENS

8
MS/900E MS/1100E MS/1300E
MS/900EPS MS/1100EPS MS/1300EPS
(IT-CH)
(GB-IE)
)
(DE-AT-CH)
(FR-BE)
(ES)
(PT)
(NL)
Misure d’ingombro
Overall dimensions
Außenabmessungen
Dimensions d’encombrement
Dimensiones totales
Medidas
Afmetingen
mm
650 x 710 x 1460
650 x 710 x 1460
700 x 740 x 1460
(IT-CH)
(GB-IE)
)
(DE-AT-CH)
(FR-BE)
(ES)
(PT)
(NL)
Misure cesto
Basket size:
Maße des Korbs
Dimensions du panier
Dimensiones del cesto
Medidas do cesto
Korfmaten
mm
500 x 500
500 x 500
550 x 550
(IT-CH)
(GB-IE)
)
(DE-AT-CH)
(FR-BE)
(ES)
(PT)
(NL)
Potenzialità di lavaggio
Washing power
Reinigungsleistung
Puissance de lavage
Potencialidad de lavado
Potencial de lavagem
Afwascapaciteit
P/h
864 (75 sec.)
360 (180 sec.)
1080 (60 sec.)
540 (120 sec.)
1320 (60 sec.)
660 (120 sec.)
(IT-CH)
(GB-IE)
)
(DE-AT-CH)
(FR-BE)
(ES)
(PT)
(NL)
Capacità vasca
Tank capacity
Fassungsvermögen des Spülbehälters
Capacité de la cuve
Capacidad del tanque
Capacidade do cuba
Kuipinhoud
lt
35
35
38
(IT-CH)
(GB-IE)
)
(DE-AT-CH)
(FR-BE)
(ES)
(PT)
(NL)
Capacità boiler
Boiler capacity
Fassungsvermögen des Boilers
Capacité du chauffe-eau
Capacidad de la caldera
Capacidade do boiler
Capaciteit boiler
lt
11
11
11
(IT-CH)
(GB-IE)
)
(DE-AT-CH)
(FR-BE)
(ES)
(PT)
(NL)
Cavo di allacciamento
Power cable
Anschlußkabel
Câble de raccordement
Cable de conexión
Cabo de ligação
Aansluitsnoer
n° x mm
2
5 x 2,5
5 x 2,5
5 x 2,5
La pagina si sta caricando...
La pagina si sta caricando...

11
(IT-CH) (GB-IE) (DE-AT-CH) (FR-BE) (ES) (PT) (NL)
Rif. Descrizione Description Beschreibung Description Descripcion Descripcion Beschrijving
CB
Teleruttore
boiler
Boiler contactor Schalter für boiler Télérupteur
chauffe-eau
Telerruptor
reservatòrio
Telerruptor hervidor Afstands-
schakelaar boiler
CF
Condensatorie
antidisturbo
radio
Suppression
filter
Entstörer Filtre anti-
parasites
Filtro
supressão
Condensadores
contra
interferencias radio
Radio-
ontstorings-
condensatoren
CL
Teleruttore di
linea
Power supply
contactor
Schalter für
inbetriebnahme
Télérupteur de
ligne
Telerruptor
linha
Telerruptor
de línea
Afstands-
schakelaar
netspanning
CP
Teleruttore
pompa lavaggio
Washing pump
contactor
Schalter für
Waschpumpe
Télérupteur
pompe de lavage
Telerruptor
bomba
lavagem
Telerruptor bomba
de lavado
Afstands-
schakelaar
Afwaspomp
CV
Teleruttore
vasca
Tank contactor Schalter für
spülbehälter
Télérupteur cuve Telerruptor
caldera
Telerruptor cuba Afstands-
schakelaar kuip
DB
(optional)
Dosatore
elettrico
brillantante
Electric additive
distributor
Elektrodosierer für
Glanzspülmittel
Distributeur
électrique de
produit de riçange
Dosador
electronico do
abrilhantador
Dosificador
eléctrónico
abrillantador
Elektrische
spoelmiddel-
dosering
DD
(optional)
Dosatore
elettrico
detersivo
Electric
detergent
distributor
Elektrodosierer für
Waschmittel
Distributeur
électrique de
detergentl
Dosagem
sabão
Dosificador
eléctrico detersivo
Elektrische
afwasmiddel-
dosering
EB
Elettrovalvola
boiler
Boiler solenoid
valve
Heißwas-
serspeicher-
magnetventil
Electrovanne
chauffe-eau
Electrovalvula
caldera
Electroválvula
boiler
Elektroventiel
boiler
EV
Elettrovalvola
vasca
Tank solenoid
valve
Spülbehälter-
magnetventil
Electrovanne cuve Electrovalvula
tanque
Electroválvula cuba Elektroventiel
kuip
F
Fusibile Fuse Schmelz-
sicherunng
Fusible Fusivel Fusible Zekering
IG
Interruttore
generale
Main switch Haupschalter Interrupteur
général
Interruptor
general On Off
Interruptor general Hoofdscha-kelaar
M
Morsettiera Terminal board Klemmenbrett Plaque á bornes Plug terminal Tablero de bornes Aansluitstrip
MP
Microporta Door
microswitch
Mikrotür Micro-porte Microswitch
porta
Microinterruptor
puerta
Microscha-kelaar
deur
PL
Pompa lavaggio Washing pump Waschpumpe Pompe de lavage Bomba
lavagem
Bomba de lavado Afwaspomp
PR
(optional)
Pompa aumento
pressione
Booster pump Druckstei-
gerungs-pumpe
Pompe
augmentation
pression
Bomba
aumento
pressión
Bomba aumento
pressão
Drukverhogings-
pomp
PS
(optional)
Pompa di
scarico
Drainage pump Ablaufpumpe pompe de vidange Bomba de
drenagem
Bomba de
descarga
Afvoerpomp
PV
Pressostato
vasca
Tank
pressureswitch
Drukwächter für
spülbehälter
Pressostat cuve Pressostato
tanque
Presostato cuba Drukverschil-
schakelaar kuip
R
Relè Relays Relay Relais Relé Relé Relais
RB
Resistenza
boiler
Boiler heating
element
Heißwas-
serspeicher-
Heizstab
Résistance
chauffe-eau
Resistencia
caldera
Resistencia boiler Verwarmings-
element boiler
RF
Start risciacquo
freddo
Cold rinse start Start-
kaltnaspulung
Start rinçage froid Rélé enxague
quente-frio
Relé enjuague
calor-frío
Start koud
spoelen
RV
Resistenza
vasca
Tank heating
element
Spülbehälter-
Heizstab
Résistance cuve Resistencia
tanque
Resistencia cuba Verwarmings-
element kuip
SB
Lampada spia
boiler
Boiler pilot lamp Kontrollampe
Heißwassers-
peicher
Lampe-témoin
chauffe-eau
Lampada luz
caldera
Luz testigo boiler Controlelampje
boiler
SC
Lampada spia
start
Start pilot lamp Kontrollampe start Lampe-temóin
start
Lampada luz
inicio
Luz testigo start Controlelampje
start
SCV
Selettore ciclo
veloce
Cycle selector Wahlschalter
für zyklus
Sélécteur cycle Rélé ciclo Relé ciclo Keuzeschakelaar
snel programma
SE
Scheda
elettronica
Pcb board Elektronik Plaque
électronique
Placa
electronica
Tarjeta electrónica Elektronische
PCB
SL
Lampada spia
linea
Power pilot lamp Betriebskontrol-
lampe
Lampe-temóin
ligne
Lampada luz
acesa
Luz testigo linea Controlelampje
netspanning
ST
Start Start Start Start Relé inicio Relé start Start
SV
Lampada spia
vasca
Tank pilot lamp Kontrollampe
Spülbehalter
Lampe-témoin
cuve
Lampada luz
tanque
Luz testigo cuba Controlelampje
kuip
TB
Termostato
boiler
Boiler
thermostat
Heißasserspeicher
-Thermostat
Termostat
chauffe-eau
Termostato
caldera
Termostato boiler Thermostaat
boiler
TBS
Termostato di
sicurezza boiler
Boiler safety
Thermostat
Sicherheits-
thermostat für
boiler
Thermostat
de sécurité
chauffe-eau
Termostato
segurança
caldera
Termostato
seguridad boiler
Veiligheids-
thermostaat
boiler
TV
Termostato
vasca
Tank thermostat Spülbehälter-
thermostat
Thermostat cuve Termostato
tanque
Termostato cuba Thermostaat kuip

12
(IT-CH)
• L’installazione, la messa in funzione e la manutenzione dell’apparecchio devono essere effettuate solamente da personale
qualificato. Tutti i lavori di allacciamento devono essere eseguiti in osservanza delle norme vigenti. Il costruttore declina
qualsiasi responsabilità in caso di cattivo funzionamento, che sia da attribuire ad uno scorretto allacciamento. Durante
l’installazione, l’apparecchio deve essere messo a bolla, piccole pendenze possono essere eliminate con i piedini regolabili
(avvitare e/o svitare).
L’installazione deve essere eseguita secondo le seguenti norme:
1. prescrizioni in vigore contro gli infortuni
2. prescrizioni CE
3. prescrizioni degli enti erogatori dell’acqua
(GB-IE)
• Installation, initial start-up and maintenance of the appliance must be carried out by qualified personnel only. All hydraulic and
electrical connections must be carried out in compliance with current safety norms. The manufacturer accepts no responsibility
for malfunctions arising from incorrect connection of the appliance. When installing, ensure that the appliance is perfectly level.
Turn the adjustable feet clockwise or anticlockwise to level the appliance.
The following norms must be observed when installing the appliance:
1. current accident -prevention regulations
2. CE standards
3. water board regulations
(DE-AT-CH)
• Aufstellung, Inbetribnahme und Wartung des Geräts dürfen nur von qualifiziertem Personal vorgenommen werden. Alle
Anschlußarbeiten müssen unter Beachtung der geltenden Normen ausgeführt werden. Der Hesteller lehnt jegliche
Verantwortung für Funktionsfhler ab, die auf nicht korrekten Anschluß zurückzuführen sind. Bei der Aufstellung muß das Gerät
ausgerichtet werden. Geringe Bodenunebenheiten können durch die verstellbaren Füße (anschrauben oder/und losschrauben)
ausgeglichen werden.
Bei der Installation sind folgende Vorschriften zu beachten:
1. geltende Bestimmungen zur Unfallverhütung
2. CE-Bestimmungen
3. Vorschrifften der Wasserversorgungsgesellschaft
(FR-BE)
• L’installation, la mise en sevice et l’entretien de l’appareil ne doivent être exécutés que par des peronnes qualifiées. Tous les
travaux de branchement doivent être réalisés conformément aux normes en vigueur. Le constructeur décline toute
responsabilité en cas de mauvais fonctionnement de l’appareil, lorsque le branchement n’a pas été effectué correctement. Lors
de l’installation, l’appareil doit être positionné de maniére à ce qu’il soit de niveau. Les pieds réglables qui équipent l’appareil
permettent une mise à niveau correcte (visser et/ou dévisser les pieds selon le cas).
Lors de la mise en place du lave-batterie, les normes ci-dessous doivent être observées:
1. réglementation en viguer contre les accidents
2. normes CE
3. normes des sociétés de distribution de l’eau.
(ES)
• La instalación, la puesta en funcionamiento y la manutención del aparato están al encargo exclusivo del personal cualificado.
Todos los trabajos necesarios para la conexión se deben ejecutar en conformidad con las normas vigentes. El Constructor no
se responsabiliza por desperfectos de funcionamiento provocados por conexión incorrecta. Al efectuar la instalación cuide de
que el aparato esté colocado en posición horizontal; atornille o destornille los pies ajustables para eliminar las pequeñas
inclinaciones.
Durante la instalación aténgase a estas normas:
1. prescripciones vigentes contra accidentes del trabajo,
2. prescripciones CE,
3. prescripciones de la sociedad que suministra el agua.
2. (IT-CH) INSTALLAZIONE – (GB-IE) INSTALLATION – (DE-AT-CH) AUFSTELLUNG –
(FR-BE) INSTALLATION – (ES) INSTALACION – (PT) INSTALAÇÃO – (NL) INSTALLATIE
La pagina si sta caricando...

14
(IT-CH)
• Il quadro elettrico si trova sul fronte dell’apparecchio. L’allacciamento alla rete si trova nella parte posteriore dell’apparecchio. Il
cavo di allacciamento (G) deve essere almeno del tipo H07RN-F ed avere una sezione di 2,5 mm².
N.B.: Come da prescrizioni internazionali, fra l’apparecchio e la rete elettrica bisogna interporre un interruttore generale (A) i cui
contatti abbiano un’apertura minima di 3 mm, dotato di fusibili ad amperaggio adeguato (vedi dati tecnici).
L’interruttore generale (A) deve essere collocato nelle vicinanze dell’apparecchio ed essere facilmente accessibile.
(GB-IE)
• The electrical panel is located on the front of the appliance. The connection to power supply is on the back side of the appliance.
The power cable (G) must have a rating of at least H07RN-F, and each wire must have a section of 2,5 mm².
N.B.: In accordance with international standards, a cut-out switch (A), provided with amperage-adequate fuses (see technical
specification), must be installed between the mains electricity supply and appliance. The contacts must have an aperture of at least
3 mm.
The main switch (A) should be positioned in the immediate vicinity of the appliance and should be easily accessible.
(DE-AT-CH)
• Die Schalttafel befindet sich an Vorderseite des Geräts. Der Netzanschluß befindet sich auf der Geräterückseite. Das
Anschlußkabel (G) muß mindestens vom Typ- H07RN-F sein und einen Querschnitt von 2,5 mm² aufweisen.
N.B.: Laut internationaler Bestimmungen muß zwischen Gerät und Stromnetz ein Hauptschalter zwischengeschaltet werden (A)
und mit Abschmelzsicherungen von angemessener Stromstärke ausgestatten. (Technische Angaben zu sehen), dessen Kontakte
eine Mindestöffnung von 3 mm aufweisen sollten.
Der Hauptschalter (A) soll sich in unmittelbarer Nähe des Geräts befinden und leicht zugänglich sein.
(FR-BE)
• Le tableau électrique est placé sur la partie antérieure de l’appareil. Le branchement électrique est placé sur la partie postérieure
de l’appareil. Le câble de raccordement (G) doit au moins être du type H07RN-F et doit avoir une section de 2,5 mm².
N.B.: Un interrupteur général (A) pourvu fusibles à ampérage adéquat (voir données techniques), muni de contacts ayant une
overture minimum de 3 mm, doit être monté entre l’appareil et le réseau électrique, conformément aux normes internationales.
L’interrupteur général (A) devrait être placé à proximité de l’appareil et de façon à être facilement accessible.
(ES)
• El cuadro eléctrico está ubicado en el lado anterior del aparato. La conexión a la red se encuentra en el lado posterior del
aparato. El cable de conexión (G) debe ser por lo menos del tipo H07RN-F y debe tener una sección mínima de 2,5 mm
2
.
N.B.: Según indican las normas internacionales, entre el aparato y la red eléctrica es preciso interponer un interruptor general (A)
cuyos contactos deben tener una abertura mínima de 3 mm. (con fusibles de amperaje adecuado: véanse características técnicas).
El interruptor general (A) se debe colocar cerca del aparato para que esté al alcance de la mano.
2.1 (IT-CH) ALLACCIAMENTO ELETTRICO – (GB-IE) CONNECTION TO POWER SUPPLY –
(DE-AT-CH) NETZANSCHLUSS – (FR-BE) BRANCHEMENT ELECTRIQUE – (ES) CONEXION ELECTRICA –
(PT) INSTALAÇÃO ELÉCTRICA –
(NL) ELEKTRISCHE AANSLUITING
La pagina si sta caricando...

16
(IT-CH)
• L’apparecchio è da collegare ad un sistema di equipotenziale. La vite predisposta a tale scopo si trova sulla parete posteriore
ed é contrassegnata da un adesivo con il simbolo
.
N.B.: Il costruttore non risponde per responsabilità e/o impegni di garanzia in caso di danni derivanti dalla inosservanza delle
prescrizioni o da installazione non conforme.
(GB-IE)
• The appliance must be grounded. The ground terminal screw is located on the rear panel of the appliance, and marked by the
symbol
.
N.B.: The manufacturer accepts no responsibility or warranty obligations in case of damage arising from non-compliance with this
requirement or from incorrect installation.
(DE-AT-CH)
• Den Äquipotentialanschluß durchführen. Die dafür vorgesehene Schraube befindet sich an der Rückwand des Geräts und ist
mit der Aufschrift mit dem Symbol
gekennzeichnet.
N.B.: Der Hersteller lehnt jegliche Haftung oder/und Garantieansprüche im Falle von Schäden ab, die durch Nichtbeachtung der
Vorschriften oder durch nicht sachgemäße Installation entstehen.
(FR-BE)
• Réaliser le raccordement équipotentiel. La vis prévue à cet effet est placée sur la paroi postérieure. Un adhésif portant le
symbole
permet d’identifier la vis.
N.B.: Le constructeur décline toute responsabilité et ne garantit pas les dommages dus à l’inobservation des prescriptions ou au
montage non conforme aux normes en vigueur.
(ES)
• Este aparato se debe conectar a un sistema de equipotencial. El tornillo prevenido para esta finalidad está ubicado en el lado
posterior y está contramarcado por el símbolo
.
N.B.: El Constructor no se responsabiliza y su garantía caduca en caso de daños provocados por inobservancia de normas o
instalación incorrecta.
(PT)
• Aparelho deve ser conectado a uma ligação terra. O parafuso terminal predisposto encontra-se na parte posterior e é
identificado pelo simbolo .
N.B.: O fabricante não se responsabiliza e não garante eventuais danos provocados pelo desrespeito das instruções, ou ainda, no
caso de instalação não conforme.
(NL)
• Het apparaat moet op een potentiaalvereffeningssysteem aangesloten worden. De schroef die daarvoor bestemd is, is in de
achterwand aangebracht en is gemarkeerd met een sticker waar het symbool
op staat
N.B.: De fabrikant kan niet aansprakelijk gesteld worden en/of aanvaardt geen garantieverplichtingen in geval van veronachtzaming
van de voorschriften of een installatie die niet conform de voorschriften is.
2.1.1 (IT-CH) EQUIPOTENZIALE – (GB-IE) GROUND – (DE-AT-CH) ÄQUIPOTENTIALANSCHLUß –
(FR-BE) RACCORDEMENT EQUIPOTENTIEL – (ES) EQUIPOTENCIAL – (PT) LIGAÇÃO TERRA – (NL)
POTENTIAALVEREFFENING

17
(IT-CH)
• L’apparecchio è previsto per l’allacciamento all’acqua fredda o calda (max 50 ÷ 55°C), con una pressione a valvola aperta
come indicato nella Tab. 2-1. In caso di pressione superiore alla massima consigliata, bisogna installare un riduttore di
pressione. In caso di pressione inferiore alla minima consigliata, bisogna installare una pompa di aumento pressione di max 0.5
Hp, con una portata di 20 L/min ed una prevalenza di 15÷20 mt.. Il controllo della pressione deve essere effettuato all’ingresso
dell’elettrovalvola (ved. fig.2-4). La conduttura dell’acqua deve avere un diametro interno di almeno 16/18 mm (ved.fig.2-5).
Collegare il tubo di carico acqua dell’apparecchio ad un rubinetto d’intercettazione (B),posto preferibilmente nelle immediate
vicinanze dell’apparecchio, interponendo l’apposito filtro in dotazione (B1) (ved. fig.2-2). Si consiglia l’installazione di un
decalcificatore (C) (non in dotazione), montato a monte dell’ elettrovalvola della macchina (ved.fig.2-3).
(GB-IE)
• The appliance is designed for connection to the cold or hot water supply (max. 50 55°C) at a mains pressure with the valve
open as shown in Table 2-1 and a minimum output of 10 litres/min. If pressure exceeds the maximum, fit a pressure reducer. If
pressure is lower than the minimum, fit a pressure booster pump of max. 0.5 HP, with an output of 20 litres/min. and a head of
15÷20 metres. Pressure must be measured at the solenoid valve inlet (see fig. 2-4). The water pipes must have an internal
diameter of at least 16/18 mm (see fig. 2-5). Connect the appliance water supply pipe to a cut-out tap (B), preferably placed
close to the appliance, fitting the special filter provided (B1) (see fig. 2-2). We recommend fitting a water softener (C) (not
provided) upstream from the machine solenoid valve (see fig. 2-3).
(DE-AT-CH)
• Das Gerät ist für den Anschluss an Warm-und Kaltwasser (max. 50-55°C) vorgesehen, wobei der Druck bei offenem Ventil dem
in Tab. 2-1. Bei höherem Druck als dem empfohlenen einen Druckminderer installieren. Bei niedrigeren Druck als empfohlen
eine Druckerhöhungspumpe mit max. 0,5 PS , einer Förderleistung von 20l/min und einer Förderhöhe von 15-20m installieren.
Die Druckkontrolle muss am Eingang des Elektroventils erfolgen (siehe Bild 2-4). Die Wasserleitung muss einen
Innendurchmesser von mindestens 16/18 mm aufweisen (siehe Bild 2-5). Den Zulaufschlauch des Gerätes an einen möglichst
nahegelegenen Wasserhahn (B) anschliessen und den vorgesehenen Filter (B1) anbringen (siehe Bild 2-2). Der Einbau eines
Etkalkers (C) wird empfohlen; dieser gehört nicht zur Ausstattunt und muss vor dem Elektroventil der Maschine eingebaut
werden. (siehe Bild 2-3).
(FR-BE)
• L’appareil peut être raccordé à l’eau froide ou chaude (50:55°C max) à une pression, soupape ouverte, comme indiqué dans le
Tableau 2-1. Si la pression dépasse la pression maximum conseillée, il faut installer un réducteur de pression. Si la pression
est inférieure à la pression minimum conseillée, il faut installer une pompe pour faire augmenter la pression de 0,5 Hp max., à
un débit de 20 litres /min et à une hauteur d’élévation de 15-20 m. Le contrôle de la pression sera effectué à l’entrée de
l’électrovanne (voir fig. 2-4). Les conduites d’eau auront un diamètre interne d’au moins 16/18 mm (voir fig. 2-5). Raccorder la
conduite d’arrivée de l’eau de l’appareil à un robinet secondaire (B), installé si possible tout près de l’appareil, après avoir
intercalé le filtre spécial fourni (B1) (voir fig. 2-2). Nous conseillons d’installer un adoucisseur (C) (non fourni) qui sera monté en
amont de l’électrovanne de la machine (voir fig. 2-3).
(ES)
• Este aparato se puede alimentar con agua caliente o fría (máx. 50 ÷ 55°C); la presión del agua con válvula abierta está
indicada en la Tabla 2-1. En caso de que la presión fuera superior a la máxima que se aconseja, instale un reductor de presión;
si fuera demasiado baja, instale una bomba de aumento de presión de 0,5 Hp (máximo), con un caudal de 20 litros por minuto
y una altura de elevación de 15 a 20 m. El control de la presión se debe efectuar en la entrada de la electroválvula (véase fig.
2-4). La tubería del agua debe tener un diámetro interior de 16-18 m. por lo menos (véase fig. 2-5). Conecte el tubo de
alimentación del agua del aparato a un grifo de paso (B), que irá montado preferentemente muy cerca del aparato, tras
interponer el filtro (B1) del equipamiento base (véase fig. 2-2). Es aconsejable instalar un descalcificador (C) (que no forma
parte del equipamiento base). El descalcificador irá montado antes de la electroválvula de la máquina (véase fig. 2-3).
2.2 (IT-CH) ALLACCIAMENTO ACQUA – (GB-IE) CONNECTION TO WATER SUPPLY –
(DE-AT-CH) WASSERANSCHLUSS – (FR-BE) RACCORDEMENT HYDRAULIQUE – (ES) CONEXION DEL AGUA
– (PT) LIGAÇÃO ÁGUA – (NL) WATERAANSLUITING
La pagina si sta caricando...
La pagina si sta caricando...

20
(IT-CH)
• Collegare il tubo di scarico dell’apparecchio alla conduttura di scarico (D) previa l’interposizione di un sifone. Un’altra possibilità
è data dal posizionamento dell’apparecchio sopra ad un pozzetto di scarico (E), questo è da completare con un coperchio
antiodore (F).
(GB-IE)
• Connect the drain hose of the appliance to the outlet (D), fitting a siphon between the hose and the outlet. Alternatively, place the
appliance over a drainage well (E), which should be fitted with a cover (F) to prevent the build-up of unpleasant odours.
(DE-AT-CH)
• Das Abflußrohr des Geräts mit der Abflußleitung (D), nach vorherigem Einbau eines Siphons, verbinden. Eine weitere
Möglichkeit ist die Aufstellung des Geräts direkt über einer Ablaufgrube (E), die mit einem geruchshemmenden Deckel
verschlossen wird (F).
(FR-BE)
• Après avoir mis en place un siphon, raccorder te tuyau de vidange de l’appareil à la conduite d’évacuation (D). Il exsiste
également une deuxième possibilité, celle-ci consiste à placer l’appareil au-dessus d’un puits collecteur (E). Il faudra ensuite
équiper ce puits d’un couvercle (F) contre la remontée des odeurs.
(ES)
• Conecte la tubería de desagüe del aparato al tubo de evacuación (D) tras interponer un sifón. En caso de que se pueda colocar
l’aparato encima de un sumidero (E), éste se debe completar con una tapa para eliminar los malos olores (F).
(PT)
• Instalar o tubo de descarga do aparelho ao cano de descarga (D), com um sifão previamente instalado. Uma outra possibilidade
é a de usar um ralo de saída (E) com a devida tampa para evitar o retorno de odores desagradáveis.
(NL)
• Sluit de afvoerslang van het apparaat aan op de afvoerleiding (D) en plaats er een hevel tussen. Een andere mogelijkheid is om
het apparaat bovenop een afvoerputje (E) te plaatsen, dat van een stankafsluitdeksel (F) voorzien moet worden.
Fig. 2-6
2.3 (IT-CH) SCARICO ACQUA – (GB-IE) WATER DRAIN – (DE-AT-CH) WASSERABLAUF –
(FR-BE) DISPOSITIF DE VIDANGE DE L’EAU – (ES) DESCARGA DEL AGUA – (PT) DESCARGA DE ÁGUA –
(NL)
WATERAFVOER
La pagina si sta caricando...

22
(IT-CH)
• La pompa di scarico interviene automaticamente durante il ciclo.
SCARICO VASCA A FINE LAVORO :
1. A macchina accesa (tasto 0-I inserito e spia A accesa ), aprire la porta.
2. Togliere il tubo troppopieno.
3. Premere il tasto START. Il tempo di scarico a fine lavoro è di 3 minuti.
4. Al termine della fase di scarico di fine lavoro, è obbligatorio spegnere la macchina per almeno 10 secondi, premendo il pulsante
verde on-off, in modo da riattivare le normali funzioni.
(GB-IE)
• The waste pump is operating automatically during the rinse phase.
TANK TOTAL DRAINING
1. With the machine on (button 0-I switched on and warming light A on), open the door.
2. Take the overflow pipe off
3. Push the button START. The time for the tank total draining is 3 minutes.
4. At the end of the tank total draining it is compulsory to switch the machine off for at least 10 seconds by pushing the green ON-
OFF button, in order to reset all its normal functions.
(DE-AT-CH)
• Die ablaufpumpe schaltet sich automatisch in der Spülphase ein.
ENTLEEREN DES TANKES AM ARBEITSENDE
1.
Bei eingeschaltener Maschine (Taste 0-1 eingedrückt und Kontrollampe A leuchtend) ), die Tür öffnen.
2. Überlaufrohr entfernen
3. START-Taste drücken.
Die Entleerung dauert ca.3 Minuten.
4. Die grüne on-off Taste drücken und die Maschine auschalten. Die Maschine muß mindestens 10 Sekunden lang nach der
Entleerung ausgeschaltet bleiben. Dieser Vorgang ist zwangsmäßig damit sich die normalen Funktionen der Maschine
wiederherstellen.
(FR-BE)
• La pompe de relevage fonctionne automatiquement dans la phase rincage.
VIDANGE DE LA CUVE A FIN DU TRAVAIL
1. Avec la machine branchée (bouton 0-I inséré et voyant A allumé), ouvrir la porte.
2. Enlever le tube tropplein
3. Brancher le bouton START. Le temps de vidange de la cuve à la fin du travail est de 3 minutes.
4. A la fin du vidange de la cuve à fin du travail il est obligatoire d’éteindre la machine pour au moins 10 seconds en pressant le
bouton vert ON-OFF, pour rétablir ses fonctionnes normales.
(ES)
• La bomba de descarga actúa automáticamente durante el ciclo.
DESCARGA DEL TANQUE AL FINAL DEL TRABAJO
1. Con la máquina encendida (tecla 0-I conectada y señal luminosa A encendida), abrir la puerta.
2. Sacar el tubo de desagüe.
3. Apretar la tecla START. El tiempo de descarga al final del trabajo es de 3 minutos.
4. Al terminar la fase de fin de trabajo de fin jornada, es obligatorio presionar como minimo durante 10 segundos el interuptor de
color verde de ON-OFF de forma que se reactive las funciones normales de la máquina.
(PT)
• A bomba de descarga intervém automaticamente durante o ciclo.
DESCARGA DA CUBA NO FIM DO TRABALHO
1. Com a máquina ligada (tecla 0-I inserida e o alarme A aceso), abra a porta.
2. Remover o tubo ladrão-esgoto.
3. Premir a tecla de START. O tempo de descarga ao fim do trabalho é de 3 minutos
4. Ao fim da fase de descarga no fim do trabalho, é obrigatório desligar a máquina pelo menos durante 10 segundos, carregando
no botão verde on-off, de maneira a reactivar as normais funções.
(NL)
• De afvoerpomp schakelt tijdens het programma automatisch in.
LEEGPOMPEN VAN DE KUIP NA GEBRUIK:
1. De machine moet aangeschakeld zijn ( schakelaar 0-1 in aan positie en indicatie lamp A brand ), u opent de deur.
2. Neem de overloop pijp (standpijp) uit de machine.
3. Druk nu op de Start knop, de schoon spoeltijd van de wastank bedraagt 3 minuten.
4. Aan het einde van het naspoelprogramma en de machine volledig is leeg gelopen moet de machine uit worden geschakeld voor
tenminste 10 seconden, Dit doet u door op de ON-OFF switch te drukken, hierdoor word de machine gereset en is hij na deze
10 seconde weer gereed. En kuntu de machine weer geen gebruiken conform de gebruiks aanwijzing.
2.4 (IT-CH) SCARICO ACQUA CON POMPA DI SCARICO – (GB-IE) WATER DRAIN WITH DRAIN PUMP – (DE-
AT-CH) WASSERABLAUF MIT ABLAUFPUMPE – (FR-BE) DISPOSITIF DE VIDANGE DE L’EAU AVEC POMPE
DE RELEVAGE – (ES) DESCARGA DEL AGUA CON BOMBA DE DESCARGA – (PT) DESCARGA DE ÁGUA
COM BOMBA DE DESCARGA – (NL) WATERAFVOER MET AFVOERPOMP

23
(IT-CH)
• L’apparecchio è costruito per il lavaggio di stoviglie. È necessario utilizzare un detergente poco schiumoso e specifico per il
lavaggio di suddette attrezzature. È consigliata l’eliminazione di grossi residui di cibo e di sporco perché potrebbero intasare lo
scarico e gli ugelli. Caricare con cura il cesto.
N.B.: Per ottenere un buon risultato di lavaggio si consiglia di non lavare stoviglie con sporco secco, ma di sottoporle a prelavaggio
od ammollo.
(GB-IE)
• The appliance is designed to wash crockery. Use a suitable low-foam detergent. Plates and dishes should be scraped clean of
residue, which might clog the drain and nozzles. Fill the basket carefully.
N.B.: It is advisable to remove large food remains. The best results are obtained when the items are washed after pre-washing or
soaking.
(DE-AT-CH)
• Das Gerät ist zur Reinigung von Geschirr vorgesehen. Als Zusatz ein wenig schämendes und geeignetes Spülmittel
verwenden. Große Speisereste, die Abfluß und Düsen verrstopfen könnten, vom Geschirr entfernen.
N.B.: Es wird empfohlen, grobe Speisereste vorher zu entfernen. Um eine gute Reinigung zu gewährleisten, sollte Geschirr mit
eingetrocknetem Schmutz vorher eingeweicht werden.
(FR-BE)
• L’appareil sert à laver les vaisselle. Aussi, il est nécessaire d’utiliser un détergent approprié et qui mousse peu. Il est conseillé
d’éliminer les restes d’aliments ou les encrassements consistants parce qu’ils pourraient boucher le tuyau de vidange et les
gicleurs. Charger le panier avec soin.
N.B.: Pour obtenir de bons résultats, il est conseillé de ne pas laver d’objets trop incrustés sans avoir préalablement fait un pré-
lavage ou un rinçage.
(ES)
• Este aparato sirve para lavar vasos. Se debe usar con un detersivo adecuado, poco espumoso y específico para este tipo de
lavado. Los residuos de alimentos más gordos se deben eliminar antes de cargar la máquina, ya que podrían atascar el
desaguadero y los inyectores. Cargue el cesto con cuidado.
N.B.: Para que el lavado dé buenos resultados, no lave vasos con suciedad seca. Si fuera necesario, efectúe un prelavado o un
remojo para ablandar la suciedad.
(PR)
• Aparelho é concebido para lavagem de louças em geral, utilizando sabão pouco espumante e adapto. Resduos de comida
devem ser removidos da louça, evitando assim que se entupam a descarga e outras partes da máquina. Posicionar
corretamente a louça no cesto.
N.B.: Para obter um bom resultado, aconselha-se a não lavar louças que apresentam sujeira seca, caso contrário é melhor
proceder a uma pré-lavagem ou limpeza para dissolver a sujeira.
(NL)
• Het apparaat is gemaakt voor het afwassen van vaatwerk. Er moet een afwasmiddel gebruikt worden dat niet erg schuimt en
dat speciaal bestemd is voor het afwassen van vaatwerk. Er wordt geadviseerd om grote etensresten en vuil te verwijderen
omdat de afvoer en de sproeiers hierdoor verstopt kunnen raken. De korf moet zorgvuldig beladen worden.
N.B.: Om een goed afwasresultaat te verkrijgen wordt geadviseerd om geen vaatwerk.
3. (IT-CH) ISTRUZIONI D’USO – (GB-IE) INSTRUCTIONS FOR USE –
(DE-AT-CH) BETRIEBSANLEITUNGEN – (FR-BE) MODE D’EMPLOI – (ES) INSTRUCCIONES PARA EL
USO – (PT) INSTRUÇÕES DE USO – (NL) GEBRUIKSAANWIJZING

24
(IT-CH)
• Aprire il rubinetto dell’acqua (B), inserire l’interruttore generale (A). Attivare l’interruttore principale dell’apparecchio (1), ne
conseguirà l’accensione della spia (A) evidenziando che la macchina è sottoposta a tensione. A porta chiusa l’apparecchio si
riempie d’acqua e alla fine del carico, si inseriscono automaticamente le resistenze della vasca e del boiler in alternanza. Il
funzionamento delle resistenze è reso visibile dall’accensione delle spie (C) ed (B). Quando entrambe le spie si spengono
l’acqua avrà raggiunto le temperature impostate e l’apparecchio sarà pronto per iniziare il lavaggio. (fig. 3-1÷3-2)
N.B.: Le temperature impostate sono quelle consigliate dal fabbricante, i termostati consentono comunque di regolare la
temperatura fino ad un massimo di 90°C.
(GB-IE)
• Turn on the water tap (B) and switch on the master switch (A). Turn the appliance ON switch (1), which will cause the warning
light (A) to illuminate, indicating that the machine is live. When the door is closed the appliance fills with water. When it is full, the
tub and boiler heating elements come on automatically in alternation. When the elements are activated, the warning lights (C)
and (B) are illuminated. When both warning lights go out the water has reached the set temperature and the appliance is ready
to begin the washing cycle. (fig. 3-1÷3-2)
N.B.: The set temperatures are the ones recommended by the manufacturer, however the thermostats allow to adjust the
temperature at max 90°C
(DE-AT-CH)
• Öffnen Sie den Wasserhahn (B) und betätigen Sie den Hauptschalter (A). Beim Betätigen des Schalters (1) am Gläserspüler
wird die Anzeige (A) aufleuchten, an der Sie erkennen können, daß die Maschine unter Spannung steht. Bei geschlossener Tür
läuft Wasser in die Maschine; ist die nötige Wassermenge einmal erreicht, so schalten die Widerstände des Spülbehälter und
des Boilers automatisch eines nach dem anderen, ein. Der Betrieb der Widerstände wird durch das Aufleuchten der Anzeigen
(C) und (B) erkennbar. Beide Leuchtanzeigen erlöschen, wenn das Wasser eine vorbestimmte Temperatur erreicht hat, d. h.
wenn der Gläserspüler betriebsbereit ist. (fig. 3-1÷3-2)
N.B.: Die angesetzten Temperaturen sind die von dem Hersteller rateten Temperaturen, jedoch Kann die Temperatur bei den
Thermostaten bis max 90°C angesetzten werden.
(FR-BE)
• Ouvrir le robinet (B) et insérer l’interrupteur général (A). Ouvrir l’interrupteur principal de l’appareil (1), le voyant (A) s’allumera ce
qui signifie que la machine est branchée. L’appareil se remplit d’eau avec porte fermée et à la fin du chargement les éléments
chauffants de la cuve et du boiler entrent automatiquement en action en alternance. Les voyants (C) et (B) s’allument quand les
éléments chauffants fonctionnent. Les deux voyants s’éteignent dès que l’eau a atteint la température programmée et l’appareil
est prêt pour commencer le lavage. (fig. 3-1÷3-2)
N.B.: Les températures affichées sont celles-là conseillées par le fabriquant, tontefois les thermostats permettent de régler la
tempèrature à 90°C maximun.
(ES)
• Abrir el grifo del agua (B), conectar el interruptor general (A). Activar el interruptor principal del aparato (1); el encendido de la
luz testigo (A) indica que la máquina está en tensión. Con puerta cerrada el aparato se llena de agua y cuando la carga esté
terminada se conectarán automáticamente las resistencias del tanque y de la caldera en la alternacón. El funcionamiento de las
resistencias es señalado por el encendido de las luces indicadoras (C) y (B). Cuando ambas luces se apaguen, el agua habrá
alcanzado la temperatura programada y el aparato estará listo para empezar el lavado. (fig. 3-1÷3-2)
N.B.: Las temperaturas fijadas son las que aconseja el Constructor; los termostatos permiten regular la temperatura hasta 90°C
máx.
(PR)
• Abrir a torneira de água (B), acionar o interruptor geral (A). Acionar o interruptor principal do aparelho (1), a luz (A) se acende
evidenciando che a máquina esta sob tensão. Uma vez fechada a porta se enche de água e no final, as resistencias do cuba e
do boiler começam a funcionar automáticamente na alternação. As luzes (C) e (B) indicam o funcionamento das duas
resistencias. Quando ambas se apagarem é porque a temperatura alcançou seu nível desejado e a máquina estará pronta para
iniciar a lavagem. (fig. 3-1÷3-2)
NB.: As temperaturas ideais são aquelas aconselhadas pelo fabricante e os termostatos permitem regular a temperatura até um
maximo de 90°C.
(NL)
• Draai de waterkraan (B) open en schakel de hoofdschakelaar (A) in. Schakel de hoofdschakelaar van het apparaat (1) in
waarna het lampje (A) gaat branden waaruit blijkt dat de machine onder stroom staat. Als de deur dichtgedaan wordt, loopt het
apparaat vol met water en na afloop van het vollopen worden de verwarmingselementen van de kuip en van de boiler
automatisch ingeschakeld in de afwisseling. De werking van de verwarmingselementen blijkt uit het feit dat de lampjes (C) en
(B) gaan branden. Als allebei de lampjes uitgaan dan heeft het water de ingestelde temperatuur bereikt en is het apparaat klaar
om met het afwasprogramma te beginnen. (Afb. 3-1 - 3-2)
N.B.: De ingestelde temperaturen zijn de temperaturen die door de fabrikant geadviseerd worden, met de thermostaten kunt u
echter de temperatuur tot maximaal 90°C regelen.
3.1 (IT-CH) MESSA IN FUNZIONE – (GB-IE) START UP – (DE-AT-CH) INBETRIEBNAHME – (FR-BE) MISE EN
MARCHE – (ES) PUESTA EN FUNCIONAMIENTO – (PR) FUNCIONAMENTO – (NL) AANZETTEN
La pagina si sta caricando...

26
(IT-CH)
• A riempimento avvenuto, aprire la porta (I) e introdurre il detersivo (ca. 2 gr. per litro di capacità della vasca). Inserire il cesto (L)
carico e chiudere la porta (I). Selezionare il ciclo di lavaggio inserendo il pulsante (3) (ciclo breve (I) tasto premuto ÷ ciclo lungo
(II) tasto rilasciato). A questo punto premere il pulsante START (4) (almeno per 2 secondi) e avrà inizio il ciclo di lavoro
visualizzato dalla lampada spia (D): la fine del ciclo coincide con lo spegnimento di questa spia. Alla fine del ciclo
(lavaggio+risciacquo caldo), premendo il tasto (2), può essere effettuato un risciacquo alla temperatura di alimentazione. Il
tempo di durata di questa fase è di 20 secondi; durante questa fase lampeggerà il led (D). Per spegnere la macchina si dovrà
disinserire l’interruttore (1) portandolo nella posizione (0) spia (A) spenta. (Fig. 3-1÷3-3).
Ogni 5 o 6 lavaggi aggiungere del detersivo
N.B.: E’ consigliato avviare il ciclo di lavoro quando entrambe le spie delle resistenze, boiler (C) e vasca (B), si spengono, come
indicato al punto 3.1 Messa in funzione.
All’apertura della porta durante il ciclo di lavaggio, la spia A lampeggerà e si interrompe la fase in corso. Alla chiusura della porta, la
spia A rimarrà accesa ed il ciclo riprenderà dalla fase precedentemente interrotta.
(GB-IE)
• When the water intake cycle is complete, open the door (I) and add detergent (about 2 g. per litre of tank capacity). Position the
full basket (L) and close the door (I). Select the appropriate washing cycle by pressing button (3) (short cycle (I) button pressed ÷
long cycle (II) button not pressed). Now press the START button (4) (at least for 2 seconds) and the wash cycle displayed by
light (D) will start. When the cycle is over, this light goes out. When the button (2) is held down at the end of the cycle
(washing+hot rinse) a rinse can be carried out at the temperature of the input water. The duration of this phase is 20 seconds;
during the cycle the led (D) flashes. To turn off the appliance, turn the switch (1) to (0). Light (A) indicates the appliance is off
(Fig. 3-2÷3-3). Add detergent every 5 - 6 wash cycles.
N.B.: It is recommended to start the wash cycle when both litgh of the heating elements, boiler (C) and tub (B) are off, as indicated
at point 3.1 Start up.
By opening the door during a washing cycle, the warning light A will blink and the phase in progress is interrupted. By closing the
door, the warning light A will stay on and the cycle will re-start from the previously interrupted phase.
(DE-AT-CH)
• Nach erfolgter Füllung die Tür (I) öffnen und das Spülmittel einfüllen (ca. 2g/l Fassungsvermögen des Spülbehälters). Den
gefüllten Geschirrkorb (L) einsetzen und die Tür (I) schließen. Das Programm durch Drücken des Druckknopfes (3) wählen
(kurzer Spülgang (I) Taste gedrückt ÷ langer Spülgang (II) Taste losgelassen). Nun die START-Taste (4) mindestens 2
Sekunden lang drücken, und das Spülprogramm beginnt, die Kontrollampe (D) leuchtet auf und am Programmende erlischt die
Kontrollampe. Am Ende des Spülgang (Spülen+warmws Nachspülen) der Taste (2) kann ein Spülgang bei der Temperatur des
Zulaufwassers durchgeführt werden. Diese Phase dauert 20 Sekunden. Während der ganzen Zyklusdauer blinkt die Led -
Anzeige (D). Um das Gerät auszuschalten, muß der Schalter (1) auf die Position (0) gestellt werden, die Kontrollampe (A)
erlischt. (Bild.3-2÷3-4). Bei manueller Dosierung ist jeweils nach vier bis sechs Spülgängen Reiniger nachzufüllen.
N.B.: Es wird empfohlen, den Arbeitszyklus erst zu starten, wenn die Kontrollampen der Heizelemente Boiler (C) und Bottich (B)
erlöschen, wie in Punkt 3.1 Inbetriebnahme angezeigt.
Bei Öffnen der Türe während des Spülganges, wird die Kontrollampe A blinken und das laufende Programm wird unterbrochen. Bei
Schliessen der Türe wird die Kontrollampe A wieder fest leuchten und das vorher unterbrochene Programm wieder aufgenommen.
(FR-BE)
• Lorsque le remplissage est terminé, ouvrir la porte (I) et verser le détersif (environ 2 g pour chaque litre remplissant la cuve).
Introduire le panier (L) plein et fermer la porte (I). Sélectionner ensuite le cycle de lavage en actionnant le bouton-poussoir (3)
(cycle court (I) touche enfoncée ÷ cycle long (II) touche relâchée). A ce stade, presser le bouton-poussoir START (4) (au moins
2 secondes) et le cycle de fonctionnement commencera, visualisé par la lampe-témoin (D). La fin du cycle coïncide avec
l’extinction de ce voyant. A la fin du cycle (lavage+rinçage chaud), en gardant la touche (2) enfoncée, on peut faire un rinçage
avec une eau ayant la température d’arrvée. Cette phase dure 20 secondes. Au cours de cette phase, le voyant (D) clignote.
Pour arrêter la machine, il faudra débrancher l’interrupteur (1) en le ramenant sur la position (0): lampe-témoin (A). (Fig.3-1÷3-3).
Ajouter du détersif tous les 5 ou 6 lavages.
N.B.: Nous conseillons de faire démarrer le cycle d’usinage quand les deux voyants des éléments chauffants du boiler (C) et de la
cuve (B) s’éteindront comme indiqué au point 3.1 Démarrage.
A l’ouverture de la porte pendant un cycle de lavage, la lampe-témoin A clignotera et la phase en cours s’interrompe. A la fermeture
de la porte, la lampe-témoin A restera allumée et le cycle reprendra du point de l’interruption.
3.1.1 (IT-CH) PROGRAMMI DI LAVAGGIO – (GB-IE) WASHING PROGRAMMES –
(DE-AT-CH) REINIGUNGSPROGRAMME – (FR-BE) PROGRAMMES DE LAVAGE – (ES) PROGRAMAS DE
LAVADO – (PR) PROGRAMAS DE LAVAGEM – (NL) AFWASPROGRAMMA'S
La pagina si sta caricando...

28
(IT-CH)
• I dosatori di detersivo (M) e brillantante (N) sono regolati dal costruttore. Nel caso si rendesse necessaria una diversa taratura
agire sulla vite di regolazione degli stessi dosatori. I contenitori di detersivo e brillantante (se non in dotazione all’apparecchio)
vanno posti presso la macchina ed il prelievo viene effettuato attraverso i tubi di raccolta trasparente (Tank per il detersivo e
Boiler per il brillantante) situati nella parte posteriore dell’apparecchio.
(GB-IE)
• The detergent dispenser (M) and rinse aid dispenser (N) are regulated by the manufacturer. If the setting needs to be changed,
turn the regulating screw on the dispensers. The detergent and rinse aid containers (if not provided with the appliance) should be
placed next to the machine and connected to the transparent pipes fitted to the back of the appliance (Tank for the detergent and
Boiler for the rinse aid).
(DE-AT-CH)
• Die Dosierer des Reinigungsmittels (M) und des Glanspülmittels (N) werden werkseitig eingestellt. Für andere Einstellungen die
Stellschraube der Dosiervorrichtung regeln. Die Behälter für Reinigungsmittel und Glanzspülmittel ( wenn nicht mit dem Gerät
mitgeliefert) müssen in unmittelbarer Nähe der Maschine stehen und die Entnahme erfolgt über die durchsichtigen Schläuche
(Tank für das Reinigungsmittel und Boiler für Glanzspülmittel) an der Rückseite des Geräts.
(FR-BE)
• Les doseurs du détergent (M) et du produit de rinçage (N) seront réglés par le constructeur. S’il vous fallait régler différemment,
faire tourner la vis de réglage sur les doseurs mêmes. Les alvéoles à détergent et à produit de rinçage (si non fournies avec
l’appareil) seront mises près de la machine et le prélèvement sera effectué par des tubes transparents (Tank pour le détergent
et Boiler pour l’agent de brillantage) situés derrière l’appareil.
(ES)
• Los dosificadores de detersivo (M) y abrillantador (N) salen de la fábrica regulados por el Constructor. En el caso de que se
necesitara una regulación distinta, usar el tornillo de dosificación de los propios dosificadores. Si los contenedores de detersivo
y abrillantador no forman parte del equipamiento base, se deben colocar cerca de la máquina; el detersivo y el abrillantador se
sacan a través de los tubos de toma transparentes (letrero Tank para el detersivo y Boiler para el abrillantador) ubicados en la
parte trasera del aparato.
(PR)
• Os dosadores de sabão (M) e abrilhantador (N) vem de fábrica já regulados pelo próprio produtor, caso fosse nescessária uma
regulagem diversa, basta girar o parafuso de regulagem de ambos. Os recipientes de sabão e abrilhantador (se disponìveis)
deven ser colocados próximos à máquina. Tanto o sabão como o abrilhantador são recolhidos através de tubos transparentes
(Tank para o sabao e Boiler para o abrilhantador) localizados na parte posterior do aparelho.
(NL)
• De afwasmiddeldosering (M) (op aanvraag verkrijgbaar) en de spoelmiddeldosering wordt door de fabrikant ingesteld. Als er
een andere instelling nodig is dan moet er aan de stelschroef van de doseringen gedraaid worden. De reservoirs met
afwasmiddel en spoelmiddel moeten (als zij niet bij het apparaat geleverd worden) bij de machine geplaatst worden en zij
worden getapt via de doorzichtige slangetjes (tank voor het afwasmiddel en boiler voor het spoelmiddel) die zich aan de
achterkant van het apparaat bevinden.
Fig. 3-4
3.1.2 (IT-CH) DETERSIVO E BRILLANTANTE – (GB-IE) DETERGENT AND RINSE AID –
(DE-AT-CH) REINIGUNGSMITTEL UND KLARSPÜLMITTEL – (FR-BE) DETERGENT ET AGENT DE
BRILLANTAGE – (ES) DETERSIVO Y ABRILLANTADOR – (PR) SABÃO E ABRILHANTADOR – (NL) AFWAS- EN
SPOELMIDDEL

29
(IT-CH)
• La pulizia è molto importante per il buon funzionamento dell’apparecchio, si consiglia di effettuarla ad ogni fine lavoro.
Disinserire l’interruttore ON-OFF e togliere il tubo troppopieno per scaricare l’acqua dala vasca. Una volta svuotata la vasca,
togliere i filtri asportando prima lo sporco residuo dal fondo vasca. Lavare tutte le parti estraibili sotto acqua corrente, poi
rimontarle correttamente.
IMPORTANTE: Prima di togliere i filtri asportare lo sporco residuo dal fondo della vasca.
N.B. : Pulire il rivestimento esterno soltanto dopo aver spento l’interruttore generale (A). Il sovracitato rivestimento non deve essere
investito con getto d’acqua diretto o ad alta pressione. Lavare tutte le parti della macchina con detersivi neutri (non corrosivi o
aggressivi).
(GB-IE)
• Cleaning is extremely important for proper operation of the appliance. We recommend cleaning at the end of each work cycle.
Turn off the ON-OFF switch and remove the overflow pipe to drain the water in the tank. Once the tank is empty, remove all
debris from the tank bottom before taking away the filters. Wash all removables parts in running water and reassemble them
with care.
WARNING: Before removing the filters clean residual foreign matter from the bottom of the tub.
N.B.: Turn off the master switch (A) before cleaning the outer coating, without using direct or high pressure water jets. Wash all
parts of the appliance with neutral detergents (not corrosive or aggressive).
(DE-AT-CH)
• Die Sauberkeit ist für die einwandfreie Funktion des Geräts sehr wichtig, es wird daher empfohlen, den Gläserrspüler am Ende
jede Arbeitszyklus zu reinigen. Dazu schalten Sie den ON/OFF Schalter aus und nehmen das Überlaufrohr ab, damit sich der
Waschtank entleert. Die auf dem Tankboden verbliebenen Schmutzreste entfernen Sie und nur dann nehmen Sie die Siebe
ab. Alle abnehmbaren Teile spülen Sie unter laufendem Wasser ab und setzen sie dann wieder richtig in die Maschine ein.
WICHTIG: Bevor Sie die Siebe herausnehmen, entfernen Sie bitte den restlichen Schmutz vom Boden des Spülbehälter.
N.B.: Bitte reinigen Sie das Gehäuse nur, nachdem Sie den Hauptschalter (A) ausgeschaltet zugedreht haben. Das Gehäuse selbst
darf nie von einem direkten bzw. unter Hochdruck stehenden Wasserstrahl getroffen werden. Bitte reinigen Sie alle Teile der
Maschine mit neutralen Pflegemitteln (keine Scheuer- od. Korrosionsmittel!).
(FR-BE)
• Le nettoyage est très important pour le bon fonctionnement de l’appareil et il est conseillé de le faire après chaque utilisation.
Débrancher l’interrupteur général ON-OFF et enlever le tube trop plein pour vider l’eau de la cuve. Quand la cuve est vide,
enlever la saleté restante au fond de la cuve avant d’enlever les filtres. Laver toutes les pièces amovibles à l’eau courante puis
les remonter correctement.
IMPORTANT: Avant d’enlever les filtres enlever la saleté restée sur le fond de la cuve.
N.B.: Ne nettoyer l’extérieur qu’après avoir débranché l’interrupteur général (A). Ne pas laver l’extérieur au jet d’eau direct, ni à forte
pression. Laver toutes les pièces de l’appareil avec du détergent neutre (non corrosifs, ni agressifs).
(ES)
• La limpieza es muy importante para el buen funcionamiento de este aparato. Es aconsejable limpiar el aparato al final de cada
jornada. Desconectar el interruptor ENCENDIDO-APAGADO y quite la pipa de desbordamiento para drenar el agua en la
cuba. Una vez que la cuba es vacío, quite toda la ruina de la parte inferior del la cuba antes de quitar los filtros. Lave todas las
piezas de los removables en agua corriente y vuélvalas a montar con cuidado.
IMPORTANTE: Antes de quitar los filtros quitar la suciedad residual del fondo de la cuba.
N.B.: Limpiar la caja exterior solamente tras apagar el interruptor general (A. No lavar la caja con chorro de agua directo a alta
presión. Lavar todas las piezas de la máquina con detersivos neutros (no oxidantes o agresivos).
(PR)
• A limpeza é muito importante para o bom funcionamento do aparelho. Se aconselha efetuá-la a cada final de funcionamento.
Desligar o interruptor ON-OFF e remova a tubulação de excesso para drenar a água da cuba. Uma vez que o cuba está vazio,
remova todos os restos do fundo da cuba antes de levar embora os filtros. Lave todas as peças removíveis com água
corrente, para depois remontá-las corretamente.
IMPORTANTE: Antes de remover os filtros e limpar a sujeira residual do fundo da cuba.
N.B.: Limpar o revestimento externo sómente depois de ter desligado o interruptor geral (A) e o acima mencionado revestimento
não deve ser lavado com jato de água direto ou de alta pressão. Lavar todas as partes da máquina com sabão neutro (não
corrosivos ou agressivos).
3.2 (IT-CH) PULIZIA E CURA – (GB-IE) CLEANING – (DE-AT-CH) WARTUNG UND PFLEGE –
(FR-BE) NETTOYAGE ET ENTRETIEN – (ES) LIMPIEZA Y CUIDADO – (PR) LIMPEZA E CUIDADOS – (NL)
REINIGING EN VERZORGING
La pagina si sta caricando...

31
(IT-CH)
• Qualora l’apparecchio restasse inutilizzato per un tempo prolungato pulirlo accuratamente. La vasca e i filtri sono da lavare ed
asciugare. Durante il periodo di riposo lasciare aperta la porta. Chiudere sia l’acqua che la corrente.
(GB-IE)
• If the machine is not used for a long period, clean it carefully. Wash and dry the tub and the filters. Leave the door open while the
machine is not in use. Turn off the water and disconnect the power supply.
(DE-AT-CH)
• Wenn das Gerät für längere Zeit stillstehen sollte, muß es sorgfältig gereinigt werden. Spülbehälter und Filter waschen und
troknen. Während der stillstandsperiode die Tür offen lassen. Wasser und Srom abdrehen.
(FR-BE)
• Lorsque l’appareil reste inutilisé pendant une période prolongée, celui-ci doit être soigneusement nettoyé. La cuve et les filtres
doivent être lavés et essuyés. Pendant cette période d’arrêt, la porte doit rester ouverte. Fermer l’arrivée d’eau et couper le
courant.
(ES)
• En el caso de que este aparato quedara sin utilizar por un período de tiempo prolongado, límpielo con mucho cuidado. La
tanque y los filtros se deben lavar y secar. Durante el período de inactividad deje abierta la puerta. Corte la corriente y el agua.
(PR)
• Desde que o aparelho esteja sem uso por um longo periodo, é nescessária uma limpeza. A cuba e os filtros devem ser lavados
e enxutos. Durante o periodo de parada, a porta deve ser mantida sempre aberta. E fechar a água e desligar a corrente
eléctrica.
(NL)
• Als het apparaat lange tijd niet gebruikt wordt dan moet het grondig schoongemaakt worden. De kuip en de filters moeten
afgewassen en afgedroogd worden. Tijdens de stilstandperiode moet de deur open blijven staan. Zowel water als stroom moet
afgesloten worden.
3.3 (IT-CH) COMPORTAMENTO IN CASO DI INUTILIZZO PROLUNGATO – (GB-IE) IF THE DISHWASHER IS
NOT USED FOR LONG PERIODS – (DE-AT-CH) VERHALTEN BEI LÄNGEREM STILLSTAND –
(FR-BE) PROCEDURE A SUIVRE EN CAS D’ARRET PROLOGE – (ES) INACTIVIDAD PROLONGADA –
(PR) PROCEDIMENTO A SEGUIR NO CASO DE FALTA DE USO POR LONGO TEMPO – (NL) GEDRAG IN
GEVAL VAN LANGE STILSTAND

32
(IT-CH)
• Appena l’apparecchio presentasse un comportamento anomalo, spegnere l’apparecchio, chiudere l’acqua e la corrente e
chiamare il servizio di assistenza.
(GB-IE)
• In case of malfunctions, immediately switch off the appliance, turn off the water and disconnect the power supply. Call a service
technician.
(DE-AT-CH)
• Wenn das Gerät gestört funktioneren sollte, sofort abschalten, Wasser und Storm abdrehen und den Kundendienst
verständigen.
(FR-BE)
• Lorsque l’appareil ne fonctionne pas normalment, la procédure à suivre est la suivante: arrêter l’appareil, fermer l’arrivée d’eau,
couper le courant et demander l’intervention du service aprés-vente.
(ES)
• En caso de funcionamiento irregular, apague el aparato, corte la corriente y el agua y llame al Servicio posventa.
(PR)
• Se a máquina apresentar um funcionamento anormal, desligar, fechar a água, desligar a corrente eléctrica e chamar a
assistencia técnica.
(NL)
• Zodra het apparaat zich abnormaal gedraagt moet u het apparaat uitzetten, water en stroom afsluiten en de technische dienst
bellen.
4. (IT-CH) COMPORTAMENTO IN CASO DI CATTIVO FUNZIONAMENTO – (GB-IE) IN CASE OF
MALFUNCTIONS – (DE-AT-CH) VERHALTEN BEI BETRIEBSSTÖRUNG – (FR-BE) PROCEDURE A
SUIVRE EN CAS DE MAUVAIS FONCTIONNEMENT – (ES) DESPERFECTOS DE FUNCIONAMIENTO –
(PR) INSTRUÇÕES EM CASO DE MAL FUNCIONAMENTO – (NL) GEDRAG IN GEVAL VAN
STORINGEN IN DE WERKING

33
(IT-CH) IMPORTANTE – (GB-IE) IMPORTANT – (DE-AT-CH) WICHTIG – (FR-BE) IMPORTANT –
(ES) IMPORTANTE – (PR) IMPORTANTE – (NL) BELANGRIJK
(IT-CH) SOLO PER PERSONALE QUALIFICATO
(GB-IE) QUALIFIED PERSONNEL ONLY
(DE-AT-CH) NUR FÜR QUALIFIZIERTES PERSONAL
(FR-BE) UNIQUEMENT POUR LE PERSONNEL QUALIFIE
(ES) SOLO PARA PERSONAL CUALIFICADO
(PR) SÓMENTE PARA A ASSISTENCIA TÉCNICA
(NL) ALLEEN VOOR VAKMENSEN
(IT-CH)
• Nel quadro elettrico si trovano tutti i componenti ad eccezione di: pompa, resistenze ed elettrovalvole, ai quali si accede
togliendo il pannello inferiore frontale.
N.B.: Prima di qualsiasi intervento tecnico, scollegare l’apparecchio dalla rete elettrica. (fig. 5-1)
(GB-IE)
• The electrical control panel features all the appliance’s components except: pump, heating elements and solenoid valves. These
components can be accessed by removing the lower front panel.
N.B.: Before any technical service, disconnect the machine from the mains. (fig. 5-1)
(DE-AT-CH)
• In der Schaltaffel befinden sich alle Bestandteile, mit Ausnahme von: Pumpe, Heizstäben und Magnetventile, die durch
Entfernen der vorderen, unteren Blende zugänglich werden.
N.B.: Vor jedem kundendienst die machine vom stromnetz ausschalten. (fig. 5-1)
(FR-BE)
• Le tableau électrique comprend tous les composants à l’exeptions de la pompe, des résistences et des électrovannes. Il est
possible d’accéder à ces composants en retirant le panneau frontal inférieur.
N.B.: Avant de toute intervention, débrancher l’appareil de l’électricité. (fig. 5-1)
(ES)
• Todos los componentes se encuentran en el cuadro eléctrico, menos: bomba, resistencias y electroválvulas. Para tener acceso
a estos componentes quite el panel delantero inferior.
N.B.: Desconecte siempre el aparato de la red antes de cualquier operación de arreglo. (fig. 5-1)
(PR)
• No painel eléctrico encontram-se todos os componentes, exceto a bomba, as resistencias e eletrovalvulas. Todos encontram-se
atrás do painel inferior frontal.
N.B.: Antes de qualquer intervento tecnico, desligar a máquina da rede eléctrica. (fig. 5-1)
(NL)
• In het elektrische schakelpaneel bevinden zich alle onderdelen met uitzondering van: pomp, verwarmingselementen en
elektroventielen die bereikbaar zijn door het onderste paneel aan de voorkant eraf te halen.
N.B.: Alvorens technische ingrepen aan het apparaat uit te voeren moet het apparaat van het elektriciteitsnetafgekoppeld
worden. (Afb. 5-1)
Fig. 5-1
5. (IT-CH) ACCESSIBILITÀ – (GB-IE) SERVICEABILITY – (DE-AT-CH) ZUGÄNGLICHKEIT –
(FR-BE) ACCESIBILITE AUX COMPOSANTS – (ES) ACCESIBILIDAD – (PR) ACESSO – (NL)
BEREIKBAARHEID

34
(IT-CH)
TIME-OUT RIEMPIMENTO
VASCA
Se dopo 5 minuti e 10 secondi non è stato ancora raggiunto il livello della vasca, la valvola di
caricamento viene disinserita e la spia (C) inizia a lampeggiare con una frequenza di 0,5 secondi.
Per riprendere il riempimento e per disinserire l’allarme è necessario premere il tasto START (3) o
spegnere e riaccendere la macchina (tasto 0-I).
N.B.: Verificare e risolvere la causa del mancato riempimento prima della riaccensione.
RISCALDAMENTO
BOILER
Nel caso la temperatura del boiler non venga raggiunta, il ciclo prosegue per un tempo massimo di
8 minuti, dopodiché seguono le fasi di pausa e risciacquo; la spia di segnalazione ciclo (C) inizia a
lampeggiare con una frequenza di 0,3 secondi e rimane lampeggiante anche terminato il ciclo. Per
disinserire l’allarme è necessario spegnere e riaccendere la macchina (tasto 0-I).
N.B.: Verificare e risolvere la causa del mancato riscaldamento del boiler prima della riaccensione.
PORTA APERTA
In qualunque momento del ciclo di lavaggio, se viene aperta la porta il ciclo si arresta, tutti i carichi
vengono disinseriti (tranne le resistenze) e la spia di segnalazione ciclo (C) inizia a lampeggiare con
una frequenza di 0,5 secondi. Richiudendo la porta, il ciclo riprende dal punto in cui si era fermato e
la spia di segnalazione ciclo (C) rimane accesa fissa.
N.B.: Nel caso di allarme con porta chiusa, verificare il corretto posizionamento e funzionamento
del microporta.
(GB-IE)
TIME-OUT TANK FILLING
If the level in the wash tank has not been reached within 5 minutes and 10 seconds, the filling
solenoid valve is disconnected and the warning light (C) starts to blink with a frequency of 0,5
seconds. In order to re-start the filling and to disconnect the alarm push the button START (3) or
switch the machine off and on (button O-I).
N.B.: Verify and solve the cause of the non-filling before switching the machine on.
BOILER HEATING
If the temperature in the boiler has not been reached, the cycle goes on for a time-limit of 8
minutes, then a pause and a rinsing phase follow; the warning light (C) starts blinking with a
frequency of 0,3 seconds and keeps on blinking after the cycle end. To disconnect the alarm it is
necessary to switch the machine off and on (button O-I).
N.B.: Verify and solve the problem of the non-heating before switching the machine on.
OPEN DOOR
I By opening the door at any time of the washing cycle, the cycle stops and all the machine
functions are cut out (except the heating elements), the warning light (C) starts blinking with a
frequency of 0,5 seconds. By closing the door the cycle re-starts from the point at which it stopped
and the warning light (C) stays on.
N.B.: In case of alarm when the door is closed, check if the door switch is in its right position and if
it works.
(DE-AT-CH)
UNTERBRECHUNG DER
SPÜLTANKAUFFÜLLUNG
Falls nach 5 Min. und 10 Sek. das Wasserniveau im Spültank noch nicht erreicht ist, schaltet das
Wasserventil automatisch ab und die Led-Anzeige (C) beginnt mit einer Frequenz von 0,5
Sekunden zu blinken. Um die Füllung wiederaufzunehmen und die Alarmmeldung auszuschalten,
die START-Taste (3) drücken, oder die Maschine aus- und wieder einschalten (Taste 0-1).
N.B.: Die Ursache der Störung feststellen und beheben, bevor man die Maschine wieder in Betrieb
setzt.
WASSERERHITZUNG IM
BOILER
Falls die Wassertemperatur im Boiler nicht erreicht wird, wird die Maschine seinen Spülgang
maximum 8 Sekunden lang fortsetzen. Danach folgen die Pause und die Nachspülung. Die Led-
Anzeige (C) beginnt mit einer Frequenz von 0,3 Sekunden zu blinken und dauert an auch wenn der
Verlauf beendet ist. Um die Alarmmeldung auszuschalten, die Maschine aus- und wieder
einschalten (Taste 0-1).
N.B.: Die Ursache der Störung feststellen und beheben, bevor man die Maschine wieder in Betrieb
setzt.
ÖFFEN DER TÜRE
Falls die Türe während dem Spülen geöffnet wird, unterbricht sich der Spülverlauf sowie jegliche
Füllvorgänge, nur die Heizung bleibt eingeschaltet, und die Led-Anzeige (C) beginnt mit einer
Frequenz von 0,5 Sekunden zu blinken. Beim Schliessen der Türe setzt die Maschine den
Spülverlauf fort von wo dieser unterbrochen wurde, die Led-Anzeige (C) bleibt fest leuchtend.
N.B.: Bei Alarmmeldung mit geschlossener Türe, die richtige Position und Arbeitsweise des
Mikroschalters der Türe prüfen.
6. (IT-CH) ALLARMI – (GB-IE) ALARMS – (DE-AT-CH) ALARMVORRICHTUNGEN –
(
F
R
-
BE
)
ALARMES
–
(
ES
)
ALARMAS
–
(
PR
)
A
LARMES
–
(
NL
)
A
LARM
La pagina si sta caricando...
La pagina si sta caricando...

37
A.E.E. IT08020000000642
(IT-CH)
Smaltimento delle apparecchiature obsolete
1. Quando su un prodotto è riportatocil simbolo di un bidone
della spazzatura barrato da una croce significa che il prodotto
è coperto dalla Direttiva Europea 2002/96/EC.
2. Tutti i prodotti elettrici ed elettronici dovrebbero essere
smaltiti separatamente rispetto alla raccolta differenziata
municipale, mediante impianti di raccolta specifici designati
dal governo o dalle autorità locali.
3. Il corretto smaltimento delle apparecchiature obsolete
contribuisce a prevenire possibili conseguenze negative sulla
salute umana e sull’ambiente.
4. Per informazioni più dettagliate sullo smaltimento delle
apparecchiature obsolete, contattare il comune, il servizio di
smaltimento rifiuti o il negozio in cui è stato acquistato il
prodotto.
(GB-IE)
Disposal of your old appliance
1. When this crossed-out wheeled bin symbol is attached to a
product it means the product is covered by the European
Directive 2002/96/EC.
2. All electrical and electronic products should be disposed of
separately from the municipal waste stream via designated
collection facilities appointed by the government or the local
authorities.
3. The correct disposal of your old appliance will help prevent
potential negative consequences for the environment and
human health.
4. For more detailed information about disposal of your old
appliance, please contact your city office, waste disposal
service or the shop where you purchased the product.
(DE-AT-CH)
Entsorgung von Altgeräten
1. Ween dieses Symbol eines durchgestrichenen Abfalleimers
auf einem Produkt angebracht ist, unterliegt dieses Produkt
der europäischen Richtlinie 2002/96/EC.
2. Alle Elektro- und Elektronik-Altgeräte müssen getrennt vom
Hausmüll über dafür staatlich vorgesehenen Stellen entsorgt
werden.
3. Mit der ordnungsgemäßen Entsorgung des alten Geräts
vermeiden Sie Umweltschäden und eine Gefährdung der
persönlichen Gesundheit.
4. Weitere informationen zur Entsorgung des alten Geräts
erhalten Sie bei der Stadtverwaltung, beim Entsorgungsamt
oder in dem Geschäft, wo Sie das Produkt erworben haben.
(FR-BE)
Élimination de votre ancien appareil
1. Ce symbole, représentant une poubelle sur roulettes barre
d’une croix, signifie que le produit est couvert par la directive
européenne 2002/96/ec.
2. Les éléments électriques et électroniques doivent être jetés
séparément, dans les vide-ordures prévus à cet effet par votre
municipalité.
3. Une élimination conforme aux instructions aidera à réduire
les conséquences négatives et risques éventuels pour
l’envitonnement et la santé humaine.
4. Pour plus d’information concernano l’élimination de votre
ancien appareil, veuillez contacter votre mairie, le service des
ordures ménagéres ou ancore la magasin où vous avez
acheté ce produit.
(ES)
Cómo deshacerse de aparatos eléctricos y electrónicos
viejos
1. Si en un producto aparece el símbolo de un contenedor de
basura tachado, significa que éste se acoge a la Directiva
2002/96/EC.
2. Todos los aparatos eléctricos o elèctrónicos se deben
desechar de forma distinta del servicio municipal de recogida
de basura, a travéò de puntos de recogida designados por el
gobierno o las autoridades locales.
3. La correcta recogida y tratamiento de los dispositivos
inservibles contribuye a evitar riesgos potenciales para el
medio ambiente y la salud pública.
4. Para obtener más información sobre cómo deshacerse de
sus aparatos eléctricos y electrónicos viejos, póngase en
contacto con su ayuntamiento, el servicio de recogida de
basuras o el establecimiento donde adquirió el producto.
(PR)
Eliminação do seu antigo aparelho
1. Quando este símbolo de latão cruzado estiver afixado a um
produco, significa que o produco è abrangido pela Directiva
Europeia 2002/96/EC.
2. Todos os produtos eléctricos e electrónicos devem ser
aliminados separatamente do lixo doméstico através de
pontos de recolha designados, facilitados pelo governo ou
autoridades locais.
3. A eliminação correcta do seu aparelho antigo ajuda a evitar
potenciais consequências negativas para o ambiente e para a
saúde humana.
4. Para obter informaçõs mais detalhadas acerca da
eliminação do seu aparelho antigo, contacte as autoridades
locais, um serviço de eliminação de resíduos ou a loja onde
comprou o produto.
(NL)
Uw oude toestel wegdoen
1. Als het symbool met de doorgekruiste verrijdbare afvalbak
op een product staat, betekent dit dat het product valt onder
de Europese Richtlijn 2002/96/EC.
2. Elektrische en elektronische producten mogen niet worden
meegegeven met het huishoudelijk afval, maar moeten
worden ingeleverd bij speciale inzamelingspunten die door de
lokale of landelijke overheid zijn aangewezen.
3. De correcte verwijdering van uw oude toestel helpt
negatieve gevolgen voor het milieu en de menselijke
gezondheid voorkomen .
4. Wilt u meer informatie over de verwijdering van uw oude
toestel? Neem dan contact op met uw gemeente, de
afvalophaaldienst of de winkel waar u het product hebt
gekocht.
La pagina si sta caricando...
La pagina si sta caricando...
La pagina si sta caricando...
La pagina si sta caricando...
La pagina si sta caricando...
La pagina si sta caricando...
La pagina si sta caricando...
La pagina si sta caricando...
-
 1
1
-
 2
2
-
 3
3
-
 4
4
-
 5
5
-
 6
6
-
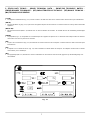 7
7
-
 8
8
-
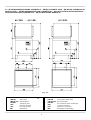 9
9
-
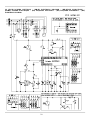 10
10
-
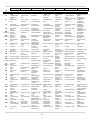 11
11
-
 12
12
-
 13
13
-
 14
14
-
 15
15
-
 16
16
-
 17
17
-
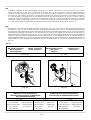 18
18
-
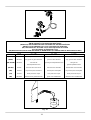 19
19
-
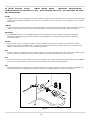 20
20
-
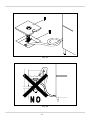 21
21
-
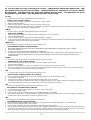 22
22
-
 23
23
-
 24
24
-
 25
25
-
 26
26
-
 27
27
-
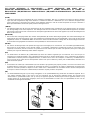 28
28
-
 29
29
-
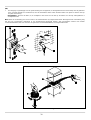 30
30
-
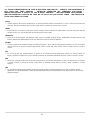 31
31
-
 32
32
-
 33
33
-
 34
34
-
 35
35
-
 36
36
-
 37
37
-
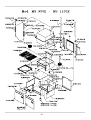 38
38
-
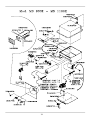 39
39
-
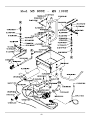 40
40
-
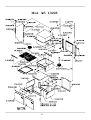 41
41
-
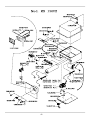 42
42
-
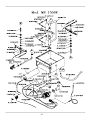 43
43
-
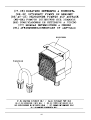 44
44
-
 45
45


in altre lingue
- English: Mach MS 900E Datasheet
- français: Mach MS 900E Fiche technique
- español: Mach MS 900E Ficha de datos
- Deutsch: Mach MS 900E Datenblatt
- Nederlands: Mach MS 900E Data papier
- português: Mach MS 900E Ficha de dados
Altri documenti
-
Lotus MB/EASY 35 Instructions Booklet For Installation Maintenance Operation
-
Casselin CLVACPV Manuale utente
-
Whirlpool AGB 643/WP Manuale del proprietario
-
Sammic SL-650C Manuale utente
-
-
-
Rancilio Epoca S1 Use And Maintenance
-
-
-