Gigaset E560 Manuale utente
- Categoria
- Telefoni
- Tipo
- Manuale utente
Questo manuale è adatto anche per


Gigaset E560A / NLD-BEL / A31008-M2708-M201-1-3F19 / Cover_front.fm / 1/31/17

1
Gigaset E560A / LUG NLD-BEL en / A31008-M2708-M201-1-3F19 / overview_E560A_LUG.fm / 1/31/17
Template Go, Version 1, 01.07.2014 / ModuleVersion 1.0
Handset
Overview
Handset
4
5
11
12
14
9
3
10
7
6
1
2
8
13
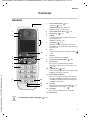
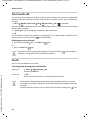
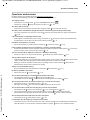
1 Direct dialling key A ( p.13)
("SOS key", p. 26)
Illuminated: Emergency function
Flashes: Emergency call started
2 Direct dialling keys B to D ( p.13)
3Display keys ( p. 14)
4 Talk key
Accepting call; selecting displayed number;
opening redial list
Flashes: Accepting a call
5 Control key ( p. 12)
Opening a menu; navigating in menus and
entry fields; accessing functions (depending on
the situation)
6Key 1
Answer machine/Call the network mailbox (
p. 35)
7Star key
Ringers on/off (press and hold
8 Torch and signal light (LED) ( p. 40)
9Volume keys
for ringtone, receiver/headset, speaker
Upper key: Setting "extra-loud" during a call
(p.19)
10 Handsfree key ( p.19)
Switch between earpiece and handsfree mode;
Lights up: handsfree activated
11 End call key, On/Off key
End call; cancel function; go back one menu
level (press briefly); back to idle status (press
and hold); activate/deactivate handset (press
and hold in idle status)
12 Hash key
Keypad lock on/off (press and hold, p. 12);
upper/lower case and digits ( p. 16)
13 Recall key
Consultation call (flash): press and hold
14 Microphone
Changing the display language: p. 44

2
Template Go, Version 1, 01.07.2014 / ModuleVersion 1.0
Gigaset E560A base
Gigaset E560A / LUG NLD-BEL en / A31008-M2708-M201-1-3F19 / overview_E560A_LUG.fm / 1/31/17
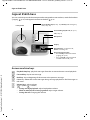
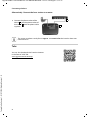
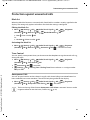
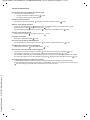
Gigaset E560A base
You can use the keys on the base to operate the integrated answer machine, search for handsets
("paging"
p. 43) and register handsets to the base p. 42.
Answer machine keys
Playback/Stop key: play back messages from the answer machine or cancel playback.
Forward key: skip to next message.
Back key: skip to beginning of the current or the previous message.
Delete key: delete the current message during message playback or all old messages in
idle status.
Volume keys: adjust volume
( = quieter; = louder)
• During message playback: adjust loudspeaker volume.
• While an external call is being signalled: adjust ringer volume.
• During the call: Changing the volume.
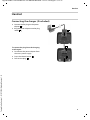
Direct dialling keys B to D (¢ p. 13)
Tab (
¢ p. 8)
Microphone
Display
Direct dialling key A (
¢ p. 13) / SOS key with emergency
LED (
¢ p. 26)
Handsfree key: accept/end call;
flashes: incoming call
Registration/paging key:
• Press briefly: search for handsets
(paging)
¢ p. 43)
• Press and hold: register handsets
and DECT devices
¢ p. 42.
Loudspeaker

3
Gigaset E560A / LUG NLD-BEL en / A31008-M2708-M201-1-3F19 / overview_E560A_LUG.fm / 1/31/17
Template Go, Version 1, 01.07.2014 / ModuleVersion 1.0
Gigaset E560A base
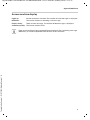
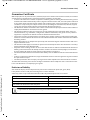
Answer machine display
Lights up: Answer machine is activated. The number of saved messages is displayed.
00 flashes: The answer machine is recording a new message.
Flashes slowly: There are new messages. The number of new messages is displayed.
99 flashes quickly: The answer machine is full.
If the answer machine is being operated from a handset or if it is recording a message
(00 flashes), it cannot be operated from the base at the same time.

4
Template Go, Version 1, 01.07.2014 / ModuleVersion 1.0
Contents
Gigaset E560A / LUG NLD-BEL en / A31008-M2708-M201-1-3F19 / E560A_IVZ.fm / 1/31/17
Contents
Overview . . . . . . . . . . . . . . . . . . . . . . . . . . . . . . . . . . . . . . . . . . . . . . . . . . . . . . . . . . . . . . . . . . . . . . . . . . . . . .1
Handset . . . . . . . . . . . . . . . . . . . . . . . . . . . . . . . . . . . . . . . . . . . . . . . . . . . . . . . . . . . . . . . . . . . . . . . . . . . . . . . 1
Gigaset E560A base . . . . . . . . . . . . . . . . . . . . . . . . . . . . . . . . . . . . . . . . . . . . . . . . . . . . . . . . . . . . . . . . . . . . 2
Illustration in the user guide . . . . . . . . . . . . . . . . . . . . . . . . . . . . . . . . . . . . . . . . . . . . . . . . . . . . . . . . . . . . 5
Safety precautions . . . . . . . . . . . . . . . . . . . . . . . . . . . . . . . . . . . . . . . . . . . . . . . . . . . . . . . . . . . . . . . . . . . . .6
Getting started . . . . . . . . . . . . . . . . . . . . . . . . . . . . . . . . . . . . . . . . . . . . . . . . . . . . . . . . . . . . . . . . . . . . . . . .7
Connecting the base . . . . . . . . . . . . . . . . . . . . . . . . . . . . . . . . . . . . . . . . . . . . . . . . . . . . . . . . . . . . . . . . . . . 7
Handset . . . . . . . . . . . . . . . . . . . . . . . . . . . . . . . . . . . . . . . . . . . . . . . . . . . . . . . . . . . . . . . . . . . . . . . . . . . . . . . 9
Using the phone . . . . . . . . . . . . . . . . . . . . . . . . . . . . . . . . . . . . . . . . . . . . . . . . . . . . . . . . . . . . . . . . . . . . . 12
Getting to know your telephone . . . . . . . . . . . . . . . . . . . . . . . . . . . . . . . . . . . . . . . . . . . . . . . . . . . . . . . 12
Making calls . . . . . . . . . . . . . . . . . . . . . . . . . . . . . . . . . . . . . . . . . . . . . . . . . . . . . . . . . . . . . . . . . . . . . . . . . . 17
Lists . . . . . . . . . . . . . . . . . . . . . . . . . . . . . . . . . . . . . . . . . . . . . . . . . . . . . . . . . . . . . . . . . . . . . . . . . . . . . . . . . . 21
Directory . . . . . . . . . . . . . . . . . . . . . . . . . . . . . . . . . . . . . . . . . . . . . . . . . . . . . . . . . . . . . . . . . . . . . . . . . . . . . 24
Emergency function . . . . . . . . . . . . . . . . . . . . . . . . . . . . . . . . . . . . . . . . . . . . . . . . . . . . . . . . . . . . . . . . . 26
Answer machine . . . . . . . . . . . . . . . . . . . . . . . . . . . . . . . . . . . . . . . . . . . . . . . . . . . . . . . . . . . . . . . . . . . . . 30
Operating the answer machine . . . . . . . . . . . . . . . . . . . . . . . . . . . . . . . . . . . . . . . . . . . . . . . . . . . . . . . . 30
Using the network mailbox . . . . . . . . . . . . . . . . . . . . . . . . . . . . . . . . . . . . . . . . . . . . . . . . . . . . . . . . . . . . 35
Further functions . . . . . . . . . . . . . . . . . . . . . . . . . . . . . . . . . . . . . . . . . . . . . . . . . . . . . . . . . . . . . . . . . . . . 37
ECO DECT . . . . . . . . . . . . . . . . . . . . . . . . . . . . . . . . . . . . . . . . . . . . . . . . . . . . . . . . . . . . . . . . . . . . . . . . . . . . . 37
Using the handset as an alarm clock . . . . . . . . . . . . . . . . . . . . . . . . . . . . . . . . . . . . . . . . . . . . . . . . . . . 38
Baby monitor . . . . . . . . . . . . . . . . . . . . . . . . . . . . . . . . . . . . . . . . . . . . . . . . . . . . . . . . . . . . . . . . . . . . . . . . . 39
One touch call . . . . . . . . . . . . . . . . . . . . . . . . . . . . . . . . . . . . . . . . . . . . . . . . . . . . . . . . . . . . . . . . . . . . . . . . 40
Torch . . . . . . . . . . . . . . . . . . . . . . . . . . . . . . . . . . . . . . . . . . . . . . . . . . . . . . . . . . . . . . . . . . . . . . . . . . . . . . . . . 40
Protection against unwanted calls . . . . . . . . . . . . . . . . . . . . . . . . . . . . . . . . . . . . . . . . . . . . . . . . . . . . . 41
Using multiple handsets . . . . . . . . . . . . . . . . . . . . . . . . . . . . . . . . . . . . . . . . . . . . . . . . . . . . . . . . . . . . . 42
Adjusting the telephone . . . . . . . . . . . . . . . . . . . . . . . . . . . . . . . . . . . . . . . . . . . . . . . . . . . . . . . . . . . . . 44
Handset settings . . . . . . . . . . . . . . . . . . . . . . . . . . . . . . . . . . . . . . . . . . . . . . . . . . . . . . . . . . . . . . . . . . . . . . 44
Base settings . . . . . . . . . . . . . . . . . . . . . . . . . . . . . . . . . . . . . . . . . . . . . . . . . . . . . . . . . . . . . . . . . . . . . . . . . . 48
Operating the base on the PABX . . . . . . . . . . . . . . . . . . . . . . . . . . . . . . . . . . . . . . . . . . . . . . . . . . . . . . . 50
Operating the telephone on a router . . . . . . . . . . . . . . . . . . . . . . . . . . . . . . . . . . . . . . . . . . . . . . . . . . . 51
Appendix . . . . . . . . . . . . . . . . . . . . . . . . . . . . . . . . . . . . . . . . . . . . . . . . . . . . . . . . . . . . . . . . . . . . . . . . . . . 52
Service (Customer Care) . . . . . . . . . . . . . . . . . . . . . . . . . . . . . . . . . . . . . . . . . . . . . . . . . . . . . . . . . . . . . . . 52
Manufacturer's advice . . . . . . . . . . . . . . . . . . . . . . . . . . . . . . . . . . . . . . . . . . . . . . . . . . . . . . . . . . . . . . . . . 56
Specifications . . . . . . . . . . . . . . . . . . . . . . . . . . . . . . . . . . . . . . . . . . . . . . . . . . . . . . . . . . . . . . . . . . . . . . . . . 58
Index . . . . . . . . . . . . . . . . . . . . . . . . . . . . . . . . . . . . . . . . . . . . . . . . . . . . . . . . . . . . . . . . . . . . . . . . . . . . . . . . 60
Not all functions described in the user guide are available in all countries or from all
network providers.

5
Gigaset E560A / LUG NLD-BEL en / A31008-M2708-M201-1-3F19 / user_guide_operating_steps.fm / 1/31/17
Template Go, Version 1, 01.07.2014 / ModuleVersion 1.0
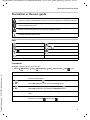
Illustration in the user guide
Illustration in the user guide
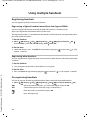
Keys
Procedures
Example: Switching Auto answer on/off:
¤ Menu Settings OK Telephony OK Auto Answer OK ( =on)
Warnings, which, if not heeded, can result in injury to persons or damage to devices.
Important information regarding function and appropriate handling or functions
that could generate costs.
Prerequisite for being able to carry out the following action.
Additional helpful information.
Talk key Handsfree key
End call key to Number / letter keys
/ Control key rim / centre Message key
Recall key Star key
Hash key
OK, Back ... Display keys
Step Follow this procedure
¤ Menu Press the display key Menu when the handset is in idle status.
The main menu opens.
¤
¤ OK
Use the control key to navigate to the entry Settings.
Select OK to confirm. The submenu Settings opens.
¤ Telephony
¤ OK
Select the Telepho ny entry using the control key .
Select OK to confirm. The submenu Tele ph ony opens.
¤ Auto -Answer The function to switch Auto answer on/off appears as the first menu
item.
¤ OK Select OK to activate or deactivate.
Function is activated /deactivated .

6
Template Go, Version 1, 01.07.2014 / ModuleVersion 1.0
Safety precautions
Gigaset E560A / LUG NLD-BEL en / A31008-M2708-M201-1-3F19 / security.fm / 1/31/17
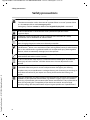
Safety precautions
Read the safety precautions and the user guide before use.
The device cannot be used in the event of a power failure. In case of a power failure
it is also not possible to make emergency calls.
Emergency numbers cannot be dialled if the keypad/display lock is activated!
Do not use the devices in environments with a potential explosion hazard
(e.g. paint shops).
The devices are not splashproof. For this reason do not install them in a damp
environment such as bathrooms or shower rooms.
Use only the power adapter indicated on the device.
Whilst charging, the power socket must be easily accessible.
Use only rechargeable batteries that correspond to the specification (see
"Specifications"). Never use a conventional (non-rechargeable) battery or other battery
types as this could result in significant health risks and personal injury. Rechargeable
batteries, which are noticeably damaged, must be replaced.
Remove faulty devices from use or have them repaired by our Service team, as these
could interfere with other wireless services.
Do not use the device if the display is cracked or broken. Broken glass or plastic can
cause injury to hands and face. Send the device to our Service department to be
repaired.
Do not hold the rear of the handset to your ear when it is ringing or when speaker mode
is activated. Otherwise you risk serious and permanent damage to your hearing.
The phone may cause interference in analogue hearing aids (humming or whistling) or
cause them to overload. If you require assistance, please contact the hearing aid
supplier.
Using your telephone may affect nearby medical equipment. Be aware of the technical
conditions in your particular environment, e.g. doctor's surgery. If you use a medical
device (e.g. a pacemaker), please contact the device manufacturer. They will be able to
advise you regarding the susceptibility of the device to external sources of high
frequency energy (for the specifications of your Gigaset product see "Specifications").

7
Gigaset E560A / LUG NLD-BEL en / A31008-M2708-M201-1-3F19 / starting.fm / 1/31/17
Template Go, Version 1, 01.07.2014 / ModuleVersion 1.0
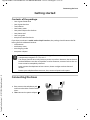
Connecting the base
Getting started
Contents of the package
• One Gigaset E560A base
• One Gigaset handset
• Two batteries
• One battery cover
• One power adapter for the base
• One phone cord
• One user guide
• one plastic cover for the tab
If you have purchased a model with multiple handsets, the package should contain the fol-
lowing for each additional handset:
• two batteries
• one battery cover
• one charging cradle
• one power adapter
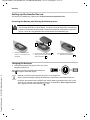
Connecting the base
The base station and charging cradle are designed for use in closed, dry rooms within
a temperature range of +5 °C to +45 °C.
The device's feet do not usually leave any marks on surfaces. However, due to the mul-
titude of different varnishes and polishes used on furniture, contact marks on the sur-
faces cannot be completely ruled out.
Never expose the telephone to heat sources, direct sunlight or other electrical
devices.
Protect your telephone from moisture, dust, corrosive liquids and vapours.
¤ First, connect the telephone jack
and insert the cables into the cable
ducts.
¤ Then connect the power adapter .
1
2
1
2

8
Template Go, Version 1, 01.07.2014 / ModuleVersion 1.0
Connecting the base
Gigaset E560A / LUG NLD-BEL en / A31008-M2708-M201-1-3F19 / starting.fm / 1/31/17
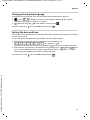
Alternatively: Connect the base station to a router
Tabs
¤ Connect the phone socket of the
device and the phone socket of
the router with the phone cable
supplied.
1
2
1
2
The answer machine is ready for use approx. 15 seconds after the base has been con-
nected or reset.
You can also download tabs from the Internet
in the form of a PDF file:
www.gigaset.com/insertstrips
.

9
Gigaset E560A / LUG NLD-BEL en / A31008-M2708-M201-1-3F19 / starting.fm / 1/31/17
Template Go, Version 1, 01.07.2014 / ModuleVersion 1.0
Handset
Handset
Connecting the charger (if included)
¤ Connect the flat plug on the power
adapter .
¤ Plug the power adapter into the plug
socket .
1
2
To remove the plug from the charging
cradle again:
¤ Disconnect the power adapter from
the mains power supply.
¤ Press the release button .
¤ Pull out the plug .
3
4
1
2
3
4

10
Template Go, Version 1, 01.07.2014 / ModuleVersion 1.0
Handset
Gigaset E560A / LUG NLD-BEL en / A31008-M2708-M201-1-3F19 / starting.fm / 1/31/17
Setting up the handset for use
The display is protected by a plastic film. Please remove the protective film!
Inserting the battery and closing the battery cover
Charging the batteries
¤ Charge the batteries fully prior to first use in the
charging cradle/base.
The batteries are fully charged when the power
icon disappears from the display.
Only use a rechargeable battery, as this could otherwise result in significant health
risks and personal injury. For example, the outer casing of the battery could be des-
troyed or the battery could explode. The device could also malfunction or be dama-
ged as a result of using batteries that are not of the recommended type.
¥ Insert the batteries (for
correct +/- direction, see
diagram).
¥ Fit the cover from the top .
¥ Then press the cover until it
clicks into place .
1
2
To open the battery cover:
¥ Push the cover down .
3
1
2
3
Batteries may heat up during charging. This is not dangerous.
After a time, the charge capacity of the battery will decrease for technical reasons.
Handsets contained in the package have already been registered to the base. In the
event that a handset is not registered however, (indicated by "Please register hand-
set"), register the handset manually ( S. 42).

11
Gigaset E560A / LUG NLD-BEL en / A31008-M2708-M201-1-3F19 / starting.fm / 1/31/17
Template Go, Version 1, 01.07.2014 / ModuleVersion 1.0
Handset
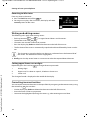
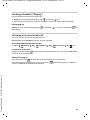
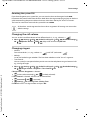
Changing the display language
Change the display language if you do not understand the language currently set.
¤ press slowly in succession. The language selection display appears.
The current language (e. g. English) is selected.
¤ Select the language OK. The selection is marked with .
To revert to idle status: Press and hold the End call key .
Setting the date and time
Set the date/time so that the correct date and time can be assigned to incoming calls, and so that
you can use the alarm.
¤ Press the display key below the display Time. The entry field will open.
¤ Enter the day, month and year in 8-digit format using the keypad, e.g.
for1 April 2017. OK
To correct errors: Press left or right on the control key in order to swap between fields.
¤ Enter the hours and minutes in 4-digit format using the keypad, e.g. for
07:15. Switch between the fields using the control key, if necessary. OK
The display shows Saved. You will hear a confirmation tone.
To revert to idle status: Press and hold the End call key .

12
Template Go, Version 1, 01.07.2014 / ModuleVersion 1.0
Getting to know your telephone
Gigaset E560A / LUG NLD-BEL en / A31008-M2708-M201-1-3F19 / operating.fm / 1/31/17
Using the phone
Getting to know your telephone
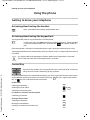
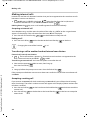
Activating/deactivating the handset
Activating/deactivating the keypad lock
The keypad lock prevents any inadvertent use of the phone.
If the keypad lock is activated, a corresponding message is displayed when you press a key.
The keypad lock deactivates automatically when you receive a call. It is reactivated when the call
is finished.
Control Key
In the description below, the side of the control key (up, down, right, left) that you have to press
in the different operating situations is marked in black, e.g. for "press right on the control
key" or for "press the centre of the control key".
Press and hold the end call key (confirmation tone).
In idle status, press and hold the hash key (confirmation tone). The keypad lock
is activated or deactivated. If it is activated, the icon appears in the dis-
play.
It is not possible to call emergency numbers either when keypad lock is activated.
The SOS key still works even if the keypad lock is activated.
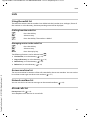
The control key enables you to navigate the menus and input fields, and also to
call up certain functions depending on the situation.
In idle status
Opening the directory
Opening the main menu or
Opening the list of handsets
In submenus, selection and entry fields
Confirming a function
During a conversation
Opening the directory
Muting the microphone
Initiating an internal consultation call

13
Gigaset E560A / LUG NLD-BEL en / A31008-M2708-M201-1-3F19 / operating.fm / 1/31/17
Template Go, Version 1, 01.07.2014 / ModuleVersion 1.0
Getting to know your telephone
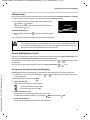
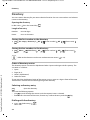
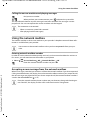
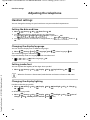
Volume keys
During a call or when listening to a message, set the volume for the receiver/headset or speaker
or in the case of an incoming call, set the volume of the ringtone (5 levels).
¤ Press the volume keys on the right side of the handset:
(louder) / (quieter)
The current setting is permanently saved after approx.
two seconds (
p. 45).
Extra-loud function
¤ Press the top volume key until you reach the highest
level.
The extra-loud setting only applies for the duration of the call.
Direct dialling keys A to D
You can save important phone numbers that you call often to the four direct dialling keys. You
can assign an external phone number to each direct dialling key.
To dial these saved numbers, press the relevant direct dialling key to on the handset or
on the base.
You can also assign the emergency function to direct dialling key ( p.26).
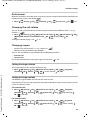
Assigning a function to direct dialling keys
Prerequisite: The direct dialling key in question has not already been assigned a function.
¤ In idle status, press the direct dialling key ( to ) on the handset to which you wish to
assign a function.
Select the relevant function using :
¤ Label with Ext. No.
Enter an external phone number directly.
¤ Label with Internal Call
Direct dial to a handset registered to the same base.
If more than one other handset is registered: Select handset OK
¤ Label with Call All Int.
Direct dial to all handsets registered to the same base.
Volume:
Back OK
•
This setting can result in harm to health in persons with a normal hearing ability
and is only intended for persons with a hearing impairment or reduced hearing.
• Disruptive noises on the phone line can be increased.
Enter the number and press OK.
Enter the name and press OK.

14
Template Go, Version 1, 01.07.2014 / ModuleVersion 1.0
Getting to know your telephone
Gigaset E560A / LUG NLD-BEL en / A31008-M2708-M201-1-3F19 / operating.fm / 1/31/17
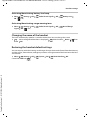
¤ Label with Dir. Number
Label the key with a number from the directory.
The directory is opened. Select a number and press OK.
The labelling of the direct dialling keys applies to the handset and the base.
Changing the function of the direct dialling keys
¤ Menu Settings OK Direct Dial Keys OK Select direct dialling key
(A to D)
The current labelling is displayed after the key number, e.g.,
You can now change the labelling.
Select a new function using Menu Not all functions may be available, depending on the
current assignment. An entry that is already present must be deleted in advance.
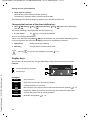
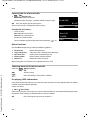
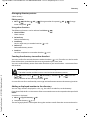
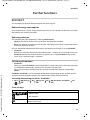
Display keys
The functions of the display keys change depending on the particular operating situation.
Example:
Examples:
¤ A: <no >entry> The key is not currently labelled.
¤ Delete Entry Delete current key labelling.
¤ Edit Entry Change phone number and/or name.
Only key : Assign key with emergency function p. 27
Redial Menu
Current display key function
Display keys
1
2
1
2
1
2
Open redial list.
Open main menu/menu for further functions.
Confirm selection or save entry.
Missed calls or messages on the answer machine/network mailbox ( p. 23).
Delete key: delete character by character/word by word from right to left.
Go back one menu level or cancel operation.
Mute the microphone ( p. 19).
Redial
Menu
OK
Delete
Back
Mute

15
Gigaset E560A / LUG NLD-BEL en / A31008-M2708-M201-1-3F19 / operating.fm / 1/31/17
Template Go, Version 1, 01.07.2014 / ModuleVersion 1.0
Getting to know your telephone
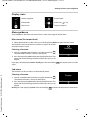
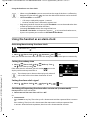
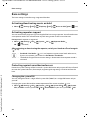
Display icons
Menu guidance
Your telephone's functions are accessed via a menu consisting of several levels.
Main menu (first menu level)
¤ When the handset is in idle status, press the display key Menu to open the main menu.
The functions in the main menu are shown by means of an icon
and the function's name.
Selecting a function:
¤ You can scroll between functions using the control key .
The selectable function is shown in the display.
¤ Press the display key OK to select the displayed function. This
opens the corresponding submenu and the first entry is dis-
played.
If you press the display key Back or briefly press the end call key , the display returns to idle
status.
Sub menu
The functions in the sub menu are indicated by name.
Selecting a function:
¤ You can scroll between functions using the control key .
The relevant function is shown in the display.
¤ Press the display key OK to select the displayed function. This
opens the corresponding submenu and the first entry is dis-
played.
Briefly press the display key Back or the end call key to return to the previous menu level.
Action complete Action failed
Information Alarm call
( p. 38)
Please wait ... Display up/Down
Settings-
Back OK
Display
Back OK

16
Template Go, Version 1, 01.07.2014 / ModuleVersion 1.0
Getting to know your telephone
Gigaset E560A / LUG NLD-BEL en / A31008-M2708-M201-1-3F19 / operating.fm / 1/31/17
Reverting to idle status
From any point in the menu:
¤ Press and hold the end call key or
¤ Do not press any key: after 2 minutes, the display will auto-
matically revert to idle status.
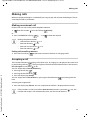
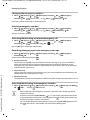
Writing and editing names
The following rules apply when writing names:
• Each key between and is assigned several letters and characters.
• Control the cursor with .
• Characters are inserted at the cursor position.
• Press the display key Delete to delete the character to the left of the cursor.
• The first letter of the name is automatically capitalised and then followed by lower case let-
ters.
¤ Briefly press the key several times in succession to select the required letter/character.
Setting upper/lower case or digits
Repeatedly press the hash key to change the text input mode.
The change of mode is displayed in the middle of the display.
Correcting incorrect entries
You can correct incorrect characters in the input fields by navigating to the incorrect entry using
the control key . You can then:
• Use the display key Delete to delete the character to the left of the cursor,
• Insert characters at the cursor position
• Overwrite the highlighted (flashing) character e.g., when entering time and date.
07:15
01.04.2016
Menu
The characters assigned to the key are shown in a selection line at the bottom left of
the screen. The selected character is highlighted.
1 Writing digits
A Upper case; First letter in capitals, all others in lower case
aLower case

17
Gigaset E560A / LUG NLD-BEL en / A31008-M2708-M201-1-3F19 / telephony.fm / 1/31/17
Template Go, Version 1, 01.07.2014 / ModuleVersion 1.0
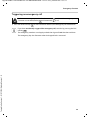
Making calls
Making calls
When the display backlight is switched off, pressing any key will activate the backlight. The rel-
evant key function is performed.
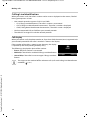
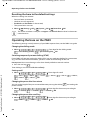
Making an external call
External calls are calls to the public telephone network.
¤ Enter the number Press the Talk key briefly
or
¤ Press and hold the Talk key . . . use to enter the number
Ending call/cancelling selection
¤ Press the End call key or place the handset in the base or charging cradle.
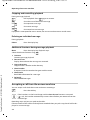
Accepting a call
The handset indicates an incoming call in three ways: by ringing, by a display on the screen and
by the flashing talk key . The signal light on the back of the handset flashes if the function
LED Call Signal is activated ( p. 46).
You can accept the call on the handset by:
¤ Pressing the talk key .
¤ Pressing the handsfree key .
¤ Press the display key Accept.
You can accept the call on the base by pressing the handsfree key and calling from the
base.
Switching the ringtone off:
¤ Press the display key Silence. You can accept the call while it is displayed on the screen.
Dialling the phone number:
• with the Direct dial key p. 13
• from the directory p. 24
• from the missed calls list p. 22
• from the redial list p. 21
If the handset is in the base and the Auto Answer function is activated ( p. 45), the
handset will accept a call automatically when you lift it out of the base.

18
Template Go, Version 1, 01.07.2014 / ModuleVersion 1.0
Making calls
Gigaset E560A / LUG NLD-BEL en / A31008-M2708-M201-1-3F19 / telephony.fm / 1/31/17
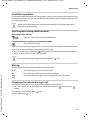
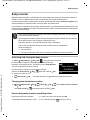
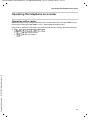
Calling Line Identification
When you receive a call, the caller's number and/or name is displayed on the screen, if the fol-
lowing prerequisites are met.
• Your network provider supports CLIP, CLI and CNIP.
• CLI (Calling Line Identification): The caller's number is transmitted.
• CLIP (Calling Line Identification Presentation): The caller's number is displayed.
• CNIP (Calling Name Identification Presentation): The caller's name is displayed.
• You have requested CLIP or CNIP from your network provider.
• The caller has arranged CLI with the network provider.
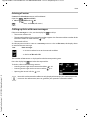
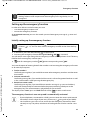
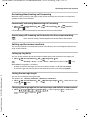
Call display
When you receive a call, the phone number or, if you have CNIP, the name (town) registered with
your network provider for the caller's number is shown in the display.
If the number of the caller is stored in your directory, the display
is replaced by the corresponding directory entry.
The following is displayed in place of the number:
• Extern. Call, if no number is transmitted.
• Withheld, if the caller has withheld Calling Line Identification.
• Unavailable, if the caller has not arranged Calling Line Identi-
fication.
The ringer can be switched off for unknown calls (calls with Calling Line Identification
withheld) ( p. 41).
John
Accept Silence
La pagina sta caricando ...
La pagina sta caricando ...
La pagina sta caricando ...
La pagina sta caricando ...
La pagina sta caricando ...
La pagina sta caricando ...
La pagina sta caricando ...
La pagina sta caricando ...
La pagina sta caricando ...
La pagina sta caricando ...
La pagina sta caricando ...
La pagina sta caricando ...
La pagina sta caricando ...
La pagina sta caricando ...
La pagina sta caricando ...
La pagina sta caricando ...
La pagina sta caricando ...
La pagina sta caricando ...
La pagina sta caricando ...
La pagina sta caricando ...
La pagina sta caricando ...
La pagina sta caricando ...
La pagina sta caricando ...
La pagina sta caricando ...
La pagina sta caricando ...
La pagina sta caricando ...
La pagina sta caricando ...
La pagina sta caricando ...
La pagina sta caricando ...
La pagina sta caricando ...
La pagina sta caricando ...
La pagina sta caricando ...
La pagina sta caricando ...
La pagina sta caricando ...
La pagina sta caricando ...
La pagina sta caricando ...
La pagina sta caricando ...
La pagina sta caricando ...
La pagina sta caricando ...
La pagina sta caricando ...
La pagina sta caricando ...
La pagina sta caricando ...
La pagina sta caricando ...
La pagina sta caricando ...
La pagina sta caricando ...
La pagina sta caricando ...
-
 1
1
-
 2
2
-
 3
3
-
 4
4
-
 5
5
-
 6
6
-
 7
7
-
 8
8
-
 9
9
-
 10
10
-
 11
11
-
 12
12
-
 13
13
-
 14
14
-
 15
15
-
 16
16
-
 17
17
-
 18
18
-
 19
19
-
 20
20
-
 21
21
-
 22
22
-
 23
23
-
 24
24
-
 25
25
-
 26
26
-
 27
27
-
 28
28
-
 29
29
-
 30
30
-
 31
31
-
 32
32
-
 33
33
-
 34
34
-
 35
35
-
 36
36
-
 37
37
-
 38
38
-
 39
39
-
 40
40
-
 41
41
-
 42
42
-
 43
43
-
 44
44
-
 45
45
-
 46
46
-
 47
47
-
 48
48
-
 49
49
-
 50
50
-
 51
51
-
 52
52
-
 53
53
-
 54
54
-
 55
55
-
 56
56
-
 57
57
-
 58
58
-
 59
59
-
 60
60
-
 61
61
-
 62
62
-
 63
63
-
 64
64
-
 65
65
-
 66
66


Gigaset E560 Manuale utente
- Categoria
- Telefoni
- Tipo
- Manuale utente
- Questo manuale è adatto anche per
in altre lingue
- English: Gigaset E560 User manual
Documenti correlati
-
Gigaset E560 Manuale utente
-
Gigaset Book Case SMART Guida utente
-
Gigaset A475A TRIO BLACK Manuale del proprietario
-
Gigaset E290 Guida utente
-
-
-
Gigaset A170 Manuale utente
-
-
Gigaset CL390 Guida utente
-
Gigaset E560HX Manuale utente