Zanussi ZHP622W Manuale utente
- Categoria
- Cappe da cucina
- Tipo
- Manuale utente

MANUALE DI INSTALLAZIONE, USO E MANUTENZIONE
INSTALLATION, USE AND MAINTENANCE HANDBOOK
MANUEL D’INSTRUCTIONS POUR L’INSTALLATION, L’EMPLOI ET L’ENTRETIEN
HANDBUCH FÜR INSTALLATION, BEDIENUNG UND WARTUNG
INSTRUCTIES VOOR MONTAGE, GEBRUIK EN ONDERHOUD
MANUAL DE INSTRUCCIONES, USO Y MANTENIMIENTO
MANUAL DE INSTRUÇÕES, UTILIZAÇÃO E MANUTENÇÃO

2
Contenuti - Contenents - Sommaire - Inhalt - Inhoud - Indice - Indice
Istruzioni per L’Installazione - Installation Instructions
Instructions pour L’Installation - Montagehinweise
Instructies voor de Installatie - Instrucciones de Instalacion
Instruções para a Instalação
Generalità .................................................................................................................... 5
General Information ................................................................................................... 9
Generalites ................................................................................................................... 13
Allgemeines ................................................................................................................. 17
Algemeen ..................................................................................................................... 21
Generalidades .............................................................................................................. 25
Informações de segurança ........................................................................................... 29
Avvertenze per la Sicurezza ......................................................................................... 5
Safety Warnings .......................................................................................................... 9
Conseils concernant la Securite .................................................................................. 13
Sicherheitshinweise ...................................................................................................... 17
Veiligheidsmaatregelen ................................................................................................ 21
Normas de seguridad .................................................................................................. 25
Precauções de segurança ............................................................................................. 29
Installazione ................................................................................................................. 5
Installation .................................................................................................................. 9
Installation .................................................................................................................. 13
Montage des Gerätes ................................................................................................... 18
Installatie ..................................................................................................................... 21
Instalacion ................................................................................................................... 25
Instalação ..................................................................................................................... 29
Installazione nel pensile ......................................................................................... 5
Installation in the overhead unit ........................................................................... 9
Installation dans l’élément haut ............................................................................. 13
Montage des Hängeschranks .................................................................................. 18
Installatie in het kastje .......................................................................................... 21
Colocación en el armario ...................................................................................... 25
Instalação no móvel suspenso ................................................................................. 29
Montaggio del distanziale ...................................................................................... 5
Fitting the spacer .................................................................................................. 9
Montage de l’entretoise .......................................................................................... 13
Montage des Abstandstückes ................................................................................... 18
Montage van het opvulstuk ................................................................................... 21
Para montar el distanciador ................................................................................. 25
Montagem do espaçador ........................................................................................ 29

3
Contenuti - Contenents - Sommaire - Inhalt - Inhoud - Indice - Indice
Connessione aspirante o filtrante ............................................................................ 6
Connecting up remote blower or filter system ......................................................... 10
Connexion aspirante ou filtrante ............................................................................ 14
Anschluß Abluft- oder Umluftbetrieb ...................................................................... 18
Afzuigende of filterende opstelling ........................................................................... 22
Conexión aspirante o filtrante ................................................................................ 26
Ligação filtrante ou aspirante ................................................................................ 30
Connessione elettrica e controllo funzionale ............................................................ 6
Connecting to the power supply and testing ........................................................... 10
Branchement électrique et contrôle fonctionnel ....................................................... 14
Elektrischer Anschluß und Funktionskontrolle ........................................................ 18
Elektrische aansluiting en controle van de werking ................................................. 22
Conexión eléctrica y control funcional .................................................................... 26
Ligação eléctrica e controle funcional ..................................................................... 30
Istruzioni per L’Uso e la Manutenzione - Operation and
Maintenance Instructions - Instructions pour L’Utilisation et
L’Entretien - Gebrauchs- und Wartungshinweise -
Gebruiksaanwijzing - Instrucciones de Uso y Mantenimiento -
Instruções para a Utilização e para a Manutenção
Avvertenze per la Sicurezza ......................................................................................... 7
Safety Warnings .......................................................................................................... 11
Conseils concernant la Securite .................................................................................. 15
Sicherheitshinweise ...................................................................................................... 19
Veiligheidsmaatregelen ................................................................................................ 23
Normas de Seguridad ................................................................................................. 27
Precauções de segurança ............................................................................................. 31
Uso .............................................................................................................................. 7
Use .............................................................................................................................. 11
Utilisation .................................................................................................................... 15
Bedienung ................................................................................................................... 19
Gebruik ....................................................................................................................... 23
Uso .............................................................................................................................. 27
Utilização ..................................................................................................................... 31
Manutenzione .............................................................................................................. 7
Maintenance ................................................................................................................ 11
Entretien ...................................................................................................................... 15

4
Wartung und Pflege ................................................................................................... 19
Onderhoud .................................................................................................................. 23
Mantenimiento ............................................................................................................ 27
Manutenção ................................................................................................................. 31
Filtri antigrasso metallici ...................................................................................... 7
Metal grease filters ................................................................................................ 11
Filtres à graisses métalliques .................................................................................. 15
Metall-Fettfilter .................................................................................................... 19
Metalen antivet-filter ............................................................................................ 23
Filtros antigrasa metálicos ..................................................................................... 27
Filtros metálicos antigordura ................................................................................. 31
Filtro antigrasso in fibra sintetica .......................................................................... 8
Synthetic fibre filter .............................................................................................. 12
Filtre synthétique .................................................................................................. 16
Fettfiltervlies ......................................................................................................... 19
Synhetisch vetfilter ................................................................................................ 23
Filtro antigrasa de fibra sintetica .......................................................................... 27
Filtro antigordura de fibra sintética ...................................................................... 32
Filtri al carbone attivo ......................................................................................... 8
Charcoal filters ..................................................................................................... 12
Filtres à charbon actif ........................................................................................... 16
Aktiv-Kohlefilter .................................................................................................... 20
Koolstoffilters ......................................................................................................... 24
Filtro de carbón activado ...................................................................................... 28
Filtros de carvão activo ......................................................................................... 32
Illuminazione ........................................................................................................ 8
Lighting ................................................................................................................ 12
Eclairage ............................................................................................................... 16
Beleuchtung ........................................................................................................... 20
Verlichting ............................................................................................................ 24
Iluminación .......................................................................................................... 28
Iluminação ........................................................................................................... 32
Pulizia ................................................................................................................. 8
Cleaning ............................................................................................................... 12
Nettoyage .............................................................................................................. 16
Pflege .................................................................................................................... 20
Reiniging .............................................................................................................. 24
Limpieza .............................................................................................................. 28
Limpeza ............................................................................................................... 32
Contenuti - Contenents - Sommaire - Inhalt - Inhoud - Indice - Indice

9
1 - GENERAL INFORMATION
This canopy hood is designed to be fixed to any rigid vertical surface, over a gas or electric hotplate
and can be used either in the extraction mode (ducted to the outside) or in the recirculation mode
(internal recycling). Before commencing the installation, consideration should be given to the
difficulties to be found during installation and to the bulky weight of the hood. The installation
work must be undertaken by a qualified and competent person in conformity to the rules
concerning the evacuation of contaminated air. The manufacturer disclaims all liability for any
damage or injury caused as a result of not following the instructions for installation contained in
the following text.
2 - SAFETY WARNINGS
2.1 - When used in the extraction mode the cooker hood ducting must not be connected to a
flue which is used for exhausting fumes from appliances supplied with energy other than
electric, such as a central heating flue or water heating flue.
2.2 - Before connecting to the mains supply ensure that the mains voltage corresponds withthe
voltage on the rating plate inside the hood.
2.3 - Connect the cooker hood to the mains via a bipolar switch which has 3 mm clearance
between the contacts.
2.4 - The appliance must be earthed.
2.5 - When istalled, the hood must be positioned at least 65 cm above the hotplate.
2.6 - Never do flambé cooking under this cooker hood.
2.7 - Never leave frying pans unattended during use as overheated fats and oils may catch
fire.
2.8 - Before carring out any kind of maintenance or cleaning, disconnect the hood from the
mains supply.
2.9 - If the room where the cooker hood is to be used contains a fuel burning appliance such
as a central heating boiler then this must be of the room sealed or balanced flue type. If
other types of flue or appliance are fitted, ensure that there is an adequate supply of air
into the room. When the cooker hood is used in conjunction with other appliances
supplied with energy other than electric, the negative pressure in the room must not
exceed 0,04 mbar to prevent fumes being drawn back into the room by the cooker hood.
3 - INSTALLATION.
This unit belongs to the category of semi-fitted hoods. The top portion is inserted inside the
overhead unit. After assembly, the pull-out undercarriage is positioned outside the overhead unit
and must be pulled out into a working position.
3.1 - Installation in the overhead unit
Using the template provided, cut the opening required to insert the top portion of the hood in the
base of the overhead unit. Open the pull-out undercarriage and remove the blower grid, position
the hood in the opening and fix the bottom portion using the screws in the bag of fittings provided.
Part 1 - INSTALLATION INSTRUCTIONS

10
3.2 - Fitting the spacer
After having fixed the hood to the overhead unit, the spacer provided can be fitted to the bottom,
to close the space remaining between the rear edge of the hood and the wall. The spacer can be
adjusted from a minimum of 1 mm to a maximum of 30 mm.
3.3 - Connecting up remote blower or filter system
1 - Connecting up remote blower system
The hood must be connected to the external air outlet using Ø 120 mm rigid or flexible pipes,
fixed using suitable hose clamps (not provided). Check whether or not there are active carbon
filters inside the body of the hood; in the remote blower version they should not be fitted (see
paragraph 3.3 part 2).
2 - Connecting up filter system
The hood must be connected to the top portion of the overhead unit using a Ø 120 mm rigid
or flexible pipe. Check that the active carbon filters are fitted inside the body of the hood (see
paragraph 3.3. part 2). The filtered air is returned to the environment through the opening at
the top of the overhead unit. If provided, a Ø 120 mm directional vent can be installed on top
of the overhead unit, making sure that the air flow is not directed against the wall.
3.4 - Connecting to the power supply and testing
Connection to the power supply is as follows:
1 - If the hood is equipped with a plug, this can be connected directly to a near-by power socket,
provided the latter is adequately earthed.
2 - If the hood does not have a plug, it must be connected by means of a special power line,
which must be suitably earthed. The warnings given in points 2.3, 2.4 and 2.5 of the safety
precautions must always be observed.
3 - After connecting to the mains power supply, check that the lighting, motor start-up and speed
change all operate correctly.
After installing the hood, the pull-out undercarriage must be opened with a certain force,
until a click is heard indicating that it has reached its full extension.
Part 1 - INSTALLATION INSTRUCTIONS

11
1 - SAFETY WARNINGS
It is most important that all the warnings shown in paragr. 2 of part 1 are strictly observed.
Moreover, special attention must be paid to the following warnings during the use and maintenance
of the cooker hood:
1.1 - The grease filters should be cleaned as recommended by the manufacturer or more
frequently if the hood is used consistently (more than 4 hours per day).
1.2 - When using a gas hob in connection with the cooker hood never leave the burners of the
hob uncovered while the hood is in use or when the pans have been removed. Switch off
the gas before removing the pan or for just short periods and never leave the
hob unattended.
1.3 - Always ensure that the appliance is kept at the correct intensity to prevent the flame
from licking round from the bottom of the pan; this will save energy and will avoid a
dangerous concentration of heat.
1.4 - Always ensure that the appliance is used in accordance with the manufacturer's
instructions for the removal of contaminated odours during cooking.
2 - USE
A microswitch activated by movement of the undercarriage turns the lighting system on and off and
activates start-up and stoppage of the motor at the pre-selected speed. A switch at the front of the
hood is used to select the fan speed:
1 = minimum speed (particularly silent, ideal for a continuous exchange of air when steam and
vapour levels are low);
2 = maximum speed (to deal with high levels of steam and vapour even for extended periods).
3 - MAINTENANCE
Regular maintenance and cleaning will ensure good performance and reliability, while extending the
working life of the hood. Special attention should be paid to the grease filters and to the charcoal
filters when the hood is used in the recirculation mode.
3.1 - Metal grease filters.
1 - Cleaning:
The metal grease filter should be cleaned every two months with normal usage and can be
cleaned in a dishwasher or by hand using a mild detergent or liquid soap.
2 - Replacements:
a) Open the sliding visor.
b) Open the metal grille pushing the knobs towards the centre while pulling downwards.
c) Remove the wire clips and replace the synthetic fibre filter.
Part 2 - OPERATION AND MAINTENANCE INSTRUCTIONS

12
3.2 - Synthetic fibre filter.
1 - This type of filter is printed with red dots. When the filter becomes saturated the red colour of
the dots will spread over the whole surface of the filter. At this point the filter has to be
replaced. The saturated filter cannot be cleaned or regenerated.
2 - Replacement:
a) Open the sliding visor.
b) Open the metal grille pushing the knobs towards the centre while pulling downwards.
c) Remove the wire clips and replace the synthetic fibre filter.
d) Close the metal grille.
3.3 - Charcoal filters
1 - Functioning:
In the recycling mode the charcoal filters absorb smell and odours. The charcoal filter cannot
be washed or regenerated and should be replaced every 2 months or more frequently if the
hood is used consistently.
2 - Replacement:
a) Open the sliding visor.
b) Open the metal grille pushing the knobs towards the centre while pulling downwards.
c) Replace the charcoal filters by unscrewing the fixing knobs.
d) Close the metal grille.
ATTENTION - There could be a possible fire hazard if the filters are not replaced
according to these instructions.
3.4 - Lighting
a) One or two 40W lamps ensure the worktop lighting. These lamps can be reached by removing
the glass visor.
b) Should the two lamps fail to work, open the metal grille and ensure they are correctly screwed
into the holder.
c) When changing the lamp, an identical replacement must be fitted to ensure the safe working
of the cooker hood.
3.5- Cleaning
When cleaning the hood:
- Never use a wet cloth or sponge, or running water.
- Never use thinners or products containing alcohol, as they might damage the paintwork.
- Never use abrasive cleaning materials, in particular when cleaning stainless steel surfaces.
It is recommended to use a damp cloth and mild liquid household cleaner.
Part 2 - OPERATION AND MAINTENANCE INSTRUCTIONS

33
4349073 136_015e0
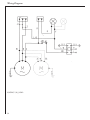
Wiring Diagram

34
4349085 136_049e0
Wiring Diagram

35

4324399 01 - 0699
-
 1
1
-
 2
2
-
 3
3
-
 4
4
-
 5
5
-
 6
6
-
 7
7
-
 8
8
-
 9
9
-
 10
10
-
 11
11
-
 12
12


Zanussi ZHP622W Manuale utente
- Categoria
- Cappe da cucina
- Tipo
- Manuale utente
in altre lingue
- English: Zanussi ZHP622W User manual