
1/2 Copyright © 2015 ZyXEL Communications Corp. All Rights Reserved
Quick Start Guide
UAG Series
Unified Access Gateway
UAG4100
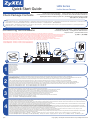
Connecting the Hardware
3
LAN
LAN/DMZ
WAN
2
4
Anschließen der Hardware | Conectar el hardware
Connecter le matériel | Collegamento dell'hardware
Подключение | Ansluta maskinvara
连接硬件 | 連接硬體
2
It is recommended that you configure the UAG before using it to protect your network. Use an Ethernet cable to connect a computer to a LAN or LAN/DMZ port.
Es wird empfohlen, die UAG zu konfigurieren, bevor Sie diese in Ihrem Netzwerk einsetzen. Schließen Sie einen Management-Computer mit einem Ethernetkabel an den LAN- oder
LAN/DMZ-Anschluss an.
Se recomienda que configure el UAG antes de usarlo para proteger su red. Utilice un cable Ethernet para conectar un equipo a un puerto LAN o LAN/DMZ.
Il est recommandé de configurer l'UAG avant de le brancher au réseau. Utilisez un câble Ethernet pour connecter un ordinateur à un port LAN ou LAN/DMZ.
Si consiglia di configurare l'UAG prima di utilizzarlo per proteggere la rete. Utilizzare un cavo Ethernet per collegare un computer di gestione a una porta LAN o LAN/DMZ.
Перед подключением устройства UAG к защищаемой сети рекомендуется его сконфигурировать. Подключите кабель Ethernet к порту LAN или LAN/DMZ компьютера.
Du rekommenderas att konfigurera UAG före användning för att skydda ditt nätverk. Använd en Ethernet-sladd för att ansluta en dator till en LAN- eller LAN-/DMZ-port.
建议您在使用UAG保护网络前先完成设置。使用以太网电缆将电脑连接至 LAN 或 LAN/DMZ 端口。
建議您在使用UAG保護網路前先完成設定。使用乙太網路線將電腦連接至 LAN 或 LAN/DMZ 埠。
Use another Ethernet cable(s) to connect the WAN port to an Ethernet jack with Internet access.
Verwenden Sie ein anderes Ethernetkabel, um den/die WAN-Port(s) mit einer Ethernetbuchse mit Internetzugang zu verbinden.
Utilice otro cable o cables Ethernet para conectar el puerto o puertos WAN a una clavija Ethernet con acceso a Internet.
Utilisez un autre (d'autres) câble(s) Ethernet pour connecter le(s) port(s) WAN à une prise Ethernet avec accès à Internet.
Utilizzare un altro cavo(i) Ethernet per collegare la(e) porta(e) WAN ad un jack Ethernet con accesso Internet.
Через другие кабели Ethernet подключите порты WAN к разъему Ethernet с доступом к Интернету.
Använd en annan Ethernet-sladd för att ansluta WAN-porten/-portarna till en Ethernet-anslutning med Internet-åtkomst.
使用另一条以太网电缆将 WAN 端口连接至可访问互联网的以太网插孔。
使用另一條乙太網路線,將WAN埠連接至接取網際網路的乙太網路插孔。
Use the included power adaptor or power cord to connect the power socket (on the rear panel) to a power outlet. You do not need to do this if your UAG supports PoE and you are using PoE to
provide power to the UAG via an 8-pin CAT 5 Ethernet cable.
Verwenden Sie das mitgelieferte Netzteil oder Stromkabel, um die Strombuchse (an der Rückseite) mit einer Steckdose zu verbinden. Das ist nicht erforderlich, wenn Ihr UAG PoE unterstützt
und Sie den UAG mit einem 8-poligen Ethernetkabel der Kategorie 5 (CAT 5) über PoE mit Strom versorgen.
Utilice el adaptador o cable de alimentación incluido para conectar el zócalo de alimentación (en el panel posterior) a una salida de alimentación. No necesita realizar esto si su UAG soporta
PoE y utiliza PoE para suministrar energía al UAG a través de un cable Ethernet CAT 5 de 8 contactos.
Utilisez l'adaptateur ou le cordon d'alimentation fournis pour connecter le connecteur d'alimentation (sur le panneau arrière) à une prise de courant. Cela n'est pas nécessaire si votre UAG
prend en charge PoE et que vous utilisez PoE pour alimenter l'UAG via un câble Ethernet CAT 5 à 8 broches.
Utilizzare l'alimentatore o il cavo di alimentazione fornito a corredo per collegare la presa di alimentazione (sul pannello posteriore) a una presa elettrica. Questa operazioe non è necessaria il
vostroUAG è compatibile PoE e state utilizzando PoE per alimentare la UAG tramite un cavo Ethernet CAT5 a 8-pin.
Подключите разъем питания (на задней панели) к электрической розетке с помощью адаптера питания или кабеля питания из комплекта поставки. Этого не требуется, если
устройство UAG поддерживает питание PoE или получает питание PoE через 8-контактный кабель Ethernet категории 5.
Använd den medföljande strömadaptern eller nätkabeln för att ansluta strömanslutningen (på bakpanelen) till ett eluttag. Du behöver inte göra detta om din UAG stöder PoE och du använder
PoE för att ge ström åt din UAG via en 8-stiftspin CAT 5 Ethernet-sladd.
使用附带的电源适配器或电源线将电源插头(在后面板上)连接到电源。如果您的 UAG 支持 PoE,而且正在使用 PoE,通过 8 针 CAT 5 以太网电缆为 UAG 供电,则不需要执行以上操作。
使用隨附的電源變壓器或電源線,將電源插槽 (位於後方面板) 連接到電源插座。如果您的 UAG 支援 PoE,而且您現正使用 PoE,透過 8 針 CAT 5 乙太網路線為 UAG 供電,則不需要執行以上操作。
Make sure that the power switch on the rear panel is turned off before you make the hardware connections.
Stellen Sie sicher, dass der Netzschalter an der Rückseite des Geräts ausgeschaltet ist, bevor Sie die Hardware in Betrieb nehmen.
Compruebe que el interruptor de alimentación del panel posterior esté apagado antes de realizar las conexiones del hardware.
Vérifiez que le commutateur d'alimentation situé sur le panneau arrière est éteint avant d'effectuer les connexions matérielles.
Verificare che l'interruttore di accensione posteriore sia spento prima di effettuare i collegamenti dell'hardware.
Перед подключением убедитесь, что выключатель питания на задней панели находится в положении “выключено”.
Se till att strömomkopplaren på bakpanelen är avstängd innan du gör maskinvaruanslutningar.
在您进行硬件连接前,要先确认后方面板上的电源开关为关闭状态。
在您進行硬體連接前,要先確認後方面板上的電源開關為關閉狀態。
1
Attach the antennas.
Antenne anschließen.
Coloque la antena.
Branchez l'antenne.
Agganciare l'antenna.
Подключение антенн.
Fäst antennerna.
连接天线。
連接天線。
POWER
1
2
3
4
Check Package Contents
Prüfen des Packungsinhalts | Comprobación del contenido del paquete
Vérification du contenu de l'emballage | Controllo del contenuto della confezione
Проверка комплектации устройства | Kontrollera förpackningens innehåll
检查包装内容 | 檢查包裝內容
• UAG
• Power adaptor/Power cord | Netzadapter/Netzkabel | Adaptador de alimentación/Cable de alimentación | Adaptateur d'alimentation/Cordon d'alimentation | Alimentatore/Cavo
di alimentazione | Адаптер питания/Кабель питания | Nätkabeln/Strömadaptern | 电源适配器/电源线 | 電源變壓器/電源線
• Quick Start Guide | Kurzanleitung in Druckform | Guía de inicio rápido impresa | Guide d'installation rapide imprimé | Breve guida all'installazione | Краткое руководство |
Snabbstartguide | 快速入门指南印刷本 | 快速入門指南印刷本

2/2 Copyright © 2015 ZyXEL Communications Corp. All Rights Reserved
EU Importer: ZyXEL Communication A/S, Generatorvej 8D, 2860 Søborg, Denmark. http://www.zyxel.dk
US Importer: ZyXEL Communications, Inc1130 North Miller Street Anaheim, CA 92806-2001 http://www.us.zyxel.com
Look at the front panel. The PWR light turns on. The SYS light blinks during system testing and initialization and then stays on when the system is ready.
Betrachten Sie das vordere Bedienfeld. Die PWR-LED beginnt zu leuchten. Die SYS-LED blinkt während des Systemtests und der Initialisierung, und sie leuchtet, wenn der Test
abgeschlossen und das System bereit ist.
Mire al panel frontal. La luz PWR se encenderá. La luz SYS parpadeará durante la prueba el sistema y la inicialización y luego se mantendrá encendida cuando el sistema esté listo.
Sur la face avant, le temoin lumineux PWR s'allume. Puis, le témoin lumineux SYS clignote pendant le test et l'initialisation du système et reste ensuite allumé quand le système est prêt.
Osservare il pannello anteriore. Si dovrà accendere la luce PWR, poi dovrà lampeggiare la luce SYS durante il test e l'inizializzazione del sistema, infine dovrà rimanere accesa quando il
sistema è pronto.
Проверьте индикацию на передней панели. Индикатор PWR должен гореть постоянно. Индикатор SYS мигает при инициализации системы, затем горит постоянно, что означает
готовность устройства к работе.
Titta på frontpanelen. Indikatorlampan PWR tänds. SYS-indikatorlampan blinkar under systemets test och initialisering, och lyser därefter stadigt när systemet är redo.
查看前面板。电源PWR指示灯亮起。系统测试及启动的过程中系统SYS 指示灯会跟着闪烁,然后等到系统准备妥当时则维持亮起的状态。
請看前面板。 電源PWR指示燈亮起。系統測試及啟動的過程中系統SYS指示燈會跟著閃爍,然後等到系統準備妥當時則維持亮起的狀態。
5
ENGLISH | DEUTSCH | ESPAÑOL | FRANÇAIS | ITALIANO | РУССКИЙ | SVENSKA | 简体中文 | 繁體中文
Important Information
Wichtige Information | Información importante
Information importante | Informazioni importanti
Важная информация | Viktig information
重要信息 | 重要資訊
Click Maintenance > Shutdown > Shutdown and wait for the device to shut down before removing the power.
Klicken Sie auf Maintenance > Shutdown > Shutdown (Wartung > Herunterfahren > Herunterfahren). Trennen Sie das Gerät erst von der Stromversorgung,
wenn es vollständig heruntergefahren ist.
Haga clic en Maintenance > Shutdown > Shutdown (Mantenimiento > Apagar > Apagar) y espere a que el dispositivo se apague antes de quitar la corriente.
Cliquez sur Maintenance > Shutdown > Shutdown (Maintenance > Arrêt > Arrêt) et attendez que votre appareil s'arrête avant de retirer l'alimentation.
Fare clic su Maintenance > Shutdown > Shutdown (Manutenzione > Spegnimento > Spegnimento) e attendere che il dispositivo si spenga prima di rimuovere
l'alimentazione.
Перед отключением электропитания устройства перейдите на страницу Shutdown веб-конфигуратора (Maintenance > Shutdown > Shutdown), нажмите
Shutdown и дождитесь завершения операции.
Klicka på Maintenance > Shutdown > Shutdown (underhåll – avstängning) och vänta tills enheten har stängts av innan du kopplar bort strömmen.
单击 Maintenance > Shutdown > Shutdown (维护 > 关闭 > 关闭),并等候设备关闭,然后再切断电源。
按一下 Maintenance > Shutdown > Shutdown (維護 > 關機 > 關機),並在移除電源之前先等候裝置關機。
Go to www.zyxel.com to view this product's documentation and certifications.
Gehen Sie auf www.zyxel.com, um die Dokumentationen und Zertifizierungen dieses Produktes anzusehen.
Visite www.zyxel.com para ver la documentación y certificaciones de este producto.
Pour une documentation complète et plus de renseignements sur les certifications, rendez-vous sur le site www.zyxel.com.
Visita www.zyxel.com per visualizzare la documentazione e le certificazioni del prodotto.
Для просмотра документации и сертификатов по данному продукту перейдите на страницу www.zyxel.com.
Besök www.zyxel.com för att ta del av denna produkts dokumentation och certifieringar.
请点击www.zyxel.com查找产品文档和认证信息。
請前往www.zyxel.com參閱此產品的相關文件及認證。
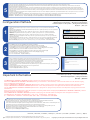
Configuration Methods
Launch your web browser and go to http://192.168.1.1 (UAG715) or http://172.16.0.1 (UAG2100, UAG4100 and
UAG5100) .
Starten Sie Ihren Webbrowser, und rufen Sie die Adresse http://192.168.1.1 (UAG715) oder http://172.16.0.1 (UAG2100,
UAG4100 und UAG5100) auf.
Abra el navegador y vaya a http://192.168.1.1 (UAG715) o http://172.16.0.1 (UAG2100, UAG4100 y UAG5100).
Lancez votre navigateur Web et allez à http://192.168.1.1 (UAG715) ou http://172.16.0.1 (UAG2100, UAG4100 et
UAG5100) .
Lanciare il browser per andare a http://192.168.1.1 (UAG715) oppure http://172.16.0.1 (UAG2100, UAG4100 e
UAG5100).
Запустите веб-браузер и перейдите на сайт http://192.168.1.1 (для UAG715) или http://172.16.0.1 (для UAG2100,
UAG4100 и UAG5100).
Starta webbläsaren och gå till http://192.168.1.1 (UAG715) eller http://172.16.0.1 (UAG2100, UAG4100 och UAG5100) .
打开 Web 浏览器并访问 http://192.168.1.1 (UAG715) 或 http://172.16.0.1 (UAG2100,UAG4100和UAG5100)。
啟動您的網路瀏覽器並前往 http://192.168.1.1 (UAG715) 或 http://172.16.0.1 (UAG2100,UAG4100和UAG5100)。
Use an installation setup wizard to connect to the Internet and register the UAG.
Stellen Sie mit dem Installationsassistenten eine Verbindung zum Internet her und registrieren Sie die UAG.
Utilice un asistente para la instalación para conectarse a Internet y registrar el UAG.
Utilisez l'assistant d'installation pour vous connecter à Internet et enregistrez l'UAG.
Utilizzare la configurazione guidata per connettersi a Internet e registrare l'UAG.
Мастер первоначальной настройки Installation Setup Wizard служит для подключения к Интернету и регистрации
устройства UAG.
Använd installationsguiden för att ansluta till Internet och registrera UAG.
利用安装设置向导来连接互联网,并注册UAG。
利用安裝設定精靈來連接網際網路,並註冊UAG。
Konfigurationsmethoden | Métodos de configuración
Méthodes de configuration | Metodi di configurazione
Рекомендации по настройке | Konfigurationsmetoder
配置方法 | 設定方式
Enter admin as the user name and 1234 as the password. Click Login.
Geben Sie als Benutzername admin und als Kennwort 1234 ein. Klicken Sie auf Login.
Escriba admin como nombre de usuario y 1234 como contraseña. Haga clic en Login (Entrar).
Tapez admin comme nom d'utilisateur et 1234 comme mot de passe. Cliquez sur Login (Ouvrir une session).
Immettere admin come nome utente e 1234 come password. Fare clic su Login.
Введите admin в поле User Name и 1234 в поле Password. Для продолжения нажмите Login.
Ange admin som användarnamn och 1234 som lösenord. Klicka på Login (inloggning).
输入admin作为用户名,而密码为1234点击"登录"。
輸入admin作為使用者名稱,而密碼為1234點擊"登入"。
1
2
3
-
 1
1
-
 2
2


ZyXEL UAG715 Guida Rapida
- Tipo
- Guida Rapida
in altre lingue
- English: ZyXEL UAG715 Quick start guide
- français: ZyXEL UAG715 Guide de démarrage rapide
Documenti correlati
-
ZyXEL UAG715 Guida Rapida
-
ZyXEL EOC350-TA Guida Rapida
-
ZyXEL VPN2S Guida Rapida
-
ZyXEL UAG50 Guida Rapida
-
ZyXEL 1050 Manuale utente
-
-
-
-
-

