Hoover OPH 6163D-86S Manuale utente
- Categoria
- Lavatrici
- Tipo
- Manuale utente

Mode d’emploi
Istruzioni per l’uso
Bedienungsanleitung
AAuuttoommaattiicckkáá pprraaöökkaa
User instructions
FR
IT
DE
CZ
EN
OPH 6163 D

2
FR
IT
T
OUS NOS
COMPLIMENTS
En achetant cet appareil
ménager Hoover,vous avez
démontré que vous
n’acceptez aucun
compromis: vous voulez
toujours ce qu’il y a de
mieux.
Hoover a le plaisir de vous
proposer cette nouvelle
machine à laver qui est le
résultat d’années de
recherches et d’études des
besoins du consommateur.
Vous avez fait le choix de la
qualité,de la fiabilité et de
l’efficacité.
Hoover vous propose une
large gamme d’appareils
électroménagers: machines
à laver la vaisselle,machines
à laver et sécher le linge,
cuisinières,fours à micro-
ondes,fours et tables de
cuisson,hottes,réfrigerateurs
et congélateurs.
Demandez à votre
Revendeur le catalogue
complet des produits
Hoover.
Nous vous prions de lire
attentivement les conseils
contenus dans ce livret.Il
contient d’importantes
indications concernant les
procédures d’installation,
d’emploi,d’entretien et
quelques suggestions utiles
en vue d’améliorer
l’utilisation de la machine à
laver.
Conservez avec soin ce
livret: vous pourrez le
consulter bien souvent.
Quand vous communiquez
avec Hoover,ou avec ses
centres d’assistance,veuillez
citer le Modèle,le n° et le
numéro G (éventuellement).
COMPLIMENTI
Con l’acquisto di questo
elettrodomestico Hoover;
Lei ha dimostrato di non
accettare compromessi:
Lei vuole il meglio.
Hoover é lieta di proporLe
questa nuova lavatrice
frutto di anni di ricerche e di
esperienze maturate sul
mercato,a contatto diretto
con i Consumatori.Lei ha
scelto la qualità,la durata e
le elevate prestazioni che
questa lavatrice Le offre.
Hoover Le propone inoltre
una vasta gamma di
elettrodomestici: lavatrici,
lavastoviglie,lavasciuga,
cucine,forni a microonde,
forni e piani di cottura,
frigoriferi e congelatori.
Chieda al Suo Rivenditore
il catalogo completo dei
prodotti Hoover
La preghiamo di leggere
attentamente le avvertenze
contenute nel presente
libretto in quanto forniscono
importanti indicazioni
riguardanti la sicurezza di
installazione,d’uso,di
manutenzione e alcuni utili
consigli per il migliore utilizzo
della lavatrice.
Conservi con cura questo
libretto per ogni ulteriore
consultazione.
Quando comunica con la
Hoover o con i suoi centri di
assistenza citi sempre il
Modello,il n° e il numero G
(se c’è).Praticamente tutto
ciò che é citato nel
riquadro.
3
DE
HERZLICHEN
GLÜCKWUNSCH!
Mit dem Kauf dieses Hoover
Elektrogerätes haben Sie
bewiesen,daß Sie stets nur
das Beste wählen - ohne
Kompromisse.
Hoover freut sich,Ihnen diese
neue Waschmaschine
anbieten zu können.Sie ist
das Ergebnis jahrelanger
Forschung und einer
Markterfahrung,die im
ständigen direkten Kontakt
mit dem Verbraucher gereift
ist.Sie haben mit diesem
Gerät Qualität,lange
Lebensdauer und einen
hohen Leistungsstandard
gewählt.
Hoover bietet Ihnen darüber
hinaus eine breite Palette
weiterer elektrischer
Haushaltsgeräte:
Waschmaschinen,
Geschirrspüler,
Wäschetrockner,
Elektroherde,
Mikrowellenherde,Backöfen
und Kochfelder,Kühl - und
Gefrierschränke.
Fragen Sie Ihren Fachhändler
nach dem kompletten
Hoover Katalog.
Lesen Sie bitte aufmerksam
die Anweisungen,die Sie in
diesem Heft finden.Sie finden
dort wichtige Hinweise zur
sicheren Installation,zur
Bedienung,zur Pflege und zur
optimalen Verwendung der
Waschmaschine.
Bewahren Sie das Heft für
eine spätere Nutzung gut auf.
Geben Sie bitte in allen
Mitteilungen an Hoover oder
an Ihre zuständige
Kundendienststelle stets das
Modell,die Nummer und die
G-Nummer (falls vorhanden),-
also praktisch alle Angaben
des Typenschildes -,an.
EN
OUR COMPLIMENTS
With the purchase of this
Hoover household
appliance,you have shown
that you will not accept
compromises: you want only
the best.
Hoover is happy to present
their new washing machine,
the result of years of
research and market
experience through direct
contact with Consumers.
You have chosen the quality,
durability and high
performance that this
washing machine offers.
Hoover is also able to offer a
vast range of other
household appliances:
washing machines,
dishwashers,washer-dryers,
cookers,microwave ovens.
Traditional ovens and hobs,
refrigerators and freezers.
Ask your local retailer for the
complete catalogue of
Hoover products.
Please read this booklet
carefully as it provides
important guide lines for
safe installation,use and
maintenance and some
useful advise for best results
when using your washing
machine.
Keep this booklet in a safe
place for further
consultation.
When contacting Hoover
or a Customer Services
Centre always refer to the
Model,No.,and G number
(if applicable of the
appliance see panel).
ÚVOD
VáÏen˘ zákazníku,
Dûkujeme Vám, Ïe jste si
zakoupil v˘robek spoleãnosti
Hoover.
Pfied prvním pouÏitím
v˘robku si pozornû pfieãtûte
pfiiloÏen˘ ãesk˘ návod , kter˘
firma Hoover dodává, a
dÛslednû se jím fiiìte.
Návod, kter˘ jste k v˘robku
obdrÏel, vychází z
v‰eobecné v˘robkové fiady
a z tohoto dÛvodu mÛÏe
dojít k situaci, Ïe nûkteré
funkce, ovládací prvky a
pfiíslu‰enství nejsou urãeny
pro Vበv˘robek. Dûkujeme
za pochopení.
CZ

FR
IT
INDEX
Avant-propos
Notes générales à la
livraison
Garantie
Mesures de sécurité
Données techniques
Mise en place,installation
Description des commandes
Tableau des programmes
Sélection
Tiroir à lessive
Le produit
Lavage
Nettoyage et entretien
Recherche des pannes
INDICE
Prefazione
Note generali alla consegna
Garanzia
Prescrizioni di sicurezza
Dati tecnici
Messa in opera,installazione
Descrizione comandi
Tabella programmi
Selezione
Cassetto detersivo
Il prodotto
Lavaggio
Pulizia e manutenzione
ordinaria
Ricerca guasti
CHAPITRE
CAPITOLO
KAPITEL
KKAAPPIITTOOLLAA
CHAPTER
1
2
3
4
5
6
7
8
9
10
11
12
13
4 5
DE
INHAL
T
Einleitung
Allgemeine Hinweise zur
Lieferung
Garantie
Sicherheitsvorschriften
Technische Daten
Inbetriebnahme,Installation
Bedienungsanleitung
Programmtabelle
Programm/Temperaturwahl
Waschmittelbehälter
Das Produkt
Waschen
Reinigung und allgemeine
Wartung
Fehlersuche
EN
INDEX
Introduction
General points on delivery
Guarantee
Safety Measures
Technical Data
Setting up and Installation
Control Description
Table of Programmes
Selection
Detergent drawer
The Product
Washing
Cleaning and routine
maintenance
Faults Search
OBSAH :
Úvod
Väeobecné pokyny püi
püevzetí vÿrobku
Záruka
Pokyny pro bezpeöné
pouïívání praöky
Technické údaje
Instalace
Popis ovládacího panelu
Tabulka programå
Volba programå
Zásobník pracích prostüedkå
Prádlo
Praní
Öiätëní a bëïná udrïba
Neï zavoláte odbornÿ servis
CZ

6
FR
IT
CHAPITRE 1
NO
TES GENERALES
A LA LIVRAISON
A la livraison veuillez,
contrôler que le matériel
suivant accompagne la
machine:
A) LIVRET
D’INSTRUCTIONS
B) ADRESSES DE SERVICE
APRES VENTE
C)CERTIFICAT DE
GARANTIE
D) BOUCHONS
E) COUDES POUR LE TUBE
DE VIDANGE
F) BAC POUR LES
PRODUITS LESSIVIELS
LIQUIDES OU POUR LES
PRODUITS
BLANCHISSANTS
LIQUIDES
LES CONSERVER
et contrôler que ce matériel
soit en bon état; si tel n’est
pas le cas appelez le centre
Hoover le plus proche.
CAPITOLO 1
NO
TE GENERALI
ALLA CONSEGNA
Alla consegna controlli che
con la macchina ci siano:
A) MANUALE
D’ISTRUZIONE
B) INDIRIZZI DI ASSISTENZA
C)CERTIFICATI DI
GARANZIA
D) TAPPI
E) CURVA PER TUBO
SCARICO
F) BACINELLA DETERSIVO
LIQUIDO O
CANDEGGIANTE
CONSERVATELI
e controlli che non abbia
subito danni durante il
trasporto,in caso contrario
chiami il centro Hoover più
vicino.
7
DE
KAPITEL 1
ALLGEMEINE
HINWEISE ZUR
LIEFERUNG
Kontrollieren Sie bei
Anlieferung des Gerätes,ob
das folgende Zubehör
mitgeliefert wurde:
A) BEDIENUNGSANLEI-
TUNG
B) VERZEICHNIS DER
KUNDENDIENST-
STELLEN
C)GARANTIESCHEIN
D)STÖPSEL
E) ROHRBOGEN FÜR
ABLAUFSCHLAUCH
F) EINSATZ FÜR
FLÜSSIGWASCHMITTEL
BZW.BLEICHMITTEL
BITTE GUT AUFBEWAHREN
Gerät bei Lieferung auf
eventuelle
Transportschäden
untersuchen und
gegebenenfalls beim
Händler reklamieren.
EN
CHAPTER 1
GENERAL POINTS
ON DELIVERY
On delivery,check that the
following are included with
the machine:
A) INSTRUCTION MANUAL
B) CUSTOMER SERVICE
ADDRESSES
C)GUARANTEE
CERTIFICATES
D) CAPS
E) BEND FOR OUTLET TUBE
F) LIQUID DETERGENT OR
LIQUID BLEACH
COMPARTMENT
(CONTAINER)
KEEP THEM IN A SAFE
PLACE
Check that the machine has
not incurred damage during
transport.If this is the case,
contact your nearest Hoover
Centre.
CZ
KKAAPPIITTOOLLAA 11
VÄEOBECNÉ
POKYNY PÜI
PÜEVZETÍ
VŸROBKU.
Püi dodání a püevzetí
vÿrobku zkontrolujte peölivë,
zda bylo dodáno následující
standardní püísluäenství:
A) NÁVOD K OBSLUZE
B) SEZNAM S ADRESAMI
ODBORNŸCH
SERVISNÍCH
STÜEDISEK
C) ZÁRUÖNÍ LIST
D) KRYCÍ ZÁTKA
E) DRÏÁK ODTOKOVÉ
HADICE, TVARU "U"
F) ZÁSOBNÍK PRACÍHO
PROST¤EDKU NEBO
BùLÍCÍHO PROST¤EDKU
ZZ PPRRAAKKTTIICCKKŸŸCCHH
DDÅÅVVOODDÅÅ PPÜÜÍÍSSLLUUÄÄEENNSSTTVVÍÍ
UUCCHHOOVVÁÁVVEEJJTTEE NNAA
BBEEZZPPEEÖÖNNÉÉMM MMÍÍSSTTËË..
Püi püevzetí vybalenou
praöku peölivë zkontrolujte,
zda nebyla bëhem
püepravy jakkoliv
poäkozena. Pokud ano,
reklamujte äkody u Vaäeho
prodejce.
AB
C
E
F
D

8
DE
KAPITEL 2
GARANTIE
Der beiliegende
Garantieschein und die
Original-Kaufrechnung
ermöglicht die kostenlose
Inanspruchnahme des
technischen Kundendienstes.
Die Garantiezeit beträgt zwei
Jahre ab Kaufdatum.
IM SERVICEFALL WENDEN
SIE SICH BITTE AN UNSEREN
AUTORISIERTEN
WERKSKUNDENDIENST. BITTE
WÄHLEN
SIE FÜR DEUTSCHLAND AUS
DEM FESTNETZ DIE
BUNDESWEIT EINHEITLICHE
SERVICENUMMER
01805 - 625562 (12 CT./
MIN), DIE SIE AUTOMATISCH
MIT DEM ZUSTÄNDIGEN
GIAS-WERKSKUNDENDIENST
IN IHRER NÄHE VERBINDET.
9
FR
CHAPITRE 2
GARANTIE
L’ a ppareil est accompagné
par un certificat de
gàrantie.
GIAS SERVICE
0820.220.224
0848.780.780
☎
A
CH
EN
CHAPTER 2
GU
ARANTEE
The appliance is supplied
with a guarantee certificate
which allows free use of the
Technical Assistance Service.
KKAAPPIITTOOLLAA 22
ZÁRUKA
Pro poskytnutí kvalitního
záruãního a pozáruãního
servisu uschovejte v‰echny
doklady o koupi a
pfiípadn˘ch opravách
v˘robku . Doporuãujeme
Vám po dobu záruãní doby
uchovat pÛvodní obaly k
v˘robku. NeÏ budete
kontaktovat servisní
stfiedisko, peãlivû
prostudujte záruãní
podmínky v záruãním listû.
Obracejte se pouze na
autorizovaná servisní
stfiediska.
CZ
IT
CAPITOLO 2
Servizio Assistenza Clienti
CERTIFICATO DI GARANZIA CONVENZIONALE: cosa fare?
Il Suo prodotto è garantito, alle condizioni e nei termini riportati sul certificato inserito nel
prodotto ed in base alle previsioni del decreto legislativo 24/02, nonché del decreto
legislativo 6 settembre 2005, n. 206, per un periodo di 24 mesi decorrenti dalla data di
consegna del bene.
Così come riportato nei testi dei Decreti Legislativi citati, il certificato di garanzia dovrà
essere da Lei conservato, debitamente compilato, per essere mostrato al Servizio
Assistenza Tecnica Autorizzato, in caso di necessità, unitamente ad un documento
fiscalmente valido rilasciato dal rivenditore al momento dell’acquisto (bolla di consegna,
fattura, scontrino fiscale, altro) sul quale siano indicati il nominativo del rivenditore, la
data di consegna, gli estremi identificativi del prodotto ed il prezzo di cessione.
Resta pure inteso che, salvo prova contraria, poiché si presume che i difetti di
conformità che si manifestano entro sei mesi dalla consegna del bene esistessero già a
tale data, a meno che tale ipotesi sia incompatibile con la natura del bene o con la
natura del difetto di conformità, il Servizio di Assistenza Tecnica Autorizzato Gias,
verificato il diritto all’intervento, lo effettuerà senza addebitare il diritto fisso di intervento
a domicilio, la manodopera ed i ricambi. Per contro, nel successivo periodo di diciotto
mesi di vigenza della garanzia, sarà invece onere del consumatore che intenda fruire
dei rimedi accordati dalla garanzia stessa provare l’esistenza del difetto di conformità
del bene sin dal momento della consegna; nel caso in cui il consumatore non fosse in
grado di fornire detta prova, non potranno essere applicate le condizioni di garanzia
previste e pertanto il Servizio di Assistenza Tecnica Autorizzato Gias effettuerà
l’intervento addebitando al consumatore tutti i costi relativi.
ESTENSIONE DELLA GARANZIA FINO A 5 ANNI: come?
Le ricordiamo inoltre che sullo stesso certificato di garanzia convenzionale Lei troverà le
informazioni ed i documenti necessari per prolungare la garanzia dell’apparecchio sino
a 5 anni e così, in caso di guasto, non pagare il diritto fisso di intervento a domicilio, la
manodopera ed i ricambi.
Per qualsiasi informazione necessitasse, La preghiamo rivolgersi al numero telefonico
del Servizio Clienti 199 12 13 14.
ANOMALIE E MALFUNZIONAMENTI: a chi rivolgersi ?
Per qualsiasi necessità il centro assistenza autorizzato è a Sua completa disposizione
per fornirLe i chiarimenti necessari; comunque qualora il Suo prodotto presenti
anomalie o mal funzionamenti, prima di rivolgersi al Servizio Assistenza Autorizzato,
consigliamo vivamente di effettuare i controlli indicati nel capitolo "Ricerca guasti".
UN SOLO NUMERO TELEFONICO PER OTTENERE ASSISTENZA.
Qualora il problema dovesse persistere, componendo il “Numero Utile” sotto indicato,
sarà messo in contatto direttamente con il Servizio Assistenza Tecnica Autorizzato che
opera nella Sua zona di residenza.
Attenzione:
la chiamata è a pagamento; il costo verrà comunicato, tramite messaggio vocale, dal
Servizio clienti dell’operatore telefonico utilizzato. Dettagli sono presenti sul sito internet
www.hoover.it.
MATRICOLA DEL PRODOTTO. Dove si trova?
E’ indispensabile che comunichi al Servizio Assistenza Tecnica Autorizzato la sigla del
prodotto ed il numero di matricola (16 caratteri che iniziano con la cifra 3) che troverà
sul certificato di garanzia oppure sulla targa matricola posta sul frontale della
lavabiancheria (zona oblò). In questo modo Lei potrà contribuire ad evitare trasferte
inutili del tecnico, risparmiando oltretutto i relativi costi.

10
FR
IT
CAPITOLO 3
PRESCRIZIONI DI
SICUREZZA
ATTENZIONE:
PER QUALSIASI
INTERVENTO DI PULIZIA
E MANUTENZIONE
DELLA LAVATRICE
●
Tolga la spina.
●
Chiuda il rubinetto
dell’acqua.
●
La Hoover correda tutte le
sue macchine di messa a
terra.
Si assicuri che l’impianto
elettrico sia provvisto di
messa a terra in caso
contrario richieda
l’intervento di personale
qualificato.
Apparecchio
conforme alle Direttive
Europee 73/23/CEE e
89/336/CEE ,sostituite
rispettivamente da
2006/95/CE e 2004/108/CE ,
e successive modifiche.
●
Non tocchi l’apparecchio
con mani,piedi bagnati o
umidi.
●
Non usi l’apparecchio a
piedi nudi.
●
Non usi,se non con
particolare cautela,
prolunghe in locali adibiti a
bagno o doccia.
ATTENZIONE:
DURANTE IL LAVAGGIO
L’ACQUA PUO’ ANDARE
A 90°C.
●
Prima di aprire l’oblò si
assicuri che non vi sia
acqua nel cestello.
CHAPITRE 3
MESURES DE
SECURITE
ATTENTION:
EN CAS
D’INTERVENTION DE
NETTOYAGE ET
D’ENTRETIEN
● Débrancher la prise de
courant.
● Fermer le robinet
d’alimentation d’eau.
● Toutes les machines
Hoover sont pourvues de
mise à la terre.
Vérifier que l’installation
électrique soit alimentée par
une prise de terre,en cas
contraire demander
l’intervention du personnel
qualifié.
Produit compatible
avec les Directives
Européennes 73/23/EEC et
89/336/EEC,remplacé par
2006/95/EC et 2004/108/EC,
et les amendements
successifs.
● Ne pas toucher l’appareil
pieds nus.
● Autant que possible éviter
l’usage de rallonges dans les
salles de bains ou les
douches.
ATTENTION:
PENDANT LE LAVAGE
L’EAU PEUT ATTEINDRE
90°C.
● Avant d’ouvrir le hublot
vérifier que le tambour soit
sans eau.
11
KAPITEL 3
SICHERHEITS-
VORSCHRIFTEN
ZUR BEACHTUNG:
BEI REINIGUNG UND
WARTUNG DES
GERÄTES
● Netzstecker ziehen.
● Wasserzufuhr sperren.
● Alle Hoover Geräte sind
geerdet.
Versichern Sie sich,daß Ihr
Stromnetz geerdet ist.Sollte
dies nicht der Fall sein,rufen
Sie einen Fachmann.
Das Gerät entspricht
den Europäischen Richtlinien
73/23/CEE und 89/336/CEE,
ersetzt durch 2006/95/CE
bzw.2004/108/CE ,und deren
nachträglichen
Veränderungen.
● Benutzen Sie nach
Mögkichkeit keine
Verlängerungskabel in
Feuchträumen.
ACHTUNG:
JE NACH
WASCHPROGRAMM
KANN SICH DAS
WASSER BIS AUF 90° C
AUFHEIZEN.
● Vor dem Öffnen des
Bullauges sicherstellen,daß
kein Wasser mehr in der
Trommel steht.
DE
EN
CHAPTER 3
SAFETY MEASURES
IMPORTANT:
FOR ALL CLEANING
AND MAINTENANCE
WORK
● Remove the plug
● Turn off the water inlet tap.
● All Hoover appliances are
earthed.Ensure that the
main electricity circuit is
earthed.Contact a qualified
electrician if this is not the
case.
Appliance complies
with European Directives
73/23/EEC and 89/336/EEC,
replaced by 2006/95/EC and
2004/108/EC,and
subsequent amendments.
● Do not touch the
appliance with wet or damp
hands or feet.
● Do not use the appliance
when bare-footed.
● Extreme care should be
taken if extension leads are
used in bathrooms or shower
rooms.Avoid this where
possible.
WARNING: DURING THE
WASHING CYCLE, THE
WATER CAN REACH A
TEMPERATURE OF 90°C.
● Before opening the
washing machine door,
ensure that there is no water
in the drum.
CZ
KKAAPPIITTOOLLAA 33
POKYNY PRO
BEZPEÖNÉ
POUÏÍVÁN
Í PRAÖKY
PPOOZZOORR!! NNÍÍÏÏEE UUVVEEDDEENNÉÉ
PPOOKKYYNNYY PPLLAATTÍÍ PPRROO
JJAAKKŸŸKKOOLLIIVV DDRRUUHH
ÖÖIIÄÄTTËËNNÍÍ AA ÚÚDDRRÏÏBBYY
● Vytáhnëte vidlici el. äñåry
ze zásuvky el. sítë
● Uzavüete kohout püívodu
vody
● Väechny el.spotüebiöe
zn.Hoover jsou uemnëny.
Zajistëte, aby napájecí el.sít’
umoïñovala ochranu
uzemnëním.
V püípadë pochybnosti
nechte provëüit pracovníkem
odborné firmy.
Spotfiebiã odpovídá
evropsk˘m smûrnicím
73/23/CEE (Bezpeãnostní
smûrnice – nízké napûtí) a
89/336/CEE (Smûrnice pro
elektromagnetickou
kompatibilitu), které byli
nahrazené smûrnicemi
2006/95/CE a 2004/108/CE a
jejich pozdûj‰ími zmûnami.
● Nedotÿkejte se praöky
mokrÿma öi vlhkÿma rukama
nebo nohama
● Nepouïívejte praöku jste-li
bosí.
● Nejvyääí pozornost vënujte
pouïívání råznÿch adaptérå,
rozdvojek a prodluïovacích
äñår v místnostech jako jsou
koupelny nebo v místnostech
se sprchou.
JJee--llii ttoo mmooïïnnéé,, vvyyhhnnëëttee ssee
jjeejjiicchh ppoouuïïíívváánníí vvååbbeecc..
UUPPOOZZOORRNNËËNNÍÍ::
BBËËHHEEMM CCYYKKLLUU PPRRAANNÍÍ
MMÅÅÏÏEE VVOODDAA
DDOOSSÁÁHHNNOOUUTT TTEEPPLLOOTTYY
AAÏÏ 9900°°CC
● Püed otevüením praöky se
ujistëte, ïe v bubnu není
ïádná voda

12 13
FR
IT
● Ne pas utiliser
d’adaptateurs ou de prises
multiples.
● Cet appareil n’est pas
destiné à être utilisé par des
personnes (notamment les
enfants) incapables,
irresponsables ou sans
connaissance sur l’utilisation
du produit,à moins qu’elles ne
soient surveillées,ou instruites
sur l’utilisation de l’appareil,
par une personne responsable
de leur sécurité.
Surveillez les enfants pour être
sûr qu’ils ne jouent pas avec
l’appareil.
● Pour débrancher la prise,ne
pas tirer sur le câble.
● Ne pas laisser la machine
exposée aux agents
atmosphériques (pluie,soleil,
etc...).
● En cas de déménagement
ne jamais soulever la machine
par les boutons ou par le tiroir
des produits lessiviels.
● Pendant le transport ne pas
appuyer le hublot sur le
chariot.
Important!
Les ouvertures à la base de
l’appareil ne doivent en
aucun cas être obstruées par
des tapis,moquette ou autres
objets.
● 2 personnes pour soulever la
machine (voir dessin).
● En cas de panne et/ou de
mauvais fonctionnement
éteindre la machine,fermer le
robinet d’alimentation d’eau
et ne pas toucher à la
machine.Pour toute
réparation adressez-vous
exclusivement à un centre
d’assistance technique Hoover
en demandant des pièces de
rechange certifiées
constructeur.Le fait de ne pas
respecter les indications
susmentionnées peut
compromettre la sécurité de
l’appareil.
● Si le remplacement du
câble d’alimentation s’avère
nécessaire,il devra être
remplacé par un câble
special fourni par le service
après-vente.
●
Non usi adattatori o spine
multiple
●
Questo apparecchio non è
destinato ad essere usato da
bambini e persone incapaci o
inesperte all'uso del prodotto,a
meno che non vengano
sorvegliate o istruite riguardo
all'uso dell'apparecchio da
una persona responsabile
della loro sicurezza.
Sorvegliare i bambini in modo
tale da assicurarsi che non
giochino con l'apparecchio.
●
Non tiri il cavo di
alimentazione,o
l’apparecchio stesso,per
staccare la spina dalla presa
di corrente.
●
Non lasci esposto
l’apparecchio ad agenti
atmosferici (pioggia,sole,
ecc...).
●
In caso di trasloco non la
sollevi mai dalle manopole o
dal cassetto del detersivo.
●
Durante il trasporto non
appoggi mai l’oblò al
carrello.
Importante!
Nel caso si installi
l’apparecchio su un
pavimento ricoperto da
tappeti o con moquette,si
deve fare attenzione che le
aperture di ventilazione alla
base dell’apparecchio non
vengano ostruite.
●
Sollevarla in due persone
come illustrato in figura.
●
In caso di guasto e/o di
cattivo funzionamento
dell’apparecchio,lo spenga,
chiuda il rubinetto
dell’acqua e non
manometta
l’elettrodomestico.Per
l’eventuale riparazione si
rivolga solamente a un
centro di Assistenza Tecnica
Hoover e richieda l’utilizzo di
ricambi originali.
Il mancato rispetto di quanto
sopra può compromettere la
sicurezza dell’apparecchio.
●
Se il cavo di alimentazione
risultasse danneggiato,dovrà
essere sostituito da un cavo
speciale disponibile presso il
servizio di Assistenza Tecnica.
DE
● Gerät nicht an Adapter oder
Mehrfachsteckdosen anschließen.
● Kinder oder Personen mit
eingeschränkten körperlichen
oder geistigen Fähigkeiten oder
mit ungenügenden Kenntnissen
und Erfahrung dürfen nur dann
das Gerät benutzen,wenn sie
beaufsichtigt werden oder
hinreichend Anweisungen zur
sicheren Behandlung des Gerätes
durch eine für ihre Sicherheit
verantwortliche Person erhalten
haben.
Kinder sind zu beaufsichtigen,um
sicher zu stellen,dass sie nicht mit
dem Gerät spielen.
● Ziehen Sie den Stecker immer
am Stecker selbst aus der
Steckdose.
● Setzen Sie das Gerät keinen
Witterungseinflüssen (Regen,
Sonne usw.) aus.
● Das Gerät niemals an den
Schaltknöpfen oder am
Waschmittelbehälter anheben.
● Während des Transportes mit
einer Sackkarre das Gerät nicht
auf das Bullauge lehnen.
Wichtig!
Falls Sie das Gerät auf einen
Teppich oder Teppichboden
aufstellen,achten Sie darauf,daß
die Lufteinlässe am Boden des
Gerätes nicht verstopft werden.
● Stets,wie auf der Zeichnung
dargestellt,zu zweit anheben.
● Bei eventuellen Defekten und
Fehlfunktionen das Gerät
abschalten,die Wasserzufuhr
unterbrechen und die
Waschmaschine nicht gewaltsam
öffnen.Bei anfallenden
Reparaturen wenden Sie sich bitte
ausschließlich an die
Kundendienststelle der Firma
Hoover und bestehen Sie auf die
Verwendung von
Originalersatzteilen.Die
Nichtbeachtung der o.a.
Vorschriften kann zur
Beeinträchtigung der Geräte-
sicherheit führen.
● Wenn das Gerät einmal
ausgedient hat,entsorgen Sie es
bitte ordnungsgemäß über Ihren
Fachhändler oder die
kommunalen
Entsorgungseinrichtungen.
● Sollte das Netzkabel
beschädigt sein,muß dieses mit
dem speziellen Netzkabel ersetzt
werden,das vom
Gias-Kundendienst zur Verfügung
gestellt werden kann.
EN
● Do not use adaptors or
multiple plugs.
● This appliance is not
intended for use by persons
(including children) with
reduced physical,sensory or
mental capabilities,or lack of
experience and knowledge,
unless they have been given
supervision or instruction
concerning use of the
appliance by a person
responsible for their safety.
Children should be supervised
to ensure that they do not
play with the appliance.
● Do not pull the mains lead
or the appliance itself to
remove the plug from the
socket.
● Do not leave the appliance
exposed to atmospheric
agents (rain,sun etc.)
● In the case of removal,
never lift the appliance by
the knobs or detersive drawer.
● During transportation
do not lean the door against
the trolley.
Important!
When the appliance location
is on carpet floors,attention
must be paid so as to ensure
that there is no obstruction to
the bottom vents.
● Lift the appliance in pairs as
illustrated in the diagram.
● In the case of failure
and/or incorrect operation,
turn the washing machine off,
close the water inlet tap and
do not tamper with the
appliance.Contact a Hoover
Technical Assistance Centre
for any repairs and ask for
original Hoover spare parts.
Avoidance of these norms
may compromise the safety
of the appliance.
● Should the supply cord
(mains cable) be demaged,
this is to be replaced by a
specific cable available from
the after sales service centre.
● Nepouïívejte adaptéry
nebo vícenásobné zásuvky.
● Tento spotfiebiã není urãen
pro pouÏití osobami (vãetnû
dûtí) s omezen˘mi fyzick˘mi ,
senzorick˘mi nebo
mentálními schopnostmi,
nebo bez zku‰eností a
znalostí spotfiebiãe, pouze
pokud nejsou pod
dohledem nebo pouãené
osobou odpovûdnou za
jejich bezpeãnost.
ZabraÀte dûtem, aby se
hrály se spotfiebiãem.
● Püi odpojování ze sítë
netahejte pouze za sít’ovou
äñåru, ale vytáhnëte
záströku ze zásuvky
● Nenechávejte püístroj
vystaven atmosférickÿm
vlivåm (déät’, slunce atd.)
● Püi püemíst’ování püístroje
jej nezvedejte za ovládací
voliöe nebo zásuvku na
práäek.
● Püi püevozu neopírejte
praöku dvíüky o vozík.
DDåålleeïïiittéé!!
Pokud umístíte püístroj na
koberec, zkontrolujte, zda
nejsou ohroïeny ventily ve
spodní öásti praöky.
● Püístroj zvedejte v páru
podle obr.
● V püípadë poruchy nebo
nesprávné öinnosti vypnëte
praöku, uzavüete püívod
vody a neodbornë s
püístrojem nemanipulujte.
Kontaktujte Servisní centrum
Hoover a ïádejte originální
náhradní díly. Nedodrïení
tëchto podmínek by mohlo
ohrozit bezpeönÿ provoz
spotüebiöe.
● Pokud by doälo k
poäkození püívodní äñåry,
musí bÿt nahrazena jinou
originální dodávanou
servisními centry Hoover.
CZ

14
FR
IT EN
CHAPTER 4CAPITOLO 4CHAPITRE 4
15
CAPACITA’DI BIANCHERIA
ASCIUTTA
ACQUA LIVELLO NORMALE
POTENZA
ASSORBITA
CONSUMO DI ENERGIA
(PROG.90°C)
AMPERE DEL
FUSIBILE DELLA RETE
GIRI DI
CENTRIFUGA (giri/min.)
PRESSIONE NELL’IMPIANTO
IDRAULICO
TENSIONE
CAPACITE DE LINGE
SEC
EAU NIVEAU NORMAL
PUISSANCE
ABSORBEE
CONSOMMATION ENERGIE
(PROG.90°C)
AMPERAGE
ESSORAGE
(Tours/min.)
PRESSION DANS
L’INSTALLATION HYDRAULIQUE
TENSION
DATI TECNICI
DONNÉES TECHNIQUES
WASSERDRUCK
DE
KAPITEL 4
FASSUNGSVERMÖGEN
TROCKENWÄSCHE
WASSERSTAND NORMAL.
GESAMTANSCHLUßWERT
ENERGIEVERBRAUCH
(PROGR.90°C)
ABSICHERUNG
SCHLEUDERDREHZAHL
(U/min.)
SPANNUNG
TECHNISCHE DATEN
MAXIMUM WASH
LOAD DRY
NORMAL WATER LEVEL
POWER INPUT
ENERGY CONSUMPTION
(PROG.90°C)
POWER CURRENT FUSE
AMP
SPIN
r.p.m.
WATER PRESSURE
SUPPLY VOLTAGE
TECHNICAL DATA
kg 9
6÷15
2150
1,8
10
min. 0,05
max. 0,8
230
l
W
kWh
A
VEDERE TARGHETTA DATI
CONSULTER LA PLAQUE TECHNIQUE
SIEHE MATRIKELSCHILD
VVIIZZ ÄÄTTÍÍTTEEKK SSEE ZZÁÁKKLLAADDNNÍÍMMII ÚÚDDAAJJII
SSEEEE RRAATTIINNGG PPLLAATTEE
MPa
V
KKAAPPIITTOOLLAA 44
CZ
MAX. HMOTNOST SUCHÉHO
PRÁDLA
NORMÁLNÍ HLADINA VODY
MAX.PÜÍKON
SPOTÜEBA ENERGIE PÜI
PROG.90°C
JIÄTËNÍ
OTÁÖKY PÜI ODSTÜEDËNÍ
(ot./min.)
TLAK VODY
NAPÁJECÍ NAPËTÍ
TECHNICKÉ ÚDAJE
8
54
cm
60
cm
6
52
cm
52 cm
60 cm
85
cm
54 cm
60 cm
85
cm
60 cm
60 cm
85
cm

16
FR
IT
CAPITOLO 5
MESSA IN OPERA
INSTALLAZIONE
Porti la macchina vicino al
luogo di utilizzo senza il
basamento dell’imballo.
Tagliare le fascette
fermatubo,prestando
attenzione di non
danneggiare il tubo e il
cavo elettrico
Svitare le 4 viti (A) sul lato
posteriore e rimuovere i 4
distanziali (B).
Richiudere i 4 fori utilizzando
i tappi contenuti nella busta
istruzione.
ATTENZIONE:
NON LASCI ALLA
PORTATA DI BAMBINI
GLI ELEMENTI
DELL’IMBALLAGGIO IN
QUANTO POTENZIALI
FONTI DI PERICOLO.
CHAPITRE 5
MISE EN PLA
CE
INSTALLATION
Placer la machine près du
lieu d’utilisation sans la base
d’emballage.
Couper avec précaution le
cordon qui maintient le
tuyeau d’évacuation et le
cable d’alimentation
Enlever les 4 vis de fixation
indiquées en (A) et enlever
les espaces indiqués en (B)
Couvrir les quatre trous en
utilisant les capuchons
prévus à cet effet dans le
sachet où se trouve la
notice
ATTENTION:
NE PAS LAISSER À LA
PORTÉE DES ENFANTS
DES ELEMENTS
D’EMBALLAGE QUI
PEUVENT CAUSER DES
RISQUES.
17
DE
KAPITEL 5
INBETRIEBNAHME
INSTALLATION
Gerät ohne
Verpackungsunterteil in die
Nähe des Aufstellungsortes
bringen.
Schneiden Sie das
Kunststoffband der
Schlauchbefestigung durch.
Achten Sie darauf,den
Schlauch und das Kabel
nicht zu beschädigen.
Schrauben Sie die 4
Schrauben (A) auf der
Rückseite ab und entfernen
Sie die 4 Distanzstücke (B).
Schließen Sie die 4
Öffnungen mit den im
Beipack mitgelieferten
Stöpseln.
ACHTUNG:
DIE VERPACKUNG IST IN
DEN HÄNDEN VON
KINDERN EINE
GEFAHRENQUELLE. BITTE
ENTSORGEN SIE DAS
VERPACKUNGS-
MATERIAL
ORDNUNGSGEMÄß.
EN
CHAPTER 5
SETTING UP
INSTALLATION
Move the machine near its
permanent position without
the packaging base.
Carefully cut the securing
strap that holds the main
cord and the drain hose.
Remove the 4 fixing screws
marked (A) and remove the
4 spacers marked (B)
Cover the 4 holes using the
caps provided in the
instruction booklet pack.
WARNING:
DO NOT LEAVE THE
PACKAGING IN THE
REACH OF CHILDREN
AS IT IS A POTENTIAL
SOURCE OF DANGER.
CZ
KKAAPPIITTOOLLAA 55
UVEDENÍ DO
PROVOZU
INSTALACE
Odstrañte ochrannou
podloïku z pënového
polystyrénu (souöást obalu)
a praöku umístëte nedaleko
místa trvalého pouïívání.
Odstfiihnûte pásku, která drÏí
hadici a dejte pozor abyste
nepo‰kodili hadici a
elektrick˘ kabel.
Od‰roubujte 4 ‰rouby (A) na
zadní stranû a odstraÀte 4
distanãní vloÏky.
Uzavfiete 4 otvory pouÏitím 4
krytek které jsou uloÏeny v
sáãku s návodem k pouÏití.
PPOOZZOORR::
OODDSSTTRRAAÑÑTTEE ZZBBYYTTKKYY
OOBBAALLUU ZZ DDOOSSAAHHUU DDËËTTÍÍ,,
MMOOHHLLYY BBYY BBŸŸTT
ZZDDRROOJJEEMM NNEEBBEEZZPPEEÖÖÍÍ..

18
min 50 cm
max 85 cm
+2,6 mt max
max 100 cm
min 4 cm
min 50 cm
max 85 cm
+2,6 mt max
max 100 cm
min 4 cm
19
EN
Fix the sheet of corrugated
material on the bottom as
shown in picture.
Connect the fill hose
to the tap.
The appliance must be
connected to the water
mains using new hose-sets.
The old hose-sets should not
be reused.
IMPORTANT:
DO NOT TURN THE TAP
ON AT THIS TIME.
Position the washing
machine next to the wall.
Hook the outlet tube to the
edge of the bath tub,
paying attention that there
are no bends or
contractions along the tube.
It is better to connect the
discharge hose to a fixed
outlet of a diameter greater
than that of the outlet tube
and at a height of min.50
cm.If is necessary to use the
plastic sleeve supplied.
Appliquer la feuille
supplémentaire sur le fond
comme dans la figure.
Raccorder le tuyau d’arrivée
d’eau au robinet.
L'appareil doit être relié à
l'arrivée d'eau exlusivement
avec les tuyaux fournis .
Ne pas réutiliser les anciens
tuyaux.
ATTENTION:
NE PAS OUVRIR LE ROBINET
Approcher la machine contre
le mur en faisant attention à
ce que le tuyau n’ait ni
coudes ni étranglements.
Raccorder le tuyau de
vidange au rebord de la
baignoire ou,mieux encore,à
un dispositif fixe d’évacuation,
hauteur mini.50 cm,et de
diamètre supérieur au tuyau
de la machine à laver.
En cas de besoin,utiliser le
coude rigide livré avec la
machine.
FR
IT
Applichi il foglio di polionda
sul fondo come mostrato in
figura.
Allacci il tubo dell’acqua al
rubinetto.
L’ a pparecchio deve essere
connesso alla rete idrica
solo con i nuovi tubi di
carico forniti in dotazione.I
vecchi tubi di carico non
devono essere riutilizzati.
ATTENZIONE:
NON APRA IL RUBINETTO
Accosti la lavatrice al muro
facendo attenzione che
non vi siano curve o
strozzature,allacci il tubo di
scarico al bordo della
vasca.
o meglio a uno scarico fisso;
altezza minima 50 cm,di
diametro superiore al tubo
della lavatrice.
In caso di necessità utilizzare
la curva rigida in dotazione.
DE
Befestigen Sie die gewellte
Bodenplatte wie in der
Abbildung dargestellt.
Den Zulaufschlauch an den
Wasserhahn anschließen.
Das Gerät muß an die
Wasserversorgung mit neuen
Schläuchen angeschlossen
werden.
Alte Schläuche dürfen nicht
wiederverwendet werden.
ACHTUNG:
WASSERHAHN NOCH NICHT
ÖFFNEN.
Die Waschmaschine an die
Wand rücken,darauf achten,
daß dabei der Schlauch nicht
verkrümmt oder eingeengt
wird.
Ablaufschlauch am
Wannenrand
befestigen,oder an einem
festen Abfluß von mindestens
50 cm Höhe anbringen,dessen
Durchmesser größer ist als der
des
Waschmaschinenschlauchs.
Falls erforderlich den
mitgelieferten starren
Rohrbogen benutzen.
Upevnëte ke dnu praöky
püiloïenÿ protihlukovÿ ätít z
vlnitého materiálu podle
obrázku.
Hadici püívodu vody
püípevnëte k vodovodnímu
kohoutu koncem s pojistnÿm
ventilem (Water stop system).
Spotüebiö musí bÿt püipojen k
püívodu vody novou hadicí,
která je souöástí vÿbavy
spotüebiöe. Staré hadice
nesmëjí bÿt znovu pouïívány.
DDÅÅLLEEÏÏIITTÉÉ::
VV TTÉÉTTOO FFÁÁZZII NNEEPPOOUUÄÄTTËËJJTTEE
VVOODDUU..
Opüete konec odtokové
hadice o vanu a dbejte na
to, aby na hadici nevznikly
zlomy nebo ohnutí. Odtoková
hadice má bÿt umístëna ve
vÿäce min. 50 cm.
Je lepäí pouïijete-li pevného
odpadu o vëtäím pråmëru,
neï je pråmër odtokové
hadice, tím umoïníte
pråchod vzduchu.
Pokud je potüeba, pouïijte
pevnÿ U-drïák k upevnëní
hadice.
Püípadné prodlouïení
odtokové hadice måïe zavinit
poruchy v chodu odtokového
öerpadla a filtru, zejména v
püípadë, je-li deläí neï 1 m.
CZ

20
21
FR
IT
Mettre la machine à niveau
en reglant les 4 pieds:
a) Tourner dans le sens des
aiguilles d’une montre
l’écrou de façon à
dévérouiller la vis du pied.
b) Tourner le pied et le faire
monter ou descendre
jusqu’à obtenir une parfaite
adhérence au sol.
c) Enfin bloquer le pied en
revissant l’écrou dans le sens
inverse des aiguilles d’une
montre et le faire adhérer au
fond de la machine.
Vérifier que la manette soit
sur la position “OFF”et que le
hublot soit fermé.
Brancher la prise.
ATTENTION:
Au cas où il serait nécessaire
de remplacer le cable
d’alimentation,assurez vous
de respecter les codes-
couleur suivants dans le
branchement de chacun
des fils:
BLEU - NEUTRE (N)
MARRON - PHASE (L)
VERT-JAUNE - TERRE ( )
Une fois l'appareil installé,la
prise électrique doit rester
accessible.
Livelli la macchina con i 4
piedini:
a) Girare in senso orario il
dado per sbloccare la vite
del piedino.
b) Ruotare il piedino e farlo
scendere o salire fino ad
ottenere la perfetta
aderenza al suolo.
c) Bloccare infine il piedino
riavvitando il dado in senso
antiorario,fino a farlo aderire
al fondo della lavatrice.
Si assicuri che la manopola
sia in posizione “OFF”e l’oblò
sia chiuso.
Inserisca la spina.
ATTENZIONE:
nel caso si renda necessario
sostituire il cavo di
alimentazione,assicurarsi di
rispettare il seguente codice-
colore durante il
collegamento dei singoli fili:
BLU - NEUTRO (N)
MARRONE - FASE (L)
GIALLO-VERDE - TERRA ( )
L’ a pparecchio deve essere
posto in modo che la spina
sia accessibile ad
installazione avvenuta.
DE
Richten Sie das Gerät mit
den 4 Verstellfüßen
waagerecht aus:
a) Kontermuttern im
Uhrzeigersinn lösen.
b) Standfuß einregulieren,bis
das Gerät genau
ausgerichtet ist (möglichst
mit der Wasserwaage
justieren!).
c) Kontermuttern (gegen
den Uhrzeigersinn) festziehen.
Wichtig: Sollte das Gerät auf
einen Sockel aufgestellt
werden,ist es durch eine
Sockelbefestigung zu sichern.
Erkundigen Sie sich bitte
hierfür im Fachhandel.
Der Hersteller haftet nicht für
unsachgemäße Aufstellung
und Installation.
Sicherstellen,daß der
Schalter auf “OFF”steht,und
das Bullauge geschlossen ist.
Stecker einstecken.
ACHTUNG:
Falls das Netzkabel
ausgetauscht werden sollte,
achten Sie beim Anschluss
der einzelnen Kabel
unbedingt auf die folgende
Farbenbelegung:
BLAU - NULLLEITER (N)
BRAUN - PHASE (L)
GELB-GRÜN - ERDE ( )
Nach der Installation muß der
Anschluß zugänglich sein.
EN
Use the 4 feet to level the
machine with the floor:
a) Turn the nut clockwise to
release the screw adjuster of
the foot.
b) Rotate foot to raise or
lower it until it stands firmly on
the ground.
c) Lock the foot in position
by turning the nut anti-
clockwise until it comes up
against the bottom of the
machine.
Ensure that the knob is on the
“OFF”position and the load
door is closed
Insert the plug.
ATTENTION:
should it be necessary to
replace the supply cord,
connect the wire in
accordance with the
following colours/codes:
BLUE - NEUTRAL (N)
BROWN - LIVE (L)
YELLOW-GREEN - EARTH ( )
After installation,the
appliance must be
positioned so that the plug is
accessible.
A
B
C
Umístûte praãku do roviny
pomocí 4 nastaviteln˘ch
noÏiãek:
aa))
Otáöejte maticí äroubu po
smëru hod. ruöiöek a pak
måïete püizpåsobit vÿäku
noïiöky.
bb))
Otáöením sniïujte nebo
zdvihejte noïiöku, dokud
perfektnë nepüilne k podlaze.
cc))
Upevnëte polohu noïiöky
otoöením matice äroubu proti
smëru hod. ruöiöek.
Zkontrolujte, Ïe voliã
programÛ je v poloze OFF a
dvífika praãky jsou zavfiená.
Zapojte záströku do sítë.
UPOZORNùNÍ:
V pfiípadû potfieby v˘mûny
pfiívodního kabelu pfiipojujte
vodiãe v souladu s
následujícím barvami/kódy:
MODR¯ - NEUTRÁLNÍ (N)
HNùD¯ - ÎIV¯ (L)
ÎLUTO-ZELEN¯ - UZEMNùNÍ ( )
Po instalaci spotüebiöe se
ujistëte, ïe spotüebiö je
umístën tak, aby byla snadno
püístupná zásuvka.
CZ

CHAPITRE 6
COMMANDES
Poignée d’ouverture du
hublot
Temoin de verrouillage de
porte
Touche marche/pause
Touche Prelavage
Touche
Aquaplus
Touche Départ Différé
Touche Selection Temperature
Touche Repassage Facile
Touche Essorage
Ecran Digital
Touche Temps de Lavage
Manette des programmes de
lavage avec OFF
Témoin de Bouton
Bacs à produits
CAPITOLO 6
COMANDI
Maniglia apertura oblò
Spia porta bloccata
Tasto Avvio/pausa
Tasto Prelavaggio
Tasto Stop Allergia
Tasto Partenza Differita
Tasto Selezione Temperatura
Tasto Stiro Facile
Tasto Selezione Centrifuga
Display Digit
Tasto Tempo Lavaggio
Manopola programmi di
lavaggio con OFF
Spie tasti
Cassetto detersivo
22
23
FR
IT
A
B
C
D
E
F
G
H
I
L
M
N
O
R
DE
KAPITEL 6
BEDIENUNGSELEMENTE
Türöffnungsgriff
Leuchtanzeige Tür
geschlossen
Start/Pause Taste
Taste Vorwäsche
Taste Aquaplus
Taste Startzeitvorwahl
Taste Temperaturwahl
Taste Leichtbügeln
Taste Schleuderdrehzahl
Display Digit
Taste “Waschdauer”
Waschprogrammwahl-
schalter mit OFF
Tastenanzeigen
Waschmittelbehälter
EN
CHAPTER 6
CONTROLS
Door handle
Door locked indicator light
Start button
Pre-wash button
Aquaplus button
Start Delay button
Wash Temperature button
Crease Guard button
Spin Speed button
Digital Display
“Wash Time” button
Timer knob for wash
programmes with OFF position
Buttons indicator light
Detergent drawer
KKAAPPIITTOOLLAA 66
OVLÁDACÍ PRVKY
DrÏadlo otevfiení dvífiek
Kontrolka zamãená dvífika
Tlaãítko Start
Tlaãítko Pfiedpírki
Tlaãítko Aquaplus
Tlaãítko OdloÏeného Startu
Tlaãítko Volba teploty
Tlaãítko Pro Zabránûní
Pomaãkání
Tlaãítko Volba Odstfiedûní
Displej Digit
Tlaãítko „Doba Praní“
Voliã programÛ s OFF
KKoonnttrroollkkyy TTllaaööíítteekk
Zásobník pracích prostfiedkÛ
CZ
Fig. 1
IMN
A
H
R
O
G
F
E
D
LB
C

25
FR
IT
DESCRIPTION DES
COMMANDES
POIGNEE D’OUVERTURE DU
HUBLOT
Pour ouvrir le hublot
actionner le bouton dans
la poignée.
ATTENTION:
UN DISPOSITIF SPECIAL
DE SECURITE EMPECHE
L’OUVERTURE
IMMEDIATE DU HUBLOT
A LA FIN DU LAVAGE.
APRES LA PHASE
D’ESSORAGE, ATTENDRE
2 MINUTES AVANT
D’OUVRIR LE HUBLOT.
TEMOIN DE VERROUILLAGE DE
PORTE
Le voyant lumineux s’allume
lorsque la porte est
totalement fermée et que la
machine est en marche.
Lorsque la touche "MARCHE"
est enfoncée sur la machine
et que la porte est fermée,
l’indicateur clignote
temporairement puis
s’allume.
Si la porte n’est pas
fermée, le voyant lumineux
continue de clignoter.
Un dispositif de sécurité
spécial vous empêche
d’ouvrir la porte
immédiatement après la fin
du cycle.Attendez
2 minutes après la fin du
cycle de lavage et assurez-
vous que le témoin est éteint
avant d’ouvrir la porte.Par
mesure de sécurité,vérifiez
qu’il n’y a plus d’eau dans le
tambour.A la fin du cycle,
tournez le sélecteur de
programmes à la position
OFF.
DESCRIZIONE
COMANDI
MANIGLIA APERTURA OBLÒ
Per aprire l’oblò premere la
leva situata all’interno della
maniglia.
ATTENZIONE:
UNO SPECIALE
DISPOSITIVO DI
SICUREZZA IMPEDISCE
L’IMMEDIATA APERTURA
DELL’OBLO” ALLA FINE
DEL LAVAGGIO. AL
TERMINE DELLA FASE DI
CENTRIFUGA ATTENDA 2
MINUTI PRIMA DI APRIRE
L’OBLÒ.
SPIA PORTA BLOCCATA
La spia è illuminata quando
l’oblò è chiuso correttamente
e la macchina è accesa.
Dopo aver premuto il tasto
AVVIO/PAUSA inizialmente la
spia lampeggia per poi
diventare fissa sino alla fine
del lavaggio.
Nel caso in cui l’oblò non sia
chiuso correttamente la spia
continuerà a lampeggiare.
Uno speciale dispositivo di
sicurezza impedisce che l’oblò
possa venire aperto
immediatamente dopo la fine
di un ciclo di lavaggio,
attendere 2 minuti che la spia
si spenga e quindi spegnere la
macchina portando la
manopola programmi in
posizione di OFF.
24
A
2 min.
B
DE
BESCHREIBUNG DER
BEDIENELEMENTE
TÜRÖFFNUNGSGRIFF
Um das Bullauge zu öffnen,
drücken Sie den Hebel im
Türgriff.
ACHTUNG:
DIE SICHERHEITSTÜR-
VERRIEGELUNG
VERHINDERT DAS
SOFORTIGE ÖFFNEN
DES BULLAUGES NACH
BEENDIGUNG DES
WASCH-PROGRAMMS.
WARTEN SIE DAHER NACH
DEM LETZTEN
SCHLEUDERN CA. ZWEI
MINUTEN, BEVOR SIE DIE
TÜR ÖFFNEN.
LEUCHTANZEIGE TÜR
GESCHLOSSEN
Die Anzeige leuchtet,wenn die
Tür korrekt geschlossen ist und
das Gerät eingeschaltet ist.
Nach Drücken der Taste
START/PAUSE blinkt die Taste
zuerst,dann leuchtet sie
permanent bis zum
Programmende.
Wenn das Bullauge nicht korrekt
geschlossen wurde,blinkt die
Leuchtanzeige weiter.
Eine spezielle
Sicherheitsvorrichtung
verhindert,dass das Bullauge
unmittelbar nach dem
Programmende geöffnet
werden kann.Warten Sie ca.2
Minuten,bis die Leuchtanzeige
ausgeht und schalten Sie dann
das Gerät durch Drehen des
Programmwahlschalters auf die
Position AUS ab.
DESCRIPTION OF
CONTROL
DOOR HANDLE
Press the finger-bar inside
the door handle to open the
door
IMPORTANT:
A SPECIAL SAFETY
DEVICE PREVENTS THE
DOOR FROM OPENING
AT THE END OF THE
WASH/SPIN CYCLE. AT
THE END OF THE SPIN
PHASE WAIT UP TO 2
MINUTES BEFORE
OPENING THE DOOR.
DOOR LOCKED INDICATOR
The “Door Locked” indicator
light is illuminated when the
door is fully closed and the
machine is ON.
When START is pressed on
the machine with the door
closed the indicator will flash
momentarily and then
illuminate.
If the door is not closed the
indicator will continue to
flash.
A special safety device
prevents the door from
being opened immediately
after the end of the cycle.
Wait for 2 minutes after the
wash cycle has finished and
the Door Locked light has
gone out before opening
the door.At the end of cycle
turn the programme
selector to OFF .
EN
POPIS OVLÁDACÍCH
PRVKÅ
DRÎADLO OTEV¤ENÍ DVͤEK
K otevfiení dvífick stisknûte
pojistku umístûnou na
vnitfiní stranû drÏadla.
PPOOZZOORR::
SSPPEECCIIÁÁLLNNÍÍ PPOOJJIISSTTKKAA
ZZAABBRRAAÑÑUUJJEE OOTTEEVVÜÜEENNÍÍ
DDVVÍÍÜÜEEKK PPRRAAÖÖKKYY IIHHNNEEDD
PPOO SSKKOONNÖÖEENNÍÍ PPRRAANNÍÍ..
JJAAKKMMIILLEE SSKKOONNÖÖÍÍ
ÏÏDDÍÍMMÁÁNNÍÍ,, VVYYÖÖKKEEJJTTEE 22
MMIINNUUTTYY AA PPOOTTOOMM
TTEEPPRRVVEE DDVVÍÍÜÜKKAA
OOTTEEVVÜÜEETTEE..
KONTROLKA ZAMâENÁ
DVͤKA
Kontrolka svítí, pokud jsou
dvífika správnû zavfiená a
praãka je zapnutá.
Po stisknutí tlaãítka
START/PAUSA nejdfiíve
kontrolka bliká, po chvíli se
rozsvítí trvale a svítí aÏ do
konce praní.
V pfiípadû, Ïe dvífika nebyla
zavfiená správnû, kontrolka
bude nadále blikat.
Speciální bezpeãnostní
zafiízení zabraÀuje, aby se
dvífika mohla otevfiít okamÏitû
po konãení pracího cyklu.
Poãkejte 2 minuty, aÏ
kontrolka zhasne, pak
vypnûte praãku nastavením
voliãe programÛ do vypnuté
polohy OFF.
CZ

27
FR
IT
TOUCHE MARCHE/PAUSE
Appuyez sur la touche pour
commencer le cycle.
ATTENTION:
LORSQUE LA TOUCHE
START A ETE
ENCLENCHEE L’APPAREIL
NE COMMENCERA LE
CYCLE QU’APRES
QUELQUES SECONDES.
CHANGER LA
PROGRAMMATION APRES LE
DEMARRAGE DE LA MACHINE
(PAUSE)
Maintenez la pression sur le
bouton “START/PAUSE” durant
2 secondes,les témoins des
boutons d’options
clignoteront et l’indicateur
du temps restant indiquera
que la machine est en
pause.Modifiez et pressez le
bouton “START/PAUSE” pour
relancer le programme.
Le voyant lumineux " Témoin
de verrouillage de porte "
reste allumé pendant environ
2 minutes.Il est possible
d’ouvrir la porte une fois le
voyant lumineux éteint.
Pour relancer le programme,
appuyez une nouvelle fois
sur le bouton "MARCHE".
ANNULATION D’UN
PROGRAMME SELECTIONNÉ
Afin d’annuler un
programme,positionnez le
sélecteur sur OFF
Sélectionnez un programme
différent
Repositionnez le sélecteur sur
OFF.
TASTO AVVIO/PAUSA
Premere per avviare il ciclo
impostato con la manopola
programmi.
NOTA: DOPO AVERE
AVVIATO LA
LAVABIANCHERIA CON IL
TASTO START SI DOVRÀ
ATTENDERE ALCUNI
SECONDI AFFINCHÉ LA
MACCHINA INIZI IL
PROGRAMMA.
MODIFICARE IMPOSTAZIONI
DOPO AVVIO DEL
PROGRAMMA (PAUSA)
Dopo l’avvio del programma
possono essere modificate solo
le regolazioni e le opzioni
tramite i tasti opzione.Tenere il
tasto “START/PAUSA”premuto
per circa 2 secondi,il
lampeggio delle spie dei tasti
opzione e del tempo residuo
indica che la macchina è in
pausa,modifichi quanto
desiderato e prema
nuovamente il tasto
“START/PAUSA”annullando
l’intermittenza.
Se si desidera aggiungere o
togliere capi durante il
lavaggio,attendere DUE minuti
affinché il dispositivo di
sicurezza liberi il blocco
dell’oblò e ne permetta
l’apertura.
Effettuata la manovra,dopo
aver richiuso l’oblò e premuto
il tasto AVVIO/PAUSA,la
macchina ripartirà dal punto
in cui era stata fermata.
CANCELLAZIONE PROGRAMMA
IMPOSTATO
Per annullare il programma,
portare il selettore in posizione
OFF.
Selezionare un programma
diverso.
Riportare il selettore
programmi in posizione OFF.
26
C
DE
START/PAUSE TASTE
Drücken Sie diese Taste,um das
Programm zu starten,die mit
dem Programmwahlschalter
gewählt wurde.
ANMERKUNG: NACH DER
BETÄTIGUNG DER START-
TASTE DAUERT ES EINIGE
SEKUNDEN, BIS DAS
GERÄT ANFÄNGT ZU
ARBEITEN.
EINSTELLUNGEN NACH DEM
PROGRAMMSTART ÄNDERN
(PAUSE)
Nachdem das Programm
gestartet wurde,können nur die
Programmoptionen und die
Zusatzfunktionen mit den
Funktionstasten verändert
werden.
Drücken Sie die Taste
“START/PAUSE”ca.2 Sekunden
lang.Die Lampen der
Optionstasten und der
Restzeitanzeigen blinken,um
anzuzeigen,dass das Gerät sich
in einer Betriebspause befindet.
Verändern Sie nun die
gewünschten Einstellungen und
drücken Sie dann erneut die
Taste “START/PAUSE”, damit das
Blinken aufhört.
Wenn Sie während des
Programmablaufs Wäsche
entnehmen bzw.hinzufügen
wollen,warten Sie ZWEI Minuten,
damit der
Türverriegelungsmechanismus
die Tür entriegelt.
Nachdem Sie die Wäsche
entnommen bzw.hinzugefügt
haben,schließen Sie die Tür und
drücken Sie die START-Taste.Das
Gerät fängt wieder dort an zu
arbeiten,wo es aufgehört hatte.
EINGESTELLTES PROGRAMM
LÖSCHEN
Um das Programm zu löschen,
drehen Sie den
Programmwahlschalter auf OFF.
Wählen Sie nun ein anderes
Programm.
Drehen sie dann den
Programmwahlschalter wieder
auf OFF.
START BUTTON
Press to start the selected
cycle.
NOTE: WHEN THE START
BUTTON HAS BEEN
PRESSED,THE APPLIANCE
CAN TAKE FEW SECONDS
BEFORE STARTS
WORKING.
CHANGING THE SETTINGS
AFTER THE PROGRAMMES
HAS STARTED (PAUSE)
Press and hold the
“START/PAUSE”button for
about 2 seconds,the
flashing lights on the options
buttons and time remaining
indicator will show that the
machine has been paused,
adjust as required and press
the “START/PAUSE”button
again to cancel the flashing
lights.
If you wish to add or remove
items during washing,wait 2
minutes until the safety
device unlocks the door.
When you have carried out
the manoeuvre,close the
door,press START button and
the appliance will continue
working where it left off.
CANCELLING THE
PROGRAMME
To cancel the programme,
set the selector to the OFF
position.
Select a different
programme.
Re-set the programme
selector to the OFF position.
EN
TLAâÍTKO START
Stisknutím tohoto tlaãítka
dojde ke spu‰tûní programu
nastaveného na voliãi
programÛ .
POZN.: PO SPU·TùNÍ
PRAâKY TLAâÍTKEM
START JE NUTNÉ VYâKAT
NùKOLIK VTE¤IN, NEÎ JE
PRAâKA UVEDENA DO
CHODU.
ZMùNA NASTAVENÍ PROGRAMU
PO SPU·TùNÍ (PAUSA)
Po spu‰tûní programu lze
zmûnit pouze ta nastavení a
funkce, které se volí pomocí
tlaãítek funkcí.
Stisknûte tlaãítko
„START/PAUSA“ pfiibliÏnû na 2
sekundy: bûhem pfiestávky v
pracím programu kontrolky
tlaãítek pro volbu
poÏadovan˘ch funkcí a
tlaãítek zb˘vajícího ãasu
blikají. Pokud si pfiejete aby
program pokraãoval,
stisknûte tlaãítko
„START/PAUSA“ je‰tû jednou.
Pokud si pfiejete vyjmout ãi
pfiidat prádlo bûhem praní, a
vyãkejte DVù minuty, dokud
bezpeãnostní zafiízení
neuvolní dvífika praãky.
Po vloÏení ãi vyjmutí prádla,
opûtovném uzavfiení dvífiek
praãky a stisknutí tlaãítka
START, bude praãka
pokraãovat v pracím cyklu od
stejného místa, ve kterém byl
cyklus pfieru‰en.
ZRU·ENÍ NASTAVENÉHO
PROGRAMU
Abyste zru‰ili program, dejte
ovladaã programÛ do
polohy OFF.
Zvolte jin˘ program.
Ovladaã programÛ dejte
zpût do polohy OFF.
CZ

28
E
EN
The option buttons should be
selected before pressing the
START button
PRE-WASH BUTTON
This option is particularly useful
for heavily soiled loads and
can be used only on some
programmes as shown in the
programmes table.
Detergent for this programme
should be added to the
compartment of the soap
drawer labelled “1” (Please
refer to Detergent Drawer
Section of manual).We
recommend you use only 20%
of the recommended
quantities shown on the
detergent pack and fabric
conditioner should not be
used for this programme.
“AQUAPLUS” BUTTON
By pressing this button you
can activate a special new
wash cycle in the Colourfast
and Mixed Fabrics programs,
thanks to the new Sensor
System.This option treats with
care the fibres of garments
and the delicate skin of those
who wear them.
The load is washed in a much
larger quantity of water and
this,together with the new
combined action of the drum
rotation cycles,where water is
filled and emptied,will give
you garments which have
been cleaned and rinsed to
perfection.The amount of
water in the wash is increased
so that the detergent dissolves
perfectly,ensuring an efficient
cleaning action.The amount
of water is also increased
during the rinse procedure so
as to remove all traces of
detergent from the fibres.
This function has been
specifically designed for
people with delicate and
sensitive skin,for whom even a
very small amount of
detergent can cause irritation
or allergy.
You are advised to also use
this function for children’s
clothing and for delicate
fabrics in general,or when
washing garments made of
towelling,where the fibres
tend to absorb a greater
quantity of detergent.
To ensure the best
performance for your wash,
this function is always
activated on the Delicates
and Woollens/Handwash
programs.
29
FR
IT
Les options doivent être
sélectionnées AVANT d’appuyer
sur la touche “MARCHE”.
TOUCHE PRELAVAGE
Cette option est très utile pour
le linge particulièrement sale
et elle peut être utilisée
en aucun programme de
lavage (voir la section
“Tableau des programme”de
ce manuel).
Pour ce programme,le
détergent doit être ajouté
dans le bac de dosage de
poudre,identifié par “1”.
Nous vous recommandons de
n’utiliser que 20 % de la
quantité de détergent pour le
lavage principal.
TOUCHE "AQUAPLUS"
Grâce au nouveau Sensor
System,il est possible,en
activant la touche Aquaplus,
d’effectuer un cycle de
lavage spécifique pour les
tissus résistants et mixtes.Le
lavage ainsi effectué permet
d’éliminer tout résidu lessiviel
et donc de prendre soin des
peaux délicates qui seront en
contact avec ces fibres.
L’ajout d’une plus grande
quantité d’eau au lavage
ainsi que l’action renforcée
de 5 rinçages avec essorages
intermédiaires permettent
d’obtenir un linge propre
parfaitement rincé.Afin
d’obtenir un résultat optimal
de lavage,la quantité d’eau
est accrue pendant cette
phase du cycle garantissant
une parfaite dilution de la
lessive.La quantité d’eau est
également accrue au
moment du rinçage de
manière à éliminer toute trace
de lessive des fibres.
Cette fonction a été
spécialement étudiée pour les
PEAUX DELICATES ET SENSIBLES
pour lesquelles même un
minimum de résidu de lessive
peut causer irritations ou
allergies.
Il est aussi conseillé d’utiliser
cette fonction pour le LINGE
DES ENFANTS,pour le LINGE
DELICAT en général ainsi que
pour le lavage des TISSUS
EPONGE dont les fibres
tendent à retenir la lessive.
Pour assurer une meilleure
prestation de lavage,cette
fonction est toujours active
pendant les programmes
Délicat et Laine/lavage a la
main.
I tasti opzione devono essere
selezionati prima di premere
il tasto AVVIO.
TASTO PRE LAVAGGIO
Questa opzione è utile in
particolare per la biancheria
molto sporca e può essere
utilizzata solo in alcuni
programmi come riportato
nella tabella programmi.
Aggiungere il detersivo per
questo programma nello
scompartimento del cassetto
contrassegnato con “1”(per
maggiori informazioni vedere
la sezione Cassetto del
detersivo in questo manuale).
Si consiglia di utilizzare solo il
20% della quantità consigliata
sul contenitore del detersivo.
TASTO “STOP ALLERGIA”
Grazie al nuovo Sensor System,
agendo sul tasto è possibile
effettuare un nuovo speciale
ciclo di lavaggio applicabile
nei programmi per tessuti
resistenti e misti che si prende
cura delle fibre e della pelle
delicata di chi le indossa.
L’aggiunta di molta più acqua
e la nuova azione combinata
di cicli di rotazione del cesto
con carico e scarico
d’acqua,permette di
ottenere capi perfettamente
puliti e risciacquati.Viene
aumentata l’acqua in
lavaggio per ottenere la
perfetta dissoluzione del
detersivo,garantendo
un’efficace azione pulente.
Viene aumentata l’acqua
anche al momento dei
risciacqui in modo da
eliminare ogni traccia di
detersivo dalle fibre.
Questa funzione è stata
studiata appositamente per le
persone con pelle delicata e
sensibile,per le quali anche un
minimo residuo di detersivo
può causare irritazioni o
allergie.
Si consiglia di utilizzare questa
funzione anche per i capi dei
bambini e per i delicati in
generale,oppure nel lavaggio
di capi di spugna le cui fibre
tendono maggiormente a
trattenere il detersivo.
Per assicurare le migliori
prestazioni di lavaggio questa
funzione è sempre attiva nei
programmi Delicati e
Lana/lavaggio a mano.
DE
Die Optionstasten müssen VOR
der Betätigung der START-Taste
gedrückt werden.
TASTE VORWÄSCHE
Diese Option ist besonders
empfehlenswert bei stark
verschmutzter Wäsche.Sie kann
nur bei bestimmten
Programmen gewählt werden
(s hierzu Programmtabelle).
Für dieses Programm füllen Sie
das Waschmittel in die Kammer
„1“ des Waschmitteilbehälters
ein (für nähere Informationen
schauen Sie bitte im Kapitel
über den Waschmittelbehälter
in diesem Heft nach).Es ist
anzuraten,nur 20% der auf der
Waschmittelpackung
empfohlenen Menge
einzusetzen.
TASTE “AQUAPLUS”
Dank des neuen „Sensor
Systems“ kann durch Drücken
dieser Taste ein neues,spezielles
Waschprogramm für Koch- und
Buntwäsche durchgeführt
werden,das nicht nur Ihre
Wäsche besonders gut pflegt,
sondern auch besonders
schonend für empfindliche
Haut ist.
Durch die Hinzunahme von
bedeutend mehr Wasser und
die Kombination von
Trommeldrehungen während
der Wasserzu- und -
ablaufphasen wird Ihre Wäsche
porentief gereinigt und
rückstandsfrei gespült.Um die
vollständige Auflösung des
Waschmittels zu garantieren,
wird mehr Wasser für die
Waschlauge hinzugefügt,so
dass perfekte Waschergebnisse
erreicht werden.Auch für die
Spülgänge wird die
Wassermenge erhöht,so dass
jegliche Waschmittelrückstände
von den Fasern restlos entfernt
werden.Diese Funktion wurde
speziell für Menschen mit
empfindlicher Haut konzipiert,
für die auch die kleinsten
Waschmittelrückstände zu
Hautreaktionen oder Allergien
führen können.Wir empfehlen,
diese Funktion auch zum
Waschen von Kinderwäsche
und für Feinwäsche im
Allgemeinen zu wählen,oder
zum Waschen von besonders
saugfähigem Gewebe,wie
Frottee o.Ä.,dessen Fasern die
Waschlauge stärker
aufnehmen.Damit die besten
Waschergebnisse gewährleistet
werden,ist diese Funktion in den
Programmen für Feinwäsche
und Wolle/Handwäsche immer
aktiviert.
Tlaãítka funkcí musí b˘t
navolena pfied stisknutím
tlaãítka start.
TLAâÍTKO “
P¤EDPÍRKY
”
Tato funkce je uÏiteãná
zejména v pfiípadû velmi
za‰pinûného prádla a mÛÏe
b˘t pouÏita pouze s nûkter˘mi
programy, jak je uvedeno v
tabulce programÛ.
Prací prostfiedek k tomuto
programu, nasypejte do
pfiihrádky zásobníku oznaãené
“1“ (k získání bliωí informace viz
rozdûlení zásobníku pro prací
prostfiedky v tomto manuálu).
Doporuãujeme pouÏít jen 20% z
uvedeného mnoÏství na obalu
pracího prostfiedku.
TLAâÍTKO “AQUAPLUS”
Díky novému systému Sensor
System je moÏné pomocí
tlaãítka provést nov˘ speciální
cyklus praní, kter˘ je vhodn˘
pfii praní odoln˘ch a smûsn˘ch
tkanin a kter˘ peãuje o vlákna
a jemnou pokoÏku toho, kdo
je nosí.
PouÏití mnohem vût‰ího
mnoÏství vody a nová
kombinace cyklÛ otáãení
bubnu s napou‰tûním a
vypou‰tûním vody umoÏÀuje
dosáhnout dokonale ãistého
a vymáchaného prádla.
MnoÏství vody pfii praní je nyní
vy‰‰í, aby se prací prá‰ek
opravdu úplnû rozpustil a
zaruãil tak perfektní úãinek
praní. Vût‰í mnoÏství vody je
nyní pouÏíváno i v okamÏiku
máchání tak, aby se odstranily
ve‰keré stopy pracího
prostfiedku z vláken.
Tato funkce byla vytvofiena
speciálnû pro osoby s jemnou
a citlivou pokoÏkou, kter˘m
mÛÏe i minimální zbytek
pracího prá‰ku zpÛsobit
podráÏdûní nebo alergii.
Doporuãujeme, abyste tuto
funkci pouÏívali i pfii praní
dûtského obleãení, praní
jemného prádla obecnû
nebo pfii praní froté prádla,
protoÏe vlákna froté mají vût‰í
tendenci zachycovat prací
prá‰ek.
Pro zaji‰tûní nejlep‰ích v˘konÛ
pfii praní je tato funkce vÏdy
aktivní u programÛ Jemné
prádlo a Vlna/Ruãní praní.
CZ
D

30
31
G
TASTE STARTZEITVORWAHL
Diese Taste ermöglicht die
Programmierung einer
Startzeitvorwahl von bis zu 24
Stunden.Um die
Startverzögerung einzustellen,
gehen Sie wie folgt vor:
Wählen Sie das gewünschte
Programm.
Drücken Sie die Taste einmal,
damit die Funktion aktiviert ist.
Das Display zeigt h00.Drücken
Sie die Taste erneut,um eine
Startverzögerung von einer
Stunde einzustellen (das
Display zeigt nun h01).Bei
jedem weiteren Drücken der
Taste wird die
Startverzögerung bis h24um je
eine Stunde erhöht.Durch ein
weiteres Drücken wird die
Verzögerungszeit annulliert.
Bestätigen Sie Ihre Einstellung
mit der Taste “START/PAUSE”.
Die Leuchtanzeige im Display
fängt an zu blinken und die
Zeit beginnt abzulaufen.Ist die
Zeit abgelaufen,startet das
Programm automatisch.
Sie können die
Startzeitvorwahl wie folgt
löschen:
Halten Sie die Taste 5
Sekunden lang gedrückt,bis
das Display die
Voreinstellungen des
gewählten Programms wieder
anzeigt.
Nun können Sie entweder das
Programm durch Drücken der
Taste “START/PAUSE” manuell
starten oder das Programm
durch Drehen des
Programmwahlschalters auf
OFF löschen und ein neues
Programm einstellen.
TASTE “TEMPERATURWAHL”
Wird ein Programm
ausgewählt,wird die für dieses
Programm empfohlene
Temperatur durch
Aufleuchten der
entsprechenden Anzeige
angegeben.
Diese Temperatur kann durch
mehrmaliges Drücken der
Taste nach Bedarf erhöht
oder reduziert werden.Bei
jedem Drücken der Taste
leuchtet eine der Anzeigen
der möglichen wählbaren
Temperaturen auf.
TLAâÍTKO „ODLOÎEN¯ START“
Toto tlaãítko umoÏÀuje odloÏit
spu‰tûní pracího programu
maximálnû o 24 hodin.
Pokud si pfiejete odloÏit
spu‰tûní programu,
postupujte následujícím
zpÛsobem:
Zvolte poÏadovan˘ program.
Stisknûte tlaãítko jednou,
abyste jej aktivovali (na
displeji se objeví h00).
Opûtovn˘m stisknutím
nastavte odloÏení o 1 hodinu
(na displeji se objeví h01).
KaÏd˘m dal‰ím stisknutím se
odloÏení prodlouÏí o 1 hodinu
aÏ po h24. V pfiípadû dal‰ího
stisknutí se odloÏen˘ start
zru‰í.
Stisknutím tlaãítka
„START/PAUSA“ (kontrolka na
displeji zaãne blikat)
potvrdíte spu‰tûní poãítání
nastaveného ãasu. Po jeho
uplynutí se program
automaticky spustí.
OdloÏen˘ start je moÏné zru‰it
následovnû:
Stisknûte tlaãítko na 5
sekund, dokud se na displeji
nezobrazí parametry
zvoleného programu.
Stisknutím tlaãítka
„START/PAUSA“ mÛÏete teì
spustit pfiedtím zvolen˘
program. Pokud chcete cel˘
proces zru‰it, nastavte
ovladaã programÛ do
polohy OFF a následnû zvolte
jin˘ program.
TLAâÍTKO „VOLBA TEPLOTY“
Pfii volbû programu se
rozsvícením pfiíslu‰né
kontrolky zobrazí
doporuãená teplota.
Vícenásobn˘m stisknutím
tlaãítka je moÏné tuto teplotu
sníÏit nebo zv˘‰it.
KaÏd˘m stisknutím tlaãítka se
z dostupn˘ch moÏností rozsvítí
kontrolka odpovídající
zvolené teplotû.
TOUCHE DEPART DIFFERE
Cette option permet de
programmer le départ du
cycle de lavage jusqu’à 24
heures.
Afin d’utiliser cette fonction,
suivez la procédure ci-
dessous :
Choisissez le programme
Pressez le bouton départ
différé pour l’activer (h00
apparais sur l’écran) puis
pressez le à nouveau pour
choisir un départ différé
d’1 heure (h01 apparaît sur
l’écran) ; à chaque pression
le départ différé augmentera
d’1 heure jusqu’à ce que 24h
apparaisse sur l’écran,une
pression supplémentaire
réinitialisera le départ différé.
Confirmez en appuyant sur
"START/PAUSE" (la lumière sur
l’écran clignotera).Le
compte à rebours
commencera et à son terme
le programme débutera
automatiquement.
Il est possible d’annuler le
départ différé selon la
procédure suivante :
Maintenez le bouton appuyé
durant 5 secondes jusqu’à ce
que l’écran montre les
réglages du programme
choisi.
A cette étape il est possible
soit de lancer le programme
en appuyant sur
"START/PAUSE" soit d’annuler
le départ différé en
positionnant le
programmateur sur OFF puis
en sélectionnant un autre
programme.
TOUCHE “SELECTION
TEMPERATURE”
Après sélection d’un
programme,le voyant
correspondant à la
température correspondante
conseillée s’allume.Il est
possible de diminuer ou
d’augmenter cette
température en appuyant
plusieurs fois sur la touche.A
chaque pression de la
touche,le voyant
correspondant à la
température sélectionnée
s’allume.
TASTO “PARTENZA DIFFERITA”
Questo tasto permette di
programmare l’avvio del
ciclo di lavaggio con un
ritardo massimo di 24h.
Per impostare la partenza
ritardata procedere nel
seguente modo:
Impostare il programma
desiderato.
Premere il pulsante una prima
volta per attivarlo (sul display
viene visualizzato h00) e
premere nuovamente per
impostare un ritardo di 1 ora
(sul display viene visualizzato
h01),ad ogni pressione
successiva il ritardo impostato
aumenta di 1 ora fino a h24
mentre con un ulteriore
pressione si azzera la partenza
ritardata.
Confermare premendo il tasto
“START/PAUSA”(La spia nel
display inizia a lampeggiare)
per iniziare il conteggio alla
fine del quale il programma
inizierà automaticamente.
E’possibile annullare la
partenza ritardata agendo
come segue:
Tenere premuto il tasto per 5
secondi fino a quando sul
display non vengono
visualizzati i parametri del
programma scelto.
A questo punto è possibile
iniziare il programma scelto in
precedenza premendo il
tasto “START/PAUSA”o
annullare l’operazione
portando il selettore in
posizione di OFF e
successivamente selezionare
un’altro programma.
TASTO “SELEZIONE
TEMPERATURA”
Quando si seleziona un
programma viene indicata la
temperatura consigliata
tramite l’accensione della
relativa spia.
E’possibile sia diminuire che
aumentare la temperatura
premendo più volte il tasto.
Ad ogni pressione del tasto si
illumina la spia corrispondente
alla temperatura scelta tra
quelle a disposizione.
“DELAY START” BUTTON
This button allows you to pre-
programme the wash cycle
to delay the start of the cycle
for up to 24 hours.
To delay the start use the
following procedure:
Set the required programme.
Press the button once to
activate it (h00 appears on
the display) and then press it
again to set a 1 hour delay
(h01 appears on the display);
the pre-set delay increases
by 1 hour each time the
button is pressed, until h24
appears on the display, at
which point pressing the
button again will reset the
delay start to zero.
Confirm by pressing the
“START/PAUSE” button (the
light on the display starts to
flash). The countdown will
begin and when it has
finished the programme will
start automatically.
It is possible to cancel the
delay start by taking the
following action:
Press and hold the button for
5 seconds until the display will
show the settings for the
programme selected.
At this stage it is possible to
start the programme
previously selected by
pressing the “START/PAUSE”
button or to cancel the
process by setting the
selector to the OFF position
and then selecting another
programme.
“WASH TEMPERATURE” BUTTON
When a programme is
selected the relevant
indicator will light up to show
the recommended wash
temperature.
The Temperature button can
be used to decrease or
increase the temperature of
your chosen wash cycle.
Each time the button is
pressed, the new
temperature level is shown on
the Wash Temperature
Indicator.
EN
FR
IT
DE
CZ
F

32
H
EN
“CREASE GUARD” BUTTON
The Crease Guard function
(Not available on COTTON
programmes) minimizes
creases as much as possible
with a uniquely designed
anti-crease system that is
tailored to specific fabrics.
MIXED FABRICS - the water is
gradually cooled
throughout the final two
rinses with no spinning and
then a delicate spin assures
the maximum relaxation of
the fabrics.
DELICATE FABRICS – after the
final two rinses with no
spinning the machine stops
in the final rinse stage and
the option indicators blink.
The load is held in the water
in the drum,thus reducing
creasing and enabling
easier ironing.
WOLLENS/SILK – after the
final rinse the load is held in
the water in the drum,thus
reducing creasing and
enabling easier ironing and
the option indicators blink.
To complete the cycle press
the Crease Guard button
and the machine will pump
out the water and complete
the cycle.
If you do not want to spin
the clothes and activate
drain only:
- Turn the programme
selector to the "OFF"
position;
- Select programme drain
only ;
- Switch on the appliance
again by pressing the
"Start/Pause" button
.
33
FR
IT
TOUCHE“REPASSAGE FACILE”
Si vous utilisez cette touche
(Non disponible sur les
programmes COTON),il vous
sera possible de réduire la
formations des plis,selon le
programme choisi et la
nature du tissu lavé.
Tissu mixte et synthetique:
- le refroidissement de l’eau
sera fait graduellement pour
éviter les chocs thermiques;
- la vidange sera faite sans
aucune action mécanique
du tambour;
- une phase d’essorage
doux,pour assurer la
distension maximale des
fibres.
Tissu délicat:
- Votre lave-linge effectuera
les actions ci dessus
mentionnées,ensuite un
"arrêt cuve pleine" après le
dernier rinçage.
Laine et soie:
- Votre lave linge effectuera
un "arrêt cuve pleine".
Le indicateur d’option
clignote et le linge reste dans
l’eau du tambour.
Pour terminer le cycle des
tissus délicats, de la laine et
soie,les opérations à
accomplir sont les suivantes:
1.Relâcher la touche de
repassage facile pour
terminer le cycle.
2.Sinon,vous pouvez
effectuer une simple vidange
- Tourner le sélecteur de
programme à la position
“OFF”;
- Sélectionner le programme
“Uniquement vidange” ;
- Allumer de nouveau la
lave-linge en appuyant sur
la touche “MARCHE/PAUSE”.
TASTO STIRO FACILE
Attivando questa funzione
(non disponibile per i
programmi cotone) è
possibile ridurre al minimo la
formazione di pieghe
personalizzando ulteriormente
il ciclo di lavaggio in base al
programma scelto ed al tipo
di biancheria da lavare.
In modo particolare per i
tessuti misti e sintetici l’azione
combinata di una fase di
raffreddamento graduale
dell’acqua,l’assenza di
rotazione del cesto durante
gli scarichi dell’acqua ed una
centrifuga delicata a bassa
velocità assicura la massima
distensione dei capi.
Per i tessuti delicati vengono
svolte le fasi già descritte
sopra per i tessuti misti ad
eccezione del
raffreddamento graduale
dell’acqua ma con
l’aggiunta di una fase di
fermo acqua in vasca con
stop dopo l’ultimo risciacquo.
Nel programma lana e seta
questo tasto ha la sola
funzione di lasciare i capi
immersi nell’acqua alla fine
dell’ultimo risciacquo al fine di
distendere perfettamente le
fibre.
Durante la fase di fermo
acqua in vasca la spia del
tasto lampeggia ad indicare
che la macchina è in pausa.
Per terminare il ciclo dei
tessuti delicati, della lana e
seta,le operazioni possono
essere:
- rilasciare il tasto per
terminare il ciclo.
Nel caso in cui si voglia
effettuare solo lo scarico:
- portare la manopola
programmi prima in posizione
di “OFF”;
- selezionare il programma
solo scarico ;
- riavviare la macchina
premendo nuovamente il
pulsante “AVVIO/PAUSA”.
DE
TASTE LEICHTBÜGELN
Diese Funktion (nicht
verfügbar für die
Programme KOCHWÄSCHE)
reduziert die Knitterbildung
durch die individuelle Wahl
der Programme und der
Wäscheart.
Im Besonderen für
Mischgewebe sorgt die
Kombination der langsamen
Abkühlphase verbunden mit
dem Stillstand der Wäsche
während des Abpumpens
und einem Schonschleudern
für die optimale Schonung
der Wäsche.
Für die Feinwäsche sind die
Phasen wie bei
Mischgewebe beschrieben,
mit Ausnahme der
Abkühlphase unter
Hinzunahme des
Wasserstopps nach dem
letzten Spülgang.
Für die Programme
Woolmark (Wolle) und Seide
dient diese Taste
ausschließlich als Spülstopp,
um die Fasern zu glätten.
In der Spülstopp-Phase
blinkt die Leuchtanzeige der
Taste, um anzuzeigen, dass
das Gerät sich in Pause
befindet.
Um die Feinwäsche bzw.das
Woll-oder Seide-Programm
zu beenden,können Sie wie
folgt vorgehen:
- Drücken Sie die Taste
Leichtbügeln zurück,um das
Programm mit Abpumpen
und Schleudern
zu beenden
Wenn Sie nur abpumpen
wollen:
- drehen Sie den
Programmwahlschalter auf
die Position OFF
- wählen Sie das Programm
Abpumpen
- schalten Sie das Gerät
durch erneutes Drücken der
Taste START/PAUSE ein
TTLLAAÖÖÍÍTTKKOO PPRROO ZZAABBRRÁÁNNËËNNÍÍ
PPOOMMAAÖÖKKÁÁNNÍÍ
Nastavením této funkce,
(Není k dispozici pro programi
BAVLNA), je moïné sníïit na
minimum pomaökání prádla v
návaznosti na prací cyklus
zvolenÿ vÿbërem programu a
druhu praného prádla.
V püípadë
ssmmëëssnnÿÿcchh
tkanin se
püi praní vyuïívá funkcí pro
postupné ochlazování vody,
vylouöení otáöení bubnu
bëhem vypouätëcí láznë a
pro jemné odstüed’ování,
öímï je zajiätëna nevyääí
regenerace pranÿch tkanin.
U
jjeemmnnÿÿcchh
tkanin, je postup
stejnÿ jako u vÿäe uvedenÿch
smësnÿch tkanin, je ale
doplnën o funkci ponechání
vody v bubnu po ukonöení
závëreöného máchání.
U programu pro praní
vvllnnyy//hheeddvváábbíí
má toto tlaöítko
pouze funkci ponechání vody
v bubnu po skonöení
posledního máchání, aby se
tím zachovala dokonalá
pruïnost vláken.
Bûhem této fáze, kdy voda
stojí ve vanû praãky,
kontrolka tlaãítka bliká, coÏ
znamená, Ïe je praãka v
pauze.
Pro dokonöení cyklu praní
jjeemmnnÿÿcchh
tkanin a
vvllnnyy//hheeddvváábbíí
måïete zvolit
následující postup:
- zruäit tuto funkci vypnutím
tlaöítka pro ZABRÁNËNÍ
POMAÖKÁNÍ. Prací cyklus
bude ukonãen fází vypuätëní
vody a odstüedëním prádla.
V pfiípadû, kdy chcete
provést pouze vypu‰tûní:
- nastavte nejdfiíve voliã
programÛ do polohy OFF
- zvolte program pouhého
vypou‰tûní
- znovu praãku spusÈte
opûtovn˘m stisknutím tlaãítka
START.
CZ

34
EN
SPIN SPEED BUTTON
The spin cycle is very
important to remove as
much water as possible from
the laundry without
damaging the fabrics.You
can adjust the spin speed of
the machine to suit your
needs.
By pressing this button,it is
possible to reduce the
maximum speed,and if you
wish,the spin cycle can be
cancelled.
To reactivate the spin cycle
is enough to press the
button until you reach the
spin speed you would like to
set.
For not damage the fabrics,
it is not possible to increase
the speed over that
automatically suitable
during the selection of the
program.
It is possible to modify the
spin speed in any moment,
also without to pause the
machine.
NOTE:
THE MACHINE IS FITTED
WITH A SPECIAL
ELECTRONIC DEVICE,
WHICH PREVENTS THE
SPIN CYCLE SHOULD
THE LOAD BE
UNBALANCED.
THIS REDUCES THE
NOISE AND VIBRATION
IN THE MACHINE AND
SO PROLONGS THE LIFE
OF YOUR MACHINE.
35
FR
IT
TOUCHE "ESSORAGE"
La phase d'essorage est très
importante pour la
préparation à un bon
séchage et votre modèle est
doté d'une grande flexibilité
pour satisfaire chaque
exigence.
En agissant sur cette touche
vous pouvez réduire la vitesse
maximale possible pour le
programme sélectionnée,
jusqu'à une complète
élimination de l'essorage.
Pour réactiver l'essorage,il est
suffisant de presser la touche
de nouveau,jusqu'à atteindre
la vitesse choisie.
Pour la sauvegarde des tissus,
il n'est pas possible
d'augmenter la vitesse
d'essorage, au-delà de celle
qui est indiquée
automatiquement au moment
de la sélection du
programme.
Il est toujours possible de
modifier la vitesse d'essorage,
sans mettre la machine en
PAUSE.
NOTE:
LA MACHINE EST DOTEE
D’UN DISPOSITIF
ELECTRONIQUE QUI
EMPECHE LE DÉPART DE
L’ESSORAGE SI LES
CHARGES SONT MAL
REPARTIES ET LIMITE LES
VIBRATIONS ET LE BRUIT
DURANT LE LAVAGE.
TASTO SELEZIONE
CENTRIFUGA
La fase di centrifuga è molto
importante per la
preparazione ad una buona
asciugatura ed il vostro
modello è dotato della
massima flessibilità per ogni
vostra esigenza.
Premendo questo tasto,si
può ridurre la massima
velocità di centrifuga
possibile per il programma
selezionato,fino alla sua
completa esclusione.
Per riattivare la centrifuga,è
sufficiente premere
nuovamente il tasto,fino al
raggiungimento della
velocità scelta.
Per la salvaguardia dei
tessuti, non è possibile
aumentare la velocità oltre
quella automaticamente
indicata al momento della
selezione del programma.
E' possibile modificare la
velocità della centrifuga in
qualsiasi momento,anche
senza portare la macchina in
PAUSA.
NOTA:
IL MODELLO È DOTATO
DI UN PARTICOLARE
DISPOSITIVO
ELETTRONICO CHE
IMPEDISCE LA PARTENZA
DELLA CENTRIFUGA
CON CARICHI
PARTICOLARMENTE
SBILANCIATI. QUESTO
SERVE
A MIGLIORARE LE
VIBRAZIONI, LA
SILENZIOSITÀ E LA
DURATA DELLA
LAVABIANCHERIA.
DE
TASTE SCHLEUDERDREHZAHL
Die Schleuderphase ist sehr
wichtig für eine gute Trocknung
der Wäsche.Auch hier kann Ihr
Gerät sich sehr flexibel an Ihre
Bedürfnisse anpassen.
Durch Betätigen der Taste
Schleuderdrehzahl können Sie
die für das jeweilige Programm
höchstmögliche Tourenzahl
reduzieren oder die
Schleuderung ganz
ausschließen.
Um den Schleudergang
wieder zu aktivieren,brauchen
Sie nur die Taste erneut zu
drücken,bis die gewünschte
Tourenzahl angezeigt wird.
Um die Gewebe zu schonen, ist
es nicht möglich, eine höhere
Schleuderdrehzahl einzustellen,
als die, die bei der
Programmwahl automatisch
angezeigt wird.
Die Schleuderdrehzahl kann zu
jedem Zeitpunkt des
Programms eingestellt werden.
Dabei brauchen Sie die Taste
PAUSE nicht zu betätigen.
ANMERKUNG:
DAS MODELL IST MIT EINER
ELEKTRONISCHEN
VORRICHTUNG
AUSGESTATTET, DIE
VERHINDERT, DAß DER
SCHLEUDERGANG MIT
FÜLLMENGEN, DEREN
GEWICHT
UNGLEICHMÄßIG VERTEILT
SIND,STARTET. DIES TRÄGT
ZU EINER REDUZIERUNG DER
VIBRATIONEN,DER
GERÄUSCHENTWICKLUNG
UND ZU EINER
VERLÄNGERUNG DER
LEBENSDAUER DER
WASCHMASCHINE BEI.
TLAâÍTKO VOLBA ODST¤EDùNÍ
Fáze odstfieìování je velmi
dÛleÏitá pro pfiípravu
dobrého usu‰ení. Vበmodel
je vybaven tak, aby byl
schopen vyhovût v‰em Va‰im
potfiebám.
Stisknutím tohoto tlaãítka lze
omezovat maximální rychlost
odstfieìování, kterou je
moÏné pouÏít pro zvolen˘
program, aÏ do úplného
vyfiazení odstfieìování.
Pro nové spu‰tûní
odstfieìování staãí znovu
stisknout tlaãítko a nastavit ho
aÏ na poÏadovanou rychlost.
Pro ochranu tkanin není
moÏné nastavit rychlost vy‰‰í,
neÏ je rychlost, která se
automaticky stanovuje v
okamÏiku zvolení programu.
Rychlost odstfieìování je
moÏné zmûnit kdykoli,
spotfiebiã nemusí b˘t v reÏimu
PAUSA.
PPOOZZNNÁÁMMKKAA::
PPRRAAÖÖKKAA JJEE VVYYBBAAVVEENNAA
SSPPEECCIIÁÁLLNNÍÍMM
EELLEEKKTTRROONNIICCKKŸŸMM
ZZAAÜÜÍÍZZEENNÍÍMM,, KKTTEERRÉÉ CCHHRRÁÁNNÍÍ
PPÜÜEEDD NNAADDMMËËRRNNŸŸMMII
VVIIBBRRAACCEEMMII AA HHLLUUKKEEMM
BBËËHHEEMM OODDSSTTÜÜEEDD’’OOVVÁÁNNÍÍ,,
PPOOKKUUDD ÄÄPPAATTNNŸŸMM
RROOZZLLOOÏÏEENNÍÍMM PPRRÁÁDDLLAA
DDOOJJDDEE VV BBUUBBNNUU KK
NNEEVVYYVVÁÁÏÏEENNOOSSTTII NNÁÁPPLLNNËË..
PPRROODDLLOOUUÏÏÍÍ SSEE TTAAKK
ÏÏIIVVOOTTNNOOSSTT PPRRAAÖÖKKYY..
CZ
I

36
EN
“DIGITAL” DISPLAY
The display’s indicator system
allows you to be constantly
informed about the status of
the machine:
1) WASH TEMPERATURE
When a programme is selected
the relevant indicator will light
up to show the recommended
wash temperature.The
Temperature button can be
used to decrease or increase
the temperature of your chosen
wash cycle.Each time the
button is pressed,the new
temperature level is shown on
the Wash Temperature Indicator.
2) DOOR LIGHT
Once the START/PAUSE button
has been pressed the light
first flashes then stops flashing
and remains on until the end
of the wash.
2 minutes after the end of the
wash the light goes off to
show that the door can now
be opened.
3) SPIN SPEED
Once the programme has
been selected,the maximum
spin speed allowed for that
programme appears on the
display. Pressing the spin
button will reduce the speed
by 100 rpm each time the
button is pressed. The
minimum speed allowed is
400 rpm,or it is possible to
omit the spin by pressing the
spin button repeatedly.
4) DELAY START LIGHT
This flashes when delay start
has been set.
5) CYCLE DURATION
When a programme is selected
the display automatically shows
the cycle duration,which can
vary,depending on the options
selected.
Once the programme has
started you will be kept
informed constantly of the time
remaining to the end of the
wash.
37
FR
IT
ECRAN DIGITAL
Cet écran électronique
permet une information
constante envers l’utilisateur:
1) TEMPERATURE DE LAVAGE
Après sélection d’un
programme,le voyant
correspondant à la température
correspondante conseillée
s’allume automatiquement.Il est
possible de diminuer ou
d’augmenter cette température
en appuyant plusieurs fois sur la
touche.A chaque pression de la
touche,le voyant correspondant
à la température sélectionnée
s’allume
2) TEMOIN DE PORTE
Dès le début du lavage le
témoin clignote puis reste
allumé jusqu’à la fin du
lavage.
2 minutes après la fin du
lavage le témoin s’éteint
signifiant que la porte peut
être ouverte.
3) VITESSE D’ESORAGE
Lors de la sélection du
programme un voyant
indiquera la vitesse
d’essorage maximum.
Chaque pression du bouton
entrainera une réduction de
100 tours/minute jusqu’à à la
vitesse minium de 400
tours/minutes ou jusqu’à
une complète élimination
de l’essorage.
4) TEMOIN DEPART DIFFERE
Ce témoin clignote lorsque
le départ différé à été activé
5) TEMPS RESTANT
Lors de la sélection d’un
programme,l’écran
indiquera automatiquement
la durée du cycle de lavage
cette dernière peut varier
selon les options choisies.
DISPLAY DIGIT
Il sistema di segnalazione del
display consente di essere
costantemente informati sul
funzionamento dell’
apparecchio:
1) TEMPERATURA DI LAVAGGIO
Al momento della selezione di
un programma verrà
automaticamente indicata la
temperatura di lavaggio
consigliata tramite
l’accensione della relativa spia.
Scegliendo una temperatura
differente,tramite l’apposito
tasto,si illuminerà la spia
corrispondente.
2) SPIA OBLO’
Dopo aver premuto il tasto
START/PAUSA inizialmente la
spia lampeggia per poi
diventare fissa sino alla fine del
lavaggio.
Dopo 2 minuti dalla fine del
lavaggio la spia si spegne per
indicare che ora è possibile
aprire l’oblò.
3) GIRI CENTRIFUGA
Una volta selezionato il
programma,sul display
apparirà la massima velocità
consentita di centrifuga per
quel programma.Premendo
ripetutamente il pulsante di
centrifuga,la velocità diminuirà
ogni volta di 100 g/m.La
velocità minima consentita è di
400 g/m,oppure è possibile
escludere la centrifuga
premendo ripetutamente il
pulsante di selezione della
centrifuga.
4) SPIA PARTENZA RITARDATA
Lampeggia quando è
impostata la partenza
ritardata.
5) DURATA CICLO
Al momento della selezione di
un programma,verrà
automaticamente indicata la
durata del ciclo che potrà
variare a seconda delle opzioni
che verranno selezionate.
Dopo l’avvio del programma vi
terrà costantemente informati
sul tempo restante alla fine del
lavaggio.
DE
DISPLAY “DIGIT”
Die Anzeigen im Display
geben Ihnen ständig Auskunft
über die gerade
durchgeführten Funktionen
des Gerätes.
1) WASCHTEMPERATUR
Wenn ein Programm
ausgewählt wird,erscheint
automatisch die empfohlene
Waschtemperatur durch
Aufleuchten der
entsprechenden Anzeige.
Falls eine andere Temperatur
durch Drücken der hierfür
vorgesehenen Taste
eingestellt worden ist,leuchtet
die entsprechende Anzeige
auf.
2) TÜRVERRIEGELUNGSANZEIGE
Nachdem die Taste
START/PAUSE gedrückt wurde,
blinkt die Anzeige zuerst eine
Zeitlang,dann leuchtet sie
permanent bis zum
Programmende.2 Minuten
nach Programmende erlischt
die Lampe,um anzuzeigen,
dass die Tür nun entriegelt ist
und geöffnet werden kann.
3) SCHLEUDERDREHZAHL
Sobald das Programm gewählt
wurde,erscheint auf dem
Display die höchstmögliche
Tourenzahl für dieses Programm.
Durch wiederholtes Drücken der
Taste wird die Schleuderdrehzahl
jeweils um 100 U/Min
herabgesenkt.Die
Mindestdrehzahl beträgt 400
U/Min,es ist jedoch auch
möglich,den Schleudergang
ganz zu unterdrücken,wenn
man die Taste
Schleuderdrehzahl wiederholt
drückt.
4) ANZEIGE
STARTZEITVORWAHL
Sie blinkt,wenn eine
Startzeitvorwahl eingestellt ist.
5) PROGRAMMDAUER
Sobald das Programm
eingestellt ist,wird die
Programmdauer automatisch
angezeigt.Diese kann je nach
den eventuell zusätzlich
gewählten Optionen
variieren.Nach dem
Programmstart gibt Ihnen die
Anzeige ständig Auskunft über
die Restzeit zum
Programmende.
DISPLEJ „DIGIT“
Signalizaãní systém displeje
neustále informuje o ãinnosti
praãky:
1) TEPLOTA PRANÍ
Pfii volbû programu se
automaticky zapne pfiíslu‰ná
kontrolka doporuãované
teploty.
Pfii volbû odli‰né teploty
pomocí pfiíslu‰ného tlaãítka se
rozsvítí její odpovídající
kontrolka.
2) KONTROLKA DVͤEK
Po stisknutí tlaãítka
„START/PAUSA“ zaãne
kontrolka blikat a následnû
svítí aÏ do konce praní.
Po uplynutí dvou minut od
ukonãení praní kontrolka
zhasne a praãku mÛÏete
otevfiít.
3) OTÁâKY ODST¤EëOVÁNÍ
Po zvolení pracího programu
se na displeji objeví maximální
povolená rychlost
odstfieìování pro dan˘
program. KaÏd˘m dal‰ím
stisknutím tlaãítka
odstfieìování se rychlost sníÏí o
100 g/m. Nejniωí povolená
rychlost je 400 ot/min.
Odstfieìování je moÏné zru‰it
opûtovn˘m stisknutím tlaãítka
na volbu odstfiedování.
4) KONTROLKA „ODLOÎEN¯ START“
Tato kontrolka svítí tehdy, kdyÏ
je nastavené posunutí
spu‰tûní pracího programu.
5) DÉLKA CYKLU
V momentu zvolení pracího
programu se automaticky
zobrazí délka cyklu, která se
mÛÏe mûnit v závislosti od
jednotliv˘ch zvolen˘ch funkcí.
CZ
L
{
1
2
4
3
{
{
1
7
{
4
5
{
6
{
5
2
3
{

38
M
EN
6) PROGRAMME START LIGHT
This lights up when the START
button has been pressed.
7) WASH TIME
When a programme is
selected the relevant
indicator will light up to show
the minimum possible wash
time.
Selecting a greater time
using the special button will
cause the corresponding
indicator to light up.
“WASH TIME” BUTTON
By selecting this button
(active only on COTTON and
MIXED FIBRES programmes)
there is a choice of 3 levels
of wash intensity,depending
on how much the fabrics
are soiled.
Once the programme has
been selected the indicator
light will automatically show
the minimum level required
for that programme.Pressing
the button increases the
duration of the wash cycle,
and adjusts the wash
settings accordingly
39
FR
IT
6) TEMOIN DE PROGRAMME
EN COURS
Ce témoin s’allume dès que
la touche START est pressée.
7) TEMPS DE LAVAGE
Une fois le choix du
programme et de la
température effectué,le
temps de lavage est
automatiquement réglé sur
le minimum.
Chaque pression du bouton
augmente le temps et
allume le nouveau temps de
lavage
TOUCHE TEMPS DE LAVAGE
L’activation de ce bouton
(uniquement sur les
programmes COTON et
MIXTES) permet le choix de 3
niveaux d’intensité de
lavage selon le degré de
salissure du linge.
Après sélection du
programme de lavage,le
voyant se positionne
automatiquement sur le
niveau de salissure minimum;
en appuyant sur la touche
on augmente le niveau de
salissure et par conséquent
la durée du cycle.
6) SPIA INIZIO PROGRAMMA
Si illumina dopo avere
premuto il tasto START.
7) TEMPO DI LAVAGGIO
Al momento della selezione di
un programma,verrà
automaticamente indicato il
tempo minimo possibile
tramite l ‘ accensione della
relativa spia.
Scegliendo un tempo
superiore tramite l’apposito
tasto si illuminerà la spia
corrispondente.
TASTO “TEMPO DI LAVAGGIO”
Agendo sul tasto (attivo solo
nei programmi COTONE e
MISTI) è possibile scegliere 3
livelli di intensità di lavaggio,a
seconda del grado di sporco
dei tessuti,.
Dopo la selezione del
programma la spia si
posiziona automaticamente
sul livello minimo consentito;
premendo il tasto si aumenta
il livello e di conseguenza
vengono modificati anche i
parametri della durata del
ciclo.
DE
6) ANZEIGE PROGRAMMSTART
Sie leuchtet auf,sobald die
Taste START gedrückt wurde.
7) WASCHDAUER
Sobald ein Programm
gewählt wird,zeigt eine
Anzeige die voreingestellte,
mindestmögliche
Waschdauer an.
Wenn Sie eine längere Dauer
durch Drücken der hierzu
vorgesehenen Taste wählen,
leuchtet die entsprechende
Anzeige auf.
TASTE “WASCHDAUER”
Durch Betätigen dieser Taste
(die nur für die
Programmgruppe
BAUMWOLLE und
MISCHGEWEBE aktiviert
werden kann) können Sie je
nach Verschmutzungsgrad
der Wäsche drei
verschiedene Stufen für die
Dauer,d.h.die Intensität der
Waschbewegungen
einstellen.Nachdem das
Programm ausgewählt wurde,
zeigt eine Leuchtanzeige
automatisch die
mindestmögliche Stufe an.
Diese kann durch Drücken der
Taste erhöht werden,was sich
natürlich auf die
Programmdauer auswirkt.
6) KONTROLKA „ZAâÁTEK
PROGRAMU“
Tato kontrolka se rozsvítí po
stisknutí tlaãítka START.
7) DOBA PRANÍ
V momentu zvolení programu
se automaticky zobrazí
nejkrat‰í moÏná doba praní a
rozsvítí se pfiíslu‰ná kontrolka.
Pfii zvolení del‰í doby praní
pomocí pfiíslu‰ného tlaãítka se
také rozsvítí pfiíslu‰ná
kontrolka.
TLAâÍTKO „DOBA PRANÍ“
Pomocí tohoto tlaãítka (které
je aktivní pouze u programÛ
BAVLNA a SMÍ·ENÉ PRÁDLO)
mÛÏete zvolit 3 úrovnû
intenzity praní v závislosti od
stupnû zneãi‰tûní prádla.
Po volbû programu se
kontrolka automaticky umístí
na nejniωí moÏn˘ stupeÀ;
stisknutím tlaãítka se tento
stupeÀ zv˘‰í, ãehoÏ
následkem se zmûní i
parametry délky cyklu.
CZ
6
7
{
La pagina sta caricando ...
La pagina sta caricando ...
La pagina sta caricando ...
La pagina sta caricando ...
La pagina sta caricando ...
La pagina sta caricando ...
La pagina sta caricando ...
La pagina sta caricando ...
La pagina sta caricando ...
La pagina sta caricando ...
La pagina sta caricando ...
La pagina sta caricando ...
La pagina sta caricando ...
La pagina sta caricando ...
La pagina sta caricando ...
La pagina sta caricando ...
La pagina sta caricando ...
La pagina sta caricando ...
La pagina sta caricando ...
La pagina sta caricando ...
La pagina sta caricando ...
-
 1
1
-
 2
2
-
 3
3
-
 4
4
-
 5
5
-
 6
6
-
 7
7
-
 8
8
-
 9
9
-
 10
10
-
 11
11
-
 12
12
-
 13
13
-
 14
14
-
 15
15
-
 16
16
-
 17
17
-
 18
18
-
 19
19
-
 20
20
-
 21
21
-
 22
22
-
 23
23
-
 24
24
-
 25
25
-
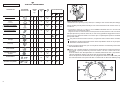 26
26
-
 27
27
-
 28
28
-
 29
29
-
 30
30
-
 31
31
-
 32
32
-
 33
33
-
 34
34
-
 35
35
-
 36
36
-
 37
37
-
 38
38
-
 39
39
-
 40
40
-
 41
41


Hoover OPH 6163D-86S Manuale utente
- Categoria
- Lavatrici
- Tipo
- Manuale utente