
EN_IMPORTANT, RETAIN FOR FUTURE REFERENCE: READ CAREFULLY.
FR_IMPORTANT:A LIRE ATTENTIVEMENT ET À CONSERVER POUR CONSULTATION
ULTÉRIEURE.
ES_IMPORTANTE, LEA Y GUARDE PARA FUTURAS REFERENCIAS.
PT_IMPORTANTE, RETER PARA REFERÊNCIA FUTURA: LEIA ATENTAMENTE.
DE_WICHTIG! SORGFÄLTIG LESEN UND FÜR SPÄTER NACHSCHLAGEN AUFBEWAHREN.
IT _ IMPORTANTE! CONSERVARE IL PRESENTE MANUALE PER FUTURO RIFERIMENTO E
LEGGERLO ATTENTAMENTE.
US_CAUS_CA
840-174_840-175
IN221100583V01_GL


1
EN

2
EN

3
1 1 2-1 1 2-3 1
3 2
5 2
4-1 1 4-2 1 4-3 1
6-1 1 6-3 1
7 2 8 1 9 1 10 3
11 3 12 6
13-1 1 14 1
13-2 1
15 32
16 3
18 2 19 2
17-1 1 17-2 1
20 8
21 1 22 1
23 6
6-2 1
2-2 1
3

4

5
01
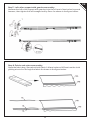
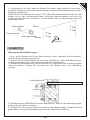
Step 1: Roller assembly
Keep the rollers aligned, assemble the roller with the connectors and secure it with
the corresponding bolts as figure below:
Step 2: Torsion bar and arm assembly:
keep the four face aligned , connect the torsion bar with the connectors and secure it
with the corresponding bolts as figure below:
Then assembly the arm to the torsion bar as figure below.Two arms need in the
same direction, the rope of arm cannot be unlocked until the whole assembly are
complete.
EN

6
03
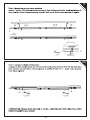
Step3: Front bar assembly
Connect the front bar with connectors and secure it with the corresponding bolts as
figure below:.(please keep the front bar aligned).
Step4:Front bar wrist support assembly:
Slide the front bar feet into the front bar without tightening.As shown in the figure
below:
EN

7
05
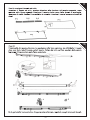
Step 5: Arms with front bar assembly:
Put front bar feet bolt through the hole of small arm, then position the front bar. After
positioning, tighten the nut with wrench, as fgure below:
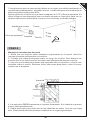
Step 6: Link the self-locking nut
Link the self-locking nut into screw which at the bottom of the screw in front bar feet
by a wrench, stop when the thread:leakage 1 ~ 2 laps.As shown in the figure below:
ATTENTION: BEFORE BLOCKING THE NUT.ENSURE THAT THE ARMS ARE
PROPERLY ALIGNED.
EN

8
07
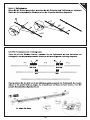
Step7: Left roller support with gear box assembly:
Hammer the left roller support with gear box into the left end of torsion bar by wood
hammer, then tighten the left hexagon bolt by 5mm. As shown in the figure below:
Step 8: Fabric and valance assembly:
Open the fabric bag, Spread out both fabric 14A and valance 14B and use the cloth
guiding wire to line through the fabric.As shown in the figure below:
EN

9
09
Step 9: Roll in the fabric on the roller
Roll in the fabric on the roller, pay attention to the fabric direction needed, as shown
in the figure below:
Please face up the fabric when assembling.Keep the same spacing X at both ends.
Spread the fabric slowly in case of damage.
Step 10:
One end of fabric through the groove of front bar,well-distributed the fabric after pull
in all fabric, then insert shaft of roller into the square hole of gear case.As shown in
the figure below,
lf the part of front bar is a little deformed, please adjust it with tools by yourself.
EN

10
11
Step 12: Assemble to make a whole awning
Make the valance through groove of front bar, pay attention to the direction and
make sure the left and right sides on average, then hitting the cover of front bar into
end of front bar. As shown in the figure below:
Step 11: Right roller support assembly:
Insert the shaft of roller into roll tube plug,meanwhile insert the torsion bar into the
right roller supports with hitting. Then tighten the right hexagon bolt by 5mm
Hexagon wrench.As shown in the figure below:
lf the part of front bar is a little deformed, please adjust it with tools by yourself.
EN

11
13
10 11 23 12 9
3pcs 3pcs 6pcs 6pcs
8'-13'
EN

12
14
8"(20.5cm)
8-13 '(2.5-4m).
EN

13
15
< 10.8'(3.5m)
10.8-14'(3.5-4m)
≥3.9"(10cm)
≥3.9"(10cm)
EN

14
“
16
3.15"(8cm)
0.55"(14mm)
EN

15
17
0.75"(19mm)
EN

16
18
EN

17
19
EN

18
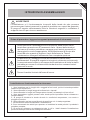
Merci d'avoir acheté notre auvent rétractable! Nous espérons que vous
trouverez de la joie dans notre produit pour de nombreuses années à
venir.
Pour assurer votre sécurité personnelle pendant l'installation et tirer le
meilleur parti de votre investissement, veuillez lire ce manuel intégral
avant de commencer le processus d'installation.
Nous vous recommandons d'installer cet auvent par deux personnes. Si
vous pensez que ce processus est trop difficile à faire seul, nous vous
conseillons de demander l'aide d'une entreprise local en bâtiment ou en
amélioration de l'habitat.
Veuillez contacter notre ligne de soutien à la clientèle pour obtenir de
l'aide si vous avez un problème ou besoin d'aide lors de l'assemblage,
ont des pièces manquantes ou défectueuses, ou tout autre problème,
nous ferons de notre mieux pour aider à résoudre vos problèmes.
Nous pouvons également vous offrir la vidéo d'assemblage si vous le
souhaitez.
Veuillez préparer les outils ci-dessous avant l'assemblage. (Non inclus)
Ruban à mesure Maillet non métallique (Clés de M17 et M14)
Tournevis cruciforme
Perceuse électrique
avec Trépan de 14 mm Niveleur de ligne à la craie
Clé de 8 mm
Deux échelles ou chaises très robustes
FR
18
La pagina si sta caricando...
La pagina si sta caricando...
La pagina si sta caricando...
La pagina si sta caricando...
La pagina si sta caricando...
La pagina si sta caricando...
La pagina si sta caricando...
La pagina si sta caricando...
La pagina si sta caricando...
La pagina si sta caricando...
La pagina si sta caricando...
La pagina si sta caricando...
La pagina si sta caricando...
La pagina si sta caricando...
La pagina si sta caricando...
La pagina si sta caricando...
La pagina si sta caricando...
La pagina si sta caricando...
La pagina si sta caricando...
La pagina si sta caricando...
La pagina si sta caricando...
La pagina si sta caricando...
La pagina si sta caricando...
La pagina si sta caricando...
La pagina si sta caricando...
La pagina si sta caricando...
La pagina si sta caricando...
La pagina si sta caricando...
La pagina si sta caricando...
La pagina si sta caricando...
La pagina si sta caricando...
La pagina si sta caricando...
La pagina si sta caricando...
La pagina si sta caricando...
La pagina si sta caricando...
La pagina si sta caricando...
La pagina si sta caricando...
La pagina si sta caricando...
La pagina si sta caricando...
La pagina si sta caricando...
La pagina si sta caricando...
La pagina si sta caricando...
La pagina si sta caricando...
La pagina si sta caricando...
La pagina si sta caricando...
La pagina si sta caricando...
La pagina si sta caricando...
La pagina si sta caricando...
La pagina si sta caricando...
La pagina si sta caricando...
La pagina si sta caricando...
La pagina si sta caricando...
La pagina si sta caricando...
La pagina si sta caricando...
La pagina si sta caricando...
La pagina si sta caricando...
La pagina si sta caricando...
La pagina si sta caricando...
La pagina si sta caricando...
La pagina si sta caricando...
La pagina si sta caricando...
La pagina si sta caricando...
La pagina si sta caricando...
La pagina si sta caricando...
La pagina si sta caricando...
La pagina si sta caricando...
La pagina si sta caricando...
La pagina si sta caricando...
-
 1
1
-
 2
2
-
 3
3
-
 4
4
-
 5
5
-
 6
6
-
 7
7
-
 8
8
-
 9
9
-
 10
10
-
 11
11
-
 12
12
-
 13
13
-
 14
14
-
 15
15
-
 16
16
-
 17
17
-
 18
18
-
 19
19
-
 20
20
-
 21
21
-
 22
22
-
 23
23
-
 24
24
-
 25
25
-
 26
26
-
 27
27
-
 28
28
-
 29
29
-
 30
30
-
 31
31
-
 32
32
-
 33
33
-
 34
34
-
 35
35
-
 36
36
-
 37
37
-
 38
38
-
 39
39
-
 40
40
-
 41
41
-
 42
42
-
 43
43
-
 44
44
-
 45
45
-
 46
46
-
 47
47
-
 48
48
-
 49
49
-
 50
50
-
 51
51
-
 52
52
-
 53
53
-
 54
54
-
 55
55
-
 56
56
-
 57
57
-
 58
58
-
 59
59
-
 60
60
-
 61
61
-
 62
62
-
 63
63
-
 64
64
-
 65
65
-
 66
66
-
 67
67
-
 68
68
-
 69
69
-
 70
70
-
 71
71
-
 72
72
-
 73
73
-
 74
74
-
 75
75
-
 76
76
-
 77
77
-
 78
78
-
 79
79
-
 80
80
-
 81
81
-
 82
82
-
 83
83
-
 84
84
-
 85
85
-
 86
86
-
 87
87
-
 88
88


Outsunny 840-175CW Guida utente
- Tipo
- Guida utente
in altre lingue
- français: Outsunny 840-175CW Mode d'emploi
- español: Outsunny 840-175CW Guía del usuario
- Deutsch: Outsunny 840-175CW Benutzerhandbuch