Pepperl+Fuchs VBG-PB-K30-DMD-S16 Guida d'installazione
- Tipo
- Guida d'installazione

Zumutbare Änderungen aufgrund technischer Verbesserungen vorbehalten. © Pepperl+Fuchs, Printed in Germany 1
Pepperl+Fuchs GmbH · 68301 Mannheim · Telefon (06 21) 7 76-11 11 · Telefax (06 21) 7 76 27-11 11 Internet http://www.pepperl-fuchs.com
Ausgabedatum: 28.07.2009
AS-Interface
Montageanweisung // Installation Instructions
1. Montageanweisung // Installation Instructions // Notice de
montage // Istruzioni per il montaggio // Instrucciones de montaje
1.2 Produktdokumentation im Internet / Product documentation on the
Internet / Documentation du produit sur Internet / Documentazione del pro-
dotto su Internet / Documentatión del producto en Internet
1.1 VBG-PB-K30-DMD-S16 AS-i 3.0 PROFIBUS Gateway mit integriertem Safety Monitor
AS-i 3.0 PROFIBUS Gateway with Integrated Safety Monitor
Passerelle AS-i 3.0 PROFIBUS avec moniteur de sécurité intégré
Gateway AS-i 3.0 PROFIBUS con monitor di sicurezza integrato
Pasarela AS-i 3.0 PROFIBUS con monitor de seguridad integrado
Die komplette Dokumentation und weitere Informationen zu Ihrem Produkt finden Sie auf
The complete documentation and additional information to your product can be found on
Vous trouverez la documentation complète, ainsi que des informations supplémentaires sur
votre produit en allant sur
La completa documentazione e altre informazioni del suo prodotto si trovano sul
La documentación completa e información adicional sobre su producto se puede
encontrar en
http://www.pepperl-fuchs.com
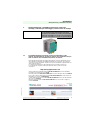
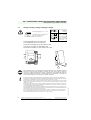
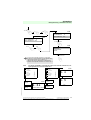
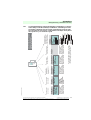
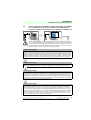
Geben Sie dazu die Produktbezeichnung VBG-PB-K30-DMD-S16, wie in der Abbildung
beschrieben, ein und klicken Sie auf Suche
Insert the product name VBG-PB-K30-DMD-S16 as shown in the figure and press SEARCH
Pour ce faire, entrez la désignation du produit VBG-PB-K30-DMD-S16, comme montré sur
l’illustration, puis cliquez sur RECHERCHE
Si prega di inserire il nome del prodotto VBG-PB-K30-DMD-S16 come è descritto nell’imma-
gine e clicca su RICERCA
Inserte el nombre del producto VBG-PB-K30-DMD-S16 como se muestra en la figura y
presiones BUSCAR
Entire Site SEARCH
VBG-PB-K30-DMD-S16

Ausgabedatum: 28.07.2009
2Zumutbare Änderungen aufgrund technischer Verbesserungen vorbehalten. © Pepperl+Fuchs, Printed in Germany
Pepperl+Fuchs GmbH · 68301 Mannheim · Telefon (06 21) 7 76-11 11 · Telefax (06 21) 7 76 27-11 11 Internet http://www.pepperl-fuchs.com
AS-i 3.0 PROFIBUS Gateway mit integriertem Safety Monitor
Montageanweisung // Installation Instructions
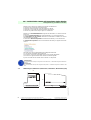
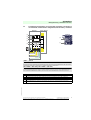
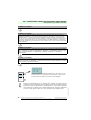
1.3 Abmessungen / Dimensions / Dimensions / Dimensioni / Dimensiones [mm]
Wählen Sie Ihr Produkt in der draufhin erscheinenden Produktliste aus.
Select then your product from the list that appears.
Sélectionnez votre produit dans la liste de produits qui s’affiche.
Selezionare il suo prodotto nella lista dei prodtti che appare dopo.
Seleccione su producto de la lista que aparece a continuación
Wählen Sie bei Produktinformationen die gewünschte Information, z.B. Technische Doku-
mente, aus.
Select from Product Information the required information, e.g. Technical Documents.
Dans Informations sur les produits, sélectionnez les informations souhaitées, Documenta-
tions techniques par exemple.
Selezionare da Informazioni prodotto le informazioni desidearti, p.e. Documenti tecnici.
En Información de producto seleccione la información deseada, por ejemplo Documentos
técnicos.
Hier finden Sie in einer Listendarstellung alle verfügbaren Dokumente.
You can find here all available documents listed.
Vous trouverez ici la liste de présentation de tous les documents disponibles.
Qui si trova una rappresentazione listino di tutti i documenti disponibili.
Aqui se encuentra una lista de todos los documentos a su disposición.
Dokumentationen:
"AS-i 3.0 PROFIBUS-Gateway mit integriertem Sicherheitsmonitor" + "ASIMON Konfigurationssoftware für
Windows"
Documentations:
"AS-i 3.0 PROFIBUS Gateways with integrated Safety Monitor" + "ASIMON Configuration Software for Win-
dows"
120
96
100
85

Zumutbare Änderungen aufgrund technischer Verbesserungen vorbehalten. © Pepperl+Fuchs, Printed in Germany 3
Pepperl+Fuchs GmbH · 68301 Mannheim · Telefon (06 21) 7 76-11 11 · Telefax (06 21) 7 76 27-11 11 Internet http://www.pepperl-fuchs.com
Ausgabedatum: 28.07.2009
AS-Interface
Montageanweisung // Installation Instructions
1.3.1 Sicherheitshinweise / Safety notes / Indications de sécurité / Indicazioni di
sicurezza / Avisos de seguridad
Fachgerecht installieren:
Die elektrische Installation ist von eingewiesenem Fachpersonal durchzuführen. Bei der
Installation ist darauf zu achten, dass Versorgungs- und Signalleitungen und auch die
AS-i-Busleitung getrennt von Kraftstromleitungen verlegt sind. Im Schaltschrank ist
darauf zu achten, dass bei Schützen eine entsprechende Funkenlöschung verwendet
wird. Bei Antriebsmotoren und -bremsen ist auf die Installationshinweise in den
entsprechenden Bedienungsanleitungen zu achten. Bitte beachten Sie, dass die maxi-
male Leitungslänge für die AS-i-Busleitung 100 m beträgt. Darüber hinausgehende Lei-
tungslängen erfordern den Einsatz einer geeigneten Leitungsverlängerung.
Ensure appropiate installation:
Electrical installation is to be performed by trained expert personnel. During installation
care must be taken that supply and signal leads and also the AS-i bus cable are laid
separately from power cables. In the switchgear cabinet it must be ensured that appro-
priate spark-quenching equipment is used with contactors. Where drive motors and
brakes are used, attention must be paid to the installation instructions in the corre-
sponding operating instructions. Please note that the maximum line length of the AS-i
bus cable is 100 m. Cables above that length require the use of a suitable circuit exten-
sion.
Veuillez installer le module de manière adaptée:
L’installation électrique ne doit être effectuée que par du personnel qualifié. Pendant
l’installation verifier que les lignes d’alimentation et de signaux ainsi que la ligne de bus
AS-i sont posées séparément des câbles de courant fort. Dans l’armoire électrique, il
faut veiller à ce qu’une extinction des etincelles appropriée soit utilisée avec des con-
tacteurs. Pour les moteurs d’entraînement et les freins, les instructions d’installation
indiquées dans les instructions d’utilisation doivent être réspectées. La longueur maxi-
male autorisée pour la ligne de bus AS-i est de 100 m. Pour atteindre des lignes plus
longues il faut utiliser une extension de ligne appropriée.
Assicurarsi che l’apparecchio sia installato in modo corretto:
L'installazione e la messa in funzione devono essere eseguite solamente da personale
qualificato. Durante l’installazione, verificare che le linee di alimentazione e di segnali e
anche la linea bus AS-i vengono posate separatamente dai cavi a corrente forte.
Nell’armadio elettrico, si deve fare attenzione di utilizzare un’estinzione scintille ade-
guata con i contattori. Per i motori di propulsione e i freni bisogna badare alle istruzioni
per il montaggio indicate nelle istruzioni per l’uso. La lunghezza massima autorizzata
per la linea di bus AS-i è di 100 m. Per ottenere delle linee più lunghe si deve utilizzare
un´ estenzione di linea adatta.
Instalece correctamente:
La instalación eléctrica debe ser efectuada por personal debidamente calificado. En la
instalación se debe tomar en consideración que los cables de alimentación, los cables
de las señales y el del bus AS-i deben estar separados de los cables de alto poder. En
el armario de distribución se debe prestar atención se debe prestar atención a utilizar
equipos con la función para extinguir arcos para los contactores. Para los motores y
frenos del accionamiento se deben acatar las instrucciones de instalación de los mis-
mos. Por favor considere que la máxima extensión del bus AS-i es de 100 m. Instala-
ciones que excedan esta longitud requieren del uso de una extensión del circuito
conveniente.
Sorgen Sie dafür, dass das Gerät nach seiner Verwendung der Wiederverwertung (Recy-
cling) zugeführt wird.
You are requested to make sure that the unit will be recycled by the end of its service life.
Veillez à ce que le module soit recyclé après usage.
Provvedere affinché il dispositivo, dopo l'utilizzo, sia destinato al riciclaggio.
Asegúrese de que el equipo después de su uso sea deshechado de forma que sea posible
reaprovechar sus partes (reciclaje).

Ausgabedatum: 28.07.2009
4Zumutbare Änderungen aufgrund technischer Verbesserungen vorbehalten. © Pepperl+Fuchs, Printed in Germany
Pepperl+Fuchs GmbH · 68301 Mannheim · Telefon (06 21) 7 76-11 11 · Telefax (06 21) 7 76 27-11 11 Internet http://www.pepperl-fuchs.com
AS-i 3.0 PROFIBUS Gateway mit integriertem Safety Monitor
Montageanweisung // Installation Instructions
Anleitung lesen:
Bevor Sie mit dem Gerät arbeiten: Lesen Sie diese Anleitung komplett durch. Alle
Sicherheitshinweise und Vorgaben des Gerätehandbuchs und des Handbuchs zur Kon-
figurationssoftware sind einzuhalten!
Read instruction:
Before working with this unit: read these instructions carefully and completely. All notes
on safety and specifications of the device manual and the manual for the configuration
software are to be considered!
Lire les instructions:
Avant de travailler avec ce module, veuillez lire l’intégralité de ces instructions.
Observez les consignes de sécurité et les instructions du manuel d’utilisation de l’appa-
reil et du guide utilisateur du logiciel de configuration.
Leggere attentamente le istruzioni:
Prima di iniziare a operare sull'apparecchio, leggere attentamente le seguenti istruzioni.
Si prega di tenere conto anche delle indicazioni di sicurezza e delle istruzioni del manu-
ale d’uso dell’apparecchio e del manuale per l’utente per il software di configurazione.
Lea las instrucciones:
Antes de trabajar con el equipo lea por completo el manual de instrucciones. Todas las
notas de seguridad y especificaciones del manual del equipo y del manual del software
de configuración deben ser acatadas.
GEFÄHRLICHE SPANNUNG:
Vor Installations-, Wartungs- oder Änderungsarbeiten: Schalten Sie Ihre Anlage span-
nungsfrei. Stellen Sie sicher, dass sie nicht versehentlich wieder eingeschaltet werden
kann!
HAZARDOUS VOLTAGE:
Before any installation, maintenance or modification work: Disconnect your system from
the supply network. Ensure that it cannot be reconnected inadvertently!
TENSION DANGEREUSE:
Avant le début des travaux d'installation, d'entretien ou de modification: Commutez le
module hors tension. Assurez-vous qu'il ne peut pas être remise par erreur!
TENSIONE PERICOLOSA:
Prima di eseguire lavori di installazione, manutenzione o modifica: disinserire il sistema,
assicurarsi che sia privo di tensione e che la stessa non possa essere reinserita
inavvertitamente!
TENSIÓN PELIGROSA:
Antes de iniciar trabajos de instalación, mantenimiento o modificación: desconecte su
instalación. ¡Cerciórese de que no pueda ser conectada nuevamente por descuido!

Zumutbare Änderungen aufgrund technischer Verbesserungen vorbehalten. © Pepperl+Fuchs, Printed in Germany 5
Pepperl+Fuchs GmbH · 68301 Mannheim · Telefon (06 21) 7 76-11 11 · Telefax (06 21) 7 76 27-11 11 Internet http://www.pepperl-fuchs.com
Ausgabedatum: 28.07.2009
AS-Interface
Montageanweisung // Installation Instructions
Personenschutzfunktion:
Sicherheitsmonitore erfüllen eine Personenschutzfunktion. Unsachgemäßer Einbau
beeinträchtigt die Funktion! Der Hersteller der Maschine/Anlage, an der das sicherheits-
gerichtete System eingesetzt wird, ist verantwortlich für die korrekte und sichere
Gesamtfunktion aller einzelnen Sicherheitskomponenten! Je nach Auswahl der verwen-
deten Sicherheitsbauteile kann die Einstufung des gesamten Sicherheitssystems auch
in eine niedrigere Sicherheitskategorie erfolgen!
Person protective function:
Safety monitors fulfill a person protective function. Inappropriate installation puts the
function in risk! The manufacturer of the machine/plant at that one the safety related
devices is used is responsible for the correct and safe total function of all single safety
components! Depending on the choice of safety components to be used the safety sys-
tem as a whole may also be assigned to a lower safety category.
Mesures de protection personnelle:
Les moniteurs de sécurité remplissent des exigences de protection personnelle. Le
montage inapproprié porte atteinte à cette fonction! Le fabricant de la machine/applica-
tion dans laquelle le système de sécurité est installé, assume la résponsabilité pour le
fonctionnement correct et sûr de chacun des composants de sécurité! Il en peut
résulter, en fonction des composants de sécurité utilisés, le classement dans une
catégorie de sécurité inférieure!
Mezzi di protezione personale:
I monitor di sicurezza soddisfanno le esigenze di protezione personale. Il montaggio
non appropriato danneggia questa funzione! Il fabbricante della macchina/dell’applica-
zione nella quale il sistema di sicurezza viene installata, assume la responsabilità per il
funzionamento corretto e sicuro di ognuno dei componenti di sicurezza! Ne può risul-
tare, in funzione dei componenti di sicurezza utilizzati, la classificazione in una catego-
ria inferiore!
Función de protección de personas:
Los monitores de seguridad cumplen la función de proteger a las personas. Una insta-
lación inapropiada de los mismos repercute en esta función! El constructor de la
máquina o planta, en la cual será utilizado el sistema de seguridad, es responsable por
el funcionamiento correcto y seguro de cada uno de los componentes de seguridad! La
selección de los elementos de seguridad también puede resultar en un nivel de segu-
ridad del sistema menor.

Ausgabedatum: 28.07.2009
6Zumutbare Änderungen aufgrund technischer Verbesserungen vorbehalten. © Pepperl+Fuchs, Printed in Germany
Pepperl+Fuchs GmbH · 68301 Mannheim · Telefon (06 21) 7 76-11 11 · Telefax (06 21) 7 76 27-11 11 Internet http://www.pepperl-fuchs.com
AS-i 3.0 PROFIBUS Gateway mit integriertem Safety Monitor
Montageanweisung // Installation Instructions
1.4 Montage / Montage / Montage / Montaggio / Montaje
1 x 0.5 - 1.5 mm² (16AWG: min. 24/max.12)
5 ... 6 mm / PZ2
0,8 Nm
7 LB.IN
2 x (0,5 .... 1,5) mm2
2 x (0,5 ..
.. 1,5) mm2
AWG 2 x 24 ...12
10
10
Temperature rating for cable: 60/75 oC
Use copper conductors only
Operating temperature: 0 °C … +55 °C
auf Montageplatte mit 35-mm-Hutschiene
on mounting plate with 35 mm top-hat rail
sur plaque de montage avec profilé-support 35 mm
su piastra di montaggio con guida DIN 35 mm
sobre placa de montaje con guía simétrica de 35 mm
1
2
3
+-
+-+-
Die Chipkarte darf nur in spannungslosem Zustand entnommen und eingesetzt werden! /
Always turn off power before inserting or removing the card! / Pour insérer ou enlever la
carte à puce, l’appareil doit être hors tension! / L’inserimento e il disinserimento della chip-
card deve svolgersi fuori tensione! / La tarjeta chip debe ser introducida o removida sola-
mente cuando el aparato se encuentra en un estado sin tensión!
Am Kabel für das Netzteil sollten keine Slaves oder Repeater angeschlossen werden. Am Kabel für den
AS-i-Anschluss sollten keine AS-i-Netzteile oder weitere Master angeschlossen werden. Die maximale Aus-
gangsspannung des Netzteils muss auch im Falle eines Fehlers kleiner als 42 V sein. /
At the cable for power supply no slaves or repeaters may be attached. At the cable for AS-i circuit no power
supplies or further masters may be attached. Even in case of a fault, the output voltage of the power supply
shall be 42 V or less. /
Au câble pour l'alimentation aucun esclave ou répéteur ne peut être raccordé. Au câble pour le circuit AS-i
aucune alimentation ou autre maître ne peut être raccordé. Même en cas d'erreur, la tension de sortie maxi-
male de l'alimentation doit être inférieure à 42 V. /
Al cavo per l’alimentazione nessuno slave o ripetitore può essere collegato. Al cavo per il circuito AS-i nes-
sun alimentatore o altro master può essere collegato. La massimale tensione di uscita dell alimentatore deve
essere anche in caso di un errore più piccola di 42 V. /
En el cable de la alimentación AS-i no se deben conectar esclavos o repetidores. En el cable del circuito
AS-i no se debe conectar ninguna fuente de poder AS-i u otro master. La máxima tensión de salida de la
fuente de alimentación debe ser, aún en caso de un error, 42 V o menos.

Zumutbare Änderungen aufgrund technischer Verbesserungen vorbehalten. © Pepperl+Fuchs, Printed in Germany 7
Pepperl+Fuchs GmbH · 68301 Mannheim · Telefon (06 21) 7 76-11 11 · Telefax (06 21) 7 76 27-11 11 Internet http://www.pepperl-fuchs.com
Ausgabedatum: 28.07.2009
AS-Interface
Montageanweisung // Installation Instructions
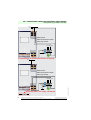
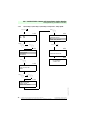
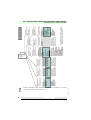
1.5 Frontansicht und Anschlüsse / Front view and connections / Vue de face et
raccordements / Vista frontale e collegamenti / Vista de frente y conexiones
+-
+-+-
+ASI 1–
+
Gateway Safety Monitor
+ASI 2–
ASI 1 +PWR– (max. 8A)
ASI 2 +PWR– (max. 8A)
[2]
[1]
M4
5 mm max!
[3]
[4]
[5]
[6]
[3]
+ASI 1– | +ASI 2–
Anschluss AS-i-Kreis 1 | AS-i-Kreis 2 / Connection AS-i circuit 1 | AS-i circuit 2 / Raccordement bus 1 AS-i | bus 2 AS-i /
Collegamento circuito 1 AS-i | circuito 2 AS-i / Conexión circuito 1 AS-i | circuito 2 AS-i
ASI 1 +PWR – (max. 8 A) | ASI 2 +PWR – (max. 8 A)
Versorgungsspannung AS-i-Kreis 1 | Kreis 2 / Supply voltage AS-i circuit 1 | circuit 2 / Tension d’alimentation bus 1|
bus 2 / Tensione di alimentazione circuito 1 | AS-i circuito 2 / Tensión de alimentación circuito 1 AS-i | circuito 2
[1] Chipkarte / Chip card / Carte de puce / Chip card / Tarjeta chip
[2] RS 232 Anschluss / RS 232 connection / Raccordement RS 232 / Collegamento RS 232 / Conexión RS 232
[3] LED-Statusanzeige / LED status display / Affichage d’état LED / Visualizzazione LED / LED visualización
[4] Profibus-Anschluss / Profibus connection / Raccordement Profibus / Collegamento Profibus / Conexión Profibus
[5] LCD-Anzeige / LCD display / Affichage LCD / Visualizzazione di stato LCD / Display LCD
[6] Tasten für Handbedienung / Buttons for hand operation / Boutons pour commande manuelle / Pulsanti per le
impostazioni manuali / Teclas para accionamiento manual

Ausgabedatum: 28.07.2009
8Zumutbare Änderungen aufgrund technischer Verbesserungen vorbehalten. © Pepperl+Fuchs, Printed in Germany
Pepperl+Fuchs GmbH · 68301 Mannheim · Telefon (06 21) 7 76-11 11 · Telefax (06 21) 7 76 27-11 11 Internet http://www.pepperl-fuchs.com
AS-i 3.0 PROFIBUS Gateway mit integriertem Safety Monitor
Montageanweisung // Installation Instructions
K2
K1
L1 L2 L3
Motor
2.Y1
I+
Safety monitor
with 2 semiconductor outputs
and 2 relay contacts
1.13 0V 24V 2.23
2.Y2 +2.Y1 +
4.14
+ 1.Y2
2.14
+
1.14
1.Y1
3.14
Connection of semiconductor outputs
+24 V
0 V
Safety monitor
with 2 semiconductor outputs
and 2 relay contacts
1.13 0V 24V 2.23
2.Y2 +2.Y1 +
4.14
+ 1.Y2
2.14
+
1.14
1.Y1
3.14
Connection of relay contacts
+24 V
1.14 1.13
K2
K1
L1 L2 L3
Motor
1.Y1
I+
0 V

Zumutbare Änderungen aufgrund technischer Verbesserungen vorbehalten. © Pepperl+Fuchs, Printed in Germany 9
Pepperl+Fuchs GmbH · 68301 Mannheim · Telefon (06 21) 7 76-11 11 · Telefax (06 21) 7 76 27-11 11 Internet http://www.pepperl-fuchs.com
Ausgabedatum: 28.07.2009
AS-Interface
Montageanweisung // Installation Instructions
3.14, 4.14
HALBLEITER-AUSGÄNGE. Max. Kontaktbelastbarkeit: 0,5 ADC-13 bei 30 V.
SEMICONDUCTOR OUTPUTS. Max. contact load: 0,5 ADC-13 at 30 V.
SORTIES SEMI-CONDUCTEURS. Charge max. des contacts: 0,5 ADC-13 sous 30 V.
SORTIES SEMI-CONDUCTEURS. Max. carico sui contatti: 0,5 ADC-13 a 30 V.
SALIDOS CON SEMICONDUCTORES. Máx. carga de contacto: 0,5 ADC-13 a 30 V.
0 V, 24 V
VERSORGUNG DER HALBLEITERAUSGÄNGE AUS SEPARATEN 24 VDC. Die Spannung muss auch im Falle eines
Fehlers kleiner als 42 V sein.
SUPPLY FOR SEMICONDUCTOR OUTPUTS OUT OF AUXILIARY 24 VDC. Even in case of a fault, the voltage shall be
42 V or less.
ALIMENTATION DES SORTIES SEMI-CONDUCTEURS À PARTIR DE 24 VDC SÉPARÉS. Même en cas d'erreur, la ten-
sion doit être inférieure à 42 V.
ALIMENTAZIONE DELLE USCITE SEMICONDUTTORI DA 24 VDC SEPARATI. La tensione deve essere anche in caso di
un errore più piccola di 45 V.
ALIMENTACÍON DE LAS SALIDAS CON SEMICONDUCTORES DE 24 VDC AUXILIARES. La máxima tensión debe ser,
aún en caso de un error, 42 V o menos. + (for EDM/Start)
STROMVERSORGUNGS-AUSGANG, VERSORGT AUS AS-I. Darf nicht mit anderen Potenzialen, sondern darf nur direkt
oder über potenzialfreie Schalter mit einem der EDM- oder Start-Eingänge verbunden werden. Spannung 30 ... 15 VDC.
CURRENT SUPPLY OUTPUT, SUPPLIED BY AS-I. It must not be connected with other potenzials, but it may be connec-
ted directly or via potential-free switches with the one of the EDM- or start inputs. Voltage range 30 ... 15 VDC.
SORTIE D’ALIMENTATION, ALIMENTÉE PAR LE BUS AS-I. Il ne faut pas la raccorder à d’autres potentiels, mais elle ne
doit être connectée que directement ou via commutateurs sans potentiel avec une des entrées EDM ou Start. Tension
30 ... 15 VDC.
USCITA DI ALIMENTAZIONE, ALIMENTATA DAL BUS AS-I. Non deve essere collegata ad altri potenziali, ma è impera-
tivo collegarla direttamente o tramite contatti senza potenziale con uno degli ingressi EDM o Start. Tensione 30 ... 15 VDC.
SALIDA DE ALIMENTACIÓN SE ALIMENTA DE AS-I. No se debe connectar a otros potenciales, sino que se debe conec-
tar directamente o con el uso de contactos de potencial libre con las entradas EDM o Start. Voltaje 30 … 15 VDC.
1.Y1 (EDM 1/Start 1), 2.Y1 (EDM 2/Start 2), 1.Y2 (EDM 3/Start 3), 2.Y2 (EDM 4/Start 4)
EDM- UND START-EINGÄNGE DÜRFEN NICHT MIT ANDEREN POTENZIALEN VERBUNDEN WERDEN, sondern dür-
fen nur direkt oder über potenzialfreie Schalter mit + (für EDM/START) verbunden werden. Die Sicherheitseinheit stellt
4 Eingänge zur Verfügung, die als EDM- oder Start-Eingänge konfiguriert werden können. Schaltstrom statisch 4 mA bei
24 V, dynamisch 30 mA bei 24 V (T=100 µs).
EDM- AND START-INPUTS MAY NOT BE CONNECTED WITH OTHER POTENTIALS, but may only be connected
directly or over potential-free switches with + (for EDM/START). The safety unit provides 4 inputs either for connecting of
EDM or Start inputs. Switching current static 4 mA at 24 V, dynamic 30 mA at 24 V (T=100 µs).
ENTRÉES EDM ET START NE DOIVENT PAS ÊTRE RACCORDÉES À D’AUTRES POTENTIELS, mais ne doivent être
connectées que directement ou via commutateurs sans potentiel avec + (pour EDM/Start). L'unité de sécurité dispose de 4
entrées qui peuvent être configurées comme entrées EDM ou Start. Courant de commutation, statique 4 mA à 24 V, dyna-
mique 30 mA à 24 V (T=100 µs).
INGRESSI EDM E START NON DEVONO ESSERE COLLEGATI AD ALTRI POTENZIALI, ma è imperativo collegarli
direttamente o tramite contatti senza potenziale con + (per EDM/Start). L 'unità di sicurezza dispone di 4 ingressi che pos-
sono essere configurati come ingressi EDM o Start. Corrente di commutazione, statica 4 mA à 24 V, dinamica 30 mA à
24 V (T=100 µs).
ENTRADAS EDM Y START NO SE DEBEN CONNECTAR A OTROS POTENCIALES, sino que se debe conectar directa-
mente o con el uso de contactos de potencial libre con + (para EDM/Start). La unidad segura está provista de 4 entradas,
las cuales pueden ser configuradas para ser utilizadas como entradas START o EDM. Corriente de conmutación: estática
4 mA a 24 V, dinámica 30 mA a 24 V (T=100 µs).
1.14, 2.14; 1.13, 2.13
POTENZIALFREIE RELAISKONTAKTE. Sicherheitsrelais mit einem Kontaktsatz zur Rücklesung. Max. Kontaktbelastbar-
keit: 3 AAC-15 bei 30 V, 3 ADC-13 bei 30 V.
POTENTIAL-FREE RELAY SWITCHES. Safety relay with a switch-set for feedback. Max. contact load: 3 AAC-15 at 30 V,
3A
DC-13 at 30 V.
CONTACTS DE RELAIS DE POTENTIEL LIBRE. Relais de sécurité avec un groupe de contacts pour feedback. Charge
max. des contacts: 3 ACA-15 sous 30 V, 3 ACC-13 sous 30 V.
CONTATTI RELÈ SENZA POTENZIALE. Relè di sicurezza con un gruppi di contatti per feedback. Max. carico sui contatti:
3A
AC-15 a 30 V, 3 ADC-13 a 30 V.
RELÉS DE POTENCIAL LIBRE. Relés de seguridad con un grupo de contactos para la retroalimentación. Máx. carga de
contacto: 3 A CA-15 a 30 V, 3 A CD-13 a 30 V.

Ausgabedatum: 28.07.2009
10 Zumutbare Änderungen aufgrund technischer Verbesserungen vorbehalten. © Pepperl+Fuchs, Printed in Germany
Pepperl+Fuchs GmbH · 68301 Mannheim · Telefon (06 21) 7 76-11 11 · Telefax (06 21) 7 76 27-11 11 Internet http://www.pepperl-fuchs.com
AS-i 3.0 PROFIBUS Gateway mit integriertem Safety Monitor
Montageanweisung // Installation Instructions
1.6 Inbetriebnahme / Commissioning / Mise en service / Messa in servizio /
Puesta en servicio
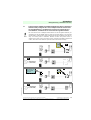
1.6.1 Wechsel in erweiterten Modus / Switching to advanced display mode / Passage
dans le mode étendu / Passaggio nel modo esteso / Cambio al modo avanzado
1.6.2 Einstellen der PROFIBUS-DP-Adresse 14 / Setting the PROFIBUS-DP
address 14 / Réglage de l’adresse PROFIBUS-DP 14 / Impostazione
dell’indirizzo PROFIBUS-DP 14 / Ajuste de la dirección PROFIBUS-DP 14
OK
ESC/Service
klassische Anzeige
classical display
affichage classique
display classico
indicación clásica
Menüaufbau siehe Zusatzblatt
menu structure see additional page
structure de menu voir page supplémentaire
struttura di menu vedi pagina supplementare
estructura del menu ver página adicional
LCD
1.12A
UNKNOWN SLAVE
LCD
PROFIBUS
QUICK SETUP
AS-I SAFETY
DIAGNOSIS
erweiterter Anzeigemodus
advanced display mode
mode d‘affichage étendu
modo di visualizzazione avanzata
modo de visualisación avanzada
LCD
PROFIBUS
OK
QUICK SETUP
ASI SAFETY
LCD
PROFIBUS ADDRESS
PROFIBUS STATUS
LCD
PROFIBUS ADDRESS
OLD ADDRESS 3
2x ↓
OK
NEW ADDRESS 000
LCD
PROFIBUS ADDRESS
OLD ADDRESS 3
NEW ADDRESS 000

Zumutbare Änderungen aufgrund technischer Verbesserungen vorbehalten. © Pepperl+Fuchs, Printed in Germany 11
Pepperl+Fuchs GmbH · 68301 Mannheim · Telefon (06 21) 7 76-11 11 · Telefax (06 21) 7 76 27-11 11 Internet http://www.pepperl-fuchs.com
Ausgabedatum: 28.07.2009
AS-Interface
Montageanweisung // Installation Instructions
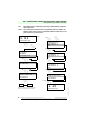
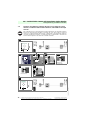
1.6.3 AS-i-Slaves anschließen / Connecting AS-i Slaves / Raccorder les esclaves AS-i / Col-
legare gli slave AS-i / Conectar esclavos AS-i
LCD
PROFIBUS
QUICK SETUP
SETUP
Das Gerät ist werkseitig auf Adresse 3 eingestellt.
The device is preset to address 3 by the manufacturer.
L’appareil est réglé en usine à l’adresse 3.
L’apparecchio è messo all’indirizzo 3 dalla fabbrica.
El aparato viene ajustado de fábrica con la dirección 3.
LCD
PROFIBUS ADDRESS
OLD ADDRESS 14
2x
ESC/Service
NEW ADDRESS 000
1x
ESC/Service
1 x OK ↑OK
LCD
PROFIBUS ADDRESS
OLD ADDRESS 3
NEW ADDRESS 010
4x ↑OK
Slave 1
AS-i
Slave 5
AS-i
LCD
0.5s
0.5s
Slave 1
AS-i
Slave 5
AS-i
AS-i prj mode
Config error
prg enable
AS-i active
U AS-i
Profibus
Power
AS-i prj mode
Config error
prg enable
AS-i active
U AS-i
Profibus
Power
1. 5
1. 1
AS-i Master
AS-i Master
LCD
1. 41
SEARCHING SLAVES

Ausgabedatum: 28.07.2009
12 Zumutbare Änderungen aufgrund technischer Verbesserungen vorbehalten. © Pepperl+Fuchs, Printed in Germany
Pepperl+Fuchs GmbH · 68301 Mannheim · Telefon (06 21) 7 76-11 11 · Telefax (06 21) 7 76 27-11 11 Internet http://www.pepperl-fuchs.com
AS-i 3.0 PROFIBUS Gateway mit integriertem Safety Monitor
Montageanweisung // Installation Instructions
1.6.4 Quick Setup / Quick setup / Quick Setup / Setup veloce / Setup rápido
config error
LCD
CONFIGURATION OK
LCD
PROFIBUS
QUICK SETUP
ASI SAFETY
DIAGNOSIS
1xOK ↓
LCD
WARNING:
OUTPUTS MAY BE
RESET
OK ↓
OK
LCD
STORE AS-I
CONFIGURATION
STORE +RUN
LCD
STORE AS-I
CONFIGURATION
OK
LCD
1. 5
OK
STORE +PRJ MODE
STORE +PRJ MODE
config error
Profibus error
no connection
1: ON 2: OFF
LCD
10s

Zumutbare Änderungen aufgrund technischer Verbesserungen vorbehalten. © Pepperl+Fuchs, Printed in Germany 13
Pepperl+Fuchs GmbH · 68301 Mannheim · Telefon (06 21) 7 76-11 11 · Telefax (06 21) 7 76 27-11 11 Internet http://www.pepperl-fuchs.com
Ausgabedatum: 28.07.2009
AS-Interface
Montageanweisung // Installation Instructions
1.6.5 Fehlersuche / Error tracing / Recherche des erreurs / Ricerca di errori / Bús-
queda de errores
1.6.5.1 Fehlerhafte Slaves / Faulty slaves / Esclaves erronés / Slave difettosi /
Esclavos incorrectos
1.6.5.2 Fehleranzeige (letzter Fehler) / Error display (last error) / Affichage
d’erreurs (dernière erreur) / Display di errori (ultimo errore) / Despliegue del
error (último error)
Slave 1
AS-i
Slave 5
AS-i
Slave 24
AS-i
1.1
AS-i prj mode
Config error
prg enable
AS-i active
U AS-i
Profibus
Power
1.24
MISSING SLAVE
MISSING SLAVE
2s
2s
LCD
LCD
AS-i Master
Slave 1
AS-i
Slave 5
AS-i
Slave 24
AS-i
AS-Interface
24
set/↓
Slave 1
AS-i
Slave 5
AS-i
Slave 24
AS-i
AS-i prj mode
Config error
prg enable
AS-i active
U AS-i
Profibus
Power
prj mode
Config error
prg enable
AS-i active
U AS-i
Profibus
Power
AS-i Master
AS-i Master
Profibus error
no connection
1: ON 2: OFF
LCD

Ausgabedatum: 28.07.2009
14 Zumutbare Änderungen aufgrund technischer Verbesserungen vorbehalten. © Pepperl+Fuchs, Printed in Germany
Pepperl+Fuchs GmbH · 68301 Mannheim · Telefon (06 21) 7 76-11 11 · Telefax (06 21) 7 76 27-11 11 Internet http://www.pepperl-fuchs.com
AS-i 3.0 PROFIBUS Gateway mit integriertem Safety Monitor
Montageanweisung // Installation Instructions
1.6.6 Slave-Adressierung / Addressing / Adressage / Indirizzamento / Asignami-
ento de dirección
1.6.6.1 Slave 2 adressieren auf Adresse 15 / Programming slave 2 to address 15 /
Affecter l’adresse 15 à l’esclave 2 / Impostare l’indirizzo 15 allo slave 2 / Asi-
gnar el esclavo 2 a la dirección 15
LCD
1. 41
SEARCHING SLAVE
↓
QUICK SETUP
AS-I SAFETY
OK
DIAGNOSIS
SLAVE ADR TOOL
CONNECT NEW SLAVE
SLAVE ADR TOOL
OLD ADDRESS 2
NEW ADDRESS 0
PRG
SLAVE ADR TOOL
OLD ADDRESS 2
NEW ADDRESS 15
2 x ESC
1. 15
UNKNOWN SLAVE
OLD ADDRESS
NEW ADDRESS
PRG
SLAVE ADR TOOL
OLD ADDRESS 2
NEW ADDRESS 15
PRG
OK
Master Slave
Modul anschließen/Connect module/Reliez
module/Colleghi modulo/Conecte modulo
SLAVE ADDR TOOL
SLAVE ADR TOOL
CONNECT NEW SLAVE
OLD ADDRESS
NEW ADDRESS
4x
6x
AS-I CIRCUIT 1
AS-I CIRCUIT 2
OK
OK
OK
↓1x
OK
OK
↓

Zumutbare Änderungen aufgrund technischer Verbesserungen vorbehalten. © Pepperl+Fuchs, Printed in Germany 15
Pepperl+Fuchs GmbH · 68301 Mannheim · Telefon (06 21) 7 76-11 11 · Telefax (06 21) 7 76 27-11 11 Internet http://www.pepperl-fuchs.com
Ausgabedatum: 28.07.2009
AS-Interface
Montageanweisung // Installation Instructions
1.7 Austausch eines defekten sicherheitsgerichteten AS-i-Slaves / Replacing a
defective safety-configured AS-i slave / Remplacement des esclaves AS-i
de sécurité défectueux / Sostituzione di uno slave AS-i riferito alla sicu-
rezza difettoso / sustitución de un esclave AS-i de seguridad averiado
Der neue Slave muss Codefolgen liefern können und auf die gleiche Adresse pro-
grammiert sein wie der defekte Slave. Es darf nur ein Slave fehlen! // The new slave
must be able to send teaching codes and must have the same address as the old one.
Only one missing slave is allowed! // Nouveau esclave doit pouvoir fournir le
séquences de code! // Slave nuovo deve essere in grado di trasmettere sequenzi di
codici! / El esclavo nuevo debe ser capaz de enviar la secuencia di código!
CONNECT
NEW SLAVE 17
THEN PRESS
SERVICE
ESC/Service
(3 seconds)
ESC/Service
(3 seconds)
[2]
[3]
[4]
[1]

Ausgabedatum: 28.07.2009
16 Zumutbare Änderungen aufgrund technischer Verbesserungen vorbehalten. © Pepperl+Fuchs, Printed in Germany
Pepperl+Fuchs GmbH · 68301 Mannheim · Telefon (06 21) 7 76-11 11 · Telefax (06 21) 7 76 27-11 11 Internet http://www.pepperl-fuchs.com
AS-i 3.0 PROFIBUS Gateway mit integriertem Safety Monitor
Montageanweisung // Installation Instructions
1.8 Austausch der Chipkarte / Replacing the chip card / Échange de la carte
mémoire / Sostituzione della scheda di memoria / Intercambio de la tarjeta
de viruta
Die Chipkarte darf nur in spannungslosem Zustand entnommen und eingesetzt werden! /
Always turn off power before inserting or removing the card! / Pour insérer ou enlever la
carte à puce, l’appareil doit être hors tension! / L’inserimento e il disinserimento della chip-
card deve svolgersi fuori tensione! / La tarjeta chip debe ser introducida o removida sola-
mente cuando el aparato se encuentra en un estado sin tensión!
[3] [4] [5]
[2]
[6] [7]
alt/old/ancien/
vecchia/anciano
neu/new/neuve/
[1]
[8]

Zumutbare Änderungen aufgrund technischer Verbesserungen vorbehalten. © Pepperl+Fuchs, Printed in Germany 17
Pepperl+Fuchs GmbH · 68301 Mannheim · Telefon (06 21) 7 76-11 11 · Telefax (06 21) 7 76 27-11 11 Internet http://www.pepperl-fuchs.com
Ausgabedatum: 28.07.2009
AS-Interface
Montageanweisung // Installation Instructions
1.8.1 Vor-Ort Parametrierung sicherer AS-i/Gateways und Monitore / Local para-
meter setting of safe AS-i/Gateways and Monitors / Paramétrage local des
passerelles et moniteurs AS-i de sécurité / Parametraggio locale dei gate-
way et monitor AS-i di sicurezza / Configuratión en el campo de las pasare-
las seguras AS-i y los monitores seguras
CHIPCARD FOUND
DATA WILL
BE SYNCHRONIZED
Karte leer + formatiert
/Card empty + formatted/
Daten werden synchronisiert:
/Data being synchronized/
NEW CHIPCARD
WILL BE FORMATTED
DATA WILL BE
SYNCHRONIZED
Karte nicht formatiert
/Card not formatted/
Karte wird formatiert:
/Formatting card /
DATA FROM
CHIPCARD TAKEN
Daten kompatibel
(Werkskonfiguration)
/Data compatible (factory
configuration)/
Daten werden übernommen:
/Data being acepted/
CHIPCARD NOT
COMPATIBLE
Daten nicht kompatibel
/Data not compatible/
Fehlermeldung:
/Error message/ CHIPCARD AND
DATA
DIFFERENT
CARD->MASTER
MASTER->CARD
CONTINUE
Geräte+Chipdaten ungleich
(Werkskonfiguration geändert)
/Device+card data not equal
(Factory configuartion changed)
Fehlermeldung:
/Error message/
Geräte+Chipdaten gleich
/Device data+card data equal/
Keine Meldung
/No message/
Keine Aktion erforderlich
/No action required/
/Aucune action requise/
/Nessuna azione richiesta/
/Ninguna deción requrida/
Karte löschen
/Clear the card/
/Supprimer carte/
/Cancellare chipcard/
/Borrar chip/
Daten kopieren
KARTE->MASTER oder
MASTER->KARTE
Copy data CARD->MASTER
or MASTER->CARD
Copier données Carte->Maître ou
Maître-Carte
Copiare dati Chipcard->Master o
copiare dati Master->Chipcard
Copiar dates Chip->Maestro o
Maestro ->Chip
Unsichere Daten / Non-safe data/
Données non-sécurisées/
Dati non sicuri / Datos no seguros/
Keine Aktion erforderlich
/No action required/
/Aucune action requise/
/Nessuna azione richiesta/
/Ninguna deción requrida/
Keine Aktion erforderlich
/No action required/
/Aucune action requise/
/Nessuna azione richiesta/
/Ninguna deción requrida/
Keine Aktion erforderlich
/No action required/
/Aucune action requise/
/Nessuna azione richiesta/
/Ninguna deción requrida/
Weitere Informationen siehe Kap. / For further
information see chap. <Austausch eines defek-
ten Gerätes / Replacing a defective device /

Ausgabedatum: 28.07.2009
18 Zumutbare Änderungen aufgrund technischer Verbesserungen vorbehalten. © Pepperl+Fuchs, Printed in Germany
Pepperl+Fuchs GmbH · 68301 Mannheim · Telefon (06 21) 7 76-11 11 · Telefax (06 21) 7 76 27-11 11 Internet http://www.pepperl-fuchs.com
AS-i 3.0 PROFIBUS Gateway mit integriertem Safety Monitor
Montageanweisung // Installation Instructions
CHIPCARD NOT
COMPATIBLE
CHIPCARD FOUND
SAFETY DATA WILL
BE SYNCHRONIZED
CHIPCARD FOUND
SAFETY DATA WILL
BE SYNCHRONIZED
Sichere Daten auf der
Chipkarte nicht kompatibel
zum Gerät
/Safe data on the chip card
not compatible to the device/
Fehlermeldung:
/Error message/
Keine validierte Konfiguration im
Gerät + Chipkarte
/No validated configuration in
the device + chip card/
Daten werden synchronisiert:
/Data being synchronized/ ERROR.
CHIPCARD AND
SAFETY DATA
DIFFERENT.
DELETE CHIPCARD
OR SAFETY DATA
Konfiguration per
Release-Code freigeben
/Validate the configuration
via release code/
/Respecter les indications
de sécurité exposées dans
le manuel ASIMON
/Osservare le istruzioni di
sicurezza riportate nel
manuale ASIMON
/Habilitar la configuratión
con el código de liberatión/
Validierte Konfiguration im
Gerät, Chipkarte leer
/Validated configuration
in the device, chip card empty/
Daten werden synchronisiert:
/Data being synchronized/
Gerät enthält keine validierte
Konfiguration
/No validated configuration in
the device/
Stamm-/Vollständige
Konfiguartion auf der Chipkarte
/Master configuration or
complete configuration on the
card
Datenfreigabe per
Release-Code notwendig:
/Data release via release code
required/
COPY BANK A TO
MONITOR
...
RELEASE CODE:
1BDF
---------------
TYPE CODE
1BDF OK
Stamm-/Vollständige
Konfiguartion auf der Chipkarte
enthalten
/Master configuration or
complete configuration on the
card
Gerät enthält validierte
Konfiguration, Daten ungleich
/There is a validated
configuration on the card, data
not equal
Beide Konfigurationen ungleich/
Both configurations not equal
Fehlermeldung:
/Error message/
Keine Aktion erforderlich
/No action required/
/Aucune action requise/
/Nessuna azione richiesta/
/Ninguna deción requrida/
Keine Aktion erforderlich
/No action required/
/Aucune action requise/
/Nessuna azione richiesta/
/Ninguna deción requrida/
Keine Aktion erforderlich
/No action required/
/Aucune action requise/
/Nessuna azione richiesta/
/Ninguna deción requrida/
Karte löschen
/Clear the card/
/Supprimer carte/
/Cancellare chipcard/
/Borrar chip/
Daten löschen
/Clear data/
/Supprimer données /
/Cancellare dati
/Borrar datos
Sichere Daten / Safe data/
Données sécurisées/
Dati sicuri / Datos seguros
Stamm-/Vollständige
Konfiguartion auf der Chipkarte
/Master configuration or
complete configuration on the
card
Gerät enthält validierte
Konfiguration
/There is a validated
configuration on the card
Beide Konfigurationen gleich/
Both configurations identical
Keine Meldung
/No message/
Weitere Informationen siehe Kap. / For further
information see chap. <Austausch eines defek-
ten Gerätes / Replacing a defective device /
Weitere Informationen siehe Gerätedokumentation Kap. <Chipkarte> / For further
information see manual, section <Chip card>.

Zumutbare Änderungen aufgrund technischer Verbesserungen vorbehalten. © Pepperl+Fuchs, Printed in Germany 19
Pepperl+Fuchs GmbH · 68301 Mannheim · Telefon (06 21) 7 76-11 11 · Telefax (06 21) 7 76 27-11 11 Internet http://www.pepperl-fuchs.com
Ausgabedatum: 28.07.2009
AS-Interface
Montageanweisung // Installation Instructions
1.9 Sichere Konfiguration mit ASIMON 3 G2 / Safe configuration using ASIMON
3 G2 / Configuration de sécurité avec ASIMON 3 G2 / Configurazione di
sicurezza con ASIMON 3 G2/Configuración de seguridad con ASIMON 3 G2
Vor der Inbetriebnahme der Sicherheitseinheit das Gateway in Betrieb nehmen! /
Before commissioning the safety unit, put the gateway into operation! / Avant la mise
en service du bloc de sécurité, mettre en service la passerelle! / Prima della messa in
servizio dell’unità di sicurezza, mettere in funzione il gateway! / Ponga en marcha la
pasarela antes de poner en marcha la unidad de seguiridad!
ASIMON 3 G2
Software
Start
ASIMON 3 G2 Software
Ändern Sie mit Monitor/Passwortänderung das voreingestellte Passwort bei der ersten Benutzung des
Gerätes! / Change the preset password during the first use of the device (Monitor/change password)! /
Modifier le mot de passe préréglé en usine en choississant Moniteur/Changement mot de passe lors de
la première utilisation de l'appareil! / Modificare la password impostata in fabbrica scelgiendo Monitor/
cambiamento password quando usate per la prima volta l'apparecchio! / Cambie la contraseña prepro-
gramada de fábrica en la primera utilización del equipo por medio de Monitor/Cambio de contraseña!
ASIMON 3 G2 Software
Stellen Sie die gewünschte Konfiguration zusammen. / Create the desired configuration. / Définir la
configuration souhaitée. / Stabilire la configurazione desiderata. / Escoja la configuración deseada.
ASIMON 3 G2 Software
Spielen Sie die Konfiguration mit MONITOR / PC-> MONITOR ins Gerät. Geben Sie dazu das Passwort
ein. / Download the configuration with MONITOR / PC-> MONITOR into the device. Enter the password
for this purpose. / Enregistrer la configuration en choississant MONITEUR / MONITEUR-> PC dans
l'appareil. Entrer le mot de passe. / Registrare la configurazione nell'apparecchio scelgiendo MONITOR
/ MONITOR-> PV. Entrare la password. / Descargue la configuración con MONITOR / PC-> MONITOR
en el monitor. Escriba la clave del aparato para este efecto.
ASIMON 3 G2 Software
Die Abfrage CODEFOLGEN EINLERNEN? können Sie mit "Ja" bestätigen oder den Vorgang später
über das Display ausführen, wenn Sie "Nein" wählen. / You can acknowledge the request TEACH
CODE SEQUENCES? selecting "Yes", or you can do it later via display selecting "No". / Sélectionner
"Oui" pour répondre affirmativement à la requête APPRENTISSAGE TABLES DE CODE, ou "No" pour
exécuter l'action plus tard via l'afficheur. / Selezionare "Si" per rispondere affirmativamente alla richiesta
TEACH SEQUENZE DI CODICE, o "No" per eseguire l'azione più tardi mediante il display. / La preg-
unta desea efectuar el aprendizaje de las secuencias de código? la puede confirmar con "Sí", o con
"No" y luego realizar este proceso por medio de la pantalla.

Ausgabedatum: 28.07.2009
20 Zumutbare Änderungen aufgrund technischer Verbesserungen vorbehalten. © Pepperl+Fuchs, Printed in Germany
Pepperl+Fuchs GmbH · 68301 Mannheim · Telefon (06 21) 7 76-11 11 · Telefax (06 21) 7 76 27-11 11 Internet http://www.pepperl-fuchs.com
AS-i 3.0 PROFIBUS Gateway mit integriertem Safety Monitor
Montageanweisung // Installation Instructions
ASIMON 3 G2 Software
ASIMON 3 G2 Software
Prüfen Sie das Konfigurationsprotokoll (beachten Sie hierzu die Anweisungen im <Kap. 5.8> der
ASIMON Dokumentation!). / Check the configuration log (respect instructions in <chap. 5.8> of the
ASIMON manual!). / Contrôler le protocole de configuration (veillez à respecter les instructions don-
nées dans le <chap. 5.8> du manuel du logiciel ASIMON). / Controllare il protocollo di configurazione
(osservare le istruzioni indicate nel <cap. 5.8> del manuale per il software ASIMON). / Compruebe el
protocolo de configuración (considere para este caso las instrucciones en <cap. 5.8> de la documenta-
ción de ASIMON).
ASIMON 3 G2 Software
Geben Sie mit MONITOR –> FREIGABE die Konfiguration frei. / Validate the configuration with MONI-
TOR –> VALIDATION. / Valider la configuration avec MONITEUR –> LIBÉRATION / Abilitare la configu-
razione scelgiendo MONITOR –> ABILITAZIONE. / Habilite la configuración con MONITOR–>
HABILITACION.
ASIMON 3 G2 Software
Starten Sie den Monitor mit MONITOR–> START. / Start the monitor with MONITOR–> START. /
Démarrer le moniteur avec MONITEUR–> START. / Avviare il monitor scelgiendo MONITOR –> START.
/ Inicie el monitor con MONITOR–>INICIO.
☺Press OK for Menu
Output Circuit
1:ON 2:OFF
☺Press OK for Menu
Output Circuit
1:ON 2:ON
3:ON 4:ON
Das Gerät ist jetzt im geschützten Betriebsmodus. / The device is in the
protected mode now. / L’appareil est en mode protegé. / L’apparecchio è
in modo protetto. / El equipo se encuentra en modo protegido.
Wird dem Sicherheitsmonitor in der ASIMON 3 G2 Software eine eigene Adresse
zugewiesen, muss die Projektierung im AS-i-Master (Quick Setup) angepasst werden!
Dies gilt auch bei der Verwendung von simullierten Slaves. / If you have assigned the
safety monitor its own address in the software ASIMON 3 G2, adjust the configuration
in the AS-i master (Quick Setup)! This is also valid when using simulated slaves.
La pagina sta caricando ...
-
 1
1
-
 2
2
-
 3
3
-
 4
4
-
 5
5
-
 6
6
-
 7
7
-
 8
8
-
 9
9
-
 10
10
-
 11
11
-
 12
12
-
 13
13
-
 14
14
-
 15
15
-
 16
16
-
 17
17
-
 18
18
-
 19
19
-
 20
20
-
 21
21


Pepperl+Fuchs VBG-PB-K30-DMD-S16 Guida d'installazione
- Tipo
- Guida d'installazione
in altre lingue
Documenti correlati
-
Pepperl+Fuchs VBG-PB-K20-DMD Guida d'installazione
-
-
-
-
-
-
-
-
-