
DE Montage- und Bedienungsanleitung 2
EN Installation and operating instructions 22
ES Instrucciones de montaje y uso 42
FR Notice de montage et d‘utilisation 12
IT Manuale di funzionamento e montaggio 32
NL Montage- en bedieningshandleiding 52
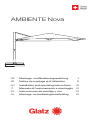
AMBIENTE Nova

32
Inhaltsverzeichnis
Herzlich willkommen 3
Optionales Zubehör 3
Technische Daten 3
Sicherheitshinweise 4
Montage und Inbetriebnahme 6
Gebrauch 8
Wartung und Pege 10
Demontage 10
Gewährleistung 11
Entsorgung 11
Herzlich willkommen
Herzlichen Glückwunsch zum Kauf Ihres neuen AMBIENTE Nova. Sie
haben ein hochwertiges Produkt erworben. Diese Anleitung ist Bestand-
teil dieses Produktes. Sie enthält wichtige Informationen zur Sicher-
heit, Verwendung und Entsorgung für Anwender des Produktes. Bitte
machen Sie sich mit allen aufgeführten Informationen vertraut, bevor Sie
das Produkt verwenden. Das Produkt darf nur wie hierin beschrieben
und für die angegebenen Anwendungsszenarien verwendet werden. Bei
ordnungsgemässer Verwendung und Pege, wird Ihnen der AMBIENTE
Nova jahrelang gute Dienste leisten.
Optionales Zubehör
Zu Ihrem Sonnenschirm gibt es ein hochwertiges Zubehörprogramm.
Es umfasst unter anderem folgende Produkte, welche perfekt zu Ihrem
Sonnenschirm passen:
• Sockel
• Montageplatten
• Bodenhülsen
• Mauerkonsole
• Drehfuss
• Schutzhülle
• OSYRION Spot
Fragen Sie dazu Ihren GLATZ-Händler.
Verwendete Warnworte
!GEFAHR Unmittelbar gefährliche Situation, die zum Tod oder
schweren Verletzungen führen kann.
!VORSICHT Potenziell gefährliche Situation, die zu kleineren bis
mittelschweren Verletzungen führen kann.
!HINWEIS Eine Situation, die zu Sachbeschädigungen führen kann.
Das Produkt dient als Vorrichtung zum Schutz des menschlichen Körpers
vor Sonneneinstrahlung. Das Produkt darf nur in privaten Haushalten, in
der Gastronomie und Hotellerie, oder in einem vergleichbaren Umfeld
eingesetzt werden. Das Produkt darf nur gemäss dieser Montage- und
Bedienungsanleitung verwendet werden. Jegliche andere als in dieser
Montage- und Bedienungsanleitung beschriebene Verwendung gilt als nicht
bestimmungsgemässe Verwendung. Änderungen im Zuge des technischen
Fortschritts bleiben vorbehalten. In dieser Anleitung wird der AMBIENTE
Nova auch als «Produkt» oder «Sonnenschirm» bezeichnet.
Bestimmungsgemässe Verwendung
ø 400 11.3 158/134 225/201 365
450 x 350 15.8 80/56 225/201 368
ø 500 17.7 146/122 225/201 401
350 x 350 12.3 92/68 225/201 343
400 x 300 12.0 80/56 225/201 334
400 x 400 16.0 80/56 225/201 367
Technische Daten
Grösse Grundäche Schliesshöhe
ohne/mit Volant Durchgangshöhe
ohne/mit Volant Gesamthöhe
[cm] [m
2
][cm] [cm] [cm]
Angaben bei Verwendung der Bodenhülse M4

54
Sicherheitshinweise
LESEN SIE ALLE SICHERHEITSHINWEISE SORGFÄLTIG
DURCH UND STELLEN SIE SICHER, DASS SIE SIE VERSTE-
HEN.
• Alle Anweisungen befolgen, um Unfälle, Feuer, Explosionen,
Stromschläge oder andere Gefahren zu vermeiden, welche
Sachschäden verursachen und/oder zu schweren oder töd-
lichen Verletzungen führen können.
• Sicherstellen, dass jede Person die das Produkt verwendet,
diese Warnungen und Anweisungen gelesen hat und befolgt.
• Diese Montage- und Bedienungsanleitung für die Zukunft
aufheben. Sie muss nachfolgenden Benutzern des Produkts
weitergegeben werden.
• Der Hersteller haftet nicht für materielle Schäden oder
Verletzungen, die durch falsche Handhabung oder Nichtein-
haltung der Sicherheitshinweise entstanden sind. In solchen
Fällen wird die Gewährleistung ungültig.
• Die Schutzwirkung gegen gefährliche UV-Strahlung ist je
nach Umgebung unterschiedlich. Eventuell sind zusätzliche
Massnahmen zum Schutz der Haut nötig.
• Kinder dürfen nicht mit dem Produkt spielen.
• !GEFAHR Kinder immer von Verpackungsmaterial fernhalten
- dieses stellt eine Erstickungsgefahr dar. Kinder unterschät-
zen Gefahren. Dieses Produkt ist kein Spielzeug.
• Kinder ab 8 Jahren und Personen mit eingeschränkten physi-
schen, sensorischen oder geistigen Fähigkeiten, mangelnder
Erfahrung und Kenntnisse dürfen das Produkt nur gebrau-
chen, wenn sie von einer für ihre Sicherheit zuständigen Per-
son beaufsichtigt werden oder ihnen der sichere Gebrauch
des Gerätes gezeigt wurde und sie die damit verbundenen
Gefahren verstanden haben. Reinigungs- und Wartungs-
arbeiten dürfen nicht von Kindern ohne Beaufsichtigung
durchgeführt werden.
• Das Gerät bei Mangel an Konzentration / Aufmerksamkeit
und / oder unter Einuss von Drogen, Alkohol oder Medika-
menten nicht verwenden.
• Das Produkt muss in einem Sockel mit geeignetem Gewicht
oder einer Bodenhülse mit genügend fester Verankerung
aufgestellt werden.
• Das Produkt nicht fallen oder anschlagen lassen.
• Spannweite des Sonnenschirms vor dem Öffnen / Schliessen
prüfen.
• Sicherstellen, dass beim Öffnen / Schliessen keine Per-
sonen / Objekte im Bewegungsbereich sind. Ansonsten
können Verletzungen / Beschädigungen auftreten.
• !GEFAHR Sonnenschirm bei auffrischendem Wind, stürmi-
schen Wetterverhältnissen und / oder Schneefall schliessen.
• Angaben für die maximal zulässige Windgeschwindigkeit
bei fester Bodenverankerung (Bodenhülse in Beton ein-
gesetzt) beachten. Falls eine andere Befestigungsmethode
verwendet wird, ist die zulässige Windgeschwindigkeit
reduziert.
• Unbeaufsichtigte Schirme dürfen nicht geöffnet bleiben.
Allfällige Schäden fallen nicht unter die Gewährleistung.
Geschlossene Schirme immer mit einem Bindegurt zusam-
menbinden.
• Nur Originalzubehör und -ersatzteile verwenden.
• Veränderungen am Produkt und technische Modizierun-
gen sind nicht zulässig.
• Während dem Öffnen und Schliessen des Schirms muss
dieser überwacht werden.
• Schirm und Zubehör regelmässig auf übermässigen Ver-
schleiss und Beschädigungen überprüfen. Werden Mängel
festgestellt, diese vor dem weiteren Gebrauch beheben
lassen.
• Keine Lösungsmittel und scheuernde Reinigungsmittel ver-
wenden.
• Demontierte Schirme dürfen nur liegend gelagert werden.
• Bei Verwendung einer festen Bodenverankerung muss die
Installation durch speziell geschulte Personen gemäss den
separaten Montageanweisungen erfolgen.
• Keine offene Flamme in der Nähe oder unter dem Sonnen-
schirm anzünden.

76
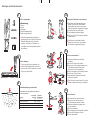
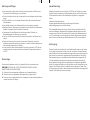
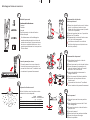
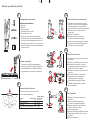
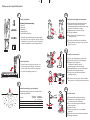
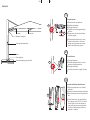
Lieferumfang:
- Schirm
- Kurbel
- Bindegurt
- Standrohrabdeckung
- Bedienungsanleitung
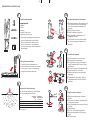
Schirm auspacken
1
Verpackungsmaterial sachgerecht
entsorgen und von Kindern fernhalten.
Defektes Material nicht in Betrieb
nehmen. Im Falle von Schäden un-
verzüglich den Transportdienstleister
informieren.
!
2
Schirm ablegen
Schirm vorsichtig auf saubere, hori-
zontale Fläche legen. Der Schirm ist
sehr schwer. Zu dritt arbeiten und den
Schirm gut festhalten.
!
4
1. Standrohr auf Bodenbefestigung
stellen. Die Seite mit den beiden
Gewindelöchern muss nach vorne
(dem Schirmdach zugewandt) zeigen
2. Lochbild / Position ausrichten
3. 5 Unterlagsscheiben auegen
4. Standrohr mit 5 Sechskantschrauben
vormontieren
Optionales Standrohr vormontieren
Die Seite mit den beiden Gewin-
delöchern muss nach vorne (dem
Schirmdach zugewandt) zeigen.
!
4.1 4.3 4.4
nach
vorne
5x
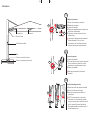
6
1. Schirmposition nal ausrichten
2. Schirm durch Festziehen der
5 Sechskantschrauben xieren
3. Standrohrabdeckung ganz nach
unten schieben
4. Schirm schliessen
5. Stoffsegmente herausziehen / wickeln
6. Schirm mit Bindegurt sichern
7. Kurbel abnehmen
Schirm xieren
6.1 6.2
6.3
5x
Der Schirm ist sehr schwer. Zu dritt ar-
beiten und den Schirm gut festhalten.
!
5
1. Standrohrabdeckung auf Mast
schieben
2. Schirm auf Standrohr stellen
3. Schirm mit 2 Unterlagsscheiben und
2 Rundkopfschrauben mit dem
Standrohr fest verschrauben
4. Kurbel aufsetzen und Bindegurt lösen
5. Schirm mit Kurbel öffnen
6. Sicherstellen, dass die Innenteile
ineinander greifen
Schirm vormontieren
5.1 5.4
5.3
5.5
5.6
5.2
Montage und Inbetriebnahme
3
Bodenbefestigung gemäss separater
Anleitung setzen.
Bodenbefestigung vorbereiten
ø 400, 400 x 300 240 45 (6)
350 x 350 240 40 (6)
ø 500, 450 x 350, 400 x 400 310 35 (5)
* maximale Windstärke bei xer Verankerung im Boden.
Grösse minimales
Gewicht maximale
Windstärke*
[cm] [kg] [km/h (Bft.)]

98
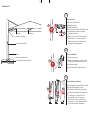
Wagen / Tragarm
Überzug
Schirmbefestigung (optional)
Kurbel (abnehmbar)
Standrohrabdeckung
Streben
1. Kurbel aufstecken
2. Gegen Uhrzeigersinn kurbeln, bis der
Schirm vollständig geschlossen ist
3. Kurbel abnehmen
Schirm schließen
2
Schirm möglichst kompakt halten.
!
Mast
1. Schutzhülle entfernen
2. Bindegurt lösen
3. Kurbel aufstecken
4. Schirm durch Kurbeln komplett öffnen
5. Sicherstellen, dass die Innenteile
ineinander greifen
Schirm öffnen
1
Der Schirm richtet sich automatisch
horizontal aus. Für einen sicheren
Betrieb müssen die Innenteile voll-
ständig ineinander greifen!
!
1.5
1. Stoffsegmente herausziehen / wickeln
2. Schirm mit Bindegurt sichern
3. Bei Bedarf Schutzhülle überziehen
Schirm binden / schützen
3
Um die Lebensdauer des Überzuges
zu verlängern, empehlt GLATZ
grundsätzlich den Einsatz einer
Schutzhülle, wenn der Schirm ge-
schlossen ist. Nur vollständig trocke-
ne Schirme wickeln / einpacken.
!
3.3
3.1
3.2
Gebrauch
1.4
2.2

1110
Entsorgung
Dieses Symbol auf dem Produkt, den Zubehörteilen oder auf der Verpa-
ckung zeigt an, dass das Produkt nicht als unsortierter Hausmüll behan-
delt werden darf, sondern separat entsorgt werden muss. Entsorgen Sie
das Produkt an einer dafür vorgesehenen Sammelstelle für Recycling.
Die Verpackung ist aus umweltfreundlichen Materialien hergestellt, die
in Ihren lokalen Recyclingeinrichtungen entsorgt werden können. Mit
der korrekten Entsorgung der Verpackungen und Verpackungsabfälle
helfen Sie, mögliche Gefahren für die Umwelt und die Gesundheit zu ver-
meiden. Das Produkt besteht aus Metall und synthetischen Teilen. Eine
Entsorgung zum Ende der Lebensdauer muss im Rahmen der regionalen
Umwelt- und Abfallvorschriften erfolgen.
Gewährleistung
Nehmen Sie immer zuerst mit ihrem GLATZ Partner Kontakt auf, bevor
Sie das Produkt einsenden. Die Gewährleistung auf den Schirm beträgt
24 Monate ab Kaufdatum. Die Gewährleistung erlischt in folgenden
Fällen:
• Äussere Gewalteinwirkung
• Unsachgemässe Bedienung und Wartung des Schirms
• Beschädigungen durch höhere Gewalt
Die Windgewährleistung für einen offenen Schirm ist beschränkt. Die
maximal zulässigen Windgeschwindigkeiten bedingen immer eine xe
Verankerung im Boden. Bei mehreren Schirmen ist ein Mindestabstand
von 25 cm zwischen zwei Schirmen einzuhalten. Ebenfalls ist zwischen
dem Schirm und Wänden der Mindestabstand von 25 cm einzuhalten.
Wartung und Pege
• Sonnenschirm in geöffnetem Zustand trocknen lassen, um Bildung von
Schimmel und Verfärbungen zu verhindern.
• Eine Schutzhülle schützt den Sonnenschirm und verlängert seine Lebens-
dauer.
• Die Schutzhülle nur in trockenem Zustand über den trockenen Sonnen-
schirm ziehen.
• Schutzhülle weder in der Waschmaschine noch chemisch reinigen.
• Reinigen Sie den Überzug des Sonnenschirms bei Bedarf mit lauwarmem
Wasser, Feinwaschmittel und einem Schwamm.
• Verwenden Sie kein Bleichmittel und keine scharfen Objekte, um
Beschä digungen am Überzug zu vermeiden.
• Von Zeit zu Zeit festen Sitz aller Schrauben überprüfen, bei Bedarf nach-
ziehen.
• Wenn der Sonnenschirm an stark exponierter Stelle steht, muss mit
erhöhtem Verschleiss gerechnet werden. In solchen Fällen empfehlen wir
eine intensivere Wartung und Pege.
• In den meisten Fällen können defekte Schirme von Ihrem GLATZ Partner
repariert werden. Verwenden Sie ausschliesslich Originalersatzteile von
GLATZ.
Sonnenschirm abbauen, falls er für längere Zeit nicht verwendet wird.
GEFAHR! KIPPGEFAHR. VERLETZUNGSGEFAHR DURCH EINEN
UMKIPPENDEN SONNENSCHIRM.
1. Sonnenschirm sachgemäss schliessen und zusammenbinden.
2. Sonnenschirm in umgekehrter Montagerichtung demontieren.
3. Sonnenschirm in liegender Position zusammen mit allen Zubehörteilen an
einem trockenen Ort lagern.
Demontage

1312
Sommaire
Bienvenue 13
Accessoires en option 13
Caractéristiques techniques 13
Consignes de sécurité 14
Montage et mise en service 16
Utilisation 18
Entretien et nettoyage 20
Démontage 20
Garantie 21
Élimination 21
Bienvenue
Félicitations pour l’achat de votre tout nouveau AMBIENTE Nova. Vous
venez de faire l’acquisition d’un produit de haute qualité! Le présent
mode d’emploi fait partie intégrante de celui-ci. Il contient d’importantes
informations pour l’utilisateur, qui concernent la sécurité, l’utilisation et
l’élimination de ce produit. Avant de l’utiliser, veuillez bien vous familiari-
ser avec toutes les informations qui gurent dans ce mode d’emploi. Ce
produit doit impérativement être utilisé comme décrit dans celui-ci et
ce, uniquement pour les scénarios d’utilisation indiqués. Si vous l’utilisez
correctement et en prenez soin, votre AMBIENTE Nova vous rendra de
bons et loyaux services durant de longues années!
Accessoires en option
Votre parasol est assorti d’une gamme d’accessoires de qualité. Elle
comprend notamment les produits suivants, qui sont parfaitement adap-
tés à votre parasol :
• Socle
• Plaques de xation
• Douille à enfoncer
• Console murale
• Adaptateur rotatif
• Housse de protection
• OSYRION Spot
Renseignez-vous auprès de votre revendeur GLATZ.
Messages d’avertissement utilisés:
DANGER! Situation à risque direct pouvant entrainer la mort ou de
graves blessures.
ATTENTION! Situation à risque potentiel pouvant entrainer des bles
sures légères à moyennement graves.
INDICATION Situation pouvant entrainer des dégâts matériels.
IMPORTANTE!
Ce produit sert à protéger le corps humain contre le rayonnement solaire. Il
est réservé à un usage privé ainsi qu’à un usage dans le secteur de la restau-
ration/de l’hôtellerie ou dans des environnements comparables. Ce produit
doit impérativement être utilisé comme indiqué dans le présent notice de
montage et d‘utilisation Toute autre utilisation sera considérée comme non
conforme. Nous nous réservons par ailleurs le droit d’apporter des modica-
tions an d’intégrer les nouvelles avancées technologiques. Dans la présente
notice, le AMBIENTE Nova est également désigné par les termes «produit»
et «parasol».
Conformité d’utilisation
Caractéristiques techniques
Taille Encombrement
au sol Hauteur replié
sans/avec lambrequin
Longueur
de course
sans/avec lambrequin Hauteur
totale
[cm] [m
2
][cm)] [cm] [cm]
Détails de l’utilisation du douille à enfoncer M4
ø 400 11.3 225/201 365
450 x 350 15.8 225/201 368
ø 500 17.7 225/201 401
350 x 350 12.3 225/201 343
400 x 300 12.0 225/201 334
400 x 400 16.0 225/201 367
158/134
80/56
146/122
92/68
80/56
80/56

1514
Consignes de sécurité
LISEZ ATTENTIVEMENT TOUTES LES CONSIGNES DE SÉCU-
RITÉ CI-DESSOUS ET ASSUREZ-VOUS DE LES AVOIR BIEN
COMPRISES.
• Respecter toutes les consignes an d’éviter les accidents,
incendies, explosions, électrocutions et autres dangers
susceptibles de provoquer des dommages matériels et/ou
des blessures graves, voire mortelles.
• S’assurer que tout utilisateur du produit a lu et respecte
les avertissements et les consignes.
• Conservez ce notice de montage et d‘utilisation pour l’avenir.
Il doit être transmis aux utilisateurs ultérieurs du produit.
• Le fabricant décline toute responsabilité pour les préjudices
matériels ou corporels résultant d’une mauvaise manipulation
ou du non-respect des consignes de sécurité. La garantie est
alors caduque.
• La protection contre les rayonnements UV dangereux varie
d’une personne à l’autre. Dans certains cas, il convient de
prévoir d’autres mesures de protection de la peau.
• Il est interdit aux enfants de jouer avec le produit.
• DANGER! Pour éviter tout risque de suffocation, les maté-
riaux d’emballage doivent rester hors de portée des enfants.
Les enfants tendent à sous-estimer les dangers. Ce produit
n’est pas un jouet!
• Les enfants âgés de 8 ans et plus et les personnes ayant des
déciences physiques, sensorielles ou mentales, ou qui ne
ossèdent pas l’expérience et la connaissance nécessaires, ne
doivent utiliser le produit que s’ils sont supervisés ou que des
instructions leur ont été données par une personne respon-
sable de leur sécurité pour l’utilisation de l’appareil et après en
avoir compris les dangers. Les opérations de nettoyage et de
maintenance ne doivent pas être effectuées par des enfants
sans surveillance.
• Ne pas utiliser en cas de décience de concentration et/ou
d’attention, et/ou sous l’inuence de drogues, de l’alcool ou
de médicaments.
• Ce produit doit être soit placé sur un socle sufsamment
lourd, soit être solidement ancré dans le sol au moyen d’un
manchon approprié.
• Ne pas faire tomber ni heurter le produit.
• Bien tenir compte de l’envergure du parasol au moment de
l’ouvrir/de le fermer.
• S’assurer que personne ne se tient à proximité lors de
l’ouverture et de la fermeture. Cela risquerait de blesser
quelqu’un ou de casser quelque chose.
• DANGER! Fermer le parasol en cas de vent ou d’orage, ou
s’il neige.
• Si le parasol est ancré directement dans le sol (manchon
enfoncé dans du béton), tenir compte de la vitesse maxi-
male du vent autorisée. Si un autre mode de xation a été
choisi, la vitesse du vent autorisée est moindre.
• Ne pas laisser un parasol ouvert sans surveillance. Dans
ce cas, les préjudices éventuels ne sont pas couverts par
la garantie. Après avoir refermé le parasol, toujours le xer
avec la sangle de xation.
• Utiliser exclusivement des accessoires et des pièces de
rechange d’origine.
• Les modications et adaptations techniques du produit ne
sont pas autorisées.
• Bien surveiller le parasol pendant ses mouvements d’ouver-
ture et fermeture.
• Vérier régulièrement que celui-ci et ses accessoires ne
présentent aucun signe d’endommagement ou d’usure ex-
cessive. Si des défauts sont constatés, les solutionner avant
réutilisation du parasol.
• N’utiliser comme produits de nettoyage ni solvants ni dé-
tergents.
• Après avoir démonté le parasol, toujours le ranger en posi-
tion couchée.
• En cas d’utilisation d’un ancrage dans le sol, l’installation
doit être effectuée par une personne spécialement formée,
conformément aux instructions de montage séparées.
• Ne pas allumer de feu à l’air libre à proximité ou en dessous
du parasol.

1716
Contenu de la livraison :
- Parasol
- Pédalier
- Sangle
- Recouvrement du tube de xation
- Mode d’emploi
Déballer le parasol
1
Se débarrasser de l’emballage de
manière adéquate et le tenir hors de
portée des enfants. Ne pas mettre en
service un matériel défectueux. Le si-
gnaler immédiatement au transporteur
s’il est abîmé.
!
2
Poser le parasol par terre
Poser le parasol sur une surface ho-
rizontale propre avec précaution. Le
parasol est très lourd. Travailler à trois
et maintenir le parasol fermement.
!
4
1. Placer le tube de xation sur la xation
au sol Le côté avec les deux trous
letés doit être dirigé en avant (orienté
vers le toit du parasol)
2. Orienter le gabarit de trou / la position
3. Poser les 5 rondelles
4. Préassembler le tube de xation avec
les 5 vis à tête hexagonale
Préassembler le tube de
xation optionnel
Le côté avec les deux trous letés
doit être dirigé en avant (orienté vers
le toit du parasol).
!
4.1
5x
4.3 4.4
en avant
Le parasol est très lourd. Travailler à
trois et maintenir le parasol fermement.
!
5
1. Faire glisser la cache du tube de
xation sur le mât
2. Placer le parasol sur le tube de xation
3. Visser fermement le parasol sur le
tube de xation à l‘aide de 2 rondel
les et de 2 vis à tête ronde
4. Insérer le pédalier et desserrer la
sangle d’attache
5. Ouvrir le parasol à l’aide du pédalier
6. S‘assurer que les pièces internes
s‘imbriquent.
Préassembler le parasol
5.1 5.4
5.3
5.5
5.6
5.2
6
1. Orienter le parasol dans sa position
nale
2. Fixer le parasol en serrant les 5 vis à
tête hexagonale
3. Pousser la cache du tube de xation
jusqu‘en bas.
4. Fermer le parasol
5. Retirer/enrouler les parties entoilées
6. Serrer la toile avec la sangle
7. Retirer le pédalier
Fixer le parasol
6.1 6.2
6.3
5x
Montage et mise en service
3
Mettre la xation au sol en place confor-
mément à la notice séparée.
Préparer la xation au sol
* Force maximale du vent pour ancrage dans le sol.
Taille Poids
minimum maximale
force du vent*
[cm] [kg] [km/h (Bft.)]
ø 400, 400 x 300 240 45 (6)
350 x 350 240 40 (6)
ø 500, 450 x 350, 400 x 400 310 35 (5)

1918
Chariot / bras
Housse
Fixation du parasol (en option)
Pédalier (amovible)
Mât
Contreche
1. Insérer le pédalier
2. Tourner dans le sens inverse des aiguil
les d‘une montre jusqu‘à ce que le
parasol soit complètement fermé
3. Retirer le pédalier
Fermer le parasol
2
Maintenir le parasol le plus serré
possible.
!
Cache du tube de xation
1. Retirer la housse de protection
2. Desserrer la sangle
3. Insérer le pédalier
4. Déployer complètement le parasol en
actionnant la manivelle
5. S‘assurer que les pièces internes
s‘imbriquent
Déployer le parasol
1
Le parasol s’aligne automatiquement
horizontalement. Pour un fonc-
tionnement sûr, les pièces internes
doivent s’imbriquer complètement !
!
1.5
1. Retirer/enrouler les parties entoilées
2. Serrer la toile avec la sangle
3. Mettre la housse de protection si
nécessaire.
Attacher/protéger la toile
3
GLATZ recommande en principe
l‘utilisation d‘une housse de protec-
tion pour prolonger la durée de vie de
la toile, quand le parasol est fermé.
Enrouler/remballer le parasol que s’il
est entièrement sec.
!
3.3
3.1
3.2
Utilisation
1.4
2.2

2120
Élimination
Ce pictogramme présent sur le produit proprement dit, les accessoires
ou l’emballage indique que le produit ne doit pas être jeté avec les ordures
ménagères, mais séparément. Aussi devez-vous le déposer dans une
déchetterie pratiquant le tri sélectif.
L’emballage est fabriqué dans des matériaux écologiques et vous pouvez
le déposer à votre déchetterie habituelle pour qu’il soit recyclé. En
mettant les emballages au rebut conformément à ces règles, et non en
vous en débarrassant de manière négligente, vous contribuez à préserver
l’environnement et la santé. Le produit comprend des pièces métalliques
et synthétiques. La mise au rebut en n de vie doit être effectuée confor-
mément aux ordonnances régionales concernant l’environnement et les
déchets.
Entretien et nettoyage
• Laisser sécher le parasol lorsqu’il est entièrement déployé an d’éviter
moisissures et décoloration.
• Une housse de protection protège bien le parasol et augmente sa durée de
vie.
• La housse de protection et la toile du parasol doivent être entièrement
sèches avant d’être remises en place.
• Ne pas mettre la housse de protection au lave-linge ni utiliser de produit
d’entretien chimique.
• Lorsque nécessaire: laver la toile du parasol en utilisant de l’eau tiède, une
lessive pour linges délicats et une éponge.
• Ne pas utiliser d’agent blanchissant ni d’objets tranchants pour ne pas
abîmer la toile.
• Contrôler toutes les vis de temps à autre, et les resserrer si nécessaire.
• Si le parasol est placé à un endroit très exposé, il risque de s’abîmer plus
rapidement. Dans ce cas, nous préconisons un entretien plus strict.
• Dans la plupart des cas, les parasols abîmés peuvent être réparés par votre
partenaire GLATZ. Utilisez exclusivement des pièces de rechange d’origine
GLATZ.
Démonter le parasol s’il doit rester inutilisé pendant une période prolongée.
DANGER! RISQUE DE CHUTE RISQUE DE BLESSURE EN CAS DE CHUTE
D’UN PARASOL.
1. Fermer et bien attacher le parasol.
2. Procéder à l’inverse du montage.
3. Ranger le parasol horizontalement et au sec avec tous les accessoires.
Démontage
Garantie
Avant de renvoyer le produit, contactez votre partenaire GLATZ. Le
parasol est garanti 24 mois à compter de la date d’achat. La garantie est
caduque dans les cas suivants:
• Brutalité
• Utilisation et entretien du parasol non conformes.
• Dommages dus à des manipulations sans précautions
La tenue au vent d’un parasol déployé est limitée. Les vitesses maximales
admissibles exigent un ancrage au sol xe. Si plusieurs parasols sont
en place, la distance entre eux doit être d’au moins 25 cm. De même, la
distance entre le parasol et les murs doit être d’au moins 25 cm.

2322
Welcome 23
Optional accessories 23
Technical data 23
Safety information 24
Installation and start-up 26
Use 28
Maintenance and care 30
Disassembly 30
Warranty 31
Disposal 31
Table of Contents Welcome
Congratulations on the purchase of your new AMBIENTE Nova. You have
purchased a high quality parasol. These instructions forms part of this
product. It contains important safety, usage and disposal information for
users of the product. Please familiarise yourself with all the information
listed before using the product. The product may only be used as de-
scribed herein and for the use scenarios stated. If you continue to use it
and care for it properly, your AMBIENTE Nova parasol will serve you well
for many years to come.
Optional accessories
A high quality range of accessories is included with your parasol: It
includes, among other things, the following products, which go perfectly
with your parasol:
• Base
• Mounting plate
• Ground Socket
• Wall console
• Swivel Adapter
• Protective cover
• OSYRION Spot
Consult your GLATZ dealer about this.
Warning words used
!DANGEROUS Immediately dangerous situation which can result in
death or severe injuries.
!CAUTION Potentially dangerous situation which can result in minor
or moderate injuries.
!NOTICE A situation that can lead to property damage.
The product serves as a device for the protection of the human body from
solar radiation. The product may only be used in private households, in the
catering and hotel sector or in a comparable environment. The product may
only be used in accordance with these installation and operating instructions.
Any use other than the uses described in these installation and operating
instructions shall be considered improper use. We reserve the right to make
modications due to technical advances. In these instructions the AMBIENTE
Nova may also be referred to as ‘the product’ or ‘parasol’.
Intended use
Technical data
Size Base area Closing height
without/with ounces Passage height
without/with ounces Overall height
[cm] [m
2
][cm)] [cm] [cm]
Details when using the M4 ground socket
ø 400 11.3 225/201 365
450 x 350 15.8 225/201 368
ø 500 17.7 225/201 401
350 x 350 12.3 225/201 343
400 x 300 12.0 225/201 334
400 x 400 16.0 225/201 367
158/134
80/56
146/122
92/68
80/56
80/56

2524
Safety information
READ ALL THE SAFETY INFORMATION CAREFULLY AND
MAKE SURE THAT YOU UNDERSTAND THEM.
• Follow all the instructions to avoid accidents, re, explosions,
electric shock or other hazards that could cause property
damage and / or severe or fatal injuries.
• Ensure that each person using the product has read and
observes these warnings and instructions.
• Keep these installation and operating instructions for the
future. It must be passed on to subsequent users of the prod-
uct.
• The manufacturer is not liable for material damages or injuries
caused by incorrect use or the failure to observe the safety
instructions. The warranty becomes invalid in such cases.
• The protective effect against hazardous UV radiation varies
depending on the environment. Additional measures to pro-
tect your skin are possibly also necessary.
• Children must not play with the product.
• !DANGER Always keep children away from packaging ma-
terial - this constitutes a choking hazard. Children underesti-
mate risks. This product is not a toy.
• Children aged 8 years or over and persons with reduced
physical, sensory or mental capabilities, lack of experience or
knowledge may only use the appliance if they are supervised
by a person who is responsible for their safety or if they
have been shown how to use the appliance safely and they
have understood the risks inherent in its use. Cleaning and
maintenance tasks may not be carried out by children without
supervision.
• Do not use the device if you are suffering from a lack of con-
centration /attention or under the inuence of drugs, alcohol
or medication.
• The product must be placed in a base or a ground sleeve that
is rmly anchored.
• Do not allow the product to fall or knock against anything.
• Check the span of the parasol before opening / closing it.
• Make sure there are no persons / objects in the movement
area when opening / closing it. Otherwise, injuries / damage
may occur.
• !DANGER Close the parasol when the wind picks up, in
stormy weather conditions and / or when snow is falling.
• Observe the specications concerning the maximum per-
missible wind speed for a xed ground anchorage (ground
sleeve inserted in concrete). The permissible wind speed is
reduced if a different anchorage method is used.
• Unattended parasols may not remain opened. Any damage
is not covered by the warranty. Always secure closed para-
sols with a binding belt.
• Only use original accessories / spare parts.
• Product and technical modications are not permitted.
• The parasol must be monitored during opening and closing.
• Check parasol and accessories regularly to be sure that no
undue wear and tear or damage has occurred. If defects are
found, have them repaired before further use.
• Do not use any solvents or abrasive cleaning agents.
• Dismantled parasols should only be stored lying down.
• When using a xed oor anchorage, the installation must be
performed by specially trained persons in accordance with
the separate installation instructions.
• Do no ignite a naked ame in the proximity of, or under, the
parasol.

2726
Supplied with:
- parasol
- crank
- binding
- support tube cover
- operating instructions
Unpacking the parasol
1
Dispose of packaging material prop-
erly and keep away from children.
Do not make use of defective ma-
terial. In the event of any damage,
inform the transport service provider
immediately.
!
2
Placing the parasol down
Carefully place the parasol on a
clean, horizontal surface. The parasol
is very heavy. Work in a threesome
and hold the parasol securely.
!
4
1. Place standpipe on oor fasteing unit.
The side with the two thread holes
must face forwards (towards the
parasol).
2. Adjust holes / position
3. Place 5 washers in position
4. Pre-assemble standpipe with 5
hexagonal screws
Pre-assemble optional standpipe
The side with the two thread holes
must face forwards (towards the
parasol).
!
4.1
5x
4.3 4.4
facing
forwards
The parasol is very heavy. Work in
a threesome and hold the parasol
securely.
!
5
1. Push standpipe cover onto mast
2. Place parasol on standpipe
3. Attach parasol tightly to standpipe,
using 2 washers and 2 round-head-
ed screws
4. Put crank in place and remove strap
5. Open parasol with the crank
6. Make sure that the inner parts are
engaging
Pre-assemble parasol
5.1 5.4
5.3
5.5
5.6
5.2
6
1. Make nal adjustments of parasol
position
2. Fix parasol in place by tightening the
5 hexagonal screws
3. Push standpipe cover down as far as
it will go
4. Close parasol
5. Pull out / wrap fabric segments
6. Secure the parasol with a binding
strap
7. Remove crank
Fixing the parasol in place
6.1 6.2
6.3
5x
Installation and start-up
3
Place the oor fastening in accordance
with the separate instructions.
Prepare the oor fastening
* maximum wind speed when it is securely anchored
in the ground.
Size minimum
weight maximum
wind speed*
[cm] [kg] [km/h (Bft.)]
ø 400, 400 x 300 240 45 (6)
350 x 350 240 40 (6)
ø 500, 450 x 350, 400 x 400 310 35 (5)

2928
Carriage / bracket
Cover
Parasol fastening (optional)
Crank (detachable)
Mast
Struts
1. Attach crank
2. Turn crank anticlockwise until the
parasol is completely closed
3. Remove crank
Closing the parasol
2
Keep the parasol as compact as
possible.
!
Standpipe cover
1. Remove protective cover
2. Detach strap
3. Attach crank
4. Completely open the parasol through
use of the crack
5. Make sure that the inner parts are
engaging
Opening the parasol
1
The parasol will be automatically
aligned horizontally. For safe oper-
ation, the inner parts must be com-
pletely engaged
.
!
1.5
1. Pull out / wrap fabric segments
2. Secure the parasol with a binding strap
3. Apply protective cover if necessary
Bind/protect the parasol
3
To extend the service life of the
covering material, GLATZ strongly
recommends the use of a protective
sleeve when the parasol is closed.
Only wrap / pack completely dry
parasols.
!
3.3
3.1
3.2
Use
1.4
2.2

3130
Disposal
This symbol on the product, accessories or packaging indicates that the
product must not be treated as unsorted domestic waste but must be
disposed of separately. Dispose of the product at a designated recycling
collection point.
The packaging is made of environmentally friendly materials that can be
disposed of at your local recycling facilities. By disposing of the product
correctly, you will help to avoid possible environmental and health
hazards. The product is made of metal and synthetic parts. End-of-life
disposal must be carried out in accordance with regional environmental
and waste regulations.
Handling and maintenance
• Allow the parasol to dry when open to prevent the formation of mould and
discolouration.
• A protective sleeve protects the parasol and will extend its service life.
• Only pull the protective sleeve over the dry parasol when it is dry.
• Do not clean the protective sleeve in the washing machine. Do not use
chemicals.
• Clean the parasol cover when needed with lukewarm water, ne detergents
and a sponge.
• Do not use any bleach or sharp objects, to avoid damage to the cover.
• Check the tightness of all screws from time to time and tighten them if
necessary.
• If the parasol is located in a highly exposed position, increased wear and tear
must be expected. In such cases we recommend more intensive care and
maintenance.
• In most cases, defective parasols can be repaired by your GLATZ partner.
Only use original replacement parts FROM GLATZ.
Dismantle the parasol if it is not going to be used for a long time.
DANGER! DANGER OF TIPPING DANGER OF INJURY IF THE PARASOL
TOPPLES OVER
1. Close and tie the parasol properly.
2. Dismantle the parasol in reverse mounting direction.
3. Store the parasol in lying position together with all accessories in a dry
place.
Disassembly
Warranty
Please contact your GLATZ partner before returning the product. The
warranty on the parasol lasts for 24 months from the date of purchase.
The warranty expires in the following cases:
• External application of excessive force
• Inappropriate operation or maintenance of the parasol
• Damage arising from force majeure
The wind guarantee for an open parasol is limited. The maximum permis-
sible wind speeds always require a xed anchorage in the ground. If there
are several parasols, a minimum distance of 25 cm must be maintained
between any two of them. Likewise, a minimum distance of 25 cm must
be maintained between the parasol and walls.

3332
Indice
Benvenuti 33
Accessori opzionali 33
Dati tecnici 33
Avvertenze di sicurezza 34
Montaggio e messa in funzione 36
Utilizzo 38
Manutenzione e cura 40
Smontaggio 40
Garanzia 41
Smaltimento 41
Benvenuti
Congratulazioni per l’acquisto del vostro nuovo AMBIENTE Nova. Si
tratta di un prodotto di alta qualità. Il manuale accompagna il prodotto e
contiene importanti informazioni per gli utenti sulla sicurezza, l’utilizzo e
lo smaltimento. Prima di utilizzare il prodotto, leggere tutte le informazioni
contenute nel manuale. Il prodotto deve essere utilizzato solo come qui
descritto e nelle situazioni applicative indicate. Seguendo accuratamente
le indicazioni d’uso e cura del prodotto, l’ombrellone AMBIENTE Nova
funzionerà alla perfezione per molti anni.
Accessori opzionali
Per l’ombrellone è disponibile una vasta gamma di accessori di alta quali-
tà, tra cui i seguenti prodotti perfettamente compatibili:
• Base
• Piastre di montaggio
• Capsula da incassare
• Morsetto murale
• Adattatore girevole
• Fodere di protezione
• OSYRION Spot
In caso di interesse rivolgersi al proprio rivenditore GLATZ.
Terminologia di avvertenza utilizzata
!PERICOLO Situazione di rischio diretto che può causare lesioni
gravi, anche mortali.
!ATTENZIONE Situazione di rischio potenziale che può causare
lesioni medio-lievi.
!SEGNALAZIONE
Una situazione che può causare danni alle cose.
Il prodotto è un dispositivo destinato alla protezione del corpo umano
dai raggi solari. L’utilizzo del prodotto è consentito solo presso abitazioni
private e in ambito alberghiero e della ristorazione, oppure in ambiti simili.
L’apparecchio deve essere utilizzato soltanto conformemente agli manuale
di funzionamento e montaggio. Ogni utilizzo diverso da quanto previsto
nel presente manuale di funzionamento e montaggio, è considerato non
conforme. Sono fatte salve le modiche dovute ai progressi tecnologici.
Nelle presenti istruzioni d’uso, l’ombrellone AMBIENTE Nova viene denito
anche “prodotto” o “ombrellone”.
Utilizzo conforme
Dati tecnici
Grandezza
nominale Supercie
di base
Altezza di
chiusura
senza/con volant
Altezza di
passaggio
senza/con volant Altezza
totale
[cm] [m
2
][cm)] [cm] [cm]
Dettagli quando si usa il capsula da incassare M4
ø 400 11.3 365
450 x 350 15.8 368
ø 500 17.7 401
350 x 350 12.3 343
400 x 300 12.0 334
400 x 400 16.0 367
225/201
225/201
225/201
225/201
225/201
225/201
158/134
80/56
146/122
92/68
80/56
80/56

3534
Avvertenze di sicurezza
LEGGERE ATTENTAMENTE TUTTE LE AVVERTENZE DI SICU-
REZZA E ASSICURARSI DI AVERLE COMPRESE.
• Osservare tutte le indicazioni, in modo da evitare incidenti,
incendi, esplosioni, scosse elettriche o altri pericoli, causa a
loro volta di danni materiali e/o lesioni gravi, anche mortali.
• Vericare che ogni persona che utilizza il prodotto abbia letto
e osservi le avvertenze e le istruzioni per l’uso fornite.
• Conservare questo manuale di funzionamento e montaggio
per il futuro. Deve essere trasmesso agli utenti successivi del
prodotto.
• Il produttore declina ogni responsabilità per danni materiali o
lesioni riconducibili a un errato utilizzo o all’inosservanza delle
indicazioni di sicurezza. In questi casi la garanzia legale perde
validità.
• L’azione protettiva contro i raggi UV pericolosi varia in base
alle condizioni ambientali. Può risultare necessario adottare
misure di protezione della pelle supplementari.
• I bambini non devono giocare con il prodotto.
• !PERICOLO Tenere i bambini lontani dai materiali d’imbal-
laggio: pericolo di soffocamento. I bambini non sono in grado
di riconoscere adeguatamente i potenziali pericoli. Questo
prodotto non è un giocattolo.
• L’utilizzo dell’apparecchio è previsto da parte di bambini a
partire dagli 8 anni e da persone con ridotte capacità siche,
sensoriali o mentali o con esperienza e conoscenza inade-
guate, solo con supervisione o istruzione iniziale sull’utilizzo
dell’apparecchio da parte di chi è responsabile della loro
sicurezza e a fronte di illustrazione degli eventuali pericoli
collegati. Gli interventi di pulizia e manutenzione non possono
essere svolti da bambini senza sorveglianza.
• Non utilizzare il prodotto in caso di mancanza di concentra-
zione / attenzione e/o sotto l’effetto di stupefacenti, alcol o
farmaci.
• Collocare il prodotto su una base di peso adeguato o una
capsula da incasso con ancoraggio sufcientemente sso.
• Non far cadere o urtare il prodotto.
• Prima di aprire o chiudere l’ombrellone, vericarne l’ampiezza
di apertura.
• Vericare che non siano presenti persone o oggetti nella zona
di movimento per l’apertura o la chiusura. In caso contrario, si
possono vericare lesioni o danni.
• !PERICOLO Chiudere l’ombrellone in caso di aumento del
vento, di temporali e/o neve.
• Rispettare le indicazioni relative alla velocità del vento mas-
sima consentita, in caso di ancoraggio sso al suolo (capsula
da incasso inserita nel calcestruzzo). Se viene utilizzato un
altro metodo di ssaggio, la velocità del vento consentita si
riduce.
• Non lasciare incustoditi gli ombrelloni aperti. Eventuali danni
non sono coperti dalla garanzia. Legare sempre l’ombrellone
chiuso con un legaccio.
• Usare solo accessori e ricambi originali.
• Non è consentito modicare il prodotto o apportare modi-
che tecniche.
• Controllare l’ombrellone durante l’apertura e la chiusura.
• Vericare regolarmente la presenza di usura eccessiva o di
danni nell’ombrellone e negli accessori. Correggere even-
tuali anomalie, prima del riutilizzo.
• Non utilizzare solventi né detergenti abrasivi.
• Conservare l’ombrellone smontato solo in posizione orizzon-
tale.
• Utilizzando un ancoraggio sso al suolo, afdare l’installazio-
ne a personale specicatamente addestrato e istruito con-
formemente a quanto indicato nelle istruzioni di montaggio
separate.
• Evitare amme libere in prossimità o direttamente sotto
l’ombrellone.

3736
Confezione:
- Ombrellone
- Manovella
- Cintura di ssaggio
- Copertura del tubo portante
- Istruzioni per l'uso
Disimballare l’ombrellone
1
Smaltire il materiale d’imballaggio in
modo appropriato e tenerlo lontano dalla
portata dei bambini. Non mettere in fun-
zione il prodotto se è difettoso. In caso
di danni, informare immediatamente il
vettore / l’impresa di spedizione.
!
2
Deporre l’ombrellone
Deporre l’ombrellone con cautela su
una supercie pulita e piana. L’om-
brellone è molto pesante. Lavorare
in tre persone e tenere l’ombrellone
sempre saldamente afferrato.
!
4
1. Poggiare il tubo verticale sul ssaggio
a pavimento. Il lato con i due fori lettati
deve mostrare verso la parte anteriore
(in direzione ombrellone).
2. Fare attenzione ai fori / alla posizione
3. Applicare 5 rondelle
4. Premontare il tubo verticale con 5 viti
esagonali
Premontare il tubo verticale
opzionale
Il lato con i due fori lettati deve
mostrare verso la parte anteriore (in
direzione ombrellone).
!
4.1
5x
4.3 4.4
in
avanti
L’ombrellone è molto pesante. Lavora-
re in tre persone e tenere l’ombrellone
sempre saldamente afferrato.
!
5
1. Spingere la copertura del tubo
verticale sul palo
2. Poggiare l’ombrellone sul tubo verticale
3. Avvitare saldamente l’ombrellone
al tubo verticale con 2 rondelle e 2 viti
a testa tonda
4. Montare la manovella e rilasciare
il nastro
5. Aprire l’ombrellone con la manovella
6. Assicurarsi che i componenti interni
combacino correttamente
Premontare l’ombrellone
5.1 5.4
5.3
5.5
5.6
5.2
6
1. Orientare l’ombrellone come
desiderato
2. Fissare l’ombrellone stringendo le
5 viti esagonali
3. Abbassare del tutto la copertura del
tubo verticale
4. Chiudere l’ombrellone
5. Estrarre/Ripiegare i segmenti in telo
6. Fissare l’ombrellone con la cintura
di ssaggio
7. Rimuovere la manovella
Fissare l’ombrellone
6.1 6.2
6.3
5x
Montaggio e messa in funzione
3
Posizionare il ssaggio a pavimento confor-
memente a quanto indicato nelle istruzioni
separate.
Preparare il ssaggio a pavimento
Grandezza Min.peso Max. intensità
del vento*
[cm] [kg] [km/h (Bft.)]
* Max. intensità del vento con ancoraggio sso nel suolo.
ø 400, 400 x 300 240 45 (6)
350 x 350 240 40 (6)
ø 500, 450 x 350, 400 x 400 310 35 (5)

3938
Carrello / Braccio portante
Rivestimento
Fissaggio dell’ombrellone (opzionale)
Manovella (rimovibile)
Palo
Stecche
1. Applicare la manovella
2. Azionare la manovella in senso
antiorario nché l’ombrellone risulta
completamente chiuso
3. Rimuovere la manovella
Chiudere l’ombrellone
2
Chiudere l’ombrellone mantenendolo
il più compatto possibile.
!
Copertura del tubo verticale
1. Rimuovere la fodera di protezione
2. Rilasciare la cintura di ssaggio
3. Applicare la manovella
4. Aprire completamente l’ombrellone
con la manovella
5. Assicurarsi che i componenti interni
combacino correttamente
Aprire l’ombrellone
1
L’ombrellone si porta automatica-
mente in posizione orizzontale. Per
un utilizzo sicuro, i componenti interni
devono combaciare perfettamente
tra loro!
!
1.5
1. Estrarre/Ripiegare i segmenti in telo
2. Fissare l’ombrellone con la cintura
di ssaggio
3. Se necessario, inserire la fodera di
protezione
Fissare / Proteggere l’ombrellone
3
Per prolungare la durata del tessuto,
GLATZ consiglia in generale l’uso di
una fodera protettiva con ombrellone
chiuso. Avvolgere e impacchettare
l’ombrellone solo se completamente
asciutto.
!
3.3
3.1
3.2
Utilizzo
1.4
2.2
La pagina si sta caricando...
La pagina si sta caricando...
La pagina si sta caricando...
La pagina si sta caricando...
La pagina si sta caricando...
La pagina si sta caricando...
La pagina si sta caricando...
La pagina si sta caricando...
La pagina si sta caricando...
La pagina si sta caricando...
La pagina si sta caricando...
La pagina si sta caricando...
-
 1
1
-
 2
2
-
 3
3
-
 4
4
-
 5
5
-
 6
6
-
 7
7
-
 8
8
-
 9
9
-
 10
10
-
 11
11
-
 12
12
-
 13
13
-
 14
14
-
 15
15
-
 16
16
-
 17
17
-
 18
18
-
 19
19
-
 20
20
-
 21
21
-
 22
22
-
 23
23
-
 24
24
-
 25
25
-
 26
26
-
 27
27
-
 28
28
-
 29
29
-
 30
30
-
 31
31
-
 32
32


in altre lingue
- français: Glatz AMBIENTE NOVA Manuel utilisateur
- español: Glatz AMBIENTE NOVA Manual de usuario
- Deutsch: Glatz AMBIENTE NOVA Benutzerhandbuch
- Nederlands: Glatz AMBIENTE NOVA Handleiding