
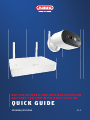
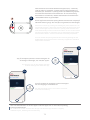
1
BATTERIKAMERA PRO MED BASISSTATION
BATTERY CAM PRO WITH BASE STATION
QUICK GUIDE
PPIC91000, PPIC91520 V 1.0

2
SYSTEMKRAV
SYSTEM REQUIREMENTS
Placeringstjenesten på den mobile slutenhed skal være aktiveret.
The location service of the mobile device must be activated.
Maks. re kameraer pr. basisstation og maks. 8 basisstationer pr. app.
Max. four cameras per base station and max. 8 base stations per app.
Kameraet kan kun bruges sammen med App2Cam Plus-appen.
The camera can only be used in conjunction with the App2Cam Plus app.
En router (til at forbinde basisstationen) og et hjemmenetværk (til adgang via app).
Smartphone og basisstation skal være i samme netværk.
Router (for connecting the base station) and home network (for access via app).
Smartphone and base station must be in the same network.
For at gemme optagelser skal du sætte din egen eller en almindelig
USB-nøgle i basisstationen (maks. 128 GB).
To save recordings, insert your own/standard commercially
available USB stick into the base station (max. 128 GB).
Før tænding og ibrugtagning: Oplad kameraets integrerede batteri ved hjælp af USB-C-kablet og en
standard 5 V USB-stikstrømforsyning, indtil den røde LED på bagsiden af kameraet lyser konstant.
Tag dereer kablet ud. Tænd ikke for kameraet endnu.
Before switching on and start-up: Charge the camera's built-in battery using the USB-C cable and a
standard 5 V USB plug-in power supply until the red LED on the back of the camera lights up continu-
ously. Then disconnect the cable. Do not switch on the camera yet.

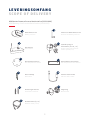
3
ABUS batterikamera Pro med basisstation (PPIC91000)
ABUS Battery-Cam Pro with Base Station (PPIC91000)
LEVERINGSOMFANG
SCOPE OF DELIVERY
Batterikamera Pro
Battery-Cam Pro
Antenne til Batterikamera Pro
Antenna for Battery-Cam Pro
11
Boreskabelon kamera
Drill template for camera
Boreskabelon basisstation
Drill template for base station
11
Basisstation
Base Station
Strømforsyning til
basisstation (12 V DC, 1 A)
Power supply unit for base
station (12 V DC, 1 A)
11
Reset-værktøj
Reset-Tool
USB-A til USB-C-kabel
USB-A to USB-C cable
11
Monteringsmateriale
Installation material
2
Vægbeslag
Wall bracket
1
Netværkskabel (1,5 m)
Network cable (1.5 m)
1

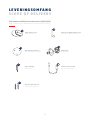
4
Ekstrakamera til ABUS batterikamera Pro (PPIC91520)
Add-on camera for ABUS battery cam Pro (PPIC91520)
LEVERINGSOMFANG
SCOPE OF DELIVERY
Monteringsmateriale
Installation material
1
Boreskabelon kamera
Drill template for camera
1
USB-A til USB-C-kabel
USB-A to USB-C cable
11
Vægbeslag
Wall bracket
1
11
Reset-værktøj
Reset-Tool
Batterikamera Pro
Battery-Cam Pro
Antenne til Batterikamera Pro
Antenna for Battery-Cam Pro

5
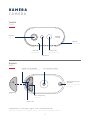
KAMERA
CAMERA
Forside
Front
*Radiofrekvens: 2,4 GHz (802.11 b/g/n), maks. sendeeekt 20 dBm
*Wireless frequency: 2.4 GHz (802.11 b/g/n), max. transmission power 20 dBm
Mikrofon
Microphone
PIR-Sensor
Hvidlys-LED
White light LED
Højtaler
Loudspeaker
Bagside
Rear
Objektiv
Lens
Status-LED
1/4"-gevind til holder
1/4” thread for bracket
USB-C-tilslutning
USB-C port
Antennetilslutning*
(RP-SMA)
Antenna connection*
(RP-SMA)
Afdækning
Cover
ON/OFF-tast og PAIRING
ON/OFF and PAIRING button

6
Forside/bagside
Front / Back
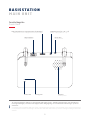
BASISSTATION
MAIN UNIT
Til kameraoptagelser kræves en almindelig USB-nøgle (maks. 128 GB lagerkapacitet; ikke inkluderet i
leveringsomfanget). Formatér USB-nøglen eer ibrugtagning via hukommelsesindstillingen på basis-
stationen.
A commercially available USB stick (max. 128 GB storage capacity; not included in the scope of delivery)
is required for camera recordings. Format the USB stick aer start-up via the storage setting of the base
station.
LAN-interface
LAN interface
Power-LED Højtaler
Loudspeaker
Pairing-LED
Strømforsyning (12 V DC / 1 A)
Power supply (12V DC / 1A)
USB-grænseade til lagringsmedie (USB-nøgle)
USB interface for storage medium (USB stick)
Reset-tast
Reset button

7
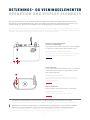
BETJENINGS- OG VISNINGSELEMENTER
OPERATION AND DISPLAY ELEMENTS
Hvis det ikke allerede er sket, oplades kameraets integrerede batteri ved hjælp af USB-C-kablet og en
almindelig 5 V USB-stikstrømforsyning, indtil den røde LED på bagsiden af kameraet lyser konstant. Tag
dereer kablet ud. Tænd kun for kameraet under ibrugtagningen, som beskrevet nedenfor.
If not already done, charge the camera's built-in battery using the USB-C cable and a standard 5 V USB
plug-in power supply until the red LED on the back of the camera lights up continuously. Then disconnect
the cable. Switch on the camera only during start-up, as described below.
Tilslut først netværkskablet til basisstationen, og forsyn dereer basisstationen med strøm.
First connect the network cable to the base station and then supply the base station with power.
Basisstationen opretter en forbindelse til kameraet under ibrugtagningen. I meget sjældne tilfælde
etableres der ingen forbindelse, og det kan være nødvendigt at nulstille til fabriksindstillinger.
The base station establishes a connection to the camera during set-up. In very rare cases,
no connection is established and a reset to factory settings may be necessary.
Tænd kameraet:
Tryk og hold tænd/sluk-knappen nede i 3 sekunder,
indtil kameraet udsender en signaltone, og den
røde status-LED lyser.
Switching on the camera:
Press and hold the On/O button for 3 seconds
until the camera issues a signal tone and the red
statusLED lights up.
Sluk for kameraet:
Tryk på tasten, og hold den nede i 5 sekunder.
Switching o the camera:
Press and hold the button for 5 seconds.
Nulstil til fabriksindstillinger,
hvis det er nødvendigt:
Tryk og hold reset-tasten nede med reset-værktøjet
i 5 sekunder, indtil power-LED'en blinker rødt.
Reset to factory settings if necessary:
Press and hold the reset button with the reset tool
for 5 seconds until the power LED ashes red.

8
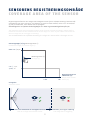
SENSORENS REGISTRERINGSOMRÅDE
COVERAGE AREA OF THE SENSOR
Registreringsområdet for den integrerede bevægelsessensor (passiv infrarød teknologi, forkortet PIR)
erbegrænset til 8 meter. Personer, der be nder sig uden for dette område, bliver "set" af kameraet
og vist på livebilledet, men udløser ikke en optagelse.
Anbefalingen for en optimal monteringshøjde er 2 meter og en hældningsvinkel på 12,5°.
The detection range of the integrated motion sensor (passive infrared technology, PIR for short) is
limited to 8 metres. Persons located outside of this range are "seen" by the camera and shown on
the live image but do not trigger a recording.
The recommendation for optimum mounting is a height of 2 metres with a tilt angle of 12.5°.
Monteringshøjde (m) og hældningsvinkel (°)
Installation height (m) and tilt angle (°)
Set oppefra
View from above
Maks. 8 m rækkevidde for bevægelsessensoren
Max. 8 m range of the motion sensor
Livebillede, men ingen udløsning
Live image but no triggering
REC °REC
Bevægelsessensorens
rækkevidde (m)
Range of the motion
sensor (m)
Hældningsvinkel (°)
Tilt angle (°)
8m4-5m
2 m | 12,5°
1,5 m | 0°
maks. 6 m | 50,0°
120°

9
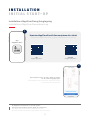
INSTALLATION
INITIAL START-UP
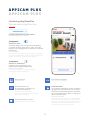
De følgende illustrationer er fra iOS-appen.
Processen med Android-appen følger de samme trin.
The following illustrations are from the iOS app.
The process with the Android app follows the same steps.
Installation af App2Cam Plus og ibrugtagning
Installation of App2Cam Plus and start-up
Start App2Cam Plus, og vælg "Tilføj ny enhed"
for at starte ibrugtagningen.
Start App2Cam Plus and select "Add new device"
to start the start-up process.
2
Download App2Cam Plus til din smartphone eller tablet
Download App2Cam Plus to your smartphone or tablet
1
App
- App2Cam Plus -
iOS
Apple App Store
Android
Google Play Store

10
3a
4
Mulighed 1: Scan QR-koden, der er placeret under basisstationen.
Option 1: Scan the QR code located under the base station.
Tilslut først basisstationen til routeren via netværkskablet. Tilslut en USB-
hukommelsesenhed til USB-tilslutningen. Forsyn dereer basisstationen
med strøm via strømforsyningen. Basisstationen er klar, så snart den røde
power-LED lyser. Tryk dereer på "Søg kamera i netværk" i appen.
First connect the base station to the router via the network cable. Connect a
USB memory device to the USB port. Then supply the base station with power
via the power supply unit. The base station is ready as soon as the red power
LED lights up. Then tap on "Search camera in network" in the app.
Mulighed 2: Tryk på knappen "Tilføj enhed manuelt"
og vælg dereer din kameramodel fra listen.
Option 2: Tap on the "Add device manually" button
and then select your camera model from the list.
3b

11
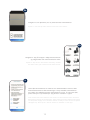
Det integrerede batteridrevne kamera skal oplades på dette tidspunkt.
The integrated camera battery must be charged at this time.
5
Vælg din basisstation ved hjælp af registreringsnummeret. Du nder registre-
ringsnummeret (DID) vedlagt i emballagen. Alternativt på undersiden af basis-
stationen. Tryk dereer på "Næste".
Select your base station using the identication number. You will nd the
identication number (DID) enclosed in the packaging. Alternatively, this
can be found on the underside of the base station. Then tap on "Next".
Tildel et kameranavn (til basisstationen). Dette kameranavn vil senere blive
vist i kameraoversigten. For push-meddelelser skal du også indtaste dette
kameranavn i de udvidede indstillinger eer ibrugtagning. Kameranavnet
kan til enhver tid ændres senere.
Assign a camera name (for the base station). This camera name will be
displayed later in the camera overview. For push notications, you must
also enter this camera name in the advanced settings aer set-up.
The camera name can be changed later on at any time.
kameraet ved at trykke på tænd/sluk-knappen på bagsiden af kameraet
og holde den nede i 3 sekunder, indtil du hører en signaltone. Dereer
blinker status-LED'en på bagsiden af kameraet (rødt).
Bekræ i appen med "Næste".
Attach the camera antenna (if you have not already done so) and switch on
the camera by pressing and holding the power button on the back of the
camera for 3 seconds until you hear a signal tone. This causes the status LED
on the back of the camera to ash (red). Conrm in the app with "Next".
6
7
Kamera Name

12
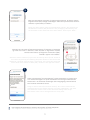
Husk sikkerhedskoden og administratoradgangskoden til senere interaktion med appen.
Du kan til enhver tid ændre koden og adgangskoden i indstillingerne e er ibrugtagning.
Remember the security code and admin password for later interactions with the app.
You can change the code and password in the settings at any time a er set-up.
Fremgangsmåden ved en alternativ ibrugtagning findes i betjeningsvejledningen.
Steps for an alternative start-up method can be found in the operating instructions.
8
For at få den bedst mulige kameraoplevelse anbefaler vi,
at du altid bruger kameraet med den nyeste rmware.
Bekræ beskeden med "OK".
For the best possible camera experience, we recommend that
you always operate the camera with the latest rmware.
Con rm the message with "OK".
Indtast nu en sikkerhedskode og en administratoradgangskode.
Følgende specialtegn understøttes:
Now enter a security code and an admin password.
The following special characters are supported:
9

13
Ibrugtagningen via app er nu afsluttet. Appen viser nu kamerao-
versigten. Tryk på play-symbolet for at få vist det første livebille-
de. I sjældne tilfælde, f.eks. hvis modtagelsen er for dårlig, viser
appen symbolet "ingen forbindelse". Tryk på den for at åbne
livevisningen.
Start-up via app is now complete. The app now shows the camera
overview. Tap the Play icon to display the rst live image. In rare
cases, e.g. if the reception is too poor, the app displays the "no
connection" icon. Tap on it to open the live view.
11
Kameraet og basisstationen er allerede sammenkoblet/tilsluttet, når de leveres fra fabrikken eller i en fælles
sætpakke (PPIC91000, PPIC91520); i dette tilfælde skal du springe over trin 11 og 12. Trin 11 og 12 skal kun
udføres, hvis produkterne/komponenterne er købt enkeltvis eller ua ængigt af hinanden, dvs. normalt e er
købet af et ekstra kamera (PPIC91520).
The camera and base station are already paired/connected when delivered from the factory or in a common
set package (PPIC91000, PPIC91520); in this case, skip steps 11 and 12. Steps 11 and 12 are only to be carried
out if the items/components were purchased individually or independently of each other; i.e. usually a er
the purchase of an additional camera (PPIC91520).
Gå til stien i appen: Kameraoversigt -> Livevisning -> Kameraind-
stillinger -> Indstillinger for basisstation -> Tilføj kamera
In the app, go to the path: Camera overview -> Live view ->
Camera settings -> Base station settings -> Add camera
Du kan finde den aktuelle firmwareversion for dit kamera og tilgængelige opdateringer under "Kameraover-
sigt" -> "Livevisning" -> "Kameraindstillinger" -> "Enhedsindstillinger" -> "Søg efter firmwareopdatering".
The current firmware version of your camera and available updates can be found under "Camera Over-
view" -> "Live View" -> "Camera Settings" -> "Device Settings" -> "Search Firmware Update".
10

14
Tænd kameraet ved at holde tænd/sluk-knappen nede i 3 sekunder,
indtil du hører en signaltone, og status-LED'en (rød) på bagsiden af
kameraet lyser. Kameraet er i pairing-tilstand fra fabrikken og opretter
nu automatisk forbindelse til basisstationen. Så snart kameraet og
basisstationen er forbundet, udløses talebeskeden af basisstationen:
"Kameraforbindelsen er gennemført"
Du kan også starte kameraets pairing-tilstand manuelt ved at trykke på
tænd/sluk-tasten 3 gange. Der skal lyde en signaltone ved aktiveringen.
Turn on the camera by pressing and holding the power button for 3 se-
conds until you hear a signal tone and the status LED (red) on the back
of the camera lights up. The camera is in pairing mode ex-works and
now automatically connects to the base station. As soon as the camera
and the base station are connected, this is conrmed by voice output
from the base station: "Camera connection successfully completed"
You can activate the pairing mode of the camera by pressing the the
On/O button three times to start it manually. A signal tone should be
output when activated.
Alle viste skærmbilleder er fra iOS-appen. Android-appen har en lidt anden opstilling,
tekst og funktionalitet.
All screenshots shown are from the iOS app. The Android app contains a slightly
different layout, labelling and functionality.
12
Tryk på symbolet for optagelseri kameraoversigten
for at få adgang til hukommelsen.
Tap the Recordings icon in the camera overview
to access the memory.
14
Tryk på tandhjulssymbolet i kameraoversigten for
at foretage indstillinger, der vedrører appen.
Tap the gear icon in the camera overview
to make settings that aect the app.
13

15
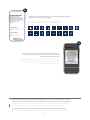
Livevisning i App2Cam Plus
The live view in App2Cam Plus
APP2CAM PLUS
APP2CAM PLUS
Akku-Kamera Pro [PPIC91000]
Foretag indstillinger for dette kamera
Make settings for this camera
Opret snapshot
Take snapshot
Samtalefunktion
For at aktivere mikrofonen på din slutenhed
og højttaleren på dit kamera skal du trykke
permanent på mikrofonsymbolet. Forbindel-
sen til kameraet forbliver åben, så længe du
holder symbolet nede.
Intercom function
To activate the microphone on your mobile
device and the loudspeaker on your camera,
press the microphone icon continuously. The
connection to the camera remains open as
long as you keep the icon pressed.
Aktivér/deaktiver lyd
(for optagelser med/uden lyd,
se kameraindstillinger)
Activate/deactivate audio
(for recordings with/without sound,
see camera settings)
Alarmen er aktiv
Kameraet optager, når der registreres bevægelser,
og sender beskeder (push eller e-mail), hvis funk-
tionerne som udgangspunkt er aktiveret i kameraets
indstillinger.
Alarm is active
The camera records when movements are detected
and sends notications (push or email) if the func-
tions are activated in the camera settings.
Alarmen er deaktiveret
Kameraet viser et livebillede, men
udfører ikke bevægelsesregistrering.
Alarm is deactivated
The camera shows a live image but does
not perform motion detection.
Start manuel optagelse
Start manual recording
Ski mellem kamera 1/2/3/4
Switch between camera 1/2/3/4

16
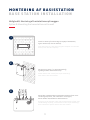
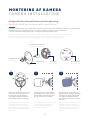
MONTERING AF BASISSTATIONE
BASE STATION INSTALLATION
Mulighed A: Placering af basisstation uden at bore
Option A: Placement of base station without drilling
Vær opmærksom på følgende punkter vedrørende
placeringen af basisstationen:
·Maksimal afstand til routeren, se længden
på det medfølgende netværkskabel; hvis det
er nødvendigt, kan du bruge et almindeligt,
længere LAN-kabel
·Metaller og genstande i nærheden af basissta-
tionen kan reducere den trådløse rækkevidde
til kameraet
·Placer basisstationen på en fri, plan over ade.
(Mulighed A)
·For mere information om signalstyrke, se ven-
ligst betjeningsvejledningen
·Placer basisstationen, så den ikke er dækket
af genstande. Sørg for optimal ventilation af
basisstationen
Pay attention to the following points regarding the
position of the base station:
·Maximum distance to the router, see the length
of the enclosed network cable; if necessary, you
can use a commercially available, longer LAN
cable
·Metals and objects near the base station can
reduce the wireless range to the camera
·Place the base station on a free, at surface.
(Option A)
·For more information on signal strength,
please refer to the operating instructions
·Place the base station so that it is not covered
by objects. Ensure optimal ventilation of the
base station
Tilslut først netværkskablet og USB-hukommelsen
(med maks. 128 GB lagerkapacitet; ikke inkluderet
i leveringen). Tilslut dere er strømkablet til basis-
stationen.
First plug in the network cable and the USB memory
(with max. 128 GB storage capacity; not included
in the scope of delivery). Then connect the power
cable to the base station.
1 32
USB

17
Markér to huller på en ad væg ved hjælp af skabelonen,
og bor hullerne (6 mm bor kræves).
Mark two holes on a at wall using the template and drill the
holes (6 mm drill bit required).
Sæt dyvler og skruer i (se leveringsomfang),
og hæng dereer basisstationen op.
Install dowels and screws (see scope of delivery),
then hook in the base station.
Tilslut først netværkskablet og USB-hukommelsen (med maks.
128 GB lagerkapacitet; ikke inkluderet i leveringen).
Tilslut dereer strømkablet til basisstationen.
First plug in the network cable and the USB memory (with max.
128 GB storage capacity; not included in the scope of delivery).
Then connect the power cable to the base station.
1
2
3
MONTERING AF BASISSTATION
BASE STATION INSTALLATION
Mulighed B: Montering af basisstationen på væggen
Option B: Mounting the base station on the wall
1 32
USB

18
Kameraet kan placeres på en ad over ade uden
et beslag. Følgende punkter bør bemærkes:
·Kameraets position er ikke fast, når det er sat
op, og det kan yttes utilsigtet og dermed
ændre registreringsområdet.
·Større genstande mellem kameraet og basis-
stationen kan påvirke transmissionen.
·Kameraet skal placeres så frit som muligt på
kanten af installations aden for at undgå
lysre eksioner mellem kameraet og installa-
tions aden.
·Kameraets synsfelt må ikke være dækket
af genstande.
·Placering på glashylder kan give forstyrrende
re eksioner i livebilledet og på optagelser.
The camera can be placed on a at surface without a
bracket. The following aspects must be observed here:
·The position of the camera is not xed during
setup and could be accidentally shi ed, thus
changing the recording area.
·Large objects located between the camera and
the base station could in uence transmission.
·Where possible, the camera should be posi-
tioned unobstructed at the edge of the setup
surface in order to prevent light re ections
between the camera and the setup surface.
·The camera's eld of vision must not be
obstructed by objects.
·Positioning on glass shelves can cause dis-
turbing re ections in the live image and in
recordings.
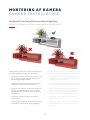
MONTERING AF KAMERA
CAMERA INSTALLATION
Mulighed A: Placering af kameraet uden vægbeslag
Option A: Placement of the camera without wall bracket

19
MONTERING AF KAMERA
CAMERA INSTALLATION
1 3
Markér tre huller på en lige væg
ved hjælp af skabelonen, bor
hullerne (6 mm bor kræves),
og fastgør beslagets bagplade
(monteringsmateriale vedlagt).
Mark three holes on a at wall
using the template, drill the
holes (6 mm drill bit required)
and attach the back plate of
the bracket (mounting material
enclosed).
Sæt kugleleddet i, sæt dækslet
på beslaget, og spænd det fast.
Sæt dereer fastgørelsesringen
på, og stram den en smule.
Insert the ball joint, t the cover
of the bracket and tighten.
Then position the xing ring
and tighten slightly.
Drej kameraet på gevindet på
kuglehovedet, og juster det eer
det ønskede registreringsområ-
de. Spænd fastgørelsesringen
for at fastgøre kameraet i denne
position.
Turn the camera onto the thread
of the ball head and align it
with the desired detection area.
Tighten the xing ring in order
to secure the camera in this
position.
Mulighed B: Montering af kameraet med vægbeslag
Option B: Installing the camera with a wall bracket
2
Hvis det er nødvendigt, skal du først sætte kameraet og basisstationen i dri som beskrevet, og dereer teste
modtagelsen på de nøjagtige positioner, du har planlagt for kameraet og basisstationen.
For mere information om signalstyrke, se venligst betjeningsvejledningen.
If necessary, rst put the camera and base station into operation as described, and then test the
reception at the exact positions you have planned for the camera and the base station.
For more information on signal strength, please refer to the operating instructions.
Kugleled med gevind
Ball joint with thread
Bagplade
Back panel
Afdækning
Cover
Boreskabelon
Drill template
Fastgørelsesring
Fixing ring

Für weitere Hilfe steht dir das Support-Team zur Verfügung: [email protected]
Our Support Team will be happy to help you with any further questions: [email protected]
ABUS | Security Center GmbH & Co. KG
abus.com
Linker Kreuthweg 5
86444 Ang
Germany
+49 8207 959 90-0
sales@abus-sc.com
abus.com/products/
PPIC91000
abus.com/products/
PPIC91520
Die komplette Bedienungsanleitung sowie weitere Informationen stehen dir auf der Website von
ABUS zur Verfügung: Einfach den QR-Code scannen oder die Web-Adresse eingeben, schon önet
sich die Produktseite mit dem Bereich Downloads.
The complete operating instructions and further information are available on the ABUS website:
Simply scan the QR code or enter the web address to open the product page with the Downloads
section.
Le mode d'emploi complet ainsi que d'autres informations sont à votre disposition sur le site
Internet d'ABUS : Il sut de scanner le code QR ou d'entrer l'adresse web pour que la page du
produit s'ouvre avec la section Téléchargements.
De volledige gebruiksaanwijzing en verdere informatie zijn beschikbaar op de website van ABUS:
Scan gewoon de QR-code of voer het webadres in om de productpagina met de sectie Downloads
te openen.
Den komplette brugsanvisning og yderligere oplysninger ndes på ABUS' hjemmeside: Du skal blot
scanne QR-koden eller indtaste web-adressen for at åbne produktsiden med området Downloads.
El manual de instrucciones completo y más información están disponibles en el sitio web de ABUS:
Basta con escanear el código QR o introducir la dirección web para abrir la página del producto con
la sección de descargas.
Den fullständiga bruksanvisningen och ytterligare information nns på ABUS webbplats: Skanna QR-
koden eller skriv in webbadressen för att öppna produktsidan och delen Downloads.
Le istruzioni per l'uso complete e ulteriori informazioni sono disponibili sul sito web di ABUS: È
suciente scansionare il codice QR o inserire l'indirizzo web per aprire la pagina del prodotto
con la sezione Downloads.
Kompletna instrukcja obsługi oraz dalsze informacje dostępne są na stronie internetowej rmy ABUS:
Wystarczy zeskanować kod QR lub wpisać adres internetowy, aby otworzyć stronę produktu z sekcją
Downloads.
-
 1
1
-
 2
2
-
 3
3
-
 4
4
-
 5
5
-
 6
6
-
 7
7
-
 8
8
-
 9
9
-
 10
10
-
 11
11
-
 12
12
-
 13
13
-
 14
14
-
 15
15
-
 16
16
-
 17
17
-
 18
18
-
 19
19
-
 20
20


