
INSTALLATION MANUAL
BUILT-IN OVEN
Before beginning installation, read these instructions
carefully. This will simplify installation and ensure that the
product is installed correctly and safely. Leave these
instructions near the product after installation for future
reference.
ENGLISH
WS9D76****, WS7D765***
MFL72082001
Rev.00_090123
www.lg.com
Copyright © 2023 LG Electronics Inc. All Rights Reserved.
global_main.book.book Page 1 Friday, September 1, 2023 4:54 PM

TABLE OF CONTENTS
This manual may contain images or
content that may be different from the
model you purchased.
This manual is subject to revision by the
manufacturer.
IMPORTANT SAFETY INSTRUCTIONS
READ ALL INSTRUCTIONS BEFORE USE...........................................................3
WARNING............................................................................................................3
INSTALLATION
Before Installing.................................................................................................6
Installing the Oven and Test Run.....................................................................9
global_main.book.book Page 2 Thursday, August 31, 2023 11:30 AM

3
IMPORTANT SAFETY INSTRUCTIONS
ENGLISH
IMPORTANT SAFETY INSTRUCTIONS
READ ALL INSTRUCTIONS BEFORE USE
Safety Messages
Your safety and the safety of others are very important.
We have provided many important safety messages in this manual and
on your appliance. Always read and follow all safety messages.
All safety messages will tell you what the potential hazard is, tell you
how to reduce the chance of injury, and tell you what may happen if the
instructions are not followed.
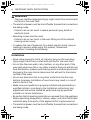
WARNING
WARNING
• The information in this manual should be followed exactly.
- Failure to do so could result in fire or electrical shock, causing
property damage, personal injury or death.
• DO NOT put any weight on the oven door. Never allow anyone to
climb, sit, stand or hang on the oven door.
This is the safety alert symbol.
This symbol alerts you to potential hazards that can kill or
injure you and others. All safety messages will follow the safety
alert symbol and either the word WARNING or CAUTION.
These words mean:
WARNING
You may be killed or seriously injured if you do not follow
instructions.
CAUTION
You may be injured or cause damage to the product if you do
not follow instructions.
global_main.book.book Page 3 Thursday, August 31, 2023 11:30 AM

4
IMPORTANT SAFETY INSTRUCTIONS
WARNING
- The oven could be tipped and injury might result from contact with
hot food or the oven itself.
• The electrical power must be shut off while the electrical connections
are being made.
- Failure to do so can result in severe personal injury, death or
electrical shock.
• Mounting screws must be used.
- Failure to do so can result in the oven falling out of the cabinet
causing serious injury.
• To reduce the risk of explosion, fire, death, electric shock, injury or
scalding to persons when using this product, follow basic
precautions, including the following:
Installation
• Never allow anyone to climb, sit, stand or hang on the oven door.
Injury might result from contact with hot food or the oven itself.
• Do not line the oven walls, racks, bottom, or any other part of the
oven with aluminum foil or any other material. Doing so will disrupt
heat distribution, produce poor baking results and cause permanent
damage to the oven interior (aluminum foil will melt to the interior
surface of the oven).
• Do not use aluminum foil or any other material to line the oven
bottom. Improper installation of oven liners may result in a risk of
electric shock or fire.
• Make sure your appliance is properly installed and grounded by a
qualified installer, according to the installation instructions. Any
adjustment and service should be performed only by qualified
installers or service technicians.
• Be certain that all packing materials are removed from the appliance
before operating. Keep plastic, clothes, paper, and other flammable
materials away from parts of the appliance that may become hot.
• The electrical power must be shut off while the electrical connections
are being made.
global_main.book.book Page 4 Thursday, August 31, 2023 11:30 AM

5
IMPORTANT SAFETY INSTRUCTIONS
ENGLISH
• Improper connection of aluminum house wiring to copper leads can
result in an electrical hazard or fire. Use only connectors designed for
joining copper to aluminum and follow the manufacturer’s
recommended procedure closely.
• Do not open or close the oven door by foot using excessive force.
• Do not obstruct vent hole with tissue.
• Do not use the oven to dry a live animal.
• The appliance must not be installed behind a decorative door in order
to avoid overheating.
• Do not install the appliance on the floor.
• Ensure that the appliance is switched off before replacing the lamp to
avoid the possibility of electric shock.
global_main.book.book Page 5 Thursday, August 31, 2023 11:30 AM

6
INSTALLATION
INSTALLATION
Before Installing
Before Beginning
Remove all tape and packing materials before
using the oven. Dispose of all plastic bags after
unpacking the oven.
Never allow children to play with packing materials
CAUTION
• Make sure the cabinets and wall coverings
around the oven can withstand the temperature
(up to 95
7
) generated by the oven.
• Fronts of nearby units up to at least 70
7
.
- Discoloration, delamination or melting may
occur.
• During installation, ensure that no persons can
come into contact with live components.
• The oven must be installed by a qualified
professional electrician, in accordance with the
corresponding regulations and standards.
• The oven is a heavy appliance and must be
transported with great care.
• Before initial use, remove all packaging, both
external and from inside the appliance.
• No modification may be made to the oven’s
technical characteristics.
• The integrated cooking area or hotplates is/are
provided with special connections. These may
only be attached to the appropriate
corresponding connections of the same type.
NOTE
This installation must be completed by a qualified
installer or technician.
Proper installation is the responsibility of the
installer and product failure due to improper
installation is NOT covered under warranty.
• Consumer: please read and keep these
instructions for future reference and be sure to
read the entire OWNER’S MANUAL prior to use.
• Do not use the parts except for provided
components when you install the product.
• Make sure the oven is flush with the front of the
enclosure.
• A malfunction can occur if the steam oven is not
correctly aligned. For correct functioning of the
steam generator please make sure that the
steam oven is horizontally level. (On some
models)
• When mounting built-in cabinet, decide the
dimension of the built-in cabinet’s depth so that
the offset between door glass face and front
surface of the left and right side furniture will be
less than 1 mm.
Installation Information
The first step of the installation is measure the
current cutout dimensions and compare them to
the cutout dimensions shown below. Little or no
cabinet work may be necessary.
NOTE
Make sure the base is level and the front of the
cabinet is square. If the cabinet base is not level,
the oven glides will tend to slide out when opening
the door.
• To lift oven, use side holes of the oven.
• Kitchen cabinets in contact with the oven must
be heat resistant up to 95
7
, and fronts of
nearby units up to at least 70
7
.
• Do not install dishwasher under the oven.
• Do not install the product on the floor.
global_main.book.book Page 6 Thursday, August 31, 2023 11:30 AM

7
INSTALLATION
ENGLISH
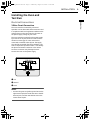
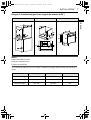
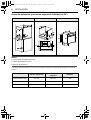
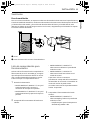
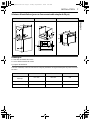
Installation Drawings (For 24" Single Built-in Oven)
NOTE
P: Back of the kitchen cabinet
R: Side of the kitchen cabinet
Q: Ventilation space
If desired, create the holes with P and R to allow the power lines to pass through the cabinet.
Built-in Cabinet Under-sink Cabinet Product
Built-in Cabinet Under-sink Cabinet Product
Cutout Depth min. 556 min. 556 549
Cutout Width min. 560 min. 560 558
Cutout Height min. 590 min. 600 579
0
global_main.book.book Page 7 Thursday, August 31, 2023 11:30 AM

8
INSTALLATION
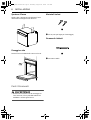
Moving the Oven
Have two or more people lift the oven using the
handles on the sides of the oven.
Screw Fastening
Secure the oven to the kitchen unit with screws.
Parts / Tools
WARNING
• Mounting screws must be used. Failure to do so
can result in the oven falling out of the cabinet
and causing serious injury.
Materials Included
a
3 X 26 (2 Wood Screws For Mounting)
Required Tools
a
Phillips screwdriver
global_main.book.book Page 8 Thursday, August 31, 2023 11:30 AM

9
INSTALLATION
ENGLISH
Installing the Oven and
Test Run
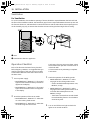
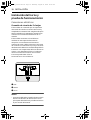
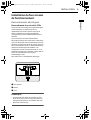
Electrical Connections
3-Wire Circuit Connection
The oven must be connected by a licensed
specialist in accordance with these instructions and
in compliance with local regulations. Make sure the
voltage shown on the rating label is the same as
the power supply voltage in your home.
The oven must be connected to the power supply
by means of an all-pole disconnect switch with a
minimum contact gap of 3 mm and must be
connected to earthed socket by law. The supply
plug shall be accessible after the installation. The
oven's components operate at 230 V / 16 A. Identify
the phase and neutral conductor in the socket.
Incorrect connection may damage the oven.
Connect the oven to the power supply.
a
Live
b
Neutral
c
Earth
NOTE
• Connect the green and yellow ground wire to the
right terminal pole, the live brown wire to the left
terminal pole, and the neutral blue wire to the
center terminal pole.
global_main.book.book Page 9 Thursday, August 31, 2023 11:30 AM

10
INSTALLATION
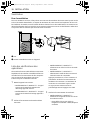
Ventilation
For Ventilation
For correct ventilation, the ventilation opening of 50 mm should be required between the back wall and
the floor of the installation cabinet, the ventilation gap of 5 mm is required between the oven top rim and
the furniture lower rim, and between the oven both sides rim and the side cabinet, these openings must
not be closed by any way. So ensure that the sides are not touching the front edges of the housing.
a
Oven
b
Close kitchen cabinet or appliance.
Operation Checklist
Each of the functions has been factory checked
before shipping. However, it is suggested that you
verify the operation of the oven once more. Refer
to the Owner’s Manual. Follow the instructions for
the basic check.
1
Turn on power supply.
• Model WSED766**, WS9D76****: The initial
signal sound is heard and startup animation
appears in the display.
• Model WSED761**, WS7D765***: The initial
signal sound is heard and the clock appears
in the display.
2
Check the operation of the Hot air mode.
• Model WSED766**, WS9D76****: Select Hot
air in the cooking mode screen.
• Model WSED761**, WS7D765***: Select Hot
air mode using the control knob.
Touch Start. The oven starts to preheat. Check
the convection fan operation. Convection fan is
in the back wall.
A chime sounds once preheating is complete.
Touch STOP.
3
Check the operation of the Grilling mode.
• Model WSED766**, WS9D76****: Select
Large grill in the cooking mode screen.
- Scroll to set the desired temperature: Low,
Medium, or High.
• Model WSED761**, WS7D765***: Select
Large grill in the cooking mode screen. Scroll
to set the desired temperature: Low,
Medium, or High.
- Touch Start. The oven door must be closed
to use the Grilling function. Touch STOP to
cancel at any time.
4
Turn on and off the oven light to check the
lights are in normal condition.
global_main.book.book Page 10 Thursday, August 31, 2023 11:30 AM

11
INSTALLATION
ENGLISH
NOTE
• A small amount of smoke and odor may be
noticeable during the initial break-in period.
• If the oven does not operate properly see the
Owner’s Manual for the troubleshooting list. The
list includes common occurrences that are not
the result of defective workmanship or materials
in this product. If the problem occurs
continuously, contact the dealer.
• Refer to the warranty in the Warranty Card for
the LG toll-free service number and address.
• This manual may contain images or content that
may be different from the model you purchased.
• This manual is subject to revision by the
manufacturer.
global_main.book.book Page 11 Thursday, August 31, 2023 11:30 AM

Memo
global_main.book.book Page 12 Thursday, August 31, 2023 11:30 AM

MANUALE D’INSTALLAZIONE
FORNO A INCASSO
Prima di iniziare l’installazione, leggere attentamente queste
istruzioni. In tal modo, l’apparecchiatura sarà installata
facilmente e in maniera corretta e sicura. Dopo l’installazione,
conservare queste istruzioni accanto al prodotto per utilizzi
futuri.
ITALIANO
WS9D76****, WS7D765***
www.lg.com
Copyright © 2023 LG Electronics Inc. All Rights Reserved.
it-it_main.book.book Page 1 Thursday, August 31, 2023 1:35 PM

INDICE
Questo manuale può contenere testo o
immagini che non si riferiscono al
modello acquistato.
Il presente manuale è soggetto a revisioni
da parte del produttore.
ISTRUZIONI IMPORTANTI SULLA SICUREZZA
LEGGERE TUTTE LE ISTRUZIONI PRIMA DELL'USO ........................................3
AVVERTENZA.......................................................................................................3
INSTALLAZIONE
Prima dell'installazione .....................................................................................6
Installazione del forno e prova di funzionamento.........................................9
it-it_main.book.book Page 2 Thursday, August 31, 2023 1:35 PM

3
ISTRUZIONI IMPORTANTI SULLA SICUREZZA
ITALIANO
ISTRUZIONI IMPORTANTI SULLA SICUREZZA
LEGGERE TUTTE LE ISTRUZIONI PRIMA DELL'USO
Messaggi di sicurezza
La tua sicurezza e quella degli altri sono molto importanti.
Il presente manuale e l’elettrodomestico contengono molti messaggi
importanti sulla sicurezza. Assicurarsi sempre di leggere e seguire tutti
i messaggi sulla sicurezza.
Tutti i messaggi sulla sicurezza ti informano di qual è il rischio
potenziale, come ridurre la possibilità di lesione e cosa può succedere
se le istruzioni non vengono seguite.
AVVERTENZA
AVVERTENZA
• Le informazioni contenute in questo manuale devono essere seguite
esattamente.
- In caso contrario, potrebbero verificarsi incendi o scosse elettriche,
con conseguenti danni materiali, lesioni personali o morte.
Questo è il simbolo di avviso di sicurezza.
Questo simbolo informa di potenziali rischi che possono
uccidere o ferire te o altri. Tutti i messaggi sulla sicurezza
seguiranno il simbolo di avviso sulla sicurezza e le parole
AVVERTENZA o ATTENZIONE.
Queste parole significano:
AVVERTENZA
Potresti restare ucciso o ferito gravemente se non segui le
istruzioni.
ATTENZIONE
Potresti essere ferito o causare danni al prodotto se non segui
le istruzioni.
it-it_main.book.book Page 3 Thursday, August 31, 2023 1:35 PM

4
ISTRUZIONI IMPORTANTI SULLA SICUREZZA
AVVERTENZA
• NON appoggiare alcun peso sulla porta del forno. Non permettere
mai a nessuno di arrampicarsi, sedersi, stare in piedi o aggrapparsi
alla porta del forno.
- Il forno potrebbe ribaltarsi e provocare lesioni a causa del contatto
con cibi caldi o con il forno stesso.
• Interrompere l’alimentazione elettrica durante l'esecuzione dei
collegamenti elettrici.
- In caso contrario, si potrebbero verificare lesioni personali gravi,
morte o scosse elettriche.
• È necessario utilizzare le viti di montaggio.
- In caso contrario, il forno potrebbe cadere dal mobile e provocare
lesioni gravi.
• Per ridurre il rischio di esplosioni, incendi, scosse elettriche, ustioni o
lesioni personali anche fatali, quando si utilizza l'elettrodomestico è
indispensabile attenersi alle seguenti precauzioni basilari per la
sicurezza:
Installazione
• Non permettere mai a nessuno di arrampicarsi, sedersi, stare in piedi
o appendersi alla porta del forno, perché il contatto con cibi caldi o
con il forno stesso potrebbero causare lesioni.
• Non rivestire le pareti del forno, le griglie, il fondo o qualsiasi altra
parte con fogli di alluminio o altro materiale perché potrebbe
provocare l’interruzione della distribuzione del calore, produrre
risultati di cottura scadenti e causare danni permanenti all'interno del
forno (il foglio di alluminio si scioglierà sulla superficie interna del
forno).
• Non utilizzare fogli di alluminio o altro materiale per rivestire il fondo
del forno. L'installazione impropria dei rivestimenti del forno può
comportare il rischio di scosse elettriche o incendi.
• Assicurarsi che il proprio apparecchio sia installato correttamente e
messo a terra da un installatore qualificato, secondo le istruzioni di
it-it_main.book.book Page 4 Thursday, August 31, 2023 1:35 PM

5
ISTRUZIONI IMPORTANTI SULLA SICUREZZA
ITALIANO
installazione. Far eseguire qualsiasi regolazione e servizio solo da
installatori qualificati o tecnici dell'assistenza.
• Assicurarsi che tutti i materiali di imballaggio siano stati rimossi
dall'apparecchio prima di metterlo in funzione. Tenere la plastica, i
vestiti, la carta e altri materiali infiammabili lontano dalle parti
dell'apparecchio che potrebbero surriscaldarsi.
• Interrompere l’alimentazione elettrica durante l'esecuzione dei
collegamenti elettrici.
• Il collegamento improprio del cablaggio domestico in alluminio ai
cavi in rame può provocare un rischio elettrico o un incendio.
Utilizzare solo connettori progettati per combinare rame e alluminio
e seguire scrupolosamente la procedura consigliata dal produttore.
• Non aprire o chiudere la porta del forno con i piedi esercitando una
forza eccessiva.
• Non ostruire il foro di sfiato con del tessuto.
• Non utilizzare il forno per asciugare un animale vivo.
• Non installare l'apparecchio dietro una porta decorativa per evitare il
surriscaldamento.
• Non installare l'apparecchio sul pavimento.
• Assicurarsi che l'apparecchio sia spento prima di sostituire la
lampada per evitare il pericolo di scosse elettriche.
it-it_main.book.book Page 5 Thursday, August 31, 2023 1:35 PM

6
INSTALLAZIONE
INSTALLAZIONE
Prima dell'installazione
Prima di iniziare
Rimuovere tutto il nastro adesivo e i materiali di
imballaggio prima di utilizzare il forno. Smaltire
tutti i sacchetti di plastica dopo aver disimballato il
forno.
Non permettere mai ai bambini di giocare con i
materiali di imballaggio
ATTENZIONE
• Assicurarsi che i mobili e i rivestimenti delle
pareti attorno al forno possano resistere alla
temperatura (fino a 95
7
) generata dal forno.
• Fronti delle unità vicine fino ad almeno 70
7
.
- Potrebbero verificarsi scolorimento,
delaminazione o fusione.
• Durante l’installazione, assicurarsi che nessuna
persona possa entrare in contatto con
componenti sotto tensione.
• Il forno deve essere installato da un elettricista
professionista qualificato, in conformità con i
regolamenti e le norme corrispondenti.
• Il forno è un elettrodomestico pesante e deve
essere trasportato con molta cura.
• Prima dell’uso iniziale, rimuovere tutti gli
imballaggi, sia dall’esterno che dall’interno
dell’elettrodomestico.
• Non può essere apportata nessuna modifica alle
caratteristiche tecniche del forno.
• L’area di cottura o le piastre di cottura integrate
sono dotate di connessioni speciali. Queste
possono essere collegate solo alle connessioni
corrispondenti dello stesso tipo.
NOTA
Questa installazione deve essere completata da un
installatore o da un tecnico qualificato.
La corretta installazione è responsabilità
dell'installatore e il guasto del prodotto dovuto a
un'installazione errata NON è coperto dalla
garanzia.
• Consumatore: leggere e conservare queste
istruzioni per riferimento futuro e assicurarsi di
leggere l'intero MANUALE UTENTE prima
dell'uso.
• Non utilizzare parti ad eccezione dei componenti
forniti durante l'installazione del prodotto.
• Assicurarsi che il forno sia a filo con la parte
anteriore dell'involucro.
• Se il forno a vapore non è allineato
correttamente può verificarsi un
malfunzionamento. Per un corretto
funzionamento del generatore di vapore
assicurarsi che il forno a vapore sia in piano. (Su
alcuni modelli)
• Quando si monta un mobile da incasso, decidere
la dimensione della profondità del mobile da
incasso in modo che lo spostamento tra il vetro
della porta e la superficie anteriore dei mobili
laterali sinistro e destro sia inferiore a 1 mm.
Informazioni sull'installazione
Il primo passo dell'installazione è misurare le
dimensioni attuali del ritaglio e confrontarle con le
dimensioni del ritaglio mostrate di seguito.
Potrebbe essere necessario poco o nessun lavoro
di gabinetto.
NOTA
Assicurati che la base sia a livello e che la parte
anteriore del mobile sia quadrata. Se il fondo del
mobile non è a livello, le guide del forno
tenderanno a fuoriuscire all'apertura della porta.
• Per sollevare il forno, utilizzare i fori laterali del
forno.
• I mobili da cucina a contatto con il forno devono
essere resistenti al calore fino a 95
7
, e i frontali
dei mobili vicini almeno fino a 70
7
.
• Non installare la lavastoviglie sotto il forno.
• Non installare il prodotto sul pavimento.
it-it_main.book.book Page 6 Thursday, August 31, 2023 1:35 PM

7
INSTALLAZIONE
ITALIANO
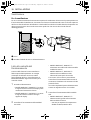
Disegni di installazione (per forno singolo da incasso da 24")
NOTA
P: Retro del mobile da cucina
R: Lato del mobile da cucina
D: Spazio di ventilazione
Se lo si desidera, realizzare i fori con P e R per consentire il passaggio delle linee elettriche attraverso il
mobile.
Mobile incorporato Mobile sottolavabo Prodotto
Mobile incorporato Mobile sottolavabo Prodotto
Profondità di ritaglio min. 556 min. 556 549
Larghezza di ritaglio min. 560 min. 560 558
Altezza di ritaglio min. 590 min. 600 579
0
it-it_main.book.book Page 7 Thursday, August 31, 2023 1:35 PM

8
INSTALLAZIONE
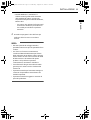
Spostare il forno
Chiedi a due o più persone di sollevare il forno
utilizzando le maniglie sui lati del forno.
Fissaggio a vite
Fissare il forno al mobile della cucina con le viti.
Parti / Strumenti
AVVERTENZA
• È necessario utilizzare le viti di montaggio. In
caso contrario, il forno potrebbe cadere dal
mobiletto e causare gravi lesioni.
Materiali inclusi
a
3 X 26 (2 viti per legno per il montaggio)
Strumenti richiesti
a
Cacciavite a stella
it-it_main.book.book Page 8 Thursday, August 31, 2023 1:35 PM
La pagina si sta caricando...
La pagina si sta caricando...
La pagina si sta caricando...
La pagina si sta caricando...
La pagina si sta caricando...
La pagina si sta caricando...
La pagina si sta caricando...
La pagina si sta caricando...
La pagina si sta caricando...
La pagina si sta caricando...
La pagina si sta caricando...
La pagina si sta caricando...
La pagina si sta caricando...
La pagina si sta caricando...
La pagina si sta caricando...
La pagina si sta caricando...
La pagina si sta caricando...
La pagina si sta caricando...
La pagina si sta caricando...
La pagina si sta caricando...
La pagina si sta caricando...
La pagina si sta caricando...
La pagina si sta caricando...
La pagina si sta caricando...
La pagina si sta caricando...
La pagina si sta caricando...
La pagina si sta caricando...
La pagina si sta caricando...
-
 1
1
-
 2
2
-
 3
3
-
 4
4
-
 5
5
-
 6
6
-
 7
7
-
 8
8
-
 9
9
-
 10
10
-
 11
11
-
 12
12
-
 13
13
-
 14
14
-
 15
15
-
 16
16
-
 17
17
-
 18
18
-
 19
19
-
 20
20
-
 21
21
-
 22
22
-
 23
23
-
 24
24
-
 25
25
-
 26
26
-
 27
27
-
 28
28
-
 29
29
-
 30
30
-
 31
31
-
 32
32
-
 33
33
-
 34
34
-
 35
35
-
 36
36
-
 37
37
-
 38
38
-
 39
39
-
 40
40
-
 41
41
-
 42
42
-
 43
43
-
 44
44
-
 45
45
-
 46
46
-
 47
47
-
 48
48


in altre lingue
- English: LG WSED7612S User manual
- français: LG WSED7612S Manuel utilisateur
- español: LG WSED7612S Manual de usuario