Explore Scientific Professional WIFI Weather Centre 7in1 Manuale del proprietario
- Categoria
- Stazioni meteorologiche
- Tipo
- Manuale del proprietario

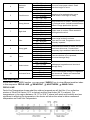
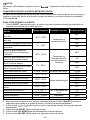
INDEX
HISTORY
CHANNEL
MAX
MIN
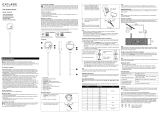
Art.No.: WSX3001
Weather station • Stazione meteo • Wetterstation • Station météo • Estación meteorológica
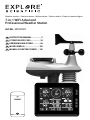
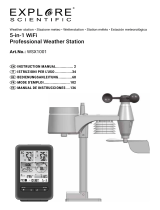
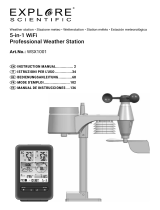
7-in-1 WiFi Advanced
Professional Weather Station
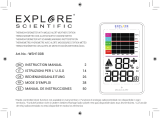
EN
INSTRUCTION MANUAL ............... 2
IT
ISTRUZIONI PER L’USO ...............34
DE
BEDIENUNGSANLEITUNG ............ 68
FR
MODE D'EMPLOI .......................102
ES
MANUAL DE INSTRUCCIONES ...136

2
EN
INSTRUCTION MANUAL
ABOUT THIS INSTRUCTION MANUAL
These operating instructions are to be considered a component of the device.
Please read the safety instructions and the operating instructions carefully before use.
Keep these instructions for renewed use at a later date. When the device is sold or given to someone else, the
instruction manual must be provided to the new owner/user of the product.
The device is intended only for indoor use.
This symbol represents a warning. To ensure safe use, always adhere to the instructions described in this
documentation.
This symbol is followed by a user’s tip.
GENERAL WARNINGS
• Risk of electric shock — This device contains electronic components that operate via a power source
(batteries). Children should only use the device under adult supervision. Only use the device as described
in the manual; otherwise, you run the risk of an electric shock.
• Choking hazard — Children should only use the device under adult supervision. Keep packaging
material, like plastic bags and rubber bands, out of the reach of children, as these materials pose a
choking hazard.
• Risk of chemical burn — Keep batteries out of the reach of children! Make sure you insert the batteries
correctly. Leaking battery acid can lead to chemical burns. Avoid contact of battery acid with skin, eyes
and mucous membranes. In the event of contact, rinse the aected region immediately with a plenty of
water and seek medical attention.
• Risk of re/explosion — Do not expose the device to high temperatures. Use only the recommended
batteries. Do not short-circuit the device or batteries, or throw them into a re. Excessive heat or improper
handling could trigger a short-circuit, a re, or an explosion.
• Do not disassemble the device. In the event of a defect, please contact your dealer. The dealer will
contact the Service Centre and can send the device in to be repaired, if necessary.
• Use only the recommended batteries. Always replace weak or empty batteries with a new, complete set
of batteries at full capacity. Do not use batteries from dierent brands or with dierent capacities. The
batteries should be removed from the unit if it has not been used for a long time.
SCOPE OF DELIVERY
Base station, 7-in-1 Multisensor, Thermo-Hygro Indoor sensor, AC/DC adapter (5V)
BEFORE YOU BEGIN
• We recommend using alkaline batteries. If temperatures regularly fall below 0°C (32°F), we recommend
using lithium batteries.
• Avoid using rechargeable batteries. (Rechargeable batteries cannot maintain correct power
requirements.)
• Insert batteries before rst use, matching the polarity in the battery compartment. Connect the AC/DC
adapter with the Base station and insert 3x AAA batteries as backup power. 3x AA batteries are required
for the 7-in-1 Multisensor and 2x AA batteries for the Thermo-Hygro indoor sensor.

3
EN
TABLE OF CONTENTS
ABOUT THIS INSTRUCTION MANUAL . . . . . . . . . . . . . . . . . . . . . . . . . . . . . . . . . . . . . . . . . 2
GENERAL WARNINGS . . . . . . . . . . . . . . . . . . . . . . . . . . . . . . . . . . . . . . . . . . . . . . . . 2
SCOPE OF DELIVERY . . . . . . . . . . . . . . . . . . . . . . . . . . . . . . . . . . . . . . . . . . . . . . . . 2
BEFORE YOU BEGIN . . . . . . . . . . . . . . . . . . . . . . . . . . . . . . . . . . . . . . . . . . . . . . . . . 2
INTRODUCTION . . . . . . . . . . . . . . . . . . . . . . . . . . . . . . . . . . . . . . . . . . . . . . . . . . . . . . 4
OVERVIEW . . . . . . . . . . . . . . . . . . . . . . . . . . . . . . . . . . . . . . . . . . . . . . . . . . . . . . . . . 4
CONSOLE . . . . . . . . . . . . . . . . . . . . . . . . . . . . . . . . . . . . . . . . . . . . . . . . . . . . . . . 4
LCD DISPLAY . . . . . . . . . . . . . . . . . . . . . . . . . . . . . . . . . . . . . . . . . . . . . . . . . . . . . 5
WIRELESS INDOOR HYGRO-THERMO SENSOR . . . . . . . . . . . . . . . . . . . . . . . . . . . . . . . . . 5
WIRELESS 7-IN-1 SENSOR . . . . . . . . . . . . . . . . . . . . . . . . . . . . . . . . . . . . . . . . . . . . . 6
INSTALLATION AND SETUP . . . . . . . . . . . . . . . . . . . . . . . . . . . . . . . . . . . . . . . . . . . . . . . 7
INSTALL WIRELESS 7-IN-1 SENSOR . . . . . . . . . . . . . . . . . . . . . . . . . . . . . . . . . . . . . . . . 7
INSTALL WIRELESS INDOOR SENSOR . . . . . . . . . . . . . . . . . . . . . . . . . . . . . . . . . . . . . . 9
SETUP THE CONSOLE . . . . . . . . . . . . . . . . . . . . . . . . . . . . . . . . . . . . . . . . . . . . . . . . 9
SYNCHRONIZING ADDITIONAL WIRELESS SENSOR(S) (OPTIONAL) . . . . . . . . . . . . . . . . . . . . 10
POINTING THE WIRELESS 7-IN-1 SENSOR TO SOUTH . . . . . . . . . . . . . . . . . . . . . . . . . . . . 10
CREATE WEATHER SERVER ACCOUNT & SETUP WI-FI CONNECTION . . . . . . . . . . . . . . . . . . . . . .11
CREATE WEATHER UNDERGROUND ACCOUNT . . . . . . . . . . . . . . . . . . . . . . . . . . . . . . . . .11
CREATE WEATHERCLOUD ACCOUNT . . . . . . . . . . . . . . . . . . . . . . . . . . . . . . . . . . . . . . 12
SETUP WI-FI CONNECTION . . . . . . . . . . . . . . . . . . . . . . . . . . . . . . . . . . . . . . . . . . . . 14
SETUP THE WEATHER SERVER CONNECTION . . . . . . . . . . . . . . . . . . . . . . . . . . . . . . . . 15
ADVANCE SETTING IN WEB INTERFACE . . . . . . . . . . . . . . . . . . . . . . . . . . . . . . . . . . . . 16
VIEW YOUR WEATHER DATA IN WUNDERGROUND . . . . . . . . . . . . . . . . . . . . . . . . . . . . . . 17
VIEW YOUR WEATHER DATA IN WEATHERCLOUD . . . . . . . . . . . . . . . . . . . . . . . . . . . . . . 17
FIRMWARE UPDATE . . . . . . . . . . . . . . . . . . . . . . . . . . . . . . . . . . . . . . . . . . . . . . . . 17
OTHER SETTING & FUNCTIONS OF THE CONSOLE . . . . . . . . . . . . . . . . . . . . . . . . . . . . . . . . 18
MANUAL CLOCK SETTING . . . . . . . . . . . . . . . . . . . . . . . . . . . . . . . . . . . . . . . . . . . . 18
MOON PHASE . . . . . . . . . . . . . . . . . . . . . . . . . . . . . . . . . . . . . . . . . . . . . . . . . . . . 19
SUNRISE & SUNSET TIME . . . . . . . . . . . . . . . . . . . . . . . . . . . . . . . . . . . . . . . . . . . . . 19
SETTING ALARM TIME . . . . . . . . . . . . . . . . . . . . . . . . . . . . . . . . . . . . . . . . . . . . . . . 19
ACTIVATING ALARM AND TEMPERATURE PRE-ALARM FUNCTION . . . . . . . . . . . . . . . . . . . . . 19
TEMPERATURE / HUMIDITY FUNCTION . . . . . . . . . . . . . . . . . . . . . . . . . . . . . . . . . . . . . 20
TREND INDICATOR . . . . . . . . . . . . . . . . . . . . . . . . . . . . . . . . . . . . . . . . . . . . . . . . . 21
WIND . . . . . . . . . . . . . . . . . . . . . . . . . . . . . . . . . . . . . . . . . . . . . . . . . . . . . . . . . 21
WEATHER INDEX . . . . . . . . . . . . . . . . . . . . . . . . . . . . . . . . . . . . . . . . . . . . . . . . . . 22
WEATHER FORECAST . . . . . . . . . . . . . . . . . . . . . . . . . . . . . . . . . . . . . . . . . . . . . . . 23
BAROMETRIC PRESSURE . . . . . . . . . . . . . . . . . . . . . . . . . . . . . . . . . . . . . . . . . . . . 23
RAIN . . . . . . . . . . . . . . . . . . . . . . . . . . . . . . . . . . . . . . . . . . . . . . . . . . . . . . . . . 24
LIGHT INTENSITY, UV INDEX & SUNBURN TIME . . . . . . . . . . . . . . . . . . . . . . . . . . . . . . . . 24
MAX / MIN DATA RECORD . . . . . . . . . . . . . . . . . . . . . . . . . . . . . . . . . . . . . . . . . . . . . 25
PAST 24 HOURS HISTORY DATA . . . . . . . . . . . . . . . . . . . . . . . . . . . . . . . . . . . . . . . . . 25
WEATHER ALERT SETTING . . . . . . . . . . . . . . . . . . . . . . . . . . . . . . . . . . . . . . . . . . . . 26
BACKLIGHT . . . . . . . . . . . . . . . . . . . . . . . . . . . . . . . . . . . . . . . . . . . . . . . . . . . . . 27
DISPLAY CONTRAST . . . . . . . . . . . . . . . . . . . . . . . . . . . . . . . . . . . . . . . . . . . . . . . . 27
MAINTENANCE . . . . . . . . . . . . . . . . . . . . . . . . . . . . . . . . . . . . . . . . . . . . . . . . . . . . . 27
BATTERY REPLACEMENT . . . . . . . . . . . . . . . . . . . . . . . . . . . . . . . . . . . . . . . . . . . . . 27
WIRELESS 7-IN-1 SENSOR MAINTNANCE . . . . . . . . . . . . . . . . . . . . . . . . . . . . . . . . . . . 27
TROUBLESHOOT . . . . . . . . . . . . . . . . . . . . . . . . . . . . . . . . . . . . . . . . . . . . . . . . . . 28
PRECAUTIONS . . . . . . . . . . . . . . . . . . . . . . . . . . . . . . . . . . . . . . . . . . . . . . . . . . . . . 28
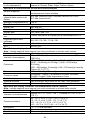
SPECIFICATIONS . . . . . . . . . . . . . . . . . . . . . . . . . . . . . . . . . . . . . . . . . . . . . . . . . . . . 29
CONSOLE . . . . . . . . . . . . . . . . . . . . . . . . . . . . . . . . . . . . . . . . . . . . . . . . . . . . . . 29
WIRELESS 7-IN-1 SENSOR . . . . . . . . . . . . . . . . . . . . . . . . . . . . . . . . . . . . . . . . . . . . 32
WIRELESS THERMO-HYGRO INDOOR SENSOR . . . . . . . . . . . . . . . . . . . . . . . . . . . . . . . . 32
EC DECLARATION OF CONFORMITY . . . . . . . . . . . . . . . . . . . . . . . . . . . . . . . . . . . . . . . . . 32
FCC DECLARATION OF CONFORMITY . . . . . . . . . . . . . . . . . . . . . . . . . . . . . . . . . . . . . . . . 32
NOTES ON CLEANING . . . . . . . . . . . . . . . . . . . . . . . . . . . . . . . . . . . . . . . . . . . . . . . . . 33
DISPOSAL . . . . . . . . . . . . . . . . . . . . . . . . . . . . . . . . . . . . . . . . . . . . . . . . . . . . . . . . 33
WARRANTY & SERVICE . . . . . . . . . . . . . . . . . . . . . . . . . . . . . . . . . . . . . . . . . . . . . . . . 33

4
INTRODUCTION
Thank you for selecting the 7-in-1 WiFi Advanced Professional Weather Station. This system gathers
and automatically uploads accurate and detail weather data to Weather Underground and Weathercloud
website - the famous weather service which allows weather observers to upload their local weather data with
automated personal weather stations (PWS) - at which you can access and upload your weather data freely.
This product oers professional weather observers or serious weather enthusiasts robust performance with
a wide range of options and sensors. You will get your own local forecast, high/lows, totals and averages for
virtually all weather variables without using a PC.
The 7-in-1 sensor which measures outdoor temperature, humidity, wind, rain UV and light together with up to
7 individual temperature humidity sensors, which can add to a sensor array of maximum 7 units continually,
transmits weather data to the console. Both sensors are fully assembled and calibrated for your easy
installation. They send data at a low power radio frequency to the console from up to 150m/450 feet away
(line of sight).
In the console, high-speed processors are embedded to analyze the received weather data and these real-
time data can be published to Wunderground.com and weathercloud.net through your home WiFi router.
The console can also synchronize with internet time server to show high precision time and for its weather
data time stamp. The color LCD display shows informative weather readings with advanced features, such
as high/low alert alarm, dierent weather index, and MAX/MIN records. With calibration, sunrise / sunset and
moon phase features, this system is truly a remarkably personal yet professional weather station for your
own backyard.
NOTE:
This instruction manual contains useful information on the proper use and care of this product. Please read
this manual through to fully understand and enjoy its features, and keep it handy for future use.
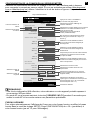
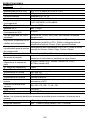
OVERVIEW
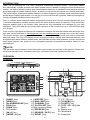
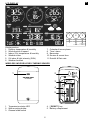
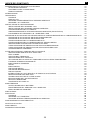
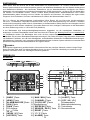
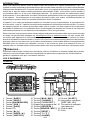
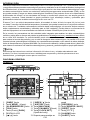
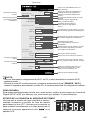
CONSOLE
WI-FI
SENSOR REFRESH ALERTALARMCLOCK
SET
RESET
OFF LO HI
DC 5V 1A
ALARM / SNOOZEBARO WIND SUN RAIN
6
7
8
9
10
11
13
12
20
22
23
17
16
15
14
19
18
21
3 4 521
1. [ BARO ] key
2. [ WIND ] key
3. [ ALARM/SNOOZE ] key
4. [ SUN ] key
5. [ RAIN ] key
6. LCD display
7. [
/ ] key
8. [ INDEX /
] key
9. [ HISTORY ] key
10. [ MAX / MIN ] key
11. [ CHANNEL ] key
12. [ CLOCK SET ] key
13. Wall mounting holder
14. [ REFRESH ] key
15. [ SENSOR / WI-FI ] key
16. [ RESET ] key
17. [ °C / °F ] key
18. [ ALARM ] key
19. [ ALERT ] key
20. [ OFF / HI / LO ] slide
switch
21. Battery door
22. Table stand
23. Power jack

5
EN
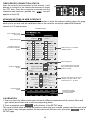
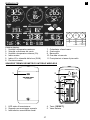
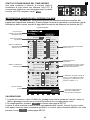
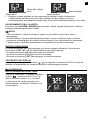
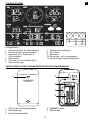
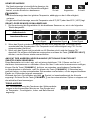
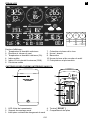
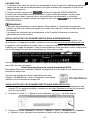
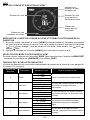
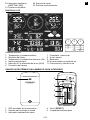
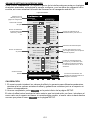
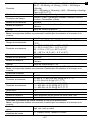
LCD DISPLAY
1
2 3
4
5 6
7
8 9
10 11
Display section:
1. Outdoor temperature & humidity
2. Wind direction & speed
3. Indoor (Ch) temperature & humidity
4. Weather index
5. UV index & light intensity (SUN)
6. Weather forecast
7. Calendar & moon phase
8. Time / alarm
9. Barometer
10. Sunrise & sunset time
11. Rainfall & Rain rate
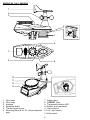
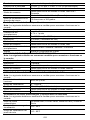
WIRELESS INDOOR HYGRO-THERMO SENSOR
1 2
3
4
5
1. Transmission status LED
2. Wall mounting holder
3. Channel slide switch
4. [ RESET ] key
5. Battery compartment

6
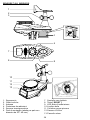
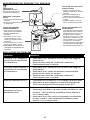
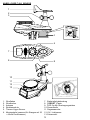
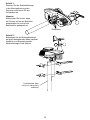
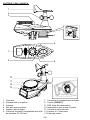
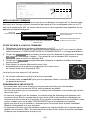
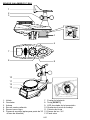
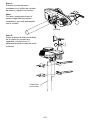
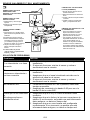
WIRELESS 7-IN-1 SENSOR
7
8
9
6
1
2
3
4
5
10
11
12
13
1. Wind vane
2. Wind cups
3. Antenna
4. Radiation shield
5. Thermo-hygro sensor
6. Mounting parts (t for 35 ~40mm diameter
pole)
7. Battery door
8. [ RESET ] key
9. Transmission status LED
10. Bubble level gradienter
11. Rain collector
12. UV / light sensor
13. Solar panel

7
EN
INSTALLATION AND SETUP
Your console can pair up with one wireless 7-in-1 outdoor sensor and up to 7 other wireless
sensors like Thermo/Hygro (ST2001H), Pool/Spa (SP60010) or Soil sensor (SM60020) (sold
separately).
INSTALL WIRELESS 7-IN-1 SENSOR
Your wireless 7-IN-1 sensor measures wind-speed, wind-direction, rainfall, UV, light intensity,
temperature and humidity for you. It’s assembled and calibrated for your easy installation.
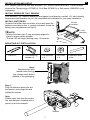
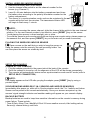
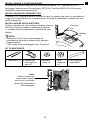
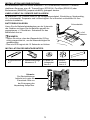
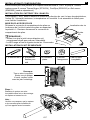
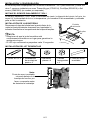
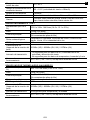
INSTALL BATTERIES
Unscrew the battery door at bottom of unit and insert the
batteries according to the +/- polarity indicated. Screw the
battery door compartment on tightly.
NOTE:
- Ensure the water tight O-ring is properly aligned in
place to ensure water resistant.
- The red LED will begin ashing every 12 seconds.
Screw
location
3 x AA
batteries
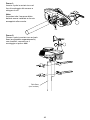
MOUNTING KIT INSTALLATION
1. U-bolt x 2 2. Pole mounting
clamps x 4
3. Flat washers
x 4
4. Hex nuts
x 4
5. Stainless steel
pole
Note:
Stainless steel pole
placed under the egg
tray, please check before
disposal of the packaging.
Step 1:
Plug the stainless steel pole into
the sensor's mounting hole and
tighten the screws.
Note:
Please make sure that the sensor
has new batteries installed and is
paired up with the console.
Screws

8
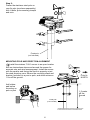
Step 2:
Fasten the stainless steel pole on
your x pole (purchase separately)
with U-bolts, pole mounting clamps
and nuts.
Fixed pole
(not included)
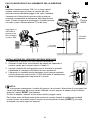
MOUNTING POLE AND DIRECTION ALIGNMENT
Install the wireless 7-IN-1 sensor in an open
location with no obstructions above and around the
sensor for accurate rain and wind measurement.
Install the sensor with the smaller end facing the
North to properly orient the wind direction vane.
Secure the mounting stand and bracket (included)
to a post or pole, and allow minimum 1.5m off the
ground.
Point to
NORTH
1.5 meter
off the
ground
Fixed pole
package not
included
Add rubber
pad before
mounting on
pole or post
Install the wireless 7-IN-1 sensor in an open location
with no obstructions above and around the sensor for
accurate rain and wind measurement. Install the sensor
with the smaller end facing the North to properly orient
the wind direction vane. Secure the mounting stand and
bracket (included) to a post or pole, and allow minimum
1.5m o the ground.
Add rubber
pad before
mounting on
pole or post
1.5 meter
o the
ground
Fixed pole
(not included)
Point to
NORTH

9
EN
Step 2:
Fasten the stainless steel pole on
your x pole (purchase separately)
with U-bolts, pole mounting clamps
and nuts.
Fixed pole
(not included)
MOUNTING POLE AND DIRECTION ALIGNMENT
Install the wireless 7-IN-1 sensor in an open
location with no obstructions above and around the
sensor for accurate rain and wind measurement.
Install the sensor with the smaller end facing the
North to properly orient the wind direction vane.
Secure the mounting stand and bracket (included)
to a post or pole, and allow minimum 1.5m off the
ground.
Point to
NORTH
1.5 meter
off the
ground
Fixed pole
package not
included
Add rubber
pad before
mounting on
pole or post
Install the wireless 7-IN-1 sensor in an open location
with no obstructions above and around the sensor for
accurate rain and wind measurement. Install the sensor
with the smaller end facing the North to properly orient
the wind direction vane. Secure the mounting stand and
bracket (included) to a post or pole, and allow minimum
1.5m o the ground.
Add rubber
pad before
mounting on
pole or post
1.5 meter
o the
ground
Fixed pole
(not included)
Point to
NORTH
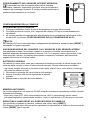
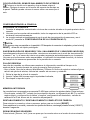
INSTALL WIRELESS INDOOR SENSOR
1. Remove the battery door of the sensor.
2. Use the channel slide switch to set the channel number for the
sensor (e.g. Channel 1)
3. Insert 2 x AA size batteries into the battery compartment and close
the battery door according to the polarity information marked on the
battery compartment.
4. The sensor is in synchronization mode, and can be registered to the
console within the next few minutes. The transmission status LED
will begin to ash every 1 minute.
NOTE:
- If you need to re-assign the sensor channel, slide the channel slide switch to the new channel
position. For the new channel number to be eective, press [ RESET ] key on the sensor.
- Avoid placing the sensors in direct sunlight, rain or snow.
- To avoid the sensor/s and console pairing failure during new console setup, please power up
the sensor/s rst, and then press [ RESET ] key on the main unit (no need on sensors).
PLACING THE WIRELESS INDOOR SENSOR
Place a screw on the wall that you wish to hang the sensor on.
Hang the sensor onto the screw by the wall mounting holder. You
can also place the sensor on a table by itself.
SETUP THE CONSOLE
POWER UP THE CONSOLE
1. Plug the adapter provided to the power jack at the back of the console.
2. Once the console is turned on, all the segments of the LCD will be shown momentarily.
3. The console will automatically enters sensor synchronization mode and AP mode (refer to
SETUP WI-FI CONNECTION).
NOTE:
If no display appears on the LCD after you plug the adaptor, press [ RESET ] key by using a
pointed object.
SYNCHRONIZING WIRELESS 7-IN-1 SENSOR AND INDOOR SENSOR(S)
Immediately after power up, while still in Synchronization mode, the 7-in-1 sensor and Indoor
Sensor can be paired to the console automatically. Once your sensors are paired up, the
sensors' signal strength indicator and weather reading will appear on your console display.
BACKUP BATTERY
Backup batteries are used to keep time-sensitive information on the console’s memory during
power failure. These include:
- Time & Date, Alarm Time, Max/Min & Past 24 hours weather records, Alert setting values,
Sensor(s) channel history, and Units

10
1. Remove the battery door of the console.
2. Insert 3 new AAA batteries as per the polarity indicated,
3. Replace the battery door.
BUILT-IN MEMORY
The console has built-in FLASH memory that holds the vital settings. These include:
- Time Zone, DST status, Time SYNC status, WI-FI and Weather server setting, Latitude /
Longitude, Hemisphere setting, Calibration values, and Sensor ID of paired sensor(s)
RESET AND FACTORY HARD RESET
To reset the console and start again, press the [ RESET ] key once
To hard reset the console and resume factory settings, press and hold the [ RESET ] key for 6
seconds
RESYNCHRONIZE SENSORS
Press the [ SENSOR / WI-FI ] key once for the console to enter sensor Synchronization
mode, and the console will re-register all the sensors that have already been registered to the it
before. i.e. the console will not lose the connection of the sensors that you’d paired up before.
CHANGING BATTERIES AND MANUAL PAIRING OF SENSOR
Whenever you changed the batteries of the wireless indoor or 7-in-1 weather sensor, re-
synchronization must be done manually.
1. Change all the batteries to new ones in the sensor.
2. Press [ SENSOR / WI-FI ] key on the console to enter sensor synchronization mode.
3. Press [ RESET ] key on the wireless indoor or 7-in-1 weather sensor.
SYNCHRONIZING ADDITIONAL WIRELESS SENSOR(S) (OPTIONAL)
The console can support up to 7 additional wireless sensors.
1. Press the [ SENSOR / WI-FI ] key once on the console to enter synchronization mode.
2. Press the [ RESET ] key on the new sensor, and wait for a few minutes for the new sensor
to paired to the console.
NOTE:
- Channel number of the indoor sensor must not be duplicated among the sensors. Please refer
to “INSTALL WIRELESS INDOOR SENSOR” for details
- This console can support dierent type of additional wireless sensor, e.g. soil moisture and
pool sensor. If you would like to pair up additional sensors, please check with your retailer for
more detail.
POINTING THE WIRELESS 7-IN-1 SENSOR TO SOUTH
The outdoor 7-IN-1 sensor is calibrated to point to North for the maximum accuracy. However,
for the user's convenience (e.g. users in the Southern hemisphere), it is possible to use the
sensor with the wind vane pointing to South.
1. Install the 7-IN-1 wireless sensor with its wind meter end pointing to South. (Please refer to
INSTALLATION OF THE WIRELESS SENSOR section for mounting details)
2. Select "S' in hemisphere section of the setup UI setup page. (Please refer to SETUP THE
WEATHER SERVER CONNECTION section for setup details)
3. Press
Apply
icon to conrm and exit.

11
EN
NOTE:
Changing the hemisphere setting will automatically switch the direction of the moon phase on
the display.
CREATE WEATHER SERVER ACCOUNT & SETUP WI-FI CONNECTION
The console can upload weather data to WUnderground and / or Weathercloud through WI-FI
router, you can follow the step below to setup your device.
NOTE:
The Weather Underground and Weathercloud website are subjected to change without notice.
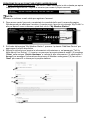
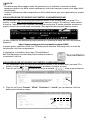
CREATE WEATHER UNDERGROUND ACCOUNT
1. In https://www.wunderground.com click the "Join" on the top right corner to open the
registration page. Follow the instructions to create your account.
NOTE:
Use the valid email address to register your account.
2. After you have created your account and completed the Email validation, please go back to
the WUndergound web page to login. Then, click “My Prole” button on the top to open the
drop-down menu and click "My Weather Station".
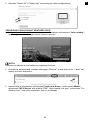
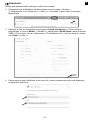
3. In "My Weather Station" page bottom, press the "Add New Device" button to add your
device.
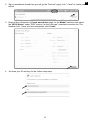
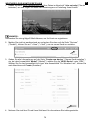
4. Follow their instruction to enter your station information, in the Step "Tell Us More About
Your Device", (1) enter a Name for your weather station. (2) choose “Other” in “Device
Hardware” section and ll in other the other information (3) select "I Accept" to accept
Weather underground's privacy terms, (4) click “Next” to create your station ID and key.

12
(2)
(2)
(3)
(4)
(1)
5. Jot down Your "Station ID" and "Station key" for the further setup step.
CREATE WEATHERCLOUD ACCOUNT
1. In https://weathercloud.net enter your information in "Join us today" section, then follow
the instructions to create your account.
NOTE:
Use the valid email address to register your account.

13
EN
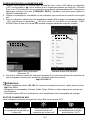
2. Sign in weathercloud and then you will go the "Devices" page, click "+ New" to create new
device.
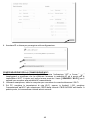
3. Enter all the information in Create new device page, for the Model* selection box select
the "W100 Series" under "CCL" section. for the Link type* selection box select the "Pro
Weather Link", Once you have completed, click Create.
4. Jot down your ID and key for the further setup step.

14
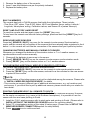
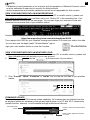
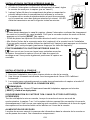
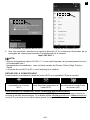
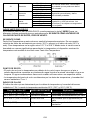
SETUP WI-FI CONNECTION
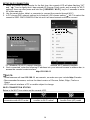
1. When you power up the console for the rst time, the console LCD will show ashing "AP"
and "
" icon to signify that it has entered AP (Access Point) mode, and is ready for WI-FI
settings. User can also press and hold the [ SENSOR / WI-FI ] key for 6 seconds to enter
AP mode manually.
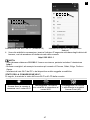
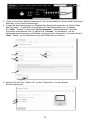
2. Use the smart phone, tablet, or computer to connect the console through WI-FI.
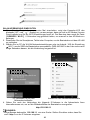
3. In PC choose WiFi network settings or In Android / iOS choose setting
WI-FI to select the
console’s SSID: PWS-XXXXXX in the list and it will need several second to connect.
PWS-XXXXXX
PWS-XXXXXX
PC (Windows 10) WI-FI network interface Android WI-FI network interface
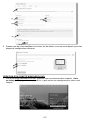
4. Once connected, enter the following IP address into your internet browser’s address bar, to
access the console’s web interface:
http://192.168.1.1
NOTE:
- Some browsers will treat 192.168.1.1 as a search, so make sure you include http:// header.
- Recommended browsers, such as the latest version of Chrome, Safari, Edge, Firefox or
Opera.
- WI-FI network interface of PC or mobile subject to change.
WI-FI CONNECTION STATUS
Below is the WI-FI icon status on the console LCD:
Stable: Console is in
connection with WI-FI router
Flashing: Console is trying to
connect to WI-FI router
Flashing: Console currently in
Access Point (AP) mode

15
EN
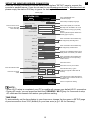
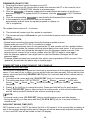
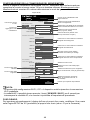
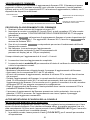
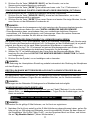
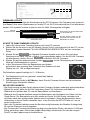
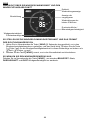
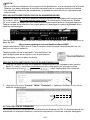
SETUP THE WEATHER SERVER CONNECTION
Enter the following information into the below web interface "SETUP" page to connect the
console to weather server, If you do not want to use Wunderground.com or Weathercloud.net,
please empty the station ID & key to ignore the data upload.
nist.time.gov
Server URL:
0.0000 North
*Latitude:
0.0000
Enter 0 to 90, no negative numbers
Enter 0 to 180, no negative numbers
East
*Longitude:
Time server setup
Location for sunrise / sunset
WiFi Router setup
ADVANCED
Wunderground
Station ID:
WDw124
******
******
******
IPACIR23Wc
Weather server setup
Station key:
Router:
Add Router
Search
Security type:
Router Password:
WAP2
ROUTER_A
Language: English
Weathercloud
Station ID:
Station key:
******
IDCR21w1
http://WAC.com
Station ID:
URL:
Station key:
Mac address 00:0E:C6:00:07:10
Hemisphere
* Depends on the model
SETUP
Apply
Firmware version: 1.00
0:00
Time Zone:
N
Press "ADVANCED" icon
to Advanced page
Press to search router
Press to allow add
router manually
Enter the Latitude value
Enter the Longitude
value
SETUP page
Select setup UI display language
Press to complete the setting
Select router (SSID) for connection
Enter new Station ID and Station key
that assigned by Wunderground
Enter new Station ID and Station key
that assigned by weathercloud
Enter new Station ID and Station key
that assigned by the corresponding
weather server
Manually enter the SSID if not on list
Select time server
Select the direction (e.g. EU
countries Longitude is East and US
is West)
Select the sensor located hemisphere
(e.g. US and EU countries are also "N",
Australia is "S")
Reserved for validated weather server,
detail please consult with your retailer
Select router's security type (usually
WAP2)
Router's password (leave blank if the
Security type is "Open")
Select time zone of your location
NOTE:
- When WI-FI setup is completed, your PC or mobile will resume your default WI-FI connection.
- During AP mode, you can press and hold the [ SENSOR / WI-FI ] key for 6 seconds to stop
AP mode and the console will restore your previous setting.
TIME ZONE
To automatically set the time display to your time-zone, change the time zone in SETUP page
of previous section from '0:00' (default) to your time zone (e.g.+1:00 for Germany).

16
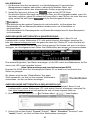
TIME SERVER CONNECTION STATUS
After the console has connected to the internet, it will
attempt to connect to the internet time server to obtain
the UTC time. Once the connection succeeds and the
console's time has been updated, the “
” icon will
appear on the LCD.
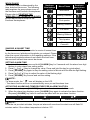
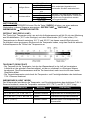
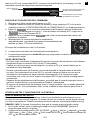
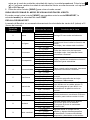
ADVANCE SETTING IN WEB INTERFACE
Press "ADVANCED" key at the top of web interface to enter the advance setting page, this page
allow you to set and view the calibration data of the console, as well as update the rmware
version on PC web browser.
Upload
Browse
Firmware version: 1.00
-560~ 560hpa / -16.54 ~ 16.54inHg / -420 ~ 420mmHg
Setting Range:
Temperature
o
C
Outdoor
Indoor
CH 1
CH 2
CH 3
CH 4
CH 5
CH 6
CH 7
Humidity %
Relative Pressure Offset:
Absolute Pressure Offset:
hpa
Range: -20 ~ 20
(Default: 0.0)
Current offset: 10Current offset: -9
Current offset: -5Current offset: 2
Current offset: -2Current offset: 3
Current offset: -2Current offset: 1.2
Current offset: -5Current offset: -0.2
Current offset: -3Current offset: -20.1
Current offset: -10Current offset: 11.5
Current offset: -3
Current offset: -3
(Default: 0)
Current offset: 10
(Default: 0)
Current offset: 0.2
Current offset: -5Current offset: 1
Pressure
Range: -20.0 ~ 20.0
o
C
-36.0 ~ 36.0
o
F (Default: 0.0)
*UV gain:
Range: 0.01 ~ 10(Default: 1.00)
Current gain: 1.1
*Light gain:
Range: 0.01 ~ 10(Default: 1.00)
Current gain: 1.1
* Depends on the model
*Wind speed gain:
*Wind direction:
*Rain gain:
Range: 0.5 ~ 1.5(Default: 1.00)
Range: -10 ~ 10(Default: 0
o
)
Range: 0.5 ~ 1.5(Default: 1.00)
Current gain: 0.85
Current offset: 2
o
Current gain: 0.75
SETUP ADVANCED
Select setting unit
Press "SETUP" icon to
Setup page
Outdoor and Ch 1~7
temperature calibration
section
Pressure calibration
section
Current rmware
version
The rmware update
function only available
in PC web browser
ADVANCED page
Select setting unit
The rain, wind speed, UV and Light
calibration use gain method. The
wind direction is +/- 10 oset.
Outdoor and Ch 1~7 humidity
calibration section
Current oset value is the value
that you set before to oset the
pressure reading.
CALIBRATION
1. User can input the oset and/or gain values for dierent parameters while current oset and
gain values are shown next to their corresponding blank.
2. Once completed, press
Apply
at the bottom of the SETUP page
The current oset value will show the previous value that you entered, please input the new value
in the blank if any changes needed, the new value will eective once you press
Apply
icon in
SETUP page.

17
EN
NOTE:
- Calibration of most parameter is not required, with the exception of Relative Pressure, which
must be calibrated to sea-level to account for altitude eects.
- Indoor temperature and humidity calibration values are not applicable for this console.
VIEW YOUR WEATHER DATA IN WUNDERGROUND
To view your weather station live data in a web browser (PC or mobile version), please visit
http://www.wunderground.com, and then enter your “Station ID” in the searching box. Your
weather data will show up on the next page. You can also login your account to view and
download the recorded data of your weather station.
Another way to view your station is use the web browser URL bar, type below in the URL bar:
https://www.wunderground.com/dashboard/pws/XXXX
Then replace the XXXX by your Weather underground station ID to view your station live data.
You can also use the Apple ipad's "WunderStation" app to
login your own weather station to view the live data.
WunderStation
VIEW YOUR WEATHER DATA IN WEATHERCLOUD
1. To view your weather station live data in a web browser (PC or mobile version), please visit
https://weathercloud.net and sign in your own account.
2. Click the
icon inside the pull down menu of your station.
3. Click "Current", "Wind", "Evolution" or "Inside" icon to view the live data of your weather
station.
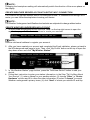
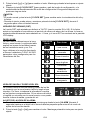
FIRMWARE UPDATE
The console supports OTA rmware update capability. Its rmware may be updated over the
air anytime (whenever necessary) through any web-browser on a PC with WI-FI connectivity.
Update function, however, is not available through mobile/smart devices.
Upload
Browse
Firmware version: 1.00
Current rmware
version
Bottom of web interface ADVANCED page
Press to start upload the rmware
to console
Please to select the rmware le for
update

18
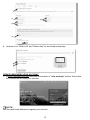
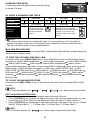
FIRMWARE UPDATE STEP
1. Download the latest version rmware to your PC.
2. Set the Console into AP (access point) mode then connect the PC to the console (ref to
"SETUP WI-FI CONNECTION" section in previous page).
3. Click the
Browse
in rmware update section and browse the location of the le you
download in step 1. To update the WI-FI rmware, click the
Browse
in WI-FI rmware
section.
4. Click the corresponding
Upload
to start transfer the rmware le to console.
5. In the meantime, the console will execute the update
automatically and will show the update progress on display (i.e.
100 is completion).
The update time is around 5 ~ 8 minutes
6. The console will restart once the update is completed.
7. The console will stay in AP mode for you to check the rmware version and all the current
setting.
IMPORTANT NOTE:
- Please keep connecting the power during the rmware update process.
- Please make sure your PC's WI-FI connection is stable.
- When the update process start, do not operate the PC and console until the update nished.
- During rmware update the console will stop upload data to the cloud server. It will reconnect
to your WI-FI router and upload the data again once the rmware update succeed. If the
console cannot connect to your router, please enter the SETUP page to setup again.
- After the rmware updates, user might need to input the Weather Underground ID and
password again.
- Firmware update process have potectial risk, which cannot guarantee 100% success. If the
update fail, please redo the above step to update again.
OTHER SETTING & FUNCTIONS OF THE CONSOLE
MANUAL CLOCK SETTING
This console is designed to obtain the local time by synchronize with the assigned internet time
server. If you want to use it oine, you can set the time and date manually. During the rst time
startup, press and hold the [ SENSOR / WI-FI ] key for 6 seconds and let the console back to
normal mode.
1. In normal mode, press and hold [ CLOCK SET ] key for 2 seconds to enter setting.
2. The setting sequence: DST AUTO/OFF
Hour Minute second 12/24 hour
format
Year Month Day M-D/D-M format Time sync ON/OFF weekday
Language.
3. Press [
] or [ ] key to change the value. Press and hold the key for quick-adjust.
4. Press [ CLOCK SET ] key to save and exit the setting mode, or the unit will automatically
exit the setting mode 60 seconds later without pressing any key.
NOTE:
- In normal mode, press [ CLOCK SET ] key to switch between year and date display.
- During the setting, you can press and hold [ CLOCK SET ] key for 2 seconds to back to
normal model.
DAYLIGHT SAVING TIME (DST)
DST function is set to "AUTO" by default (for EU or US version). If the current date on display is
with in the summer daylight saving period, the time will will be automically adjusted forward by
+1 hour, and DST icon will be shown on the LCD dsiplay.

19
EN
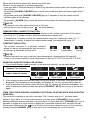
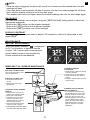
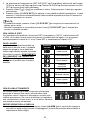
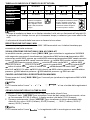
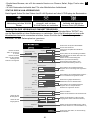
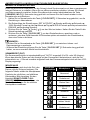
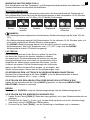
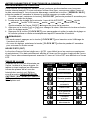
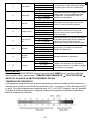
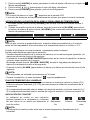
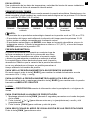
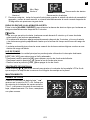
MOON PHASE
The moon phase is determined by the
time, date and time zone. The following
table explains the moon phase icons of
the Northern and Southern Hemispheres.
Please refer to
POINTING THE
WIRELESS 7-IN-1 SENSOR TO SOUTH
section about how to setup for the
Southern Hemispheres.
Northern
Hemisphere
Moon Phase
Southern
Hemisphere
New Moon
Waxing Crescent
First quarter
Waxing Gibbous
Full Moon
Waning Gibbous
Third quarter
Waning
Crescent
SUNRISE & SUNSET TIME
The console indicates your location’s sunrise & sunset time
by the time zone, latitude and longitude you entered. Please
enter the correct information in the regarding settings. If the
latitude and longitude values do not match the time zone,
the sunrise & sunset time cannot be shown.
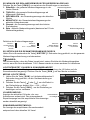
SETTING ALARM TIME
1. In normal time mode, press and hold [ ALARM ] key for 2 seconds until the alarm hour digit
ashes to enter alarm time setting mode.
2. Press [
] or [ ] key to change the value. Press and hold the key for quick-adjust.
3. Press [ ALARM ] key again to step the setting value to Minute with the Minute digit ashing.
4. Press [
] or [ ] key to adjust the value of the ashing digit.
5. Press [ ALARM ] key to save and exit the setting.
NOTE:
- In alarm mode, the “
” icon will display on the LCD.
- The alarm function will turn on automatically once you set the alarm time.
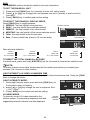
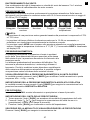
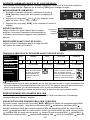
ACTIVATING ALARM AND TEMPERATURE PRE-ALARM FUNCTION
1. In normal mode, press [ ALARM ] key to show the alarm time for 5 seconds.
2. When the alarm time displays, press [ ALARM ] key again to activate the alarm function.
Or press [ ALARM ] key twice to activate the alarm with ice pre-alarm function.
Alarm o Alarm on Alarm with ice-alert
NOTE:
Once the ice pre-alert activates, the pre-set alarm will sound and ice-alert icon will ash 30
minutes earlier if the outdoor temperature is below -3°C.

20
When clock reach the alarm time, alarm sound will start.
Where it can be stopped by following operation:
- Auto-stop after 2 minutes alarming if without any operation and the alarm will activate again in
the next day.
- By pressing [ALARM / SNOOZE] key to enter snooze that the alarm will sound again after 5
minutes.
- By pressing and hold [ALARM / SNOOZE] key for 2 seconds to stop the alarm and will
activate again in the next day
- By pressing [ ALARM ] key to stop the alarm and the alarm will activate again in the next day.
NOTE:
- The snooze could be used continuously in 24 hours.
- During the snooze, the alarm icon “
” will keep ashing.
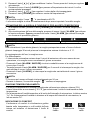
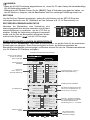
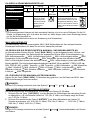
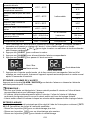
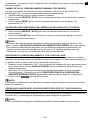
TEMPERATURE / HUMIDITY FUNCTION
- The temperature and humidity reading are display on the outdoor and indoor (CH) section.
- Use the [ °C / °F ] slide switch to select the temperature display unit.
- If temperature / humidity is below the measurement range, the reading will show “Lo”. If
temperature / humidity is above the measurement range, the reading will show “HI”.
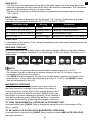
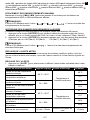
COMFORT INDICATION
The comfort indication is a pictorial indication
based on indoor air temperature and humidity in
an attempt to determine comfort level.
Too cold Comfortable Too hot
NOTE:
- Comfort indication can vary under the same temperature, depending on the humidity.
- There is no comfort indication when temperature is below 0°C (32°F) or over 60°C (140°F).
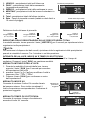
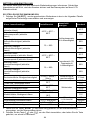
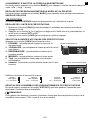
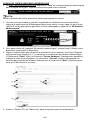
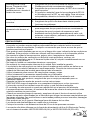
WIRELESS SENSOR SIGNAL RECEIVING
1. The console display signal strength for the wireless sensor(s), as per table below:
Outdoor 7-in-1 sensor
Indoor channel sensor
No signal Weak signal Good signal
2. If the signal has discontinued and does not recover within 15 minutes, the signal icon will
disappear. The temperature and humidity will display “Er” for the corresponding channel.
3. If the signal does not recover within 48 hours, the “Er” display will become permanent. You
need to replace the batteries and then press [ SENSOR / WI-FI] key to pair up the sensor
again.
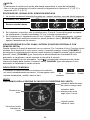
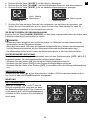
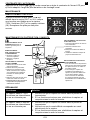
VIEW THE OTHER INDOOR CHANNELS (OPTIONAL FEATURE WITH ADD ON EXTRA
SENSORS)
This console is capable to pair with a wireless 7-IN-1 sensor and up to 7 wireless indoor
sensors. If you have 2 or more Indoor sensors, you can press [ CHANNEL ] key to switch
between dierent wireless channels in normal mode, or press and hold [ CHANNEL ] key for 2
seconds to toggle auto-cycle mode to display the connected channels at 4 seconds interval.
During auto-cycle mode, the
icon will show on the indoor channel section of the console's
display. Press [ CHANNEL ] key to stop auto cycle and display the current channel.
La pagina si sta caricando...
La pagina si sta caricando...
La pagina si sta caricando...
La pagina si sta caricando...
La pagina si sta caricando...
La pagina si sta caricando...
La pagina si sta caricando...
La pagina si sta caricando...
La pagina si sta caricando...
La pagina si sta caricando...
La pagina si sta caricando...
La pagina si sta caricando...
La pagina si sta caricando...
La pagina si sta caricando...
La pagina si sta caricando...
La pagina si sta caricando...
La pagina si sta caricando...
La pagina si sta caricando...
La pagina si sta caricando...
La pagina si sta caricando...
La pagina si sta caricando...
La pagina si sta caricando...
La pagina si sta caricando...
La pagina si sta caricando...
La pagina si sta caricando...
La pagina si sta caricando...
La pagina si sta caricando...
La pagina si sta caricando...
La pagina si sta caricando...
La pagina si sta caricando...
La pagina si sta caricando...
La pagina si sta caricando...
La pagina si sta caricando...
La pagina si sta caricando...
La pagina si sta caricando...
La pagina si sta caricando...
La pagina si sta caricando...
La pagina si sta caricando...
La pagina si sta caricando...
La pagina si sta caricando...
La pagina si sta caricando...
La pagina si sta caricando...
La pagina si sta caricando...
La pagina si sta caricando...
La pagina si sta caricando...
La pagina si sta caricando...
La pagina si sta caricando...
La pagina si sta caricando...
La pagina si sta caricando...
La pagina si sta caricando...
La pagina si sta caricando...
La pagina si sta caricando...
La pagina si sta caricando...
La pagina si sta caricando...
La pagina si sta caricando...
La pagina si sta caricando...
La pagina si sta caricando...
La pagina si sta caricando...
La pagina si sta caricando...
La pagina si sta caricando...
La pagina si sta caricando...
La pagina si sta caricando...
La pagina si sta caricando...
La pagina si sta caricando...
La pagina si sta caricando...
La pagina si sta caricando...
La pagina si sta caricando...
La pagina si sta caricando...
La pagina si sta caricando...
La pagina si sta caricando...
La pagina si sta caricando...
La pagina si sta caricando...
La pagina si sta caricando...
La pagina si sta caricando...
La pagina si sta caricando...
La pagina si sta caricando...
La pagina si sta caricando...
La pagina si sta caricando...
La pagina si sta caricando...
La pagina si sta caricando...
La pagina si sta caricando...
La pagina si sta caricando...
La pagina si sta caricando...
La pagina si sta caricando...
La pagina si sta caricando...
La pagina si sta caricando...
La pagina si sta caricando...
La pagina si sta caricando...
La pagina si sta caricando...
La pagina si sta caricando...
La pagina si sta caricando...
La pagina si sta caricando...
La pagina si sta caricando...
La pagina si sta caricando...
La pagina si sta caricando...
La pagina si sta caricando...
La pagina si sta caricando...
La pagina si sta caricando...
La pagina si sta caricando...
La pagina si sta caricando...
La pagina si sta caricando...
La pagina si sta caricando...
La pagina si sta caricando...
La pagina si sta caricando...
La pagina si sta caricando...
La pagina si sta caricando...
La pagina si sta caricando...
La pagina si sta caricando...
La pagina si sta caricando...
La pagina si sta caricando...
La pagina si sta caricando...
La pagina si sta caricando...
La pagina si sta caricando...
La pagina si sta caricando...
La pagina si sta caricando...
La pagina si sta caricando...
La pagina si sta caricando...
La pagina si sta caricando...
La pagina si sta caricando...
La pagina si sta caricando...
La pagina si sta caricando...
La pagina si sta caricando...
La pagina si sta caricando...
La pagina si sta caricando...
La pagina si sta caricando...
La pagina si sta caricando...
La pagina si sta caricando...
La pagina si sta caricando...
La pagina si sta caricando...
La pagina si sta caricando...
La pagina si sta caricando...
La pagina si sta caricando...
La pagina si sta caricando...
La pagina si sta caricando...
La pagina si sta caricando...
La pagina si sta caricando...
La pagina si sta caricando...
La pagina si sta caricando...
La pagina si sta caricando...
La pagina si sta caricando...
La pagina si sta caricando...
La pagina si sta caricando...
La pagina si sta caricando...
La pagina si sta caricando...
La pagina si sta caricando...
La pagina si sta caricando...
La pagina si sta caricando...
La pagina si sta caricando...
La pagina si sta caricando...
La pagina si sta caricando...
La pagina si sta caricando...
La pagina si sta caricando...
-
 1
1
-
 2
2
-
 3
3
-
 4
4
-
 5
5
-
 6
6
-
 7
7
-
 8
8
-
 9
9
-
 10
10
-
 11
11
-
 12
12
-
 13
13
-
 14
14
-
 15
15
-
 16
16
-
 17
17
-
 18
18
-
 19
19
-
 20
20
-
 21
21
-
 22
22
-
 23
23
-
 24
24
-
 25
25
-
 26
26
-
 27
27
-
 28
28
-
 29
29
-
 30
30
-
 31
31
-
 32
32
-
 33
33
-
 34
34
-
 35
35
-
 36
36
-
 37
37
-
 38
38
-
 39
39
-
 40
40
-
 41
41
-
 42
42
-
 43
43
-
 44
44
-
 45
45
-
 46
46
-
 47
47
-
 48
48
-
 49
49
-
 50
50
-
 51
51
-
 52
52
-
 53
53
-
 54
54
-
 55
55
-
 56
56
-
 57
57
-
 58
58
-
 59
59
-
 60
60
-
 61
61
-
 62
62
-
 63
63
-
 64
64
-
 65
65
-
 66
66
-
 67
67
-
 68
68
-
 69
69
-
 70
70
-
 71
71
-
 72
72
-
 73
73
-
 74
74
-
 75
75
-
 76
76
-
 77
77
-
 78
78
-
 79
79
-
 80
80
-
 81
81
-
 82
82
-
 83
83
-
 84
84
-
 85
85
-
 86
86
-
 87
87
-
 88
88
-
 89
89
-
 90
90
-
 91
91
-
 92
92
-
 93
93
-
 94
94
-
 95
95
-
 96
96
-
 97
97
-
 98
98
-
 99
99
-
 100
100
-
 101
101
-
 102
102
-
 103
103
-
 104
104
-
 105
105
-
 106
106
-
 107
107
-
 108
108
-
 109
109
-
 110
110
-
 111
111
-
 112
112
-
 113
113
-
 114
114
-
 115
115
-
 116
116
-
 117
117
-
 118
118
-
 119
119
-
 120
120
-
 121
121
-
 122
122
-
 123
123
-
 124
124
-
 125
125
-
 126
126
-
 127
127
-
 128
128
-
 129
129
-
 130
130
-
 131
131
-
 132
132
-
 133
133
-
 134
134
-
 135
135
-
 136
136
-
 137
137
-
 138
138
-
 139
139
-
 140
140
-
 141
141
-
 142
142
-
 143
143
-
 144
144
-
 145
145
-
 146
146
-
 147
147
-
 148
148
-
 149
149
-
 150
150
-
 151
151
-
 152
152
-
 153
153
-
 154
154
-
 155
155
-
 156
156
-
 157
157
-
 158
158
-
 159
159
-
 160
160
-
 161
161
-
 162
162
-
 163
163
-
 164
164
-
 165
165
-
 166
166
-
 167
167
-
 168
168
-
 169
169
-
 170
170
-
 171
171
-
 172
172


Explore Scientific Professional WIFI Weather Centre 7in1 Manuale del proprietario
- Categoria
- Stazioni meteorologiche
- Tipo
- Manuale del proprietario
in altre lingue
Documenti correlati
-
 Explore Scientific Professional WIFI colour Weather Center 5-in-1 V Manuale del proprietario
-
 Explore Scientific WSX1001 Manuale del proprietario
-
 Explore Scientific SP60010000000 Manuale del proprietario
-
 Explore Scientific SM60020000000 Manuale del proprietario
-
 Explore Scientific WSH1008000000 Manuale del proprietario


Altri documenti
-
Emos ESW5003 Manuale utente
-
-
Bresser 7002581 Manuale del proprietario
-
Bresser Professional WIFI Weather Centre 6in1 Manuale del proprietario
-
Emos ESW5002 Manuale utente
-
Bresser WIFI color weather center Manuale del proprietario
-
-
Marathon BA030019-EU Berlin Weather Station Manuale utente
-
-