HP LASERJET PRO 200 COLOR MFP M276 Manuale del proprietario
- Categoria
- Barebone per PC / workstation
- Tipo
- Manuale del proprietario
Questo manuale è adatto anche per

EN
Installation Guide
BG
Ръководство за
инсталиране
UK
Посібник зі
встановлення
FR
Guide d'installation
DE
Installationshandbuch
IT
Guida all'installazione
ES
Guía de instalación
CA
Guia d’instal·lació
HR
Vodič kroz instalaciju
CS
Průvodce instalací
DA
Installationsvejledning
NL
Installatiehandleiding
FI
Asennusopas
EL
Οδηγός εγκατάστασης
HU
Telepítési útmutató
KK
Орнату нұсқаулығы
NO
Installasjonsveiledning
PL
Podręcznik instalacji
PT
Guia de Instalação
RO
Ghid de instalare
RU
Руководство по
установке
SK
Inštalačná príručka
TR
Yükleme Kılavuzu
SV
Installationshandbok
SL
Priročnik za namestitev
AR
*CF145-90915*
*CF145-90915*
CF145-90915
*CF145-90915*
*CF145-90915*
CF145-90915
LASERJET PRO 200 COLOR MFP
M276n
M276nw

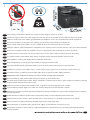
30% - 70%
17 - 25°C
(62.6 - 77°F)
1
1
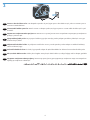
EN
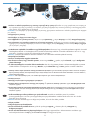
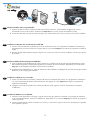
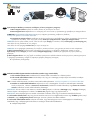
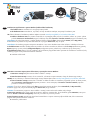
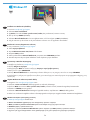
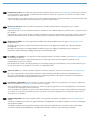
Select a sturdy, well-ventilated, dust-free area, away from direct sunlight to position the product.
BG
Изберете стабилно, добре проветрявано и незапрашено място, встрани от пряка слънчева светлина, където да поставите принтера.
EN
UK
Встановлюйте пристрій на стійкій поверхні у добре провітрюваному й незапиленому місці, захищеному від потрапляння прямих
сонячних променів.
FR
Choisissez un support solide et un endroit propre, bien aéré et à l'abri du rayonnement direct du soleil pour placer votre produit.
DE
Stellen Sie das Gerät an einem stabilen, gut durchlüfteten und staubfreien Ort auf, der nicht direktem Sonnenlicht ausgesetzt ist.
IT
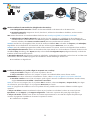
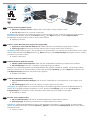
Posizionare il prodotto in un'area piana, ben ventilata, priva di polvere e lontana dalla luce diretta del sole.
ES
Busque un lugar sólido, bien ventilado, sin polvo y alejado de la luz solar directa para colocar el producto.
CA
Seleccioneu una superfície sòlida, ben ventilada, sense pols i allunyada de la llum directa del sol per situar el producte.
HR
Proizvod postavite na čvrstu površinu do koje ne dopire izravno sunčevo svjetlo u dobro prozračenom prostoru bez prašine.
CS
Pro umístění produktu vyberte stabilní, dobře větraný a bezprašný prostor mimo dosah přímého slunečního světla.
DA
Placer produktet i et stabilt, godt udluftet, støvfrit område uden direkte sollys.
NL
Plaats het apparaat op een stevige, goed geventileerde, stofvrije plek uit direct zonlicht.
FI
Sijoita laite tukevalle alustalle pölyttömään paikkaan, johon aurinko ei paista suoraan ja jossa on hyvä ilmanvaihto.
EL
Τοποθετήστε τη συσκευή σε ένα σταθερό σημείο, σε καλά αεριζόμενο χώρο χωρίς σκόνη και μακριά από το άμεσο ηλιακό φως.
HU
A készüléket masszív, jól szellőző, pormentes helyen állítsa fel, és ne tegye ki közvetlen napfény hatásának.
KK
Өнімді берік, жақсы желдетілетін, шаңсыз, күн сәулесі тікелей түспейтін жерге орнатыңыз.
NO
Plasser produktet i et stabilt, støvfritt område med god ventilasjon og utenfor direkte sollys.
PL
Do umieszczenia produktu wybierz solidne, dobrze wentylowane i pozbawione kurzu miejsce, gdzie urządzenie nie będzie wystawione
na bezpośrednie działanie promieni słonecznych.
PT
Selecione uma área sem poeira, bem ventilada e rme, longe de luz solar direta para posicionar o produto.
RO
Pentru a amplasa produsul, alegeţi un loc stabil, bine ventilat şi fără praf, ferit de lumina directă a soarelui.
RU
Выберите для установки устройства хорошо проветриваемое непыльное помещение и не допускайте попадания прямых солнечных
лучей на устройство.
SK
Produkt umiestnite na stabilnom, dobre vetranom a bezprašnom mieste, na ktoré nedopadá priame slnečné svetlo.
SL
Izdelek postavite na trdno površino v dobro prezračevanem in čistem prostoru, ki ni izpostavljen neposredni sončni svetlobi.
SV
Placera produkten i ett stadigt, välventilerat, dammfritt utrymme och fritt från direkt solljus.
TR
Ürünü yerleştirmek için, doğrudan güneş ışığından uzak, sağlam, iyi havalandırılan ve tozsuz bir yer seçin.
AR
La pagina si sta caricando...

3
3
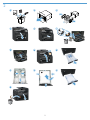
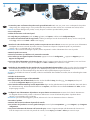
EN
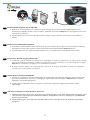
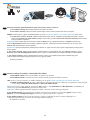
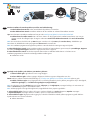
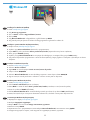
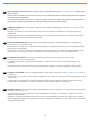
Connect the phone cord for fax. A country/region specic adapter for the RJ11 telephone cord may be required to connect to the
telephone jack.
BG
Свържете телефонния кабел за факса. Възможно е за свързване към телефонната розетка да е необходим специфичен за
страната/региона адаптер за телефонния кабел RJ11.
FR
Connectez le cordon de téléphone au télécopieur. Un adaptateur spécique à votre pays/région pour le cordon de téléphone RJ11 peut
être requis pour la connexion à la prise téléphonique.
DE
Schließen Sie das Telefonkabel für das Fax an. Für den Anschluss an die Telefonbuchse ist möglicherweise für das RJ11-Telefonkabel ein
spezieller Adapter je nach Land/Region erforderlich.
IT
Collegare il cavo telefonico per il fax. È necessario utilizzare un adattatore specico per il paese/regione per collegare il cavo del
telefono RJ11 alla presa telefonica.
ES
Conecte el cable de teléfono para fax. Puede que se requiera un adaptador especíco de país/región para conectar el cable del
teléfono RJ11 a la toma de teléfono.
CA
Connecteu el cable de telèfon per al fax. Pot ser que sigui necessari un adaptador especíc del país/la regió per connectar el cable
de telèfon RJ11 a l’endoll del telèfon.
HR
Priključite telefonski kabel za faks. Za priključivanje u telefonsku utičnicu može biti potreban adapter za telefonski kabel RJ11 specičan
za državu/regiju.
CS
Připojte telefonní kabel pro fax. Připojení telefonního kabelu RJ11 do telefonní zdířky může vyžadovat speciální adaptér pro určitou
zemi/oblast.
DA
Tilslut telefonledningen til fax. Det kan være nødvendigt med en lande-/områdespecik adapter til RJ11-telefonledningen for at kunne
slutte den til telefonstikket.
NL
Sluit het telefoonsnoer van de fax aan. Een land-/regiospecieke adapter voor het RJ11-telefoonsnoer is mogelijk vereist om het snoer op
de telefoonaansluiting aan te sluiten.
FI
Liitä puhelinjohto faksia varten. Liittäminen puhelinliitäntään voi edellyttää maa-/aluekohtaista RJ11-puhelinjohdon sovitinta.
EL
Συνδέστε το καλώδιο τηλεφώνου για φαξ. Για τη σύνδεση στο βύσμα τηλεφώνου, ενδέχεται να απαιτείται ειδικός προσαρμογέας ανάλογα
με τη χώρα/περιοχή για το καλώδιο τηλεφώνου RJ11.
HU
Csatlakoztassa a fax telefonkábelét. Az RJ11 telefonvezeték telefonaljzathoz történő csatlakoztatásához szükség lehet az adott
országban/térségben használatos adapterre.
KK
Телефон сымын факсқа жалғаңыз. Телефон ұясына жалғау үшін, белгілі бір елге/аймаққа арналған RJ11 телефон
сымының адаптері қажет болуы мүмкін.
NO
Koble til telefonledningen for faksen. Du trenger kanskje en land-/regionspesikk adapter for RJ11-telefonledningen for å kunne koble til
telefonkontakten.
PL
Podłącz przewód telefoniczny do faksu. W niektórych krajach/regionach do podłączenia kabla do gniazdka telefonu może być
wymagane użycie specjalnego adaptera kabla RJ11.
La pagina si sta caricando...

2
5
1
3 4
5
4
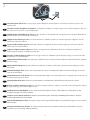
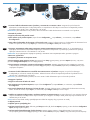
EN
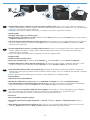
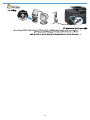
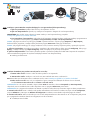
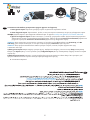
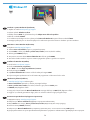
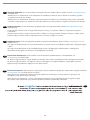
1. Connect the power cord between the product and a grounded AC outlet. Make sure your power source is adequate for the product
voltage rating. The voltage rating is on the product label. The product uses either 100-127 Vac or 220-240 Vac and 50/60 Hz.
CAUTION: To prevent damage to the product, use only the power cord that is provided with the product.
2. Turn on the product.
3. Follow the instructions on the control panel.
4. To verify that your product prints, touch the Setup
button, touch Reports, and then touch Conguration Report.
5. To test the document feeder and the copy function, load the printed report into the document feeder face-up. On the control panel,
touch Copy, and then touch Black or Color to start copying.
FR
1. Branchez le cordon d’alimentation entre le produit et une prise CA avec mise à la terre. Assurez-vous que votre source d'alimentation
est adaptée à la tension nominale du produit. La tension nominale est indiquée sur l'étiquette du produit. Le produit utilise
100-127 volts c.a. ou 220-240 volts c.a. et 50/60 Hz.
ATTENTION : An d’éviter d’endommager le produit, utilisez uniquement le cordon d’alimentation fourni avec le produit.
2. Mettez le produit sous tension.
3. Suivez les instructions qui s’afchent sur le panneau de commande.
4. Pour vérier que votre appareil imprime correctement, appuyez sur la touche Conguration
, Appuyez sur Rapports, puis sur
Rapport de conguration.
5. Pour tester le bac d'alimentation et la fonction de copie, chargez le rapport imprimé dans le bac d'alimentation, recto vers le haut.
Sur le panneau de commande, appuyez sur Copie puis sur Noir ou Couleur pour commencer à copier.
DE
1. Verbinden Sie das Netzkabel mit dem Produkt und einer geerdeten Wechselstromsteckdose. Stellen Sie sicher, dass Ihre Stromquelle
für die Betriebsspannung des Geräts geeignet ist. Die Betriebsspannung nden Sie auf dem Geräteetikett. Das Gerät verwendet
entweder 100 bis 127 Volt Wechselspannung oder 220 bis 240 Volt Wechselspannung und 50/60 Hz.
ACHTUNG: Um Schäden am Gerät zu vermeiden, sollten Sie ausschließlich das Netzkabel verwenden, das im Lieferumfang des Geräts
enthalten ist.
2. Schalten Sie das Gerät ein.
3. Befolgen Sie die Anweisungen auf dem Bedienfeld.
4. Um sicherzustellen, dass Ihr Gerät druckt, berühren Sie die Schaltäche Setup (Einrichtung)
, dann Reports (Berichte) und
anschließend Conguration Report (Kongurationsbericht).
5. Zum Testen des Dokumenteneinzugs und der Kopierfunktion legen Sie den gedruckten Bericht mit der bedruckten Seite nach oben in
den Dokumenteneinzug. Auf dem Bedienfeld berühren Sie Kopieren, und berühren Sie anschließend Schwarz oder Farbe, um den
Kopiervorgang zu starten.
IT
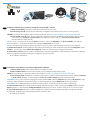
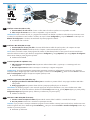
1. Collegare il cavo di alimentazione del prodotto a una presa elettrica con messa a terra. accertarsi che la fonte di alimentazione
sia adeguata alla tensione del prodotto. L'indicazione della tensione si trova sull'etichetta del prodotto. Il prodotto utilizza
100-127 V CA o 220-240 V CA e 50/60 Hz.
ATTENZIONE: per evitare di danneggiare il prodotto, utilizzare solo il cavo di alimentazione fornito in dotazione.
2. Accendere il prodotto.
3. Attenersi alle istruzioni visualizzate sul pannello di controllo.
4. Per vericare che il prodotto in uso sia in grado di stampare, toccare il pulsante Impostazione
, toccare Rapporti, quindi Rapporto
congurazione.
5. Per provare l'alimentatore di documenti e la funzione di copia, caricare il rapporto stampato nell'alimentatore di documenti con
il lato di stampa rivolto verso l'alto. Sul pannello di controllo, toccare Copia, quindi Nero o Colore per avviare la copia.
La pagina si sta caricando...
La pagina si sta caricando...
La pagina si sta caricando...
La pagina si sta caricando...
La pagina si sta caricando...
La pagina si sta caricando...

7
8
5
6
12
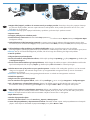
EN
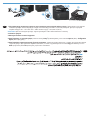
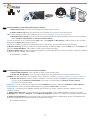
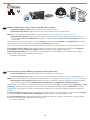
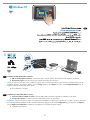
Choose a software install method
BG
Изберете начин за инсталиране на софтуер
UK
Вибір методу встановлення програмного забезпечення
FR
Choisissez une méthode d'installation logicielle
DE
Wählen Sie eine Methode für die Software-Installation aus
IT
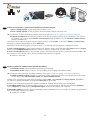
Scegliere un metodo di installazione del software
ES
Seleccione un método de instalación del software
CA
Selecció d’un mètode d’instal·lació del programari
HR
Izaberite način instalacije softvera
CS
Volba způsobu instalace softwaru
DA
Vælg en softwareinstallationsmetode
NL
Kies een software-installatiemethode
FI
Valitse ohjelmiston asennustapa
EL
Επιλέξτε μέθοδο εγκατάστασης του λογισμικού
HU
Válassza ki a szoftvertelepítés módját
KK
Бағдарламалық құралды орнату әдісін таңдау
NO
Velg en installasjonsmetode for programvare
PL
Wybierz sposób instalacji oprogramowania
PT
Escolha um método de instalação de software
RO
Alegerea unei metode de instalare a software-ului
RU
Выбор способа установки программного обеспечения
SK
Vyberte spôsob inštalácie softvéru
SL
Izbira načina namestitve programske opreme
Välj installationsmetod för programvara
SV
TR
AR
Yazılım yükleme yöntemini seçme

13
5
EN
Windows installation when using a USB cable:
1. Insert the product CD into the computer and follow the onscreen instructions. If the installation program does not start
automatically, browse to the CD drive. Double-click the Setup.exe le to run the program and install the product.
2. Connect the USB cable only when the software prompts you, and then follow the on-screen instructions to nish the installation.
FR
Installation sous Windows lors de l'utilisation d'un câble USB :
1. Insérez le CD du produit dans l'ordinateur et suivez les instructions à l'écran. Si le programme d'installation ne démarre pas
automatiquement, parcourez le lecteur CD. Cliquez deux fois sur le chier Setup.exe pour exécuter le programme et installer le
produit.
2. Branchez le câble USB uniquement lorsque le logiciel vous y invite, puis suivez les instructions afchées à l'écran pour terminer
la procédure.
DE
Windows-Installation bei Verwendung eines USB-Kabels:
1. Legen Sie die dem Gerät beiliegende CD in den Computer ein, und folgen Sie den Anweisungen auf dem Bildschirm. Wenn
das Installationsprogramm nicht automatisch gestartet wird, wechseln Sie zum CD-Laufwerk. Doppelklicken Sie auf die Datei
Setup.exe, um das Programm auszuführen und das Gerät zu installieren.
2. Schließen Sie das USB-Kabel nur an, wenn die Software Sie dazu auffordert, und befolgen Sie dann die Anweisungen auf dem
Bildschirm, um den Vorgang abzuschließen.
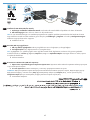
IT
Installazione su Windows con un cavo USB:
1. Inserire il CD del prodotto nel computer e attenersi alle istruzioni visualizzate sullo schermo. Se il programma di installazione
non viene avviato automaticamente, andare all'unità CD. Fare doppio clic sul le Setup.exe per eseguire il programma di
installazione del prodotto.
2. Collegare il cavo USB solo quando viene richiesto dal software, quindi seguire le istruzioni visualizzate per completare
l'installazione.
ES
Instalación de Windows con un cable USB:
1. Introduzca el CD del producto en el equipo y siga las instrucciones que aparecen en pantalla. Si el programa de instalación
no se inicia automáticamente, examine la unidad de CD. Haga doble clic en el archivo Setup.exe para ejecutar el programa e
instalar el producto.
2. Conecte el cable USB solo cuando el software se lo solicite y, a continuación, siga las instrucciones que aparecen en pantalla
para completar el proceso.
La pagina si sta caricando...
La pagina si sta caricando...
La pagina si sta caricando...
La pagina si sta caricando...
La pagina si sta caricando...
La pagina si sta caricando...

20
DE
Windows-Installation für Netzwerkdrucker (kabelgebunden oder Wireless):
1. Nur kabelgebundene Netzwerke: Schließen Sie das Netzwerkkabel an das Gerät und an das Netzwerk an.
2. Nur Wireless-Netzwerke: Vergewissern Sie sich, dass der PC, auf dem Sie die Installation durchführen, mit dem Wireless-
Netzwerk verbunden ist.
TIPP: Weitere Informationen zur Wireless-Installation nden Sie unter www.hp.com/global/us/en/wireless/index.html.
3. Kabelgebundene und Wireless-Netzwerke: Legen Sie die CD in den Computer ein, und befolgen Sie die Anleitungen zur
Softwareinstallation auf dem Bildschirm. Bei Aufforderungwählen Sie Connect to a wired network (Mit einem kabelgebundenen
Netzwerk verbinden) oder Connect to a wireless network (Mit einem Wireless-Netzwerk verbinden).
HINWEIS: Wird die CD nicht ausgeführt, klicken Sie auf die Windows-Schaltäche Start, und wählen Sie Computer (oder Arbeitsplatz).
Doppelklicken Sie anschließend auf das CD-Laufwerk und dann auf das Programm Autorun.exe, um es zu starten.
HINWEIS: Wenn das Installationsprogramm das Produkt auf dem Netzwerk nicht erkennt, müssen Sie die folgenden Schritte ausführen.
a. Nur kabelgebundene Netzwerke: Geben Sie die IP-Adresse des Geräts manuell ein. Um die IP-Adresse zu ermitteln, berühren Sie die
Schaltäche Setup (Einrichtung), dann Reports (Berichte) und anschließend Conguration Report (Kongurationsbericht). Sie nden die
IP-Adresse auf der ersten Seite des Berichts.
b. Nur Wireless-Netzwerke: Möglicherweise werden Sie aufgefordert, vorübergehend ein USB-Kabel zwischen Ihrem PC und dem Gerät
anzuschließen, damit das Installationsprogramm die erforderlichen Wireless-Einstellungen abrufen kann.
4. Die Installation ist abgeschlossen.
IT
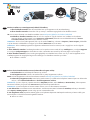
Installazione di Windows per i prodotti collegati in rete (tramite cavo o wireless):
1. Solo per reti cablate: Collegare il cavo di rete al prodotto e alla rete.
2. Solo per reti wireless: Assicurarsi che il computer sul quale si sta installando abbia accesso alla rete wireless.
SUGGERIMENTO: Per ulteriori informazioni sull'installazione wireless, vedere www.hp.com/global/us/en/wireless/index.html.
3. Reti cablate e wireless: Inserire il CD nel computer, quindi seguire le istruzioni di installazione del software. Quando richiesto,
scegliere Connessione a rete cablata o Connessione a rete wireless.
NOTA: Se il CD non viene eseguito, fare clic sul pulsante Start di Windows, selezionare Computer (o Computer locale), fare doppio
clic sull'unità CD, quindi fare doppio clic sul programma Autorun.exe per avviarlo.
NOTA: Se il programma di installazione non trova il prodotto sulla rete, potrebbe essere necessario effettuare una delle seguenti
operazioni:
a. Solo per reti cablate: Immettere manualmente l'indirizzo IP per il prodotto. Per individuare l'indirizzo IP, toccare il pulsante
Impostazione, toccare Rapporti, quindi Rapporto congurazione. L'indirizzo IP è riportato nella prima pagina del rapporto.
b. Solo per reti wireless: Potrebbe essere richiesto di connettere temporaneamente un cavo USB dal computer alla periferica per
consentire al programma di installazione di ottenere le impostazioni wireless.
4. L'installazione è completata.
La pagina si sta caricando...
La pagina si sta caricando...
La pagina si sta caricando...
La pagina si sta caricando...
La pagina si sta caricando...
La pagina si sta caricando...
La pagina si sta caricando...
La pagina si sta caricando...
La pagina si sta caricando...
La pagina si sta caricando...
La pagina si sta caricando...

32
7
EN
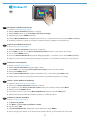
Installation for Windows RT (wireless)
1. Go to www.hp.com/go/support.
2. Select Drivers and Software.
3. Type M276 into the Enter a product name/number search box.
4. Click the SEARCH button.
5. Select Microsoft Windows RT in the drop-down dialog box, and then click the NEXT button.
6. Follow the on-screen instructions for downloading the correct software and drivers for your device.
FR
Installation pour Windows RT (sans l)
1. Rendez-vous à l'adresse www.hp.com/go/support.
2. Sélectionnez Pilotes et logiciel.
3. Tapez M276 dans la zone de recherche Enter a product name/number (Entrer un nom/numéro de produit).
4. Cliquez sur le bouton SEARCH.
5. Sélectionnez Microsoft Windows RT dans la boîte de dialogue déroulante, puis cliquez sur le bouton NEXT.
6. Suivez les instructions à l'écran pour télécharger le logiciel approprié et les pilotes de votre périphérique.
DE
Installation unter Windows RT (Wireless)
1. Besuchen Sie die Website unter www.hp.com/go/support.
2. Wählen Sie Drivers and Software (Treiber und Software).
3. Geben Sie M276 in das Suchfeld Produktname/-nummer eingeben ein.
4. Klicken Sie auf SEARCH (Suchen).
5. Wählen Sie Microsoft Windows RT (Microsoft Windows RT) im Dropdown-Dialogfeld aus, und klicken Sie auf NEXT (Weiter).
6. Folgen Sie den Anleitungen auf dem Bildschirm, um die richtige Software und die richtigen Treiber für Ihr Gerät herunterzuladen.
IT
Installazione per Windows RT (wireless)
1. Accedere all'indirizzo www.hp.com/go/support.
2. Selezionare Drivers and Software.
3. Immettere M276 nella casella di ricerca Enter a product name/number (Immettere il nome/codice del prodotto).
4. Fare clic sul pulsante SEARCH.
5. Selezionare Microsoft Windows RT nella casella a discesa, quindi fare clic sul pulsante NEXT.
6. Seguire le istruzioni visualizzate per scaricare il software e i driver corretti per la periferica.
ES
Instalación para Windows RT (inalámbrica)
1. Vaya a www.hp.com/go/support.
2. Seleccione Controladores y software.
3. Escriba M276 en la casilla de búsqueda Introduzca un nombre/número de producto.
4. Haga clic en el botón SEARCH.
5. Seleccione Microsoft Windows RT en el cuadro de diálogo desplegable y, a continuación, haga clic en el botón NEXT.
6. Siga las instrucciones que aparecen en pantalla para descargar el software y los controladores correctos para su dispositivo.
La pagina si sta caricando...
La pagina si sta caricando...
La pagina si sta caricando...
La pagina si sta caricando...
La pagina si sta caricando...

9
38
8
BG
Инсталиране за Mac OS X (USB или по мрежа):
1. USB или кабелна мрежова връзка: Свържете USB кабела или мрежовия кабел с продукта и компютъра или мрежата.
2. Всички типове връзки: Поставете компактдиска в компютъра и следвайте указанията.
ЗАБЕЛЕЖКА: За мрежови връзки, ако инсталиращата програма не открие устройството в мрежата, може да се наложи да
въведете ръчно IP адреса. За да намерите IP адреса, докоснете бутона Setup
(Настройка), докоснете Reports (Отчети), след
което докоснете Conguration Report (Отчет за конфигурацията). IP адресът е изписан на първата страница на отчета.
3. Инсталирането приключи.
DE
Installation für Mac OS X (USB oder Netzwerk):
1. USB- oder Netzwerkverbindungen: Schließen Sie das USB- oder Netzwerkkabel an das Gerät und den Computer oder das
Netzwerk an.
2. Alle Verbindungstypen: Legen Sie die CD in den Computer ein, und folgen Sie den Anleitungen auf dem Bildschirm.
HINWEIS: Bei Netzwerkverbindungen: Wenn das Installationsprogramm das Produkt auf dem Netzwerk nicht erkennt, müssen Sie die
IP-Adresse manuell eingeben. Um die IP-Adresse zu ermitteln, berühren Sie die Schaltäche Setup (Einrichtung)
, dann Reports
(Berichte) und anschließend Conguration Report (Kongurationsbericht). Sie nden die IP-Adresse auf der ersten Seite des Berichts.
3. Die Installation ist abgeschlossen.
IT
Installazione per Mac OS X (tramite USB o rete):
1. Connessioni USB o per rete cablata: Collegare il cavo USB o di rete al prodotto e al computer o alla rete.
2. Tutti i tipi di connessione: Inserire il CD nel computer e seguire le istruzioni.
NOTA: per le connessioni di rete, se il programma di installazione non rileva il prodotto sulla rete, potrebbe essere necessario immettere
manualmente l’indirizzo IP. Per individuare l’indirizzo IP, toccare il pulsante Impostazione
, toccare Rapporti, quindi Rapporto
congurazione. L’indirizzo IP è riportato nella prima pagina del rapporto.
3. L'installazione è completata.
ES
Instalación para Mac OS X (USB o red):
1. Conexiones de red por cable o USB: conecte el cable de red o USB al producto y al equipo o a la red.
2. Todos los tipos de conexión: introduzca el CD en el equipo y siga las instrucciones.
NOTA: para conexiones de red, si el programa de instalación no detecta el producto en la red, es posible que deba introducir
la dirección IP de forma manual. Para buscar la dirección IP, toque el botón Conguración
, toque Informes y, a continuación,
toque Informe de conguración. La dirección IP aparece en la primera página del informe.
3. La instalación ha nalizado.
CA
Instal·lació per a Mac OS X (USB o xarxa):
1. Connexions a xarxa amb l o USB: connecteu el cable USB o de xarxa al producte i a l’ordinador o la xarxa.
2. Tots els tipus de connexió: Inseriu el CD a l’ordinador i seguiu les instruccions.
NOTA: per a connexions de xarxa, si el programa d’instal·lació no detecta el producte a la xarxa, potser haureu d’introduir l’adreça IP
manualment. Per trobar l’adreça IP, toqueu el botó Conguració
, toqueu Informes i, tot seguit, Informe de conguració. L’adreça IP
apareix a la primera pàgina de l’informe.
3. La instal·lació ha nalitzat.
La pagina si sta caricando...
La pagina si sta caricando...
La pagina si sta caricando...
La pagina si sta caricando...

43
9
Setup is complete. If you did not register your product during software installation, go to www.register.hp.com to register now.
The HP Help and Learn Center and other documentation are on the CD that came with the product or in the HP Program folder on your
computer.
The HP Help and Learn Center is a product help tool that provides easy access to product information, HP product Web support,
troubleshooting guidance, and regulatory and safety information.
EN
9
Инсталирането е завършено. Ако не сте регистрирали продукта по време на инсталирането на софтуера, отидете на
www.register.hp.com, за да го регистрирате сега.
Центърът на HP за помощ и обучение и друга документация се намират на компактдиска, предоставен с устройството,
или в папката HP Program на вашия компютър.
Центърът на HP за помощ и обучение е помощен инструмент за устройството, който предоставя лесен достъп до информация
за принтера, уеб поддръжка за продукти на HP, указания за отстраняване на неизправности, както и нормативна информация
и информация за техническата безопасност.
BG
9
L’installation est terminée. Si vous n'avez pas enregistré votre produit lors de l'installation du logiciel, rendez-vous sur
www.register.hp.com pour le faire dès maintenant.
Le centre d’aide et d’apprentissage HP (HP Help and Learn Center) ainsi que d’autres documents se trouvent sur le CD livré avec
le produit ou dans le dossier dédié aux programmes HP sur votre ordinateur.
Le centre d’aide et d’apprentissage HP est un outil d’aide qui fournit un accès facile aux informations sur le produit, à une assistance
en ligne pour les produits HP, à un guide de dépannage et à des informations relatives à la réglementation et à la sécurité.
FR
Die Einrichtung ist abgeschlossen. Falls Sie Ihr Gerät während der Softwareinstallation nicht registriert haben, besuchen Sie die Website
www.register.hp.com, um es jetzt zu registrieren.
Das HP Help and Learn Center sowie weitere Dokumentation benden sich auf der CD, die dem Gerät beiliegt, oder im
HP Programmordner auf Ihrem Computer.
Das HP Help and Learn Center ist eine Produkthilfe für einfachen Zugriff auf Produktinformationen, Web-Support für HP Produkte,
Hinweise zur Fehlerbehebung sowie Zulassungs- und Sicherheitsinformationen.
DE
La congurazione è stata completata. Se durante l'installazione del software non è stata eseguita la registrazione del prodotto, visitare
il sito Web www.register.hp.com per eseguire la registrazione.
HP Help and Learn Center e documentazione aggiuntiva sono disponibili sul CD fornito con il prodotto o nella cartella dei programmi
HP sul computer.
HP Help and Learn Center è uno strumento di assistenza che fornisce accesso facilitato alle informazioni sul prodotto, supporto Web
ai prodotti HP, guida alla risoluzione dei problemi e informazioni relative alla sicurezza e alle normative.
IT
La conguración ha terminado. Si no registró el producto durante la instalación del software, vaya a www.register.hp.com para
registrarlo ahora.
El HP Centro de ayuda y formación se incluye junto con otra documentación en el CD suministrado con el producto o en la carpeta
Programa de HP de su equipo.
El HP Centro de ayuda y formación es una herramienta de ayuda para el producto que permite acceder fácilmente a información del
producto, asistencia Web del producto HP, guía para la solución de problemas e información legal y de seguridad.
ES
La instal·lació ha nalitzat. Si no heu registrat el producte durant la instal·lació del programari, visiteu www.register.hp.com per
fer-ho ara.
El centre d’aprenentatge i ajuda d’HP i d’altra informació es troben al CD subministrat amb el producte o a la carpeta de programes
HP del vostre ordinador.
El centre d’aprenentatge i ajuda d’HP és una utilitat d’ajuda que permet accedir fàcilment a informació sobre productes, assistència
tècnica web de productes HP, guia per a la solució de problemes i informació sobre normativa i seguretat.
CA
La pagina si sta caricando...
La pagina si sta caricando...
La pagina si sta caricando...
La pagina si sta caricando...
-
 1
1
-
 2
2
-
 3
3
-
 4
4
-
 5
5
-
 6
6
-
 7
7
-
 8
8
-
 9
9
-
 10
10
-
 11
11
-
 12
12
-
 13
13
-
 14
14
-
 15
15
-
 16
16
-
 17
17
-
 18
18
-
 19
19
-
 20
20
-
 21
21
-
 22
22
-
 23
23
-
 24
24
-
 25
25
-
 26
26
-
 27
27
-
 28
28
-
 29
29
-
 30
30
-
 31
31
-
 32
32
-
 33
33
-
 34
34
-
 35
35
-
 36
36
-
 37
37
-
 38
38
-
 39
39
-
 40
40
-
 41
41
-
 42
42
-
 43
43
-
 44
44
-
 45
45
-
 46
46
-
 47
47
-
 48
48


HP LASERJET PRO 200 COLOR MFP M276 Manuale del proprietario
- Categoria
- Barebone per PC / workstation
- Tipo
- Manuale del proprietario
- Questo manuale è adatto anche per
in altre lingue
- English: HP LASERJET PRO 200 COLOR MFP M276 Owner's manual
- français: HP LASERJET PRO 200 COLOR MFP M276 Le manuel du propriétaire
- español: HP LASERJET PRO 200 COLOR MFP M276 El manual del propietario
- Deutsch: HP LASERJET PRO 200 COLOR MFP M276 Bedienungsanleitung
- русский: HP LASERJET PRO 200 COLOR MFP M276 Инструкция по применению
- Nederlands: HP LASERJET PRO 200 COLOR MFP M276 de handleiding
- português: HP LASERJET PRO 200 COLOR MFP M276 Manual do proprietário
- slovenčina: HP LASERJET PRO 200 COLOR MFP M276 Návod na obsluhu
- dansk: HP LASERJET PRO 200 COLOR MFP M276 Brugervejledning
- čeština: HP LASERJET PRO 200 COLOR MFP M276 Návod k obsluze
- polski: HP LASERJET PRO 200 COLOR MFP M276 Instrukcja obsługi
- svenska: HP LASERJET PRO 200 COLOR MFP M276 Bruksanvisning
- Türkçe: HP LASERJET PRO 200 COLOR MFP M276 El kitabı
- suomi: HP LASERJET PRO 200 COLOR MFP M276 Omistajan opas
- română: HP LASERJET PRO 200 COLOR MFP M276 Manualul proprietarului
Documenti correlati
-
HP LASERJET PRO 200 COLOR MFP M276 Guida d'installazione
-
-
-
-
-
-
-
-
-