
A
Hardware Review
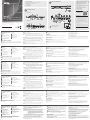
Front View
1
KVM Status Panel
2
OSD (Esc)
3
Port Selection Pushbuttons
4
Mode Selection Pushbutton
5
Selection button
6
Direction/Function buttons
7
Console Audio Ports
8
USB 2.0 Peripheral Port
9
IR Receiver
B
Hardware Installation
Rear View
1
Power Socket
2
Power Switch
3
Daisy Chain Control In/Out Ports
4
KVM Ports
5
Grounding Terminal
6
IR Receiver (Extension)
7
Console Ports
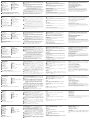
Use the diagram above and follow the steps below to set up the CM1284 unit.
1
Ground the CM1284 by connecting one end of a grounding wire to the
grounding terminal, and the other end of the wire to a suitable grounded
object.
9
Power on the KVM switch, the displays, and the computer/devices.
Note: The recommended power-on sequence is Port 1, Port 2, Port 3, and
then Port 4.
Operation
There are several convenient methods you can use to operate the CM1284 to
display the source device(s) connected to it.
Manual Switching
Use the front panel pushbuttons (1 to 4) to switch between KVM ports.
IR Remote Control
To select a source device with the remote control, press the numbered button
(1 to 4) that corresponds to the port to which it is connected.
Hotkeys
You can switch ports using the console’s keyboard by activating the Hotkey
Setting Mode (HSM). Please refer to the user manual for further hotkey control
details.
B
Hardware Installation
© Copyright 2019 ATEN
®
International Co., Ltd.
ATEN and the ATEN logo are trademarks of ATEN International Co., Ltd. All rights reserved. All
other trademarks are the property of their respective owners.
Part No. PAPE-1223- K90G Printing Date: 04/2019
4-Port USB HDMI Multi-View KVMP
TM
Switch
Quick Start Guide
CM1284
CM1284 4-Port USB HDMI Multi-View KVMP
TM
Switch
www.aten.com
CM1284 Commutateur KVMP
TM
multi-vue USB HDMI 4 ports
www.aten.com
CM1284 4-Port-USB-HDMI-Mehrfachansicht-KVMP
TM
-Switch
www.aten.com
Conmutator KVMP Multi-Vista de 4-Puertos USB HDMI
TM
CM1284
www.aten.com
CM1284 4-портовый KVMP
TM
коммутатор с поддержкой USB HDMI и функцией Multi-View
www.aten.com
Switch KVMP
TM
USB HDMI Multi-View 4 porte CM1284
www.aten.com
Hotkey Setting Mode (HSM)
To invoke HSM, do the following:
1.Press and hold down the Num Lock key.
2.Press and release the minus key.
3.Release the Num Lock key.
On-Screen Display (OSD)
Additionally, you can activate the On-Screen Display (OSD) and confi gure the
CM1284 including assigning the KVM, Audio and USB Link focus for each PC
port, setting up channels, selecting the Display mode, and so on. To open the
OSD screen, trigger the drop down menu and click the settings icon on the
menu.
Package Contents
1 CM1284 4-Port USB HDMI Multi-View KVMP
TM
Switch
4 KVMI Cables (HDMI, USB, Audio)
1 Power Cord
1 IR Remote Control
1 Rack Mounting Kit
1 User Instructions
A
Hardware Review
1
2
3
4
HDMI Cable
PC1PC2PC3PC4
3
2
1
8
7
4
6
4
7
5
4
5 6 7
321
1
3 73 4 5 6 8 9
2
Front View
Rear View
A
Présentation du matériel
Vue de devant
1
Panneau d'état KVM
2
OSD (Échap)
3
Boutons poussoirs de sélection
de port
4
Bouton de sélection de mode
5
Bouton de sélection
6
Boutons de direction/fonction
7
Ports audio de la console
8
Port périphérique USB 2.0
9
Récepteur IR
Vue de derrière
1
Prise d'alimentation
2
Interrupteur marche/arrêt
3
Ports d'entrée/sortie de contrôle de
la connexion en guirlande
4
Ports KVM
5
Borne de terre
6
Récepteur IR (Extension)
7
Ports console
B
Installation du matériel
Utilisez le schéma ci-dessus et suivez les étapes ci-dessous pour confi gurer le
CM1284.
1
Mettez le CM1284 à la terre en raccordant une extrémité d'un fi l de terre à
la borne de terre et l'autre extrémité du fi l à un objet mis à la terre adapté.
8
Branchez le cordon d'alimentation à la prise de courant du CM1284,
puis branchez l'autre extrémité du cordon d'alimentation à une source de
courant CA.
9
Allumez le commutateur KVM, les écrans et l'ordinateur/appareils.
Remarque : La séquence de mise sous tension recommandée est Port 1,
Port 2, Port 3, puis Port 4.
Fonctionnement
Vous pouvez utiliser plusieurs méthodes pratiques pour faire fonctionner le
CM1284 et affi cher le(s) périphérique(s) source qui lui sont connectés.
Commutation manuelle
Utilisez les boutons du panneau avant (1 à 4) pour basculer entre les ports KVM.
Télécommande IR
Pour sélectionner un périphérique source avec la télécommande, appuyez sur le
bouton numéroté (1 à 4) correspondant au port auquel il est connecté.
Touches de raccourcis
Vous pouvez changer de port à l'aide du clavier de la console en activant le
mode de réglage des touches de raccourcis (HSM). Veuillez consulter le manuel
d'utilisation pour plus de détails sur le contrôle des touches de raccourcis.
Mode de réglage des touches de raccourcis (HSM)
Pour appeler le HSM, procédez comme suit :
1.Appuyez sur la touche Verr Num et maintenez-la enfoncée.
2. Appuyez et relâchez la touche moins.
3. Relâchez la touche Verr Num.
Menu OSD (Affi chage à l'écran)
Vous pouvez également activer le menu OSD (Affi chage à l'écran) et
confi gurer le CM1284, notamment affecter la liaison KVM, Audio et USB sur
chaque port du PC, confi gurer les canaux, sélectionner le mode d'affi chage,
etc. Pour ouvrir le menu OSD, faites apparaître le menu déroulant et cliquez
sur l'icône des paramètres dans le menu.
A
Hardwareübersicht
Ansicht von vorne
1
KVM-Statusblende
2
OSD (Esc)
3
Anschlussauswahltasten
4
Modusauswahldrucktaste
5
Auswahltaste
6
Richtungs-/Funktionstasten
7
Konsolen-Audioanschlüsse
8
USB-2.0-Peripherie-Anschluss
9
IR-Empfänger
Ansicht von hinten
1
Netzanschluss
2
Netzschalter
3
Ein-/Ausgänge Daisy-Chain-
Steuerung
4
KVM-Ports
5
Erdungsklemme
6
IR-Empfänger (Erweiterung)
7
Konsolenports
B
Hardwareinstallation
Verwenden Sie das obige Diagramm und führen Sie die folgenden Schritte aus,
um das CM1284 Gerät einzurichten.
1
Erden Sie den CM1284, indem Sie ein Ende des Erdungskabels mit der
Erdungsklemme und das andere Ende mit einem geeigneten geerdeten
Objekt verbinden.
7
Schließen Sie Ihre USB-Peripheriegeräte an die USB Typ-A Anschlüsse an,
einen an der Vorderseite und den anderen an der Rückseite.
8
Stecken Sie das Netzkabel in die Netzeingangsbuchse des CM1284 und
dann das andere Ende des Netzkabels in eine Wechselstromquelle.
9
Schalten Sie den KVM-Switch, die Bildschirme und den Computer/Geräte
ein.
Hinweis: Die empfohlene Einschaltsequenz ist Anschluss 1, Anschluss 2,
Anschluss 3 und dann Anschluss 4.
Bedienung
Es gibt verschiedene komfortable Methoden zur Bedienung des CM1284 zur
Anzeige des/der verbundenen Eingangsgeräte(s).
Manuell wechseln
Wechseln Sie mit den Drucktasten (1 bis 4) an der Frontblende zwischen den
KVM-Anschlüssen.
IR-Fernbedienung
Wählen Sie ein Eingangsgerät mit der Fernbedienung, indem Sie die dem
Anschluss entsprechende Zifferntaste (1 bis 4) drücken.
Schnelltasten
Sie können Anschlüsse über das Bedienfeld der Konsole wechseln, indem
Sie den Tastenkombinationseinstellungsmodus (HSM) aktivieren. Weitere
Einzelheiten zur Steuerung mittels Tastenkombinationen fi nden Sie in der
Bedienungsanleitung.
Tastenkombinationseinstellungsmodus (HSM)
Gehen Sie zum Aufrufen des HSM wie folgt vor:
1. Halten Sie die Num-Taste gedrückt.
2. Drücken Sie kurz die Minus-Taste.
3. Lassen Sie die Num-Taste los.
Bildschirmanzeige (OSD)
Darüber hinaus können Sie die Bildschirmanzeige (OSD) aktivieren und den
CM1284 konfi gurieren, einschließlich der Zuweisung des KVM, der Audio-
und USB-Verbindungsfokussierung für jeden PC-Anschluss, der Einrichtung
von Kanälen, der Auswahl des Anzeigemodus usw. Lösen Sie zum Einblenden
des Bildschirmmenüs das Auswahlmenü aus und klicken Sie im Menü auf das
Einstellungssymbol.
A
Revisión de hardware
Vista frontal
1
Panel de estado del KVM
2
OSD (Esc)
3
Pulsadores de selección de
puerto
4
Pulsadores de selección de modo
5
Botón de selección
6
Botones de dirección/función
7
Puertos de audio de la consola
8
Puerto Periférico USB 2.0
9
Receptor IR
Vista posterior
1
Toma de alimentación
2
Interruptor de alimentación
3
Control de conexión en cadena de
puertos de entrada/salida
4
Puertos KVM
5
Terminal de toma de tierra
6
Receptor IR (Extensión)
7
Puertos de consola
B
Instalación de hardware
Utilice el diagrama de arriba y siga los pasos a continuación para confi gurar la
unidad CM1284.
7
Conecte sus periféricos USB a los puertos USB tipo A, uno en el panel
frontal y el otro en el panel posterior.
8
Conecte el cable de alimentación a la toma de corriente del CM1284 y
luego conecte el otro extremo del cable de alimentación a una fuente de
alimentación de CA.
9
Encienda el switch KVM, las pantallas y el ordenador/dispositivos.
Nota: La secuencia de encendido recomendada es Puerto 1, Puerto 2,
Puerto 3 y luego Puerto 4.
Funcionamiento
Hay varios métodos convenientes que puede usar para hacer funcionar el
CM1284 para mostrar el(los) dispositivo(s) fuente(es) conectado(s).
Conmutación manual
Use los pulsadores del panel frontal (1 a 4) para alternar entre los puertos KVM.
Mando a distancia IR
Para seleccionar un dispositivo fuente con el mando a distancia, presione el
botón numerado (1 a 4) que corresponde al puerto al que está conectado.
Teclas de acceso rápido
Puede cambiar los puertos utilizando el teclado de la consola activando el
Modo de confi guración de teclas de acceso rápido (HSM). Consulte el manual
del usuario para obtener más detalles sobre el control de teclas de acceso
rápido.
Modo de confi guración de teclas de acceso rápido (HSM)
Para recurrir a las teclas de acceso rápido (HSM), haga lo siguiente:
1. Pulse y mantenga presionada la tecla Bloq Num.
2. Presione y suelte la tecla menos.
3. Suelte la tecla Bloq Num.
Visualización en pantalla (OSD)
Además, puede activar la visualización en pantalla (OSD) y confi gurar el
CM1284, incluida la asignación del foco del del enlace del KVM, del audio y
del USB para cada puerto de PC, confi gurar canales, seleccionar el modo de
visualización, y así sucesivamente. Para abrir la pantalla OSD, active el menú
desplegable y haga clic en el ícono de confi guración en el menú.
A
Descrizione hardware
Vista anteriore
1
Pannello di stato KVM
2
OSD (Esc)
3
Pulsanti di selezione porta
4
Pulsante di selezione modalità
5
Pulsante di selezione
6
Pulsanti di direzione/funzione
7
Porte audio console
8
Porta periferica USB 2.0
9
Ricevitore IR
Vista posteriore
1
Presa di alimentazione
2
Interruttore di alimentazione
3
Porte di ingresso/uscita controllo
collegamento a catena
4
Porte KVM
5
Terminale di massa
6
Ricevitore IR (Estensione)
7
Porte console
B
Installazione dell'hardware
Usare il diagramma qua sopra e seguire i passaggi seguenti per confi gurare
l'unità CM1284.
6
All'altra estremità del cavo USB HDMI KVM, collegare i connettori HDMI,
USB e audio alle rispettive porte del computer.
7
Collegare le periferiche USB alle porte USB di tipo A, una sul pannello
anteriore e l'altra sul pannello posteriore.
8
Collegare il cavo di alimentazione alla presa di alimentazione del CM1284,
quindi collegare l'altra estremità del cavo di alimentazione a una fonte di
alimentazione CA.
9
Accendere lo switch KVM, i display e il computer/i dispositivi.
Nota: La sequenza di accensione consigliata è Porta 1, Porta 2, Porta 3 e
quindi Porta 4.
Funzionamento
Esistono diversi metodi utili per utilizzare il CM1284 per visualizzare i dispositivi
sorgente ad esso collegati.
Cambio manuale
Utilizzare i pulsanti del pannello anteriore (da 1 a 4) per commutare tra le porte
KVM.
Telecomando infrarosso
Per selezionare un dispositivo sorgente con il telecomando, premere il tasto
numerico (1-4) corrispondente alla porta a cui è collegato.
Tasti di scelta rapida
È possibile cambiare le porte utilizzando la tastiera della console attivando la
modalità di impostazione tasti di scelta rapida (HSM). Per ulteriori dettagli sul
controllo dei tasti di scelta rapida, fare riferimento al manuale utente.
Modalità di impostazione tasti di scelta rapida (HSM)
Fare come segue per richiamare la modalità HSM:
1. Tenere premuto il tasto BLOC NUM.
2. Premere e lasciare il tasto meno.
3. Lasciare il tasto BLOC NUM.
OSD
Inoltre, è possibile attivare il menu OSD e confi gurare il CM1284, compresa
l'assegnazione dell'attivazione di KVM, Audio e Collegamento USB per
ciascuna porta PC, l'impostazione dei canali, la selezione della modalità di
visualizzazione e così via. Per aprire la schermata OSD, attivare il menu a
discesa e fare clic sull'icona delle impostazioni nel menu.
A
Обзор аппаратного обеспечения
Вид спереди
1
Панель индикации состояния
KVM
2
Экранное меню (Esc)
3
Кнопки выбора порта
4
Клавиша выбора режима
5
Клавиша выбора
6
Клавиши направления/
функций
7
Аудиопорты консоли
8
Периферийный порт USB 2.0
9
ИК-приемник
Вид сзади
1
Разъем питания
2
Переключатель питания
3
Порты ввода/вывода устройства
шлейфового управления
4
KVM порты
5
Заземляющий контакт
6
ИК-приемник (удлинитель)
7
Порты консоли
B
Установка аппаратного обеспечения
Руководствуясь схемой установки выше, выполните следующую
процедуру установки устройства CM1284.
6
Подсоедините HDMI, USB и аудиоразъемы, расположенные на
другом конце кабеля USB HDMI KVM, к соответствующим портам на
компьютере.
7
Подключите периферийные USB-устройства к периферийным
портам USB (тип A) — одно к порту на передней панели, а другое к
порту на задней панели.
8
Подсоедините шнур блока питания к гнезду питания CM1284, а
другой конец к источнику питания пер.тока.
9
Включите коммутатор KVM, мониторы, компьютер и устройства.
Примечание. Рекомендованная последовательность включения:
Порт 1, Порт 2, Порт 3, а затем Порт 4.
Эксплуатация
Существует несколько удобных способов управления CM1284 для
отображения подключенных к нему устройств-источников сигнала.
Переключение вручную (OSD)
Переключение портов KVM выполняется кнопками, расположенными
на передней панели (1-4).
ИК-пульт дистанционного управления
Чтобы выбрать источник сигнала с пульта дистанционного управления,
нажмите на кнопку с номером (1-4), соответствующим порту, к которому
он подключен.
Клавиши быстрого вызова
Для переключения портов с клавиатуры консоли активируйте режим
установки клавиш быстрого вызова(HSM). Дополнительные сведения
об управлении с помощью клавиш быстрого вызова представлены в
руководстве пользователя.
Режим установки клавиш быстрого вызова (HSM)
Для вызова HSM выполните следующие действия.
1. Нажмите и удерживайте клавишу Num Lock.
2. Нажмите и отпустите клавишу "минус".
3. Отпустите клавишу Num Lock.
Экранное меню (OSD)
Кроме того, можно вызвать экранное меню и настроить параметры
CM1284, включая назначение KVM, Аудио и USB Link focus для каждого
порта ПК, настройку каналов, выбор режима отображения и другое. Для
вызова экранного меню откройте раскрывающееся меню и щелкните
значок настройки в меню.
2
Plug your USB keyboard and USB mouse into the USB Console Ports located
on the unit’s rear panel.
3
Plug your main HDMI display to Console HDMI Port 1, located on the unit's
rear panel, and the second display to Console HDMI Port 2.
Note: The display connected to Console HDMI Port 1 supports operations on
system confi guration and multi-view displays; the display connected
to Console HDMI Port 2 is limited to showing a selected source in full
screen.
4
To use separate microphone and speakers, plug them into the analog audio
ports on the unit's front or the rear panel. When the audio ports on both
the front-panel and rear-panel are used, the front panel takes priority.
5
Using the USB HDMI KVM cables, plug the HDMI, USB, and audio
connectors to their corresponding ports on the rear of the KVM switch.
6
At the other end of the USB HDMI KVM cable, plug the HDMI, USB, and
audio connectors into their respective ports on the computer.
7
Plug your USB peripherals into the USB Type-A ports, one on the front
panel and the other on the rear panel.
8
Plug the power cord into the CM1284's power socket, and then plug the
other end of the power cord into an AC power source.
2
Branchez votre clavier USB et votre souris USB sur les ports USB de la
console situés sur le panneau arrière de l'appareil.
3
Branchez votre affi chage HDMI principal au Port 1 de la Console HDMI,
situé sur le panneau arrière de l'appareil, et le second affi chage au Port 2
de la Console HDMI.
Remarque : L'affi chage connecté au Port 1 HDMI de la console prend
en charge les opérations de confi guration du système et les
affi chages multi-vues ; l'affi chage connecté au Port 2 HDMI de la
console est limité à l'affi chage d'une source sélectionnée en plein
écran.
4
Pour utiliser un microphone et des haut-parleurs séparés, branchez-les aux
ports audio analogiques du panneau avant ou arrière de l'appareil. Lorsque
les ports audio du panneau avant et du panneau arrière sont utilisés, le
panneau avant est prioritaire.
5
À l'aide des câbles KVM HDMI USB, branchez les connecteurs HDMI, USB
et audio aux ports correspondants à l'arrière du commutateur KVM.
6
À l'autre extrémité du câble KVM USB HDMI, branchez les connecteurs
HDMI, USB et audio sur leurs ports correspondants sur l'ordinateur.
7
Branchez vos périphériques USB aux ports USB de type A, l'un sur le
panneau avant et l'autre sur le panneau arrière.
2
Schließen Sie USB-Tastatur und USB-Maus an den USB-Konsolenanschlüssen
an der Rückblende des Gerätes an.
3
Schließen Sie Ihren Haupt-HDMI-Bildschirm an den Konsolen-HDMI-
Anschluss 1 an, der sich auf der Rückseite des Geräts befi ndet, und den
zweiten Bildschirm an den Konsolen-HDMI-Anschluss 2.
Hinweis: Der an den Konsolen-HDMI-Anschluss 1 angeschlossene Bildschirm
unterstützt die Bedienung der Systemkonfi guration und der
Mehrbildschirmanzeige; der an den Konsolen-HDMI-Anschluss 2
angeschlossene Bildschirm ist darauf beschränkt, eine ausgewählte
Quelle im Vollbildmodus anzuzeigen.
4
Um ein separates Mikrofon und separate Lautsprecher zu verwenden,
schließen Sie diese an die analogen Audioanschlüsse an der Vorder-
oder Rückseite des Geräts an. Wenn die Audioanschlüsse sowohl an
der Vorderseite als auch an der Rückseite verwendet werden, hat die
Vorderseite Vorrang.
5
Schließen Sie die HDMI-, USB- und Audioanschlüsse mit Hilfe der USB-
HDMI-KVM-Kabel an die entsprechenden Anschlüsse auf der Rückseite des
KVM-Switches an.
6
Schließen Sie am anderen Ende des USB-HDMI-KVM-Kabels die
HDMI-, USB- und Audioanschlüsse an ihre entsprechenden Anschlüsse am
Computer an.
1
Conecte a tierra el CM1284 conectando un extremo de un cable de
conexión a tierra al terminal de conexión a tierra, y el otro extremo del
cable a un objeto adecuado conectado a tierra.
2
Enchufe su teclado y su ratón USB en los puertos de la consola USB
ubicados en el panel posterior de la unidad.
3
Conecte su pantalla HDMI principal al puerto HDMI 1 de la consola,
ubicado en el panel posterior de la unidad y la segunda pantalla al puerto
HDMI 2 de la consola.
Nota: La pantalla conectada al puerto HDMI 1 de la consola admite
operaciones en la confi guración del sistema y pantallas de vista
múltiple; la pantalla conectada al puerto HDMI 2 de la consola está
limitado a mostrar la fuente seleccionada en pantalla completa.
4
Para usar un micrófono y altavoces separados, conéctelos a los puertos
de audio analógico en el panel frontal o posterior de la unidad. Cuando
se utilizan los puertos de audio a la vez en el panel frontal y en el panel
posterior, el panel frontal tiene prioridad.
5
Usando los cables USB HDMI KVM, conecte los conectores HDMI, USB y de
audio a sus puertos correspondientes en la parte posterior del switch KVM.
6
En el otro extremo del cable USB HDMI KVM, conecte el HDMI, el USB y
los conectores de audio a sus respectivos puertos en el PC.
1
Collegare a massa l'unità CM1284 collegando un'estremità del cavo per
la messa a terra al terminale di massa, e l'altra estremità del cavo a un
oggetto collegato a terra.
2
Collegare la tastiera e il mouse USB alle porte USB della console poste sul
pannello posteriore del dispositivo.
3
Collegare il display HDMI principale alla porta HDMI 1 della console, situata
sul pannello posteriore dell'unità, e il display secondario alla porta HDMI 2
della console.
Nota: il display collegato alla porta HDMI 1 della console supporta le
operazioni sulla confi gurazione del sistema e sui display multi-vista;
il display collegato alla porta HDMI 2 e della console è limitato alla
visualizzazione a schermo intero di una sorgente selezionata.
4
Per usare microfono e altoparlanti separati, collegarli alle porte audio
analogiche posizionate sul pannello anteriore o posteriore dell'unità. Se si
utilizzano le porte audio sia sul pannello anteriore che su quello posteriore,
quello anteriore ha la priorità.
5
Usando i cavi USB HDMI KVM, collegare i connettori HDMI, USB e audio
alle corrispondenti porte sulla parte posteriore dello switch KVM.
1
Выполните заземление CM1284: подсоедините один конец
заземляющего провода к заземляющему разъему, а другой конец
провода - к подходящему заземленному объекту.
2
Подключите USB клавиатуру и мышь к USB портам консоли на
задней панели устройства.
3
Подключите главный монитор HDMI к консольному порту HDMI 1 на
задней панели устройства, а второй монитор к консольному порту HDMI 2.
Примечание: Монитор, подключенный к консольному порту HDMI
1, поддерживает операции по настройке системных
параметров и управлению несколькими мониторами;
Монитор, подключенный к консольному порту HDMI 2,
поддерживает только полноэкранный просмотр одного
выбранного источника.
4
Для использования раздельных микрофона и динамиков подключите
их к аналоговым аудиопортам на передней или задней панели. Если
одновременно используются аудиопорты на передней и задней
панели, приоритет будут иметь порты на передней панели.
5
При использовании кабелей «USB/HDMI/KVM» подсоедините
разъемы HDMI, USB и аудио к соответствующим портам на задней
панели коммутатора KVM.
Support and Documentation Notice
All information, documentation, fi rmware,
software utilities, and specifi cations
contained in this package are subject to
change without prior notifi cation by
the manufacturer.
To reduce the environmental impact of our
products, ATEN documentation and software
can be found online at
http://www.aten.com/download/
Technical Support
www.aten.com/support
이 기기는 업무용(A급) 전자파적합기기로서 판매자 또는
사용자는 이 점을 주의하시기 바라며, 가정외의 지역에
서 사용하는 것을 목적으로 합니다.
Scan for
more information
EMC Information
FEDERAL COMMUNICATIONS COMMISSION INTERFERENCE
STATEMENT:
This equipment has been tested and found to comply with the limits
for a Class A digital device, pursuant to Part 15 of the FCC Rules.
These limits are designed to provide reasonable protection against
harmful interference when the equipment is operated in a commercial
environment. This equipment generates, uses, and can radiate radio
frequency energy and, if not installed and used in accordance with
the instruction manual, may cause harmful interference to radio
communications. Operation of this equipment in a residential area
is likely to cause harmful interference in which case the user will be
required to correct the interference at his own expense.
FCC Caution: Any changes or modifi cations not expressly approved by
the party responsible for compliance could void the user's authority to
operate this equipment.
Warning: Operation of this equipment in a residential environment
could cause radio interference.
This device complies with Part 15 of the FCC Rules. Operation is subject
to the following two conditions: (1) this device may not cause harmful
interference, and (2) this device must accept any interference received,
including interference that may cause undesired operation.
To prevent damage to your installation
from power surges or static electricity,
it is important that all connected
devices are properly grounded.
La pagina sta caricando ...
-
 1
1
-
 2
2


in altre lingue
- English: ATEN CM1284 Quick start guide
- français: ATEN CM1284 Guide de démarrage rapide
- español: ATEN CM1284 Guía de inicio rápido
- Deutsch: ATEN CM1284 Schnellstartanleitung
- русский: ATEN CM1284 Инструкция по началу работы
- português: ATEN CM1284 Guia rápido
- polski: ATEN CM1284 Skrócona instrukcja obsługi
- 日本語: ATEN CM1284 クイックスタートガイド
- Türkçe: ATEN CM1284 Hızlı başlangıç Kılavuzu