
PUB. DIM-1101-001
CT-V1
En
Camera Pan Table
Instruction Manual
Fr
Support panoramique de Caméra
Manuel d'instruction
De
Kamera Schwenkvorrichtung
Bedienungsanleitung
It
Supporto per il monitoraggio in remoto
Manuale di istruzioni
Es
Soporte de videocámara para barrido
Manual de Instrucciones
Ru
Столик для панорамной съемки
Руководство по эксплуатации
Kk
Панорамалайтын түпқойма
Zh
ᨘڣᴎѥৄ
Փ⫼䇈ᯢк
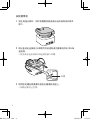
Փ⫼ᴀѻકПࠡˈ䇋ࡵᖙܜҨ㒚䯙䇏ᴀՓ⫼䇈ᯢкDŽ䇋ࡵᖙ
ཹֱㅵདᴀкˈҹ֓᮹ৢ㛑䱣ᯊᶹ䯙ֱ⬭⫼DŽ䇋ܙߚ
⧚㾷ݙᆍⱘ⸔Ϟˈℷ⹂Փ⫼DŽ
H1.indd 1 2015/03/18 14:58:28

2
NOTES
•Thisequipmenthasbeentestedandfoundtocomplywiththe
limitsforaClassBdigitaldevice,pursuanttopart15ofthe
FCCRules.Theselimitsaredesignedtoprovidereasonable
protectionagainstharmfulinterferenceinaresidential
installation.
Thisequipmentgenerates,usesandcanradiateradio
frequencyenergyand,ifnotinstalledandusedinaccordance
withtheinstructions,maycauseharmfulinterferenceto
radiocommunications.However,thereisnoguarantee
thatinterferencewillnotoccurinaparticularinstallation.If
thisequipmentdoescauseharmfulinterferencetoradioor
televisionreception,whichcanbedeterminedbyturningthe
equipmentoffandon,theuserisencouragedtotrytocorrect
theinterferencebyoneormoreofthefollowingmeasures:
- Reorientorrelocatethereceivingantenna.
- Increasetheseparationbetweentheequipmentandreceiver.
- Connecttheequipmentintoanoutletonacircuitdifferent
fromthattowhichthereceiverisconnected.
- Consultthedealeroranexperiencedradio/TVtechnicianfor
help.
ThankyouforpurchasingthisCanonproduct.
AftermountingacompatiblecamcordertotheCT-V1CameraPan
Table,youcanusetheCameraAccessplusapponyoursmartphone
ortabletasaremotecontroltomovethecamcordersideways
(panning)whilerecording.
DIM-1101_CT-V1.indb 2 2014/01/31 11:31:43

3
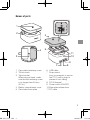
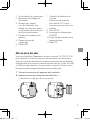
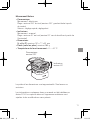
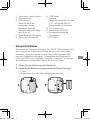
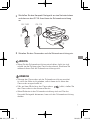
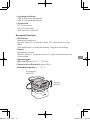
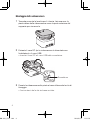
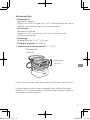
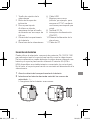
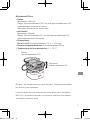
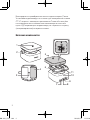
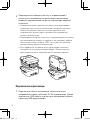
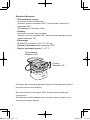
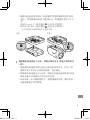
Names of parts
2
1
4
3
5
6
11
10
9
8
7
1 Camcorderfasteningscrew
2 Tiltlockknob
3 Tripodsocket
Whenusingatripod,make
surethatthefasteningscrew
isnolongerthan5.5mm
(0.2in.).
4 Batterycompartmentcover
5 Camcorderbaseplate
6 USBcable
7 Strapmount
(use,forexample,tosecure
theCT-V1withastrapto
preventitfromfalling)
8 DCINterminal
9 Powerswitch(ON/OFF)
10Baseplatereleaselever
11DCcable
DIM-1101_CT-V1.indb 3 2014/01/31 11:31:44

4
Inserting Batteries
YoucanusetheCA-110/CA-110ECompactPowerAdaptertopower
boththepantableandthecamcorder.Alternatively,youcanpower
thecamcorderusingabatterypackandthepantableusing2
commerciallyavailableAA(LR6orHR6)batteries(notincluded).In
suchcase,thepantablewillnotsupplypowertothecamcorder.
1
Open the battery compartment cover.
2
Insert the batteries matching the + / - polarity marks.
•Makesurethatthebatteriesarenew.
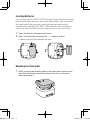
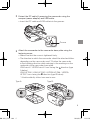
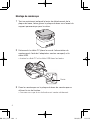
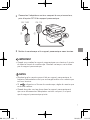
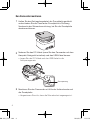
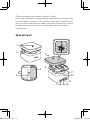
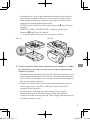
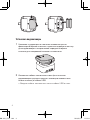
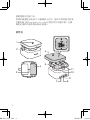
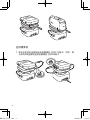
Mounting the Camcorder
1
While pressing and holding down the base plate release lever,
slide the camcorder base plate toward the front of the pan
table to remove it.
DIM-1101_CT-V1.indb 4 2014/01/31 11:31:46

5
2
Extract the DC cable (if powering the camcorder using the
compact power adapter) and USB cable.
•InserttheDCcableandUSBcableintothegrooves.
Groove
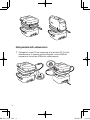
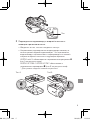
3
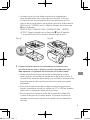
Attach the camcorder to the camcorder base plate using the
fastening screw.
•Makesurethatthescrewistightenedrmly.
•Thedirectioninwhichthecamcordershouldbeattacheddiffers
dependingonthecamcorderused*.Positionthecamcorder
inthefollowingdirectionwhilereferringtothemarkingsonthe
undersideofthecamcorderbaseplate.
VIXIAminiX/LEGRIAminiX:Lensfacingthe
A
direction(type
Abelow).
VIXIAHFR50/VIXIAHFR52/LEGRIAHFR56/LEGRIA
HFR57:Lensfacingthe
B
direction(typeBbelow).
* Modelavailabilitydiffersfromareatoarea.
TypeA: TypeB:
DIM-1101_CT-V1.indb 5 2014/01/31 11:31:50

6
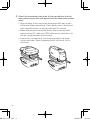
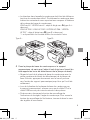
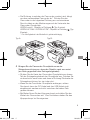
4
Attach the camcorder base plate to the pan table so that the
lens points forward (the side opposite of the base plate release
lever).
•Aligntheedgeofthecamcorderbaseplatewiththetoppart
ofthebaseplatereleaselever.Then,gentlypressitdownand
pushtowardthebackofthepantableuntilitissecure.
•Whenattachingthecamcorderbaseplatetothepantable,
makesuretheDCcableandUSBcablearenotpinchedordo
notgetcaughtbetweenthetwoparts.
•Ifnecessary,loosenthetiltlockknobandadjusttheangle
ofthecamcorder.Whentighteningthetiltlockknob,turnit
clockwise.
DIM-1101_CT-V1.indb 6 2014/01/31 11:31:50

7
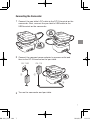
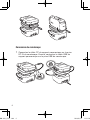
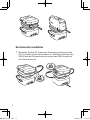
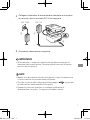
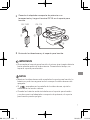
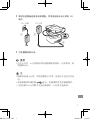
Connecting the Camcorder
1
Connect the pan table’s DC cable to the DC IN terminal on the
camcorder. Next, connect the pan table’s USB cable to the
USB terminal on the camcorder.
2
Connect the compact power adapter to a power outlet and
then to the DC IN terminal on the pan table.
CA-110E CA-110
3
Turn on the camcorder and pan table.
DIM-1101_CT-V1.indb 7 2014/01/31 11:31:51

8
IMPORTANT
•Whenyouturnonthepantable,itwillswivelasitdetectsthe
camcorder’sfacing.Duringthistime,donottouchthepantable.
NOTES
•Whilethecamcorderisattachedtothepantable,thebatterypack
willnotberechargedevenifthecamcorderisturnedoff.
•Ifashesonthecamcorder’sscreen,setthecamcorderto
cameramode.
•Whenbatteriesareinsertedinthepantableandyoudisconnect
thecompactpoweradapter,thepantablemayswivel.
Using the Pan Table
1
Camcorder: Turn on the camcorder in recording mode and
activate one of the [Remote Control+Streaming] functions
(Monitor from Home, Monitor while Out functions).
•Fordetails,refertothecamcorder’sinstructionmanual.
2
iOS/Android device: Start the CameraAccess plus app and use
it to operate the camcorder and pan table.
•FordetailsabouttheCameraAccessplusapp,visitPIXELA’s
Website.
http://pixela.jp/cecap
About the camcorder’s onscreen displays
Whilethecamcorderismountedonthepantableandcorrectly
connectedwiththeUSBcable,theiconwillappearonthetop
rightcornerof[RemoteControl+Streaming]screens(Monitorfrom
Home,MonitorwhileOutfunctions).Whenthepantableisblocked
fromswivelingorwhenitisoutsidetheoperatingtemperaturerange,
willappearonthecamcorder’sscreen.Afterappearson
thescreen,youcanoperatethepantablewithyoursmartphoneor
tablet.
DIM-1101_CT-V1.indb 8 2014/01/31 11:31:51

9
IMPORTANT
•Laythepantableonaat,horizontalsurface.Evenwhenthepan
tableismountedonatripod,makesurethetripodisonaat,
horizontalsurface.
•Donotusethepantableonlocationsexposedtovibrations,such
asinsideacar.
When you have finished recording
1
End the Monitor from Home or Monitor while Out function.
2
Turn off the camcorder and pan table.
3
Disconnect the compact power adapter.
4
Disconnect the pan table’s USB cable and DC cable from the
camcorder.
5
Detach the camcorder base plate from the pan table and then
detach the camcorder from it.
6
Store the USB cable and DC cable inside the rotary head unit.
•Inserteachterminalintherespectiveopeningintherotaryhead
unitandtuckthecablesneatlyintothecablegrooves.
7
Replace the camcorder base plate.
IMPORTANT
•Whenyouarenotusingthepantable,makesuretoremovethe
batteries.Ifthebatteriesarenotremovedandtheyleak,thismay
damagethepantable.
Important Usage Instructions
•Donotdisassemblethepantable.
•Donotsubjectthepantabletoshocksorvibration.
•Donotgetthepantablewet.
•Donotuseorstorethepantableindustyorsandyplaces,or
placeswithhighhumidity.
DIM-1101_CT-V1.indb 9 2014/01/31 11:31:51

10
•Donotleavethepantableinplacessubjecttohightemperatures
(liketheinsideofacarparkedunderdirectsunlight),nextto
lightingequipmentorotherplacesinwhichthetemperaturecan
reach60°C(140°F)orhigher.
•Donotcoverthepantablewithapieceofcloth,blanketorsimilar
item.
•Donotmixnewandoldbatteries.Also,donotusebatteriesof
differenttypesorbatteriesfromdifferentmanufacturers.
•Disconnectthecompactpoweradapterfromthepoweroutlet
whennotinuse.
•Useonlythespeciedcompactpoweradapters,batteriesand
camcorders.
•Whenusingthepantableinhospitals,medicalclinicsoronboard
aircraft,followtheinstructionssetforthbythemedicalinstitution
orairline.
•Donotlaythepantableonanunstablesurface.
•Whenattachingthecamcordertothecamcorderbaseplate,make
sureitisrmlyattachedtopreventthecamcorderfromfalling.
Similarly,whenattachingthepantabletoatripod,makesureitis
rmlyattached.
Specifications
Power Supply
•CA-110/CA-110ECompactPowerAdapter
2xAAalkalinebatteries(LR6)or2xAAnickel-metalhydride
rechargeablebatteries(HR6)(notsupplied)
•Rated input
5.3VDC(compactpoweradapter)
3.0VDC(dry-cellbatteries)
•Power consumption
0.58W(compactpoweradapter)
0.59W(dry-cellbatteries)
DIM-1101_CT-V1.indb 10 2014/01/31 11:31:51

11
•Terminals
DCINterminal
DCOUTterminal
USBterminal(mini-B)
Movement/Others
•Panning
Movement:Electric
Range:Approx.200°overall(approx.100°left/rightfromcenter)
Speed:Fastsetting,slowsetting
•Tilting
Movement:Manual
Range:Approx.40°overall(approx.20°up/downfromhorizontal)
•Dimensions
[W x H x D]:Approx.101x77x91mm(4x3.5x3.6in.)
•Weight (excluding batteries):Approx.280g(9.9oz.)
•Operating temperature:0—40°C(32—104°F)
Panning
Approx.200°
Tilting
Approx.40°
Weightanddimensionsareapproximate.Errorsandomissions
excepted.
TheinformationinthismanualisveriedasofFebruary2014.
Specicationsandouterappearancearesubjecttochangewithout
previousnotice.
DIM-1101_CT-V1.indb 11 2014/01/31 11:31:52

2
Nousvousremercionsd'avoirachetéceproduitCanon.
Aprèsavoirmontéunecaméscopecompatiblesurlesupport
panoramiquedecaméraCT-V1,vouspouvezutiliserl'application
CameraAccessplussurvotresmartphoneouvotretablette
commetélécommandepourdéplacerlecaméscopelatéralement
(panoramique)pendantl'enregistrement.
Nom des pièces
2
1
4
3
5
6
11
10
9
8
7
DIM-1101_CT-V1.indb 2 2014/01/31 11:31:52

3
1 Visdexationducaméscope
2 Boutondeverrouillagede
l'inclinaison
3 Filetagepourtrépied
Lorsdel'utilisationd'un
trépied,assurez-vousquela
visdexationnefaitpasplus
de5,5mmdelongueur.
4 Couvercledulogementde
batterie
5 Plaquedebasedu
caméscope
6 CâbleUSB
7 Dispositifdexationdela
courroie
(utilisez-le,parexemple,
pourxerleCT-V1avec
unecourroiepourl'éviterde
tomber)
8 PriseDCIN
9 Interrupteurd’alimentation
(ON/OFF)
10Levierdedétachementdela
plaquedebase
11CâbleCC
Mise en place des piles
Vouspouvezutiliserl'adaptateursecteurcompactCA-110/CA-110E
pouralimenteràlafoislesupportpanoramiqueetlecaméscope.
Vouspouvezaussialimenterlecaméscopeenutilisantunebatterie
d'alimentationetlesupportpanoramiqueenutilisant2pilesAA(LR6
ouHR6)enventedanslecommerce(noncomprises).Danscecas,
lesupportpanoramiquen'alimentepaslecaméscope.
1
Ouvrez le couvercle du logement de la batterie.
2
Insérez les piles en respectant les polarités + / -.
•Assurez-vousquelespilessontneuves.
DIM-1101_CT-V1.indb 3 2014/01/31 11:31:52

4
Montage du caméscope
1
Tout en maintenant enfoncé le levier de détachement de la
plaque de base, faites glisser la plaque de base vers l'avant du
support panoramique pour la retirer.
2
Faites sortir le câble CC (dans le cas de l'alimentation du
caméscope à l'aide de l'adaptateur secteur compact) et le
câble USB.
•InsérezlecâbleCCetlecâbleUSBdanslesfentes.
Fente
3
Fixez le caméscope sur la plaque de base du caméscope en
utilisant la vis de fixation.
•Assurez-vousquelavisdexationestserréesolidement.
DIM-1101_CT-V1.indb 4 2014/01/31 11:31:52

5
•Ladirectiondanslaquellelecaméscopedoitêtrexédiffèreen
fonctionducaméscopeutilisé*.Positionnezlecaméscopedans
ladirectionsuivanteenvousreportantauxmarquesàl'intérieur
delaplaquedebaseducaméscope.
VIXIAminiX/LEGRIAminiX:objectifdirigévers
A
(typeAci-
dessous).
VIXIAHFR50/VIXIAHFR52/LEGRIAHFR56/LEGRIA
HFR57:objectifdirigévers
B
(typeBci-dessous).
* Ladisponibilitéd'unmodèlediffèred’unendroitàl’autre.
TypeA: TypeB:
4
Fixez la plaque de base du caméscope sur le support
panoramique, de sorte que l’objectif soit dirigé vers l’avant (du
côté opposé au levier de détachement de la plaque de base).
•Alignezleborddelaplaquedebaseducaméscopeavecla
partiesupérieuredulevierdedétachementdelaplaquede
base.Ensuite,appuyezdoucementverslebasetpousser
versl'arrièredusupportpanoramiquejusqu'àcequ'ilsoitxé
solidement.
•Lorsdelaxationdelaplaquedebaseducaméscopesur
lesupportpanoramique,assurez-vousquelecâbleCCetle
câbleUSBnesontpascoincésentrelesdeuxpièces.
•Sinécessaire,desserrezleboutondeverrouillagede
l'inclinaisonetderéglerl'angleducaméscope.Pourserrezle
boutondeverrouillagedel'inclinaison,tournez-ledanslesens
desaiguillesd'unemontre.
DIM-1101_CT-V1.indb 5 2014/01/31 11:31:53

6
Connexion du caméscope
1
Connectez le câble CC du support panoramique sur la prise
DC IN du caméscope. Ensuite, connectez le câble USB du
support panoramique sur la prise USB du caméscope.
DIM-1101_CT-V1.indb 6 2014/01/31 11:31:54

7
2
Connectez l’adaptateur secteur compact à une prise secteur,
puis à la prise DC IN du support panoramique.
CA-110E CA-110
3
Mettez le caméscope et le support panoramique sous tension.
IMPORTANT
•Quandvousmettezlesupportpanoramiquesoustension,ilpivote
etdétectel'avantducaméscope.Pendantcetemps,netouchez
paslesupportpanoramique.
NOTES
•Pendantquelecaméscopeestxéausupportpanoramique,la
batteried'alimentationn'estpasrechargéemêmesilecaméscope
esthorstension.
•Si
clignotesurl'écranducaméscope,réglezlecaméscope
enmodecaméra.
•Quanddespilessontenplacedanslesupportpanoramiqueet
quevousdéconnectezl’adaptateursecteurcompact,ilsepeut
quelesupportpanoramiquepivote.
DIM-1101_CT-V1.indb 7 2014/01/31 11:31:55

8
Utilisation du support panoramique
1
Caméscope : mettez le caméscope sous tension en mode
d'enregistrement et activez une des fonctions [Comm. à dist.
+ diffusion continue] (fonctions Pilotage à domicile, Pilotage
durant déplacements).
•Pourlesdétails,reportez-vousaumanueld'instructionsdu
caméscope.
2
Dispositif iOS/Android : démarrez l'application CameraAccess
plus et utilisez la pour commander le caméscope et le support
panoramique.
•Pourlesdétailssurl'applicationCameraAccessplus,visitezle
siteWebdePIXELA.
http://pixela.jp/cecap
À propos des affichages sur l'écran du caméscope
Pendantquelecaméscopeestmontésurlesupportpanoramiqueet
correctementconnectésurlecâbleUSB,l'icôneapparaîtdans
lecoinsupérieurdroitdesécran[Comm.àdist.+diffusioncontinue]
(fonctionsPilotageàdomicile,Pilotagedurantdéplacements).Quand
lesupportpanoramiqueestbloquéetnepivotepasouquand
ilestendehorsdelaplagedetempératuredefonctionnement,
apparaîtsurl'écranducaméscope.Aprèsqueapparaîtsur
l'écran,vouspouvezcommanderlesupportpanoramiqueavecvotre
smartphoneouvotretablette.
IMPORTANT
•Posezlesupportpanoramiquesurunesurfaceplateet
horizontale.Mêmequandlesupportpanoramiqueestmontésur
untrépied,assurez-vousqueletrépiedestsurunesurfaceplateet
horizontale.
•N'utilisezpaslesupportpanoramiquedansunendroitexposéaux
vibrations,telquedansunevoiture.
DIM-1101_CT-V1.indb 8 2014/01/31 11:31:55

9
Quand vous avez fini l’enregistrement
1
Terminez la fonction Pilotage à domicile ou Pilotage durant
déplacements.
2
Mettez le caméscope et le support panoramique hors tension.
3
Débranchez l'adaptateur secteur compact.
4
Déconnectez le câble USB et le câble CC du support
panoramique au niveau du caméscope.
5
Détachez la plaque de base du caméscope du support
panoramique, puis détachez le caméscope de la plaque.
6
Rangez le câble USB et le câble CC à l'intérieur de la tête
rotative.
• Insérezchaqueprisedansl'ouverturerespectivedelatêterotative
etcachezsoigneusementlescâblesdanslesrainuresdecâble.
7
Remplacez la plaque de base du caméscope.
IMPORTANT
•Quandvousn’utilisezpaslesupportpanoramique,assurez-vous
deretirerlespiles.Sivousneretirezpaslespilesetqu’ellesfuient,
ellesrisquentd’endommagerlesupportpanoramique.
Instructions importantes d'utilisation
•Nedémontezpaslesupportpanoramique.
•Nesoumettezpaslesupportpanoramiqueauxchocsouaux
vibrations.
•Nelaissezpaslesupportpanoramiqueêtremouillé.
•N'utilisezpasninerangezlesupportpanoramiquedansunendroit
poussiéreuxousableux,oudansunendroittrèshumide.
•Nelaissezpaslesupportpanoramiquedansunendroitsoumis
auxhautestempératures(commedansunevoituregaréeenplein
soleil),prèsd'unappareild'éclairageoudansunautreendroitoù
latempératurepeutatteindre60°Couplus.
DIM-1101_CT-V1.indb 9 2014/01/31 11:31:55

10
•Nerecouvrezpaslesupportpanoramiqueavecuntissu,une
couvertureouquelquechosedesimilaire.
•Nemélangezpasdespilesneuvesetusées.Deplus,n'utilisezpas
despilesdetypedifférentoudespilesdedifférentsfabricants.
•Déconnectezl'adaptateursecteurcompactdelaprisesecteur
quandvousnel'utilisezpas.
•Utilisezuniquementlesadaptateurssecteurcompacts,les
batteriesetlescaméscopesspéciés.
•Lorsdel'utilisationdusupportpanoramiquedansunhôpital,une
cliniquemédicaleouàl'intérieurd'unavion,suivezlesinstructions
établiesparl'installationmédicaleouaérienne.
•Neposezpaslesupportpanoramiquesurunesurfaceinstable.
•Lorsdelaxationducaméscopesurlaplaquedebasedu
caméscope,assurez-vousqu'ilestxésolidementanqu'ilne
puissepastomber.Demême,lorsdelaxationd'unsupport
panoramiquesuruntrépied,assurez-vousqu'ilestxésolidement.
Caractéristiques
Alimentation
•AdaptateursecteurcompactCA-110/CA-110E
2pilesalcalinesAA(LR6)ou2pilesrechargeablesnickel-métal
hydrureAA(HR6)(nonfournies)
•Entrée nominale
5,3VCC(adaptateursecteurcompact)
3,0VCC(pilessèches)
•Consommation électrique
0,58W(adaptateursecteurcompact)
0,59W(pilessèches)
•Prises
PriseDCIN
PriseDCOUT
PriseUSB(mini-B)
DIM-1101_CT-V1.indb 10 2014/01/31 11:31:55
La pagina si sta caricando...
La pagina si sta caricando...
La pagina si sta caricando...
La pagina si sta caricando...
La pagina si sta caricando...
La pagina si sta caricando...
La pagina si sta caricando...
La pagina si sta caricando...
La pagina si sta caricando...
La pagina si sta caricando...
La pagina si sta caricando...
La pagina si sta caricando...
La pagina si sta caricando...
La pagina si sta caricando...
La pagina si sta caricando...
La pagina si sta caricando...
La pagina si sta caricando...
La pagina si sta caricando...
La pagina si sta caricando...
La pagina si sta caricando...
La pagina si sta caricando...
La pagina si sta caricando...
La pagina si sta caricando...
La pagina si sta caricando...
La pagina si sta caricando...
La pagina si sta caricando...
La pagina si sta caricando...
La pagina si sta caricando...
La pagina si sta caricando...
La pagina si sta caricando...
La pagina si sta caricando...
La pagina si sta caricando...
La pagina si sta caricando...
La pagina si sta caricando...
La pagina si sta caricando...
La pagina si sta caricando...
La pagina si sta caricando...
La pagina si sta caricando...
La pagina si sta caricando...
La pagina si sta caricando...
La pagina si sta caricando...
La pagina si sta caricando...
La pagina si sta caricando...
La pagina si sta caricando...
La pagina si sta caricando...
La pagina si sta caricando...
La pagina si sta caricando...
La pagina si sta caricando...
La pagina si sta caricando...
La pagina si sta caricando...
La pagina si sta caricando...
La pagina si sta caricando...
La pagina si sta caricando...
La pagina si sta caricando...
La pagina si sta caricando...
La pagina si sta caricando...
La pagina si sta caricando...
La pagina si sta caricando...
La pagina si sta caricando...
La pagina si sta caricando...
La pagina si sta caricando...
La pagina si sta caricando...
La pagina si sta caricando...
La pagina si sta caricando...
-
 1
1
-
 2
2
-
 3
3
-
 4
4
-
 5
5
-
 6
6
-
 7
7
-
 8
8
-
 9
9
-
 10
10
-
 11
11
-
 12
12
-
 13
13
-
 14
14
-
 15
15
-
 16
16
-
 17
17
-
 18
18
-
 19
19
-
 20
20
-
 21
21
-
 22
22
-
 23
23
-
 24
24
-
 25
25
-
 26
26
-
 27
27
-
 28
28
-
 29
29
-
 30
30
-
 31
31
-
 32
32
-
 33
33
-
 34
34
-
 35
35
-
 36
36
-
 37
37
-
 38
38
-
 39
39
-
 40
40
-
 41
41
-
 42
42
-
 43
43
-
 44
44
-
 45
45
-
 46
46
-
 47
47
-
 48
48
-
 49
49
-
 50
50
-
 51
51
-
 52
52
-
 53
53
-
 54
54
-
 55
55
-
 56
56
-
 57
57
-
 58
58
-
 59
59
-
 60
60
-
 61
61
-
 62
62
-
 63
63
-
 64
64
-
 65
65
-
 66
66
-
 67
67
-
 68
68
-
 69
69
-
 70
70
-
 71
71
-
 72
72
-
 73
73
-
 74
74
-
 75
75
-
 76
76
-
 77
77
-
 78
78
-
 79
79
-
 80
80
-
 81
81
-
 82
82
-
 83
83
-
 84
84


in altre lingue
- français: Canon CT-V1 Manuel utilisateur
- español: Canon CT-V1 Manual de usuario