
Quick Start Guide

CONTENTS
English
Deutsch
Español
Eλληνικά
Français
Italiano
Português
1
5
9
13
17
21
25

1 2
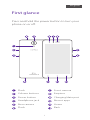
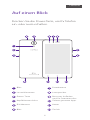
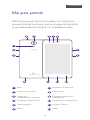
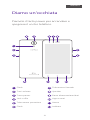
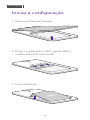
First glance
English
Press and hold the power button to turn your
phone on or off.
3
3
4
1
2
2
10
5 6 87
9
11
12
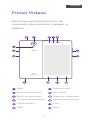
Charging/data port Power button
Headphone jack Recent apps
Rear camera
Flash
Front camera
EarpieceVolume buttons
Flash
1
2
3
4
5
6
Back
12
7
8
10
Home
11

1 2 3
English
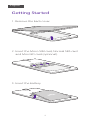
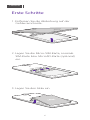
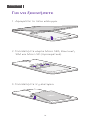
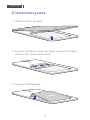
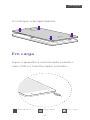
Getting Started
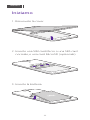
2. Insert the Micro SIM card, Normal SIM card
and MicroSD card (optional).
1. Remove the back cover.
3. Insert the battery.

2 3 4
English
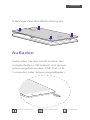
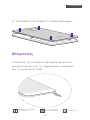
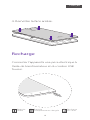
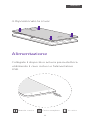
Charging
4. Replace the back cover.
Full power Charging
Low Battery
Connect the device to a power outlet using
the included cable and USB power adapter.

3 4
English
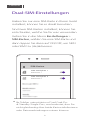
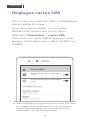
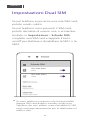
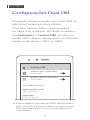
SIM cards
SIM slot 1
SIM 1
SIM slot 2
SIM 2
2
If there's only one SIM card in the phone, it's
ready to use.
With two SIM cards inserted, you can choose
to use one or both of them:
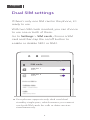
Go to Settings > SIM cards, choose a SIM
card and then tap the on/off button to
enable or disable SIM1 or SIM2.
Dual SIM settings
Your phone supports only dual card dual
standby single pass, which means you cannot
use both SIM cards for calls or data services
simultaneously.

5 6
Auf einen Blick
Drücken Sie die Power-Taste, um Ihr Telefon
ein- oder auszuschalten.
3
3
4
1
2
2
10
5 6 87
9
11
12
Blitz
1
Lautstärketasten
2
Power-Taste
3
Kopfhöreranschluss
4
Rückkamera
5
Blitz
6
Frontkamera
7
Lautsprecher
8
Zuletzt genutzte Apps
10
Port zum Aufladen
und für Datentransfers
Zurück
12
Home
11
Deutsch

5 6 7
Erste Schritte
1. Entfernen Sie die Abdeckung auf der
Gehäuserückseite.
3. Legen Sie den Akku ein.
2. Legen Sie die Micro-SIM-Karte, normale
SIM-Karte bzw. MicroSD-Karte (optional)
ein.
Deutsch

6 7 8
Auaden
4. Bringen Sie die Abdeckung an.
Akku geladen
AufladenAkku schwach
Verbinden Sie das Gerät mittels des
mitgelieferten USB-Kabels mit einem
spannungsführenden USB-Port (z.B.
Computer oder Spannungsadapter).
Deutsch

7 8 9
SIM-Karten
SIM-Steckplatz 1
SIM-Karte 1
SIM-Steckplatz 2
SIM-Karte 2
2
Haben Sie nur eine SIM-Karte in Ihrem Gerät
installiert, können Sie es direkt benutzen.
Sind zwei SIM-Karten installiert, können Sie
entscheiden, welche Sie für was verwenden:
Gehen Sie in das Menü Einstellungen >
SIM-Karten, wählen Sie eine SIM-Karte und
dann tippen Sie dann auf ON/OFF, um SIM1
oder SIM2 zu (de)aktivieren.
Dual-SIM-Einstellungen
Ihr Telefon unterstützt nur Dual-Card-Du-
al-Standby-Single-Pass, was bedeutet, dass Sie
nicht gleichzeitig über beide Karten telefonieren
oder Datenverbindungen nutzen können.
Deutsch

8 9 10
Flash
1
Botones de volumen
2
Botón de encendido
3
Conector de auriculares
4
Cámara trasera
5
Flash
6
Cámara frontal
7
Auriculares
8
Aplicaciones recientes
10
Puerto de carga/datos
Atrás
12
Inicio
11
Primer Vistazo
Mantenga presionado el botón de
encendido para encender o apagar su
teléfono.
3
3
4
1
2
2
10
5 6 87
9
11
12
Español

9 10 11
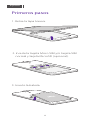
Primeros pasos
1. Retire la tapa trasera.
3. Inserte la batería.
2. Inserte la tarjeta Micro SIM y/o tarjeta SIM
normal y tarjeta MicroSD (opcional).
Español

10 11 12
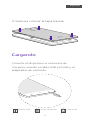
Cargando
4. Vuelva a colocar la tapa trasera.
Carga completa CargandoBatería baja
Conecte el dispositivo a una toma de
corriente usando el cable USB incluido y el
adaptador de corriente.
Español

11 12
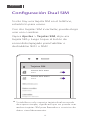
Tarjetas SIM
Ranura de la SIM 1
SIM 1
Ranura de la SIM 2
SIM 2
2
Si solo hay una tarjeta SIM en el teléfono,
estará listo para usarse.
Con dos tarjetas SIM insertadas, puede elegir
usar uno o ambas:
Vaya a Ajustes > Tarjetas SIM, elija una
tarjeta SIM y luego toque el botón de
encendido/apagado para habilitar o
deshabilitar SIM1 o SIM2 .
Conguración Dual SIM
Su teléfono solo soporta tarjeta dual en modo
de espera simple, significará que no puede usar
ambas tarjetas SIM para llamadas o servicios de
datos simultáneamente.
Español

1413
Φλας
1
Πλήκτρα έντασης
2
Πλήκτρο
τροφοδοσίας (power)
3
Υποδοχή ακουστικών
4
Πίσω κάμερα
5
Φλας
6
Μπροστινή κάμερα
7
Ακουστικό
8
Πρόσφατες εφαρμογές
10
Υποδοχή φόρτισης/
δεδομένων
Πίσω
12
Αρχική Οθόνη
11
Με μια ματιά
Πιέστε και κρατήστε πατημένο το πλήκτρο
τροφοδοσίας (power) για να ενεργοποιήσετε
ή να απενεργοποιήσετε το τηλέφωνό σας.
3
3
4
1
2
2
10
5 6 87
9
11
12
Ελληνικά

1413 15
Για να ξεκινήσετε
1. Αφαιρέστε το πίσω κάλυμμα.
3. Τοποθετήστε τη μπαταρία.
2. Τοποθετήστε κάρτα Micro SIM, Κανονική
SIM και Micro SD (προαιρετικά).
Ελληνικά

14 15 16
Η μπαταρία
είναι γεμάτη
Φορτίζει
Χαμηλή στάθμη
μπαταρίας
Φόρτιση
4. Τοποθετήστε ξανά το πίσω κάλυμμα.
Συνδέστε τη συσκευή σε πρίζα ρεύματος
χρησιμοποιώντας το παρεχόμενο καλώδιο
και το φορτιστή USB.
Ελληνικά

15 16 17
Κάρτες SIM
Υποδοχή SIM 1
SIM 1
Υποδοχή SIM 2
SIM 2
2
Αν έχετε τοποθετήσει μόνο μία κάρτα SIM
στο τηλέφωνο, είναι έτοιμο για χρήση.
Αν έχετε τοποθετήσει δύο κάρτες SIM,
μπορείτε να επιλέξετε να χρησιμοποιήσετε
τη μία ή και τις δύο:
Μπείτε στο μενού Ρυθμίσεις > Κάρτες SIM,
επιλέξτε κάρτα SIM και στη συνέχεια πιέστε
το πλήκτρο on/off για να
ενεργοποιήσετε/απενεργοποιήσετε τη SIM1
ή τη SIM2.
Ρυθμίσεις διπλής SIM
Το τηλέφωνό σας υποστηρίζει αναμονή για
κλήσεις από δύο κάρτες SIM, αλλά δεν μπορείτε
να χρησιμοποιήστε και τις δύο κάρτες SIM για
κλήσεις ή υπηρεσίες δεδομένων ταυτόχρονα.
Ελληνικά

16 17 18
Flash
1
Boutons de volume
2
Bouton d'alimentation
3
Connecteur casque audio
4
Caméra arrière
5
Flash
6
Caméra avant
7
Haut parleur
8
Applications récentes
10
Connecteur de Charge
et de Données
Retour
12
Accueil
11
Aperçu
Maintenir le bouton d'alimentation pour
allumer ou éteindre le téléphone.
3
3
4
1
2
2
10
5 6 87
9
11
12
Français

17 18 19
Commençons
1. Ôter la face arrière.
3. Insérer la batterie.
2. Insérer la Micro Sim, la mini Sim et la Carte
Micro SD (non fournies).
Français
La pagina si sta caricando...
La pagina si sta caricando...
La pagina si sta caricando...
La pagina si sta caricando...
La pagina si sta caricando...
La pagina si sta caricando...
La pagina si sta caricando...
La pagina si sta caricando...
La pagina si sta caricando...
La pagina si sta caricando...
La pagina si sta caricando...
La pagina si sta caricando...
-
 1
1
-
 2
2
-
 3
3
-
 4
4
-
 5
5
-
 6
6
-
 7
7
-
 8
8
-
 9
9
-
 10
10
-
 11
11
-
 12
12
-
 13
13
-
 14
14
-
 15
15
-
 16
16
-
 17
17
-
 18
18
-
 19
19
-
 20
20
-
 21
21
-
 22
22
-
 23
23
-
 24
24
-
 25
25
-
 26
26
-
 27
27
-
 28
28
-
 29
29
-
 30
30
-
 31
31
-
 32
32


in altre lingue
- français: TP-LINK C5 A Mode d'emploi
- español: TP-LINK C5 A Instrucciones de operación
- português: TP-LINK C5 A Instruções de operação
