
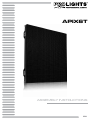
ASSEMBLY INSTRUCTIONS
APIX6T
EN

All rights reserved by Music & Lights S.r.l. No part of this instruction manual may be
reproduced in any form or by any means for any commercial use.
In order to improve the quality of products, Music&Lights S.r.l. reserves the right to modify the
characteristics stated in this instruction manual at any time and without prior notice.
All revisions and updates are available in the ‘manuals’ section on site www.musiclights.it
REV.002-08/16

1
APIX6T
TABLE OF CONTENTS
Safety
General instructions
Warnings and installation precautions
General information
1 Introduction
1. 1 Description
2 Installation
2. 1 Mechanical Requirements
2. 2 Electrical Requirements
2. 3 System Requirements
3 System
3. 1 Brief Introduction
3. 2 Key Benets
3. 3 Applications
3. 4 System Components
3. 5 Display Components
3. 6 Frame
3. 7 Module
3. 8 Socket and Plug for Power and Data Connection
3. 9 Receveir Card
4 INSTALLATION
4. 1 Suspended Installation
4. 2 Setup Process of Standing Installation
4. 3 Data and power Cabling
5 TROUBLESHOOTING
5. 1 Module Problems
5. 2 Power Problems
5. 3 Data Transfer Problems
6 MAINTENANCE
Warranty
2
2
3
4
6
6
7
7
8
8
8
9
9
11
11
12
13
16
19
20
20
20
21

APIX6T
2
SAFETY
General instruction
• The products referred to in this manual conform to the European Community Directives and are there-
fore marked with .
• The unit is supplied with hazardous network voltage (230V~). Leave servicing to skilled personnel only.
Never make any modications on the unit not described in this instruction manual, otherwise you will
risk an electric shock.
• Connection must be made to a power supply system tted with ecient earthing (Class I appce ac-
cording to standard EN 60598-1). It is, moreover, recommended to protect the supply lines of the units
from indirect contact and/or shorting to earth by using appropriately sized residual current devices.
• The connection to the main network of electric distribution must be carried out by a qualied electrical
installer. Check that the main frequency and voltage correspond to those for which the unit is designed
as given on the electrical data label.
• This unit is not for home use, only professional applications.
• Never use the xture under the following conditions:
- in places subject to vibrations or bumps;
- in places with a temperature of over 40 °C.
• Make certain that no inammable liquids, water or metal objects enter the xture.
• Do not dismantle or modify the xture.
• All work must always be carried out by qualied technical personnel. Contact the nearest sales point for
an inspection or contact the manufacturer directly.
• If the unit is to be put out of operation denitively, take it to a local recycling
plant for a disposal which is not harmful to the environment.
Warnings and installation precautions
• If this device will be operated in any way dierent to the one described in this manual, it may suer damage
and the guarantee becomes void. Furthermore, any other operation may lead to dangers like short circuit,
burns, electric shock, etc.
• Always disconnect power from the mains, when device is not used or before cleaning!
• Before starting any maintenance work or cleaning the unit and when device is not used, cut o power from
the main supply.
• Don’t connect the device to a dimmer pack.
• Never let the power-cord come into contact with other cables! Handle the power-cord and all connections
with the mains with particular caution!
• Never remove warning or informative labels from the unit.
• Do not shake the device. Avoid brute force when installing or operating the device.
• Do not switch the device on and o in short intervals.
• Never use the device during thunderstorms, unplug the device immediately.
• Only operate the device after having familiarized with its functions.
• Make sure that the device is not exposed to extreme heat, moisture or dust.
• Keep any inammable material at a safe distance from the xture.
• Make sure that the power-cord is never crimped or damaged. Check the device and the power-cord from
time to time. If the external cable is damaged, it has to be replaced by a qualied technician.
• If device is dropped or struck, disconnect mains power supply immediately. Contact a qualied technical
personnel inspect for safety before operating.
WARNING! Before carrying out any operations with the unit, carefully read this instruction
manual and keep it with cure for future reference. It contains important information about
the installation, usage and maintenance of the unit.

3
APIX6T
• If the device has been exposed to drastic temperature uctuation (e.g. after transportation), do not switch it
on immediately. The arising condensation water might damage your device. Leave the device switched o
until it has reached room temperature.
• If your device fails to work properly, discontinue use immediately.
• For replacement use fuses of same type and rating only.
• This device is not designed for permanent operation. Consistent operation breaks will ensure that the device
will serve you for a long time without defects.
• When hanging the product, always use a safety cable. When carrying out any work, always comply scrupu-
lously with all the regulations (particularly regarding safety) currently in force in the country in which the
xture’s being used.
• Do not operate the product if you see damage on the housing, LEDs, or cables. In any of these cases, have the
damaged parts replaced by a qualied technician.
• The user is responsible for correct positioning and operating of the APIX6T. Music & Lights will not accept
liability for damages caused by the misuse or incorrect installation of this device..
GENERAL INFORMATION
Shipments and claims
The goods are sold “ex works” and always travel at the risk and danger of the distributor. Eventual damage will
have to be claimed to the freight forwarder. Any claim for broken packs will have to be forwarded within 8 days
from the reception of the goods.
Warranty and returns
The guarantee covers the xture in compce with existing regulations. You can nd the full version of the “Gen-
eral Guarantee Conditions” on our web site www.musiclights.it.
Please remember to register the piece of equipment soon after you purchase it, logging on www.musiclights.it
. The product can be also registered lling in and sending the form available on your guarantee certicate. For
all purposes, the validity of the guarantee is endorsed solely on presentation of the guarantee certicate. Music
& Lights will verify the validity of the claim through examination of the defect in relation to proper use and the
actual validity of the guarantee. Music & Lights will eventually provide replacement or repair of the products
declining, however, any obligation of compensation for direct or indirect damage resulting from faultiness.

APIX6T
4
- 1 - INTRODUCTION
1.1 DESCRIPTION
AlphaPIX6T is a LED module for the creation of ledscreens with 6,6 mm pixel pitch, ideal for video screen-
ing, pictures and backgrounds for medium viewing distances from ledwall surface.
The architecture of AlphaPIX6T is conceived with 640x720 mm module size, featuring 10368 SMD Full-
Color LEDs for an impressive light output (up to 5500 NIT, suitable for day-light environments).
The module design is completely made in aluminium and the IP65 protection rate on front side makes
AlphaPIX6T suitable also for temporary outdoor application.
The main structure is designed in aluminum, making AlphaPIX6T extremely lightweight, only 30 kg/m2,
allowing a wide exibility in conguration, also in hanging applications, with no limits of weight.
Applications
• In environments where the video-projection is not allowed by the high luminosity or short depth of
the room
• In TV Studios for multiple viewing angle
• Touring and Live event for Camera streaming
• Large trade-show booths with creative video imaging
• In theme parks or public events
Mechanical architecture
• Module dimensions (WxHxD): 640x720x100 mm
• Module weight: 13,5 kg
• Weight per square meter: 30 kg
• Internal protection: IP65/IP43
• Die-cast aluminium housing
• Mechanical nishing: black
• Seamless locking system
• Cooling: natural airow
• Vertical hanging system: built-in aliscaf clamp support
Electrical features
• Power supply: AC 110/230V 50/60Hz
• Power IN connections: Neutrik Powercon
• Max power consumption (module): 415W
• Average power consumption (module): 139W
• Max rated current/cabinet: AC 220V/1.88A
• Max power consumption (per square meter): 900W
• Average power consumption (per square meter): 300W
• Power output: Max 3 modules
• MTBF: > 1.000 h
• Working temperature/humidity: -20°C - +60°C / 10% - 90%
Video features
• LED source: high-power SMD2727 FullColor black face
• Module resolution: 96x108 pixel, 10’368 total pixel
• Pixel pitch: 6,6 mm
• LED density: 22’500 LED/sqm
• Luminous ux: 5’500 cd/sqm (NIT)
• Best viewing distance: 8 - 100 m

5
APIX6T
• LED life span: >100’000h
• Colours: >4,4 trilioni through RGB mixing
• Grayscale: 16 bit (16’384 level)
• Refresh rate: ≥ 1’920 Hz
• Colour calibration through PC software
• Input video signals: AV, S-Video, VGA, DVI, HDMI, SDI, DP
• Viewing angle: 140° horizontal, 70° vertical
• Dead pixel ratio: <0,002
Control system
• Dedicated G2 NOVASTAR interface (Sender box) for video signal distribution and screen conguration
(not included)
• Data IN sender box: USB connector
• Data IN module: RJ45 connectors
• Connection between screen and sender box: USB cable
• Connection between sender box and videowall: CAT5 data cable

6
APIX6T
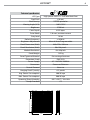
Technical specication
LED Type High-power SMD2727 FullColor black face
Pixel Pitch 6.6 mm
Pixel Density
22’500 pixels/m
2
Viewing Angle (H/V) 140°H/70°V
Brightness 5’500 nit
Color Depth 8192 bytes
Drive Mode 1/6 scan, constant current
Grey Level 16 bit
Refresh frequency ≥1920 Hz
Brightness Adjustment Manual/Auto/Programmable
Panel Dimension (WxH) 640×720×100 mm
Panel Resolution (WxH) 96×108 pixels
Module Resolution 48×36 pixels
Panel Weight 13.5 kg
Panel Type and Material Die-casting aluminum
Protection Grade IP65/IP43
Power Supply AC 110/230V 50/60Hz
Connectors Powercon Ethercon
Control Protocol Novastar
Hanging Panel Quantity ≤15 panels
Avg. Power Consumption 300 W/sqm
Max. Power Consumption 900 W/sqm
Operating Temp/Humidity -20°C-+50°C / 10%-90%
Compt Standard CE
Pi
720
100
640

APIX6T
7
2. INSTALLATION REQUIREMENTS
This chapter species the requirements for safety, mechanism, electricity and control software of APIX6T
LED display.
Warning: This LED indoor product is designed for outdoor. Both outdoor and indoor can be used.
2.1 Mechanical Requirements
Weight Warning: Do not underestimate the weight of a complete APIX6T LED display. Be sure that The
oor or truss installation on which the APIX6T display has to be installed is capable of Handling ve (5)
times the complete load of the display. For oor mounting, conclude the weight of any other load.
Caution: One APIX6T tile weighs approximately 13.5 kg.
Horizontal surface
For oor installation, the oor on which APIX6T display is installed must be horizontal. Never install LED
display on a slant surface.
Ballast
Depending on the height of the display and the position of the LED display upon the foot beams (some-
where between front and middle) additional weight (ballast)will be required.
Truss beam
The truss beam has to be provided and installed by the customer. Pay attention to following points for
installation design and preparation. Calculate precisely for on individual basis.
Weight tolerances:
Ensure that the truss beam and the ceiling against which the truss beam has to be installed is able to han-
dle the complete weight of the APIX6T LED display.
Ceiling stability.
Installation ambience
Environmental conditions: humidity, ventilation, temperature, etc.
Location: Altitude, etc.
Front clearances: for optimal eect, ensure that enough free space is supplied in front of the LED display
and respect the minimum viewing distance.
Comply with local regulations regarding such installations.
Warning: Suspending installation is limited to 15 tiles in vertical direction.
2.2 Electrical Requirements
Power requirements
The displaying area of one APIX6T tile is 0.460 m². APIX6T LED tiles have pixel densities (see Appendix A –
technical specications). For dierent pixel densities, one APIX6T tile may need power supply of 0.6 amps
to 1.5 amps at 220 VAC, 100-250 VAC, 50-60 Hz. Each APIX6T tile has one input and one output socket of AC
power. The power is distributed to display tiles by power split cables from power distributor. However, one
power split cable can be connected with 8 – 20 tiles in parallel. So, one power split cable has to be provid-
ed for every 8 – 20 tiles. Protect every power cable by a circuit breaker or fuses rated 16 A / 250 VAC (15 A /
110 VAC in the USA and Canada). PROLIGHTS provides a range of power distributor to satisfy the demands
of your LED display. See more details for power distributor of LED display in Power Distribution Section.
Contact PROLIGHTS for more information.

8
APIX6T
Power system
It is recommended to use power distribution system with a separate neutral and grounding
conductor to avoid large current loops due to voltage dierences in the neutral conductor.
•Protecttheelectricalinstallationbyswitch,circuitbreaker,over-voltageprotector,defectivegrounding
circuit breaker with proper rated power.
•Installthedisplayinaccordancewithlocalelectricalinstallationstandards.InEurope,complywith
EN 60364, the standard for electrical installation of buildings. In Germany, comply with EN 60364. In
America, comply with National Electrical Code ANSI/NFPA 70.
Protective grounding
To prevent against the risk of electric shock, the installation should be properly grounded. Defeating
the purpose of grounding will expose you to the risk of electric shock.
2.3 System Requirements
Before you begin, it is assumed that you are familiar with the Windows operating software. Windows
7 Ultimate is allowed to launch the relative control software.
System requirements
Minimum specications:
- Hardware
• PC PentiumIV 2.0 GHz or equivalent
• 1 GB RAM
• Free hard disk space: 10GB
• XGA resolution (1024 x 768)
• Serial communicationport
• Ethernet connection
- Software
• Windows7 Professional/ Ultimate
Recommended specications:
- Hardware
• PC Intel i5 processor or above
• 4GB RAM
• Free hard disk space: APIX6T GB
• SXGA resolution (1280 x 1024), with 512MB video memory
• Serial communication port
• Ethernet connection
- Software
• Windows 7 Professional
3. SYSTEM INTRODUCTION
3.1 Brief Introduction
APIX6T is the LED indoor display product of PROLIGHTS that uses die-casting aluminum frame
with CNC high precision machining techniques. With it‘s compact, light and handy exterior, the LED
tile is easy to install and disassemble. As the tile dimension is of very high precision, so the whole
display keeps in high atness and seamless.

APIX6T
9
3.2 Key Benets
• High resolution and high pixel density, reproducing reality of high denition video
• Uniform color and high contrast, ensuring clear and sharp picture
• High precision die-casting aluminum tile, achieving high atness and seamless matching of the whole
display
• Fan design with good heat dissipation, achieving noise-free
• Light and slim tile, easier to handle and transport
• High stability and reliability, prolonging lifespan of the display
3.3 Applications
Indoor hall, multi-functional conference hall, performing hall, theater, stage, command and control
center and so on.
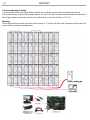
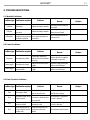
3.4 System Components
APIX6T LED display system composed of the following basic components (optional):
• LED Display: APIX6T LED display tiles, power supply cables, signal cables, connectors
• Control System: control computer, LED display controller, DVI splitter, control system software
• Power Distribution System: power distribution box, power cables
• Peripheral Devices: video processor, optical ber transmitter
LED Display Components List
Number Name Function /Explanation
LED Display Components
1 APIX6T display tile Tile size: 640mmX 720mm,Weight: 13.5 kg
2 Power cord plug and socket
Used for power cable loop connection between tiles; plug for
input and socket for output
3 RJ45 data cord plug and socket
Used for data link between tiles; both sockets can be used
for output or input
Control System Components
1 LED display control computer Industrial control computer
2 Controller (sending card) Congure and send video signal
3 Graphic card Support the output of multiple screens
4 Light sensor Receive signal data (One card for one tile)
5 Receiver card Congure and send video signal
6 Multi-Function card
Support power supply remote control, support feeding back
humidity and temperature information.
7 LED control system software
1. Control, congure and publish play list on LED display
2. Support calibration on-site
3. Support manual and automatic brightness adjustment
4. Support turning on/o LED display through remote
network

10
APIX6T
Number Name Function /Explanation
Power Distribution System Components
1 Main power distributor
Supply power for LED screen (Support power supply remote
control)
2 Power distribution box Support power supply remote control
3 Lightning arrester International brand, to avoid lightning
4 Power cable Comply with international standards
Peripheral Devices
1 Video processor Support for peripheral video source
2 Optical ber transmitter
Both single mode and multiple modes optical ber
transmitter can be used; multiple modes transmitter for R M,
and single mode transmitter for 20KM
3 Optical ber 8 cores optical ber with premium brand
4 Heat sink devices
Axial ow fan can be chosen according to the heat
dissipation space and the environment temperature
3.5 LED Display Components
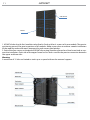
APIX6T Tile
APIX6T LED display is built with APIX6T tiles. A tile consists of die-casting aluminum frames in
high accuracy, APIX6T display modules, switching power supply, receiver cards, and some other
mechanical and electrical connection parts. The APIX6T die-casting aluminum frame adopts one
time die-casting and CNC precision processing technology with high quality aluminum to ensure the
high accuracy of the frame and the uniformity of the whole display.
The introduction of the main components of APIX6T tile is shown as below with related images.
3.6 Die-Casting Aluminum Frame
Each die-casting aluminum frame is installed with four APIX6T display modules. There are LED
signal receiver cards and low voltage DC switching power supply inside the frame, and they all have
electrical connection with 6 modules. There are special designs for xing and connecting the tiles at
each side of the die-casting aluminum frame. The frame has attachment points at the back and four
corners. The attachment points are to x the tiles to the supports like steel structures and buildings.

APIX6T
11
Side fast lock
Module
1. APIX6T tile has 6 grids for 6 modules to be xed in. Each grid has 8 screws to x one module. The precise
positioning ensures the precise position of all modules. Keep screws clean to achieve smooth installation
of the modules and avoid seams between tiles and uneven pixel pitches.
2. Each of the four corners at the back of APIX6T die-casting aluminum frame has a xed screw hole to sup-
port the installation. Each side of the upper frame has fast locks used for the precise connection between
the upper and lower tiles.
Warning:
A maximum of 15 tiles are limited to stack up or suspend without the external support.

12
APIX6T
3.7 APIX6T Module
APIX6T module includes plastic cover, PCBA, plastic mask, etc. At the back of the plastic base
frame, Both front and back service design. Over the lamps, replaceable masks are equipped to
protect the LED lamps and PCB and increase the use life of display. PROLIGHTS choose the best
full color SMD LED lamps as materials. Which lead to high uniformity and perfect show eect .The
use of black organic silicone makes the black LED lamps darker to improve the contrast of the
display signicantly.
APIX6T tile includes 2×3 modules. Each module has 2 kinds of pixel pitch (mm): PH 6.67mm &
PH 8 mm with the corresponding module resolution (pixel) of 96×108 & 80×90. The weight of each
display module is about 0.95kg.
Warning:
APIX6T die-casting aluminum frame can only install APIX6T display modules.
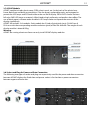
3.8 Socket and Plug for Power and Data Connection
The following two types of socket and plug are respectively used for the power and data connection
between APIX6T display tiles. Both data and power socket is for the data or power connection
between upper and lower tiles.

APIX6T
13
3.9 LED Receiver Card
Each APIX6T tile has one receiver card for receiving and transmitting the data of LED display .
The functions of the MRV220 receiver card are shown as below:
• Power supply: 3.3 - 5.0V
• Temperature monitoring(standard feature)
• Power supply voltage monitoring(standard feature)
• Working status monitoring(standard feature)
• 16 RGB data groups output (it can be extended to 32 groups.)
• Load capacity of single receiver card up to 256×208
• Support pixel level brightness/color calibration

APIX6T
14
4. APIX6T INSTALLATION
4.1 Suspended Installation
Warning: APIX6T display is limited to a height of 20 display tiles and the display surface has to obtain the
atness within a tolerance zone of +/-0.2 mm and keep perpendicular to the reference surface.
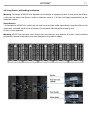
Setup Process
1. Assemble ve APIX6T tiles ,connect all truss bars, keep them on the same level .assemble the rst line of
cabinets. Screw down side lock by hand one by one. All jobs is easy operated.
Warning: APIX6T side fast locks were chosen the same devices with bottom fast locks, when combine
horizontally ,please kindly follow the same method to assemble as above.

15
APIX6T
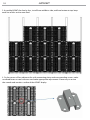
2. Assemble APIX6T tiles line by line , install from middle to side, and from top to bottom keep all truss bars
on the same level.

APIX6T
16
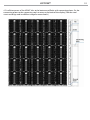
3. Install all the tiles for a whole screen.

17
APIX6T
4.2 Setup Process of Standing Installation
Warning: The height of APIX6T tiles depends on the height of supporting steel structure and the display
surface has to obtain the atness within a tolerance zone of +/-0.2mm and keep perpendicular to the
reference surface.
Setup Process
1. Assemble ve APIX6T tiles ,make sure all steel structure were under right design, keep base at on the
same level .assemble the rst line of cabinets. Screw down side lock by hand one by one.
All jobs is easy operated.
Warning: APIX6T side fast locks were chosen the same devices with bottom fast locks, when combine
horizontally ,please kindly follow the same method to assemble as above.

APIX6T
18
2. Assemble APIX6T tiles line by line , install from middle to side, and from bottom to top .keep
each line of tiles on the same level.
3. Fix the corners of four adjacent tiles with connecting plates and corresponding screws, make
sure xed fasten to steel structure. and make appropriate adjustments if necessary to ensure
the smooth and seamless surface of the APIX6T display.
La pagina si sta caricando...
La pagina si sta caricando...
La pagina si sta caricando...
La pagina si sta caricando...
La pagina si sta caricando...
La pagina si sta caricando...
La pagina si sta caricando...
La pagina si sta caricando...
-
 1
1
-
 2
2
-
 3
3
-
 4
4
-
 5
5
-
 6
6
-
 7
7
-
 8
8
-
 9
9
-
 10
10
-
 11
11
-
 12
12
-
 13
13
-
 14
14
-
 15
15
-
 16
16
-
 17
17
-
 18
18
-
 19
19
-
 20
20
-
 21
21
-
 22
22
-
 23
23
-
 24
24
-
 25
25
-
 26
26
-
 27
27
-
 28
28


in altre lingue
- English: ProLights APIX6T User manual
Documenti correlati
Altri documenti
-
Eaton FlexiTech AT L Series Manuale utente
-
-
Barco T-16BK Manuale utente
-
Packard Bell EasyNote LV Manuale utente
-
Packard Bell EN LE11BZ Manuale utente
-
Gateway NE572 Manuale utente
-
-
-