
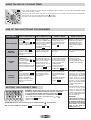
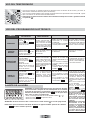
PT
FORNOS
MANUAL DE INSTRUÇÕES DE UTILIZAÇÃO
HOOVER - Via Privata Eden Fumagalli - 20047 Brugherio (Milano) - Italy
IT
FORNI DA INCASSO
ISTRUZIONI PER L’USO
GB
OVENS
USER INSTRUCTIONS
ES
HORNOS EMPOTRABLES
INSTRUCCIONES DE USO
NL
OVEN
GEBRUIKSAANWIJZING
DE
EINBAUBACKÖFEN
BEDIENUNGSANLEITUNG


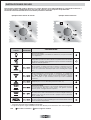
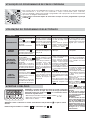
( e )

Scongelamento
Questa posizione permette di far circolare l’aria a temperatura ambiente
intorno al cibo surgelato facendolo così scongelare in pochi minuti senza
modificare od alterare il contenuto proteico.
Funzione pizza
Il calore avvolgente in questa funzione ricrea un ambiente simile a quello dei
forni a legna di pizzeria.


Thank you for choosing one of our products. To get the most out of your oven we recommend that you:
• Read the notes in this manual carefully: they contain important instructions on how to install, use and service this oven safely.
• Keep this booklet in a safe place for easy, future reference.
When the oven is first switched on it may give out acrid smelling fumes. This is because the bonding agent for insulating panels around
the oven has been heated up for the first time.
This is a completely normal, if it does occur you merely have to wait for the fumes to clear before putting the food into the oven.
An oven by its very nature becomes very hot. Especially the glass of the oven door.
Do not allow children to go near the oven when it is hot, especially when the grill is on.
A specially designed protector shield (some models only) which reduces considerably the surface temperature of the oven door can
be obtained through our service organization. This shield is recommended for households with young children.
GENERAL WARNINGS
To locate the fixing holes, open the oven door and look inside.
To allow adequate ventilation, the measurements and distances
indicated in the diagram on last page must be adhered to when
fixing the oven.
Note: For ovens that are combined with a hob unit the instructions
contained in the manual for the hob unit must be followed.
IMPORTANT
If the oven is to work properly, the kitchen housing must be suitable.
The panels of the kitchen unit that are next to the oven must be
made of a heat resistant material. Ensure that the glues of units
made of veneered wood can withstand temperatures of at least
120 °C. Plastics or glues that cannot withstand such temperatures
will melt and deform the unit. Once the oven has been lodged
inside the unit, the electrical parts must be completely insulated.
This is a legal safety requirement. All guards must be firmly fixed
into place so that it is impossible to remove them without using
special tools.
Remove the back of the kitchen unit to ensure an adequate
current of air circulates around the oven. The hob must have
a rear gap of at least 45 mm.
CONNECTING TO THE POWER SUPPLY
Plug into the power supply. Ensure first that there is a third contact
that acts as earthing for the oven. The oven must be properly
earthed.
If the model of oven is not fitted with a plug, fit a standard plug to
the power cable. It must be able to bear the power supply indicated
on the specifications plate. The earthing cable is yellow-green.
The plug must be fitted by a properly qualified person.
If the socket and the plug are incompatible the socket must be
changed by a properly qualified person. A properly qualified person
must also ensure that the power cables can carry the current
required to operate the oven.
An ON/OFF switch with a minimum distance of 3 mm between
contacts may also be connected to the power supply. The
connections must take account of the current supplied and must
comply with current legal requirements. The yellow-green earthing
cable must not be governed by the ON/OFF switch. The socket
or the ON/OFF switch used for connecting to the power supply
must be easily accessible when the oven has been installed.
Important: During installation, position the power cable in such a
way that it will not be subjected to temperatures of above 50°C
at any point.
The oven complies with safety standards set by the regulatory
bodies. The oven is safe to use only if it has been adequately
earthed in compliance with current legal requirements on wiring
safety. You must ensure that the oven has been adequately
earthed.
The manufacturers cannot be held responsible for any harm
or injury to persons, animals or belongings caused by failure
to properly earth the oven.
WARNING: the voltage and the supply frequency are showed
on the rating plate (fig. on last page).
The cabling and wiring system must be able to bear the maximum
electric power required by the oven. This is indicated on the
specifications plate.
If you are in any doubt at all, use the services of a professionally
qualified person.
DECLARATION OF COMPLIANCE
• The parts of this appliance that may come into contact with
foodstuffs comply with the provisions of EEC Directive 89/109.
This appliances complies with Directives 89/336/EEC,
73/23/EEC and following changes.
When you have unpacked the oven, make sure that it has not
been damaged in any way. If you have any doubts at all, do
not use it: contact a professionally qualified person.
Keep packing materials such as plastic bags, polystyrene, or
nails out of the reach of children because they are dangerous
for children.
SAFETY HINTS
The oven must be used only for the purpose for which it was
designed: it must only be used for cooking food.
Any other use, e.g. as a form of heating, is an improper use
of the oven and is therefore dangerous.
The manufacturers cannot be held responsible for any damage
caused by improper, incorrect or unreasonable use.
When using any electrical appliance you must follow a
few basic rules.
– Do not pull on the power cable to remove the plug from the
socket.
– Do not touch the oven with wet or damp hands or feet.
– Do not use the oven unless you are wearing something on
your feet.
– Do not allow children or irresponsible people to use the oven
unless they are carefully supervised.
– It is not generally a good idea to use adapters, multiple sockets
for several plugs and cable extensions.
– If the oven breaks down or develops a fault switch it off at the
mains and do not touch it.
If the cable is at all damaged it must be replaced promptly.
When replacing the cable, follow these instructions.
Remove the power cable and replace it with one of the HO5RR-
F, H05VV-F, H05V2V2-F type. The cable must be able to bear
the electrical current required by the oven. Cable replacement
must be carried out by properly qualified technicians.
The earthing cable (yellow-green) must be 10 mm longer than
the power cable.
Use only an approved service centre for repairs and ensure
that only original parts are used. If the above instructions are
not adhered to the manufacturers cannot guarantee the safety
of the oven.
INSTALLATION
Installation is the customer’s responsibility. The manufacturers
have no obligation to carry this out. If the assistance of the
manufacturer is required to rectify faults arising from incorrect
installation, this assistance is not covered by the guarantee.
The installation instructions for professionally qualified personnel
must be followed. Incorrect installation may cause harm or injury
to people, animals or belongings. The manufacturer cannot be
held responsible for such harm or injury.
FITTING THE OVEN INTO THE KITCHEN UNIT
Fit the oven into the space provided in the kitchen unit; it may be
fitted underneath a work top or into an upright cupboard.
Fix the oven in position by screwing into place, using the four
fixing holes in the frame.
7 GB

SERVICE CENTRE
Before calling the Service Centre
If the oven is not working, we recommend that:
you check that the oven is properly plugged into the power
supply.
If the cause of the fault cannot be detected:
disconnect the oven from the mains, do not touch the oven and
call the after sales service.
Before calling the Service Centre remember to make a note
of the serial number on the serial number specifications plate
(see fig. on last page).
The oven is supplied with a guarantee certificate that ensures that
it will be repaired free of charge by the Service Centre.
This appliance is marked according to the
European directive 2002/96/EC on Waste
Electrical and Electronic Equipment (WEEE).
By ensuring this product is disposed of correctly,
you will help prevent potential negative
consequences for the environment and human
health, which could otherwise be caused by
inappropriate waste handling of this product.
The symbol on the product indicates that this
product may not be treated as household waste.
Instead it shall be handed over to the applicable collection point
for the recycling of electrical and electronic equipment
Disposal must be carried out in accordance with local
environmental regulations for waste disposal.
For more detailed information about treatment, recovery and
recycling of this product, please contact your local city office,
your household waste disposal service or the shop where you
purchased the product.
USEFUL TIPS
If the walls of the oven are so thickly coated in grease that the
catalytic lining is no longer effective remove surplus grease with
a soft cloth or sponge soaked in hot water.
The lining must be porous for self-cleaning to be effective.
N.B.: All catalytic linings currently on the market have a working
life of about 300 hours. They should therefore be replaced after
about 300 hours.
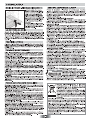
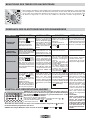
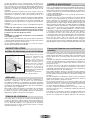
SHELF SAFETY SYSTEM
The oven features a new shelf
safety system.
This allows you to pull out the
oven shelves when inspecting
the food without danger of food
spillages or shelves falling
accidentally out of the oven.
To remove the shelves pull out
and lift.
GRILLING
Grilling makes it possible to give food a rich brown colour quickly.
For browning we recommend that you insert the grill onto the
fourth level, depending on the proportions of the food (see fig.
page 11).
Almost all food can be cooked under the grill except for very lean
game and meat rolls.
Meat and fish that are going to be grilled should first be lightly
doused with oil.
COOKING TIME
For recommended cooking times and temperatures the first time
you use the oven, refer to the tables on pages 11, 12. You may
then wish to vary these times and settings in the light of your own
experience.
CLEANING AND MAINTENANCE
Clean the stainless steel and enamelled surfaces with warm,
soapy water or with suitable brand products. On no account use
abrasive powders that may damage surfaces and ruin the oven’s
appearance. It is very important to clean the oven each time that
it is used. Melted fat is deposited on the sides of the oven during
cooking. The next time the oven is used this fat could cause
unpleasant odours and might even jeopardise the success of the
cooking. Use hot water and detergent to clean; rinse out thoroughly.
To make this chore unnecessary all models can be lined with
catalytic self-cleaning panels: these are supplied as an optional
extra (see the section SELF-CLEANING OVEN WITH CATALYTIC
LINING).
Use detergents and abrasive metal pads like «brillo pads» for the
stainless steel grills.
The glass surfaces as the top, oven door and warming compartment
door must be cleaned when they are cold. Damage that occurs
to them because this rule was not adhered to are not covered by
the guarantee.
To replace the interior light: switch off the mains power supply and
unscrew bulb. Replace with an identical bulb that can withstand
very high temperatures.
SELF-CLEANING OVEN WITH CATALYTIC
Special self-cleaning panels covered in a micro-porous coating
are available as optional extras for all models. If they are fitted,
the oven no longer needs to be cleaned by hand.
The fat that is splattered onto the sides of the oven during roasting
is eliminated by the microporous coating which breaks the fat
down by catalysis and transforms it into gas.
Excessive splattering may nevertheless block the pores and
therefore hinder self-cleaning. The self-cleaning capacity may be
restored by switching on the empty oven to maximum for about
10-20 minutes.
Do not use abrasive products, metal cleaning wads, sharp objects,
rough cloths, or chemical products and detergents that may
permanently damage the catalytic lining.
It is a good idea to use deep roasting trays to roast fatty foods
such as joints of meat etc. and to put a tray underneath the grill
to catch surplus fat.
8 GB

WARNING : the first operation to carry out after the oven has been
installed or following the interruption of power supply (this
is recognizable the display pulsating and showing )
is setting the correct time. This is achieved as follows
• Press and hold the TIMER and END buttons
• Set time with buttons
• Release all buttons
• Sounds an alarm at the
end of the set time.
• To check how long is
left to run press the
button
• When the set time as
elapsed an audible alarm
is activated (this alarm will
stop on its own, however
it can be stopped
immediately by pressing
the button)
• Press and hold the
button
• Press the buttons or
to set the required time
• Release all the buttons
• Press and hold the END
button
• Press the buttons
to set the time at which you
wish the oven to switch off
• Release the buttons
• Set the cooking function
with the oven function
selector
FUNCTION
HOW TO ACTIVATE IT HOW TO SWITCH IT OFF WHAT IT DOES WHAT IT IS FOR
MINUTE MINDER
• Allows to use the oven as
alarm clock (could be
activated either with
operating the oven or
with out operating the
oven)
• For cooking the desired
recipes
MANUAL
FUNCTION
• Turn the oven function
selector to position O.
• Enables you to operate
the oven.
COOKING
TIME
• Press and hold the
TIMER button
• Press the buttons or
to set the lenght of coo-
king required
• Release all buttons
• Set the cooking function with
the oven function selector
• When the time is elapsed
the oven will switch off
automatically. Should you
wish to stop cooking
earlier either turn the
function selector to 0, or
set time to 0:00
(TIMER and buttons)
• It allows to preset the
cooking time required
for the recipe chosen
• To check how long is
left to run press the
TIMER button.
• To alter/change the
preset time press
TIMER and buttons
• At the end of the
cooking set time,
the oven will switch
off automatically and an
audible alarm will ring.
END OF
COOKING
• This function is typically
used with “cooking time”
function. For example
if the dish has to be cooked
for 45 minutes and needs
to be ready by 12:30,
simply select the required
function, set the cooking
time to 45 minutes and the
end of cooking time to
12:30.
• Cooking will start automa-
tically at 11:45 (12:30
minus 45 mins) and will
continue until the pre-set
end-of-cooking-time, when
the oven will switch itself
off automatically.
WARNING.
If the END of cooking is
selected without setting
the length of cooking time,
the oven will start cooking
immediately and it will
stop at the END of
cooking time set.
• At the time set, the oven
will switch off. To switch
off manually, turn the
oven function selector
to position O.
• Enables you to set the
end of cooking time
• To check the preset
time press the END
button
• To modify the preset
time press buttons
END +
• Press the button
• Set the cooking function
with the oven function
selector
ATTENTION the oven only operates if set on manual function or preset time.
N.B.: on some models the symbols are replaced by + and - .
SETTING THE CORRECT TIME
USING THE END OF COOKING TIMER
9 GB
This control enables to set the desired cooking time (max. 120 min.) the oven will automatically switch
off at the end of the set time.
The timer will count down from the set time return to the O position and switch off automatically.
For normal use of oven set the timer to the position.
To set the oven ensure the timer is not on the O position.
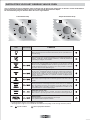
USE OF THE ELECTRONIC PROGRAMMER
( and )

Our range includes many different styles and colours. To find the technical specifications and functions of the model which
you have bought, study the diagrams below.
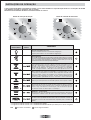
During oven operation the internal lamp is on.
OPERATING INSTRUCTIONS
10 GB
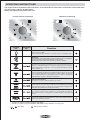
Function selector control knob Thermostat control knob
* Tested in accordance with the CENELEC EN 50304.
** Tested in accordance with the CENELEC EN 50304 used for definition of energy class.
Turns on the oven light
This will automatically activate the cooling fan (on fan cooled models only)
Fan oven
Air that has been heated is blown by the fan onto the different levels. It is
ideal for cooking different types of food at the same time (e.g. meat and fish)
without mixing tastes and smells. It cooks very gently and is ideal for sponge
cakes, pastries, etc.
Door closed fan grill
The air is heated by the grill element and the fan blows the air onto the food
at the required temperature. This ranges from 50°C to 200°C. The grill/fan
is an excellent alternative to roasting on the spit. It is ideal for roasting even
large quantities of poultry, sausages and red meats.
Fan plus lower element
This function is ideal for delicate dishes (pies-souffle).
Natural convection
Bottom and top oven elements are used. This is the traditional form of baking
and roasting. It is ideal for roasting joints of meat and game, baking biscuits
and apples and making the food nice and crunchy.
Door closed Grilling
The setting of this function switches on the infrared grill element.
This function is ideal for cooking meats of medium thickness (sausages and
bacon).
Function
dial
Thermostat
dial
Function
Defrosting
When the dial is set to this position. The fan circulates air at room temperature
around the, frozen food so that it defrosts in a few minutes
without the protein content of the food being changed or altered.
Function Pizza
This function with hot air circulated in the oven ensure perfect result for
dishes such as pizza or focaccia.
All models Only on some models

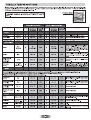
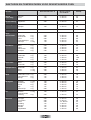
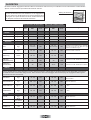
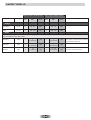
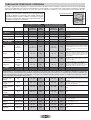
TABLES OF COOKING TIMES
The overall suggested cooking times set out below are intended as a rough guide only. They may in fact vary according to the quality,
the freshness, the size and the thickness of the food cooked and of course cooking time is also partly a matter of taste. Let the food
stand for a few minutes before serving because the ingredients continue cooking after they
have been removed from the oven.
Shelf position
Food Quantity Shelf Oven
tempe-
rature
Time
of cooking
in minutes
Remarks
Static electric oven Electric fan oven
Form the dough into a loaf and make a
cross with a knife on top of the dough leave
the dought to rise for at least 2 hours.
Grease the baking tin and put the dough in
the middle of it.
Bread
Kg 1
di pasta
2
35
10 (pre-heating)
200 2
30 ÷ 35
10
(pre-heating)
180
• Pasta
Put the lasagne into an unheated oven
Lasagne Kg 3,5 2 70 ÷ 75 220 2 60 ÷ 65 200
Put the cannelloni into an unheated oven
Cannelloni Kg 1,8 2 50 ÷ 60 220 2 40 ÷ 50 200
Put the oven baked pasta into an unhea-
ted oven
Oven baked pasta Kg 2,5 2 55 ÷ 60 220 2 45 ÷ 50 200
Warm the oven for 15 minutes and place
the pizzas on the greased baking tray.
Garnish them with tomatoes, mozzarella,
ham, oil, salt and origano.
Pizza Kg 1 1 190 1 19025 ÷ 35 20 ÷ 25
Place 24 vol au vents in the oven and
bake.
Pastry (frozen)
vol au vents
n° 24 1 220 2 20030 ÷ 35 25 ÷ 30
Focaccia
(n° 4)
gr. 200
of dough each
2 200 2 18025 ÷ 30 20 ÷ 25
• Meat
All meats can be roasted in shallow or deep roasting trays.
It is advisable to cover the shallow trays to avoid splattering the sides of the oven with grease.
The roasting times are the same whether the meat has been covered up or not.
Put the meat into a deep Pyrex dish and
season with salt and pepper; turn the meat
half way through cooking.
Whole joint of
beef
Kg 1 3 220 3 20070 ÷ 80 50 ÷ 60
Cook the meat in a covered Pyrex dish with
herbs, spice, oil and butter.
Joint of
deboned
Kg 1 2 220 2 200100 ÷ 110 80 ÷ 90
Joint of
deboned veal
Kg 1,3 1 220 2 20090 ÷ 110 90 ÷ 100
Cook as indicated above.
Joint of
fillet of beef
Kg 1 2 220 2 20080 ÷ 90 80 ÷ 90
Cook as indicated above.
• Fish
Trout
3 whole trout
or / Kg 1
2 220 2 20040 ÷ 45 35 ÷ 40
Cover the trout with salt, oil and onions and
cook in a Pyrex dish.
Salmon
700 g
2,5 cm slice
2 220 2 20030 ÷ 35 30 ÷ 25
Cook the salmon in an open Pyrex dish with
salt, pepper and oil.
Sole Kg 1 2 220 2 20040 ÷ 45 35 ÷ 40
Cook the sole with salt and a spoonful of
oil.
Bream 2 whole ones 2 220 2 20040 ÷ 45 35 ÷ 40
Cook the bream in oil and salt in a covered
dish.
HANDY TIP: Lower the temperature so as to avoid the
surface of the food becoming hard and dry.
Shelf Time
of cooking
in minutes
Oven
tempe-
rature
• Baking (not cakes)
Warm the oven for 15 minutes, grease the
baking tray, season the 4 focaccia with oil
and salt and leave them to
rise at room temperature for at least 2 hours
before putting them in the oven.
11 GB

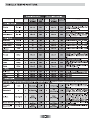
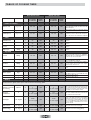
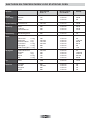
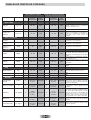
TABLES OF COOKING TIMES
Guinea fowl Kg 1-1,3 2 60 ÷ 80 220 2 60 ÷ 70 200
• Rabbits and Poultry
Place the guinea fowl in a deep Pyrex or
pottery dish with very little oil and season with
herbs and spices.
chicken Kg 1,5-1,7 2 110 ÷ 120 220 2 100 ÷ 110 200
Follow the procedure for cooking the guinea
fowl.
Rabbit pieces Kg 1-1,2 2 55 ÷ 65 220 2 50 ÷ 60 200
Put all the pieces of the same size in the
glazed tray. Season with herbs and spices.
Turn the pieces as and when required.
• Cakes
1 55 180 1 50 160
Use a tin that is 22 cm deep. Pre-heat for
10 mins.
Sponge cake
1 55 175 1 40 ÷ 45 160
Carrot cake baked
in a tin
1 65 180 1 50 ÷ 60 160
Apricot pie
700 gr 1 40 200 2 30 ÷ 35 180
• Vegetable
Fennel 800 gr 1 70 ÷ 80 220 1 60 ÷ 70 200
Cut the fennel into four pieces, add butter,
salt and potatoes if required and place in a
Pyrex face up. Cover the dish.
Courgettes 800 gr 1 70 220 1 60 ÷ 70 200
Slice the courgettes, place in a Pyrex
dish and add butter and salt.
Potatoes 800 gr 2 60 ÷ 65 220 2 60 ÷ 65 200
Cut the potatoes into equal parts and place
in a Pyrex dish. Season with salt, origano
and rosemary. Cook in oil.
Carrots 800 gr 1 80 ÷ 85 220 1 70 ÷ 80 200
Slice the carrots, place in a Pyrex dish and
cook.
• Fruit
Whole apples Kg 1 1 45 ÷ 55 220 2 45 ÷ 55 200
Bake the fruit in an open Pyrex or earthen-
ware dish. Leave it to cool inside the oven.
Follow procedure above.
Pears Kg 1 1 45 ÷ 55 220 2 45 ÷ 55 200
Follow procedure above.
Peaches Kg 1 1 45 ÷ 55 220 2 45 ÷ 55 200
• Grilling
Place the food to be grilled underneath the infra-red grill. Warning: When the grill is on it takes on a bright red colour. Place the tray
underneath the grill to collect juices and fat from the food being grilled.
Squares of bread
for toasting
4 pieces 4
5
(5 to heat up grill)
grill 4
5
(10 to heat up grill)
grill
Lay the bread on the grill tray. When one
side of the bread has been toasted, turn
over and toast the other side. Remember:
keep the toast warm at the bottom of the
oven until you are ready to serve it.
Toasted
sandwiches
43
10
(10 to heat up grill)
grill 3
5/8
(10 to heat up grill)
grill
Lay the bread on the grill tray. When one
side of the sandwich has been toasted, turn
over and toast the other side.
Sausages n°6 / Kg 0,9 4
25/30
(5 to heat up grill)
grill 4
15/20
(10 to heat up grill)
grill
Cut the sausages in half and lay them face
down on the grill. Half way through grilling
turn them over. Every so often, check that
they are being cooked equally all over. (If
this is not happening, turn and reposition
the ones being cooked ether less or more
than the others.
Ribs of beef n°4 / Kg 1,5 4
25
(5 to heat up grill)
grill 4
15/20
(10 to heat up grill)
grill
Make sure that the ribs of beef are exposed
to the full effect on the main grill.
Chicken legs n°4 / Kg 1,5 3
50/60
(5 to heat up grill)
grill 3
50/60
(10 to heat up grill)
grill
Turn them over twice during grilling.
Food Quantity Shelf Oven
tempe-
rature
Time
of cooking
in minutes
Remarks
Static electric oven Electric fan oven
Shelf Time
of cooking
in minutes
Oven
tempe-
rature
Coconut cake
baked in a tin
Use a tin that is 22 cm deep. Pre-heat for
10 mins.
Use a tin that is 22 cm deep. Pre-heat for
10 mins.
Use a tin that is 22 cm deep. Pre-heat for
10 mins.
12 GB

Le agradecemos que haya elegido uno de nuestros productos. Para obtener de este
electrodoméstico las mejores prestaciones aconsejamos:
• Leer atentamente las advertencias contenidas en el presente manual.
• Conservar con cuidado este manual para cualquier consulta posterior.
Durante la primera puesta en funcionamiento del horno puede producirse un humo de olor acre causado por el primer calentamiento
del pegamento de los paneles de aislamiento que envuelven el horno. Se trata de un fenómeno absolutamente normal y, en caso de
verificarse, es preciso esperar a la extinción del humo antes de introducir los alimentos.
Por su naturaleza el horno es un aparato que se calienta, de modo particular el cristal de la puerta. Es aconsejable pues impedir que
los niños puedan acercarse al horno cuando se encuentre en funcionamiento, especialmente cuando está en márcha el grill.
Hay disponible un dispositivo suplementario de protección (sólo en los modelos predispuestos) a fin de reducir la temperatura de la
superficie frontal de la puerta del horno; este dispositivo debería ser montado en caso de presencia de niños pequeños. Este accesorio
puede obtererse a través de nuestro servicio de asistencia técnica.
INSTRUCCIONES GENERALES
DECLARACIÓN DE CONFORMIDAD.
• Este aparato, en las partes destinadas a estar en contacto
con los alimentos cumple la Directiva CEE 89/109.
Este aparato cumple las Directivas Europeas 89/336/CEE,
73/23/CEE y sucesivas modificationes.
INFORMACIÓN SOBRE SEGURIDAD
• Este aparato deberá destinarse únicamente al uso para el
cual ha sido especialmente concebido, es decir, para la cocción
de alimentos.
Cualquier otro uso (por ejemplo, calentamiento a temperatura
ambiente) debe considerarse impropio, y por lo tanto peligroso.
El fabricante declina toda responsabilidad por los posibles
daños causados por el uso impropio, erróneo e irracional del
aparato.
El uso de cualquier aparato eléctrico comporta la observación
de algunas reglas fundamentales. En particular:
— No tire del cable de alimentación para desenchufar el aparato.
— No toque el aparato con las manos o los pies húmedos o
mojados.
— No utilice el aparato si no lleva calzado.
— No deje que los niños o las personas incapacitadas usen el
aparato sin vigilancia.
— No utilice adaptadores, ladrones ni alargadores.
— En caso de avería o de mal funcionamiento del aparato,
apáguelo y no lo manipule.
En caso de deterioro del cable, sustitúyalo inmediatamente
con arreglo a las siguientes indicaciones:
— saque el cable de alimentación y sustitúyalo por uno (tipo
HO5RR-F, H05VV-F, H05V2V2-F) y adecuado a la potencia
del aparato.
— esta operación deberá realizarla un técnico especializado. El
hilo de tierra (amarillo-verde) debe ser obligatoriamente
10 mm más largo que los conductores de línea.
En caso de que el aparato precise ser reparado, diríjase
únicamente a un centro de asistencia técnica autorizado y
exija piezas de recambio originales.
No observar todo lo mencionado puede comprometer la
seguridad del aparato.
INSTALACIÓN
La instalación corre a cargo del comprador y el Fabricante queda
exento de este servicio; eventuales intervenciones requeridas a
la Casa Constructora que dependan de una instalación incorrenta
no están incluidas en la Garantia.
La instalación debe ser efectuada según las instrucciones por
personal profesionalmente cualificado. Una instalación errónea
puede causar daños a personas, animales o cosas, de los cuales
el fabricante no puede ser considerado responsable.
INTRODUCCIÓN DEL MUEBLE
Introduzca el aparato en el hueco del mueble (bajo encimera o
en columna). El horno se fija introduciendo 4 tornillos en los
agujeros del marco, visibles al abrir la puerta.
Con el objeto de permitir una mejor ventilación del mueble, empotre
el horno respetando las medidas y las distancias indicadas en la
última página.
Nota: Para los hornos que deban acoplarse a una encimera,
resulta indispensable respetar las instrucciones contenidas en el
manual adjunto al aparato a acoplar.
IMPORTANTE
Para garantizar un correcto funcionamiento del aparato encastrable,
es necesario que el mueble tenga las características adecuadas.
Los paneles de los muebles adyacentes al horno deberán ser de
un material resistente al calor. En el caso de los muebles de
madera chapada, el encolado deberá resistir una temperatura de
120 °C: los materiales plásticos o encolados que no resistan esta
temperatura pueden deformarse o despegarse.
De acuerdo con las normas de seguridad, una vez empotrado el
aparato no deben existir contactos con las piezas eléctricas. Todas
las piezas protectoras deben fijarse de manera que no puedan
sacarse sin la ayuda de un utensilio.
Para garantizar una buena ventilación debe eliminarse la
pared posterior del hueco, y el panel de apoyo debe tener
una apertura mínima de 45 mm.
CONEXIÓN ELÉCTRICA
Enchufe la clavija en una base provista de un tercer contacto
correspondiente a la toma de tierra, la cual deberá conectarse
correctamente.
En los modelos desprovistos de clavija, monte una clavija estándar
en el cable capaz de soportar la carga indicada en la placa de
características. El hilo de tierra es de color amarillo-verde. Esta
operación deberá realizarla un técnico especializado.
En caso de que la base y la clavija del aparato sean incompatibles,
haga que un técnico especializado le cambie la base por otra
adecuada.
También puede efectuar la conexión a la red intercalando entre
el aparato y la red un interruptor omnipolar con una distancia de
apertura de los contactos equivalente a 3 mm, preparado para la
carga y con arreglo a las normas vigentes. El hilo de tierra amarillo-
verde no debe quedar interrumpido por el interruptor.
La base o el interruptor omnipolar utilizados para la conexión
deben estar situados en un lugar fácilmente accesible y cerca del
electrodoméstico instalado.
Importante: en la fase de instalación, coloque el cable de
alimentación de manera que en ningún punto alcance una
temperatura superior a los 50 °C a temperatura ambiente.
El aparato cumple los requisitos de seguridad previstos por los
institutos normativos. Sólo se garantiza la seguridad eléctrica de
este aparato si ha sido conectado correctamente a una instalación
de toma de tierra eficaz, con arreglo a lo dispuesto en las normas
vigentes de seguridad eléctrica, (en caso de duda, exija un control
exhaustivo de la instalación por parte de un técnico especializado).
El fabricante declina toda responsabilidad por los posibles daños
causados por la falta de conexión a tierra de la instalación.
Importante: el fabricante queda exento de cualquier
responsabilidad por los posibles daños personales o materiales
causados por la falta de conexión a tierra.
ATENCIÓN: La tensión y frecuencia de alimentación están
indicadas en la tarjeta de matrícula (er la última página).
Compruebe que la capacidad eléctrica de la instalación de las
bases sean adecuadas para la potencia máxima del aparato,
indicada en la placa de características. En caso de duda, diríjase
a un técnico cualificado.
13 ES

ASISTENCIA TÉCNICA
En caso de incorrecto funcionamiento del horno le aconsejamos:
— verificar la buena conexión del enchufe en la toma de corriente.
En caso de que no se determine la causa del mal funcionamiento:
apagar el aparato sin manipularlo y llamar al Servicio de
Asistencia Técnica. Antes de llamar al Centro de Asistencia
recuerde tomar nota del número de matrícula situado en la
tarjeta matrícula del producto (Fig. última página).
El aparato está dotado de un certificado de garantía que le permite
disponer del Servicio Asistencia Técnica.
Este electrodomestico está marcado conforme
a la directiva Europea 2002/96/CE sobre los
residuos de aparatos eléctricos y electrónicos
(WEEE).
Asegurándose que este producto ha sido
eliminado correctamente, ayudará a evitar
posibles consecuencias negativas en el ambiente
y la salud de las personas, que pudiera verificarse
por causa de un anómalo tratamiento de este
producto
El simbolo sobre el producto indica que este aparato no puede
ser tratado como un residuo doméstico normal, en su ligar deberá
ser entregado al centro de recogidas para reciclaje de aparatos
eléctricos y electrónicos.
La eliminación debe ser efectuada de acuerdo con las reglas
medioambientales vigentes para el tratamiento de los residuos.
Para informacion más detallada sobre el tratamiento, recuperación
y reciclaje de este producto, por favor contacte con la oficina
compentente (del departamento de ecología y mediomabiente),
o su servicio de recogida a domicilio si lo hubiera o el punto de
venta donde compró el producto.
CONSEJOS ÚTILES
Se aconseja además utilizar fuertes con bordes altos en el caso
de cocciones de alimentos particularmente grasos (asados, etc)
y utilizar la grasera al realizar la cocción al grill.
Para el caso que, por condiciones particulares de suciedad, no
fuera suficiente la acción precedente, se aconseja apartar las
grasas con un paño mullido o una esponja humedecidos con agua
caliente. La porosidad del esmalte es fundamental para garantizar
la acción autolimpiante.
N.B. Todos los paneles autolimpiantes comercializados en el
mercado tienen una eficacia de rendimiento de aproximadamente
300 horas de funcionamiento del horno. Pasado dicho límite los
paneles deberían ser sustituidos.
LA COCCIÓN AL GRILL
Este tipo de cocción permite el dorado rápido de los alimentos.
Con este fin, le aconsejamos introducir la rejilla generalmente en
el 3° o 4° estante, según las dimensiones de los alimentos.
(pág. 17)
Casi todas las carnes pueden ser cocidas al grill, excepto
algunas carnes tiernas de caza y albóndigas.
La carne y el pescado para cocinar al grill deben ser ligeramente
untados con aceite.
TIEMPOS DE COCCIÓN
En las págs. 17 y 18 mostramos una tabla indicativa de los tiempos
y temperaturas aconsejados para las primeras cocciones. Con la
experiencia podrá variar a su gusto los valores mostrados en la
tabla.
LIMPIEZA Y MANTENIMIENTO
Limpiar las superficies de acero inox y esmaltadas con agua
templada y jabón, o con productos específicos de comercios
especializados, evitando absolutamente el uso de polvos abrasivos
que dañarían las superficies y partes estéticas.
La limpieza del horno es muy importante y debe ser efectuada
cada vez que éste es utilizado. En las paredes se depositan
grasas derretidas durante la cocción que podrían, en el sucesivo
encendido, producir olores desagradables que afectarían a la
cocción. Para la limpieza utilizar agua caliente y jabón, aclarando
cuidadosamente.
Para eliminar esta hardua tarea, las paredes del horno pueden
ser revestidas con paneles autolimpiantes especiales, of
recidos como accesorios opcionales en algunos modelos:
ver párrafo específico «HORNO AUTOLIMPIANTE CATALÍTICO».
Utilizar jabón y barillas de acero para las rejillas inox. La limpieza
de las superficies de cristal templado debe ser efectuada cuando
las superficies estén frias. Eventuales roturas debidas a la no
observación de esta regla elemental no están cubiertos por la
garantia.
La bombilla del horno puede ser sustituida desconectando
eléctricamente el aparato y destornillando la ampolla que la
encierta, sustituyendo la bombilla por una análoga resistente a
altas temperaturas.
HORNO AUTOLIMPIANTE CATALÍTICO
Los paneles especiales autolimpiantes recubiertos por un esmalte
con estructura microporosa (ofrecidos como accesorios opcionales
en unos modelos o de serie en otros) eliminan la limpieza manual
del horno.
Las grasas proyectadas sobre las paredes durante la cocción,
son descompuestas por el esmalte, mediante un proceso catalítico
de oxidación y son transformados en productos gasos.
Salpicaduras excesivas de grasa pueden obstruir los poros y por
consiguiente impedir la autolimpieza. tal característica puedé ser
restablecidá mediante un calentamiento de unos 10-20 minutos
del horno vacío programándo el horno a la máxima temperatura.
no usar productos abrasivos, barillas metálicas, objetos de punta,
paños rugosos, productos químicos o jabones que puedieran
dañar irremediablemente el esmalte.
14 ES
REJILLAS HORNO - SISTEMA DE SUJECIÓN
El horno está dotado de un
nuevo sistema de sujeción de
las rejillas.
Este sistema permite extraer
las rejillas casi por completo
sin que caigan y manteniéndo-
las perfectamente en plano,
permitiendo verificar y mezclar
los alimentos con la máxima
tranquilidad y seguridad.
Para extraer las rejillas es
suficiente, como se indica en el
dibujo, levantarlas, cogiéndolas por la parte anterior y tirar de ellas.

• Emite una señal acústica
finalizado el tiempo
establecido
• Para visualizar el tiempo
restante pulse la tecla
• Pulse y mantenga pulsada
la tecla
• Pulse las teclas o
para ajustar la duración
• Suelte las teclas
• Cuando transcurre el
tiempo seleccionado, el
funcionamiento se para
solo y avisa con una señal
acústica (la señal acústica
se para sola; para inter-
rumpirlo inmediatamente
pulse la tecla )
• Pulse la tecla
• Seleccione la función de
cocción con el mando
selector de función
ATENCIÓN: la primera operación que hay que efectuar después
de la instalación o después de una interrupción de la corriente
(este tipo de situaciones se reconocen al observar que en la pan-
talla de visualización parpadea la hora ) es el ajuste de la
hora, como se indica a continuación:
• Pulse y mantenga pulsadas las teclas TIMER o END
• Pulse las teclas o para ajustar la hora
• Suelte las teclas
• Cuando transcurre el
tiempo seleccionado, el
horno se desconecta solo;
párelo antes de situer
el mando selector de
función en la posición O ó
ajuste a 0:00 el tiempo de
la cocción (teclas
TIMER o ).
FUNCIÓN
MODO DE
ACTIVACIÓN
FUNCIONAMIENTO FINALIDAD
MINUTERO
• Permite utilizar el progra-
mador del horno a modo
de alarma (puede utilizarse
con horno en funciona-
miento o desconectado).
• Efectúe las cocciones
deseadas
FUNCIÓN
MANUAL
• Situer el mando selector
de función en la
posición O.
• Permite el funcionamien-
to del horno
DURACIÓN DE
LA COCCIÓN
• Pulse y mantenga pulsada
la tecla TIMER
• Pulse las teclas o
para el ajuste de la
duración
• Suelte las teclas
• Seleccione la función de
cocción con el mando
selector de función
• Permite seleccionar el
tiempo de cocción del
alimento introducido en el
horno.
• Para visualizar el tiempo
restante pulse la tecla
TIMER.
• Para modificar el tiempo
restante, pulse la tecla
TIMER+ o
• Cuando termina el tiempo
seleccionado, el horno se
desconecta automática-
mente y avisa emitiendo
una señal acústica.
FIN DE LA
COCCIÓN
• Normalmente se utiliza
esta función con la finali-
dad de DURACIÓN DE LA
COCCIÓN. A modo de
ejemplo: el alimento debe
cocinarse durante 45
minutos y deseo que esté
listo para las 12:30; en tal
caso
Seleccione la función de
cocción deseada.
Ajuste el tiempo de la
cocción en 45 minutos
(TIMER + o )
Ajuste el fin de la cocción
a las 12:20 h. (END + o )
La cocción comenzará
automáticamente a las
11:45 h (12:30, menos 45
minutos), y a la hora
seleccionada como fin de
la cocción el horno se
desconectará automáti-
camente.
ATENCIÓN: Si selecciona
únicamente el fin de
cocción sin el tiempo de
cocción, el horno se
conectará inmediata-
mente y se desconectará
a la hora de fin de la
cocción seleccionada.
• Pulse y mantenga pulsada
la tecla END
• Pulse las teclas o para
ajustar la hora del fin de
cocción.
• Suelte las teclas
• Seleccione la función de
cocción con el mando
selector de función
• A la hora seleccionada el
horno se desconectará
solo; si desea inter-
rumpirlo, situer antes
el mando selector de
función en la posición O.
• Permite memorizar la hora
de fin de la cocción.
• Para visualizar la hora
programada, pulse la tecla
END
• Para modificar la hora
programada, pulse las
teclas END + o
ATENCIÓN: El horno funciona sólo si selecciona en modo manual o cocción programada
NOTA: Para ajustar las diversas funciones del horno, en algunos modelos aparecen los símbolos
o , en otros modelos aparecen + o - .
AJUSTE DE LA HORA
MODO DE
DESCONEXIÓN
15 ES
USO DEL TEMPORIZADOR
Con este mecanismo es posible programar la duración exacta en minutos de la cocción y, por tanto, la
desconexión automática del horno (máx. 120 minutos).
Una vez transcurrido el tiempo seleccionado el mando alcanzará la posición de señal acústica O, a partir
de la cual el horno se desconectará automáticamente.
Únicamente se podrá conectar el horno seleccionando un tiempo de cocción o girando el mando
a la posición .
USO DEL PROGRAMADOR ELECTRÓNICO
( o )

INSTRUCCIONES DE USO
16 ES
Nuestra gama comprende estéticas distintas con colores distintos. Para poder individuar las caracteristicas técnicas y
funcionales relativas al modelo del horno que acaba de comprar siga los esquemas abajo indicados.
Durante el funcionamiento del horno la luz interior permanece conectada.
Ejemplo mando selector de función Ejemplo mando termostato
N.B. En todos los modelos Solo en alguros modelos
* Programa de prueba según CENELEC EN 50 304
** Programa de prueba según CENELEC EN 50 304 utilizado para la definición de la clase energética
Conecta la luz interior
Está integrado también el ventilador de enfriamiento (sólo para los modelos
con refrigeración)
Horno ventilado
El aire caliente, se reparte entre todos los niveles; es ideal para cocer a la
vez distintos tipos de alimentos (carne, pescado) sin mezclar sabores y
olores. Cocción delicada - indicada para plum cakes, tarta Margarita, hojaldre,
etc..
Grill ventilado con puerta cerrada
El aire calentado por la resistencia grill, es aspirado por el ventilador que
lo vuelve a ampujar sobre los alimentos a la temperatura deseada entre
50° y 200°C. El grill ventilado sustituye perfectamente el asador y garantiza
óptimos resultados con pollo, salchichas y carnes rojas, incluso en cantdades
relevantes.
Base ventilada
Adaptada para cocciones delicadas (pastelería-soufflé, etc).
Convección natural
Funcionan la resistencia inferior y la resistencia superior del horno. Es la
cocción tradicional, ideal para cocinar asados, caza, galletas, manzanas
al horno y para conseguir alimentos crujientes.
Grill tradicional con puerta cerrada
En esta posición, entra en funcionamiento la resistencia del grill a infrarrojos.
Óptima en la cocción de carnes de medio o pequeño espesor (salchichas,
bacon, costillas, etc.).
Descongelación
Esta posición permite la circulación del aire a temperatura ambiente alrededor
del alimento congelado, descongelándolo en pocos minutos sin modificar ni
alterar su contenido proteínico.
Modalidad pizza
El calor envolvente en esta modalidad genera un ambiente similar al de los
hornos de leña de las pizzerías.
Mando
selector
Mando
termostato
Funzionción

TABLAS DE TIEMPOS DE COCCIÓN
Los tiempos sugeridos en las tablas siguientes son indicativos y pueden variar según la calidad, frescura, dimensión y espesor de los
alimentos y según su gusto. Dejar siempre reposar durante unos minutos antes de servir, ya que todos los alimentos siguen cociéndose
tras extraerlos del horno.
Posición de las repisas
Plato Cantidad Estante Tempe-
ratura
horno
Tiempo de
cocción en
minutos
Observaciones
Horno Eléctrico Estático Horno Eléctrico Ventilado
Preparar la pasta en forma redonda e incida
con un cuchillo una cruz sobre la parte
superior de la forma. Dejar a temperatura
ambiente al menos 2 horas, untar la grasera
y situar la forma en el centro de la misma.
Pan
Kg 1
pasta
2
35
precal.10
200 2
30 ÷ 35
precal.10
180
• Pasta
Introduzca la lasaña en el horno frío.
Lasañas Kg 3,5 2 70 ÷ 75 220 2 60 ÷ 65 200
Introduzca la canelones en el horno frío.
Canelones Kg 1,8 2 50 ÷ 60 220 2 40 ÷ 50 200
Introduzca la pasta en el horno frío.
Pasta al horno Kg 2,5 2 55 ÷ 60 220 2 45 ÷ 50 200
Precalentar durante 15 minutos el horno.
Preparar la pizza en la grasera esmaltada
con tomates, mozzarella y jamón, aceite,
sal, orégano.
Pizza Kg 1 1 190 1 19025 ÷ 35 20 ÷ 25
Situar 24 vol au vent en la grasera y cocer.
Hojaldre n. 24
vol au vent
n° 24 1 220 2 20030 ÷ 35 25 ÷ 30
Precalentar durante 15 minutos el horno.
Dejar a temperatura ambiente al menos 2
horas, untar la grasera y situar la forma en
el centro de la misma.
Focaccia
(n° 4)
gr. 200
di pasta cad.
2
200 2 18025 ÷ 30 20 ÷ 25
• Carne
Todas las carnes pueden ser cocidas en recipientes de borde bajo o borde alto.
Es aconsejable cubrir el recipiente de borde bajo con una tapa para evitar ensuciar el horno con salpicaduras del condimento.
Las carnes cubiertas resultan más blandas y jugosas, mientras que las descubiertas resultan más crujientes.
Los tiempos indicados valen para cocciones con recipiente cubierto o descubierto.
Situar la carne en una bandeja Pirex de
borde alto con sal y pimienta. Dele la vuelta
a mitad cocción.
Roastbeef
entero
Kg 1 3 220 3 20070 ÷ 80 50 ÷ 60
Cocer la carne en bandeja Pirex cubierta
con sal, pimienta, aromas naturales, aceite
y mantequilla.
Solomillo de
cerdo enrollado
Kg 1 2 220 2 200100 ÷ 110 80 ÷ 90
Solomillo de
ternera enrollado
Kg 1,3 1 220 2 20090 ÷ 110 90 ÷ 100
Cocer como arriba.
Solomillo de buey
filete
Kg 1 2 220 2 20080 ÷ 90 80 ÷ 90
Cocer como arriba.
• Pescado
Trucha 3 enteras / Kg 1 2 220 2 20040 ÷ 45 35 ÷ 40
Cocer las truchas cubiertas aceite, sal y
cebollas en bandejas de Pirex.
Salmon
700 g a rodajas
de 2,5 cm esp.
2 220 2 20030 ÷ 35 30 ÷ 25
Cocer el salmón no tapado en bandeja
Pirex con sal, pimienta y aceite.
Lenguado Filetes / Kg 1 2 220 2 20040 ÷ 45 35 ÷ 40
Cocer el lenguado con sal y una cuchara
de aceite.
Dorada 2 enteras 2 220 2 20040 ÷ 45 35 ÷ 40
Cocer las doradas en recipiente cubierto
con aceite y sal.
CONSEJO ÚTIL: Apagar el horno al menos 10 minutos antes del tiempo indicado dejando los
alimentos en el interior del mismo. Ello le permitirá ahorrar energiá y completar la cocción según
sus gustos. Para no secar demasiado las superficies es indispensable bajar la temperatura.
Estante Tiempo de
cocción en
minutos
Tempe-
ratura
horno
• Pastas saladas
17 ES

TABLAS DE TIEMPOS DE COCCIÓN
Pintada Kg 1-1,3 2 60 ÷ 80 220 2 60 ÷ 70 200
• Aves, Conejo
Coloque la pintada en bandeja Pirex o
cerámica de borde alto condimentado con
aromas naturales y poquísimo aceite.
Pollo Kg 1,5-1,7 2 110 ÷ 120 220 2 100 ÷ 110 200
Como para la pintada.
Conejo troceado Kg 1-1,2 2 55 ÷ 65 220 2 50 ÷ 60 200
Trocear el conejo en partes iguales y
situarlas en la grasera esmaltada,
condimente con aromas naturales. Si fuera
necesario darle la vuelta.
• Dulces, Pasteles
Pastel cacao en bote scatola 1 55 180 1 50 160
En bandeja para pasteles Ø 22. Prec.
durante 10 min.
Pastel Margarita
en bote
scatola 1 55 175 1 40 ÷ 45 160
En bandeja para pasteles Ø 22. Prec.
durante 10 min.
Pastel de zanahorias
en bote
scatola 1 65 180 1 50 ÷ 60 160
En bandeja para pasteles Ø 22. Prec.
durante 10 min.
Torta crostata
albicocca
700 gr 1 40 200 2 30 ÷ 35 180
En bandeja para pasteles Ø 22. Prec.
durante 10 min.
• Verdura
Hinojos 800 gr 1 70 ÷ 80 220 1 60 ÷ 70 200
Colocar los hinojos cortados en 4 partes y
tapados en bandeja Pirex, con mantequilla
y sal y preferiblemente con la parte interna
hacia arriba.
Calabacín 800 gr 1 70 220 1 60 ÷ 70 200
Rabanar los calabacines y cocer en bandeja
Pirex, cubiertas con mantequilla y sal.
Patatas 800 gr 2 60 ÷ 65 220 2 60 ÷ 65 200
Cortar las patatas en partes iguales y
cocerlas cubiertas con aceite, sal y orégano
o romero en bandeja Pirex.
Zanahorias 800 gr 1 80 ÷ 85 220 1 70 ÷ 80 200
Cortar las zanahorias y cocerlas cubiertas
en bandeja Pirex.
• Fruta
Manzanas enteras Kg 1 1 45 ÷ 55 220 2 45 ÷ 55 200
Cocer la fruta en bandeja de Pirex o
cerámica no cubierta. Dejar enfriar en horno.
Como arriba.
Peras Kg 1 1 45 ÷ 55 220 2 45 ÷ 55 200
Como arriba.
Molocotones Kg 1 1 45 ÷ 55 220 2 45 ÷ 55 200
• Cocción al grill
La cocción al grill debe ser realizada colocando el alimento bajo el grill eléctrico a rayos infrarrojos. Atención: durante el funcionamiento
el grill está al rojo vivo. La grasera debe ser colocada bajo la rejilla para recoger las salsas.
Pan de molde
tostado
4 rebanadas
4 5 (5 precal.) grill 4 5 (10 precal.) grill
Introducir el pan de molde sobre la parrilla
soporte. Tras la 1a cocción dar la vuelta
hasta ultimar la cocción. Advertencia:
mantener el pan de molde en calinete en
el fondo del horno antes de servir.
Bikinis 4 3 10 (5 precal.) grill 3
5/8
(10 precal.)
grill
Introducir los bikins sobre la parrilla soporte
grasera; tras la 1a bruñidura dar la vuelta
al bikini hasta ultimar la bruñidera.
Salchichas n°6 / Kg 0,9 4
25/30
(5 precal.)
grill 4
15/20
(10 precal.)
grill
Cortar las salchichas por la mitad y
disponerlas sobre la parrilla, con la parte
interna hacia arriba. A mitad cocción dar la
vuelta a las salchichas hasta ultimar la
cocción. Advertencia: De vez en cuando
controlar visualmente la uniformidad de la
cocción. En caso de desuniformidad
intercambiar las cocidas con las menos
cocidas.
Costillas de buey n°4 / Kg 1,5 4
25
(5 precal.)
grill 4
15/20
(10 precal.)
grill
Disponer las piezas debajo de la acción
del grill grande y darles la vueltas dos veces.
Muslos de pollo n°4 / Kg 1,5 3
50/60
(5 precal.)
grill 3
50/60
(10 precal.)
grill
Condimente con aromas naturales y darles
la vuelta de vez en cuando.
Plato Cantidad Estante Tempe-
ratura
horno
Tiempo de
cocción en
minutos
Observaciones
Horno Eléctrico Estático Horno Eléctrico Ventilado
Estante Tiempo de
cocción en
minutos
Tempe-
ratura
horno
18 ES

Le agradecemos que haya elegido uno de nuestros productos. Para obtener de este
electrodoméstico las mejores prestaciones aconsejamos:
• Leer atentamente las advertencias contenidas en el presente manual.
• Conservar con cuidado este manual para cualquier consulta posterior.
Durante la primera puesta en funcionamiento del horno puede producirse un humo de olor acre causado por el primer calentamiento
del pegamento de los paneles de aislamiento que envuelven el horno. Se trata de un fenómeno absolutamente normal y, en caso de
verificarse, es preciso esperar a la extinción del humo antes de introducir los alimentos.
Por su naturaleza el horno es un aparato que se calienta, de modo particular el cristal de la puerta. Es aconsejable pues impedir que
los niños puedan acercarse al horno cuando se encuentre en funcionamiento, especialmente cuando está en márcha el grill.
Hay disponible un dispositivo suplementario de protección (sólo en los modelos predispuestos) a fin de reducir la temperatura de la
superficie frontal de la puerta del horno; este dispositivo debería ser montado en caso de presencia de niños pequeños. Este accesorio
puede obtererse a través de nuestro servicio de asistencia técnica.
INSTRUCCIONES GENERALES
DECLARACIÓN DE CONFORMIDAD.
• Este aparato, en las partes destinadas a estar en contacto
con los alimentos cumple la Directiva CEE 89/109.
Este aparato cumple las Directivas Europeas 89/336/CEE,
73/23/CEE y sucesivas modificationes.
INFORMACIÓN SOBRE SEGURIDAD
• Este aparato deberá destinarse únicamente al uso para el
cual ha sido especialmente concebido, es decir, para la cocción
de alimentos.
Cualquier otro uso (por ejemplo, calentamiento a temperatura
ambiente) debe considerarse impropio, y por lo tanto peligroso.
El fabricante declina toda responsabilidad por los posibles
daños causados por el uso impropio, erróneo e irracional del
aparato.
El uso de cualquier aparato eléctrico comporta la observación
de algunas reglas fundamentales. En particular:
— No tire del cable de alimentación para desenchufar el aparato.
— No toque el aparato con las manos o los pies húmedos o
mojados.
— No utilice el aparato si no lleva calzado.
— No deje que los niños o las personas incapacitadas usen el
aparato sin vigilancia.
— No utilice adaptadores, ladrones ni alargadores.
— En caso de avería o de mal funcionamiento del aparato,
apáguelo y no lo manipule.
En caso de deterioro del cable, sustitúyalo inmediatamente
con arreglo a las siguientes indicaciones:
— saque el cable de alimentación y sustitúyalo por uno (tipo
HO5RR-F, H05VV-F, H05V2V2-F) y adecuado a la potencia
del aparato.
— esta operación deberá realizarla un técnico especializado. El
hilo de tierra (amarillo-verde) debe ser obligatoriamente
10 mm más largo que los conductores de línea.
En caso de que el aparato precise ser reparado, diríjase
únicamente a un centro de asistencia técnica autorizado y
exija piezas de recambio originales.
No observar todo lo mencionado puede comprometer la
seguridad del aparato.
INSTALACIÓN
La instalación corre a cargo del comprador y el Fabricante queda
exento de este servicio; eventuales intervenciones requeridas a
la Casa Constructora que dependan de una instalación incorrenta
no están incluidas en la Garantia.
La instalación debe ser efectuada según las instrucciones por
personal profesionalmente cualificado. Una instalación errónea
puede causar daños a personas, animales o cosas, de los cuales
el fabricante no puede ser considerado responsable.
INTRODUCCIÓN DEL MUEBLE
Introduzca el aparato en el hueco del mueble (bajo encimera o
en columna). El horno se fija introduciendo 4 tornillos en los
agujeros del marco, visibles al abrir la puerta.
Con el objeto de permitir una mejor ventilación del mueble, empotre
el horno respetando las medidas y las distancias indicadas en la
última página.
Nota: Para los hornos que deban acoplarse a una encimera,
resulta indispensable respetar las instrucciones contenidas en el
manual adjunto al aparato a acoplar.
IMPORTANTE
Para garantizar un correcto funcionamiento del aparato encastrable,
es necesario que el mueble tenga las características adecuadas.
Los paneles de los muebles adyacentes al horno deberán ser de
un material resistente al calor. En el caso de los muebles de
madera chapada, el encolado deberá resistir una temperatura de
120 °C: los materiales plásticos o encolados que no resistan esta
temperatura pueden deformarse o despegarse.
De acuerdo con las normas de seguridad, una vez empotrado el
aparato no deben existir contactos con las piezas eléctricas. Todas
las piezas protectoras deben fijarse de manera que no puedan
sacarse sin la ayuda de un utensilio.
Para garantizar una buena ventilación debe eliminarse la
pared posterior del hueco, y el panel de apoyo debe tener
una apertura mínima de 45 mm.
CONEXIÓN ELÉCTRICA
Enchufe la clavija en una base provista de un tercer contacto
correspondiente a la toma de tierra, la cual deberá conectarse
correctamente.
En los modelos desprovistos de clavija, monte una clavija estándar
en el cable capaz de soportar la carga indicada en la placa de
características. El hilo de tierra es de color amarillo-verde. Esta
operación deberá realizarla un técnico especializado.
En caso de que la base y la clavija del aparato sean incompatibles,
haga que un técnico especializado le cambie la base por otra
adecuada.
También puede efectuar la conexión a la red intercalando entre
el aparato y la red un interruptor omnipolar con una distancia de
apertura de los contactos equivalente a 3 mm, preparado para la
carga y con arreglo a las normas vigentes. El hilo de tierra amarillo-
verde no debe quedar interrumpido por el interruptor.
La base o el interruptor omnipolar utilizados para la conexión
deben estar situados en un lugar fácilmente accesible y cerca del
electrodoméstico instalado.
Importante: en la fase de instalación, coloque el cable de
alimentación de manera que en ningún punto alcance una
temperatura superior a los 50 °C a temperatura ambiente.
El aparato cumple los requisitos de seguridad previstos por los
institutos normativos. Sólo se garantiza la seguridad eléctrica de
este aparato si ha sido conectado correctamente a una instalación
de toma de tierra eficaz, con arreglo a lo dispuesto en las normas
vigentes de seguridad eléctrica, (en caso de duda, exija un control
exhaustivo de la instalación por parte de un técnico especializado).
El fabricante declina toda responsabilidad por los posibles daños
causados por la falta de conexión a tierra de la instalación.
Importante: el fabricante queda exento de cualquier
responsabilidad por los posibles daños personales o materiales
causados por la falta de conexión a tierra.
ATENCIÓN: La tensión y frecuencia de alimentación están
indicadas en la tarjeta de matrícula (er la última página).
Compruebe que la capacidad eléctrica de la instalación de las
bases sean adecuadas para la potencia máxima del aparato,
indicada en la placa de características. En caso de duda, diríjase
a un técnico cualificado.
13 ES
La pagina si sta caricando...
La pagina si sta caricando...
La pagina si sta caricando...
La pagina si sta caricando...
La pagina si sta caricando...
La pagina si sta caricando...
La pagina si sta caricando...
La pagina si sta caricando...
La pagina si sta caricando...
La pagina si sta caricando...
La pagina si sta caricando...
La pagina si sta caricando...
La pagina si sta caricando...
La pagina si sta caricando...
La pagina si sta caricando...
La pagina si sta caricando...
La pagina si sta caricando...
La pagina si sta caricando...
La pagina si sta caricando...
La pagina si sta caricando...
La pagina si sta caricando...
La pagina si sta caricando...
La pagina si sta caricando...
La pagina si sta caricando...
La pagina si sta caricando...
-
 1
1
-
 2
2
-
 3
3
-
 4
4
-
 5
5
-
 6
6
-
 7
7
-
 8
8
-
 9
9
-
 10
10
-
 11
11
-
 12
12
-
 13
13
-
 14
14
-
 15
15
-
 16
16
-
 17
17
-
 18
18
-
 19
19
-
 20
20
-
 21
21
-
 22
22
-
 23
23
-
 24
24
-
 25
25
-
 26
26
-
 27
27
-
 28
28
-
 29
29
-
 30
30
-
 31
31
-
 32
32
-
 33
33
-
 34
34
-
 35
35
-
 36
36
-
 37
37
-
 38
38
-
 39
39
-
 40
40
-
 41
41
-
 42
42
-
 43
43
-
 44
44
-
 45
45


