Mediacom Smartpad Quick User Manual
- Categoria
- Compresse
- Tipo
- Quick User Manual

SMARTPAD
Quick User Guide

Language contents:
English
Russian
French
German
Greek
Italian
Portuguese
Romanian
Spanish

12
10
3
8
11
1
7
9
56
8
3
4
2
11
10
Picture 1
Picture 2
Picture 3
1
6
2 5 7
4
9
7

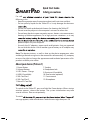
Quick Start Guide
Safety precautions
For safe
following rules:
Keep the computer away from extreme heat, cold, moisture and dust.•
Do not spill any liquids on the Tablet PC as it may damage the device or •
Do not use liquids and chemical cleaners for cleaning the Tablet PC.•
Do not insert any objects in the computer's air vents or other slots.•
Do not keep the device near magnetic sources, heaters, microwave ovens, •
heating up kitchen appliances, or in high pressure containers, as it may
•
perform repairs on your computer.
Use only the AC adapters, power cords and batteries that are approved •
for use with this device. Use of another type of battery or AC adapter may
Note: The device pictures, as well as data on the device appearance, color
and design features are given in the manual for reference only. 3Q company
reserves the right to change the appearance and technical parameters of its
products without prior notice.
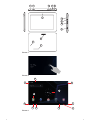
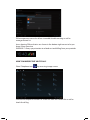
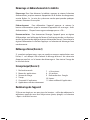
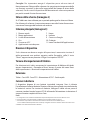
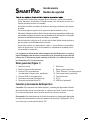
About your device (Picture 1)
Swit
To switch on the Tablet PC, press and hold the Power button. When startup
window appears, release the button. The system initialization may take
several minutes. Please wait patiently.
SMARTPAD
To switch
message appears, release the button. Touch the message, then press OK.
1. Power Button
2. Volume Bottons
3. USB / Power - Charge
4. HDMI (if available)
5. SIM Card Slot 1
6. SIM Card Slot 2
7. Micro-SD Card Slot
7. Speaker
8. Headphone Jack
9. Reset port (if available)
10. Rear camera (optional)
11. Front camera
12. Microphone

Recommendation: To save the battery charge, the device is set to sleep mode:
the screen is locked and sensor functions become inactive (in accordance
with the settings of screen lock time). To “wake up” the device, short press
the power button.
Unlocking the screen (Рicture 2)
If you do not use the screen during certain period of time, the screen will be locked.
To unlock the screen, press the power button once and drag “Lock” image right.
Main screen (Рicture 3)
Voice search 1.
Application menu2.
Battery charge indicator3.
.4 emiT
Connected to PC 5.
Recently used applications6.
.7 emoH
.8 kcaB
Google search9.
.01 kcolC
Standard application button11.
Restarting the device
If the screen does not response to key press or tap, press the reset button (located in
the hole) using any thin object (paper clip, pin, etc.) to restart your Tablet PC or keep
power button for long time
Factory reset
To delete all data and restore your Tablet PC to factory defaults, touch Settings >
> Recovery and reset; touch menu item Reset > Reset to factory defaults.
Contents
Tablet, USB Cable, OTG Cable, Power adapter AC / DC, Quick Guide
Charging the battery
Device is provided with built in rechargeable battery There is no need of supplemental
batteries. Important: The battery must be charged for at least 5 hours before using it
for the rst time. When related Icon or warning message alerts you please charge the
battery using proper adapter (do not use dierent adapter from original one).

Wireless networks
Prior to starting an Internet-application, activate Wi-Fi connection and set
up Wi-Fi network.
Touch the icon “Applications” > "Settings” > “Wireless connections”.1.
Select Wi-Fi item and set the switch to On position.
The device will automatically start searching for available networks 2.
and will display them on the right panel.
Select any network from the list and press “Connect”. If the network 3.
you selected is protected by WEP-protocol, type the security key, then
pr
ess “Connect” button.
When the connection is successfully created, “Connected to” (Network
name) message will appear on the screen.
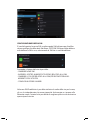
3G networks (Optional)
NOTE: If your device does not connect to your 3G provider’s network
Contact your 3G provider to obtain the connection parameters.1.
On your device, tap the Menu icon, then settings.2.
Select Wireless & networks > Mobile networks > Select your operator.3.
In Access Point Names, select the correct access point name and enter the
exact connection parameters.
Bluetooth (Optional)
Tap "Settings" > Select "Wireless connections/Bluetooth" > Tap "On" to
switch on the Bluetooth function. The device will automatically search for
available Bluetooth device.
Select the Bluetooth device and start data transmission.

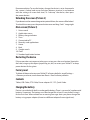
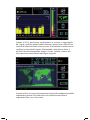
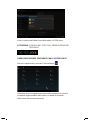
GPS Function
GPS Navigation
To start GPS (Global Positioning System) system you can tap on the proper GPS
icon on quick widget bar
You can also select GPS by accessing settings menu Location services
GPS satellites and tap to ag selection.
Map of the third parties is required for MID internal GPS satellite signal receiver
positioning, afterinstallation the device can accurately implement trac
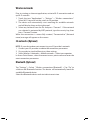
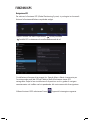
To test GPS tap on
real-time navigation, meet the needs of outdoor navigation.
icon, enter into below picture

When positioning successfully, you’ll see some bars lighting showing satellite
connections. The value indicates the signal strength.
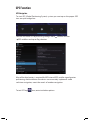
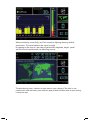
By tapping on the map it is possible to get latitude, longitude, height, speed,
and the time of your location (see following picture)
The positioning time is relavant to time zone in your setting, if the time is not
inconsistent with real time in your location, please check the time zone in your setting
is correct or not.

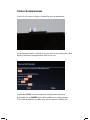
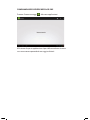
Insert Sim card(s) in the available slot(s) on top side and close the cover
(refer to below picture).
When powering on tablet, following screen will appear and you might
be prompted to key in with PIN (if stored) to access to SIM settings.
You can change SIM setting or accept current ones by tapping Close.
If you wish to modify settings please select Change to enable/disable/manage
Voice Call, Video Call, SMS and Data conneon.
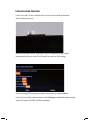
Communication Functions

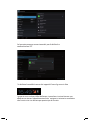
To modify tap on the selection you wish to change. For example: tap on
Data connection to disable 3G connection and conrm with O as follow.
When both Voice call and Data connection are enabled following 3G icon will
appear as follow conrming you are under 3G line coverage.
This means you are allowed to make voice call, send/receive SMS,
place/receive video call as well as surf the net (please make sure your SIM
card is allowed to support all those task services)

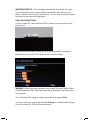
IMPORTANT NOTICE : after loosing connection due to poor/low 3G signal
system should reconnect automatically to the network but sometime this
doesn’t happen because of cells redundancy. You just need to power o tablet
and restart to get signal coverage again.
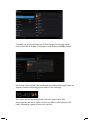
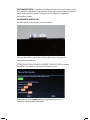
DUAL SIM CONNECTIONS
Turn your tablet OFF and insert both SIMs as shown in picture and close the
plastic cover
When powering on tablet, following screen will appear and you might be
prompted to key in with PIN (if stored) to access to SIM settings.
WARNING ! Roaming will be required for the second SIM card if both of them
are Data connection SIM. Please pay attention to related cost and billing from
your provider.
You can change SIM setting or accept current ones by tapping Close.
If you wish to modify settings please select Change to enable/disable/manage
Voice Call, Video Call, SMS and Data connection.

DUAL SIM SETTINGS
Select Settings SIM Management to select your preference about Voice call and
Data connections. You can also enable/disable current SIMs by agging the one
you want to disable enable/disable
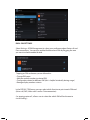
Tapping on SIM card name you are allowed to :
- Change SIM name
- Add your mobile number to related SIM
- Change color related to dierent SIM (this is helpful to identify during usage)
- Manage display numbers criteria
In the DEFAULT SIM menu you can select which function to pair to each SIM card
(Voice call, SMS, Video calla s well as Data connection)
(i.e. tapping voice call, allows user to select the which SIM will be the one to
use for calling.)

SIM management menu also allows to enable/disable roaming as well as
manage contact list
Icons showing SIM card status are shown in the bottom right corner to let you
know if they are active.
WARNING ! : Always pay attention to related cost and billing from your provider.
HOW TO MAKE/RECEIVE VOICE CALLS
Select Telephone icon by accessing to apps menu.
You can dial telephone numbers or select one from the contact list as well as
check for call log.

HOW TO SEND/RECEIVE SMS
Select SMS icon from apps menu
Within this app you can send/receive messages as well as search for
old messages.

Кнопка включения. 1.
Клавиша регулирования 2.
громкости
Разъем USB- подключение 3.
компьютера либо
периферийных устройств
Разъем HDMI4.
Разъем для SIM карты.5.
Разъем для карты Micro-SD 6.
Динамики 7.
Разъем для наушников8.
Отверстие «Сброс» 9.
Камера тыловая 10.
Камера фронтальная11.
Разъем подключения 12.
адаптера питания
Краткое руководство пользователя
Меры предосторожности
В целях безопасной и эффективной эксплуатации планшета соблюдайте
несколько правил:
Берегите компьютер от воздействия экстремальных температур, •
вла
ги и пыли
Не проливайте на планшет никаких жидкостей − это может привести •
к его поломке или к пожару
Не используйте жидкости и химические чистящие средства для •
чистки планшета
Не вставляйте в вентиляционные и другие отверстия устройства •
посторонние предметы
Не храните устройство рядом с источниками магнитного поля, •
обогревателями, микроволновыми печами, нагревающимся
кухонным оборудованием, или в контейнерах с высоким давлением –
устройство может перегреться и вызвать возгорание
Не разбирайте планшет самостоятельно. Техническое обслуживание •
устройства должность осуществляться квалифицированным специалистом.
Используйте только адаптеры, кабели питания и аккумуляторы, •
разрешенные к применению совместно с данным устройством.
Использование аккумулятора или адаптера неподходящего типа
может привести к возгоранию или взрыву.
Приведенные в настоящем руководстве иллюстрации и сведения
о внешнем виде, цвете и конструктивных особенностях устройства
носят исключительно справочный характер. Дизайн и технические
характеристики продуктов 3Q могут быть изменены без уведомления.
Обзор устройства (Рисунок 1)

Включение и выключение устройства
Включение. Чтобы включить планшет, нажмите и удерживайте клавишу
питания, пока не появится окно загрузки, затем отпустите. Запуск
системы может занять несколько минут. Пожалуйста, подождите.
Выключение. Для выключения устройства нажмите и удерживайте
клавишу питания, пока не появится сообщение «Отключение питания».
Коснитесь сообщения, затем нажмите «ОК».
Рекомендация. Для экономии энергии устройство переходит в спящий
режим с блокировкой экрана и временным отключением его сенсорных
функций (в зависимости от настроек времени ожидания экрана).
Для вывода устройства из спящего режима следует кратковременно
нажать кнопку включения.
Разблокировка экрана (Рисунок 2)
Если вы какое-то время не происходит никаких манипуляций с экраном,
он блокируется. Для снятия блокировки экрана, необходимо один раз
нажать кнопку включения и перетащить изображение замка вправо.
6
Главный экран (Рисунок 3)
Голосовой поиск1.
Меню приложений2.
Уровень заряда3.
Время4.
Подключен к ПК5.
Недавно использовавшиеся 6.
приложения
«Домой»7.
«Назад»8.
Поиск в Google9.
Часы10.
Стандартная иконка 11.
приложения
Перезагрузка устройства
Ес ли экран не реагирует на нажатия, перезагрузите планшет, нажав любым
тонким предметом (скрепкой, булавкой) расположенную в углублении
клавишу «Сброс».

Возврат заводских настроек
Для уничтожения всех данных и восстановления заводских настроек
планшета, коснитесь Настройки > Восстановление и сброс; коснитесь
пункта меню Сброс настроек > Сбросить настройки планшета.
Беспроводные сети
Перед запуском интернет- приложения, активируйте Wi-Fi соединение
и настройте Wi-Fi сеть.
Коснитесь иконки «Приложения» > «Настройки» > «Беспроводные 1.
подключения». Выберите пункт Wi-Fi и передвиньте переключатель
в положение «Включить».
Устройство автоматически включит поиск доступных сетей и 2.
отобразит их в правой панели.
Выберите сеть для подключения из списка и нажмите «Соединить». 3.
Если выбранная сеть защищена WEP- протоколом, введите ключ
безопасности, затем нажмите «Подключиться». В случае успешного
подключения на экране появится сообщения Подключен к… (Имя сети)
3G сети (Опционально)
Сигнал 3G активен только в случае нахождения в зоне доступа 3G, EDGE сетей.
Выключите устройство > Вставьте SIM карту в разъем > Включите устройство
> При необходимости введите PIN код вашей SIM карты. Устройство
подключится к вашему провайдеру связи.
В случае отсутствия связи, свяжитесь с провайдером связи и запросите
параметры соединения. Далее в Настройках выберите «Беспроводные
соединения» > «Параметры мобильной сети» > «Операторы сети».
Выберите вашего оператора связи. Выберите название точки доступа и
введите точные параметры связи.
Bluetooth (Опционально)
Коснитесь иконки «Настройки» > Выберите «Беспроводные сети/
Bluetooth» > Прикоснитесь к иконке “Включить». Устройство автоматически
подключит все доступные в радиусе зоны действия Bluetooth устройства.
Выберите одно из предложенных устройств и начните передачу данных.
9

Manuel d’usager
Mesures de sécurité
respecter certaines règles:
•
l’humidité et la poussière
Ne versez pas sur la tablette des liquides quelconques – cela pourrait la •
mettre hors de service ou provoquer un incendie
N’utilisez pas des liquides et des nettoyants chimiques pour •
le nettoyage de la tablette
Ne mettez pas des objets étrangers dans des bouches de ventilation ou •
Ne laissez pas l’appareil auprès de sources du champ magnétique, •
Ne triez pas la tablette par vous-même. Le service technique de •
N’utilisez que les adaptateurs, câbles d’alimentation et batteries •
autorisées et compatibles avec cet appareil.
L’usage de la batterie ou de l’adaptateur qui ne convient pas peut •
tnos sevitcurtsnoc sétiralucitrap te rueluoc ,rueirétxe tcepsa’l à evitaler
exclusivement de nature usuelle. Le design et les caractéristiques des
Revue d’appareil (Dessin 1)
Poussoir de démarrage 1.
Bouton de réglage de volume 2.
Prise USB-raccord de l’ordinateur 3.
ou des unités périphériques
Prise HDMI4.
Prise pour la carte SIM 5.
Prise pour la carte Micro-SD 6.
Haut-parleurs7.
Prise pour écouteurs 8.
9.
Cellule arrière 10.
Cellule frontale 11.
.21 ni-CD
SMARTPAD

Démarrage et débranchement de la tablette
Démarrage. Pour faire démarrer la tablette, appuyez et retenez le bouton
d’alimentation, jusqu’au moment d’apparition de la fenêtre de chargement,
ensuite lâchez –le. La mise du système en marche peut prendre quelques
minutes. Patientez s’il vous plait.
Débranchement. Pour débrancher l’appareil appuyez et retenez le
bouton d’alimentation jusqu’au moment d’apparition du message « Arrêt
d’alimentation ». Cliquez le message, ensuite appuyez sur « OK ».
Recommandation. Pour économiser l’énergie, l’appareil passe au régime
d’hibernation avec le blocage de l’écran et l’arrêt provisoire des ses fonctions
tactiles (en fonction du réglage du temps d’attente de l’écran). Pour enlever le
régime d’hibernation il convient d’appuyer sur le bouton de démrrage d’une
manière courte.
Déblocage d’écran (Dessin 2)
Si pendant quelque temps vous ne produisez aucune manipulation avec
l’écran, il sera bloqué. An d’enlever le blocage d’écran il est nécessaire
d’appuyer une fois sur le bouton de démarrage et faire trainer l’image de
la serrure à droite.
Ecran principal (Dessin 3):
Recherche vocale 1.
Menu des applications 2.
Niveau de charge 3.
Temps4.
Connecté à l’ordinateur 5.
Applications utilisées récemment6.
«A la maison»7.
«En arrière»8.
Recherche dans Google9.
Heures 10.
Icône uniée de l’application 11.
Redémarrage de l’appareil
Si l’écran ne réagit pas aux pressions des boutons, veillez de redémarrer la
tablette en appuyant avec tout l’objet mince (pince, épingle) sur le bouton
« Rejet » situé dans le creux.

Restitution des réglages d’usine
Pour éliminer toutes les données et restituer les réglages d’usine, cliquez
Réglages> Rétablissement et rejet; cliquez le point du menu Rejet des
réglages> Rejeter les réglages de la tablette.
Réseaux Wi-Fi
Avant de faire démarrer les applications d’Internet, veillez d’activer la connex-
1.
L’appareil fera automatiquement la recherche des réseaux accessibles et 2.
Choisissez sur la liste apparue un réseau pour s’y brancher et cliquez 3.
« Connecter ». Si le réseau choisi est protégé par le protocole – WEP,
introduisez la clé de sécurité, en cliquant par la suite sur « Connecter ».
Dans le cas de la bonne connexion vous verrez sur l’écran un message
«Connecté à …… (Nom du réseau)
Réseaux 3G (Option)
Le signal 3G n’est actif que dans la zone d’accès des réseaux 3G, EDGE.
Débranchez l’appareil > Mettez la carte SIM dans la prise > Démarrez l’appareil
> Dans le cas de nécessité introduisez le code PIN de votre carte SIM. L’appareil
sera connecté avec votre provider de communication.
Si la communication n’est pas établie, contactez votre provider pour le demand-
er les paramètres de connexion. Ensuite, dans les Réglages choisissez « Connec-
» > «Paramètres du réseau mobile > «Оopérateurs du réseau». Choisis-
sez votre opérateur de communication. Choisissez le nom du point d’accès et
introduisez les paramètres exacts de la communication.
Bluetooth (Оpiton)
Touchez l’icône «Réglages» > Choisissez «Réseaux Wi-Fi/Bluetooth» > Touchez
l’icône « Démarrer ». L’appareil branchera automatiquement toutes les unités
de Bluetooth disponibles dans le rayon de la zone d’action. Choisissez l’une
des unités proposées et procédez à la transmission des données.
La pagina si sta caricando...
La pagina si sta caricando...
La pagina si sta caricando...
La pagina si sta caricando...
La pagina si sta caricando...
La pagina si sta caricando...
La pagina si sta caricando...
La pagina si sta caricando...
La pagina si sta caricando...
La pagina si sta caricando...
La pagina si sta caricando...
La pagina si sta caricando...
La pagina si sta caricando...
La pagina si sta caricando...
La pagina si sta caricando...
La pagina si sta caricando...
La pagina si sta caricando...
La pagina si sta caricando...
La pagina si sta caricando...
La pagina si sta caricando...
La pagina si sta caricando...
La pagina si sta caricando...
La pagina si sta caricando...
La pagina si sta caricando...
La pagina si sta caricando...
La pagina si sta caricando...
La pagina si sta caricando...
La pagina si sta caricando...
-
 1
1
-
 2
2
-
 3
3
-
 4
4
-
 5
5
-
 6
6
-
 7
7
-
 8
8
-
 9
9
-
 10
10
-
 11
11
-
 12
12
-
 13
13
-
 14
14
-
 15
15
-
 16
16
-
 17
17
-
 18
18
-
 19
19
-
 20
20
-
 21
21
-
 22
22
-
 23
23
-
 24
24
-
 25
25
-
 26
26
-
 27
27
-
 28
28
-
 29
29
-
 30
30
-
 31
31
-
 32
32
-
 33
33
-
 34
34
-
 35
35
-
 36
36
-
 37
37
-
 38
38
-
 39
39
-
 40
40
-
 41
41
-
 42
42
-
 43
43
-
 44
44
-
 45
45
-
 46
46
-
 47
47
-
 48
48


Mediacom Smartpad Quick User Manual
- Categoria
- Compresse
- Tipo
- Quick User Manual
in altre lingue
- English: Mediacom Smartpad
- français: Mediacom Smartpad
- español: Mediacom Smartpad
- Deutsch: Mediacom Smartpad
- русский: Mediacom Smartpad
- português: Mediacom Smartpad
- română: Mediacom Smartpad
Altri documenti
-
Prestigio PMP Series User MultiPad 4 Quantum 7.85 3G - PMP5785C3G QUAD Manuale del proprietario
-
Archos Xenon Series User 101 Xenon Manuale utente
-
Archos 101 Xenon Manuale utente
-
Archos Xenon Series User 502711 Manuale utente
-
Archos 80 Helium - 4G Manuale utente
-
-
-
Archos Xenon Series User 70b Xenon Manuale utente
-