Lindy HDMI 2.0 18G Audio Extractor & Embedder Manuale utente
- Categoria
- Video splitter
- Tipo
- Manuale utente

© LINDY Group - FIRST EDITION (NOVEMBER 2016)
HDMI 2.0a 4K Audio Extractor/Embedder
User Manual English
Benutzerhandbuch Deutsch
Manuel Utilisateur Français
Manuale Italiano
No. 38168
www.lindy.com
Tested to Comply with
FCC Standards
For Home and Office Use!

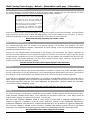
Multi Country Power Supply – Netzteil – Alimentation multi-pays – Alimentatore
ENGLISH – Security Remarks
For safety purposes you must not rebuild or modify the power supply. Improper use can cause hazards, for which
we assume no liability. Read this manual carefully and retain it for future reference.
Insert the required country plug into the adapter. The plugs are keyed to avoid incorrect insertion. Push the adapter
firmly towards the housing, push it down and allow the latch on the power supply to click into place. To remove,
slide the locking button to the back. Make sure the plug is locked firmly in place before use.
Never insert the plug separately into a mains socket!
DEUTSCH – Sicherheitshinweise
Aus Sicherheitsgründen darf das Netzteil nicht geöffnet werden. Für Schäden und Gefahren, die durch
unsachgemäße Handhabung entstehen, übernehmen wir keine Haftung. Lesen Sie diese Bedienungsanleitung
sorgfältig und bewahren Sie sie auf.
Stecken Sie den entsprechenden Länderadapter in das Netzteil. Die Konstruktion der Adapter verhindert ein
falsches Einsetzen. Drücken Sie den Adapter fest gegen das Gehäuse und achten Sie darauf, dass der Riegel
korrekt einrastet. Vergewissern Sie sich vor Inbetriebnahme, dass der Adapter fest im Netzteil sitzt. Wenn Sie den
Adapter wieder vom Netzteil abnehmen und durch einen anderen ersetzen wollen, ziehen Sie den Riegel nach
hinten und entnehmen Sie den Stecker-Adapter.
Stecken Sie niemals einen Länderadapter separat in eine Steckdose!
FRANÇAIS
Pour des raisons de sécurité, vous ne devez pas réparer ou modifier ce produit. Si le produit est utilisé à d’autres
fins que celles décrites, il peut être endommagé. Une mauvaise utilisation peut entraîner des risques, pour lesquels
nous déclinons toute responsabilité. Lisez attentivement ces et conservez-les dans un endroit approprié.
Connectez le bon adaptateur dans l’alimentation. La conception de l’adaptateur empêche une mauvaise mise en
place. Poussez l’adaptateur dans son logement jusqu’au blocage. Assurez-vous de la bonne mise en place dans
l’alimentation avant de le brancher. Pour retirer l’adaptateur de l’alimentation, poussez le bouton de verrouillage
vers l’arrière et retirez l’adaptateur secteur.
Ne jamais connecter un adaptateur secteur seul dans une prise de courant !
ITALIANO
Per motivi di sicurezza non smontate o modificate questo prodotto. Se viene utilizzato per altre applicazioni oltre a
quelle descritte, potrebbe subire danni. L’uso improprio può provocare pericoli per i quali siamo esenti da
responsabilità. Leggete con attenzione le istruzioni e conservatele.
Per prima cosa scegliete l’adattatore adatto al vostro paese fra quelli forniti e installatelo nell’alimentatore. Il
sistema di aggancio è studiato in modo da evitare inserimenti scorretti. Tenete saldamente l’alimentatore,
posizionate l’adattatore nella sua sede e ruotatelo facendo attenzione che gli attacchi si aggancino saldamente.
Per rimuovere l’adattatore premete il tasto di rilascio e ruotatelo nella direzione opposta. Prima di ogni utilizzo
assicuratevi che l’adattatore sia sempre agganciato saldamente all’alimentare prima di inserirlo nella presa.
Non inserite mai solo la spina nella presa di corrente!
EN: Make sure the plug is locked firmly before
use.
DE: Stellen Sie sicher, dass der Adapter fest
eingerastet ist bevor Sie das Netzteil verwenden
FR: Assurez-vous du bon verrouillage de la prise
avant toute utilisation de l’alimentation.
IT: Assicuratevi che l’adattatore sia inserito
fermamente nell’alimentatore prima di collegarlo
alla presa

User Manual English
Introduction
Thank you for purchasing the LINDY HDMI 2.0a 4K Audio Extractor & Embedder. This product has been
designed to provide trouble free, reliable operation. It benefits from both a LINDY 2 year warranty and
free lifetime technical support. To ensure correct use, please read this manual carefully and retain it for
future reference.
The LINDY HDMI 2.0 4K Audio Extractor & Embedder performs a number of useful functions to help you
overcome the challenges of installing AV equipment and is designed to be used in both domestic and
commercial installations. Setting the Extractor Embedder up is quick and easy thanks to its simple to
operate dip switch configuration, whilst its integrated mounting ears make it simple to fix in to position.
Package Contents
HDMI 2.0a 4K Audio Extractor & Embedder
5V DC power supply
This manual
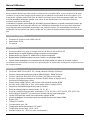
Features
HDMI 2.0a compliant, supports Ultra HD 4K 60Hz 4:4:4 and HDR 4:2:0
Extract audio from HDMI signals in digital or analogue* format
Extract audio from a TV’s HDMI ARC signal in digital format
HDMI audio pass-through allows audio to be sent to a HDMI display
Embed analogue or digital audio in to a HDMI signal in place of the original soundtrack
*Only LPCM audio can be converted to an analogue signal, Dolby and DTS signals can only be output by the digital interface
Specification
HDMI 2.0a & HDCP 2.2 Compliant – Bandwidth: 594MHz (18Gbps)
Supports resolutions up to 4096x2160p60, including 1080p 3D
Supports 4K 60Hz HDR 4:2:0 @ 10bpc / 4K 60Hz 4:4:4 @ 8bpc
Supports 8/10/12/16bpc colour depths depending on resolution/colour sampling
Input ports: HDMI Type A, 3.5mm stereo audio & Optical SPDIF
Output ports: HDMI type A, 3.5mm stereo audio & Optical SPDIF
Audio Sample Frequency: Up to 192 kHz
Supports up to 8 audio channels: 2.0, 5.1 & 7.1 channels are supported
Supported Digital Audio formats: LPCM, DD, DD+, DD True-HD, DTS & DTS-HD
Dolby Digital and DTS Audio cannot be decoded to analogue audio
ARC Audio may be extracted via Optical SPDIF
Analogue or Digital Audio may be inserted in place of HDMI audio
CEC pass-through
Chipset: EP91A6SX
Max Power Consumption: 3W
Operating Temperature: 0˚C to 40˚C
Storage Temperature: -20˚C - 60˚C
Operating relative humidity: 20 - 90% RH (non-condensing)

User Manual English
Overview
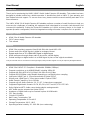
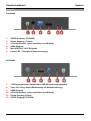
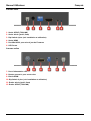
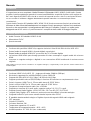
Front Panel
1. S/PDIF output (TOSLINK)
2. Stereo output (3.5mm)
3. 4-Pin Dip Switch (Please refer to Installation and Operation)
4. HDMI output
5. Mini-USB port: for F/W update
6. Power LED indicator
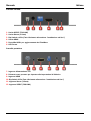
Rear Panel
7. +5V power
8. Push button: for factory reset
9. HDMI input
10. 2-Pin Dip Switch (Please refer to Installation and operation)
11. Stereo input (3.5mm)
12. S/PDIF input (TOSLINK)

User Manual English
Installation and operation
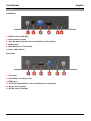
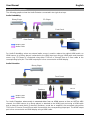
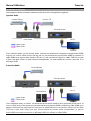
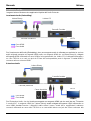
The following graphics show the Audio Extractor connected in two typical set ups:
Audio Embedding
For Audio Embedding, where an external audio source is used to replace the original HDMI audio, an
HDMI source (e.g. Bluray player) is attached to the HDMI input port using a HDMI cable and the audio
source (e.g. CD player) is connected using either TOSLink or Phono/3.5mm to 3.5mm cable to the
corresponding input port. The HDMI output port is then connected to a HDMI display.
Audio Extraction
For Audio Extraction, where audio is extracted either from an HDMI source or from an HDTV’s ARC
channel, the HDMI source (e.g. Bluray player) is attached to the HDMI input port using a HDMI cable
and an external sound device or devices (speakers, sound bar or amplifier) are connected using either
TOSLink or 3.5mm to Phono/3.5mm cable connected to the corresponding output port. The HDMI output
port is then connected to an HDMI display using a HDMI cable.
Bluray Player
CD Player
HDTV
HDMI Cable
Audio Cable
HDMI Cable
Audio Cable
HDTV
Speakers
Bluray Player
Rear Panel
Rear Panel
Front Panel
Front Panel

User Manual English
Installation is simple, make sure that all devices are powered off and then connect the cables as shown
in the example installations according to your requirement. Now connect the provided power supply and
power on all devices, the power led on the front panel will illuminate.
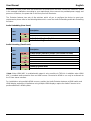
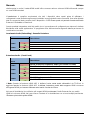
The Extractor features two sets of dip switches which all you to configure the device to meet your
requirements please refer to the following tables which cover the Audio Embedding and Audio Extracting
functions:
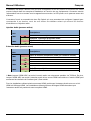
Audio Embedding (Rear Panel)
Audio Extracting (Front Panel)
* Note: When HDMI ARC is enabled audio output is only possible via TOSLink. In addition when HDMI
ARC is enabled audio extraction from an HDMI source connected to HDMI In can only be achieved via
the 3.5mm stereo interface.
For installations using multiple HDMI sources, position the Audio Extractor between a HDMI switch and
HDMI display equipment. Installations using multiple HDMI displays require the Audio Extractor to be
positioned before a HDMI splitter.
DIP Switch Position
Description
2-Pin
PIN#1
ON []
Enable Audio Embedder Function
OFF []
Disable Audio Embedder Function
PIN#2
ON []
Audio Embedding from Toslink
OFF []
Audio Embedding from 3.5mm
DIP Switch Position
Description
4-Pin
PIN#1
ON []
Enable Audio Extractor Function (via Toslink & 3.5mm)
OFF []
Disable Audio Extractor Function
PIN#2
ON []
Enable ARC Function *See Note
OFF []
Disable ARC Function
PIN#3
ON []
No Function
OFF []
No Function
PIN#4
ON []
Firmware Update Mode
OFF []
Normal Mode

Benutzerhandbuch Deutsch
Einführung
Wir freuen uns, dass Ihre Wahl auf ein LINDY-Produkt gefallen ist und danken Ihnen für Ihr Vertrauen.
Sie können sich jederzeit auf unsere Produkte und einen guten Service verlassen. Dieser HDMI Audio
Extractor unterliegt einer 2-Jahres LINDY Herstellergarantie und lebenslangem kostenlosen technischen
Support. Bitte lesen Sie diese Anleitung sorgfältig und bewahren Sie sie auf.
Der HDMI 2.0 4 K Audio Extractor & Embedder stellt eine Reihe von nützlichen Funktionen zur
Verfügung um die Herausforderungen der Installation von HDMI- und Sound-Geräten sowohl in Home
als auch im kommerziellen Installationen zu meistern. Der Extraktor Embedder ist schnell eingerichtete
und dank seiner einfachen Bedienung und Dip Switch-Konfiguration schnell konfiguriert. Mit seinen
integrierten Montagewinkeln kann er einfach montiert werden.
Lieferumfang
HDMI 2.0a 4K Audio Extractor & Embedder
Steckernetzteil 100…240VAC / 5VDC mit 4 Wechselsteckern für Euro, UK, US und AUS
Dieses Handbuch
Eigenschaften
HDMI 2.0a kompatibel, unterstützt Ultra HD 4K 60Hz 4:4:4 und HDR 4:2:0
Extrahiert Audio aus einem HDMI-Signal in digitaler oder analoger* Form
Extrahiert Audio aus dem HDMI ARC-Signal eines TV- oder ähnlichen Gerätes
HDMI Audio pass-through erlaubt den Verbleib des Audiosignals auch im HDMI-Signal
Einbettung eines analogen oder digitalen Audiosignals im HDMI Ausgabesignal als Ersatz für das
Audiosignal im HDMI Eingangssignal
*Ausschließlich LPCM Audio kann in analoges Audio gewandelt und ausgegeben werden, Dolby und DTS Signale können nur
digital ausgegeben werden!
Spezifikation
HDMI 2.0a & HDCP 2.2 kompatibel – Bandbreite: 594MHz (18GBit/s., volle HDMI 2.0 Bandbreite)
Unterstützt Auflösungen bis 4096x2160p60, einschließlich 1080p 3D
Unterstützt 4K 60Hz HDR 4:2:0 @ 10bpc / 4K 60Hz 4:4:4 @ 8bpc
Unterstützt 8/10/12/16 Bit Farbtiefe, abhängig von der Auflösung und vom Format
Eingänge: HDMI Typ A, 3.5mm Stereo Audio Buchse, Optisches SPDIF (Toslink)
Ausgänge: HDMI Typ A, 3.5mm Stereo Audio Buchse, Optisches SPDIF (Toslink)
Audio-Bitrate: bis 192 kHz
Unterstützt bis zu 8 Audiokanälen: 2.0, 5.1 & 7.1
Unterstützte digitale Audioformate: LPCM, DD, DD+, DD True-HD, DTS & DTS-HD
Dolby Digital und DTS Audio können nicht zu analogem Audio dekodiert werden
ARC Audio kann über den optischen SPDIF-Ausgang ausgegeben werden
Analoges oder digitales Audio kann in das HDMI Ausgabesignal als Ersatz für das Audiosignal im
HDMI Eingangssignal eingebettet werden
CEC pass-through – Weitergabe von Fernbedienungssignalen im HDMI Signal
Chipset: EP91A6SX
Maximale Leistungsaufnahme: 3W
Betriebstemperaturbereich: 0˚C … 40˚C
Lagertemperaturbereich: -20˚C … 60˚C
Luftfeuchtigkeitsbereich: 20 … 90% RH (nicht-kondensierend)

Benutzerhandbuch Deutsch
Übersicht
Frontseite
1. S/PDIF Ausgang (TOSLINK)
2. Stereo Ausgang (3.5mm)
3. 4-Pin Dip-Schalter (siehe Installation und Betrieb)
4. HDMI Ausgang
5. Mini-USB Port - für F/W Update
6. Power LED – Anzeige für Stromversorgung
Rückseite
7. +5V Eingangsbuchse (Netzteil oder USB Stromversorgungskabel)
8. Taste für Factory Reset (Rücksetzung auf Werkseinstellung)
9. HDMI Eingang
10. 2-Pin Dip-Schalter (siehe Installation und Betrieb)
11. Stereo Eingang (3.5mm)
12. S/PDIF Eingang (TOSLINK)

Benutzerhandbuch Deutsch
Installation und Betrieb
Die folgenden Grafiken zeigen den Audio Extractor in zwei typischen Konfigurationen:
Audio Embedding / Einbettung
Für die Audio-Einbettung, wobei eine externe Audioquelle verwendet wird um das Audio im originalen
HDMI-Audio-Eingangssignal zu ersetzen, wird eine HDMI-Quelle (z.B. Blu-Ray-Player) an den HDMI-
Eingang angeschlossen und die Audioquelle (z.B. CD-Player) mit dem Toslink oder Stereo/3,5 mm
Eingangsport verbunden. Das HDMI-Ausgangssignal enthält dann das ersetzte Audiosignal.
Audio Extraction / Extrahierung
Für die Audio-Extraktion, wobei Audio aus einem HDMI-Eingangssignal oder aus einem HDTV ARC
Kanal extrahiert wird, wird die HDMI Quelle (z.B. Blu-Ray-Player) an den HDMI-Eingang angeschlossen
und ein externes Audio-Wiedergabegerät (z.B. Lautsprecher, Sound Bar oder Verstärker) via Toslink
oder 3,5 mm Stereo an den entsprechenden Ausgangs-Port angeschlossen. Die HDMI-Ausgangs-Port
wird mit einem HDMI-Display verbunden.
Bluray Player
CD Player
HDTV
HDMI Kabel
Audio Kabel
HDMI Kabel
Audio Kabel
HDTV
Speakers
Bluray Player
Rückseite
Rückseite
Vorderseite
Vorderseite

Benutzerhandbuch Deutsch
Die Installation ist einfach, stellen Sie sicher, dass alle Geräte ausgeschaltet und schließen Sie die
Kabel entsprechend Ihrer Anforderung wie in den Beispiel-Installationen an. Verbinden Sie nun das
mitgelieferte Netzteil und schalten Sie alle Geräte ein, die Power-LED auf der Vorderseite sollte
aufleuchten.
Die Extraktor verfügt über zwei Reihen von Dip-Switches, die Sie zur Anpassung der Gerätefunktion an
Ihre Anforderungen benötigen. Bitte stellen Sie die Dip-Schalter entsprechend den folgenden Tabellen
ein:
Audio Einbettung (Rückseite)
Audio Extrahierung (Vorderseite)
* HINWEIS: Bei aktivierter HDMI ARC Einstellung ist Audio-Ausgabe des ARC-Signals vom TV-Gerät
ausschließlich über Toslink möglich. Über die 3,5mm Stereo-Buchse wird nicht das ARC-Signal vom
Monitor sondern weiterhin das Audiosignal vom HDMI-Eingangsport ausgegeben!
Positionieren Sie für Installationen mit mehreren HDMI-Quellen den Audio-Extractor zwischen dem
HDMI-Switch und dem HDMI-Display. Installationen mit mehreren HDMI-Displays erfordern den Audio
Extractor zwischen der HDMI-Signalquelle und dem HDMI-Splitter.
DIP-Schalter
Position
Description
2-Pin
PIN #1
ON []
Audio Einbettungs-Funktion EIN
OFF []
Audio Einbettungs-Funktion AUS
PIN #2
ON []
Audio Einbettung des Toslink Signals
OFF []
Audio Einbettung des 3.5mm Stereosignals
DIP-Schalter
Position
Description
4-Pin
PIN #1
ON []
Audio Extraktor-Funktion (via Toslink & 3.5mm) EIN
OFF []
Audio Extraktor-Funktion AUS
PIN #2
ON []
ARC Funktion EIN *siehe Hinweis
OFF []
ARC Funktion AUS
PIN #3
ON []
Ohne Funktion
OFF []
Ohne Funktion
PIN #4
ON []
Firmware Update Modus
OFF []
Normaler Betriebsmodus

Manuel Utilisateur Français
Introduction
Nous sommes heureux que votre choix se soit porté sur un produit LINDY et vous remercions de votre
confiance. Vous pouvez compter à tout moment sur la qualité de nos produits et de notre service. Cet
Extracteur & Injecteur audio HDMI 2.0a 4K LINDY est soumis à une durée de garantie LINDY de 2 ans
et d’une assistance technique gratuite à vie. Merci de lire attentivement ces instructions et de les
conserver pour future référence.
L’extracteur & injecteur audio HDMI 2.0 4K LINDY permet d’effectuer un certain nombre de fonction qui
vous permettent de surmonter les défis liés aux installations audio/vidéo et est conçu pour être utilisé
aussi bien dans des installations domestiques que professionnelles. Son paramétrage est simple et
rapide grâce à ses boutons Dip Switch, tandis que ses pattes de fixation rendent simple son installation
fixe.
Contenu de l’emballage
Extracteur & Injecteur Audio HDMI 2.0a 4K
Alimentation 5V DC
Ce manuel
Caractéristiques
Conforme HDMI 2.0a, prise en charge Ultra HD 4K 60Hz 4:4:4 et HDR 4:2:0
Extrait l’audio du signal HDMI au format numérique ou analogique*
Extrait l’audio d’un signal TV HDMI ARC au format numérique
Bypass audio HDMI permettant d’envoyer l’audio à un affichage HDMI
Injecte l’audio analogique ou numérique dans un signal HDMI à la place de la bande originale
*Uniquement l’audio LPCM peut être convertit en un signal analogique, les signaux Dolby et DTS peuvent uniquement être sorti
par l’interface numérique
Spécifications
Conforme HDMI 2.0a & HDCP 2.2– bande passante: 594MHz (18Gbit/s)
Prise en charge des résolutions jusqu’à 4096x2160p60, 1080p 3D inclus
Prise en charge 4K 60Hz HDR 4:2:0 @ 10bpc / 4K 60Hz 4:4:4 @ 8bpc
Prise en charge des profondeurs de couleurs 8/10/12/16bpc en fonction de la
résolution/échantillonnage couleur
Ports d’entrée: HDMI Type A, jack 3,5mm audio stéréo & optique SPDIF
Ports de sortie: HDMI type A, jack 3,5mm audio stéréo & optique SPDIF
Fréquence d’échantillonnage audio: jusqu’à 192 kHz
Prend en charge jusqu’à 8 canaux audio: 2.0, 5.1 & 7.1
Prend en charge les formats audio numériques: LPCM, DD, DD+, DD True-HD, DTS & DTS-HD
Dolby Digital et Audio DTS ne peuvent pas être décodé en audio analogique
L’audio ARC doit être extrait via le connecteur optique SPDIF
L’audio analogique ou numérique peut être injecté à la place de l’audio HDMI
Bypass CEC
Chipset: EP91A6SX
Consommation max.: 3W
Température de fonctionnement: 0˚C à 40˚C
Température de stockage: -20˚C - 60˚C
Humidité relative: 20 - 90% RH (sans condensation)

Manuel Utilisateur Français
Panneau avant
1. Sortie S/PDIF (TOSLINK)
2. Sortie stéréo (jack 3,5mm)
3. Dip Switch 4 pins (voir installation et utilisation)
4. Sortie HDMI
5. Port Mini-USB: pour mise à jour du Firmware
6. LED Power
Panneau arrière
7. Port d’alimentation +5V
8. Bouton poussoir: pour reset usine
9. Entrée HDMI
10. Dip Switch 2 pins (voir installation et utilisation)
11. Entrée stéréo (jack 3,5mm)
12. Entrée S/PDIF (TOSLINK)

Manuel Utilisateur Français
Installation et utilisation
Les images suivantes montrent l’extracteur audio avec deux configurations typiques:
Injection Audio
Pour l’injection audio, où une source audio externe est utilisée pour remplacer le signal audio HDMI
original, une source HDMI (lecteur Blu-ray par ex.) est connecté au port d’entrée HDMI en utilisant un
câble HDMI et la source audio (lecteur CD par ex.) est connecté à l’aide d’un câble TOSLink ou jack
3,5mm vers jack 3,5mm au port d’entrée correspondant. La sortie HDMI est ensuite connectée à un
affichage HDMI.
Extraction Audio
Pour l’extraction audio, où l’audio est extrait soit d’une source HDMI ou d’un canal ARC d’une HDTV, la
source HDMI (lecteur Blu-ray par ex.) est raccordé au port d’entrée HDMI e utilisant un câble HDMI et un
appareil audio externe (haut-parleurs, barre son ou amplificateur) est connecté en utilisant soit un câble
TOSLink ou jack audio 3,5mm vers jack 3,5mm branché au port de sortie correspondant. Le port de
sortie HDMI est ensuite connecté à un affichage HDMI, en utilisant un câble HDMI.
Lecteur Bluray
Lecteur CD
HDTV
Câble HDMI
Câble Audio
Câble HDMI
Câble Audio
HDTV
Haut-parleurs
Lecteur Bluray
Rear Panel
Panneau arrière
Panneau avant
Panel
Panneau avant

Manuel Utilisateur Français
L’installation est simple, assurez-vous que tous les appareils soient hors-tension et connectez les câbles
comme indiqué dans les exemples d’installations en fonction de vos équipements. Connectez ensuite
l’alimentation fournie et mettez tous les appareils sous tension, la LED power sur le panneau avant doit
s’allumer.
L’extracteur fournit un ensemble de deux Dip Switch qui vous permettent de configurer l’appareil pour
correspondre à vos besoins, merci de vous référer aux tableaux suivant qui couvrent les fonctions
d’extraction ou d’injection audio:
Injection Audio (panneau arrière)
Extraction Audio (panneau avant)
* Note: lorsque l’HDMI ARC est activé la sortie audio est uniquement possible via TOSLink. De plus,
lorsque l’HDMI ARC est activé l’extraction audio d’une source HDMI connectée sur l’entrée HDMI peut
seulement être réalisée via l’interface jack 3,5mm stéréo.
Pour les installations utilisant plusieurs sources HDMI, positionnez l’extracteur Audio entre un switch
HDMI et l’affichage HDMI. Les installations utilisant plusieurs affichages HDMI nécessitent que
l’extracteur audio soit positionné avant un splitter HDMI.
Position DIP Switch
Descriptions
2-Pin
PIN#1
ON []
Active la fonction d’injection audio
OFF []
Désactive la fonction d’injection audio
PIN#2
ON []
Injection audio en Toslink
OFF []
Inction audio en jack 3,5mm
Position DIP Switch
Descriptions
4-Pin
PIN#1
ON []
Active la fonction d’extraction audio (via Toslink & 3.5mm)
OFF []
Désactive la fonction d’extraction audio
PIN#2
ON []
Active la fonction ARC *voir note
OFF []
Désactive la fonction ARC
PIN#3
ON []
Pas de fonction
OFF []
Pas de fonction
PIN#4
ON []
Mode Firmware Update
OFF []
Mode Normal

Manuale Italiano
Introduzione
Vi ringraziamo per aver acquistato l’Audio Extractor & Embedder LINDY HDMI 2.0a 4K Audio. Questo
prodotto è stato progettato per garantirvi la massima affidabilità e semplicità di utilizzo ed è coperto da
da 2 anni di garanzia LINDY oltre che da un servizio di supporto tecnico a vita. Per assicurarvi di farne
un uso corretto vi invitiamo a leggere attentamente questo manuale e a conservarlo per future
consultazioni.
Questo Audio Extractor & Embedder LINDY HDMI 2.0 4K fornisce numerose funzioni per aiutarvi ad
affrontare le sfide offerte dall’installazione di un sistema AV ed è pensato per l’utilizzo sia in ambiente
domestico che commerciale. La configurazione dell’Extractor Embedder è semplice e rapida grazie
all’apposito set di DIP switch e il posizionamento è semplificato dalle staffe di fissaggio integrate.
Contenuto della confezione
Audio Extractor & Embedder HDMI 2.0a 4K
Alimentatore 5V DC
Questo manuale
Caratteristiche
Conforme alle specifiche HDMI 2.0a, supporto risoluzioni Ultra HD 4K 60Hz 4:4:4 e HDR 4:2:0
Estrae l’audio da segnali HDMI in formato digitale o analogico*
Estrae l’audio da segnali HDMI ARC provenienti da TV in formato digitale
La funzione HDMI audio pass-through permette di inviare comunque il segnale audio allo schermo
HDMI
Incorpora un segnale analogico o digitale in una connessione HDMI sostituendo la sezione sonora
originale.
*Solo l’audio LPCM può essere convertito in un segnale analogico; i segnali Dolby e DTS possono essere estratti solo in
formato digitale.
Specifiche
Conforme HDMI 2.0a & HDCP 2.2 – larghezza di banda: 594MHz (18Gbps)
Risoluzioni supportate fino a 4096x2160p60, incluse 1080p 3D
Supporto 4K 60Hz HDR 4:2:0 @ 10bpc / 4K 60Hz 4:4:4 @ 8bpc
Supporto profondità colore a 8/10/12/16bpc in funzione di risoluzione e campionamento colore
Porte in ingresso: HDMI Tipo A, 3.5mm audio stereo & SPDIF Ottica
Porte in uscita: HDMI Tipo A, 3.5mm audio stereo & SPDIF Ottica
Frequenza di campionamento audio: fino a 192 kHz
Supporta un massimo di 8 canali audio: supporto audio a 2.0, 5.1 & 7.1 canali
Supporto formati Audio Digitale: LPCM, DD, DD+, DD True-HD, DTS & DTS-HD
I segnali Dolby Digital e DTS Audio non possono essere decodificati in formato analogico
Il segnale Audio ARC può essere estratto tramite la porta ottica SPDIF
E’ possibile inserire audio Analogico o Digitale al posto del segnale HDMI audio originale
CEC passante
Chipset: EP91A6SX
Consumo Massimo: 3W
Temperatura operativa: 0˚C to 40˚C
Temperatura di immagazzinamento: -20˚C - 60˚C
Umidità operativa: 20 - 90% RH (non condensata)

Manuale Italiano
Pannello Frontale
1. Uscita S/PDIF (TOSLINK)
2. Uscita Stereo (3.5mm)
3. Dip Switch a 4-Pin (Fate riferimento alla sezione “Installazione ed Uso”)
4. Uscita HDMI
5. Porta Mini-USB: per aggiornamento del FirmWare
6. LED Power
Pannello posteriore
7. Ingresso Alimentazione +5V
8. Pulsante reset: premere per riportare alle impostazioni di fabbrica
9. Ingresso HDMI
10. Dip Switch 2-Pin (Fate riferimento alla sezione “Installazione ed Uso”)
11. Ingresso Stereo (3.5mm)
12. Ingresso S/PDIF (TOSLINK)

Manuale Italiano
Installazione ed Uso
I seguenti schemi illustrano due applicazioni tipiche dell’Audio Extractor:
Inserimento Audio (Embedding)
Per l’inserimento dell’Audio (Embedding), dove una sorgente audio è utilizzata per sostituire la sezione
audio originale presente nel segnale HDMI audio, una sorgente HDMI (es. un lettore Bluray) è collegato
all’ingresso HDMI utilizzando un cavo HDMI e la sorgente audio (es. lettore CD) è collegata utilizzando o
un cavo TOSLink o un cavi con jack da 3.5mm alla corrispondente porta in ingresso. L’uscita HDMI è
connessa ad uno schermo HDMI.
Estrazione Audio
Per l’Estrazione Audio, sia che l’audio provenga da una sorgente HDMI, sia che arrivi da una TV tramite
il canale ARC, la sorgente HDMI (es. lettore Bluray) andrà collegata all’ingresso HDMI utilizzando un
cavo HDMI standard mentre i dispositivi audio esterni (casse, sound bar o amplificatori) andranno
connessi utilizzando un cavo ottico TOSLink o un cavo audio stereo con jack da 3.5mm connesso alla
Lettore Bluray
Lettore CD
HDTV
Cavo HDMI
Cavo Audio
Cavo HDMI
Cavo Audio
HDTV
Casse Acustiche
Lettore Bluray
Pannello Posteriore
Pannello posteriore
Pannello Frontale
Pannello frontale

Manuale Italiano
relativa porta in uscita. L’uscita HDMI andrà infine connessa ad uno schermo HDMI utilizzando sempre
un cavo HDMI standard.
L’installazione è semplice: assicuratevi che tutti i dispositivi siano spenti prima di effettuare i
collegamenti come illustrato negli esempi installativi a seconda delle vostre necessità. Una volta ultimate
tutte le connessioni date corrente a tutti i dispositivi e il LED Power posto sul pannello frontale dell’Audio
Extractor & Embedder si illuminerà.
Questo prodotto integra due set di dip switch che vi consentiranno di configurarlo per ottenere il risultato
desiderato nella vostra applicazione. Vi preghiamo di far riferimento alla seguente tabella per trovare la
combinazione corretta:
Inserimento Audio (Embedding) - Pannello Posteriore
Estrazione Audio - (Front Panel)
* Nota: Quando la funzione HDMI ARC è abilitata l’unica uscita audio utilizzabile è la TOSLink. In
aggiunta quando la funzione HDMI ARC è abilitata l’estrazione audio dalla sorgente HDMI connessa
all’ingresso HDMI può essere effettuata solo tramite l’uscita da 3.5mm.
Nel caso di installazioni che utilizzino più sorgenti HDMI posizionate l’Audio Extractor fra uno switch
HDMI e lo schermo HDMI. Nel caso invece vi troviate in un installazione con schermi multipli posizionate
l’Extractor prima dello splitter HDMI.
Posizione DIP Switch
Descrizione
2-Pin
PIN#1
ON []
Abilita la funzione Inserimento Audio
OFF []
Disabilita la funzione Inserimento Audio
PIN#2
ON []
Inserimento Audio da Porta Toslink
OFF []
Inserimento Audio da Porta Jack 3.5mm
Posizione DIP Switch
Descrizione
4-Pin
PIN#1
ON []
Abilita la funzione Estrazione Audio (via Toslink & 3.5mm)
OFF []
Disabilita la funzione Estrazione Audio
PIN#2
ON []
Abilita la funzione ARC *Vedi Nota
OFF []
Disabilita la funzione ARC
PIN#3
ON []
Non utilizzato / Nessuna Funzione
OFF []
Non utilizzato / Nessuna Funzione
PIN#4
ON []
Modalità Aggiornamento Firmware
OFF []
Modalità Normale

CE/FCC
CE Certification
This equipment complies with the requirements of the European Union. It has been manufactured under
the scope of RoHS compliance.
CE Konformitätserklärung
Dieses Produkt entspricht den einschlägigen EMV Richtlinien der EU für IT-Equipment und darf nur
zusammen mit abgeschirmten Kabeln verwendet werden.
Diese Geräte wurden unter Berücksichtigung der RoHS Vorgaben hergestellt.
Die formelle Konformitätserklärung können wir Ihnen auf Anforderung zur Verfügung stellen
FCC Certification
This equipment has been tested and found to comply with the limits for a Class B digital device, pursuant
to part 15 of the FCC Rules. These limits are designed to provide reasonable protection against harmful
interference in a residential installation.
You are cautioned that changes or modification not expressly approved by the party responsible for
compliance could void your authority to operate the equipment.
This device complies with part 15 of the FCC Rules.
Operation is subject to the following two conditions:
1. This device may not cause harmful interference, and
2. This device must accept any interference received, including interference that may cause undesired
operation.
LINDY Herstellergarantie – Hinweis für Kunden in Deutschland
LINDY gewährt für dieses Produkt über die gesetzliche Regelung in Deutschland hinaus eine zweijährige
Herstellergarantie ab Kaufdatum. Die detaillierten Bedingungen dieser Garantie finden Sie auf der LINDY Website
aufgelistet bei den AGBs.
Hersteller / Manufacturer (EU):.
LINDY-Elektronik GmbH LINDY Electronics Ltd
Markircher Str. 20 Sadler Forster Way
68229 Mannheim Stockton-on-Tees, TS17 9JY
GERMANY United Kingdom
Email: in[email protected]m , T: +49 (0)621 470050 postmaster@lindy.co.uk , T: +44 (0)1642 754000

Recycling Information
WEEE (Waste of Electrical and Electronic Equipment),
Recycling of Electronic Products
Europe, United Kingdom
In 2006 the European Union introduced regulations (WEEE) for the collection and recycling of all waste electrical
and electronic equipment. It is no longer allowable to simply throw away electrical and electronic equipment.
Instead, these products must enter the recycling process.
Each individual EU member state has implemented the WEEE regulations into national law in slightly different
ways. Please follow your national law when you want to dispose of any electrical or electronic products. More
details can be obtained from your national WEEE recycling agency.
Germany / Deutschland Rücknahme Elektroschrott und Batterie-Entsorgung
Die Europäische Union hat mit der WEEE Direktive Regelungen für die Verschrottung und das Recycling von
Elektro- und Elektronikprodukten geschaffen. Diese wurden im Elektro- und Elektronikgerätegesetz – ElektroG in
deutsches Recht umgesetzt. Das Entsorgen von Elektro- und Elektronikgeräten über die Hausmülltonne ist
verboten! Diese Geräte müssen den Sammel- und Rückgabesystemen zugeführt werden! Dort werden sie
kostenlos entgegen genommen. Die Kosten für den weiteren Recyclingprozess übernehmen die Gerätehersteller.
LINDY bietet deutschen Endverbrauchern ein kostenloses Rücknahmesystem an, beachten Sie bitte, dass
Batterien und Akkus den Produkten vor der Rückgabe an das Rücknahmesystem entnommen werden müssen und
über die Sammel- und Rückgabesysteme für Batterien separat entsorgt werden müssen. Ausführliche
Informationen zu diesen Themen finden Sie stets aktuell auf der LINDY Webseite im Fußbereich.
France
En 2006, l'union Européenne a introduit la nouvelle réglementation (DEEE) pour le recyclage de tout équipement
électrique et électronique.
Chaque Etat membre de l’ Union Européenne a mis en application la nouvelle réglementation DEEE de manières
légèrement différentes. Veuillez suivre le décret d’application correspondant à l’élimination des déchets électriques
ou électroniques de votre pays.
Italy
Nel 2006 l’unione europea ha introdotto regolamentazioni (WEEE) per la raccolta e il riciclo di apparecchi elettrici
ed elettronici. Non è più consentito semplicemente gettare queste apparecchiature, devono essere riciclate. Ogni
stato membro dell’ EU ha tramutato le direttive WEEE in leggi statali in varie misure. Fare riferimento alle leggi del
proprio Stato quando si dispone di un apparecchio elettrico o elettronico.
Per ulteriori dettagli fare riferimento alla direttiva WEEE sul riciclaggio del proprio Stato.
LINDY No 38168
1
st
Edition, November 2016
www.lindy.com
Tested to Comply with
FCC Standards
For Home and Office Use!
-
 1
1
-
 2
2
-
 3
3
-
 4
4
-
 5
5
-
 6
6
-
 7
7
-
 8
8
-
 9
9
-
 10
10
-
 11
11
-
 12
12
-
 13
13
-
 14
14
-
 15
15
-
 16
16
-
 17
17
-
 18
18
-
 19
19
-
 20
20


Lindy HDMI 2.0 18G Audio Extractor & Embedder Manuale utente
- Categoria
- Video splitter
- Tipo
- Manuale utente
in altre lingue
Documenti correlati
-
Lindy USB Type C to Audio Converter Manuale utente
-
-
Lindy 2 Port Automatic Optical Audio Switch Manuale utente
-
-
-
-
-
-
Lindy 38239 Manuale utente
-
