Indesit IWDC 6145 (EU) Guida utente
- Categoria
- Lavatrici
- Tipo
- Guida utente

GB
1
Contents
Installation, 2-3
Unpacking and levelling
Connecting the electricity and water supplies
The first wash cycle
Technical data
Care and maintenance, 4
Cutting off the water or electricity supply
Cleaning the washer-dryer
Cleaning the detergent dispenser drawer
Caring for the door and drum of your appliance
Cleaning the pump
Checking the water inlet hose
Precautions and tips, 5
General safety
Disposal
Description of the washer-dryer and
starting a wash cycle, 6-7
Control panel
Indicator lights
Starting a wash cycle
Wash cycles, 8
Table of wash cycles
Personalisation, 9
Setting the temperature
Setting the drying cycle
Functions
Detergents and laundry, 10
Detergent dispenser drawer
Preparing the laundry
Garments requiring special care
Load balancing system
Troubleshooting, 11
Service, 12
IWDC 6145
Instructions for use
WASHER-DRYER
English,1
GB
BG
Français,25
F
Česky,49
CZ
Nederlands,37
NL
Български,13
! This symbol reminds you to read this
instruction manual.

2
GB
Installation
! This instruction manual should be kept in a safe
place for future reference. If the washing machine
is sold, transferred or moved, make sure that the
instruction manual remains with the machine so
that the new owner is able to familiarise himself/
herself with its operation and features.
! Read these instructions carefully: they contain
vital information relating to the safe installation
and operation of the appliance.
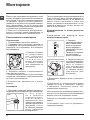
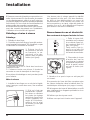
Unpacking and levelling
Unpacking
1. Remove the washing machine from its packaging.
2. Make sure that the washing machine has not
been damaged during the transportation process.
If it has been damaged, contact the retailer and do
not proceed any further with the installation process.
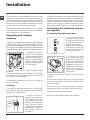
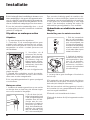
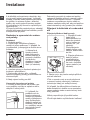
3. Remove the 4 pro-
tective screws (used
during transportation)
and the rubber washer
with the corresponding
spacer, located on the
rear part of the applian-
ce (see figure).
4. Close off the holes using the plastic plugs
provided.
5. Keep all the parts in a safe place: you will need
them again if the washing machine needs to be
moved to another location.
! Packaging materials should not be used as
toys for children.
Levelling
1. Install the washing machine on a flat sturdy
floor, without resting it up against walls, furniture
cabinets or anything else.
2. If the floor is not per-
fectly level, compensa-
te for any unevenness
by tightening or loo-
sening the adjustable
front feet (see figure);
the angle of inclination,
measured in relation to
the worktop, must not
exceed 2°.
Levelling the machine correctly will provide it with
stability, help to avoid vibrations and excessive
noise and prevent it from shifting while it is ope-
rating. If it is placed on carpet or a rug, adjust the
feet in such a way as to allow a sufficient venti-
lation space underneath the washing machine.
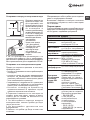
Connecting the electricity and wa-
ter supplies
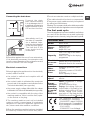
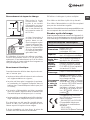
Connecting the water inlet hose
1. Connect the supply
pipe by screwing it to
a cold water tap using
a ¾ gas threaded con-
nection (see figure).
Before performing the
connection, allow the
water to run freely until
it is perfectly clear.
2. Connect the inlet
hose to the washing
machine by screwing
it onto the correspon-
ding water inlet of the
appliance, which is si-
tuated on the top right-
hand side of the rear
part of the appliance
(see figure).
3. Make sure that the hose is not folded over
or bent.
! The water pressure at the tap must fall within
the values indicated in the Technical details table
(see next page).
! If the inlet hose is not long enough, contact a
specialised shop or an authorised technician.
! Never use second-hand hoses.
! Use the ones supplied with the machine.

GB
3
Technical data
Model
IWDC 6145
Dimen-
sions
width 59.5 cm
height 85 cm
depth 53,5 cm
Capacity
from 1 to 6 kg for the wash
programme;
from 1 to 5 kg for the drying
programme
Electrical
c o n n e c -
tions
please refer to the technical
data plate fixed to the machine
Water
connec-
tions
maximum pressure 1 MPa
(10 bar)
minimum pressure 0.05 MPa
(0.5 bar)
drum capacity 52 litres
Spin
speed
up to 1400 rotations per
minute
Energy
rated pro-
grammes
according
to regula-
tion
EN 50229
Wash: programme 2; tempe-
rature 60°C;
run with a load of 6 kg.
Drying: first drying cycle per-
formed with a 1 kg load, by se-
lecting a drying time of 60 min;
Second drying cycle perfor-
med with a 5 kg load and the
DRYING knob on the
setting.
This appliance conforms to
the following EC Directives:
- 89/336/EEC dated 03/05/89
(Electromagnetic Compatibility)
and subsequent modifications
- 2012/19/EU
- 2006/95/EC Low Voltage)
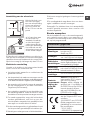
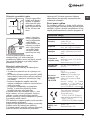
65 - 100 cm
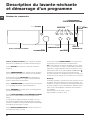
Connecting the drain hose
Connect the drain
hose, without bending
it, to a drainage duct or
a wall drain located at a
height between 65 and
100 cm from the floor;
alternatively, rest it on
the side of a washba-
sin or bathtub, faste-
ning the duct supplied
to the tap (see figure).
The free end of the
hose should not be
underwater.
! We advise against the use of hose extensions;
if it is absolutely necessary, the extension must
have the same diameter as the original hose and
must not exceed 150 cm in length.
Electrical connections
Before plugging the appliance into the electricity
socket, make sure that:
• the socket is earthed and complies with all
applicable laws;
• the socket is able to withstand the maximum
power load of the appliance as indicated in the
Technical data table (see opposite);
• the power supply voltage falls within the values
indicated in the Technical data table (see opposite);
• the socket is compatible with the plug of the
washing machine. If this is not the case, repla-
ce the socket or the plug.
! The washing machine must not be installed
outdoors, even in covered areas. It is extremely
dangerous to leave the appliance exposed to
rain, storms and other weather conditions.
! When the washing machine has been installed,
the electricity socket must be within easy reach.
! Do not use extension cords or multiple sockets.
! The cable should not be bent or compressed.
! The power supply cable must only be replaced
by authorised technicians.
Warning! The company shall not be held responsible
in the event that these regulations are not respected.
The first wash cycle
Once the appliance has been installed, and before
you use it for the first time, run a wash cycle with
detergent and no laundry, using the wash cycle 2.

4
GB
Care and maintenance
Cutting off the water and electri-
city supplies
• Turn off the water tap after every wash cycle.
This will limit wear on the hydraulic system
inside the washing machine and help to pre-
vent leaks.
• Unplug the washing machine when cleaning
it and during all maintenance work.
Cleaning the washer-dryer
The outer parts and rubber components of the
appliance can be cleaned using a soft cloth
soaked in lukewarm soapy water. Do not use
solvents or abrasives.
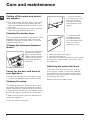
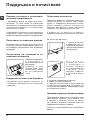
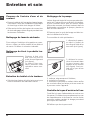
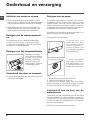
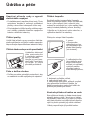
Cleaning the detergent dispenser
drawer
Remove the dispenser
by raising it and pul-
ling it out (see figure).
Wash it under running
water; this operation
should be repeated
frequently.
Caring for the door and drum of
your appliance
• Always leave the porthole door ajar in order
to prevent unpleasant odours from forming.
Cleaning the pump
The washing machine is fitted with a self-clea-
ning pump which does not require any mainte-
nance. Sometimes, small items (such as coins
or buttons) may fall into the pre-chamber which
protects the pump, situated in its bottom part.
! Make sure the wash cycle has finished and
unplug the appliance.
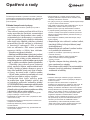
To access the pre-chamber:
1. using a screwdri-
ver, remove the cover
panel on the lower
front part of the wa-
shing machine (see
figure);
2. unscrew the lid
by rotating it anti-
clockwise (see figu-
re): a little water may
trickle out. This is
perfectly normal;
3. clean the inside thoroughly;
4. screw the lid back on;
5. reposition the panel, making sure the hooks
are securely in place before you push it onto
the appliance.
Checking the water inlet hose
Check the inlet hose at least once a year. If
there are any cracks, it should be replaced
immediately: during the wash cycles, water
pressure is very strong and a cracked hose
could easily split open.
! Never use second-hand hoses.

GB
5
Precautions and tips
! This Washer-dryer was designed and constructed in ac-
cordance with international safety regulations. The following
information is provided for safety reasons and must therefore
be read carefully.
General safety
• This appliance can be used by children
aged from 8 years and above and persons
with reduced physical, sensory or mental
capabilities or lack of experience and know-
ledge if they have been given supervision or
instruction concerning use of the appliance
in a safe way and understand the hazards
involved. Children shall not play with the
appliance. Cleaning and user maintenance
shall not be made by children without super-
vision.
- Do not dry unwashed items in the tumble
dryer.
- Items that have been soiled with substan-
ces such as cooking oil, acetone, alcohol,
petrol, kerosene, spot removers, turpentine,
waxes and wax removers should be washed
in hot water with an extra amount of deter-
gent before being dried in the tumble dryer.
- Items such as foam rubber (latex foam),
shower caps, waterproof textiles, rubber
backed articles and clothes or pillows fitted
with foam rubber pads should not be dried
in the tumble dryer.
- Fabric softeners, or similar products,
should be used as specified by the fabric
softener instructions.
- The final part of a tumble dryer cycle
occurs without heat (cool down cycle) to
ensure that the items are left at a tempera-
ture that ensures that the items will not be
damaged.
WARNING: Never stop a tumble dryer be-
fore the end of the drying cycle unless all
items are quickly removed and spread out
so that the heat is dissipated.
• This appliance was designed for domestic use only.
• Do not touch the machine when barefoot or with wet or
damp hands or feet.
• Do not pull on the power supply cable when unplugging
the appliance from the electricity socket. Hold the plug
and pull.
• Do not open the detergent dispenser drawer while the
machine is in operation.
• Do not touch the drained water as it may reach extreme-
ly high temperatures.
• Never force the porthole door. This could damage the
safety lock mechanism designed to prevent accidental
opening.
• If the appliance breaks down, do not under any circum-
stances access the internal mechanisms in an attempt
to repair it yourself.
• Always keep children well away from the appliance while
it is operating.
• The door can become quite hot during the wash cycle.
• If the appliance has to be moved, work in a group of
two or three people and handle it with the utmost care.
Never try to do this alone, because the appliance is very
heavy.
• Before loading laundry into the Washer-dryer, make sure
the drum is empty.
• During the drying phase, the door tends to get quite hot.
• Do not use the appliance to dry clothes that
have been washed with flammable solvents
(e.g. trichlorethylene).
• Do not use the appliance to dry foam rubber
or similar elastomers.
• Make sure that the water tap is turned on during the
drying cycles.
• Children of less than 3 years should be kept
away from the appliance unless continuou-
sly supervised.
• Remove all objects from pockets such as
lighters and matches.
Disposal
• Disposing of the packaging materials: observe local
regulations so that the packaging may be re-used.
• The European Directive 2012/19/EU on Waste Electrical
and Electronic Equipment, requires that old household
electrical appliances must not be disposed of in the
normal unsorted municipal waste stream. Old applian-
ces must be collected separately in order to optimise
the recovery and recycling of the materials they contain
and reduce the impact on human health and the envi-
ronment. The crossed out “wheeled bin” symbol on the
product reminds you of your obligation, that when you
dispose of the appliance it must be separately collec-
ted. Consumers should contact their local authority or
retailer for information concerning the correct disposal
of their old appliance.

6
GB
Detergent dispenser drawer: used to dispense
detergents and washing additives (see “Detergents and
laundry”).
ON/OFF button: switches the washer-dryer on and off.
WASH CYCLE knob: programmes the wash cycles. Du-
ring the wash cycle, the knob does not move.
FUNCTION buttons with indicator light: used to select the
available functions. The indicator light corresponding to the
selected function will remain lit.
TEMPERATURE knob: sets the temperature or the cold
wash cycle (see “Personalisation”).
DRYING knob: used to set the desired drying programme
(see “Personalisation”).
WASH CYCLE PROGRESS/DELAY TIMER
indicator
light
s: used to monitor the progress of the wash cycle.
The illuminated indicator light shows which phase is in
progress.
If the Delay Timer function has been set, the time remai-
ning until the wash cycle starts will be indicated (see next
page).
DOOR LOCKED indicator light: indicates whether the
door may be opened or not (see next page).
START/PAUSE button with indicator light: starts or tempo-
rarily interrupts the wash cycles.
N.B. To pause the wash cycle in progress, press this button;
the corresponding indicator light will flash orange, while the
indicator light for the current wash cycle phase will remain lit
in a fixed manner. If the DOOR LOCKED
indicator light is
switched off, the door may be opened (wait approximately
3 minutes).
To start the wash cycle from the point at which it was inter-
rupted, press this button again.
Standby mode
This washing machine, in compliance with new energy
saving regulations, is fitted with an automatic standby
system which is enabled after a few minutes if no activity is
detected. Press the ON-OFF button briefly and wait for the
machine to start up again.
Consumption in off-mode: 0,5 W
Consumption in Left-on: 8 W
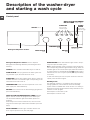
Description of the washer-dryer
and starting a wash cycle
WASH CYCLE PROGRESS/
DELAY TIMER
indicator lights
DOOR LOCKED
indicator light
START/
PAUSE
button with
indicator light
Control panel
Detergent dispenser drawer
ON/OFF
button
WASH CYCLE
knob
TEMPERATURE
knob
FUNCTION
buttons with
indicator lights
DRYING
knob

GB
7
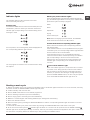
Indicator lights
The indicator lights provide important information.
This is what they can tell you:
Delayed start
If the DELAY TIMER function has been activated (see “Per-
sonalisation”), after the wash cycle has been started the
indicator light corresponding to the selected delay period
will begin to flash:
As time passes, the remaining delay will be displayed and
the corresponding indicator light will flash:
The set programme will start once the selected time delay
has expired.
Wash cycle phase indicator lights
Once the desired wash cycle has been selected and has be-
gun, the indicator lights switch on one by one to indicate which
phase of the cycle is currently in progress.
Note: when the drying cycle has finished, the DRYING
knob should be returned to the “0” position.
Function buttons and corresponding indicator lights
When a function is selected, the corresponding indicator
light will illuminate.
If the selected function is not compatible with the program-
med wash cycle, the corresponding indicator light will flash
and the function will not be activated.
If the selected function is not compatible with another
function which has been selected previously, the indicator
light corresponding to the first function selected will
flash and only the second function will be activated; the
indicator light corresponding to the enabled option will
remain lit.
Door locked indicator light
When the indicator light is on, the porthole door is locked
to prevent it from being opened; make sure the indicator
light is off before opening the door (wait approximately 3
minutes). To open the door during a running wash cycle,
press the START/PAUSE button; the door may be opened
once the DOOR LOCKED indicator light turns off.
Starting a wash cycle
1. Switch the washer-dryer on by pressing the ON/OFF button. All indicator lights will switch on for a few seconds, then they
will switch off and the START/PAUSE indicator light will pulse.
2. Load the laundry and close the door.
3. Set the WASH CYCLE knob to the desired programme.
4. Set the washing temperature (see “Personalisation”).
5. Set the drying cycle if necessary (see “Personalisation”).
6. Measure out the detergent and washing additives (see “Detergents and laundry”).
7. Select the desired functions.
8. Start the wash cycle by pressing the START/PAUSE button and the corresponding indicator light will remain lit in a fixed
manner, in green.
To cancel the set wash cycle, pause the machine by pressing the START/PAUSE button and select a new cycle.
9. At the end of the wash cycle the
indicator light will switch on. The door can be opened once the DOOR LOCKED
indicator light turns off (wait approximately 3 minutes). Take out your laundry and leave the appliance door ajar to make sure
the drum dries completely. Switch the washer-dryer off by pressing the ON/OFF button.
Wash
Rinse
Spin/Drain
Drying
End of wash cycle

8
GB
Specials wash cycles
Sport Light (
wash cycle
9) is for washing lightly soiled sports clothing fabrics (tracksuits, shorts, etc.); for best results,
we recommend not exceeding the maximum load indicated in the “Table of wash cycles”. We recommend using a
liquid detergent and dosage suitable for a half-load.
Sport Shoes (
wash cycle
10) is for washing sports shoes; for best results, do not wash more than 2 pairs (fabric)
simultaneously.
Express Wash & Dry (
wash cycle
13) was designed to wash and dry lightly soiled garments quickly. This cycle may
be used to wash and dry a laundry load of up to 0.5 kg in just 35 minutes.
To achieve optimum results, use liquid detergent and pre-treat cuffs, collars and stains.
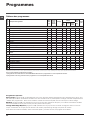
Wash cycles
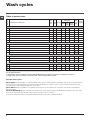
The length of cycle shown on the display or in this booklet is an estimation only and is calculated assuming standard working conditions. The actual duration can vary according to factors such as water
temperature and pressure, the amount of detergent used, the amount and type of load inserted, load balancing and any wash options selected.
For all Test Institutes:
1) Test wash cycle in compliance with regulation EN 50229: set wash cycle 2 with a temperature of 60°C.
2) Long wash cycle for cottons: set wash cycle 2 with a temperature of 40°C.
Table of wash cycles
Wash cycles
Description of the wash cycle
Max.
temp.
(°C)
Max.
speed
(rpm)
Drying
Detergents
Max.
load
(kg)
Cycle
duration
Prewash
Main
wash
Fabric
softener
Daily
1
Cotton with prewash: extremely soiled whites. 90° 1400
6 170’
2
Cotton: extremely soiled whites. 90° 1400
-
6 160’
2
Cotton (1): heavily soiled whites and resistant colours. 60° 1400
-
6 185’
2
Cotton (2): lightly soiled whites and delicate colours. 40° 1400
-
6 175’
3
Cotton: heavily soiled whites and resistant colours. 60° 1400
-
6 140’
4
Coloured Cotton: lightly soiled whites and delicate colours. 40° 1400
-
6 90’
5
Synthetics: lightly soiled resistant colours. 60° 1000
-
3 110’
Special
6
Wool: for wool, cashmere, etc. 40° 600 - -
1,5 70’
7
Silk/Curtains: for garments in silk and viscose, lingerie. 30° 0 - -
1 55’
8 Jeans
40° 800
-
3 75’
9 Sport Light
30° 600 - -
3 60’
10 Sport Shoes
30° 600 - -
Max. 2
pairs
60’
Drying
11 Cotton dry
- -
- - - 5 -
12 Synthetics dry
- -
- - - 3 -
13 Express Wash & Dry
30° 1400
-
0,5 35’
Partial wash cycles
Rinse - 1400
- -
6 36’
Spin - 1400
- - - 6 10’
Drain - 0 - - - - 6 3’

GB
9
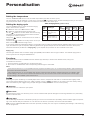
Setting the temperature
Turn the TEMPERATURE knob to set the wash temperature (see Table of wash cycles).
The temperature may be lowered, or even set to a cold wash
. The washer-dryer will automatically prevent you from selec-
ting a temperature which is higher than the maximum value set for each wash cycle.
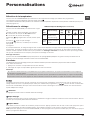
Setting the drying cycle
Turn the DRYING knob to select the desired drying
option. There are two options:
A - Based on time: From 40 minutes to 180.
B - Based on the desired laundry dryness level:
Iron dry
: suitable for clothes which will need ironing
afterwards. the remaining dampness softens creases,
making them easier to remove.
Hanger dry
: ideal for clothes which do not need to
be dried fully.
Cupboard dry
: suitable for laundry which can be put
back in a cupboard without being ironed.
If your laundry load to be washed and dried is much greater than the maximum stated load (see adjacent table), perform the wash
cycle, and when the cycle is complete, divide the garments into groups and put some of them back in the drum. At this point,
follow the instructions provided for a “Drying only” cycle. Repeat this procedure for the remainder of the load.
Drying only
Use the cycle selector knob to select a drying cycle (11-12) in accordance with the type of fabric. The desired drying level or
time may also be set using the DRYING knob.
Functions
The various wash functions available with this washer-dryer will help to achieve the desired results, every time.
To activate the functions:
1. Press the button corresponding to the desired function;
2. the function is enabled when the corresponding indicator light is illuminated.
Note:
- If the selected function is not compatible with the programmed wash cycle, the corresponding indicator light will flash and
the function will not be activated.
- If the selected function is not compatible with another function which has been selected previously, the indicator light
corresponding to the first function selected will flash and only the second function will be activated; the indicator light
corresponding to the enabled option will remain lit.
Selecting this option enables you to suitably adjust drum rotation, temperature and water to a reduced load of lightly soiled
cotton and synthetic fabrics (refer to the
“Table of wash cycles”
). “ ” enables you to wash in less time thereby saving
water and electricity. We suggest using a liquid detergent suitably measured out to the load quantity.
1400-600
Press this button to reduce the spin speed.
Extra rinse
By selecting this option, the efficiency of the rinse is increased and optimal detergent removal is guaranteed. It is particularly
useful for sensitive skin.
Delay timer
This timer delays the start time of the wash cycle by up to 9 hours. Press the button repeatedly until the indicator light correspond-
ing to the desired delay time switches on. The fifth time the button is pressed, the function will be disabled.
N.B. Once the START/PAUSE button has been pressed, the delay time can only be modified by decreasing it until launching
the set programme.
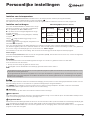
Personalisation
Table of Drying times (guideline values)
Fabric
type
Load type
Max.
load (kg)
Cupboard
dry
Hanger
dry
Iron
dry
Cotton
Clothing of diffe-
rent sizes, Terry
towels
5 250 210 190
Synthe-
tics
Sheets, Shirts, Py-
jamas, socks, etc.
3 180 130 115

10
GB
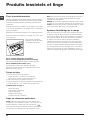
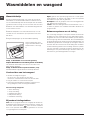
Detergents and laundry
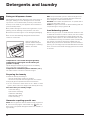
Detergent dispenser drawer
Good washing results also depend on the correct dose of
detergent: adding too much detergent will not necessa-
rily result in a more efficient wash, and may in fact cause
build up on the inside of your appliance and contribute to
environmental pollution.
!Use powder detergent for white cotton garments, for pre-
washing, and for washing at temperatures over 60°C.
!Follow the instructions given on the detergent packaging.
! Do not use hand washing detergents because these
create too much foam.
Open the detergent di-
spenser drawer and pour
in the detergent or washing
additive, as follows.
compartment 1: Pre-wash detergent (powder)
compartment 2: Detergent for the wash cycle
(powder or liquid)
Liquid detergent should only be poured in immediately
prior to the start of the wash cycle.
compartment 3: Additives (fabric softeners, etc.)
The fabric softener should not overflow the grid.
Preparing the laundry
• Divide the laundry according to:
- the type of fabric/the symbol on the label
- the colours: separate coloured garments from whites.
• Empty all garment pockets and check the buttons.
• Do not exceed the values listed in the “Table of wash
cycles”, which refer to the weight of the laundry when dry.
How much does your laundry weigh?
1 sheet 400-500 g
1 pillow case 150-200 g
1 tablecloth 400-500 g
1 bathrobe 900-1200 g
1 towel 150-250 g
Garments requiring special care
Wool: all wool garments can be washed using programme
6, even those carrying the “hand-wash only”
label. For
best results, use special detergents and do not exceed 1,5
kg of laundry.
Silk: use special wash cycle 7 to wash all silk garments.
We recommend the use of special detergent which has
been designed to wash delicate clothes.
Curtains: fold curtains and place them in a pillow case or
mesh bag. Use wash cycle 7.
Jeans: Turn garments inside-out before washing and use
a liquid detergent. Use programme 8.
Load balancing system
Before every spin cycle, to avoid excessive vibrations and
to distribute the load in a uniform manner, the drum rotates
continuously at a speed which is slightly greater than the
washing rotation speed. If, after several attempts, the load
is not balanced correctly, the machine spins at a reduced
spin speed. If the load is excessively unbalanced, the
washer-dryer performs the distribution process instead of
spinning. To encourage improved load distribution and bal-
ance, we recommend small and large garments are mixed
in the load.
1
2
3

GB
11
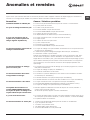
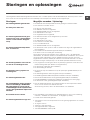
Troubleshooting
Your washer-dryer could fail to work. Before contacting the Technical Assistance Centre (see “Assistance”), make sure that
the problem cannot be not solved easily using the following list.
Problem:
The Washer-dryer does not switch
on.
The wash cycle does not start.
The Washer-dryer does not take
in water (the indicator light for
the first wash cycle stage flashes
rapidly).
The Washer-dryer continuously
takes in and
drains water.
The Washer-dryer does not drain or
spin.
The Washer-dryer vibrates a lot
during the spin cycle.
The Washer-dryer leaks.
The “Functions” indicator lights
and the “start/pause” indicator
light flash, while one of the “phase
in progress” indicator lights and
the “door locked” indicator light
will remain lit in a fixed manner.
There is too much foam.
The washer-dryer does not dry.
Possible causes / Solutions:
• The appliance is not plugged into the socket fully, or is not making contact.
• There is no power in the house.
• The Washer-dryer door is not closed properly.
• The ON/OFF button has not been pressed.
• The START/PAUSE button has not been pressed.
• The water tap has not been opened.
• A delayed start has been set.
• The water inlet hose is not connected to the tap.
• The hose is bent.
• The water tap has not been opened.
• There is no water supply in the house.
• The pressure is too low.
• The START/PAUSE button has not been pressed.
• The drain hose is not fitted at a height between 65 and 100 cm from the floor
(see “Installation”).
• The free end of the hose is under water (see “Installation”).
• The wall drainage system is not fitted with a breather pipe.
If the problem persists even after these checks, turn off the water tap, switch the applian-
ce off and contact the Assistance Service. If the dwelling is on one of the upper floors of
a building, there may be problems relating to water drainage, causing the Washer-dryer
to fill with water and drain continuously. Special anti-draining valves are available in shops
and help to avoid this inconvenience.
• The wash cycle does not include draining: some wash cycles require the drain
phase to be started manually.
• The drain hose is bent (see “Installation”).
• The drainage duct is clogged.
• The drum was not unlocked correctly during installation (see “Installation”).
• The Washer-dryer is not level (see “Installation”).
• The Washer-dryer is trapped between cabinets and walls (see “Installation”).
• The water inlet hose is not screwed on properly (see “Installation”).
• The detergent dispenser drawer is blocked (for cleaning instructions, see “Care
and maintenance”).
• The drain hose is not fixed properly (see “Installation”).
• Switch off the machine and unplug it, wait for approximately 1 minute and then
switch it back on again.
If the problem persists, contact the Technical Assistance Service.
• The detergent is not suitable for machine washing (it should display the text
“for Washer-dryers” or “hand and machine wash”, or the like).
• Too much detergent was used.
• The appliance is not plugged into the socket, or not enough to make contact.
• There has been a power failure.
• The appliance door is not shut properly.
• A delayed start has been set.
• DRYING knob is in the 0 position.

12
GB
Service
Before calling for Assistance:
• Check whether you can solve the problem alone (see “Troubleshooting”);
• Restart the programme to check whether the problem has been solved;
• If this is not the case, contact an authorised Technical Assistance Centre using the telephone number provided on the
guarantee certificate.
! Always request the assistance of authorised technicians.
Have the following information to hand:
• the type of problem;
• the appliance model (Mod.);
• the serial number (S/N).
This information can be found on the data plate applied to the rear of the washer-dryer, and can also be found on the front of
the appliance by opening the door.

BG
13
Български
Ñúäúðæàíèå
Ìîíòèðàíå, 14-15
Ðàçîïàêîâàíå è íèâåëèðàíå
Õèäðàâëè÷íè è åëåêòðè÷åñêè âðúçêè
Ïúðâî ïðàíå
Òåõíè÷åñêè äàííè
Ïîääðúæêà è ïî÷èñòâàíå, 16
Ñïèðàíå íà âîäàòà è èçêëþ÷âàíå íà åëåêòðîçàõðàíâàíåòî
Ïî÷èñòâàíå íà ïåðàëíàòà ìàøèíà
Ïî÷èñòâàíå íà ÷åêìåäæåòî çà ïåðèëíèòå ïðåïàðàòè
Ïîääðúæêà íà ëþêà è íà áàðàáàíà
Ïî÷èñòâàíå íà ïîìïàòà
Ïðîâåðêà íà ìàðêó÷à çà ñòóäåíàòà âîäà
Ìåðêè çà áåçîïàñíîñò è ïðåïîðúêè, 17
Îáùè ïðåäîõðàíèòåëíè ìåðêè
Ðåöèêëèðàíå
Îïèñàíèå íà ïåðàëíàòà ìàøèíà è ïóñêàíåòî
íà äàäåíà ïðîãðàìà, 18-19
Òàáëî çà óïðàâëåíèå
Ñâåòëèííè èíäèêàòîðè
Âêëþ÷âàíå íà ïðîãðàìà
Ïðîãðàìè, 20
Òàáëèöà ñ ïðîãðàìèòå
Ïåðñîíàëèçèðàíèÿ, 21
Çàäàâàíå íà òåìïåðàòóðàòà
Çàäàâàíå íà ñóøåíåòî
Ôóíêöèè
Ïåðèëíè ïðåïàðàòè è äðåõè çà ïðàíå, 22
×åêìåäæå çà ïåðèëíèòå ïðåïàðàòè
Ïîäãîòâÿíå íà ïðàíåòî
Ñïåöèôè÷íî ïðàíå
Ñèñòåìà çà èçìåðâàíå íà òîâàðà
Ïðîáëåìè è ìåðêè çà îòñòðàíÿâàíåòî èì, 23
Ñåðâèçíî îáñëóæâàíå, 24
BG
IWDC 6145
Èíñòðóêöèè çà ïîëçâàíå
ÏÅÐÀËÍÀ ÌÀØÈÍÀ
! Този символ ви напомня да прочетете
настоящата книжка с инструкции.

14
BG
Ìîíòèðàíå
! Âàæíî å äà ñúõðàíÿâàòå èíñòðóêöèèòå, çà äà
ìîæåòå äà ïðàâèòå äîïúëíèòåëíè ñïðàâêè ïî
âñÿêî âðåìå.  ñëó÷àé ÷å ïåðàëíàòà ìàøèíà
ñå ïðîäàäå, ïðåîòñòúïè èëè ïðåìåñòè,
òðÿáâà äà ñå ïîãðèæèòå èíñòðóêöèèòå âèíàãè
äà ÿ ïðèäðóæàâàò, çà äà ñå ïðåäîñòàâè
èíôîðìàöèÿ íà íîâèÿ ñîáñòâåíèê çà ðàáîòàòà
è ñúîòâåòíèòå ïðåäóïðåæäåíèÿ.
! Ïðî÷åòåòå âíèìàòåëíî èíñòðóêöèèòå:
çàùîòî ñúäúðæàò âàæíà èíôîðìàöèÿ çà
ìîíòàæà, èçïîëçâàíåòî è áåçîïàñíîñòòà.
Ðàçîïàêîâàíå è íèâåëèðàíå
Ðàçîïàêîâàíå
1. Ðàçîïàêîâàéòå ïåðàëíàòà ìàøèíà.
2. Ïðîâåðåòå äàëè ïåðàëíàòà ìàøèíà íå
å ïîâðåäåíà ïðè òðàíñïîðòèðàíåòî. Àêî å
ïîâðåäåíà, íå ÿ ñâúðçâàéòå, à ñå îáúðíåòå
êúì ïðîäàâà÷à.
3. Ñâàëåòå 4-òå âèíòà
ç à ï ð å ä ï à ç â à í å
ï ð è ò ð à í ñ ï î ð ò
è ã ó ì è ÷ ê àò à ñ ú ñ
ñ ú î ò â å ò í à ò à
âòóëêà, ïîñòàâåíè
îò çàäíàòà ñòðàíà
(âèæ ïîêàçàíîòî íà
ôèãóðàòà).
4. Çàòâîðåòå îòâîðèòå ñ ïðåäîñòàâåíèòå
ïëàñòìàñîâè êàïà÷êè.
5. Ñúõðàíåòå âñè÷êè ÷àñòè: çà äà ñå ìîíòèðàò
îòíîâî ïðè íåîáõîäèìîñò ïåðàëíàòà ìàøèíà
äà áúäå òðàíñïîðòèðàíà.
! Îïàêîâú÷íèÿò ìàòåðèàë íå å äåòñêà
èãðà÷êà.
Íèâåëèðàíå
1. Ìîíòèðàéòå ïåðàëíàòà ìàøèíà íà ðàâåí è
òâúðä ïîä, áåç äà ÿ îïèðàòå â ñòåíè, ìåáåëè è äð.
2 . À ê î ï î ä ú ò
í å å è ä å à ë í î
õ î ð è ç î í ò à ë å í ,
ê î ì ï å í ñ è ð à é ò å
íåðàâíîñòèòå, êàòî
îòâèåòå èëè çàâèåòå
ïðåäíèòå êðà÷åòà (âèæ
ôèãóðàòà); úãúëúò
íà íàêëîíà, èçìåðåí
âú ðõ ó ð à á îò í àòà
ïîâúðõíîñò, íå òðÿáâà äà íàäâèøàâà 2°.
Òî÷íîòî íèâåëèðàíå ïîçâîëÿâà ìàøèíàòà äà
áúäå ñòàáèëíà è äà ñå èçáÿãâàò âèáðàöèèòå,
øóìúò è ïðåìåñòâàíåòî é ïî âðåìå íà
ðàáîòà. Êîãàòî íàñòèëêàòà å ìîêåò èëè
êèëèì, ðåãóëèðàéòå òàêà êðà÷åòàòà, ÷å ïîä
ïåðàëíàòà ìàøèíà äà îñòàíå äîñòàòú÷íî
ìÿñòî çà âåíòèëàöèÿ.
Õèäðàâëè÷íè è åëåêòðè÷åñêè
âðúçêè
Ñ â ú ð ç â à í å í à ì à ð ê ó ÷ à ê ú ì
âîäîïðîâîäíàòà ìðåæà
1. Ñâúðæåòå
çàõðàíâàùèÿ ìàðêó÷,
êàòî ãî çàâèåòå êúì
êðàíà çà ñòóäåíàòà
âîäà ñ íàêðàéíèê ñ
ãàçîâà ðåçáà 3/4 (âèæ
ôèãóðàòà).
Ïðåäè äà ãî ñâúðæåòå,
èçòî÷åòå âîäàòà,
äîêàòî ñå èçáèñòðè.
2. Ñâúðæåòå ìàðêó÷à
çà ñòóäåíàòà âîäà êúì
ïåðàëíàòà ìàøèíà,
ê à ò î ãî ç à â è åò å
ê ú ì ñ ï å ö è à ë í è ÿ
ùóöåð, ðàçïîëîæåí
îò çàäíàòà ñòðàíà,
ãîðå âäÿñíî (âèæ
ôèãóðàòà).
3. Âíèìàâàéòå ìàðêó÷à äà íå ñå ïðåãúâà è
ïðèòèñêà.
! Íàëÿãàíåòî ïî âîäîïðîâîäíàòà ìðåæà
òðÿáâà äà áúäå â ãðàíèöèòå, óêàçàíè
â òàáëèöàòà „Òåõíè÷åñêè äàííè” (âæ.
ñëåäâàùàòà ñòðàíèöà).
! Àêî äúëæèíàòà íà çàõðàíâàùèÿ ìàðêó÷ íå å
äîñòàòú÷íà, ñå îáúðíåòå êúì ñïåöèàëèçèðàí
ìàãàçèí èëè êúì îòîðèçèðàí òåõíèê.
! Íèêîãà íå èçïîëçâàéòå âå÷å óïîòðåáÿâàí
ìàðêó÷.
! Èçïîëçâàéòå òåçè, êîåòî ñà äîñòàâåíè ñ
ïåðàëíàòà ìàøèíà.

BG
15
Òåõíè÷åñêè äàííè
Ìîäåë IWDC 6145
Ðàçìåðè
øèðèíà 59,5 ñì
âèñî÷èíà 85 ñì
äúëáî÷èíà 53,5 ñì
Âìåñòèìîñò
îò 1 äî 6 êã. çà èçïèðàíåòî
îò 1 äî 5 êã. çà ñóøåíåòî
Åëåêòðè÷åñêî
çàõðàíâàíå
Âèæ òàáåëêàòà ñ
õàðàêòåðèñòèêèòå,
ïîñòàâåíà íà ìàøèíàòà
Çàõðàíâàíå ñ
âîäà
ìàêñèìàëíî íàëÿãàíå 1
ÌÐà (10 bar)
ìèíèìàëíî íàëÿãàíå
0,05 ÌÐà (0,5 bar)
îáåì íà êàçàíà 52 ëèòðà
Ñêîðîñò íà
öåíòðîôóãàòà
äî 1400 îáîðîòà/ìèíóòà
Ïðîãðàìè
çà ïðîâåðêà
ñúãëàñíî
íîðìà EN
50229
èçïèðàíåòî: ïðîãðàìà
2; òåìïåðàòóðà 60°;
èçâúðøåíà ñ 6 êã ïðàíå.
ñóøåíå: ïúðâîíà÷àëíî
ñóøåíå ïðè 1 êã. ïðàíå è
èçáðàíà ïðîäúëæèòåëíîñò
îò 60 ìèí.;
ïîâòîðíî ñóøåíå
ïðè 5 êã. ïðàíå, êàòî
ïðîãðàìàòîðúò ÑÓØÅÍÅ
å ïîñòàâåí íà ïîçèöèÿ
.
Ïåðàëíàòà ìàøèíà
ñúîòâåòñòâà íà ñëåäíèòå
Åâðîïåéñêè äèðåêòèâè:
- 89/336/ÑÅÅ
îò 03/05/89 (çà
åëåêòðîìàãíèòíà
ñúâìåñòèìîñò)
è ïîñëåäâàùèòå
èçìåíåíèÿ
- 2012/19/EU
- 2006/95/CE (çà íèñêî
íàïðåæåíèå)
65 - 100 cm
Ñâúðçâàíå íà ìàðêó÷à çà ìðúñíàòà âîäà
Ñâúðæåòå ìàðêó÷à çà
ìðúñíàòà âîäà, áåç
äà ãî ïðåãúâàòå, êúì
êàíàëèçàöèîííàòà
òðúáà èëè êúì òðúáàòà
ç à îò â å æ ä à í å â
ñòåíàòà, ðàçïîëîæåíè
íà âèñî÷èíà ìåæäó 65
è 100 ñì îò ïîäà, èëè
ãî ïîäïðåòå íà ðúáà íà
ìèâêàòà èëè âàíàòà,
ñâúðçâàéêè
äîñòàâåíèÿ
âîäà÷ êúì êðàíà
(âæ. ôèãóðàòà).
Ñâîáîäíèÿò êðàé
íà ìàðêó÷à çà
ìðúñíàòà âîäà
íå òðÿáâà äà
áúäå ïîòîïåí âúâ
âîäàòà.
! Íå ñå ïðåïîðú÷âà èçïîëçâàíåòî íà
óäúëæèòåëíè ìàðêó÷è. Àêî å íåîáõîäèìî,
óäúëæèòåëÿò òðÿáâà äà èìà ñúùèÿ äèàìåòúð
êàòî îðèãèíàëíèÿ è äà íå íàäâèøàâà 150 ñì.
Ñâúðçâàíå êúì åëåêòðè÷åñêàòà ìðåæà
Ïðåäè äà ñâúðæåòå ùåïñåëà â êîíòàêòà,
ïðîâåðåòå äàëè:
• êîíòàêòúò å çàçåìåí ñúãëàñíî äåéñòâàùèòå
ñòàíäàðòè;
• êîíòàêòúò ìîæå äà ïîåìå ìàêñèìàëíàòà
ìîùíîñò íà íàòîâàðâàíå íà ìàøèíàòà,
óêàçàíà â òàáëèöàòà ñ òåõíè÷åñêèòå äàííè
(âèæ ñëåäâàùàòà ñòðàíèöà);
• çàõðàíâàùîòî íàïðåæåíèå å â ãðàíèöèòå
íà óêàçàíîòî â òàáëèöàòà ñ òåõíè÷åñêèòå
äàííè (âèæ ñëåäâàùàòà ñòðàíèöà);
• êîíòàêòúò îòãîâàðÿ íà ùåïñåëà íà
ïåðàëíàòà ìàøèíà.  ïðîòèâåí ñëó÷àé
çàìåíåòå ùåïñåëà èëè êîíòàêòà.
! Ïåðàëíàòà ìàøèíà íå ñå ìîíòèðà íà
îòêðèòî, äîðè ïîä íàâåñ, çàùîòî å ìíîãî
îïàñíî äà ñå îñòàâè íà âëèÿíèåòî íà
àòìîñôåðíèòå óñëîâèÿ.
! Çà ìîíòèðà íàòà ïåðàë íà ìàø èíà
åëåêòðè÷åñêèÿò êîíòàêò òðÿáâà äà áúäå
ëåñíî äîñòúïåí.
! Íå è ç ï îë ç âà é ò å óäúëæèò åë è èë è
ðàçêëîíèòåëè.
! Êàáåëúò íå òðÿáâà äà áúäå îãúíàò èëè
ñïëåñêàí.
! Çàõðàíâàùèÿò êàáåë òðÿáâà äà ñå ïîäìåíÿ
ñàìî îò îòîðèçèðàíè òåõíèöè.
Âíèìàíèå! Ôèðìàòà îòõâúðëÿ âñÿêàêâà
îòãîâîðíîñò â ñëó÷àèòå, â êîèòî òåçè íîðìè
íå ñå ñïàçâàò.
Ïúðâî ïðàíå
Ñëåä èíñòàëèðàíå è ïðåäè óïîòðåáà âêëþ÷åòå
åäèí öèêúë íà èçïèðàíå ñ ïåðèëåí ïðåïàðàò,
íî áåç äðåõè, çàäàâàéêè ïðîãðàìà 2.

16
BG
Ïîääðúæêà è ïî÷èñòâàíå
Ñïèðàíå íà âîäàòà è èçêëþ÷âàíå
íà åëåêòðîçàõðàíâàíåòî
• Çàòâàðÿéòå êðàíà çà âîäà ñëåä âñÿêî
èçïèðàíå. Ïî òîçè íà÷èí ñå îãðàíè÷àâà
èçíîñâàíåòî íà õèäðàâëè÷íàòà èíñòàëàöèÿ
íà ïåðàëíàòà ìàøèíà è ñå îãðàíè÷àâà
îïàñíîñòòà îò òå÷îâå.
• Èçêëþ÷âàéòå ùåïñåëà îò åëåêòðè÷åñêîòî
çàõðàíâàíå, êîãàòî ïî÷èñòâàòå ïåðàëíàòà
ìàøèíà è ïî âðåìå íà ðàáîòè ïî ïîääðúæêàòà.
Ïî÷èñòâàíå íà ïåðàëíàòà ìàøèíà
Âúíøíàòà ÷àñò è ãóìåíèòå ÷àñòè ìîãàò äà ñå
ïî÷èñòâàò ñ êúðïà ñ õëàäêà âîäà è ñàïóí. Íå
èçïîëçâàéòå ðàçòâîðèòåëè èëè àáðàçèâíè
ïðåïàðàòè.
Ïî÷èñòâàíå íà ÷åêìåäæåòî çà
ïåðèëíèòå ïðåïàðàòè
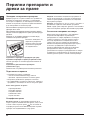
Èçâàäåòå ÷åêìåäæåòî
ñ ï î â ä è ã à í å è
èçòåãëÿíå íàâúí (âèæ
ôèãóðàòà).
È ç ì è é ò å ã î ï î ä
òå÷àùà âîäà. Òîâà
ïî÷èñòâàíå òðÿáâà
ä à ñ å è ç â ú ð ø â à
÷åñòî.
Ïîääðúæêà íà ëþêà è íà áàðàáàíà
• Îñòàâÿéòå ëþêà âèíàãè îòêðåõíàò çà
èçáÿãâàíå îáðàçóâàíåòî íà íåïðèÿòíè
ìèðèçìè.
Ïî÷èñòâàíå íà ïîìïàòà
Ïåðàëíàòà ìàøèíà å îêîìïëåêòîâàíà ñúñ
ñàìîïî÷èñòâàùà ñå ïîìïà, êîÿòî íÿìà
íóæäà îò ïîääðúæêà. Âúçìîæíî å îáà÷å
ìàëêè ïðåäìåòè (ìîíåòè, êîï÷åòà) äà
ïîïàäíàò âúâ ôèëòúðà, êîéòî ïðåäïàçâà
ïîìïàòà è ñå íàìèðà â äîëíàòà é ÷àñò.
! Óâåðåòå ñå, ÷å öèêúëúò íà ïðàíå å
çàâúðøèë, è èçêëþ÷åòå ùåïñåëà îò êîíòàêòà.
Çà äîñòúï äî ôèëòúðà:
1. ñâàëåòå ïàíåëà
â ïðåäíàòà ÷àñò íà
ïåðàëíàòà ìàøèíà ñ
ïîìîùòà íà îòâåðòêà
(âæ. ôèãóðà);
2. î ò â è é ò å
ê à ï à ÷ ê à ò à , ê à ò î
ÿ ç à â ú ð ò è ò å â
ï î ñ î ê à , î á ð àò í à
íà ÷àñîâíèêîâàòà
ñ ò ð å ë ê à ( â è æ
ôèãóðà): íîðìàëíî
å äà èçòå÷å ìàëêî
âîäà;
3. ïî÷èñòåòå âíèìàòåëíî îòâúòðå;
4. çàâèéòå îòíîâî êàïà÷êàòà;
5. çàòâîðåòå îòíîâî ïàíåëà, êàòî, ïðåäè äà
ãî èçáóòàòå êúì ïåðàëíÿòà, ñå óâåðèòå, ÷å
ñòå ïîñòàâèëè ïðàâèëíî çàêðåïâàùèòå êóêè
â ñïåöèàëíèòå âîäà÷è.
Ïðîâåðêà íà ìàðêó÷à çà ñòóäåíàòà âîäà
Ïðîâåðÿâàéòå ìàðêó÷à çà ñòóäåíàòà âîäà
ïîíå âåäíúæ ãîäèøíî. Äà ñå çàìåíè, àêî
å íàïóêàí è íàöåïåí, çàùîòî ïî âðåìå
íà èçïèðàíå ãîëÿìîòî íàëÿãàíå ìîæå äà
ïðåäèçâèêà âíåçàïíî ñïóêâàíå.
! Íèêîãà íå èçïîëçâàéòå âå÷å óïîòðåáÿâàí
ìàðêó÷.

BG
17
Ìåðêè çà áåçîïàñíîñò è
ïðåïîðúêè
! Ïåðàëíàòà ìàøèíà å ïðîåêòèðàíà è ïðîèçâåäåíà â
ñúîòâåòñòâèå ñ ìåæäóíàðîäíèòå íîðìè çà áåçîïàñíîñò.
Ïðåäóïðåæäåíèÿòà òóê ñà ïðîäèêòóâàíè ïî ïðè÷èíè çà
áåçîïàñíîñò è òðÿáâà äà ñå ÷åòàò âíèìàòåëíî.
Îáùè ïðåäîõðàíèòåëíè ìåðêè
• Този уред е предназначен изключително за домашна
употреба.
•
Този уред може да бъде използван от деца над 8
години и лица с ограничени физически, сетивни
или умствени способности, или с недостатъчен
опит и познания, ако те са наблюдавани или
инструктирани относно използването на уреда
от лице, отговорно за тяхната безопасност и
разбират опасностите, свързани с употребата
на уреда. Децата не трябва да си играят с уреда.
Поддръжката и почистването не трябва да се
извършват от деца без надзор.
– Не сушете неизпрани дрехи.
– Преди сушене на дрехи, замърсени с
готварско олио, ацетон, алкохол, бензин,
керосин, препарати за почистване на петна,
терпентин, восък и съставки за почистването
му, те трябва да бъдат изпрани в топла вода
с по-голямо количество перилен препарат.
– Предмети като експандирана гума
(латексова пяна), шапки за баня,
текстилни непромокаеми материали,
едностранно гумирани артикули и дрехи
или възглавници с части от латексова
пяна не трябва да се сушат в сушилнята.
– Използването на омекотители или
подобни препарати трябва да се
извършва в съответствие с инструкциите
на производителя.
– Краят на цикъла на сушене се изпълнява
без нагряване (цикъл на охлаждане), за да се
гарантира, че дрехите няма да се повредят.
ВНИМАНИЕ: Никога не спирайте
сушилнята преди края на програмата за
сушене. В такъв случай бързо извадете
всички дрехи и ги прострете, за да се
охладят бързо.
• Не докосвайте машината, когато сте боси или с мокри
или влажни ръце или крака.
• Изключвайте от контакта, като хващате за щепсела,
а не като дърпате кабела.
• Не докосвайте маркуча за мръсната вода, защото
може да достигне високи температури.
• Никога не отваряйте люка със сила: защото може
да се повреди механизмът за безопасност, който
предпазва от случайно отваряне.
• В случай на повреда по никакъв повод не достигайте до
вътрешните механизми в опити за ремонт.
• Винаги контролирайте децата да не се доближават
до работещата машина.
• Преместването да се извършва внимателно от
двама или трима души. Никога от сам човек, защото
пералната машина тежи много.
• Преди да заредите машината, проверете дали
барабанът е празен.
• По време на сушенето, люка се нагрява.
• Не сушете дрехи които са чистени с запалими
разтворители (напр. трихлоретилен).
• Не сушете дрехи, съдържащи гума или
други еластомери.
• Проверявайте крана за вода да е винаги отворен при
сушене.
• Извадете всички предмети, като запалки
и кибрити, от джобовете.
• Децата под 3-годишна възраст трябва да
бъдат държани далеч от сушилнята, ако
не са под постоянен надзор.
Ðåöèêëèðàíå
• Óíèùîæàâàíå íà îïàêîâú÷íèÿ ìàòåðèàë: ñïàçâàéòå
ìåñòíèòå íîðìè – ïî òîçè íà÷èí îïàêîâú÷íèÿò
ìàòåðèàë ìîæå äà ñå ðåöèêëèðà.
• Европеиската директива 2012/19/EU за отпадъците
от електрическо и електронно оборудване предвижда
домакинските електроуреди да не се изхвърлят заедно
с обичайните твърди градски отпадъци. Извадените от
употреба уреди трябва да бъдат събирани отделно с цел
да бъде увеличен делът на подлежащите на повторна
употреба и рециклиране материали, от които са направени,
както и да бъдат избегнати евентуални вреди за здравето и
околната среда. Символът “зачеркнато кошче” е поставен
върху всички продукти, за да напомня за задължителното
разделно събиране.
Çà äîïúëíèòåëíà èíôîðìàöèÿ îòíîñíî ïðàâèëíîòî
èçâàæäàíå îò óïîòðåáà íà äîìàêèíñêèòå åëåêòðîóðåäè,
èíòåðåñóâàùèòå ñå ìîãàò äà ñå îáúðíàò êúì ñëóæáàòà
çà ñúáèðàíå íà îòïàäúöè èëè êúì äèñòðèáóòîðèòå.

18
BG
×åêìåäæå çà ïåðèëíèòå ïðåïàðàòè: çà äîçèðàíå
íà ïåðèëíèòå ïðåïàðàòè è äîáàâêèòå (âæ. “Ïåðèëíè
ïðåïàðàòè è äðåõè çà ïðàíå”).
Áóòîí ÂÊËÞ×ÂÀÍÅ/ÈÇÊËÞ×ÂÀÍÅ: çà âêëþ÷âàíå è
èçêëþ÷âàíå íà ïåðàëíÿòà.
Ïðîãðàìàòîð ÏÐÎÃÐÀÌÈ: çà çàäàâàíå íà ïðîãðàìèòå.
Ïî âðåìå íà èçïúëíåíèå íà ïðîãðàìàòà êëþ÷úò
îñòàâà íåïîäâèæåí.
Áóòîíè ñúñ ñâåòëèííè èíäèêàòîðè ÔÓÍÊÖÈß: çà
ñåëåêòèðàíå íà âúçìîæíèòå ôóíêöèè. Ñâåòëèííèÿò
èíäèêàòîð çà èçáðàíàòà ôóíêöèÿ ùå ïðîäúëæè äà
ñâåòè.
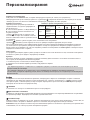
Ïðîãðàìàòîð ÑÓØÅÍÅ: çà äà çàäàäåòå æåëàíîòî
ñóøåíå (âæ. “Ïåðñîíàëèçèðàíèÿ”).
Ïðîãðàìàòîð ÒÅÌÏÅÐÀÒÓÐÀ: çà çàäàâàíå íà
òåìïåðàòóðà èëè ïðàíå ñúñ ñòóäåíà âîäà (âæ.
“Ïåðñîíàëèçèðàíèÿ”).
Ñâåòëèííè ÈÍÄÈÊÀÒÎÐÈ ÇÀ ÕÎÄ ÍÀ ÖÈÊÚË/
ÇÀÁÀÂÅÍÎ ÂÊËÞ×ÂÀÍÅ: çà äà ñëåäâàòå õîäà íà
èçïúëíåíèå íà ïðîãðàìàòà çà ïðàíå.
Âêëþ÷åíèÿò ñâåòëèíåí èíäèêàòîð ïîêàçâà, ÷å ñå
èçâúðøâà îïðåäåëåíà ôàçà îò öèêúëà.
Àêî å çàäàäåíà ôóíêöèÿòà “Çàáàâåíî âêëþ÷âàíå”, ùå
ñå ïîñî÷âà âðåìåòî, îñòàâàùî äî ñòàðòèðàíåòî íà
ïðîãðàìàòà (âæ. ñúñåäíàòà ñòðàíèöà).
Ñâåòëèíåí èíäèêàòîð ÁËÎÊÈÐÀÍ ËÞÊ: çà äà
ñå ðàçáåðå äàëè ëþêúò ìîæå äà ñå îòâîðè (âæ.
ñúñåäíàòà ñòðàíèöà).
Áóòîí ñúñ ñâåòëèíåí èíäèêàòîð ÑÒÀÐÒ/ÏÀÓÇÀ:
çà ñòàðòèðàíå íà ïðîãðàìèòå èëè âðåìåííîòî èì
ïðåêúñâàíå.
Çàáåëåæêà: çà çàäàâàíå íà ïàóçà â ïðàíåòî
íàòèñíåòå îòíîâî áóòîíà - èíäèêàòîðúò ùå
ìèãà ñ îðàíæåâà ñâåòëèíà, äîêàòî ñâåòëèííèÿò
èíäèêàòîð, óêàçâàù èçïúëíåíèå íà ôàçà, ùå
ñâåòè íåïðåêúñíàòî. Àêî ñâåòëèííèÿò èíäèêàòîð
ÁËÎÊÈÐÀÍ ËÞÊ
å óãàñíàë, ùå ìîæå äà ñå îòâîðè
âðàòàòà íà ëþêà (èç÷àêàéòå îêîëî 3 ìèíóòè).
Çà ïðîäúëæàâàíå íà öèêúëà ïðàíå îò ìÿñòîòî, â
êîåòî å áèë ïðåêúñíàò, íàòèñíåòå îòíîâî òîçè áóòîí.
Ðåæèì íà stand by
 ñúîòâåòñòâèå ñ íîâèòå íîðìàòèâè çà ïåñòåíå
íà åíåðãèÿ òàçè ïåðàëíà ìàøèíà å ñíàáäåíà ñúñ
ñèñòåìà çà àâòîìàòè÷íî èçêëþ÷âàíå (stand by),
êîÿòî ñå çàäåéñòâà ñëåä 30 ìèíóòè â ñëó÷àé, ÷å
ìàøèíàòà íå ñå èçïîëçâà. Íàòèñíåòå çà êðàòêî áóòîí
ÂÊËÞ×ÂÀÍÅ/ÈÇÊËÞ×ÂÀÍÅ è èç÷àêàéòå ìàøèíàòà
äà ñå çàäåéñòâà îòíîâî.
Потребление в режим „Off“ (Изкл.) 0,5 W
Потребление в режим „On“ (Вкл.) 8 W
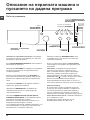
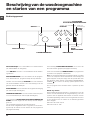
Îïèñàíèå íà ïåðàëíàòà ìàøèíà è
ïóñêàíåòî íà äàäåíà ïðîãðàìà
Ñâåòëèííè ÈÍÄÈÊÀÒÎÐÈ ÇÀ
ÕÎÄ ÍÀ ÖÈÊÚË/ÇÀÁÀÂÅÍÎ
ÂÊËÞ×ÂÀÍÅ
Ñâåòëèíåí èíäèêàòîð
ÁËÎÊÈÐÀÍ ËÞÊ
Áóòîí ñúñ
ñâåòëèíåí
èíäèêàòîð
ÑÒÀÐÒ/
ÏÀÓÇÀ
Òàáëî çà óïðàâëåíèå
×åêìåäæå çà ïåðèëíèòå
ïðåïàðàòè
Ïðîãðàìàòîð
ÒÅÌÏÅÐÀÒÓÐÀ
Áóòîíè ñúñ ñâåòëèííè
èíäèêàòîðè ÔÓÍÊÖÈß
Áóòîí
ÂÊËÞ×ÂÀÍÅ/
ÈÇÊËÞ×ÂÀÍÅ
Ïðîãðàìàòîð
ÏÐÎÃÐÀÌÈ
Ïðîãðàìàòîð
ÑÓØÅÍÅ

BG
19
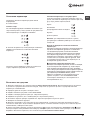
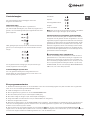
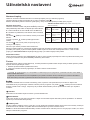
Ñâåòëèííè èíäèêàòîðè
Ñëåäÿùèòå ñâåòëèííè èíäèêàòîðè äàâàò âàæíà
èíôîðìàöèÿ.
Åòî êàêâî êàçâàò:
Îòëîæåí ñòàðò
Àêî å àêòèâèðàíà ôóíêöèÿòà “Çàáàâåíî âêëþ÷âàíå” (âæ.
“Ïåðñîíàëèçèðàíèÿ”), ñëåä ïóñêàíå íà ïðîãðàìàòà ùå
ñâåòíå èíäèêàòîðúò çà èçáðàíîòî çàáàâÿíå:
 òå÷åíèå íà âðåìåòî ùå ñå âèçóàëèçèðà îñòàâàùîòî
çàáàâÿíå ÷ðåç ìèãàíå íà ñúîòâåòíèÿ ñâåòëèíåí
èíäèêàòîð:
Ñëåä êàòî èçòå÷å çàäàäåíîòî âðåìå çà îòëàãàíå íà
ñòàðòà, èçáðàíàòà ïðîãðàìà ùå ñå âêëþ÷è.
Ñâåòëèííè èíäèêàòîðè çà òåêóùèòå ôàçè
Ñëåä êàòî å èçáðàí è ñòàðòèðàí æåëàíèÿò öèêúë íà
ïðàíå, ñâåòëèííèòå èíäèêàòîðè ùå ñâåòâàò åäèí ñëåä
äðóã, çà äà óêàçâàò õîäà íà öèêúëà:
Бележка: при завършване на цикълът сушене,
програматорът СУШЕНЕ трябва да се постави на
позиция “0”.
Áóòîíè çà ôóíêöèÿ è ñúîòâåòíè ñâåòëèííè
èíäèêàòîðè
Ïðè èçáîð íà ôóíêöèÿ ñúîòâåòíèÿò ñâåòëèíåí èíäèêàòîð
ùå ñâåòíå. Àêî èçáðàíàòà ôóíêöèÿ íå å ñúâìåñòèìà
ñúñ çàäàäåíàòà ïðîãðàìà, ñúîòâåòíèÿò ñâåòëèíåí
èíäèêàòîð ùå ìèãà è ôóíêöèÿòà íÿìà äà ñå àêòèâèðà.
Àêî èçáðàíàòà ôóíêöèÿ íå å ñúâìåñòèìà ñ äðóãà
ïðåäâàðèòåëíî çàäàäåíà, ñâåòëèííèÿò èíäèêàòîð,
ñúîòâåòñòâàù íà ïúðâàòà èçáðàíà ôóíêöèÿ, ìèãà
è ñå àêòèâèðà ñàìî âòîðàòà, êàòî èíäèêàòîðúò íà
àêòèâèðàíàòà ôóíêöèÿ ñâåòâà.
Ñâåòëèíåí èíäèêàòîð áëîêèðàí ëþê
Ñâåòåùèÿò ñâåòîèíäèêàòîð ïîêàçâà, ÷å ëþêúò å áëîêèðàí,
çà äà ñå âúçïðåïÿòñòâà îòâàðÿíåòî ìó; çà äà îòâîðèòå
ëþêà èç÷àêàéòå ñâåòîèíäèêàòîðà äà óãàñíå; (èç÷àêàéòå
îêîëî 3 ìèíóòè).Çà îòâàðÿíå íà ëþêà ïî âðåìå íà ïðàíå ñå
íàòèñêà áóòîí ÑÒÀÐÒ/ÏÀÓÇÀ; ìîæå äà îòâîðèòå ëþêà, àêî
ñâåòîèíäèêàòîðúò ÁËÎÊÈÐÀÍ ËÞÊ å óãàñíàë.
! Áúðçîòî ïðèìèãâàíå íà ñâåòîèíäèêàòîðèòå íà
„ôàçèòå çà ïðàíå“ è òîçè çà ÁËÎÊÈÐÀÍ ËÞÊ
ñèãíàëèçèðàò àíîìàëèÿ (âæ. “Íåèçïðàâíîñòè è
îòñòðàíÿâàíåòî èì”).
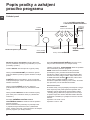
Âêëþ÷âàíå íà ïðîãðàìà
1. Âêëþ÷åòå ïåðàëíÿòà, êàòî íàòèñíåòå áóòîíà ÂÊËÞ×ÂÀÍÅ/ÈÇÊËÞ×ÂÀÍÅ. Âñè÷êè èíäèêàòîðè ùå ñå âêëþ÷àò
è ùå ñâåòÿò â ïðîäúëæåíèå íà íÿêîëêî ñåêóíäè, ñëåä êîåòî ùå óãàñíàò è ùå ñâåòè ñ ïóëñèðàùà ñâåòëèíà
èíäèêàòîðúò ÑÒÀÐÒ/ÏÀÓÇÀ.
2. Çàðåäåòå äðåõèòå çà ïðàíå è çàòâîðåòå ëþêà.
3. Çàäàéòå æåëàíàòà ïðîãðàìà ñ êëþ÷à ÏÐÎÃÐÀÌÈ.
4. Çàäàéòå òåìïåðàòóðàòà íà ïðàíå (âæ. “Ïåðñîíàëèçèðàíèÿ”).
5. Çàäàâàíå íà ñóøåíåòî, àêî å íåîáõîäèìî (âæ. “Ïåðñîíàëèçèðàíèÿ”).
6. Ïîñòàâåòå ïåðèëåí ïðåïàðàò è äîáàâêè âæ. “Ïåðèëíè ïðåïàðàòè è äðåõè çà ïðàíå”.
7. Èçáèðàíå íà æåëàíèòå ôóíêöèè.
8. Âêëþ÷åòå ïðîãðàìàòà, êàòî íàòèñíåòå áóòîíà ÑÒÀÐÒ/ÏÀÓÇÀ, ñúîòâåòíèÿò ñâåòëèíåí èíäèêàòîð ùå ñâåòè
ïîñòîÿííî â çåëåí öâÿò. Çà äà îòìåíèòå çàäàäåíèÿ öèêúë, ïîñòàâåòå ìàøèíàòà â ïàóçà, êàòî íàòèñíåòå áóòîíà
ÑÒÀÐÒ/ÏÀÓÇÀ, è èçáåðåòå íîâèÿ öèêúë.
9. Êîãàòî ïðîãðàìàòà ñâúðøè, ùå ñâåòíå èíäèêàòîðúò
. Êîãàòî ñâåòîèíäèêàòîðúò ÁËÎÊÈÐÀÍ ËÞÊ óãàñíå,
ìîæå äà îòâîðèòå ëþêà (èç÷àêàéòå îêîëî 3 ìèíóòè). Èçâàäåòå ïðàíåòî è îñòàâåòå ëþêà ïðèòâîðåí, çà äà èçñúõíå
áàðàáàíúò. Èçêëþ÷åòå ïåðàëíÿòà, êàòî íàòèñíåòå áóòîíà ÂÊËÞ×ÂÀÍÅ/ÈÇÊËÞ×ÂÀÍÅ.
Ïðàíå
Èçïëàêâàíå
Öåíòðîôóãà/Èçòî÷âàíå íà âîäàòà
Ñóøåíå
Êðàé íà ïðàíåòî

20
BG
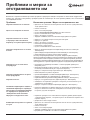
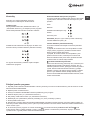
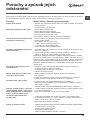
Ñïåöèàëíè ïðîãðàìè
Sport Light (ïðîãðàìà
9
) ðàçðàáîòåíà å çà ïðàíå íà òúêàíè íà ëåêî çàìúðñåíî ñïîðòíî îáëåêëî (àíöóçè,
ïàíòàëîíè, äð.); çà ïîñòèãàíå íà ïî-äîáðè ðåçóëòàòè ñå ïðåïîðú÷âà äà íå ñå íàäâèøàâà ìàêñèìàëíîòî
íàòîâàðâàíå, óêàçàíî â „Tàáëèöà ñ ïðîãðàìèòå“. Ïðåïîðú÷âà ñå äà ñå èçïîëçâà òå÷åí ïåðèëåí ïðåïàðàò â
äîçà, ïîäõîäÿùà çà ïîëîâèí çàðåæäàíå.
Sport Shoes (ïðîãðàìà
10
) ðàçðàáîòåíà å çà ïðàíå íà ñïîðòíè îáóâêè; çà ïîñòèãàíå íà ïî-äîáðè ðåçóëòàòè
äà íå ñå ïåðàò ïîâå÷å îò 2 ÷èôòà (тъкан).
Express Wash & Dry (ïðîãðàìà 13) å ñúçäàäåíà çà ïðàíå è ñóøåíå íà ëåêî çàìúðñåíè äðåõè çà êðàòêî
âðåìå. Ïðè èçáîð íà òîçè ðåæèì ìîæå äà ñå èçïåðå è èçñóøè ïðàíå äî 0,5 êã ñàìî çà 35 ìèíóòè. Çà
ïîñòèãàíå íà îïòèìàëíè ðåçóëòàòè èçïîëçâàéòå òå÷åí ïåðèëåí ïðåïàðàò. Ïðåäâàðèòåëíî îáðàáîòâàéòå
ìàíøåòèòå, ÿêèòå è ïåòíàòà.
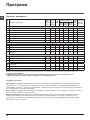
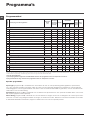
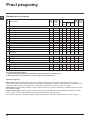
Ïðîãðàìè
Òàáëèöà ñ ïðîãðàìèòå
Ïðîãðàìè
Îïèñàíèå íà ïðîãðàìàòà
Ìàêñ.
òåìïå-
ðàòóðà
(°C)
Ìàêñ.
ñêîðîñò
(îáîðîòè
â
ìèíóòà)
ÑÓØ-
ÅÍÅ
Ïåðèëíè ïðåïàðàòè
Çàðåæ-
äàíå
ìaêñ.
(êã)
Ïðîäúëæ-
èòåëíîñò
íà öèêúëà
Ïðåä-
ïðàíå
Îñíîâíî
ïðàíå
Îìåêî-
òèòåë
Ïðîãðàìè çà âñåêè äåí
1
ÏÀÌÓ Ïðåäïðàíå: Áåëè, èçêëþ÷èòåëíî çàìúðñåíè.
90° 1400
6 170’
2
ÏÀÌÓ: Áåëè, èçêëþ÷èòåëíî çàìúðñåíè.
90° 1400
-
6 160’
2
ÏÀÌÓ (1): Áåëè è öâåòíè, óñòîé÷èâè, ñèëíî çàìúðñåíè.
60° 1400
-
6 185’
2
ÏÀÌÓ (2): Áåëè è öâåòíè, íåóñòîé÷èâè, ñèëíî çàìúðñåíè.
40° 1400
-
6 175’
3
ÏÀÌÓ: Áåëè è öâåòíè, óñòîé÷èâè, ñèëíî çàìúðñåíè.
60° 1400
-
6 140’
4
ÏÀÌÓ–ÖÂÅÒÍÈ: Áåëè, ìàëêî çàìúðñåíè, è öâåòíè, íåóñòîé÷èâè.
40° 1400
-
6 90’
5
ÑÈÍÒÅÒÈ×ÍÈ: Öâåòíè, óñòîé÷èâè, ìíîãî çàìúðñåíè.
60° 1000
-
3 110’
Ñïåöèàëíè ïðîãðàìè
6
ÂÚËÍÅÍÈ ÒÚÀÍÈ: Çà âúëíà, êàøìèð è ò.í.
40° 600 - -
1,5 70’
7
ÎÏÐÈÍÀ/ÏÅÐÄÅÒÀ: Çà äðåõè îò êîïðèíà, âèñêîçà, ôèíî áåëî.
30° 0 - -
1 55’
8
EN
40° 800
-
3 75’
9
prt iht
30° 600 - -
3 60’
10
prt hes
30° 600 - -
(ìaêñ.2
÷èôòà.)
60’
Ïðîãðàìè çà ñóøåíå
11
Ñóøåíå “Ïàìóê”
- -
- - - 5 -
12
Ñóøåíå “Ñèíòåòè÷íè òúêàíè”
- -
- - - 3 -
13
ss as y
30° 1400
-
0,5 35’
×àñòè÷íè ïðîãðàìè
ÈÇÏËÀÂÀÍÅ
- 1400
- -
6 36’
ÖÅÍÒÐÎÔÓÃÀ
- 1400
- - - 6 10’
ÈÇÏÎMÏÂÀÍÅ
- 0 - - - - 6 3’
Продължителността на цикъла, показана на дисплея или посочена в ръководството, е приблизително изчислена въз основа на стандартните
условия. Реалното времетраене може да варира в зависимост от множество фактори като температура и налягане на водата при пълнене,
температура на въздуха в помещението, количество перилен препарат, количество, вид и тегло на прането, допълнително избрани опции.
Çà âñè÷êè Test Institutes:
1) Ïðîãðàìà çà ïðîâåðêà ñúãëàñíî ñòàíäàðò EN 50229: çàäàéòå ïðîãðàìà 2 ñ òåìïåðàòóðà 60 °C.
2) Äúëãà ïðîãðàìà çà ïàìóê; çàäàéòå ïðîãðàìà 2 ñ òåìïåðàòóðà 40 °C.
La pagina si sta caricando...
La pagina si sta caricando...
La pagina si sta caricando...
La pagina si sta caricando...
La pagina si sta caricando...
La pagina si sta caricando...
La pagina si sta caricando...
La pagina si sta caricando...
La pagina si sta caricando...
La pagina si sta caricando...
La pagina si sta caricando...
La pagina si sta caricando...
La pagina si sta caricando...
La pagina si sta caricando...
La pagina si sta caricando...
La pagina si sta caricando...
La pagina si sta caricando...
La pagina si sta caricando...
La pagina si sta caricando...
La pagina si sta caricando...
La pagina si sta caricando...
La pagina si sta caricando...
La pagina si sta caricando...
La pagina si sta caricando...
La pagina si sta caricando...
La pagina si sta caricando...
La pagina si sta caricando...
La pagina si sta caricando...
La pagina si sta caricando...
La pagina si sta caricando...
La pagina si sta caricando...
La pagina si sta caricando...
La pagina si sta caricando...
La pagina si sta caricando...
La pagina si sta caricando...
La pagina si sta caricando...
La pagina si sta caricando...
La pagina si sta caricando...
La pagina si sta caricando...
La pagina si sta caricando...
-
 1
1
-
 2
2
-
 3
3
-
 4
4
-
 5
5
-
 6
6
-
 7
7
-
 8
8
-
 9
9
-
 10
10
-
 11
11
-
 12
12
-
 13
13
-
 14
14
-
 15
15
-
 16
16
-
 17
17
-
 18
18
-
 19
19
-
 20
20
-
 21
21
-
 22
22
-
 23
23
-
 24
24
-
 25
25
-
 26
26
-
 27
27
-
 28
28
-
 29
29
-
 30
30
-
 31
31
-
 32
32
-
 33
33
-
 34
34
-
 35
35
-
 36
36
-
 37
37
-
 38
38
-
 39
39
-
 40
40
-
 41
41
-
 42
42
-
 43
43
-
 44
44
-
 45
45
-
 46
46
-
 47
47
-
 48
48
-
 49
49
-
 50
50
-
 51
51
-
 52
52
-
 53
53
-
 54
54
-
 55
55
-
 56
56
-
 57
57
-
 58
58
-
 59
59
-
 60
60


Indesit IWDC 6145 (EU) Guida utente
- Categoria
- Lavatrici
- Tipo
- Guida utente
in altre lingue
- English: Indesit IWDC 6145 (EU) User guide
- français: Indesit IWDC 6145 (EU) Mode d'emploi
- Nederlands: Indesit IWDC 6145 (EU) Gebruikershandleiding
- slovenčina: Indesit IWDC 6145 (EU) Užívateľská príručka